Mestra Boomerang Evolution R-080591 User manual

f
R-080591
BOOMERANG EVOLUTION
E......... DOSIFICADORA DE ESCAYOLA-AGUA............................................6
GB...... PLASTER-WATER DISPENSER...........................................................11
F.......... DOSEUR DE PLATRE-EAU....................................................................16
D......... GIPS-WASSER-DOSIERGERÄT..........................................................22
MESTRA®
TALLERES MESTRAITUA S.L.
Txori-erri etorbidea, 60
48150 SONDIKA - BILBAO - ESPAÑA
Tel. (+34) 944530388 - Fax (+34) 944711725
E-mail: mestra@mestra.es - www.mestra.es
Rev. 26/05/14

2
INSTRUCCIONES RÁPIDAS
1. Monte el depósito pequeño con agua.
2. Coloque un recipiente para recoger el agua y pulse 5 veces el botón
MARCHA/PARO .
3. Monte el depósito grande con escayola del tipo III.
4. La máquina se encuentra lista para funcionar.
5. Pulse el botón MARCHA/PARO para que la máquina sirva una dosis con las
proporciones indicadas.
SHORT INSTRUCTIONS
1. Mount the small tank and fill it with water.
2. Place a container to collect the water and press the START/STOP key 5 times.
3. Mount the big tank with Type III plaster.
4. The unit is ready for operation.
5. Press the START/STOP key for the unit to dispense a dose in the right proportion.
INSTRUCTIONS RAPIDES
1. Mettez en place le réservoir d’eau rempli.
2. Placer un bol sous la machine pour récupérer l’eau et agissez 5 fois sur le bouton
MARCHE/ARRÊT .
3. Placer le silo à plâtre avec du type III.
4. La machine est prête à fonctionner.
5. Appuyer sur MARCHE/ARRÊT pour obtenir le produit avec le dosage indiqué.
KURZANLEITUNG
1. Setzen Sie den kleinen Wasserbehälter ein.
2. Platzieren Sie einen Behälter zum Auffangen des Wassers und betätigen Sie 5 Mal die
Taste START/STOPP .
3. Setzen Sie den großen Behälter mit Gips der Klasse III ein.
4. Das Gerät ist nun betriebsbereit.
5. Betätigen Sie die Taste START/STOPP , damit das Gerät die Dosierung in dem
gewünschten Verhältnis vornimmt.

3
A Depósito grande para polvo / Big tank for powder / Réservoir grand format pour le plâtre / Großer
Behälter für Gipspulver
B Depósito pequeño para líquido / Small tank for water / Réservoir pour l’eau / Kleiner Behälter für
Flüssigkeit
C Botón start-stop / Start-stop key / Bouton start-stop / Start-Stopp-Taste
D Display polvo / Powder display / Display poudre / Display Gipspulver
E Display líquido / Water display / Display liquide / Display Flüssigkeit
F Teclado / Keyboard / Clavier / Tastatur
A
B
C
D
E
F
4
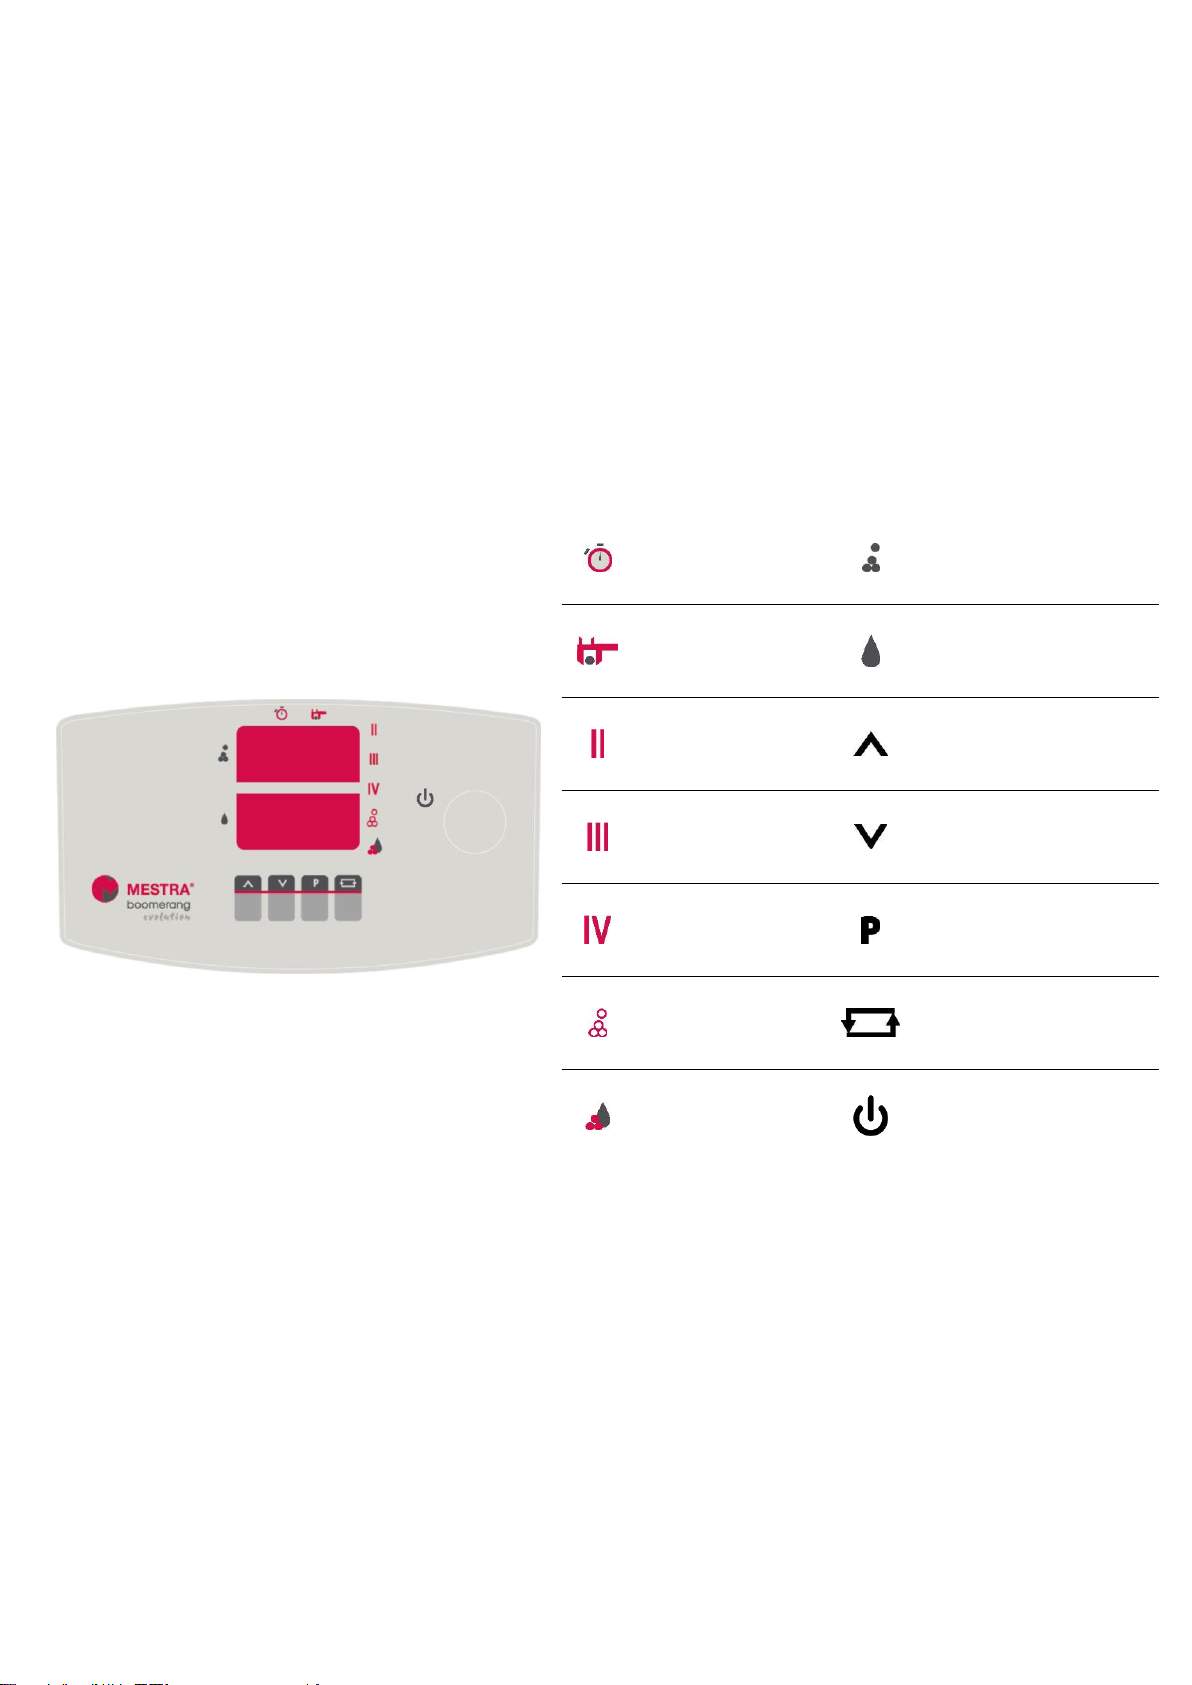
Alarma
Alarm
Alarme
Alarm
Display polvo
Powder display
Display poudre
Display Gipspulver
Calibración
Calibration
Calibration
Kalibrieren
Display líquido
Liquid display
Display liquide
Display Flüssigkeit
Escayola tipo II
Type II plaster
Plâtre type II
Gips Typ II
Subir
Up
+
Erhöhen
Escayola tipo III
Type III plaster
Plâtre type III
Gips Typ III
Bajar
Down
-
Reduzieren
Escayola tipo IV
Type IV plaster
Plâtre type IV
Gips Typ IV
Memoria
Memory
Mémorie
Speicher
Material libre
Free material
Matériau libre
Freies Material
Cambio de display
Display change
Changement de display
Wechsel des Bildschirms
Proporción fija
Fixed proportion
Proportion fixe
Fixe Proportion
Marcha-paro
Start-stop
Marche-Arrêt
Start-Stopp
5
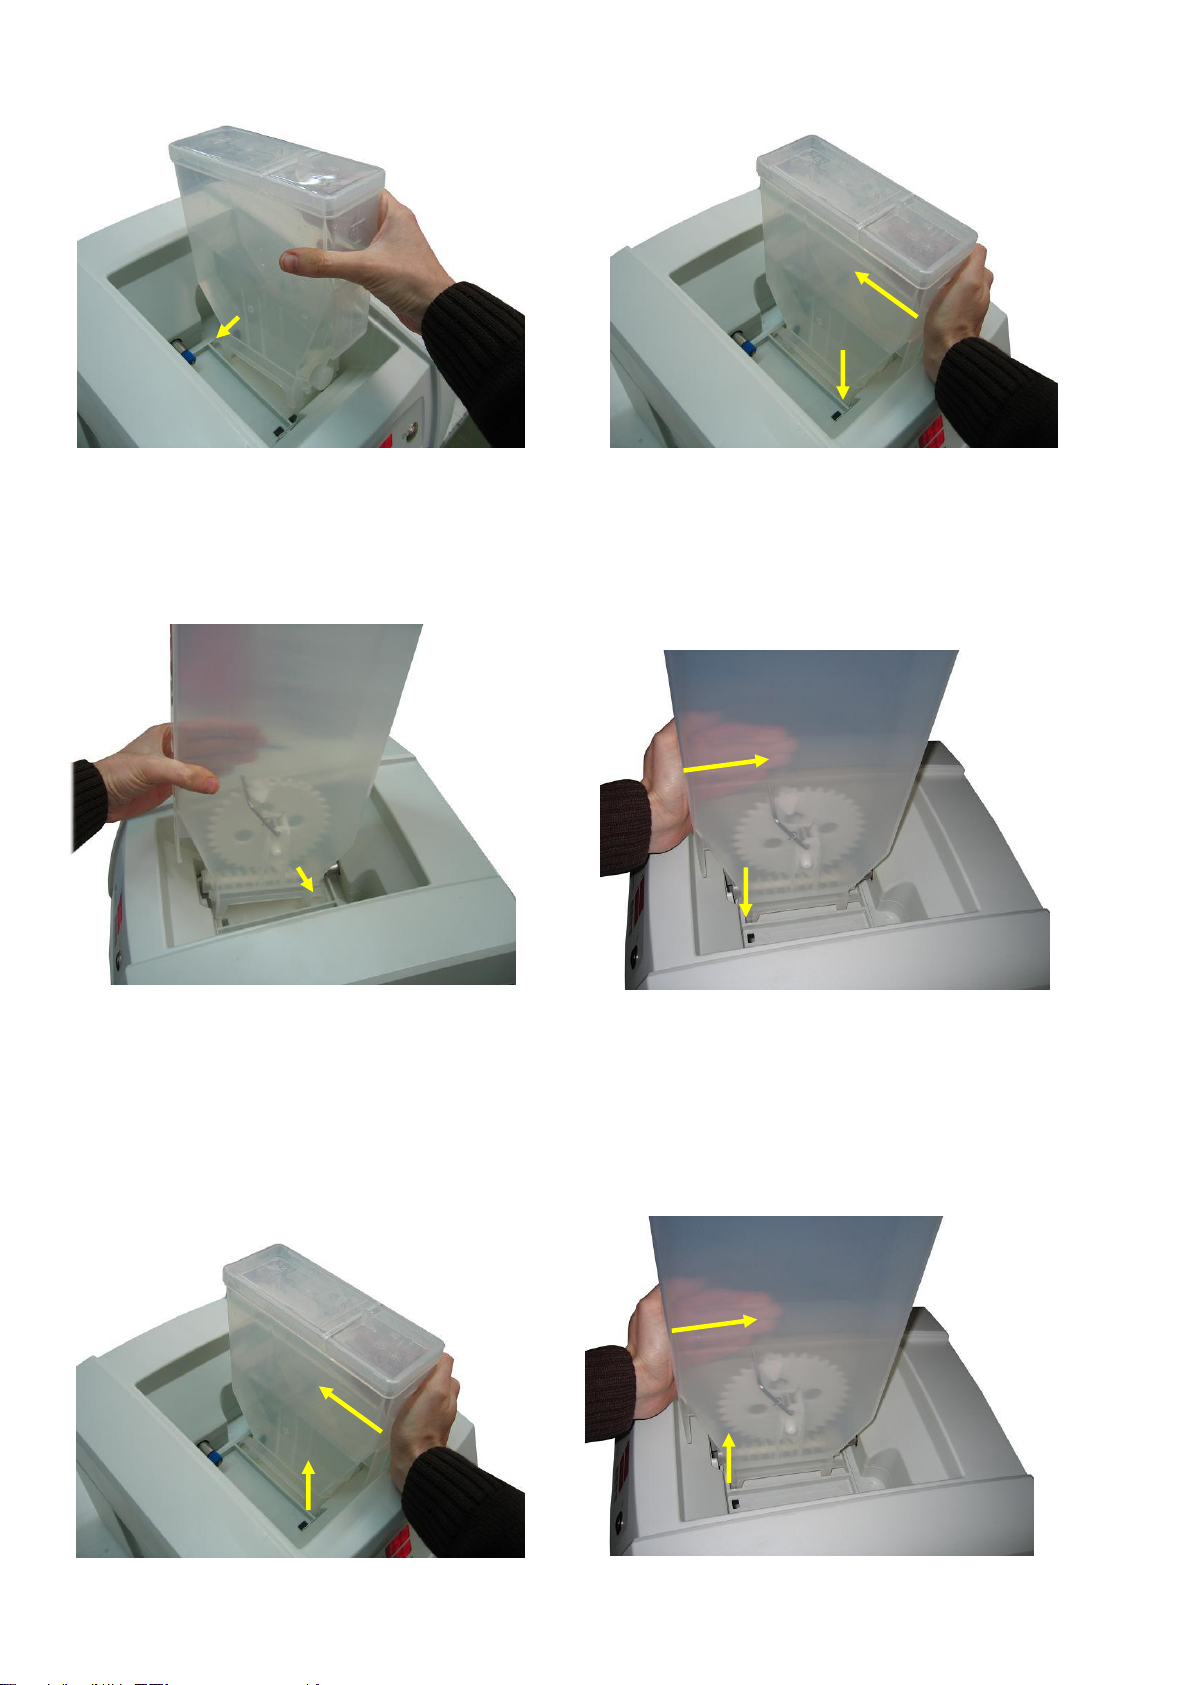
COLOCACIÓN DEL DEPÓSITO DE AGUA / PLACING THE WATER TANK
/ MISE EN PLACE DU RÉSERVOIR D’EAU / EINSETZEN DES WASSERBEHÄLTERS
COLOCACIÓN DEL DEPÓSITO DE ESCAYOLA / PLACINGTHEPLASTER TANK
/ MISEEN PLACEDURESERVOIR APLATRE/ EINSETZENDES GIPSBEHÄLTERS
EXTRACCIÓN DE LOS DEPÓSITOS / REMOVING THE TANKS / EXTRACTION DES RÉSERVOIRS /
ENTNEHMEN DER BEHÄLTER
DEPÓSITO DE AGUA / WATER TANK
/ RÉSERVOIR À EAU / WASSERBEHÄLTER
DEPÓSITO DE ESCAYOLA / PLASTER TANK
/ RÉSERVOIR À PLÂTRE / GIPSBEHÄLTER
1
3
1
2
2
3
1
2
2
1

Español
6
E
La dosificadora R-080591 es una máquina
especialmente diseñada para el sector dental, capaz de
dosificar con precisión y de manera automática las
cantidades deseadas de escayola y agua. Además,
permite alternar fácilmente entre diferentes tipos de
escayola u otro material.
NOTA: Lea con atención este manual. Contiene
importante información sobre seguridad en la
instalación, uso y mantenimiento. Si el equipo
se utiliza de una manera no indicada por el
fabricante, la seguridad proporcionada por el
equipo puede verse comprometida.
SIGNIFICADO DE LOS SÍMBOLOS UTILIZADOS
SOBRE LA MÁQUINA
Peligro. Existe peligro de lesiones.
Leer completamente estas instrucciones antes
de poner el aparato en funcionamiento.
Riesgo de choque eléctrico.
Fig. 1
Fig. 2
INSTALACIÓN
Condiciones ambientales:
Usar únicamente en espacios interiores.
Tª ambiente: 5-40 ºC [41-104 ºF]
Humedad relativa máxima: 0-95 %
Grado de protección: IP20
1. Desembale cuidadosamente la máquina. Compruebe
que no ha sufrido ningún deterioro durante el
transporte. Junto a la dosificadora encontrará: 2
depósitos para escayola, 1 depósito para agua, 1
taza, 1 espátula, 1 cable de conexión, 1 barra soporte
para colgar depósitos en la pared.
2. Elija para el emplazamiento del aparato una base
horizontal, plana y rígida, alejada de fuentes de calor
o vibraciones.
3. Posicione el equipo de modo que sea fácil maniobrar
el dispositivo de desconexión (interruptor general).
4. Monte los dos depósitos en su posición sobre la
carcasa. Para ello presione las patillas flexibles
contra el tope y encaje las pestañas delanteras en los
orificios de la carcasa.
5. El piñón del motor debe encajar con el husillo del
depósito para escayola. Si el depósito no encaja
fácilmente, introduzca el dedo índice en la cajera
del husillo y gírelo ligeramente.
6. No olvide conectar el tubo de agua presionando
hasta oír el “clic” (Fig. 1).
7. Puede atornillar la barra soporte a la pared para
colgar cómodamente los depósitos de escayola con
otros tipos de escayola y tenerlos siempre a mano
(Fig. 2).
8. Conecte el aparato a una toma de corriente de 230 V,
50/60 Hz provista de tierra.
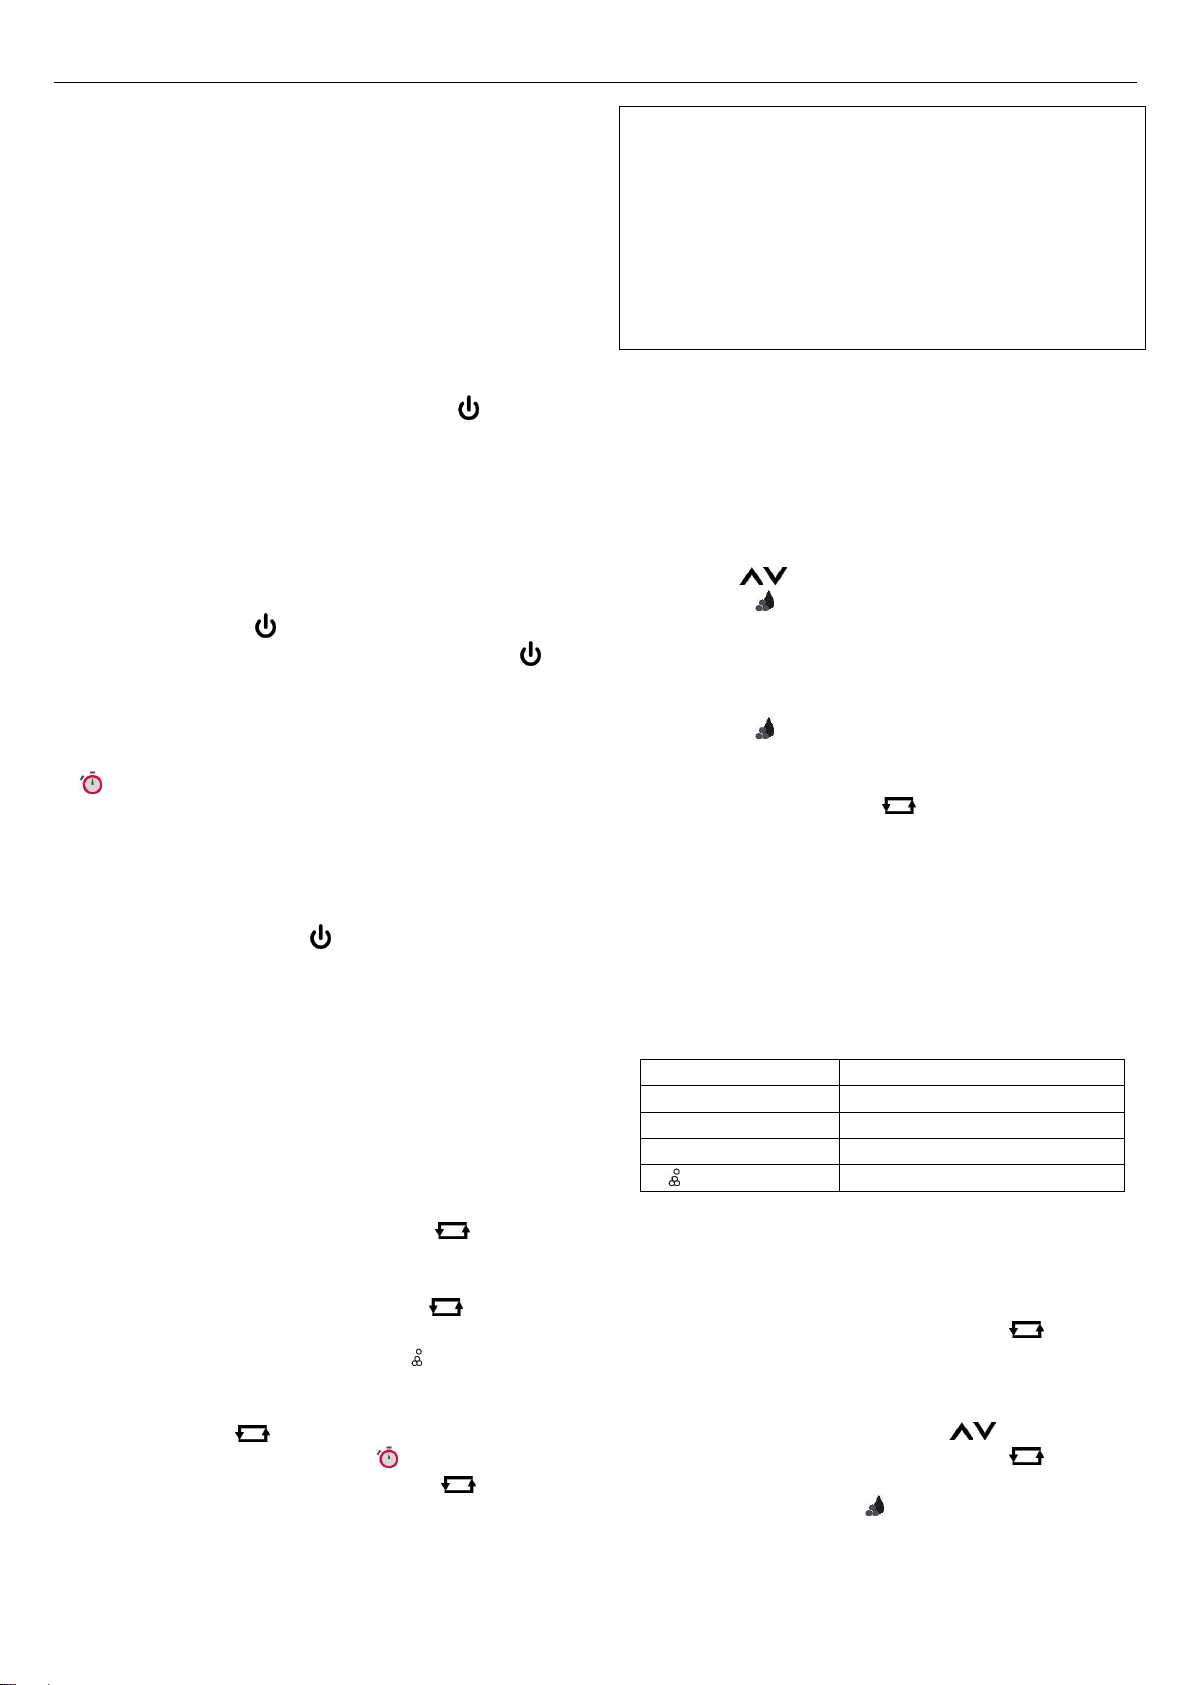
PURGA DE LA BOMBA DE AGUA
Cuando se estrena la máquina o cuando se conecta el
recipiente de agua, es normal que el circuito de agua
tenga aire que será necesario purgar.
Para proceder a la purga, no monte todavía el tanque
de escayola. Monte sólo el tanque pequeño lleno de
agua y asegúrese de que ha conectado el tubo de agua
presionando hasta oír el “clic” (Fig. 1).
Coloque un recipiente para recoger el agua y pulse 5
veces el botón MARCHA/PARO .
La bomba funcionará durante unos segundos.
Compruebe que el agua que expulsa está libre de
burbujas. En caso contrario vuelva a repetir el
proceso.
No utilice la dosificadora ni realice la calibración del
aparato hasta que no se asegure que el circuito se
encuentra purgado.
Español
7
USO BÁSICO
La dosificadora Boomerang Evolution sale de fábrica
lista para dosificar 100 gramos de escayola de tipo III y
25 mililitros de agua.
Pulse el interruptor general (luz verde) situado en la
parte trasera de la máquina.
El display superior mostrará los gramos de escayola y
el display inferior los mililitros de agua que se van a
dosificar.
Coloque una taza para recoger la mezcla.
Pulse una vez el botón MARCHA/PARO para que
la máquina sirva la dosis indicada.
OTRAS FUNCIONES
Para detener en cualquier momento el funcionamiento
de la máquina mantenga pulsado el botón
MARCHA/PARO .
Si pulsa varias veces el botón MARCHA/PARO ,
la máquina servirá varias dosis con la misma
proporción.
Cuando la máquina finalice la dosificación, el display
mostrará el valor “0”. Si la alarma está activa (piloto
encendido), sonará un aviso acústico después de 2
minutos, indicando que la escayola ya está
humedecida (ver apartado Alarma). Pulsando
cualquier tecla se anulará la alarma y la máquina
quedará lista para volver a dosificar.
Si, estando la máquina parada, mantiene pulsado el
botón MARCHA/PARO durante varios segundos,
la máquina comenzará a servir polvo hasta que suelte
el botón. Posteriormente servirá la cantidad de líquido
según la proporción que estuviera seleccionada.
CAMBIO DE MATERIAL
La dosificadora Boomerang Evolution permite alternar
fácilmente entre diferentes tipos de escayola u otro
material. Para ello:
Presione durante unos segundos la tecla .
Observará que el piloto correspondiente al tipo de
material seleccionado parpadea.
Mediante pulsaciones cortas de la tecla seleccione
el tipo de material con el que va a trabajar (escayola
de tipo II, III, IV o bien otro material ).
Una vez que esté parpadeando el piloto del material
con el que va a trabajar, presione durante unos
segundos la tecla .
Observará que parpadea el piloto . Vuelva a
presionar durante unos segundos la tecla para
confirmar.
Se cargarán los parámetros del nuevo material
seleccionado y la dosificadora está lista para trabajar.
CLASIFICACIÓN DE LAS ESCAYOLAS Y
PROPORCIÓN DE AGUA
Clase II: 35-45 ml de agua por cada 100 gr.
Clase III: 25-35 ml de agua por cada 100 gr.
Clase IV: 20-25 ml de agua por cada 100 gr.
Para una mayor precisión siga las instrucciones del
fabricante de la escayola.
VARIACIÓN DE LA DOSIFICACIÓN
El display superior muestra la cantidad de escayola
que se va a dosificar (en gramos).
El display inferior muestra la cantidad de agua que se
va a dosificar (en mililitros).
Para variar la cantidad de material dosificado, pulse
las teclas .
Si el piloto está encendido (proporción fija),
observará que a medida que modifica los gramos de
escayola, variarán los mililitros de agua
proporcionalmente (ver apartado Variación de la
proporción fija escayola-agua).
Si el piloto está apagado (proporción variable),
podrá modificar las cantidades de escayola y agua de
manera independiente. Para pasar de un display a otro,
pulse brevemente la tecla .
Para modificar la proporción entre escayola y agua,
consulte el apartado siguiente.
VARIACIÓN DE LA PROPORCIÓN FIJA
ESCAYOLA-AGUA
La dosificadora Boomerang Evolution sale de fábrica
con las siguientes proporciones de escayola y agua:
Tipo de escayola
ml agua / 100 gr escayola
II
35
III
25
IV
20
(otro material)
20
Para variar la proporción de agua de un material proceda
de la siguiente manera:
Seleccione el material a modificar según lo indicado
en apartado Cambio de Material.
Presione durante unos segundos la tecla .
Observará que el display superior muestra el valor
“100”.
Para variar la proporción de agua por cada 100
gramos de polvo, pulse las teclas .
Presione durante unos segundos la tecla para
confirmar.
Observará que el piloto está encendido, indicando
que se está trabajando en proporción fija escayola-
agua (a medida que modifica los gramos de escayola,
variarán los mililitros de agua proporcionalmente).

Español
8
TRABAJAR EN PROPORCIÓN ESCAYOLA-
AGUA VARIABLE
La dosificadora Boomerang Evolution sale de fábrica
lista para trabajar con una proporción de escayola-agua
fija. Esta condición se indica mediante el piloto
encendido. En esta situación, a medida que modifica los
gramos de escayola al pulsar las teclas , los
mililitros de agua variarán proporcionalmente.
Si desea variar la cantidad de escayola y de agua de
manera independiente, proceda de la siguiente manera:
Seleccione el material a modificar según lo indicado
en apartado Cambio de Material.
Presione durante unos segundos la tecla .
Observará que el display superior muestra el valor
“100”.
Pulsando la tecla , haga descender el valor del
display inferior por debajo de 5, de manera que se
visualice el mensaje “- - -”.
Presione durante unos segundos la tecla para
confirmar.
Observará que el piloto está ahora apagado,
indicando que se está trabajando en proporción
variable de escayola-agua.
Ahora podrá modificar la cantidad de escayola y de
agua de manera independiente. Para alternar entre el
display superior e inferior, pulse brevemente la tecla
. Un punto a la derecha le indicará el display
activo.
NOTA: Trabajando en proporción variable, si desea
obtener sólo polvo o sólo líquido, haga descender el
valor del display del producto que no desea servir hasta
que se visualice el mensaje “- - -”.
GUARDAR DOSIFICACIONES EN MEMORIA
El control electrónico de la dosificadora Boomerang
Evolution permite almacenar en memoria hasta 4
dosificaciones diferentes para cada tipo de material. Para
guardar una dosificación, proceda de la siguiente
manera:
En primer lugar, seleccione la dosificación que quiere
guardar, según lo explicado en los aparatados
anteriores.
Una vez establecidos los valores que desea guardar,
pulse la tecla Plas veces necesarias para seleccionar
el programa P1, P2, P3 o P4 en el que se grabará su
dosificación.
Por último, mantenga pulsada la tecla Pdurante
varios segundos. El display parpaderará una vez,
indicando que los valores han quedado almacenados
en la memoria.
UTILIZACIÓN DE LAS DOSIFICACIONES
GUARDADAS EN MEMORIA
Para utilizar una dosificación almacenada en la
memoria, pulse la tecla Pla veces necesarias para
seleccionar el programa P1, P2, P3 o P4 que desee.
Pulse la tecla para visualizar los valores
guardados.
Pulse el botón MARCHA/PARO para que la
máquina comience a funcionar.
CALIBRACIÓN
La dosificadora Boomerang Evolution sale de fábrica
con los parámetros que Mestra ha determinado a través
de ensayos con diferentes tipos de escayola. Es posible
que el material utilizado no coincida exactamente con
dichos valores, o que las características de una escayola
varíen a lo largo del tiempo. Para obtener una mayor
precisión en la dosificación, es posible calibrar del
aparato. Una diferencia de la tensión eléctrica de
alimentación también podría hacer variar la dosificación
del agua.
Para calibrar el aparato, proceda de la siguiente manera:
Tenga a mano una balanza para pesar la escayola y un
vaso graduado para medir la cantidad de agua.
Asegúrese de que el circuito de agua está
correctamente purgado (ver apartado Purga de la
bomba de agua).
Coloque un tanque con la escayola del tipo
seleccionado (ver apartado Cambio de material).
Pulse simultáneamente las teclas durante unos
segundos hasta que parpadee el piloto .
El display superior mostrará el mensaje “dus”
indicando que se va a proceder a la calibración del
polvo.
El display inferior mostrará el valor de calibración
almacenado para ese tipo de escayola. Si desea ajustar
el valor a mano, puede hacerlo ahora mediante las
teclas .
Si no conoce el valor adecuado para la calibración,
coloque un recipiente para recoger el polvo y pulse el
botón MARCHA/PARO .
La máquina expulsará durante 30 segundos una
medida patrón de polvo.
Pese la cantidad de polvo expulsada en una balanza
externa.
Con las teclas introduzca el valor pesado en
gramos.
Pulse la tecla para confirmar.
El display superior mostrará el mensaje “liq”
indicando que se va a calibrar el liquido.

Español
9
El display inferior mostrará el valor de calibración
almacenado para el líquido. Si desea ajustar el valor a
mano, puede hacerlo ahora mediante las teclas .
Coloque un recipiente para recoger el agua y pulse el
botón MARCHA/PARO .
La máquina expulsará durante 10 segundos una
medida patrón de agua.
Mida el volumen de agua expulsada con un recipiente
graduado o con una balanza externa.
Con las teclas introduzca el volumen de agua en
mililitros.
Pulse la tecla para confirmar.
La máquina está calibrada y lista para funcionar.
En caso de urgencia, también existe la posibilidad de
realizar un calibrado aproximado de la máquina. Para
ello, puede contar con los datos que aparecen en la
siguiente tabla:
Cantidad aproximada de agua expulsada en el tiempo patrón:
137 ml
Cantidad aproximada de la escayola tipo II expulsada en el tiempo patrón:
158 gr
Cantidad aproximada de la escayola tipo III expulsada en el tiempo patrón:
171 gr
Cantidad aproximada de la escayola tipo IV expulsada en el tiempo patrón:
335 gr
ALARMA
La dosificadora Boomerang Evolution permite activar
una alarma acústica que avisa de cuándo la mezcla está
lista para batir. Cuando la máquina finalice la
dosificación, el display mostrará el valor “0”. Si la
alarma está activa (piloto encendido), sonará un aviso
acústico después de 2 minutos, indicando que la escayola
ya está humedecida.
Para activar o desactivar la alarma, actúe de la siguiente
manera:
Presione durante unos segundos la tecla .
Observará que el piloto correspondiente al tipo de
material seleccionado parpadea.
Mediante pulsaciones cortas de la tecla seleccione
el tipo de material con el que va a trabajar (escayola
de tipo II, III, IV o bien otro material ).
Una vez que esté parpadeando el piloto del material
con el que va a trabajar, presione durante unos
segundos la tecla .
Observará que parpadea el piloto .
Con las teclas seleccione en el display superior
el valor “YES” para activar la alarma o “NO” para
desactivarla.
Pulse brevemente la tecla para pasar al display
inferior.
Con las teclas seleccione el tipo de alarma, 1 o 2:
1 La alarma sonará una sola vez.
2 La alarma sonará cada 2 minutos.
Vuelva a presionar durante unos segundos la tecla
para confirmar.
SUSTITUCIÓN DEL FILTRO
El depósito de agua cuenta con un filtro que evita el paso
de partículas. En caso de que sea necesario sustituirlo,
proceda de la siguiente manera:
1. Retire el tapón empujando con el dedo desde el
interior del depósito.
2. Desenrosque el filtro con una llave de tubo del 13.
SUSTITUCIÓN DEL HUSILLO
El husillo de la dosificadora es una pieza sometida a
desgaste. Su duración depende del uso que se de a la
máquina. Con la máquina se incluye un husillo de
repuesto. Para sustituirlo, proceda de la siguiente
manera:
1. Suelte la tuerca (A) girando en la dirección de la
flecha.
2. Extraiga el husillo gastado.
3. Coloque el husillo nuevo y volver a apretar la tuerca.
A

Español
10
MANTENIMIENTO Y LIMPIEZA
Para asegurar una óptima fiabilidad y una larga vida del
aparato, le recomendamos:
Mantenga limpia la máquina y su entorno.
Tenga cuidado al cargar el depósito de polvo, no
permita que se introduzcan en el depósito de líquido
partículas que podrían dañar la bomba.
Mantenga limpias las boquillas de salida de polvo y
de líquido. Evitará acumulaciones de suciedad y
posibles agarrotamientos del husillo.
Extreme la limpieza si cambia de material de polvo,
para evitar la contaminación por la suciedad que
puede quedar en la máquina.
La limpieza de la carcasa exterior del aparato deberá
hacerse siempre con un paño humedecido. No utilice
disolventes.
Vigile el nivel de llenado de los depósitos. No permita
que la máquina trabaje con los depósitos vacíos.
Periódicamente compruebe el estado del filtro, de los
depósitos, el posible desgaste de sus piezas internas y
la correcta estanqueidad del depósito para líquido.
Utilice sólo recambios originales suministrados por el
fabricante.
PRECAUCIONES
Antes de conectar el aparato a la red, asegúrese que la
tensión de alimentación es la adecuada (230 V, 50/60
Hz con toma de tierra).
El cable sólo puede ser sustituido por uno de iguales
características al suministrado por el fabricante.
Lea con atención este manual. Contiene importante
información sobre seguridad en la instalación, uso y
mantenimiento.
Mantenga este manual en un lugar apropiado para su
futura consulta.
Revise las condiciones generales del aparato
inmediatamente después de retirar el embalaje.
Antes de conectar el aparato, compruebe que la placa
de identificación indica el voltaje correcto para la
fuente de alimentación eléctrica. La instalación debe
estar de acuerdo con todos los estándares de seguridad
aplicables y con las instrucciones del fabricante.
El fabricante no será responsable de daños causados
por un sistema de conexión a tierra inapropiado.
Quedan excluidas de la garantía las averías
provocadas por la mala instalación o por el mal uso
del aparato.
En caso de duda no ponga en funcionamiento el
aparato. Contacte con un reparador cualificado y
autorizado.
No toque el cable del aparato con las manos húmedas.
Desenchufe el aparato en caso de tormenta y cuando
no lo use durante un largo tiempo.
Evite traccionar, torsionar o plegar en exceso el cable
de conexión a la red.
Desenchufe el aparato antes de limpiarlo, no lo moje
directamente, no use productos químicos.
No coloque ni retire nunca los depósitos cuando la
máquina se encuentra en marcha.
Evite que los niños o personal no especializado
manipulen el aparato.
No desmonte, repare ni modifique el aparato.
Antes de utilizar el aparato, asegúrese de que se
encuentra asentado sobre una base firme y sólida.
Contacte con su distribuidor para preguntas o
información detallada sobre resolución de problemas.
CARACTERÍSTICAS
Alto:
650 mm
Ancho:
350 mm
Fondo:
430 mm
Peso:
7 kg
Capacidad dep. grande:
5 L
Capacidad dep. pequeño:
2 L
Tensión:
230 V, 50/60 Hz
Potencia:
100 W
Fusible:
Cristal 2 A, 110-240 V
Potencia sonora:
<60 dBA

English
11
GB
The R-080591 dispenser has been specially designed for
the field of dental prosthesis, and it measures the
required amount of plaster and water thoroughly and
automatically. Besides it allows you to switch easily
from a type of plaster or other material to another type.
NOTE: Carefully read this manual. It contains
important safety information in the installation,
use and maintenance. If the equipment is used
in a manner not specified by the manufacturer,
the security provided by the equipment may be
compromised.
MEANING OF THE SYMBOLS ON THE UNIT
Danger. Risk of injury.
Read completely these instructions before
operating the unit.
Electric shock risk.
Fig. 1
Fig. 2
INSTALLATION
Environmental conditions:
Use indoors only.
Environmental temperature: 5-40 ºC [41-104 ºF]
Max. relative humidity: 0-95 %
Degrees of protection: IP20
1. Carefully unpack the unit. Make sure it has not
suffered any damage during its delivery. Together
with the unit you will find: 2 plaster tanks, 1 water
tank, 1 bowl, 1 spatula, 1 power cord, 1 supporting
bar to hang the tanks on the wall.
2. Place the unit in a horizontal, flat and firm surface,
away from heat or vibration sources.
3. Place the device so that it is easy to use the
disconnecting device (main switch).
4. Mount the two tanks in place on the casing. To do
this press the flexible pins against the stop and insert
the forward rims into the holes on the casing.
5. The engine pinion and the spindle in the powder
tank must fit together. If the tank does not fit easily,
insert your forefinger in the spindle opening and turn
the spindle slightly.
Do not forget to connect the water pipe by pressing
it until you hear a “click” (Fig. 1).
6. You can screw the supporting bar to the wall to hang
plaster tanks, and have them at hand filled with
different types of plaster (Fig. 2).
7. Connect the unit to a grounded 230 V, 50/60 Hz
power source.
BLEEDING THE WATER PUMP
When using the unit for the first time or when connecting
the water tank, the water circuit usually takes some air and
you need to bleed it.
To bleed the circuit, do not mount the plaster tank yet.
Mount the small tank filled with water and make sure
yoou have connected the water pipe by pressing until
you hear the “click” (Fig. 1).
Place a container to collect the water and press the
START/STOP key 5 times.
The pump will work for several seconds. Make sure
the water expelled is bubble-free. If it is not, repeat
the process.
Do not use the dispenser or calibrate the unit until
making sure that the circuit has been properly bled.

English
12
BASIC OPERATION
The Boomerang Evolution dispenser is factory set to
dispense 100 gr of Type III plaster and 25 ml of water.
Turn on the main switch (green light) at the rear of the
unit.
The upper display will show the grammes of powder
to be dispensed and the lower display will show the
millilitres of water.
Place a bowl to collect the mixture.
Press the START/STOP key once for the unit to
dispense the dose selected.
OTHER FUNCTIONS
To stop the operation of the unit at any moment keep
the START/STOP key pressed
If you press the START/STOP key several times,
the unit will dispense several doses in the same
proportion
When the unit finishes the dispensing, the display will
read “0”. If the alarm is on ( pilot light on), an
accoustic signal will go off after 2 minutes, which
will indicate that the plaster is already damp (see
Alarm section). To stop the alarm, just press any key,
and the unit will be ready to dispense again.
If you keep the START/STOP key pressed for a
few seconds when the unit is stopped, the unit will
start to dispense powder until you release the key.
Then, it will dispense the amount of water in the
proportion previously selected.
SWITCHING BETWEEN MATERIALS
The Boomerang Evolution dispenser allows you to
switch easily between different types of plaster or
another material. To do this:
Press the key for a few seconds.
The pilot light for selecting the material will start
flickering.
Select the material you want to work with (Type II, III
or IV plaster or other material ) by pressing the
key in short strokes.
Once the pilot light for the material you want to work
with is flickering, press the key for a few
seconds.
You will see that the pilot light is flickering. Press
the key again for several seconds to confirm it.
The parameters for the selected material will be
loaded, and the dispenser will be ready for operation.
TYPES OF PLASTER AND WATER
PROPORTION
Type II: 35-45 ml of water per 100 g of plaster.
Type III: 25-35 ml of water per 100g of plaster.
Type IV: 20-25 ml of water per 100g of plaster.
For a more detailed description, follow the instructions
of the plaster manufacturer.
CHANGING THE DOSAGE
The upper display shows the amount of powder (in
grammes) to be dispensed.
The lower display shows the amount of water (in
millilitres) to be dispensed.
To change the amount of material to be dispensed
press the keys.
If the pilot light is on (fixed proportion), you will
notice that as you change the amount of plaster (g),
the amount of water (ml) will change proportionally
(see Changing the fixed plaster/water proportion
section).
If the pilot light is off (variable proportion), you
will be able to change the amount of plaster (g) and
the amount of water (ml) independently. To shift from
a display to the other, press the key.
To change the plaster/water proportion, see the next
section.
CHANGING THE PROPORTION
The Boomerang Evolution dispenser is factory set
according to the following proportions of plaster/water:
Type of plaster
ml of water / 100 g of plaster
II
35
III
25
IV
20
(other material)
20
To change the water proportion of a material proceed as
follows:
Select the material you want to change, as explained
in the Switching Materials section.
Press the key for a few seconds.
You will notice that the upper display reads “100”.
To change the proportion of water for each 100
grammes of powder, press the keys.
To confirm it, press the key for a few seconds.
You will notice that the pilot is on, which means
that it is working in a fixed plaster/water proportion
(as you change the grammes of plaster, the millilitres
of water will change proportionally).

English
13
OPERATION IN A VARIABLE PROPORTION
The Boomerang Evolution dispenser is factory set to
operate in a fixed plaster/water proportion, which is
shown by the pilot light turned on. If the unit is set to
operate this way, when you change the grammes of
plaster by pressing the keys, the millilitres of water
will change proportionally.
If you want to change the amount of plaster and the
amount of water independently, proceed as follows:
Select the material you want to change, as explained
in the Switching Materials section.
Press the key for a few seconds.
You will notice that the upper display reads “100”.
Press the key,and make the reading on the lower
display go down below 5. The display will show the
message ”_ _ _”.
To confirm it, press the key for a few seconds.
You will notice that now the pilot is off. It means
that the unit is operating in a variable plaster/water
proportion.
Now you can modify the amount of plaster and the
amount of water independently. To shift between the
upper and the lower displays, press shortly the
key. A dot on the right side will show you which
display is active.
NOTE: When working in a variable proportion, if you
want to obtain powder or liquid only, bring down
the reading on the display of the product you don’t
want to obtain until it shows the message ”_ _ _”.
STORING DOSAGES IN THE MEMORY
The electronic controls of the Boomerang Evolution
dispenser allow you to store up to 4 different dosages for
each type of material. To store a dosage, proceed as
follows:
First of all, select the dosage you want to store, as
explained in previous sections.
Once you have selected the values you want to store,
select the program (P1, P2, P3 or P4) in which you
want to store the dosage by pressing the Pkey as
many times as required.
Finally, keep the P key pressed for a few seconds. The
display will flicker once to indicate that the values
have been stored in the memory.
USING THE DOSAGES STORED IN THE
MEMORY
To use a dosage stored in the memory, press the Pkey
as many times as required to select the program you
want (P1, P2, P3 or P4).
Press the key to display the values stored.
Press the START/STOP key and start dispensing.
CALIBRATION
The Boomerang Evolution dispenser is factory set
according to the parameters that Mestra has determined
through tests with different types of plaster. The material
you use may be slightly different and the features of the
plaster may vary over time. The unit can be calibrated to
obtain a greater thoroughness in the dosage. The water
dosage may be altered by difference in the voltage of the
power supply as well.
To calibrate the unit, proceed as follows:
Keep a scales close at hand to weigh the plaster, and a
graduated cup to measure the amount of water.
Make sure the water circuit is properly bled (see
Bleeding the water pump section).
Place a tank with the plaster you have selected (see
Switching materials section).
Press simultaneously the keys for a few seconds
until the pilot starts flickering.
The upper display will show the “dus” message to
indicate the dust calibration is going to start.
The lower display will show the calibration value
stored for that type of plaster. If you want to adjust
the value by hand, you can do it by pressing the
keys.
If you do not know the appropriate value for the
calibration, place a container to collect the powder
and press the START/STOP key.
The unit will dispense a standard dose of powder in
30 seconds.
Weigh the amount of powder dispensed on an external
scales.
Insert the amount weighed in grammes by pressing
the keys.
To confirm it press the key.
The upper display will show the “liq” message to
indicate the liquid calibration is going to start.
The lower display will show the calibration value
stored for the liquid. If you want to adjust the value
by hand, you can do it by pressing the keys.
Place a container to collect the water and press the
START/STOP key.
The unit will dispense a standard dose of water in 10
seconds.
Measure the amount of water dispensed in a graduated
cup or on an external scales.
Insert the volume of water in millilitres by pressing
the keys.
To confirm it press the key.
The unit is calibrated and ready to operate.
In an emergency, the unit can be calibrated
approximately. To do this, you can use the values shown
in the next table:

English
14
Approximate amount of water dispensed in the standard time:
130 ml
Approximate amount of Type II plaster dispensed in the standard time:
113 g
Approximate amount of Type III plaster dispensed in the standard time:
260 g
Approximate amount of Type IV plaster dispensed in the standard time:
272 g
ALARM
The Boomerang Evolution dispenser allows you to
activate an acoustic alarm to warn when the mixture is
ready. When the unit finishes the dispensing, the display
will read “0”. If the alarm is on ( pilot light on), an
acoustic signal will go off after 2 minutes, which will
indicate that the plaster is already damp.
To activate or deactivate the alarm, proceed as follows:
Press the key for a few seconds.
The pilot light for selecting the material will start
flickering.
Select the material you want to work with (Type II, III
or IV plaster or other material ) by pressing the
key in short strokes.
Once the pilot light for the material you want to work
with is flickering, press the key for a few
seconds.
You will see that the pilot light is flickering.
Select “YES” or “NO” on the upper display in order
to activate or deactivate the alarm by pressing the
keys.
Press shortly the key to shift to the lower display.
Select the type of alarm (1 or 2) by pressing the
keys.
1The alarm will go on only once.
2The alarm will go on every 2 minutes.
To confirm it, press the key for a few seconds.
REPLACING THE SPINDLE
The spindle is a perishable element. Its duration depends
on the use of the machina. A spare spindle is included
with the machine. To replace it, proceed as following:
1. Loosen nut (A) rotating in the direction of the
arrow.
2. Remove the damaged spindle (B).
3. Place the new spindle and tighten the nut again.
REPLACING THE FILTER
The water tank has a filter to prevent particles entering
the tank. If it needs to be replaced, proceed as follows:
1. Remove the cap by pushing it with your finger
from inside the tank.
2. Unscrew the filter with a 13 mm tube spanner.
MAINTENANCE AND CLEANING
To ensure an ideal reliability and a long working life of
the unit, we strongly recommend:
Keep the unit and the surroundings clean.
Be careful when filling the powder tank; do not let
particles enter the water tank, since the pump could be
damaged.
Keep the powder and water nozzles clean. It will
prevent dirt gathering and the spindle from seizing up.
Clean the unit thoroughly when changing the type of
powder, to prevent the pollution from the dirt that can
gather in the unit.
The outer casing of the unit should be always cleaned
with a damp cloth. Do not use solvents.
Watch the filling level of the tanks. Do not let the unit
work when the tanks are empty.
Check the filter and the tanks periodically, as well as
the possible wear of the interior pieces and the
watertightness of the water tank.
Use only original spare parts supplied by the
manufacturer.
A

English
15
PRECAUTIONS
Before connecting the unit to the power source, make
sure the voltage is correct (grounded 230 V, 50/60
Hz).
The cable may only be replaced by one with the same
characteristics as supplied by the manufacturer.
Read these instructions carefully before operating the
unit. They contain very important information about
safety during the installation, operation and
maintenance of the unit.
Keep these instructions for further consultation.
Check out the state of the unit upon unpacking it.
Before connecting the device, make sure the voltage
in the identification plate matches the power source to
be used. During the installation all the safety
requirements must be observed and the instructions of
the manufacturer followed.
The manufacturer will not be liable for the damage
caused by an inappropriate grounding system.
Damage caused by a faulty installation or a wrong use
of the unit is not covered by the warranty.
When in doubt, do not start the unit. Contact the
supplier for questions or detailed information about
problems with the unit.
Do not touch the unit or the power cord with wet
hands.
Unplug the unit in case of storm and when you are not
going to use it for a long time.
Place the unit in a dry place, away from dust and
water splashes.
Do not pull, twist or fold the power cord excessively.
Do not wet the unit; do not use chemical products to
clean it.
Do not allow children or non-qualified personnel
handling the unit.
Do not dismount, repair or modify the unit.
Do not ever place or remove the tanks while the unit
is in operation
Contact the supplier for questions or detailed
information about problems with the unit.
SPECIFICATIONS
Height:
650 mm
Width:
350 mm
Depth:
430 mm
Weight:
7 kg
Big tank capacity:
5 L
Small tank capacity:
2 L
Voltage:
230 V, 50/60 Hz
Power:
100 W
Fuse:
Glass 2 A, 110-240 V
Sound power:
<60 dBA

Français
16
F
Le doseur R-080591 est une machine spécialement
conçue pour le secteur dentaire, capable de doser avec
précision et de manière automatique les quantités
désirées de plâtre et d’eau.
NOTE: Lisez ce manuel. Il contient des informations
importantes sur la sécurité dans l'installation,
l'utilisation et la maintenance. Si l'équipement
est utilisé d'une manière non spécifiée par le
fabricant, la garantie fournie par l'équipement
peut être compromise.
SIGNIFICATION DES SYMBOLES UTILISÉS SUR
LA MACHINE
Danger. Risque de blessure.
Lisez ces instructions avant de faire
fonctionner l'appareil
Risque de choc électrique.
Fig. 1
Fig. 2
INSTALLATION
Conditions environnementales:
Utilixer uniquement à l’intérieur.
Tª ambiante: 5-40 ºC [41-104 ºF]
Humidité relative maximale: 0-95 %
Degré de protection: IP20
1. Déballez soigneusement la machine. Vérifiez qu’elle
n’a pas subi de dommages durant le transport. Les
accessoires joint au doseur sont: 2 silos à plâtre, 1
réservoir pour l’eau, 1 Bol, 1 spatule, 1 câble de
connexion, 1 barre murale pour les silos.
2. Placez la machine sur un plan horizontal bien plat et
stable, éloignée des sources de chaleur ou de
vibrations.
3. Placez l'appareil de sorte qu'il est facile à
manoeuvrer le dispositif de coupure (interrupteur
principal).
4. Installez le silo à plâtre et le réservoir sur la
machine. Pour ce faire, faire une légère pression sur
les ailettes flexibles qui vont venir buter contre le
rebord et emboitez les ergots antérieurs dans les
orifices de la machine prévus à cet effet.
Le pignon du moteur doit s’emboiter avec la vis
sans fin du silo à plâtre. Si l’emboitement est
difficile faites tourner légèrement avec l’index
l’axe de la vis sans.
5. Pensez à connecter l’eau en introduisant le petit
tube dans l’orifice du réservoir jusqu’à entendre un
petit “clic” (Fig. 1).
6. Vous pouvez fixer la barre support au mur pour
suspendre confortablement les divers silos à plâtre et
les avoir toujours à portée de main. (Fig. 2).
7. Branchez le doseur à une prise de courant de 230 V,
50/60 Hz reliée à la terre.
PURGE DE LA POMPE A EAU
Lors de la première utilisation, lorsqu’on connecte le
réservoir d’eau il es nécessaire de purger le circuit d’eau
afin d’évacuer l’air qui se trouve à l’intérieur.
Pour procéder à la purge, il est préférable de ne pas
monter encore le silo à plâtre. Montez simplement le
réservoir à eau avec de l’eau à l’intérieur tout en
vérifiant qu’il est bien connecté “après avoir entendu
le “clic” (Fig. 1).
Placer un récipient à la sortie et appuyer à 5 reprises
sur le bouton MARCHE/ARRET .
La pompe fonctionnera pendant quelques secondes.
Assurez-vous que l’eau sortant à la fin est exempte de
bulles. Dans le cas contraire renouvelez l’opération.
Tant que le circuit n’est pas parfaitement purgé
n’effectuez aucun dosage ni aucune calibration.

Français
17
UTILISATION SIMPLE
Le doseur Boomerang Evolution est calibré d’usine avec
un dosage de 100 grammes de plâtre de type III pour 25
ml d’eau.
Appuyer sur l’interrupteur général (lumière verte)
situé sur la partie postérieure de la machine.
Le display supérieur indiquera les grammes de plâtre,
le display inférieur les ml d’eau qui entreront dans le
dosage.
Placer un bol pour récupérer le mélange.
Actionner 1 fois le bouton MARCHE/ARRET
pour que la machine vous fournisse le dosage indiqué.
AUTRES FONCTIONS
Pour interrompre à tout instant le fonctionnement de
la machine il suffit d’appuyer à nouveau sur le bouton
MARCHE/ARRET .
Si l’on appuie plusieurs fois sur le bouton
MARCHE/ARRET le doseur débitera autant de
portions que de nombre d’impulsions.
Lorsque la machine a fini le dosage le display
indiquera la valeur “0”. Si l’alarme est active (témoin
allumé), elle vous avertira d’un signal acoustique
après 2 minutes pour signaler que le dosage est prêt
(voir chapitre alarme). On annulera l’alarme en
appuyant sur n’importe qu’elle touche; la machine
sera alors prête à doser.
Si, alors que la machine est en stand by vous
maintenez le bouton MARCHE/ARRET appuyé
pendant quelques secondes, la machine commencera a
débiter du plâtre tant que vous maintiendrez le bouton
appuyé. Postérieurement elle débitera l’eau dans la
proportion sélectionnée.
CHANGEMENT DE PLATRE
Le doseur Boomerang Evolution permet d’alterner
facilement les différents types de plâtre. Pour ce faire:
Appuyez durant quelques secondes la touche .
Vous observerez que le témoin correspondant au type
de plâtre sélectionné clignotera.
En appuyant brièvement sur la touche vous
sélectionnerez le type de plâtre avec lequel vous
voulez travailler (plâtre de type II, III, IV o bien un
autre matériau ).
Lorsque le témoin correspondant au type de plâtre
voulu, maintenez la touche appuyée pendant
quelques secondes.
Vous observerez que le témoin clignotera.
Appuyer à nouveau quelques secondes la touche
pour confirmer.
Les nouveaux paramètres deviendront effectifs et le
doseur sera prêt à l’emploi.
PROPORTION EAU / PLATRE
Type II: 35-45 ml eau / 100 gr plâtre.
Type III: 25-35 ml eau / 100 gr plâtre.
Type IV: 20-25 ml eau / 100 gr plâtre.
VARIATION DU DOSAGE
Le display supérieur indique la quantité en grammes
du plâtre débité.
Le display inférieur indique la quantité en ml de l’eau
débitée.
Pour changer ces proportions il suffit d’appuyer sur
les touches .
Si le témoin est allumé (proportion fixe), vous
observerez qu’à mesure que vous changez les
grammes, les ml d’eau changeront en proportion (voir
chapitre Changement de la proportion fixe
plâtre/eau).
Si le témoin est éteint (proportion variable), vous
pourrez modifier les quantités de plâtre et d’eau
indépendamment. Pour passer d’un display à l’autre il
suffit d’appuyer brièvement sur la touche .
Pour modifier la proportion entre le plâtre et l’eau
référez vous au chapitre suivant.
VARIATION DE LA PROPORTION PRE-ETABLIE
PLATRE/EAU
Le doseur Boomerang Evolution est calibré d’usine de la
manière suivante:
Type de plâtre
ml eau / 100 gr plâtre
II
35
III
25
IV
20
(matériau divers)
20
Pour changer les proportions procéder de la manière
suivante:
Sélectionner le plâtre dont vous voulez changer les
proportions comme indiqué dans le chapitre
Changement de plâtre.
Maintenez appuyée la touche pendant quelques
secondes.
Vous observerez que le display supérieur indiquera la
valeur 100”.
Pour changer la proportion d’eau pour 100 g de plâtre
actionner les touches .
Maintenez la touche quelques secondes pour
confirmer.
Vous observerez que le témoin est allumé,
indiquant que l’on travaille selon la proportion
préétablie plâtre-eau (à mesure que vous changez le
poids du plâtre, la quantité d’eau changera en
proportion.

Français
18
TRAVAILLER EN PROPORTION VARIABLE
EAU/PLATRE
LE DOSEUR Boomerang Evolution sort d’usine prêt à
l’emploi avec une proportion eau plâtre pré calibrée et
fixe. Cette condition est indiquée grâce au témoin
allumé. Dans ce cas de figure, si l’on change le
grammage du plâtre en appuyant sur les touches ,
les ml d’eau changeront proportionnellement.
Si l’on veut changer la quantité de plâtre ou d’eau de
manière indépendante, procédez de la manière suivante:
Sélectionner le plâtre comme indiqué dans le chapitre
Changement de plâtre.
Maintenez appuyée la touche pendant quelques
secondes.
Vous observerez que le display supérieur indiquera la
valeur 100”.
En appuyant sur la touche ,Faites descendre la
valeur de ce display jusqu’à la visualisation du
message “- - -”.
Maintenez la touche quelques secondes pour
confirmer.
Vous observerez que le témoin est à présent éteint,
ce qui signifie que l’on travaille en proportion
variable eau/plâtre.
Maintenant l’on pourra modifier la quantité plâtre et
eau de manière indépendante. Pour alterner entre le
display supérieur et le display inférieur, appuyer
brièvement sur la touche .Un témoin en forme de
point vous indiquera le display actif.
NOTE: Si l’on choisit de travailler en proportion
variable, lorsque l’on veut obtenir simplement
du plâtre ou simplement de l’eau, faites
descendre la valeur du display correspondant
au produit que l’on ne veut pas jusqu’à
l’indication ”- - -”.
MEMORISER DES DOSAGES
Le contrôle électronique du doseur Boomerang
Evolution permet de mémoriser jusqu’à 4 dosages
différents pour chaque type de plâtre. Pour mémoriser
ces dosages procédez de la manière suivante:
En premier lieu, sélectionnez le dosage que vous
voulez mémoriser, comme indiqué précédemment.
Une fois les valeurs à mémoriser définies appuyer sur
la touche Pautant de fois que nécessaire pour
sélectionner le programme P1, P2, P3 ou P4 où
s’enregistrera votre dosage.
Pour finir, maintenez appuyée la touche Ppendant
quelques secondes. Le display clignotera une seule
fois, ce qui signifiera que le dosage a été mémorisé.
UTILISATION DES DOSAGES MEMORISES
Pour utiliser un dosage mémorisé appuyer sur la
touche Pautant de fois que nécessaire pour
sélectionner le programme P1, P2, P3 ou P4.
Appuyer sur la touche pour visualiser les valeurs
mémorisées.
Appuyer sur le bouton MARCHE/ARRET .
CALIBRATION
Le doseur Boomerang Evolution sort d’usine avec les
paramètres que MESTRA a déterminé après divers
essais sur les différents types de plâtre. Il est possible
que le matériel utilisé ne coïncide pas exactement avec
ces valeurs ou bien que les caractéristiques de votre
plâtre changent sensiblement. Pour obtenir une plus
grande précision dans le dosage il vous est possible de
calibrer l’appareil. Une différence de tension électrique
peut également faire changer le dosage de l’eau.
Pour calibrer le doseur, procéder de la manière suivante:
Mettez à portée de main une balance pour peser le
plâtre et un récipient gradué pour mesurer l’eau.
Assurez-vous que le circuit d’eau est correctement
purgé (voir chapitre Purge de la pompe à eau).
Placez le silo contenant le plâtre à calibrer (voir
chapitre Changement de plâtre).
Appuyez simultanément les touches pendant
quelques secondes jusqu’à ce que le témoin
clignote.
Le display supérieur indiquera le message “dus” ce
qui voudra dire que l’on va procéder à la calibration
de la poudre.
Le display inférieur affichera la valeur de calibration
mémorisée pour ce type de plâtre. Si vous voulez
ajuster la valeur manuellement servez-vous des
touches .
Si vous ne connaissez pas la valeur adéquate pour la
calibration, placez un bol à plâtre sous la machine et
appuyer sur le bouton MARCHE/ARRET .
La machine débitera du plâtre pendant 30 secondes.
Pesez la quantité de plâtre débitée sur une balance
(ayant taré le bol au préalable).
Avec les touches introduire la valeur en grammes.
Appuyer sur la touche pour confirmer.
Le display supérieur marquera “liq” indiquant que la
prochaine étape sera la calibration de l’eau.
Le display inférieur indiquera la valeur mémorisée
pour le liquide. Si vous voulez ajuster la valeur
manuellement servez-vous des touches .
Placer un récipient permettant de collecter l’eau
débitée par la machine et appuyer sur la touche
MARCHE/ARRET .
La machine débitera de l’eau pendant 10 secondes.
Mesurer le volume de l’eau débitée avec un récipient
gradué.
Avec les touches introduire la valeur en ml.
Appuyer sur la touche pour confirmer.

Français
19
La machine est à présent calibrée et prête à fonctionner.
En cas d’urgence, il existe également la possibilité de
réaliser un calibrage approximatif de la machine. Pour
cela vous pouvez prendre en compte les éléments du
tableau ci-dessous:
Quantité approximative de l’eau débitée durant le temps de calibration:
130 ml
Quantité approx. du plâtre type II débité durant le temps de calibration:
113 gr
Quantité approx. du plâtre type III débité durant le temps de calibration:
260 gr
Quantité approx. du plâtre type IV débité durant le temps de calibration:
272 gr
ALARME
Le doseur Boomerang Evolution permet d’activer une alarme acoustique qui vous prévient lorsque le mélange est prêt à
être malaxé. Lorsque la machine a terminé de débiter le plâtre et l’eau le display affichera “0”. Si l’alarme est activée
(témoin allumé), un signal acoustique sera perceptible indiquant que le plâtre a été mouillé.
Pour activer ou désactiver l’alarme procéder de la manière suivante:
Maintenez appuyée la touche pendant quelques secondes.
Vous observerez que le témoin correspondant au type de plâtre clignotera.
En appuyant brièvement sur la touche sélectionnez le type de plâtre avec lequel vous allez travailler (type II, III, IV
ou autre ).
Lorsque le témoin du plâtre avec lequel vous voulez travailler clignotera appuyer durant quelques secondes la touche
.
Le témoin clignotera.
A l’aide des touches sélectionnez “YES” pour activer l’alarme ou “NO” pour la désactiver.
Appuyer brièvement sur la touche pour passer au display inférieur.
Avec les touches sélectionnez le type d’alarme, 1 ou 2:
3L’ alarme sonnera une seule fois.
4L’alarme sonnera toutes les 2 min.
Appuyer à nouveau pendant quelques secondes la touche pour confirmer.
REMPLACEMENT DU FILTRE A EAU
LE RÉSERVOIR À EAU est pourvu d’un filtre qui évite le passage de particules. Si son remplacement s’avère nécessaire
procédez comme suit:
1. Otez le bouchon en poussant avec le doigt depuis

Deutsch
20
l’intérieur du réservoir.
2. Dévisser le filtre grâce à une clé à tube 13mm.
REMPLACEMENT DE LA VIS SANS FIN
La vis sans fin du doseur est une pièce soumise à l’usure. Sa durée dépend de la fréquence d’utilisation de la machine
ainsi que des propriétés abrasives du plâtre. Avec le doseur est fournie une vis sans fin supplémentaire. Pour la remplacer
procéder comme suit
1. Dévisser l’écrou (A) plastique comme indiqué ci-
contre. Dans le sens des aiguilles d’une montre.
2. Extraire la vis usée.
3. Placer la nouvelle vis et serrez l’écrou.
ENTRETIEN
Pour assurer une durée de vie optimale de la machine ainsi que son meilleur rendement veuillez suivre les
recommandations suivantes:
Maintenir la machine propre ainsi que ses pourtours.
Prenez soin lors du remplissage des réservoirs de ne pas introduire des particules qui pourraient endommager la pompe.
Nettoyer avec soin les sorties d’eau et de plâtre. Vous éviterez des accumulations de déchets de plâtre qui pourraient
altérer l’état de vos modèles et même bloquer la vis sans fin.
La carcasse du doseur devra se nettoyer avec un chiffon humide. Ne pas utiliser de dissolvants.
Surveillez le niveau des réservoirs. Eviter de travailler avec les réservoirs trop vides.
Vérifier régulièrement l’état du filtre, l’étanchéité des réservoirs ainsi que le degré d’usure des pièces.
Utilisez uniquement des pièces de rechange d'origine fournies par le fabricant.
PRECAUTIONS
Avant de connecter l’appareil assurez-vous de la bonne tension électrique (230 V, 50/60 Hz) pourvue d’une prise de
terre.
Le câble ne peut être remplacé par un avec les mêmes caractéristiques que fourni par le fabricant.
Lisez attentivement ce manuel. Il contient des informations importantes sur la sécurité de l’installation.
Conservez ce manuel dans un lieu adéquat pour d’éventuelles consultations
Vérifiez l’état général de l’appareil à peine déballé.
Avant de brancher l’appareil vérifiez que sur la plaque d’identification de la machine le voltage indiqué corresponde à
celui que vous utilisez. L’installation doit se faire en accord avec tous les standards de sécurité en vigueur et selon les
instructions du fabricant.
Le fabricant ne pourra être tenu pour responsable en cas de dommages causé par une mise à la terre inadéquate.
La machine ne sera pas garantie en cas de pannes provoquées par une installation incorrecte, ou par une mauvaise
utilisation de l’appareil
En cas de doute ne mettez pas la machine en route. Contactez un réparateur agréé.
A
Table of contents
Languages:
Popular Dispenser manuals by other brands

Hupfer
Hupfer Powerstapler PSUH operating instructions

Thermo Scientific
Thermo Scientific Multidrop Pico 8 operating manual

Vollrath
Vollrath LidSaver 2 Operator's manual

Multiplex
Multiplex FreshBlender Installation, operation and maintenance manual

Cecilware
Cecilware GB3-LPO Operator's manual

Graco
Graco 1093 operation & maintenance

CRG
CRG CDM8240 Service manual

Nordson
Nordson RV Series operating manual

Dr. Schnell
Dr. Schnell DSC-Spender V10 instruction manual

DITTING
DITTING 807 instruction manual

Miele professional
Miele professional DOS-Modul G 60 Fitting instructions

Kimberly-Clark PROFESSIONAL
Kimberly-Clark PROFESSIONAL 9960 manual


 owner's manual")
