Yaesu ZCUT-3EX User manual

INSTRUCTION MANUAL

2
Contents
P 3
P 3-5
P 6
P 7
P 8
P 8-9
P 10
P 10
P 10
P 11
P 12
P 12
Safety Instructions
Definition of Warning and Caution Symbols
Identification
Loading the Tape
Setting the tape Length
Setting the Mode
Memo Function
Count up function
Maintenance
Error messages
Warranty
Specification
Thank you very much for buying our tape dispenser ZCUT-3EX.
Please read this Instruction Manual carefully.
For your safety, please always keep this Instruction Manual for
reference and retraining.
Read Before Use

3
A Required Action
A symbol within the circle, or the description, will indicate
the required action.
Indicates a potentially hazardous situation which if not
avoided, could result in death or serious injury.
Indicate that mishandling may result in danger and
that the operator is at risk of injury, or the machine is
at risk of damage.
Indicates Caution
A symbol within the triangle, or the description, will indicate
a specific hazard.
A Prohibited Action
A symbol within the circle, or the description, will indicate
prohibited action.
Definition of Warning and Caution Symbols
The safety guidelines in this Instruction Manual must be observed in
order to prevent damage to the machine or injury to the operator or
other persons.
The safety guidelines presciribed "Warning " and "Caution" describe
possible injury or damage that may be suffered from operating or
maintaining the machine in a manner other than as described in this
Instruction Manual.
Read and follow the safety precautions carefully before reading the
Instruction Manual.
Safety Instructions
WARNING
CAUTION

Do not plug in, unplug the cord, or operate the machine with wet hands.
Failure to observe this may result in injury due to electric shock.
Never insert your finger, or any other body part, or any foreign object into
the machine.
Failure to observe this may result in injury.
Keep hair or loose clothing away from the machine while it is operating.
Failure to observe this may result in injury.
This machine is intended for industrial use only.
Do not allow untrained operators or children to operate the machine.
Failure to observe this may result in injury.
Turn off the power switch and unplug the machine prior to replacing the blade
unit or performing any maintenance on the machine.
Failure to observe this may result in serious injury.
Do not use this machine for anything other than its specified applications.
Use of the machine for any unintended applications can cause injury to the
operator or failure of the machine.
Do not expose the machine to water or other liquids.
Exposure to water or other liquid can cause injury due to electric shock, or
failure of the machine.
Never modify or disassemble the machine.
This can cause injury or failure of the machine.
Always unplug, or plug the machine in, by holding the plug.
Never pull on the cord. Pulling on the cord can result in electric shock.
4
WARNING
CAUTION

Do not insert any foreign material from the tape outlet.
This can cause failure of the machine.
An operator’s presence is required whenever the machine is in operation.
Turn the machine off and unplug the cord when the operator is not present.
Failure to observe this can result in injury.
Do not cut or damage the power cord.
A cut or damaged cord can result in electric shock, a short circuit or possible
fire hazard.
Make sure the cord is connected properly to the electrical outlet as well as the
receptacle on the back of the machine.
A loose connection can result in high heat or fire.
Do not use the machine in areas where moisture is present, high temperature
exist or a high content of dust or dirt is present.
This can lead to failure of the machine.
Always install and operate the machine on a flat, stable surface.
Dropping the machine may cause injury to the operator or failure of the machine.
Use the machine only in the upright position.
Using the machine in the inclined state may cause failure of the machine.
Please take out the tape every time after finished using the machine.
Leaving the tape inside the machine may cause failure of the machine.
5
CAUTION

6
Identification
TAPE FEED ROLLER
BOBBIN
AC CORD INLET
START BUTTON
FWD BUTTON
SELECT BUTTON
−BUTTON
+BUTTON
REV BUTTON
LED LAMP
AUTO/MANUAL
MODE BUTTON
SAFETY COVER
SAFETY COVER
HOOK
START SWITCH
FRONT PANEL
CONTROL PANEL
BLADE
BLADE HOLDER
SILICON SPONGE ROLLER
SPARE FUSE
SCREW
START SWITCH
TAPE OUTLET
POWER SWITCH
SAFETY SWITCH
IDENTIFICATION OF CONTROL PANEL
DISPLAY
WARNING. HAZARDOUS
MOVING PARTS. KEEP
FINGERS AND OTHER
BODY PARTS AWAY.

7
Load i n g t h e Tap e
■The SOCKET-OUTLET shall be installed near the eq uipment and shall be
easily accessible.
■Set the machine only in the upright position.
■Plug in AC CORD to the AC CORD INLET.
■Make sure the POWER SWITCH is off then plug into an appropriate
SOCKET-OUTLET.
■Turn the POWER SWITCH on.
・When the POWER SWITCH is turned on, a letter, A, b, C, d, E, F and 3 or
4 digits will be displayed on CONTROL PANEL.
( Previous use cutting length will be displayed)
・When the POWER SWITCH is turned on, mode setting is set to previous use.
■Put a tape into BOBBIN and set them back to the machine.
■Lift the SAFETY COVER HOOK and open the SAFETY COVER.
■Fold the edge of tape about 20-30mm to the sticky side, and insert the
tape between TAPE FEED ROLLER and SILICON SPONG E ROLLER.
■Press the FWD BUTTON to feed out the tape.
・Press the FWD BUTTON until the tape comes out from the tape outlet.
・If the tape comes out inclining, press the FWD BUTTON until tape comes
out straight.
・FWD BUTTON operates only while pressing the button.
■Close the SAFETY COVER and replace a hook.
■Press the START BUTTON, or lift the START SWITCH up and down.
・Pressing the START BUTTON or the START SWITCH after pressing FWD
BUTTON, the cutting blade starts operation to cut the tape.
・Remove first piece of tape and discard it.
■When you pull out tape from TAPE FEED ROLLER, please follow the
instruction below.
・Lift the SAFETY COVER HOOK and open the SAFETY COVER.
・Press REV BUTTON, and reverse the tape.
・After front edge of the tape comes out between TAPE FEED ROLLER and
SILICON SPONG E ROLLER, stop pressing REV BUTTON.
Caution: If you keep pressing REV BUTTON even after all tape was
reversed, tape might get caught in TAPE FEED ROLLER
from opposite.
LOAD THE TAPE CONFIRM THE SETTING
START SWITCH
CUT THE TAPE
REMOVE THE TAPE
Op en t h e
saf et y c ov er
SOCKET-OUTLET
BOBBIN
SET UP THE TAPE
AC CORD
INLET
AC CORD

If the cutting length is short, cut tape may not reach to the outlet and may
not be fed with one cutting.
Press start button or start switch to load short length tape to make it come
out from outlet.
■Make sure that blue LED LAMP is off.
・When the POWER SWITCH turn on, setting mode will be previous used
setting.
■Press the START BUTTON or START SWITCH, the machine will start
cutting and every piece ready to take it.
■In the case of cutting any longer than 90mm, it is effective to lift a tape up
while taking a tape. Then next piece of tape will come out like automatically.
AUTO MODE (LED LAMP is on )
MANUAL MODE (LED LAMP is off )
Useful mode, when the set tape length is long enough to come out from
outlet by one cutting.
■Make sure that blue LED LAMP is on.
・If the blue LED LAMP is off, press the AUTO/MANUAL BUTTON to turn it on.
■Manipulate the START BUTTON or START SWITCH to cut a tape.
・Remove the piece of tape and machine will automatically cut another piece
each time when you remove the cut piece.
This machine can be set manual mode or auto mode.
Setting the Mode
■Make sure that cutting length is displayed.
・The cutting length will be displayed as A, b, C, d, E, F with 3 digits, or 4
digit number.
・If cutting length is not displayed, press SELECT BUTTON more than few
seconds to display cutting length.
■Set the cutting length.
・Set the desired length by pressing the +/- BUTTON.
・6 different cutting lengths (-999mm) or 1 cutting length (-7000mm) can be
memorized.
・You can select memorized length A~F by using SELECT BUTTON.
・The length is adjusted in 1mm increments, or press the button to fast forward.
■The length will be memorized automatically after 3 seconds.
■If you turn the POWER SWITCH off right after you set the length, length
will not be memorized.
Caution: The minimum cutting length is 30mm. However, the tape may be
jammed depending on the type of tape used. Please have a cutting
test before starting the operation.
Setting the Tape Length
INDICATE CUTTING LENGTH
A~F
SET THE CUTTING LENGTH
INCREASE NUMBER
DECREASE NUMBER
(exp. A-100mm)
4 digits
4 digits
CUT and STAND BY
CUT and STAND BY
REMOVE THE TAPE
REMOVE THE TAPE
TAPE FEED
TAPE FEED
LIGHT ON
SET AUTO / MANUAL
LIGHT OFF
LED LAMP
MANUAL MODE
MANUAL MODE
AUTO MODE
AUTO MODE
8

9
設定例:100枚
SELECT
SELECT
SELECT
SELECT
SELECT
START
START
AUTO
MANU
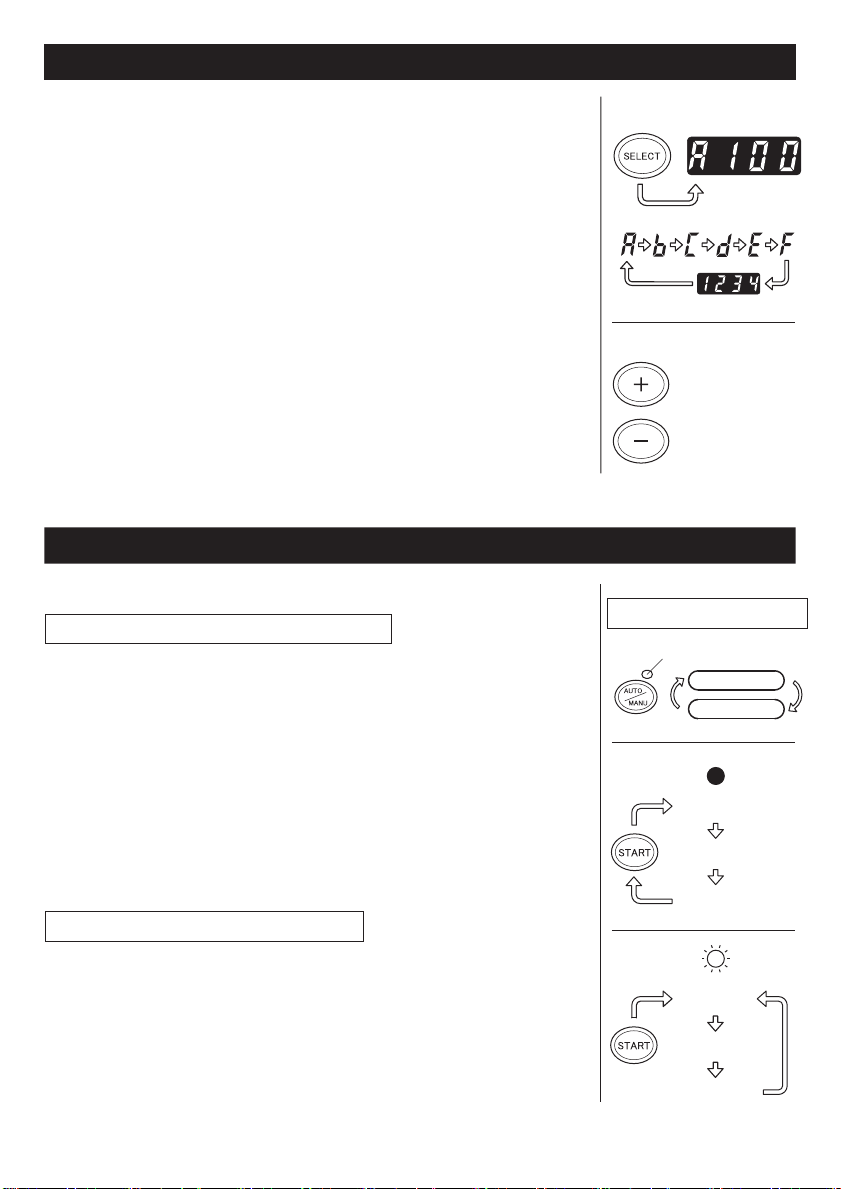
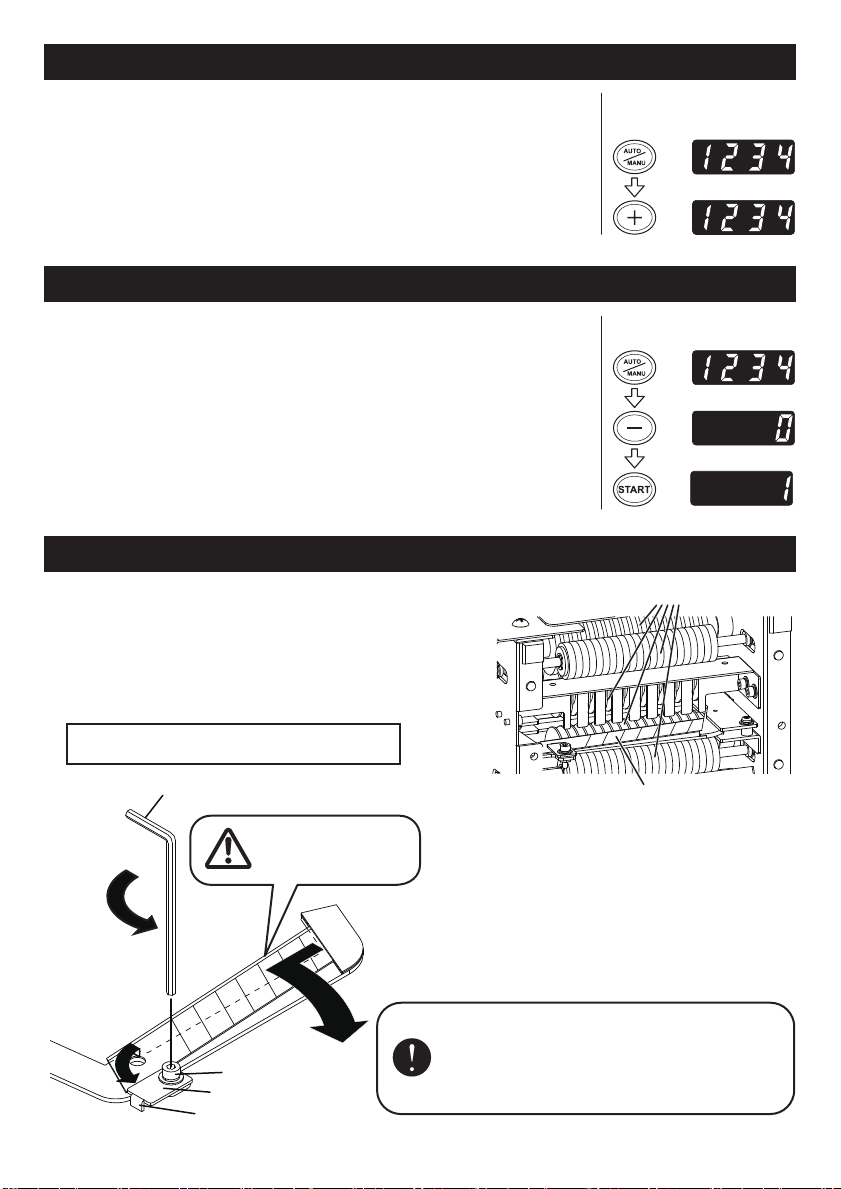
You can preset the quantity of piece which will be cut out. (Maximum 999 pieces)
The machine will cut out the pieces based on your selected quantities then it
will stop.
■Press the SELECT BUTTON and decide the length of tape.
■Press the SELECT BUTTON more than few seconds to DISPLAY L-mode
setting screen. ( Factory default will indicate as “Lcon” )
■Set the number of pieces to be cut out by using +/- BUTTON.
■When you press the START BUTTON, DISPLAY indicates a signal shows
numbers backwards and cutting continuously.
・When the DISPLAY indicates “0”, a buzzer sounds and the machine stops.
・To stop the mahicne while running under L-MODE, press the START BUTTON.
L-MODE (Loop Mode)
The machine is able to be programmed.
A signal will be shown based on your selected quantity of pieces and it will
all cut out. (Maximum 999 pieces.)
A buzzer will has sound when the program is finished.
You can use the mode either MANUAL or AUTO.
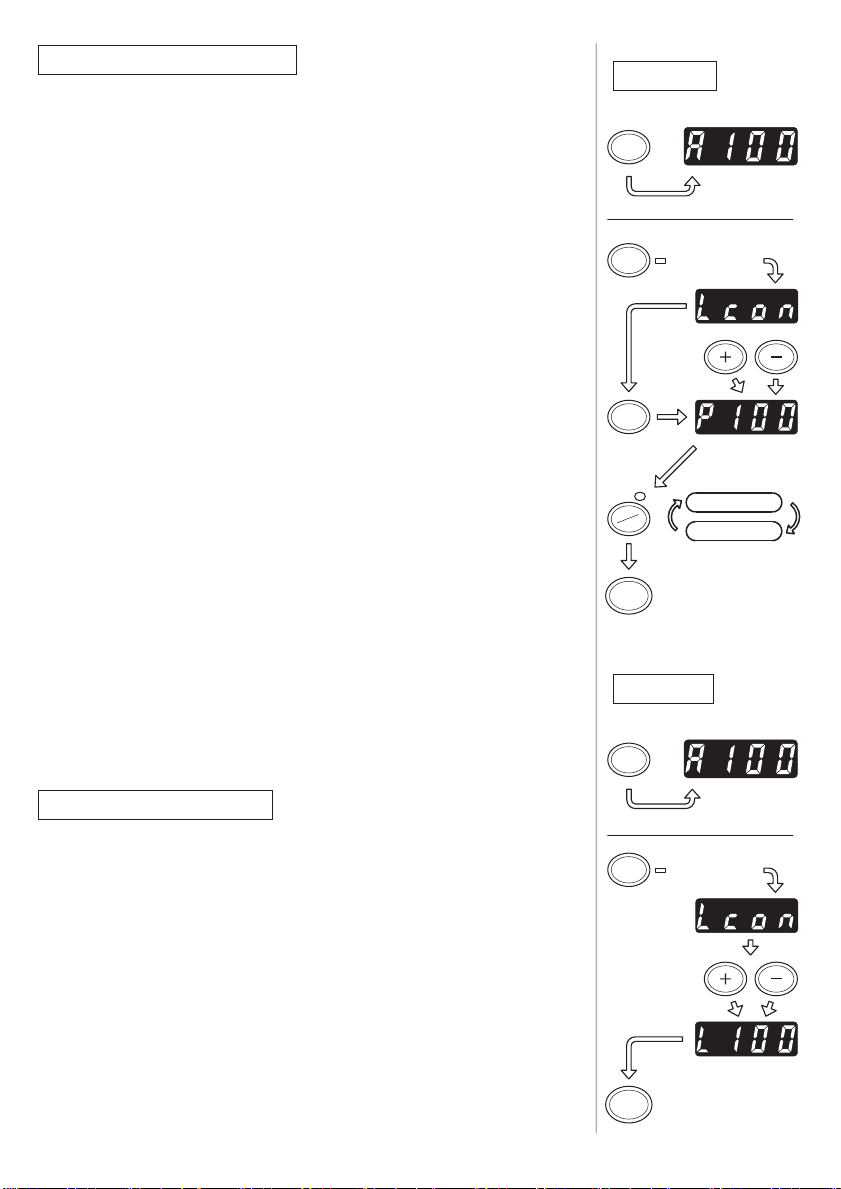
■Press the SELECT BUTTON, and choose the needed cutting length from
A to F with 4 digits.
■Press the SELECT BUTTON more than few seconds to display L-mode
setting screen. ( Factory default will indicate as “Lcon” )
■Press SELECT BUTTON again to display P-MODE setting screen.
・Display will indicate as P with the selected cutting quantity of 1~999.
■Use +/- BUTTON and set your needed number of quantity.
■Choose AUTO or MANUAL by using AUTO/MANUAL BUTTON.
■Press the START BUTTON, or lift the START SWITCH up and down.
The machine will feed-in and cut out a piece of tape on testing purpose.
・To operate the machine by using MANUAL MODE, press the START BUTTON
or lift the START SWITCH up and down to feed-in the next piece of tape.
・To operate the machine by using AUTO MODE, the machine will feed-in a
piece of tape automatically.
■The signal shows numbers backwards when feeding-in another piece of tape.
■When the DISPLAY indicates "0", the buzzer will has a sound.
・The DISPLAY indicates the number of pieces that is preset.
Please wait until the buzzer stops.
・If you take the tape out before the buzzer stops, the LED LAMP will flash.
Then you need to press the START SWITCH again.
■If you try to change the mode (AUTO/MANUAL) when machine is operating,
just press AUTO/MANUAL BUTTON.
■If you take out tape when the machine is operating with AUTO MODE and
the buzzer is sounding, another piece of tape will be fed after the buzzer.
At that time, indicating quantity on the display is one piece less than
setting quantity.
P-MODE (Preset Mode) P-MODE
A~F
PRESS FOR 3SEC.
(exp.100pcs.)
(exp. A-100mm)
INDICATE CUTTING LENGTH
MANUAL MODE
AUTO MODE
INDICATE CUTTING LENGTH
(exp. A-100mm)
A~F
PRESS FOR 3SEC.
(exp.100pcs.)
L-MODE
4 digits
4 digits
or START SWITCH
or START SWITCH

Memo function
Present cutting quantity can be memorized.
■Press AUTO/MANUAL BUTTON more than few seconds to display present
cutting quantity.
■Press +BUTTON.
・Present cutting quantity will be forwarded and memorized.
・Forwarded data will not be deleted even if power switch was turned off.
■To display cutting length, press AUTO/MANUAL BUTTON more than few
seconds.
Count up function
■Press AUTO/MANUAL BUTTON more than few seconds and display
present cutting quantity.
■Press −BUTTON, then present cutting quantity will be reset, and display
will indicate 0.
■Machine will start operation with the previous used mode.
■To display cutting length, press AUTO/MANUAL BUTTON more than few
seconds.
■Cutting quantity will be counted continuously even the setting mode is
changed. ( After the cutting quantity of 9999, the number will be reverted to 0. )
Maintenance
■Use wrung cloth which was dipped in water with natural
detergent.
■Keep clean for where tape passes through.
・Inspect and clean around all ROLLERS and BLADE,
and make sure that there is no foreign material around.
■Procedure of replacing blade cutter ①→②→③
①Remove the SCREW by using the accessary of
HEXAGONAL SPANNER.
②Grip the PROTRUSION on BLADE HOLDER,
pull it up and slide it as the drawing to take
out the BLADE.
③Slide off to the left side and pull the BLADE.
■Please replace the BLADE in an opposite
procedure.
10
BLADE
ROLLERS
SCREW
BLADE HOLDER
PROTRUSION
HEXAGONAL SPANNER
HOW TO REPLACE THE BLADE
DISPLAY PRESENT CUTTING QUANTITY
( PRESS MORE THAN FEW SECONDS )
①
②③
CAUTION:
CUTTING EDGE
IT MIGHT CAUSE AN INJURY.
WHENEVER YOU CLEAN OR REPLACE
THE BLADE, DO NOT TOUCH THE
SHARP EDGE OF THE BLADE.

START
START
11
Error Messages
The buzzer will sound and the message will flash on the display.
E-02 BLADE IS OUT OF POSITION
E-03 MOTOR IS STOPPED
A signal shows that the blade is not installed correctly or the tape is jammed.
・Turn the POWER SWITCH off.
・Open the FRONT PANEL and inspect around BLADE and all rollers.
・If you see some tape is jammed, remove the tape carefully.
・Close the FRONT PANEL and tighten the SCREWS.
・Close the SAFETY COVER and replace the HOOK.
・Turn the POWER SWITCH on.
・Press START BUTTON. Display will indicate E-02 with the buzzer sound.
・Press START BUTTON again, then blade will be positioned in readiness.
・Follow instruction and set up again.
This indicates that the motor is stopped because of an overloaded.
・Turn the POWER SWITCH off.
・Open the FRONT PANEL and SAFETY COVER.
・Inspect around all rollers and make sure that foreign materials are not stuck
around rollers.
・Clear any tape residue or tape pieces carefully.
・Close the FRONT PANEL and tighten the SCREWS.
・Close the SAFETY COVER and replace the HOOK.
・Turn the POWER SWITCH on.
・Press START BUTTON and check whether machine is operating normally.
・Follow instruction and set up again.
Blade positions in
readiness
Load the tape
Load the tape
POWER SWITCH is off
Open the FRONT PANEL and
SAFETY COVER
Inspect around BLADE and
ROLLERS
Remove foreign material
Close the FRONT PANEL and
SAFETY COVER
POWER SWITCH is on
POWER SWITCH is off
Open the FRONT PANEL and
SAFETY COVER
Inspect around BLADE and
ROLLERS
Remove foreign material
Close the FRONT PANEL and
SAFETY COVER
POWER SWITCH is on
DO NOT TOUCH THE BLADE WHEN YOU ARE CORRECTING AN ERROR
UNDER POWER SWITCH IS ON.
TURN OFF THE POWER SWITCH AND STOP USING THE MACHINE. IF THE
MACHINE CANNOT WORK NORMALLY AFTER CORRECTING THE ERROR.
IT SEEMS THAT NOTHING WRONG WITHOUT ANY ERROR MESSAGES.

12
We warrant to the original purchaser of the product that will be free
form defects in material or workmanship for as long as the original
purchaser owns the product, when given normal wear and proper
usage.
The limited warranty for the machine shall be for a period of 180 days
form the date of purchase.
The spare parts such as Cutting Blades, Rollers, are not covered
under the warranty period as they are considered as "wear parts".
This warranty is only valid if the product:
◆Was not damaged while being installed.
◆Was operated in accordance with products's specifications,
instructions and any technical support directions.
◆Was not modified or damaged by tempering, user error, accident,
disaster, abuse, misuse, power supply, power application,
alternation, repair, modification, a fix or replacement by someone
other than the original product.
Warranty
Power Requirement 90V-264V~50-60Hz
Rated current 0.45A-0.21A
Dimensions 191mm(W) x 305.2mm(H) x 248.3mm(D)
Weight 9.5 KG.
Tape Length 30mm-7000mm (Manual mode)
100mm-7000mm (Auto mode)
Tape Width 15mm-80mm
Feeding Speed 330mm/sec. (using Craft Tape)
Approximately 68 PCS./min (in case of cutting 100mm with Craft Tape)
Max. Outside Dia. of Roll 240 mm
Operating environment Temperature 5-40 ℃
※No condensation Humidity 35-85 % RH
※Indoor use only Atmospheric pressure 850-1050 hPa
Accessories Power Cord
2A Fuse ( Built-In Inlet )
Bobbin(Φ75、Φ 31 )
Hexagonal spanner
Spare blade 6 PCS.
Remarks ◆The specifications are subject to change without prior notice.
◆The length of the tape may differ from the set length depending upon the type of the tape or its condition.
◆Some types of tape available with the machine may not be cut depending upon conditions.
Specifications
(Protoruding parts are not included.)
17e29
Table of contents
Other Yaesu Dispenser manuals