Metal Defender MD-6A User manual


2
MEDICAL SAFETY
Metal Defender makes every effort to ensure its products are safe for use. Extensive research
by Metal Defender has produced no information which would indicate that its products have
any adverse effects on medical implants, pregnancy, recording media or magnetic strips.
Metal Defender makes every effort to cooperate with medical device manufacturers and to
communicate with agencies such as the United States Food and Drug Administration and
Health Canada as a means of assuring product safety. The electromagnetic fields produced by
Metal Defender products are similar to those encountered in the daily environment and meet
U.S. and International standards for electromagnetic emissions.
Metal Defender recognizes that certain medical devices may have additional requirements
which may require special care. Any recommendations or directives issued by personal
physicians or medical device manufacturers should be followed. If, for any reason, (e.g.
doctors orders, etc.), a patron objects to being scanned with a metal detector, it is
recommended that alternative procedures be used.
The following should be considered when developing a security checkpoint screening plan.
• Traffic Flow - Traffic flow should remain consistent and encourage unrestricted traffic flow
as a means of minimizing the time a person remains within the archway of a walk- through
metal detector.
• Alternative Screening - Alternative screening methods such as scanning with a handheld
metal detector, hand searching or denial of access should be clearly defined in checkpoint
screening procedures as approved alternatives to screening with the walk- through metal
detector.
• Personnel Training - Security screening personnel should be instructed in the care of
persons with special medical needs and use of alternative screening methods that meet the
requirements of medical practitioners or medical device manufacturers.

3
Index
Medical Safety –pg.2
Parts of the Detector –pg.3
Technical Specifications –pg.5
Product Description –pg.6
Common Troubleshooting Tips & Tricks –pg.6-7
Interference –pg.8
Install Instructions –pg.9-10
Product Guide –pg.11
Understanding the Zones –pg.12
FAQ –pg.13-14
Suggested Single Lane Configuration –pg.15
Suggested Multi Lane Configuration –pg.16
Warranty Information –pg.17
Replacement Parts –pg.18
Parts of the Detector
Head Unit (1)
Left Probe (1)
Right Probe (1)
Bolts and Nuts (8)
AC Power Cord (1)
Serial Port Plug (2)
Allen Wrench (1)
Instruction Manual (1)
Keys (2)

4
PLEASE READ THE FOLLOWING INSTRUCTION CAREFULLY BEFORE OPERATON
Please follow the corresponding instructions to operate the unit safely and accurately.
1. The unit can be used indoors and outdoors. If used outdoors a canopy must be provided to
ensure the unit is kept safe from the elements.
2. Chose a smooth and non-vibrating surface to install the metal detector on. Do NOT touch
the machine during screening as it can cause false alarms.
3. Within 4-6 feet ensure there are no other heavy metal objects in the environment except
for other walk-through metal detectors.
4. Keep unit far from any power cables or other communication lines that may cause
interference.
5. Do not install unit in 105 degree + weather or wet environments.
6. Do not disassemble any of the pieces inside the head-unit without explicit instructions from
a trained technician.
7. Allow 1 minute after turning the machine on to allow for the unit to self-calibrate.

5
Technical Specifications
Metal Defender’s MD-6 Walk-through Metal Detector provides pinpoint accuracy and discrimination features. This detector
is effective in all environments including but not limited to airports, government buildings, correctional facilities, and sports
venues. While being cost effective it also provides the same security that professionals worldwide receive from other
brands.
Standard Programs
Has 6 “Occasions” for pre-programming Unit
Sensitivity
6 Adjustable Zones with sensitivity levels 0-255
Zone Indications
6 Zones
Overhead Control Unit
All Electronics- LCD, Alarm light, LED bar graph, Control Touch pads-
Integrated to eliminate wire exposure
Tamper-Proof Settings
4- Digit customizable passcode and physical key for Overhead Control Unit
Self Diagnostics
Upon Startup/Reset Unit will Self-Diagnose
Battery Pack (Optional)
8-10 Hours of Backup Battery Charge
Warranty
24-Month standard warranty Limited Parts/Labor
Interior Size
79.2in(H)x27.25in(W)x19.7in(D)
Exterior Size
86.6in(H)x32in(W)x19.7in(D)
Shipping weight
2 Pieces per unit - Legs:160lbs Head:45lbs
Temperatures
-20C to 60C Operating-20C to 50C Storing
Power
110-230VAC ± 10%
Weatherproofing
IP65 Water/Dust resistant
Networking (Optional)
Perform statistical analysis of throughput
Camera (Optional)
2 mega pixel IR Cube Network Camera/ 128 GB SD card / Motion Capture

6
Product Description
The MD-6A from Metal Defender utilizes a unique 6 zone detection system. This 6 zone
detection system can help identify what portion of the body has metal on it. This unit should
specifically be used for detecting and preventing metal and alloy materials from being hidden
on the human body. The MD-6A by Metal Defender has 6 individual zones that can all be
programmed based on the users desired settings. The sensitivity can be adjusted up or down;
The highest sensitivity could detect metal similar to the size of a paper clip. The MD-6A from
Metal Defender is a great security solution for most but not limited to: Schools, Recycling
plants, Airports, Night Clubs, and Venues.
Common Troubleshooting Tips & Tricks
1. Machine won’t power on
-Check and ensure the power is connected properly and securely
-Check whether the power switch is on.
-Check to make sure a fuse did not blow out.
2. Unit is not counting pass throughs
- Make sure the unit isn’t installed in strong sunlight as it uses infrared communication to
operate properly
- Make sure that the infrared sensors are lined up properly, clean, and void of any physical
defect
- Lastly call a technician to take troubleshooting steps further and decide whether or not the
sensors are malfunctioning
3. Unit is alarming without metal content
- Make sure the unit is still working properly by ensuring there is no metal on a test persons
body including jewelry, buttons, etc. If it still alarms in specific zone turn down the
coordinating zones respectively until it doesn’t alarm.

7
- Make sure there are no heavy metal objects in the near vicinity that can cause interference.
- If there are other metal detectors installed nearby ensure that they are on different
operating frequencies.
- Lastly make sure the unit is installed on a flat vibration free surface.
4. Unit is not alarming even though metal content is on a persons’ body
- Following the user manual increase zone sensitivity as well as total sensitivity until it detects
metal that is similar to what you are trying to screen for.
- Metal detectors can detect coins up to 25mm in diameter. If the object being screened is
smaller than that and you try to adjust the machine you may receive multiple false alarms per
screen.
5. A single zone is not alarming
- This is likely caused by the corresponding zone not being sensitive enough. Can be caused by
a zone card not operating as it should. If problem persists at highest sensitivity reach out to a
technician.
6. LCD Screen Problems, LED Bar Graph Not Lighting, Buttons Not Working
- Make sure all cables are seated properly, especially the ones connecting to the back of the
display.

8
Interference
Frequency and Interference information
Electronic Jamming
The working frequency for the metal detector is between 4KHz-8KHz. The working frequency
should exclude certain electronic objects around the unit such as other units, tv, and radios.
Moving metal objects Interference
The walk-through metal detector will receive interference based on heavy metal content in
the environment. This includes turnstiles, fork lifts, elevators, metal doors etc.
Interference Between Units
When using 2 or more units in close proximity ensure they are on different operating
frequencies. As well make sure that they are more than 2 feet away from each other.

9
Installation Instructions
1. Two (2) people are required for the initial setup.
2. Carefully unpack your new walk thru metal detector.
3. On a Flat Clean surface, set the head module on the pad provided. The head unit should be
face up with the LED screens facing the ceiling. Once the head module is positioned correctly;
insert the keys to open and access the motherboard.
4. Attach the Left and Right Uprights/Legs using the Bolts Provided - DO NOT OVER TIGHTEN

10
5. Connect the commutation cables from each leg to the corresponding spot on the
motherboard. Next connect the white led strip from each leg to the corresponding spot on the
motherboard. Once both of the connectors are secured and fastened in place connect the
master power plug to whichever leg you would prefer the power cord to be running from.
6. Now the unit should be fully assembled & preprogrammed by us ready to go. With one
person on each side of the unit, carefully pick it up and stand it upright.
7. Your power cord can be plugged into either leg but the master power plug located in the
head module must be connected to the same leg.
(Never plug two metal detectors into the same set of outlets. Each unit must operate on its
own circuit.)
8. Make sure your unit is at least 3-4 feet away from any metal doors, over ductwork or other
metal objects

11
Product Guide
Operating the metal detector is extremely simple. A quick overlay of the changeable features
are listed below.
Password:
By default to access the machine settings you will press the enter button and be shown a
password entry screen. The password is 800 0000 as to make it easier to access for the
customer.
Sensitivity:
The first options presented to you after the password is entered is the sensitivities. Ranging
from zones 0-6.
“0” controls the overall sensitivity. When cycling through zones 1-6, the user is allowed to
change the sensitivity of specific zones. With a programmable sensitivity range of 0-255, you’ll
be able to set each individual zone to detect any desired metallic object.
Additional Settings:
There are 3 “A” options which control different features within the unit.
A-1: This controls the volume. Max volume is 255. 0 turns volume off.
A-2: This is alarm duration. Programmable 1-20 seconds of alarm.
A-3: This is the tone feature. 12 distinct tones for units set-up in tandem.
Frequency:
Lastly, there is the frequency option which gives you values between 4.00-8.00 to determine
the best operating frequency for your machine.
If you notice too many false alarms on the unit; the first option is always to adjust the
frequency to cancel any outside noise. When setting units up close to each other always
ensure that the units are set to differing frequencies to eliminate any interference from one
another.

12
Understanding the Zones
A: Alarm Zone Locations –There are 6 unique and precise zones that will monitor and
attempt to detect for metal each time somebody walks through. Each zone can be individually
programmed for a specific sensitivity. Each individual zone will light up when metal is
detected and a beep will sound to alert security as to where the metal is located. B: Infrared
Sensor –Records each person that passes by.

13
FAQ
What does the signal strength indicator mean?
This is how the unit detects metal. This indicates the density and presence of metal.
Sometimes if there are any overhead pipes, hvac vents, metal doors, metal cabinets or
florescent light fixtures this may trigger this indicator to light up. Ideally you would want to
keep 2-3 feet from these items and find a location where this indicator won’t light up
continuously.
What if I cannot put in a location where the signal strength indicator will not go off?
If you cannot find a fitting location where the signal strength indicator will not turn off, that is
ok, it will just make the unit less sensitive. It will still pick up metal from passer bys, but the
sensitivity levels will have to be adjusted higher. A good indication is to adjust your sensitivity
2 points higher for every LED that remains lighted on the signal strength indicator. If your
desired sensitivity setting is 70, and if your unit’s signal strength indicator continuously has 2
LED’s lit at all times, adjust your sensitivity to 74 to accommodate for the surrounding metal
around the unit. Sometimes, even moving the unit a few inches or even 90 degrees can help
decrease the LED indicator.
What is the right sensitivity setting for me?
The best way to determine what sensitivity setting would work best for you is to start on the
lowest sensitivity setting –01 and find an article of metal that you wish to pick up. Walk
through with the object and increase gradually until the detector picks up the metal. Start with
a smaller piece of metal you wish to detect and work from there. If set for smaller traces of
metal, the unit will alarm for larger pieces too. (The unit is defaulted at a 70 sensitivity).
I set up my unit, but it will not sound when I walk through with metal?
Always remember that the control panel with the buttons and LED should always be facing
away from the people walking through. Continue with the flowchart and make sure that your
alarm time length is not set at y-00. If set at y-00, the unit is on mute mode and will not give
an audio alarm when metal is detected. Secondly, please make sure that the internal AC plug
is plugged into the panel where the internal power source is plugged in. Also, please make

14
sure that the correct serial ports inside the head unit are securely fastened in the proper
locations.
There seems to be a lot of alarm detections occurring, more than we want or expected. Why
is this?
Before implementing a metal detector into your security, one must have a plan as to how the
equipment is going to best work for them. The best way is to consult who is going to be
monitoring the unit and what is the purpose of the unit. For example, if you are looking to
catch people stealing small computer IC chips in their pockets, you are going to need a high
sensitivity to detect them. One must have a plan as to which items are needed to be put aside
before walking through. If you are not sure, or would like a product specialist to assist creating
a plan, feel free to contact us at (815) 467-6464.
The passerby units are not adjusting or are continuously increasing. What should I do?
The black circular discs on the inside of the panels are the infrared sensors. These pick up
when a person walks through the unit. If the unit is not picking up the passerbys, the sensors
may have fingerprints or dirt on them. With a cloth towel with rubbing alcohol or window
cleaner, rub around the sensor to clean. Also, please check and make sure that the cables are
securely fastened to the metal detector leg panels and PC board. If this connection is loose,
the unit may not work.
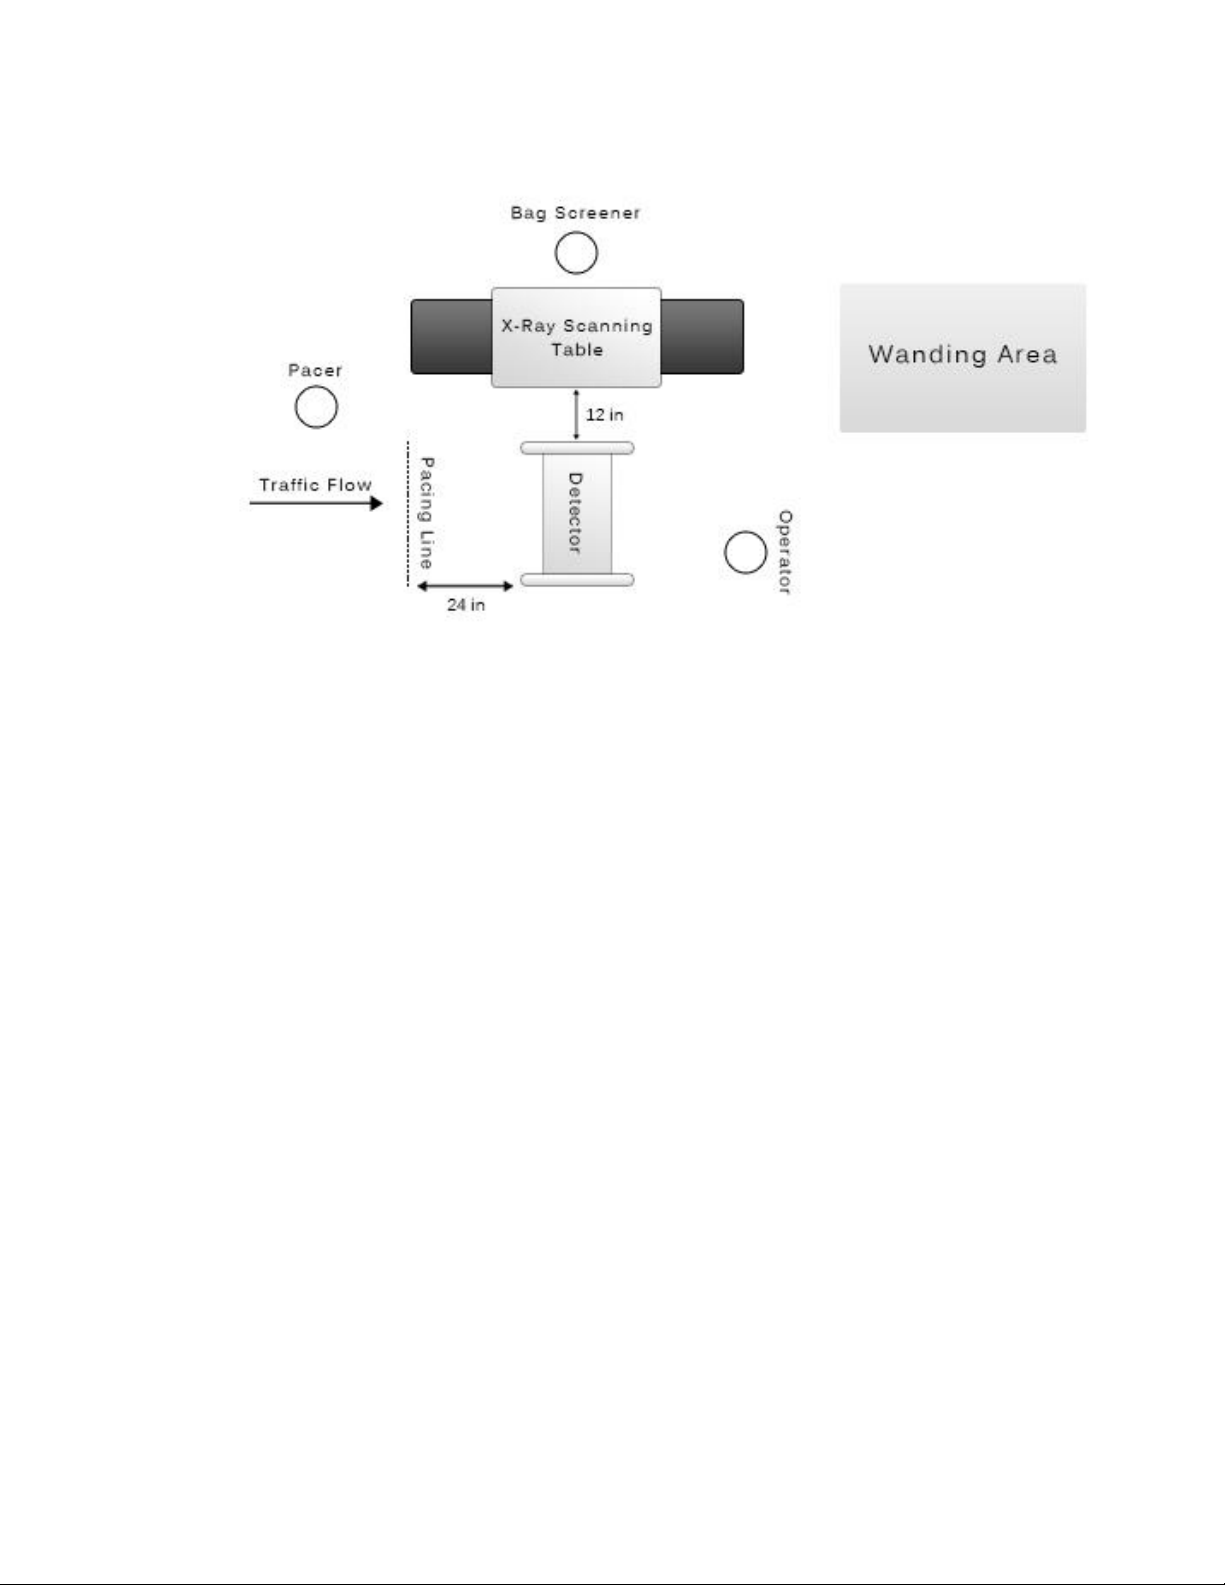
SUGGESTED SINGLE LANE CONFIGURATION
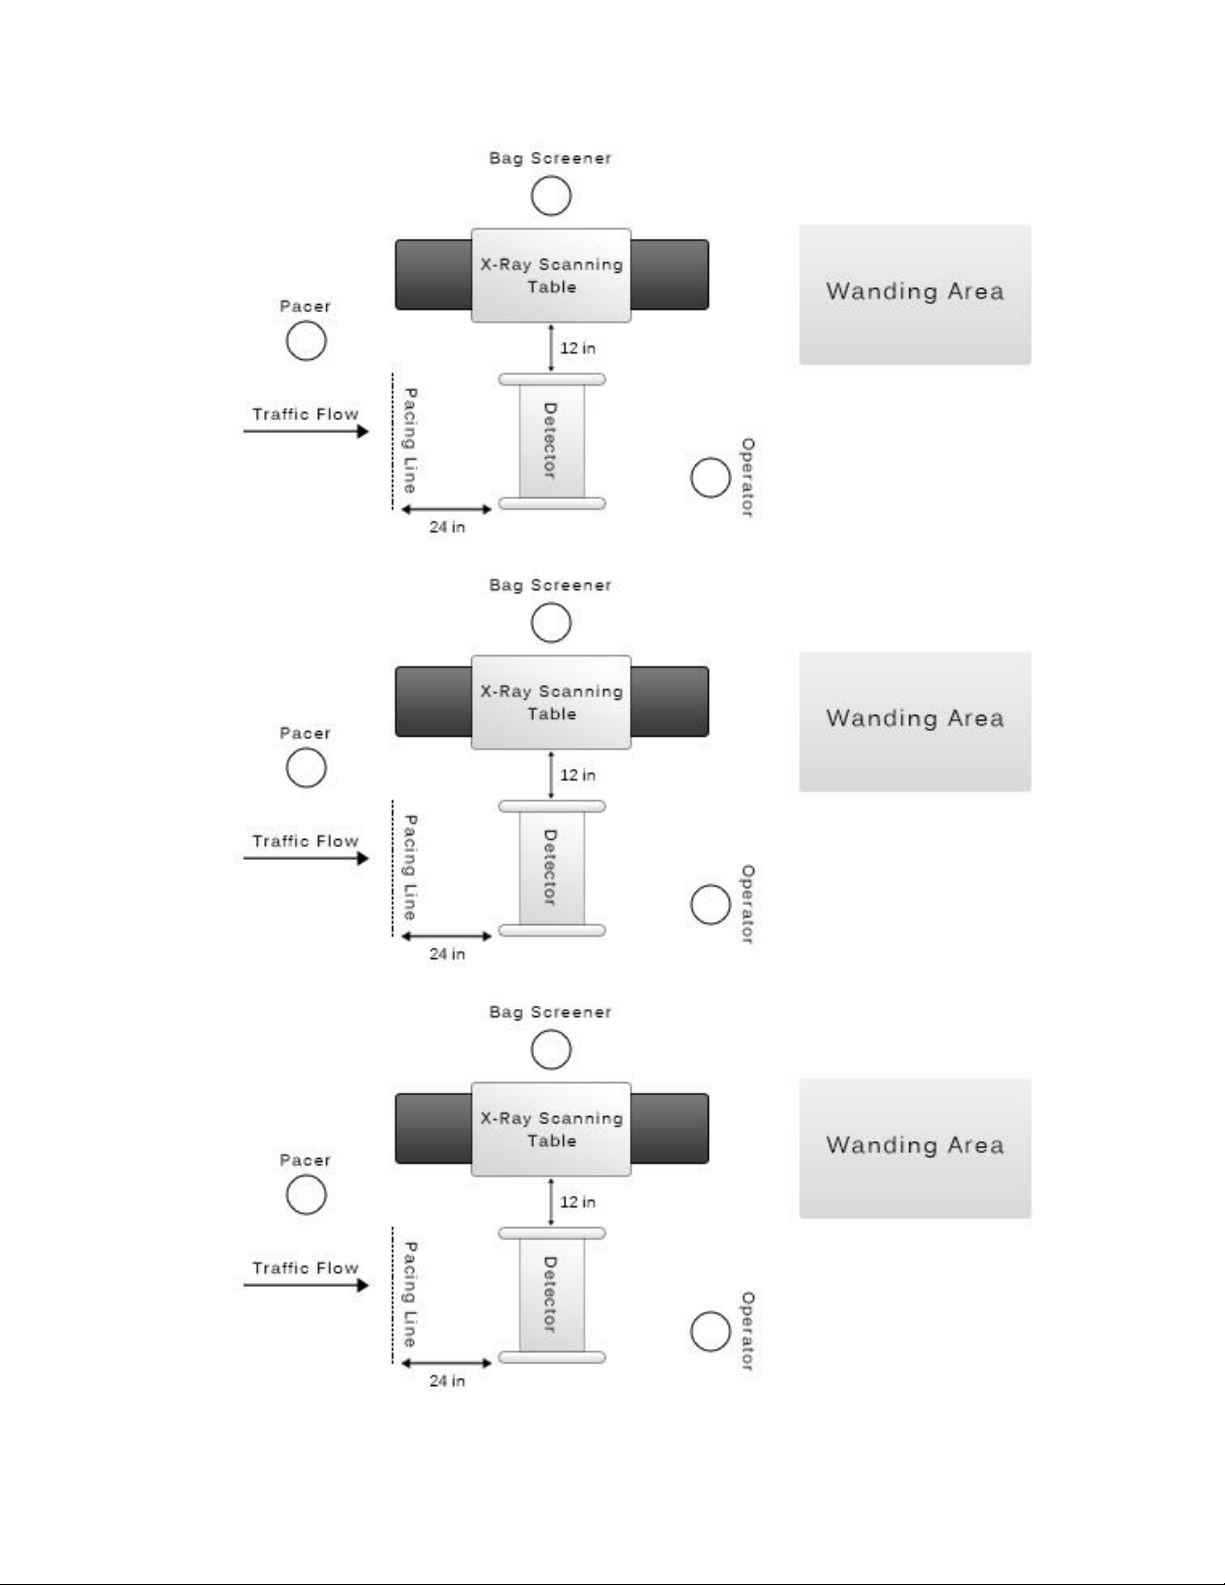
SUGGESTED MULTI-LANE CONFIGURAT

2 YEAR WARRANTY INFORMATION
Metal Defender warrants that each piece of security equipment manufactured by
Metal Defender is protected by the following limited parts and labor warranty for
a period of 24 (twenty-four) months (the “Warranty”). During this 24-month
period Metal Defender will inspect and evaluate all equipment returned to its
authorized repair station or factory to determine if the equipment meets Metal
Defender’s performance specifications. Metal Defender will repair or replace at
no charge to the owner all parts determined faulty. This Warranty does not cover
batteries nor any and all failures caused by abuse, tampering, theft, failure due to
weather, battery acid or other contaminants and equipment repairs made by an
unauthorized party.
THIS WARRANTY IS EXPRESSLY IN LIEU OF ALL OTHER WARRANTIES, EXPRESSED
OR IMPLIED, INCLUDING THE WARRANTY OF MERCHANTABILITY OR FITNESS FOR
A PARTICULAR PURPOSE. THE BUYER ACKNOWLEDGES THAT ANY ORAL
STATEMENTS ABOUT THE MERCHANDISE DESCRIBED IN THIS CONTRACT MADE BY
SELLERS’ REPRESENTATIVES, IF ANY SUCH STATE-MENTS WERE MADE, DO NOT
CONSTITUTE WARRANTIES, SHALL NOT BE RELIED UPON BY THE BUYER, AND ARE
NOT A PART OF THIS CONTRACT FOR SALE. THE ENTIRE CONTRACT IS EMBODIED
IN THIS WRITING. THIS WRITING CONSTITUTES THE FINAL EXPRESSION OF THE
PARTIES’ AGREEMENT AND IS A COMPLETE AND EXCLUSIVE STATEMENT OF THE
TERMS OF THIS AGREEMENT.
The parties agree that the Buyers’ sole and exclusive remedy against Seller shall
be for the repair and replacement of defective parts. The Buyer agrees that no
other remedy (including, but not limited to, incidental or consequential damages
for lost sales, lost profits, injury to person or property) shall be available to him.

Replacement Parts
Replacement Legs
Please Call Us Directly For Price:
(815-290-5354) (815-467-6464)
Replacement Head Unit
Please Call Us Directly For Price:
(815-290-5354) (815-467-6464)
Speaker
$19.99
Zone Card
$22.99
Fuse
$15.99
Power Supply
$34.99
Motherboard
$79.99
Power Cords
$21.99
Set of Nuts + Bolts
$14.99
Battery Back Up
$165.00
Casters
$140.00
Leg Feet (pair x2)
$59.99
Infrared Sensors (pair x2)
$19.99

Table of contents
Other Metal Defender Metal Detector manuals


