Metal Work RITC909G User manual

727819090GBNLFE
P. 2 Please read and keep for future reference
P. 3 Gelieve te lezen en voor later gebruik bewaren
P. 4 Veuillez lire et conserver pour usage ultérieur
P. 5 Leer y guardar para posteriores consultas
MANUAL - HANDLEIDING - MODE D’EMPLOI - MANUAL
RITC909G
(727819090)
Riveting tool
Riveteertang
Pince à riveter
Remachadora
F
GB
NL
E
copyrighted document - all rights reserved by FBC
727819090GBNLFE
2v1.0 06112012
GB
Safety
- Wear safety glasses.
- Keep children and bystanders away while operating the tool.
- Store the tool out of reach of children and other untrained persons.
- Tool shall not be used in any application other that the intended use. Any other use is forbidden.
- Tool cannot be uses in an explosive environment.
Instructions for using rivets
1. Drill a hole in the appropriate location of the workpiece.
2. Select the right draw nosepiece for the rivet.
3. Release the handles.
4. Put the rivet in the draw nosepiece of the riveter and set it in the hole of the workpiece.
5. Tighten the handles. Mandrel will be cut off after 1 or 2 operations.
6. Release the handles and allow the mandrel to drop from the nosepiece.
7. 2,4 to 4,8/5,0 mm, 3/32’’ to 3/16’’ rivets.
Instructions for using nuts
1. Drill a hole in the appropriate location of the workpiece.
2. Change the draw bar as needed.
3. Release the handles. Screw the draw bar into place with wrench counter-clockwise and fasten the xing screw.
4. Fasten the nut to the draw bar and set it in the hole of the workpiece.
5. Tighten the handles. If the nut is not tight enough with the workpiece, just release the handles and fasten the draw
bar head, then tighten the handles again.
6. Release the handles and turn the draw bar head to separate the nut and the draw bar.
7. 4 to 6 mm, 1/8’’ to 1/4’’ nuts.
Nut usage: when you need to add more toughness into the thread of a screw, just take out this nut riveting tool and it
will make your work look fantastic.
copyrighted document - all rights reserved by FBC

727819090GBNLFE
v1.0 06112012 3
NL
Veiligheid
- Draag een veiligheidsbril.
- Hou kinderen en voorbijgangers uit de buurt tijdens het gebruik van het toestel.
- Bewaar het toestel buiten bereik van kinderen en andere onbevoegde mensen.
- Gebruik het toestel niet voor een ander gebruik dan deze waarvoor het geschikt is. Elk andere gebruik is verboden.
- Het toestel mag niet in een explosiegevaarlijke omgeving gebruikt worden.
Aanwijzingen voor klinknagels
1. Boor een gat op de juiste plaats van het werkstuk.
2. Kies een gepaste nippel.
3. Laat de hendels los.
4. Zet de klinknagel in de nippel en plaats deze in het gat van het werkstuk.
5. Druk de hendels vast. De schacht zal afgesneden worden na 1 of 2 maal.
6. Laat de hendels los en laat de gebroken schacht uit de nippel vallen.
7. Klinknagels van 2,4 tot 4,8/5,0 mm, 3/32’’ tot 3/16’’.
Aanwijzingen voor blindklinkmoeren
1. Boor een gat op de juiste plaats van het werkstuk.
2. Vervang de trekstang naar behoefte.
3. Laat de hendels los. Maak de trekstang vast met een sleutel door tegen de klok te draaien, en maak de
vastzetschroef vast.
4. Bevestig de blindklinkmoer aan de trekstang en plaats deze in het gat van het werkstuk.
5. Druk de hendels vast. Indien de blindklinkmoer niet strak genoeg met het werkstuk vastzit, laat de hendels los, maak
de kop van de trekstang vast en druk de hendels opnieuw vast.
6. Laat de hendels los en draai de kop van de trekstang om de blindklinkmoer van de trekstang te scheiden.
7. Blindklinkmoeren van 4 tot 6 mm, 1/8’’ tot 1/4’’.
Moer gebruik: Indien u meer sterkte in de schroefdraad van een schroef wil toevoegen, gebruik maar deze
riveteertang, en uw werk zal er fantastisch uitzien.
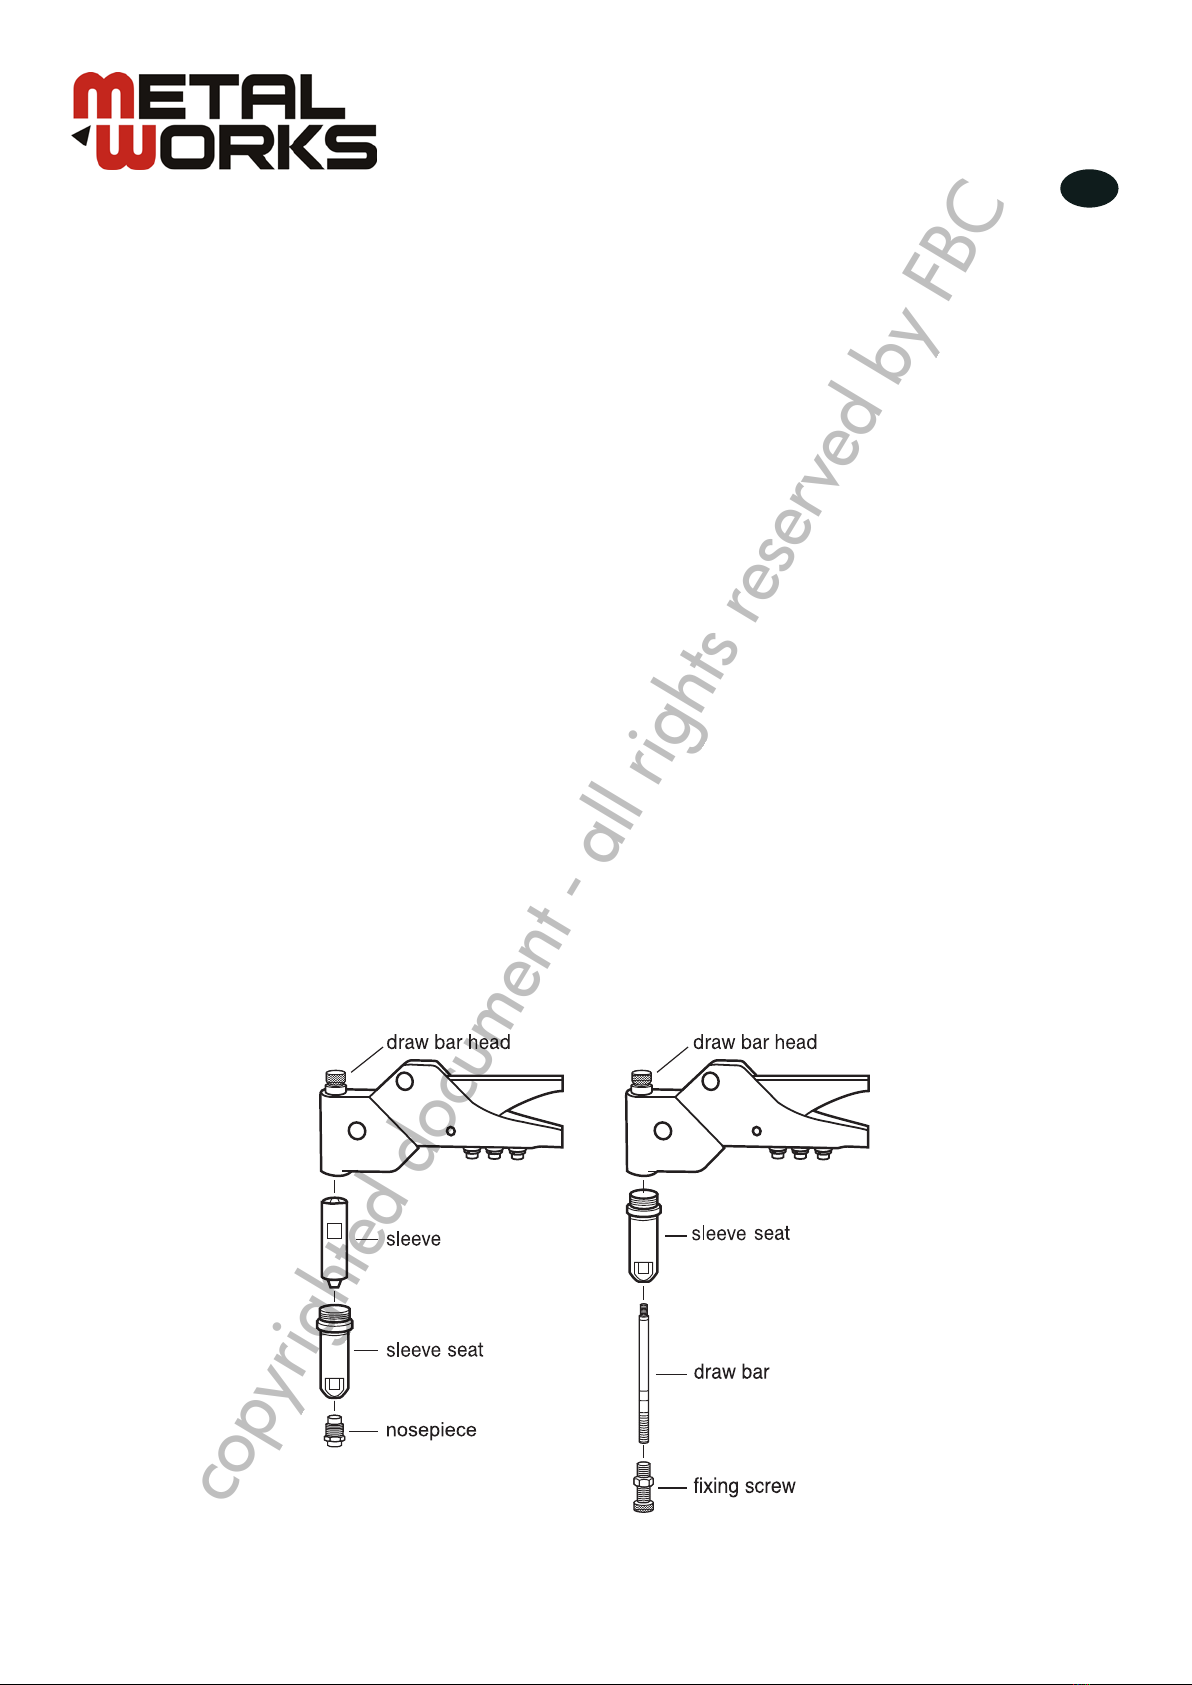
Kop trekstang
Huls zitting
Huls
Vastzetschroef
Trekstang
Kop trekstang
Huls zitting
Nippel
copyrighted document - all rights reserved by FBC

727819090GBNLFE
v1.0 06112012
F
4
Sécurité
- Portez des lunettes de protection.
- Tenez les enfants et les gens de passage à l'écart pendant l'utilisation de l'appareil.
- Rangez l'appareil hors de portée des enfants et des personnes non autorisées.
- N'utilisez pas l'appareil pour un autre usage que ce pour lequel il a été conçu. Tout autre usage est interdit.
- L'appareil ne peut pas être utilisé dans un environnement explosif.
Utilisation pour rivets classiques
1. Percez un trou à l’endroit prévu dans la pièce.
2. Sélectionnez l’embout adapté au rivet.
3. Relâchez les poignées.
4. Placez le rivet dans l’embout de la pince et placez-le dans le trou de la pièce.
5. Serrez les poignées. La tige va se casser après 1 ou 2 pressions.
6. Relâchez les poignées et laissez tomber la tige cassée de l’embout.
7. Rivets de 2,4 à 4,8/5,0 mm, 3/32’’ à 3/16’’.
Utilisation pour rivets creux et rivets goujons
1. Percez un trou à l’endroit prévu dans la pièce.
2. Changez la tige de traction comme nécessaire.
3. Relâchez les poignées. Vissez la tige de traction en place avec une clé en tournant dans le sens antihoraire et xez
la vis de blocage.
4. Fixez le rivet creux à la tige de traction et placez-le dans le trou de la pièce.
5. Serrez les poignées. Si le rivet n’est pas assez serré, relâchez les poignées, resserrez la tête de la tige et serrez à
nouveau les poignées.
6. Relâchez les poignées et tournez la tête de la tige de traction pour séparer le rivet et la tige.
7. Rivets creux de 4 à 6 mm, 1/8’’ à 1/4’’.
Utilisation écrou : Si vous voulez donner plus de force au letage d’une vis, utilisez cette pince à riveter, pour un
résultat fantastique.
Tête tige de traction
Logement douille
Embout
Vis de xation
Tige de traction
Tête tige de traction
Logement douille
Douille
copyrighted document - all rights reserved by FBC

727819090GBNLFE
v1.0 19042012
E
5
Seguridad
- Use gafas de seguridad cuando use la herramienta.
- Mantenga al personal y a los niños alejados mientras opera la herramienta.
- Guarde la herramienta fuera del alcance de los niños y otras personas no capacitadas.
- La herramienta no se puede utilizar para cualquier aplicación que no sea el uso previsto. Cualquier otro
uso está prohibido.
- La herramienta no se puede utilizar en un entorno explosivo.
Instrucciones para el uso de remaches clásica
1. Haga un agujero en el lugar apropiado en la pieza.
2. Seleccione la boquilla adecuada para el remache.
3. Abra la maneta.
4. Coloque la punta del remache en el vastagode tracción y colóquela en la parte agujero.
5. Apretado. El vastago se rompe después de 1 o 2 presiónes.
6. Suelte las manetas saque el vastago roto de la boquilla.
7. Remaches 2,4 a 4,8 / 5,0 mm, 3/32'' a 3/16''.
Instrucciones para el uso de tuercas y perno de retención
1. Taladre un agujero en el lugar adecuado de la pieza.
2. Cambie la barra de estirado según se necesite.
3. Libere las empuñaduras. Atornille la barra de estirado con una llave de ajuste en sentido antihorario y apriete el
tornillo de jación.
4. Apriete la turca/perno de retención hacia la barra de estirado y colóquelo en el agujero de la pieza a trabajar.
5. Apriete las empuñaduras. Si la tuerca/perno de retención no está sucientemente apretada a la pieza, sólo debe
liberar las empuñaduras y apretar el cabezal de la barra de estirado y después vuelva a apretar las empuñaduras.
6. Libere las empuñaduras y gire el cabezal de la barra de estirado para separar la tuerca/perno de retención y la
barra de estirado.
7. 4 - 6 mm, 1/8’’ – 1/4’’ tuerca de acero.
Boquilla
Asiento de
manguito
Manguito
Tornillo de sujeción
Barra de estirado
Cabezal barra de estirado Cabezal barra de estirado
Asiento de
manguito
copyrighted document - all rights reserved by FBC

727819090GBNLFE
v1.0 19042012
6
Spare parts
Onderdelenlijst
Pièces détachées
Recambios
F
GB
NL
E
copyrighted document - all rights reserved by FBC

727819090GBNLFE
v1.0 19042012 7
F
GB
NL
E
Maintenance
Onderhoud
Entretien
Mantenimiento
copyrighted document - all rights reserved by FBC
This manual suits for next models
1
Table of contents
Languages:
Other Metal Work Tools manuals


