MetalMaster PB-440A User manual

HYDRAULIC PANBRAKE
OPERATION MANUAL
Edition No : HPB-01
Date of Issue : 07/2016
Models.
PB-440A/T, PB-825A
PB-830A/T, PB-860T, PB-1030T
07/11/2019
Instructions Manual for PB-460 (S581B)
1
2
OPERATION MANUAL
NOTE:
In order to see the type and model of the machine, please see the
specication plate. Usually found on the back of the machine. See
example (Fig.1)
Fig.1
HYDRAULIC PANBRAKE
MACHINE
MODEL NO.
SERIAL NO.
DATE OF MANF.
Note:
is manual is only for your reference. Owing to the continuous improvement of the
machine, changes may be made at any time without obligation or notice. Please ensure
the local voltage is the same as listed on the specication plate before operating this
electric machine.
Distributed by
www.machineryhouse.co.nz
MACHINE DETAILS
07/11/2019
Instructions Manual for PB-460 (S581B)
2

3
OPERATION MANUAL
C O N T E N T S:
1. GENERAL MACHINE INFORMATION
1.1 Specications..................................................................4
1.2 Standard Equipment......................................................4
2. IMPORTANT INFORMATION
2.1 Safety Requirements......................................................5
2.2 Features of the Machine................................................7
2.3 Liing Instructions........................................................8
3. INSTALLATION
3.1 Base Foundation and Securing Points........................9
3.2 Machine Leveling.........................................................10
3.3 Checking the Power Supply........................................10
3.4 Attaching the Accessories...........................................11
3.5 Fill e Hydraulic Oil Tank.......................................11
4. COMMISSIONING
4.1 Preparation of the Machine.......................................12
4.2 Check Clamp Safety Mute Stop.................................12
4.3 Commissioning Check List........................................12
5.MACHINE OPERATION
5.1 Setting e Clamp Gap...............................................13
5.2 Start Up.........................................................................14
5.3 Bending.........................................................................14
5.4 Controls........................................................................14
5.5 NC89 Controller Operation.......................................15
5,6 BANNER - Touch Screen Operation........................16
6. MAINTENANCE
6.1 Type and frequency of Inspections...........................19
6.2 Lubrication Points.......................................................20
6.3 Changing Oil...............................................................21
6.4 Changing e Filter....................................................21
6.5 Troubleshooting..........................................................22
APPENDIX
A. Hydraulic Circuit..........................................................23
B. Primary Electrical Circuit Diagram............................24
C. NC89 Electrical Circuit Diagram.................................24
D. Ezy Touch Controller Electric Circuit Diagram.......25
General Machinery Safety Instruction...........................26
07/11/2019
Instructions Manual for PB-460 (S581B)
3

4
OPERATION MANUAL
1.1 SPECIFICATIONS
1. GENERAL MACHINE INFORMATION
Machine Type PB-440A/T PB-825A PB-830A/T PB-860T PB-1030T
Bending Length (mm) 1300 2500 2500 2500 3050
Material Capacity Mild Steel (mm) 4 2.5 4 6 3.2
Stainless Steel (mm) 2 1.2 2 3 1.6
Bending Angle Indicator (deg) 0-120 0-120 0-120 0-125 0-120
Box Depth Of Fingers (mm) 230 215 205 205 205
Opening Height (mm) 140 140 140 140 140
Weight (kgs) 1250 1740 2900 3800 3730
System Pressure (Mpa) 5 5 5 12 5
Pan Movement Speed (mm/sec) 5 5 5 5 5
Clamp Movement Speed (mm.sec) 10 10 10 10 10
Oil Tank Volume (ltr) 60 40 60 60 60
Back Gauge Range (mm) 1000 1000 1000 1000 1000
Main Motor 3Ph 415v 50Hz (KW) 3.75 3.75 5.5 7.5 5.5
1.2. STANDARD EQUIPMENT
q Tools and instruction manual
q Back-gauge assembly
q Side guarding
q Foot switch and control panel
e above specications were current at the time this manual was published, but because of our policy of
continuous improvement, Metalmaster reserves the right to change specications at any time and without
prior notice, without incurring obligations.
07/11/2019
Instructions Manual for PB-460 (S581B)
4

5
OPERATION MANUAL
SAFETY CHECKS BEFORE OPERATING
qLocate and ensure you are familiar with all machine operations and controls.
q Take notice of any warning labels on the machine and do not remove them.
qEnsure all guards are tted, secure and functional.
qEnsure working parts are well lubricated and the jaws and ngers free of rust and dirt.
qCheck workspaces and walkways to ensure no slip/trip hazards are present
qBe aware of other people in the area. Ensure the area is clear before using equipment.
SAFETY CHECKS WHEN OPERATING
q Operate the machine only if all protective devices and guarding are mounted and eective.
qRemove the pan brake ngers that are in the way. Use only the pan brake ngers required to
make the bend.
q Check that the material to be bent is the correct thickness.
qEnsure the pan brake ngers that are not removed for an operation are securely seated and
rmly tightened before the machine is used.
qEnsure your ngers and limbs are clear before operating the pan brake.
qLower nger clamps to work. Do not drop.
qCheck workpiece is secure.
qKeep clear of moving counterweight (where tted).
POTENTIAL HAZARDS AND INJURIES
qSharp edges and burrs.
qSquash/crush and pinch points.
qImpact from apron.
2.1 SAFETY REQUIREMENTS
Safety glasses must be worn at
all times in work areas. Earmus
should be worn if the work area is
noisy.
Sturdy footwear must be worn at
all times in work areas.
Gloves must be worn when han-
dling the material..
Long and loose hair must be con-
tained with a net or under a hat
2. IMPORTANT INFORMATION
e purpose of the safety section of this manual is to inform operators and maintenance
personnel of the precautions to be taken while operating or servicing the machine.
e following are a few basic guidelines to follow, but as with any type of machinery good judg-
ment and a safe attitude should be applied at all times.
07/11/2019
Instructions Manual for PB-460 (S581B)
5

6
OPERATION MANUAL
DO NOT
qDo not use faulty equipment. Immediately report suspect machinery.
qDo not use a panbrake for bending metal that is beyond its capacity for thickness, or type.
qDo not attempt to bend rod, wire, strap or spring steel sheets.
q Do not remove the guards in front of the machine under any circumstances while the
machine is in an operational mode.
q Do not operate the machine without proper adjustment according to sheet thickness.
q Do not bend material which has been welded or deformed.
q Do not use clamp ngers which are excessively damaged.
2.1 SAFETY REQUIREMENTS Cont.
q Use the right tool for the job
q Identify possible pinch point hazards in your work area
q Concentrate on objects that move or are capable of moving.
q Ask yourself, “What will happen if this moves? Will I be in
the path of that movement?”
qBe aware of pinch points created by objects that move and
come into direct or close contact with xed objects
q Be on guard whenever you put your hands, ngers, toes, or
feet “between” anything.
qDiscuss and point out pinch point hazards as part of your
risk assessment.
q Make sure your hands are placed where you can see them
PINCH POINT SAFETY WARNING
Machinery can pose a hazard with moving parts, conveyors, rollers and rotating shas. Never reach
into a moving machine. e machine must always be properly maintained. Always use the machine
tool guards provided with your equipment. ey act as a barrier between the moving parts and your
body.
In order to prevent accidents involving pinch points, the points listed below must be followed when
using machinery
WHEN MAINTAINING THE MACHINE
q Shut o the machine completely before any repair work is carried out.
q Disconnect and tag the power supply if not required while doing maintenance
q e machine is to be serviced and/or be repaired only by the authorized personnel
07/11/2019
Instructions Manual for PB-460 (S581B)
6

7
OPERATION MANUAL
e electrical and hydraulic circuits of your machine are designed to
allow operation with maximum safety. e following precautions are
available on the machine for enhanced safety.
e Emergency stop button (engaging type) is found on the foot switch
control unit. Once the button has been pressed to reset the emergency
stop, the red button must be rotated to reset the stop.
2.2. FEATURES OF THE MACHINE:
Foot pedal control
e foot pedals are used to activate the clamping mechanism
Main Controls
e main machine operating controls are located on the mobile unit.
1
2
3
4
568
7
1 Power ON Light
2 Switches on the Controller
3 Manual or Cycle mode
4 Emergency Stop
5Apron UP
6 Pump ON
7Apron Down
8 Pump OFF
07/11/2019
Instructions Manual for PB-460 (S581B)
7
8
OPERATION MANUAL
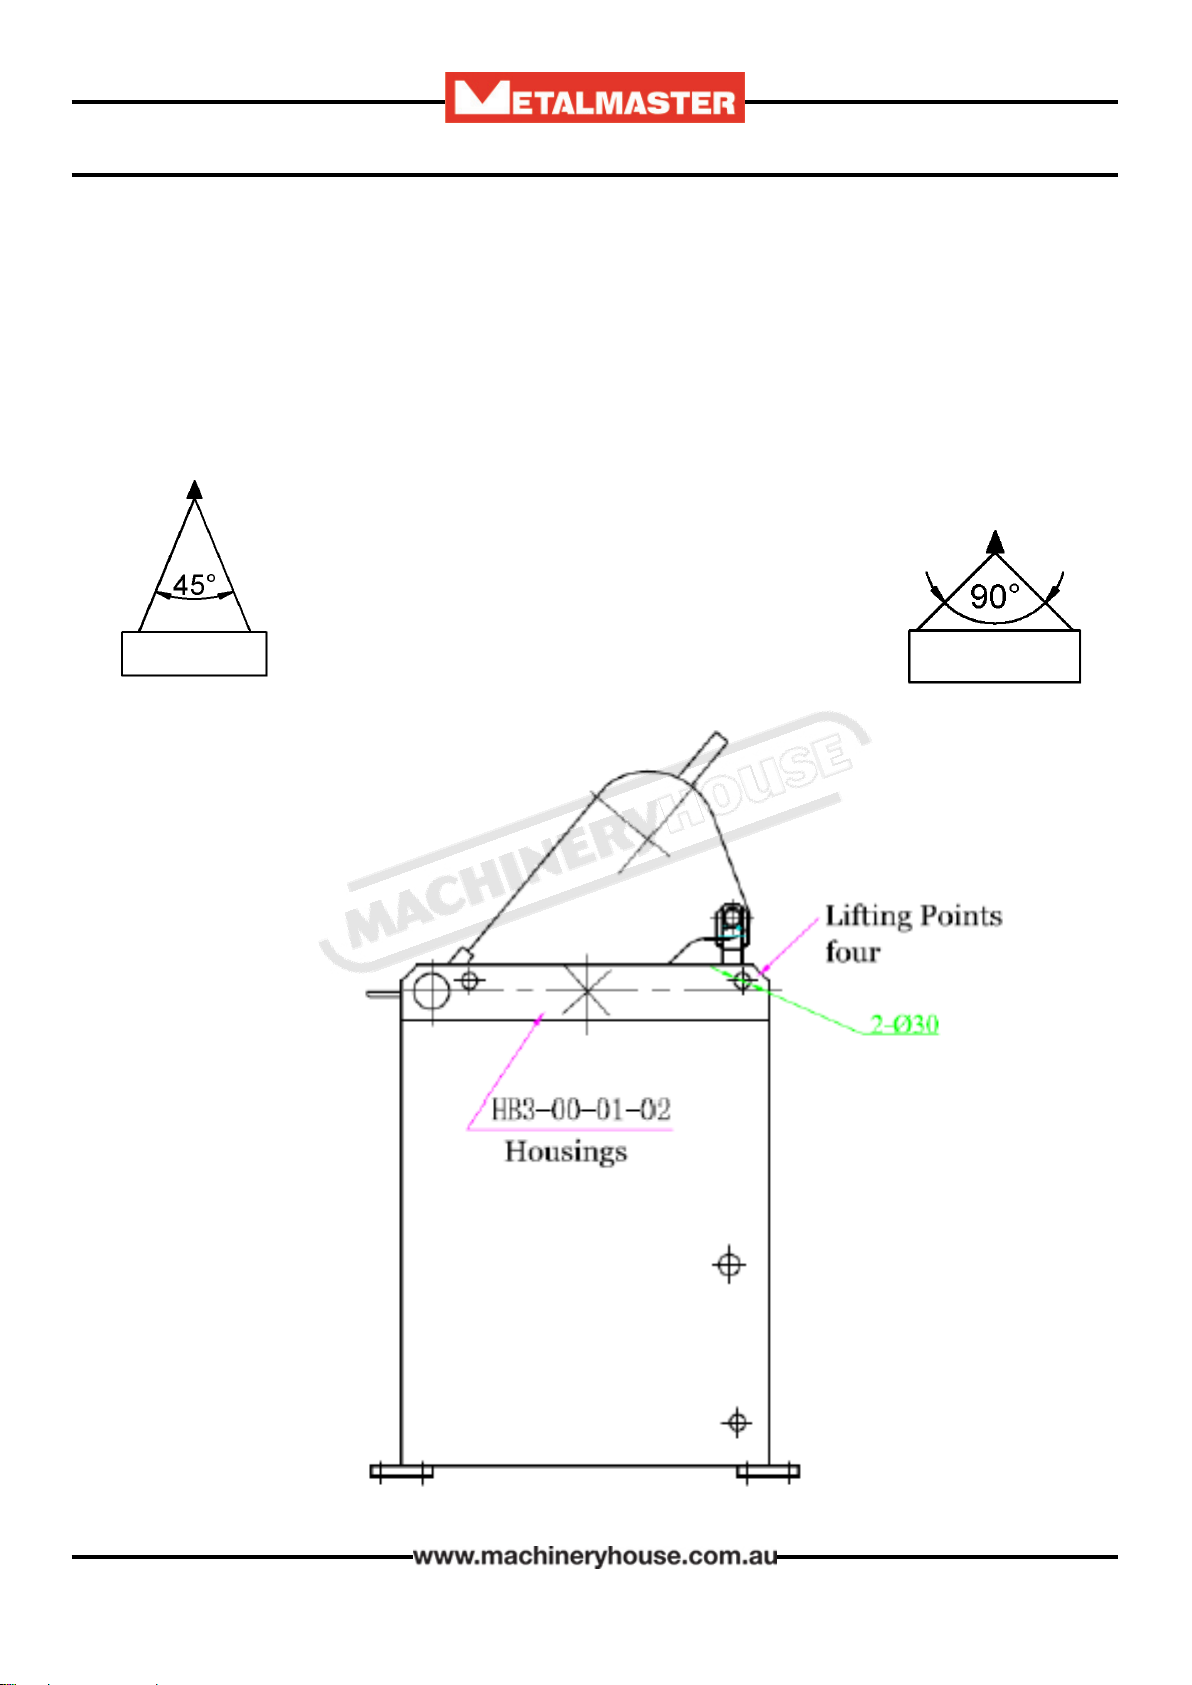
2.2 LIFTING INSTRUCTIONS
On the day that the machine arrives, make sure that a crane with sucient capacity is available to
unload the Panbrake from the vehicle. Make sure access to the chosen site is clear and that doors
and ceilings are suciently high and wide enough to receive the machine.
To handle the Panbrake, use only the four sling holes located on the top of the end plates. (Fig. 2.3)
e slings should be positioned so the machine is level when lied.
When using slings please take note of the sling angle and the loads that apply
When the slings are at a 45° angle then each sling will carry
the equivalent of 50% of load weight. (Fig.2.1).
When the slings are at a 90° angle then each sling will carry
a load weight on each sling the equivalent to 75% of the
weight of the machine.
(Fig 2.2)
Note! Metalmaster recommend not to exceed 90° angle
Fig 2.2
Fig 2.1.
Fig. 2.3
07/11/2019
Instructions Manual for PB-460 (S581B)
8
9
OPERATION MANUAL
e machine must be leveled and rmly stationed on the oor where it is to be used, according
to the Installation Diagram attached.
e oor load, where the machine is to be installed, must be suitable for the weight of the ma-
chine.
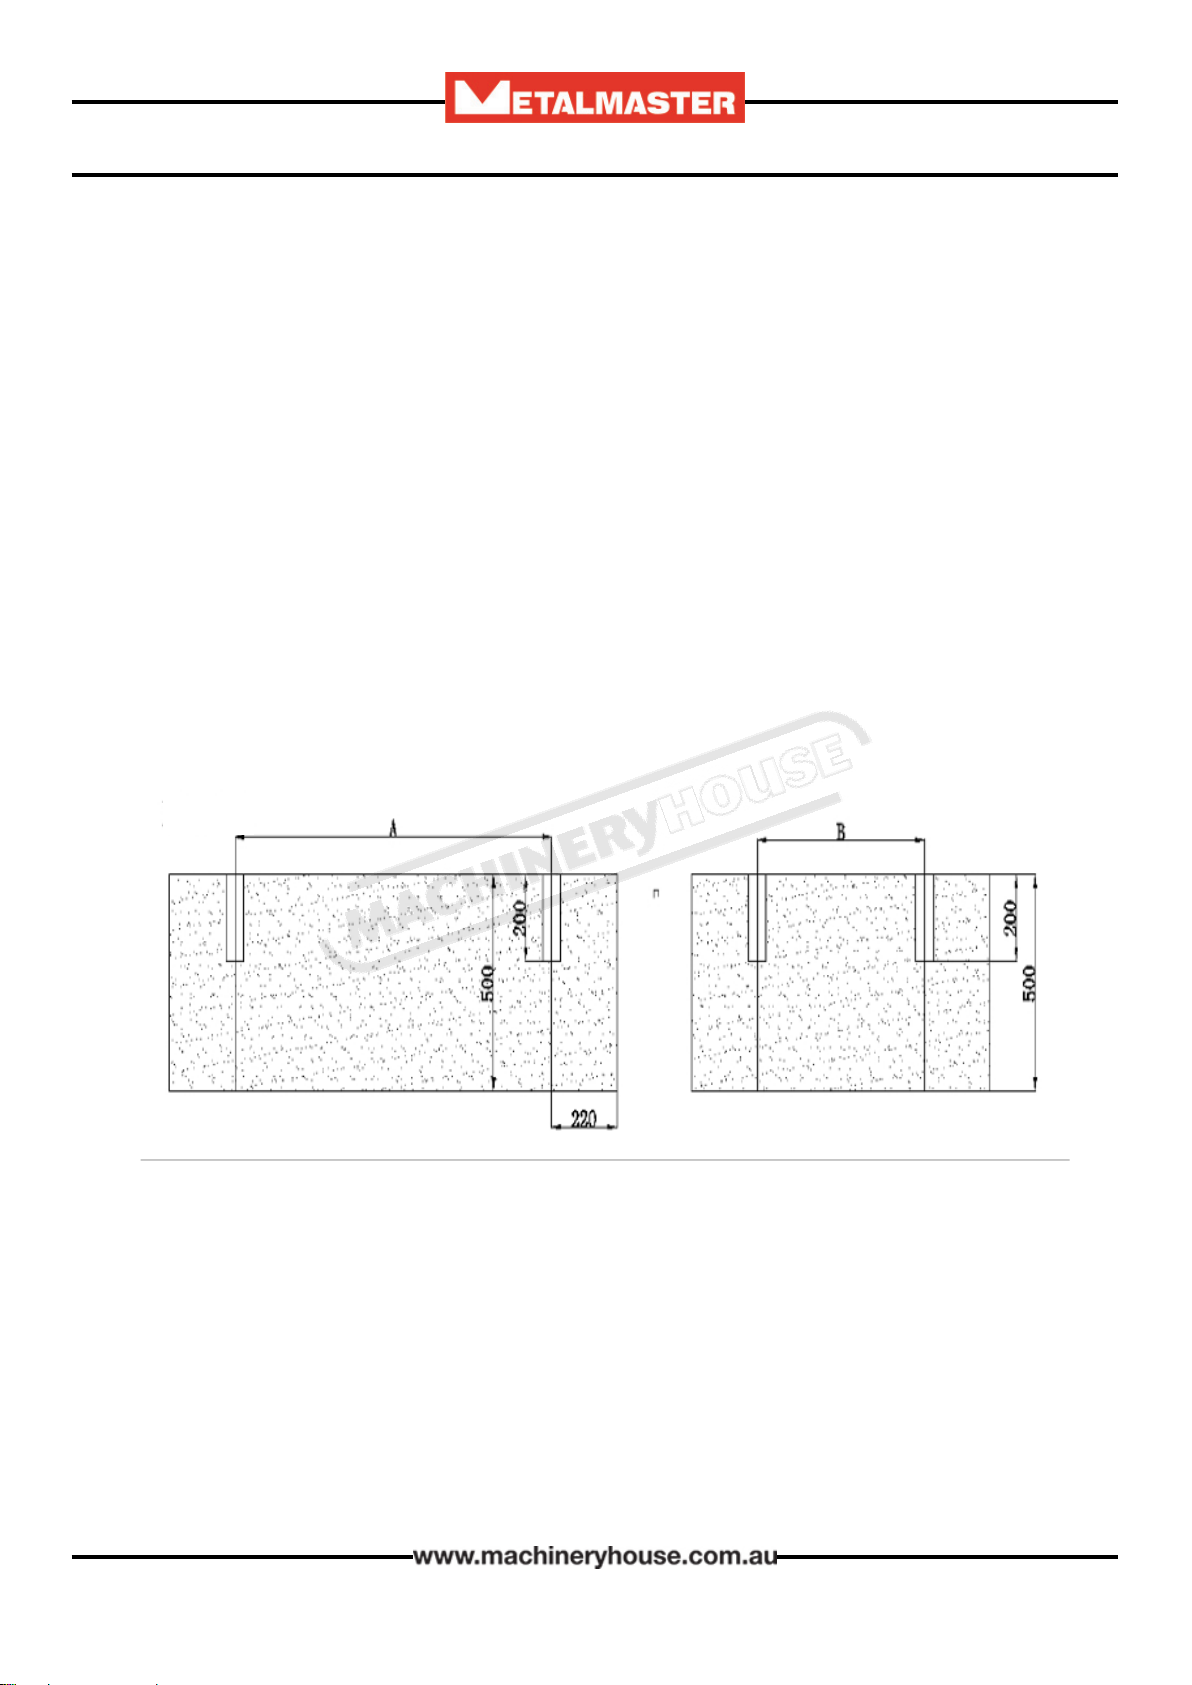
3. INSTALLATION
3.1 BASE FOUNDATION AND SECURING POINTS
Before securing the machine a solid concrete base must be prepared to the specication of the
machine.
e sizes for the bolt holes position are listed as A-B. (Check with your dealer before the ma-
chine arrives)
Fig. 2.5
07/11/2019
Instructions Manual for PB-460 (S581B)
9
10
OPERATION MANUAL
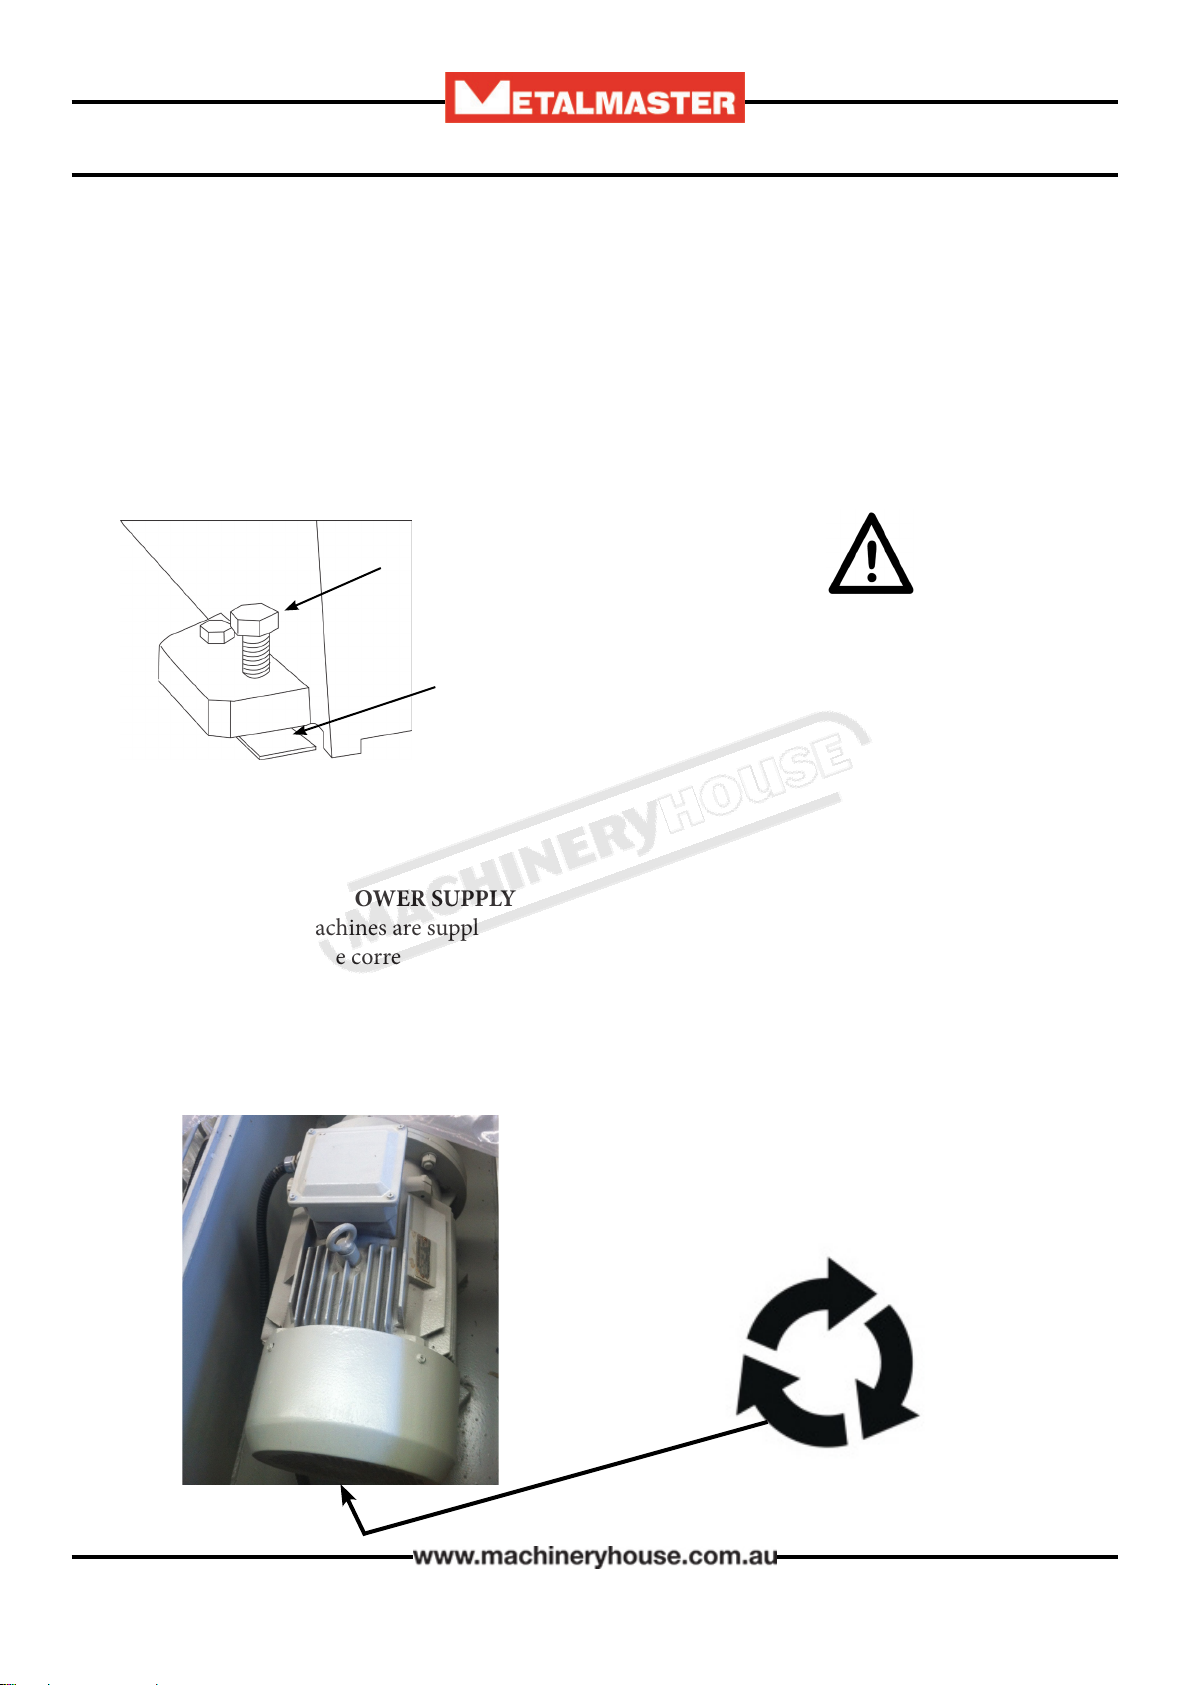
3.3 CHECKING THE POWER SUPPLY
METALMASTER machines are supplied wired ready to run. Check the specication plate on the
machine to conrm the correct voltage of the power supply.
e machine must be connected by a qualied and licensed electrician. Warranty could be voided
if it is found that the connection was not carried out by a qualied electrician.
Check the rotation of the motor. e motor needs to rotate clockwise.
If the direction is incorrect, stop the pump, isolate the machine and make changes to the wiring
3.2 MACHINE LEVELING
To set your machine up so that it operates to optimum performance, apply the following procedure
Aer your panbrake has been anchored to a concrete slab oor, it then needs to be leveled. e
leveling is performed using each of the screws on each pad.(Fig. 3.1). Loosen the hold down bolts
and place a level on the surface of the working table. Tolerances: 1000:0.30mm, for both axis.
Metal plates need to be placed under each jacking screw to distribute the load. Once level then
tighten the hold down bolts.
Metal Plate
Jacking Screw
e machine must not rest on supports other
than those dened in Fig. 3.1
Fig. 3.1
07/11/2019
Instructions Manual for PB-460 (S581B)
10

11
OPERATION MANUAL
3.5 FILL THE HYDRAULIC OIL TANK.
Cover
Oil Level Indicator
1. Remove the oil tank cover.
2. Make sure the inside of the tank is clean and clear of any dirt
3. Using a pump, ll the tank with oil until the level reaches the top mark of the oil indicator.
Observation of the oil level indicator should be done regularly to ensure the oil is kept at the same
level.
When lling the tank with oil, make sure that the top of the tank is clean and free from dust and dirt.
3.4 ATTACHING THE ACCESSORIES.
q Bolt on the arms that support the back gauge. Ensure they are square to the table. (Fig 3.2)
q Bolt on the apron safety guards (Fig 3.3)
Fig.3.2 Fig.3.3
07/11/2019
Instructions Manual for PB-460 (S581B)
11

12
OPERATION MANUAL
4. COMMISSIONING
4.1. PREPARATION OF THE MACHINE.
q Remove all wrapping and packing grease from the machine.
q Check the machine for loose bolts. Tighten as required.
q Inspect for oil leakage or loose ttings.
q Grease all grease nipples.
q Start pump and test Emergency stop operation
q Inform your service provider of any damage or faults with the machine.
4.2. CHECK CLAMP SAFETY MUTE STOP-
Press & hold clamp down pedal so the clamp travels down continuously. It must stop 20-28mm
above the bed. If it does not stop within the range adjust the micro switch located on the le rear of
the machine. Release pedal and repress to complete clamping.
4.3. COMMISSIONING CHECK LIST.
Before starting the machine the following checks must be carried out.
q Installation and machine preparation has been performed according to the manuals instructions.
q Fill the oil reservoir with 46 grade hydraulic oil and ensure that the oil lter breather cap is tted
q All grease nipple points have been lubricated.
q Electrical earth tted and power circuits, switches, and foot-pedal checked.
q Check power connections and any damage to wiring.
q Safety guards have been tted securely
q Check pump rotation.
q Test Emergency stop to ensure it is operating correctly.
q Test controller operation.
q Test all mechanical operations on the machine.
q Test bend material and check quality of the bend.
q Tools, equipment and personnel are clear of the machine.
q Operation Manual on how to operate the machine has been read.
07/11/2019
Instructions Manual for PB-460 (S581B)
12
13
OPERATION MANUAL
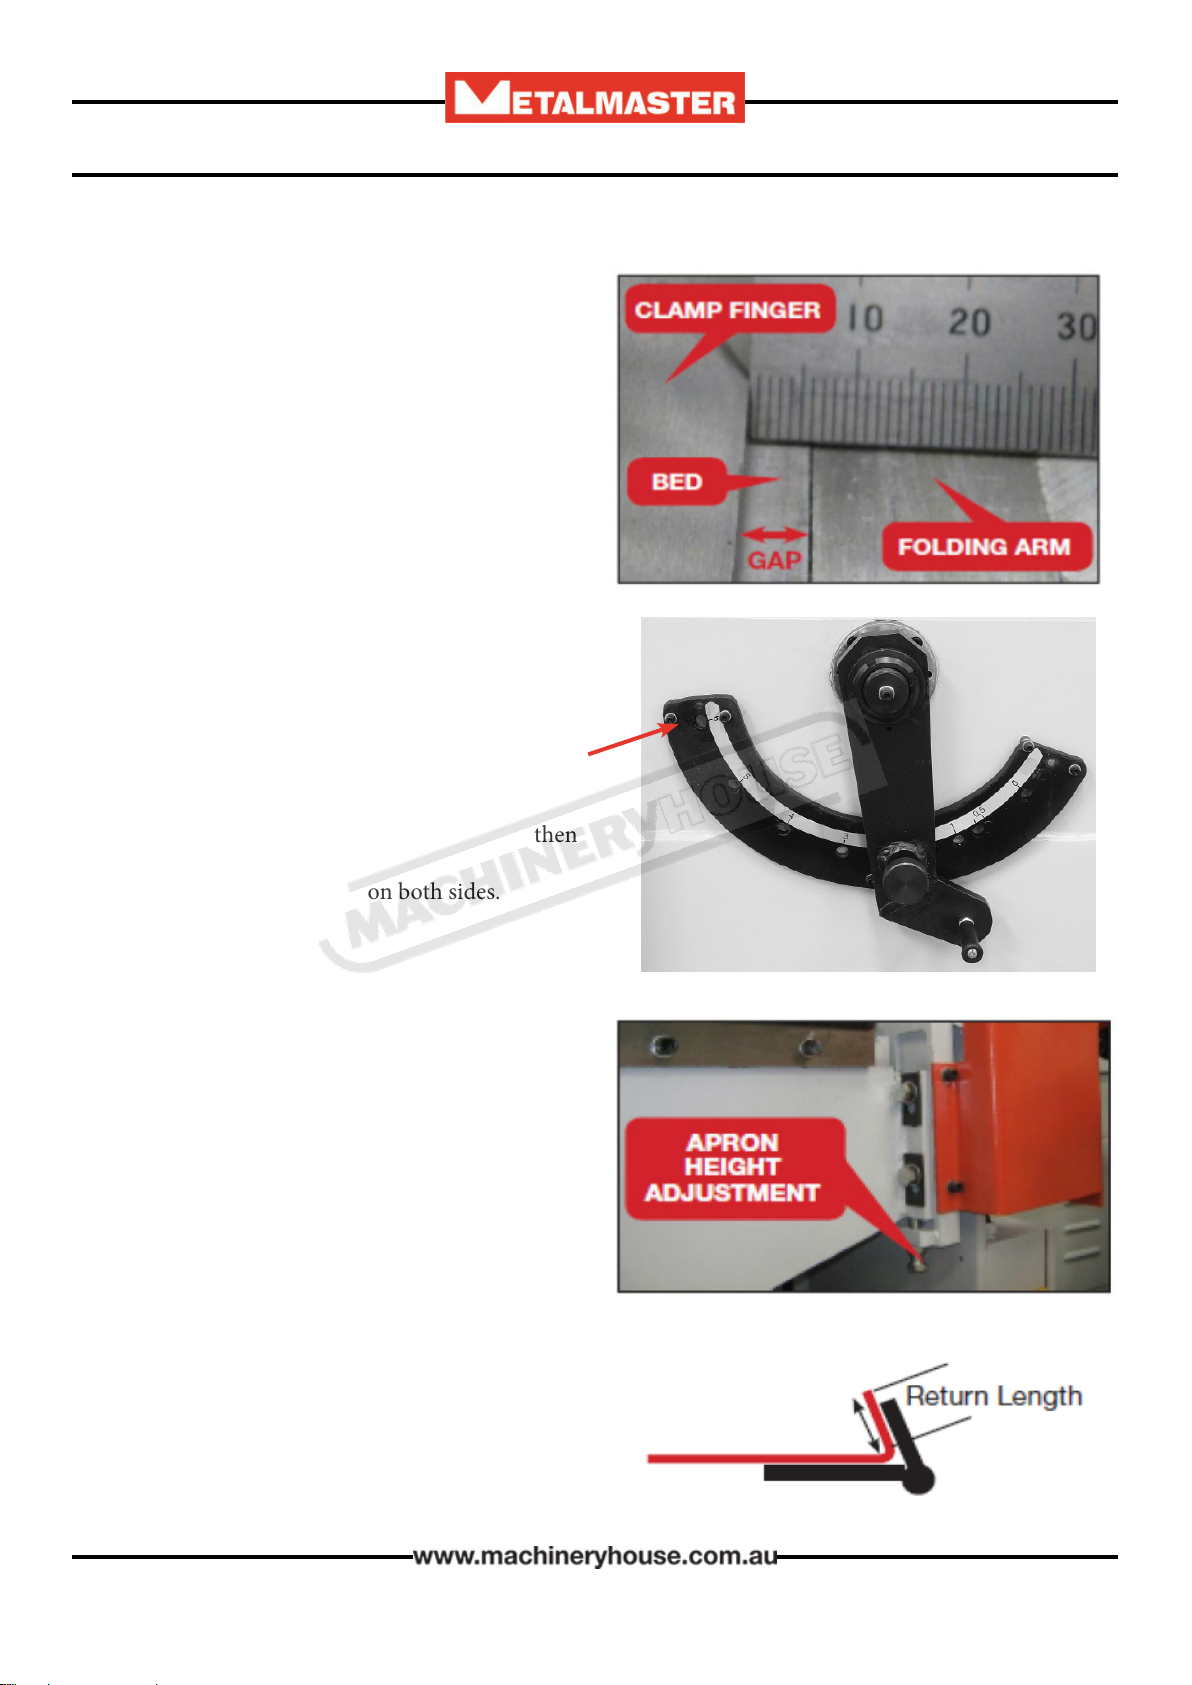
5.1 SETTING THE CLAMP GAP
Before operating the machine the clamp gap needs
to be set to match the material thickness
e Clamp gap must be set to a minimum of 1.5 x
material thickness.
Example: If the material that is to be bent is 4mm
then the clamp gap must be set to a minimum of
6mm.
Each panbrake may have dierent mechanisms for
adjusting the clamp gap but the formula of 1.5 x
Material ickness must be maintained to prevent
overload and possible damage
5. MACHINE OPERATION
Some machines have a quick adjusting arm with
pin positions marked 0-6. is should represent
your material thickness.
Example: If the material to be bent is 6mm then
place the pin in position 6.
Note ! is must be done on both sides.
You may have to use a combination of top clamp
adjustment and apron adjustment.
Example: If bending 6mm aluminium with the
clamping position 4, the apron must be dropped
down 3mm to make the total gap of 9mm (1.5 x
6mm = 9mm)
Note ! e locking bolts on the apron must be re-
leased before adjusting, then tightened when the
correct height is reached.
RETURN LENGTH - LIMITATION
Caution - ere is a minimum “Return Length”
of 15 x ickness of Material when bending
thicker material over 1mm. Damage could occur
to the machine if the return is too short.
Example: If bending 4mm the minimum return
length must be 60mm
07/11/2019
Instructions Manual for PB-460 (S581B)
13
14
OPERATION MANUAL
a. Check that the electrical supply has been connected.
b. Check that the hydraulic tank has been lled with hydraulic oil.
c. Ensure that the emergency stop button is in the released position.
d. Ensure the isolating switch is on and power light is illuminated
e. Press the hydraulic pump button to start the electric motor.
a. Adjust the bend angle adjuster according to your requirements.
b. Ensure the clamp gap has been set according to the thickness of the plate.
c. Once the steel plate is in position for bending then the choice of inching or cycle mode can be
selected.
d. Do not bend material which has been welded or deformed.
5.3 BENDING
5.2 START UP
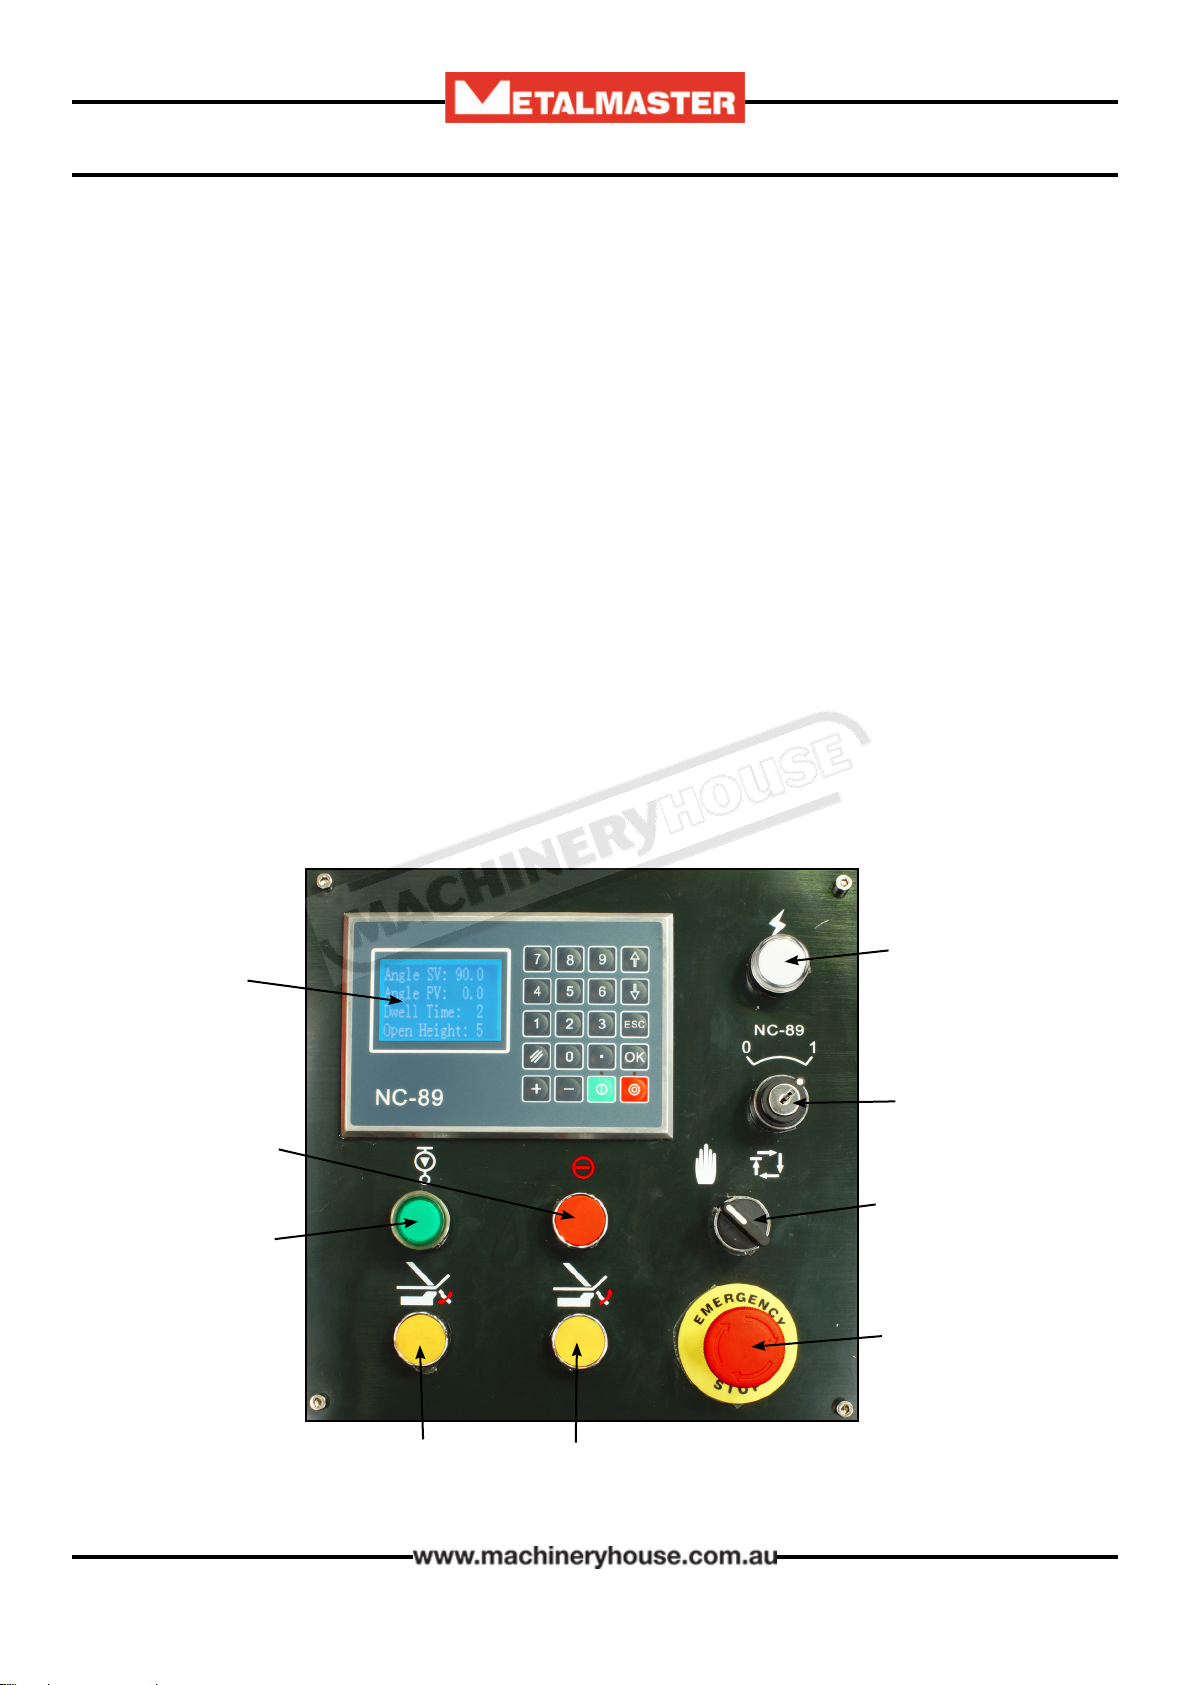
5.4 CONTROLS
Power Light
Key Switch for
Power To NC89
Switch Le for Manual
Right for Cycle Mode
Emergency Stop
Apron Up
Apron Down
Pump On
Pump O
NC89
Controller
07/11/2019
Instructions Manual for PB-460 (S581B)
14

15
OPERATION MANUAL
NC-89 Panbrake Controller Operation
Angle SV: Desired programmed angle.
Operation: Move Arrow to Angle SV, clear value, enter desired angle value. Example: 5 = 5º, and
press .
Angle PV: Actual position of apron.
Operation: Angle PV is a digital readout for the apron angle as the apron moves. This is visual only and can
not be modied.
Dwell Time: Desired time apron will dwell after it has reached Angle SV. Auto function only
Operation: Move Arrow to Dwell Time, clear value, enter desired value. Example: 2 = 2 seconds, and
press.
Open Height: Desired height the clamp opens after apron returns to zero. Auto function only
Operation: Move Arrow to Open Height, clear value, enter desired value. Example: 3 = 3 seconds, and
press.
Manual Bend: Switch mode to manual. Example: Enter 90ºin Angle SV. Clamp material and use the Up Manual
Button to bend material. Button can be released at any time and apron will stop. NC-89 with stop apron at 90º.
Release button and bend more/less or return back to 0ºand unclamp with foot pedal.
Auto Bend: Switch mode to Auto. Example: Enter 90ºin Angle SV, Enter 2 sec in Dwell Time, Enter 3 sec in Open
Height. Clamp material and press green start button on NC-89. Apron will automatically bend up to 90º, dwell for 2
seconds, return to 0º and then clamp will open for 3 seconds. Job complete.
WARNING: The apron will automatically bend up once the start button is pressed.
Clear
Stop
Start
Manual
Auto
Arrow
Manual
Bend
Up / Down
Emergency
Stop
07/11/2019
Instructions Manual for PB-460 (S581B)
15

16
OPERATION MANUAL
BANNER - Panbrake Touch Screen Operation
Touch Screen: Touch any icon to navigate the controller or operate apron.
PUMP ON: Press the PUMP ON icon to turn the pump on for any bending operations.
HOME page: This is the main page to access all the bending screens.
MANUAL MODE: Press MANUAL MODE icon to access this screen.
Operation: Clamp job with foot pedal. When CLAMP OK is green, means the clamp is in position to allow
bending to start. Pressing UP / DOWN will operate apron. Apron angle will count as the apron moves up
or down.
07/11/2019
Instructions Manual for PB-460 (S581B)
16

17
OPERATION MANUAL
QUICK BEND: Press QUICK BEND icon to access this screen.
PROGRAM LIST: Press EDIT PROGRAM icon to access this screen.
WARNING: The apron will automatically bend up once the start button is pressed.
Operation: Touching icon will change to which indicates bend is ON. Touching will
bring up a screen for you to change the value. If desired you may change the DWELL TIME and OPEN
HEIGHT. Once all values are correct press PROGRAM CONFIRM to load program (This will turn RED
which means the program has been loaded). Clamp job with foot pedal and Press the start button
to start bending. The apron will automatically bend up to the programed angle, dwell for set value, return
back down to 0 position, then the clamp will open automatically to the set open height. Repeat process
for next bend.
Operation: Press to select a PROGRAM number. Press SET to change bend data or press HOME
to load the program onto the home page.
07/11/2019
Instructions Manual for PB-460 (S581B)
17

18
OPERATION MANUAL
PROGRAM MODIFICATION:
Press the SET icon in PROGRAM LIST to access this screen.
WARNING: The apron will automatically bend up once the start button is pressed.
Operation: Press NAME to enter a name. To make BEND 01 bend to 90ºPress ANGLE and enter 90.
OFFSET is for bending thicker material, Entering 5 in OFFSET will make apron bend to 95º. Pressing delete
will skip the bend. Press EXIT to return to HOME page. Once on HOME page press PROGRAM CONFIRM to load
program then press the start button to start bending. The apron will automatically bend up to the programed
angle, dwell for set value, return back down to 0 position, then the clamp will open automatically to the set open
height. Repeat process for next bend.zzzzzzz
USB Device: Press the Save to USB icon to access this screen
This screen is for saving or loading programs to or from a USB device.
Operation: To SAVE a program: Press and hold on the PROGRAM LIST screen for 3 seconds
to activate the “Save to USB” function. Press on the test1.csv to rename your program, press “ent” to save your
program then press OK. To LOAD a program: Press and hold on the PROGRAM LIST screen
for 3 seconds to activate the “Read from USB” function. Press on the eg: HAFCO.prd le and press OK.
07/11/2019
Instructions Manual for PB-460 (S581B)
18

19
OPERATION MANUAL
6.1 TYPE AND FREQUENCY OF INSPECTIONS
6. MAINTENANCE
Inspection Frequency Responsible
Lubrication of all grease
points
See Lubrication points
(Section 4.2) Operator
Lubrication of clamp ngers
and machine surfaces Daily Operator
Guards for physical damage Daily Operator
Machine xing bolts against
loosening Weekly Operator
Oil Leakage in cylinders Week ly Operator
Oil leakages in hoses, pipes
and hydraulic parts Week ly Operator
Hydraulic uid levels Week ly Operator
Cylinder connecting bolts
against loosening Week ly Operator
Safety and limit switches
against loosening Week ly Operator
Electrical terminal connec-
tions Annually Electrician
07/11/2019
Instructions Manual for PB-460 (S581B)
19

20
OPERATION MANUAL
GREASE POINTS X 2 EVERY 8HRS
GREASE POINTS X 2 EVERY 8HRS
GREASE POINTS X 2 EVERY 8HRS
GREASE POINTS X 2 EVERY 8HRS
6.2 LUBRICATION POINTS
07/11/2019
Instructions Manual for PB-460 (S581B)
20
This manual suits for next models
6
Table of contents
Other MetalMaster Industrial Equipment manuals

MetalMaster
MetalMaster SJM-2.5 User manual

MetalMaster
MetalMaster Fasfold PB-40A User manual

MetalMaster
MetalMaster PB-440T User manual

MetalMaster
MetalMaster SJ-24D User manual

MetalMaster
MetalMaster SJM-1.2 User manual

MetalMaster
MetalMaster PB-CL Series User manual

MetalMaster
MetalMaster PB-440A/T User manual

MetalMaster
MetalMaster PB-422L User manual

MetalMaster
MetalMaster PB-110B User manual


