METER AQUALAB TDL User manual

AQUALAB© TDL

i
TABLE OF CONTENTS
1. Introduction..............................................................................................1
2. Operation ...................................................................................................2
2.1 Installation ................................................................................................2
2.2 Sample Preparation ...................................................................................3
2.2.1 Sample Composition........................................................................4
2.2.2 Sample Temperature........................................................................5
2.3 Taking a Reading ........................................................................................6
2.4 Viewing Data ..............................................................................................8
2.5 Setting Up Isotherm-Determined Moisture Content ..................................9
2.6 Performing a Linear Offset .......................................................................15
3. System.......................................................................................................18
3.1 Specifications..........................................................................................18
3.2 Components.............................................................................................19
3.2.1 Cords and Cables ...........................................................................20
3.2.2 Sample Chamber............................................................................20
3.2.3 Buttons ..........................................................................................21
3.2.4 Display Screen ...............................................................................22
3.3 Theory......................................................................................................32
3.3.1 Water Activity ................................................................................32
3.3.2 Water Potential ..............................................................................35
3.3.3 Moisture Content ...........................................................................35
3.3.4 Sorption Isotherms ........................................................................35
18286-02
7.19.2021

ii
4. Service.......................................................................................................37
4.1 Verification and Calibration ...................................................................37
4.1.1 Water Activity Verification .............................................................37
4.1.2 Linear Offset ..................................................................................39
4.1.3 Multipoint Calibration....................................................................41
4.1.4 Restore Factory Defaults ...............................................................44
4.2 Cleaning...................................................................................................45
4.2.1 Cleaning Kit....................................................................................46
4.2.2 Cleaning Procedure........................................................................47
4.3 Maintenance Packages ............................................................................48
4.4 Repair ......................................................................................................48
4.5 Troubleshooting .......................................................................................49
4.6 Customer Support....................................................................................51
4.7 Terms and Conditions...............................................................................52
Reference.......................................................................................................53
Index .................................................................................................................54

1
1. INTRODUCTION
Thank you for choosing the AQUALAB®TDL Water Activity Meter from METER Group, Inc. USA.
AQUALAB is the most accurate and most reliable instrument available for measuring water
activity (aw ).
This manual includes instructions for the AQUALAB TDL and AQUALAB TDL 2. For simplicity,
both will be referred to as "AQUALAB TDL" and all instructions in this manual apply to both
instruments: setting up the instrument, verifying its calibration, preparing samples, and
taking readings as well as instructions on proper care, maintenance, and cleaning. Contact
Customer Support with any questions about your TDL.
Verify all of the listed instrument contents shipped and appear in good condition:
• AQUALAB TDL Water Activity Meter
• Calibration certificate
• Power cord
• USB A to B cable
• 250 disposable sample cups
• AQUALAB Cleaning Kit
• Two vials each of the following verification standards solutions:
1.00 awPure Steam Distilled H2O
0.984 aw0.50 mol/kg KCl
0.920 aw2.33 mol/kg NaCl
0.760 aw6.00 mol/kg NaCl
0.500 aw8.57 mol/kg LiCl
0.250 aw13.41 mol/kg LiCl

2
OPERATION
2. OPERATION
Please read all instructions before operating the AQUALAB TDL to ensure the instrument
performs to its full potential. Please contact Customer Support at any time for assistance
with installation and setup.
Please observe the following considerations carefully.
• Only allow personnel qualified by METER to carry out service work on the electrical
components.
A Certificate of Calibration will be issued upon completion of the work.
• Never remove the housing of the instrument. There are no parts inside the housing that can
be serviced or replaced by the user.
WARNING: There is a risk of damaging the instrument or of causing serious injury if the live components are touched.
• Only operate this instrument with a main power voltage specified for it (100 to 240 V AC at
50–60 Hz).
• An incorrect main power voltage can damage the instrument.
• Plug the instrument into a grounded outlet or power strip.
• Only use the fuse type and rating specified for this instrument (Section3.1).
If the instrument is used in a manner not specified by the manufacturer, the protection
provided by the equipment may be impaired.
PRECAUTIONS
METER instruments are built to the highest standards, but misuse or neglect may damage
the device and possibly void the manufacturer’s warranty. Before using the AQUALAB TDL,
follow the recommended user instructions and arrange proper protections to safeguard the
instrument from damage.
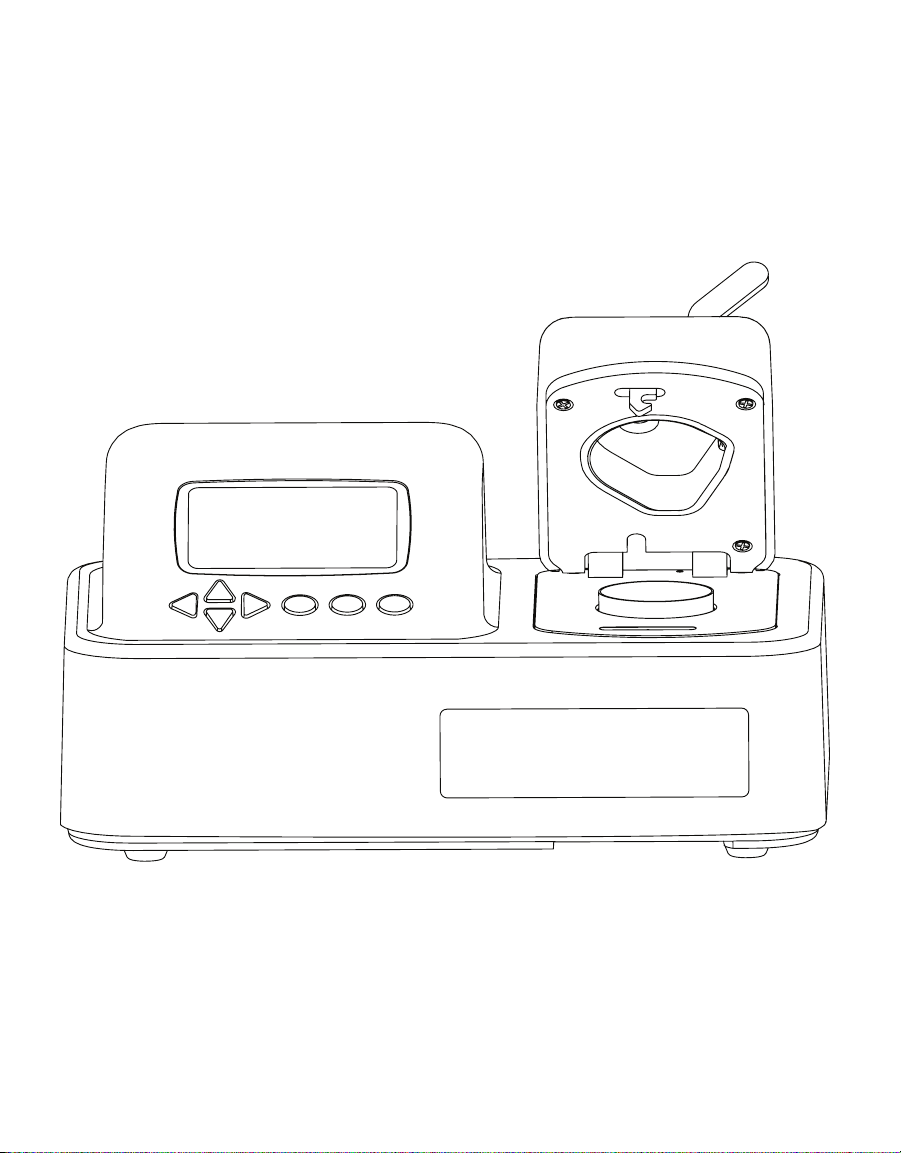
2.1 INSTALLATION
Follow the steps listed in Table 1 to set up the AQUALAB TDL.
Table 1 Installation
Preparation
Select Clean, Level Location
Preserve cleanliness to prevent contamination of the sample chamber.
Maintain a level surface to reduce the chance of spilling sample material and
contaminating the sample chamber.
Select a location where the temperature remains fairly stable to avoid
temperature changes that can affect accuracy (away from air conditioner and
heater vents, open windows, etc.)
NOTE: Always ensure the sample chamber is empty prior to moving the instrument.

3
AQUALAB TDL/TDL 2
Table 1 Installation (continued)
Installation
Plug In Instrument
Plug the power cord into the back of the unit and an outlet.
Only use the supplied power cord or one rated for AQUALAB TDL and certified
for the country of use. The cord must be a minimum of 18 AWG and have a
rating for 10 A or greater.
WARNING: An incorrect main power voltage can damage the instrument.
Turn the Unit ON
Use the power switch on the back of the instrument to turn it on (Section3.2).
Allow the AQUALAB TDL a 15-min warm-up period to ensure the most accurate
readings.
Select the User Profile (Optional)
If user profiles are set up, the User screen appears first (Section3.2.4).
Use UP and DOWN to select the appropriate user profile.
2.2 SAMPLE PREPARATION
Proper sample preparation is important to keep the AQUALAB TDL clean and achieve
repeatable results. A contaminated sample chamber can lead to unusually long read times
and water activity readings that drift over time.
Carefully prepare and load samples to lengthen time between cleanings and help avoid
downtime. Be consistent in sample preparation methods (e.g., crush, grind, slice the sample)
to obtain reproducible results. For more information on proper sample preparation for
different sample types, visit Six AQUALAB sample preparation best practices (metergroup.
com/food/articles/six-sample-preparation-best-practices).
More specific considerations regarding sample composition and sample temperature are
discussed in Section2.2.1 and Section2.2.2, respectively.
Follow the steps listed below to prepare samples:
1. Make sure the sample to be measured is homogeneous.
Multicomponent samples (e.g., muffins with raisins) or samples that have outside
coatings (like deep-fried, breaded foods) can be measured, but they need to have
representative portions in the cup and may take longer than other sample types
toequilibrate.
2. Place the sample in a disposable sample cup.
a. Completely cover the bottom of the cup, if possible, to provide enough sample to get
an accurate reading.
The AQUALAB TDL is able to accurately measure a sample that does not (or cannot)
cover the bottom of the cup. For example, raisins only need to be placed in the cup
and do not need to be flattened to cover the bottom.

4
OPERATION
A larger sample surface area increases instrument efficiency by providing more
stable infrared sample temperatures. It also speeds up the reading by shortening
the time needed to reach vapor equilibrium.
b. Do not fill the sample cup more than half full.
Overfilled cups can contaminate the chamber and do not make the readings faster
or more accurate.
3. Wipe any excess sample material from the rim and outside of the sample cup with a
clean KIMWIPES®tissue prior to loading the sample into the instrument.
Material left on the rim or the outside of the cup can contaminate the chamber and can
be transferred to subsequent samples.
4. If a sample cannot be measured immediately, put the disposable sample cup lid on the
cup to restrict water transfer.
If waiting more than 20 min to measure the sample, seal the cup with Parafilm®wax or a
similar material. Properly sealed samples can be measured up to 4 h aftersampling.
2.2.1 SAMPLE COMPOSITION
The nature of some samples results in longer reading times. These materials may need
additional preparation to ensure accurate readings. Contact Customer Support for questions
on sample composition.
Use the following steps to determine if further sample preparation is necessary:
1. Take several readings of the sample to see if the readings (awand time) stabilize
(Section2.3).
2. If the readings take less than 6 min to stabilize, the sample can be handled normally.
If the readings take longer than 6 min, remove the sample and take a reading of a
verification standard (Section4.1.1).
3. If the verification standard takes less than 6 min to test, the sample itself is causing the
long read time. Refer to the following sections for pertinent sampling considerations.
If the verification standard also takes longer than 6 min to test, the chamber may be
dirty and will need to be cleaned (Section4.2). Retest the sample after cleaning and
verifying the instrument.
2.2.1.1 COATED AND DRIED SAMPLES
Samples with high sugar or fat coatings often require multiple readings because they
equilibrate very slowly with the sample chamber.
Crush or slice the sample before sampling to reduce the time needed to take a water
activity reading for coated or dried samples. This increases the surface area of the sample,
thus decreasing reading times. However, modifying some samples may alter their water
activityreadings.

5
AQUALAB TDL/TDL 2
For example, a candy may have a soft chocolate center and a hard outer coating. The water
activity reading for the center and the outer coating are different, so one would need to
evaluate which part of the sample needed to be measured before crushing it. When the
candy is crushed, the water activity represents the average water activity of the entire
sample; leaving the candy whole gives a reading for the coating, which may act as a barrier to
the center.
To reduce test time when testing whole samples, see Section3.2.4.2 for Low-Emitting mode.
2.2.1.2 LOW WATEREMITTING SAMPLES
Some extremely dry, dehydrated, highly viscous, water-in-oil emulsions (e.g., butter), high fat,
or glassy compositions may require multiple readings because of their slow water-emitting
properties.The slow emission of water can be interpreted to mean that the head space is in
equilibrium with the sample and cause the instrument to exit the reading prematurely.
The most effective way to test these types of samples is to run them in the AQUALAB TDL
using Continuous or Custom mode and wait for the water activity readings to stabilize.
For faster reading, it is important to have the relative humidity of the chamber at or below
the water activity of these types of samples. This causes the sample to release water to the
vapor phase and equilibrate with the chamber. If the relative humidity of the headspace is
greater than the water activity of the sample, the sample will require a long period of time to
reach equilibrium.
To reduce test time when testing low water-emitting samples, see Section3.2.4.2 to set
Low-Emitting mode.
2.2.2 SAMPLE TEMPERATURE
The ambient temperature of the AQUALAB TDL should be between 4 and 50 °C. The AQUALAB
TDL has temperature control capabilities that enable it to read samples at temperatures
different from ambient temperature but no higher than 50 °C and no lower than 15 °C.
Samples that are more than ±4 °C than the instrument chamber temperature need to
equilibrate to the instrument temperature before taking a reading, ideally within 1 or 2 °C of
the chamber temperature. Rapid changes in temperature over short periods of time cause
the water activity readings to rise or fall until the temperature stabilizes. Proceed with
normal measurements when the temperature stabilizes within an optimal 1 or 2 °C of the
chamber temperature.
High water activity samples that are warmer than the chamber temperature can cause
condensation inside the measuring chamber, which adversely affects subsequent readings.
A warning message appears if the sample temperature is more than 4 °C above chamber
temperature (Figure1).

6
OPERATION
Figure1 Sample is too hot! message
If this error message appears,
1. Remove the sample from the instrument.
2. Place a lid on the cup.
3. Allow the sample to cool to within 4 °C of the instrument before measuring.
To check the differences in temperature between the sample and the chamber prior to
beginning a reading, set the sample in the chamber, close the lid without latching it, and
press the RIGHT or LEFT button. Figure2 provides an example of this screen.
Figure2 Temperature difference between sample and sample chamber
2.3 TAKING A READING
The AQUALAB TDL provides readings in 5 min or less. Readings are reliable, providing
±0.005 awaccuracy.
CAUTIONS
• Never leave a sample in the AQUALAB TDL after a reading has been taken. The sample may
spill and contaminate the instrument chamber if the instrument is accidentally moved
orjolted.
• Never move the instrument after a sample has been loaded. Movement may cause the
sample material to spill and contaminate the sample chamber.
• Do not measure a sample that differs by more than 4 °C than the AQUALABTDL chamber
(Section2.2.2).

7
AQUALAB TDL/TDL 2
Perform the following steps to take a reading.
1. Ensure the AQUALAB TDL is plugged in and turned on.
The splash screen will appear, followed by the main Measurement tab (Section3.2.4.1).
2. Open the sample chamber by moving the lever to the OPEN position.
3. Verify cleanliness (Section4.2), calibration (Section4.1), and sample preparation
(Section2.2).
4. Check the top lip and outside surfaces of the sample cup to ensure they are free from
sample residue and confirm the sample cup is not overfilled.
NOTE: Overfilling the sample cup may contaminate the chamber sensors.
The sample cup lid must be removed for correct functionality.
5. Place the prepared sample cup in the chamber.
6. Close the chamber lid.
7. Move the lever to the READ position to seal the chamber. The reading will automatically
start.
In 1 to 2 min, the first measurement will display on the screen (this is an intermediate
reading). Length of read times may vary depending on temperature differences between
the chamber and the sample as well as on other properties of the sample (Section2.2).
The default AQUALAB TDL reading cycle continues until the rates of change of three
consecutive intermediate readings are <0.0005 awof each other.
When the instrument has finished its read cycle, results will display, including water
activity and read time. The SAVE icon replaces the spinning measurement icon, and, if
enabled, a series of beeps sounds (Figure3).
NOTE: Autosave only saves the moisture content value of the model selected at the end of the reading. Overwrite
the autosave by selecting the correct model using the UP and DOWN buttons and selecting SAVE.
Figure3 Completed test results with both water activity and moisture content
8. Autosave (default setting) retains the data without any annotation (Section3.2.4.2).
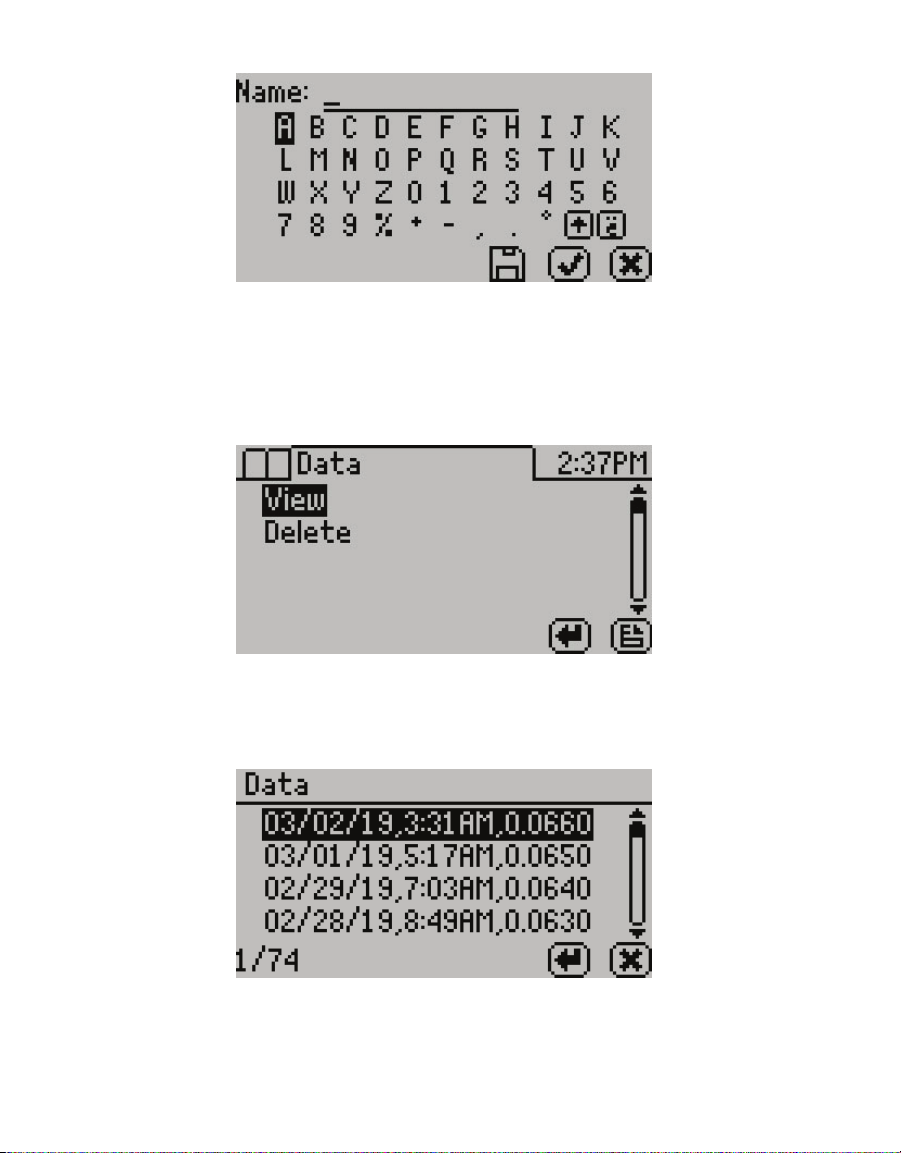
To add an annotation, select SAVE, add desired letters, and select SAVE again (Figure4).
8
OPERATION
Figure4 Keyboard screen to annotate data results
2.4 VIEWING DATA
To view prior test results, use the following steps:
1. Press MENU to navigate to the Data tab (Figure5).
Figure5 Data tab
2. Select ENTER.
3. Scroll through the list of saved tests using UP and DOWN (to move one item at a time) or
RIGHT and LEFT (to move a page at a time) (Figure6).
Figure6 List of saved tests
4. Select ENTER.
The detailed test results screen will appear (Figure7). Tests can also be scrolled through
using the arrow buttons on this detailed screen.

9
AQUALAB TDL/TDL 2
Figure7 Detailed test results screen
5. Select OK to return to the list of tests.
6. Select CANCEL to return to the Data tab.
2.5 SETTING UP ISOTHERMDETERMINED MOISTURE CONTENT
The relationship between water activity and moisture content is called the moisture sorption
isotherm. This relationship is specific to the product type and can be modeled to allow
water activity measurements to be converted to moisture content. This method provides
unmatched precision when compared to traditional moisture measurement methods. All
AQUALAB water activity meters can be connected to the cloud-based SKALA platform to
unlock this functionality.
An active subscription to SKALA includes access to the METER library of existing isotherm
models, allows users to manage all quality data, and enables users to perform advanced
analytics. SKALA is compliant with CFR21 Part11 and audit ready. For more information,
visit metergroup.com/food/skala-system or contact Customer Support.
The AQUALAB TDL calculates moisture content values based on water activity readings
using a method known as isotherm-determined moisture content. Isotherm-determined
moisture content relies on models stored in the SKALA isotherm library or on a custom
isotherm model provided by METER Food Lab.
Because there is no standard for dryness, moisture content results vary between reference
methods. These differences are typically linear, and offsetting the model to correlate with
the preferred reference method is straightforward. METER recommends offsetting the model
to a primary reference method (Section2.5).
Once a moisture model is loaded on the AQUALAB TDL, it will return a moisture content
reading. Until a linear offset has been performed, this moisture content value should not be
considered precise and should be discarded (Section2.5). This reading is not a reference
value that can be used to offset the model.
To assign a model to a product, follow these steps:
1. Open skalacontrol.com.

10
OPERATION
2. Select Products from the SKALA Main menu to open the Product groups page (Figure8).
Figure8 SKALA Main Menu
3. Select the product group that contains the product to be added as a model (Figure9).
Figure9 Select product
4. Select the product.
5. Click the edit icon on the product row (Figure9).
The Edit Product screen should appear (Figure10).


12
OPERATION
Figure11 Add Model
A dropdown will appear with two options:
a. Predefined model from the SKALA isotherm library.
To set up the predefined model, follow step8.
b. Custom model using data on the Custom Isotherm Model Coefficients sheet
received from the METER Food Lab.
To set up a custom model, follow step9.
8. METER has created dozens of isotherms and compiled them into the SKALA isotherm
library. Contact Customer Support with questions about the preset isotherm models.
a. In the dropdown box below the Moisture Content Model heading, select the
Predefined model option (Figure12).

13
AQUALAB TDL/TDL 2
Figure12 Predefined model
b. Under Market group, select the general classification for the type of model
(Figure13).
The first time the Product is edited, the list of Market groups will be quite long. A
maximum of two market groups can be selected and a dialog will appear to confirm
the selections. In future sessions, the Market group dropdown will only show the
two groups selected in the initial product setup.
NOTE: Once Market groups are selected,they cannot be changed without contacting Customer Support.
Figure13 Market group
c. Under Product name, select the product category that most closely matches the
product being measured (Figure14).

14
OPERATION
Figure14 Product category
d. Click the Save button.
This will save the model associated with the product and close the Edit Product
window, returning to the Product groups page.
e. Before taking moisture content readings, perform a linear offset (Section2.6).
9. To set up a custom model, the Custom Isotherm Model Coefficients sheet must be
received from METER Food Lab. The information on the sheet will be added manually
into SKALA. Contact Customer Support if the sheet was not received.
a. In the dropdown box below the Moisture Content Model heading, select the Custom
model option (Figure15).
There are several isotherm model types. The Custom Isotherm Model Coefficients
sheet will identify which type to use.
Figure15 Custom model selection
b. Click the radio button beside the model type identified on the Custom Isotherm
Model Coefficients sheet (Figure16).
NOTE: The DLP (double log polynomial) method is the most frequently used method.

15
AQUALAB TDL/TDL 2
Figure16 Custom model type and coefficients
c. Fill in the data fields by matching each field with the values on the Custom Isotherm
Model Coefficients sheet.
NOTE: It is extremely important that the radio button remains activated or entered data will be lost.
d. Click the Save button.
e. This will save the model associated with the product and close the Edit Product
window, returning to the Product groups page.
f. Before taking moisture content readings, perform a linear offset (Section2.6).
2.6 PERFORMING A LINEAR OFFSET
A linear offset must be performed every time a new model is implemented. In addition, the
linear offset should be adjusted if moisture content values calculated by the AQUALAB TDL
are consistently higher or lower than reference method values over several samples.
To perform a linear offset, select a reference moisture content method to use. Acceptable
moisture content reference methods include ROS 1, loss-on-drying, and Karl Fischer
titration. Secondary methods have increased margins of error, which will in turn increase
the error in AQUALABTDL moisture content measurements. If desired, an offset can be set
to a secondary method (e.g., fast moisture analyzer, microwave analyzer, or NIR) to
compare results with a previously used method.
To perform the linear offset, follow these steps:
1. Ensure the instrument is verified (Section4.1).
2. Collect a large sample of the product for analysis.
3. Divide the large sample into three subsamples, ensuring that each is representative of
the larger sample.
4. Place one subsample into a sample cup.
5. Read the water activity using the AQUALAB TDL (Section2.5) and make a note of the
water activity value.

16
OPERATION
This will be used in step13.
NOTE: The moisture content value has not yet been properly offset and should be ignored.
6. Use the reference method to determine the average moisture content of the other
twosubsamples.
This average is the reference moisture content value. This will be used in step14.
7. Open skalacontrol.com.
NOTE: Linear offsets must be performed on a product-by-product basis in the SKALA Control desktop
application.This functionality does not appear in the SKALA Mobile app.
Figure17 SKALA Main Menu
8. Select Products from the SKALA Main menu.
9. Select the Product group containing the product to be offset (Figure18).
Figure18 Product group
10. Click the edit icon next to the product to be offset (Figure18).
11. Make sure the model has been selected or set as instructed in (Section2.5).
12. In the Moisture Content Model portion of the Edit Product screen, scroll down to the
Linear offset section (Figure19).
Other manuals for AQUALAB TDL
2
Table of contents
Other METER Laboratory Equipment manuals

Popular Laboratory Equipment manuals by other brands


Thermo
Thermo Forma 3911 Operating and maintenance manual

Sakura Seiki
Sakura Seiki Cyto-Tek 2500 operating manual

ThermoFisher Scientific
ThermoFisher Scientific TX-150 instruction manual

Kubota
Kubota 2420 Nstruction and service manual

Opti-Med
Opti-Med JM032-HA Series user manual

Steinberg Systems
Steinberg Systems SBS-MR-2000 user manual

RotaChrom
RotaChrom rCPC Operation manual

TeleDart
TeleDart RD206 quick start guide

Powerfiller
Powerfiller Powermax 3+ user manual

Thermo Scientific
Thermo Scientific Nunc Cell Factory CF1 Instructions for use

Ameson
Ameson MINI AIR PRO user manual

Applied Photophysics
Applied Photophysics Chirascan Integrating Sphere user manual