METER AQUALAB 3 User manual

AQUALAB 3

i
TABLE OF CONTENTS
1. Introduction.............................................................................................. 1
2. Operation ...................................................................................................3
2.1 System Network Requirements .................................................................3
2.1.1 Connection Options .........................................................................5
2.1.2 NEXUS Static IP Address..................................................................5
2.1.3 Using a METER Data Logger .............................................................6
2.2 AQUALAB 3 First Time Setup ......................................................................6
2.2.1 Connect AQUALAB3 and NEXUS ......................................................7
2.2.2 Connect iPad and Download SKALA Mobile App ..............................8
2.2.3 Register New Company Site............................................................. 9
2.2.4 Connect First NEXUS ..................................................................... 13
2.2.5 Enter SKALA Mobile First Time ...................................................... 15
2.2.6 Create First Product....................................................................... 16
2.3 Enter Existing Company Site.................................................................... 19
2.3.1 Add Additional iPads to Existing System ....................................... 20
2.3.2 Add Additional NEXUSES ............................................................... 21
2.3.3 Add Additional Water Activity Products ......................................... 23
2.3.4 Select Market Groups (Subscription Required).............................. 28
2.3.5 Add First Total Moisture Product (Subscription Required)............. 31
2.4 Add a Batch.............................................................................................. 35
2.5 Take a Reading ......................................................................................... 38
2.5.1 Water Activity Reading................................................................... 39
2.5.2 Total Moisture Reading .................................................................. 46
2.5.3 One-Minute Water Activity Reading Mode ..................................... 54
2.5.4 Setting Up Isotherm-Determined Moisture Content ...................... 54
2.5.5 Performing a Linear Offset............................................................. 60
18395-05
8.11.2021

ii
3. System....................................................................................................... 63
3.1 Specifications.......................................................................................... 63
3.2 Components ............................................................................................ 65
3.2.1 Sensor Block.................................................................................. 65
3.2.2 Sample Drawer .............................................................................. 66
3.2.3 Drawer Knob Indicator Lights......................................................... 67
3.2.4 NEXUS ........................................................................................... 68
3.3 Modes and Tests ...................................................................................... 69
3.3.1 One-Minute Water Activity Mode................................................... 69
3.3.2 Total Moisture................................................................................ 69
3.4 Theory...................................................................................................... 70
3.4.1 Water Content................................................................................ 70
3.4.2 Moisture Content........................................................................... 70
4. Service....................................................................................................... 74
4.1 Performance Verification......................................................................... 74
4.2 Cleaning................................................................................................... 77
4.3 Troubleshooting....................................................................................... 81
4.4 Customer Support.................................................................................... 82
4.5 Terms and Conditions .............................................................................. 83
Reference....................................................................................................... 84

1
1. INTRODUCTION
Thank you for choosing the AQUALAB®3 water activity meter from METER Group.The
AQUALAB3 uses a chilled-mirror dew point sensor and capacitive hygrometer and is controlled
and operated through the SKALA®Mobile by METER application using an Apple®iPad®device.
Verify all AQUALAB3 system components are included and appear in good condition:
• AQUALAB3 Water Activity Meter with calibrated sensor block
• AQUALAB Accessory Kit
Power cord (2.29 m, 7.5 ft)
USB A to USB B cable (1.83 m, 6 ft)
250 disposable sample cups
Cleaning kit
Standards kit
SDS booklet
• SKALA NEXUS Benchtop Unit
• SKALA NEXUS Accessory Kit
AC adapter (micro USB)
Ethernet cable (1.83 m, 6 ft)
USB A to USB A cable (1.28 m, 6 ft)
• iPad stand
• Apple iPad (optional)
NOTE: Prior models of AQUALAB3 are compatible with a SKALA Hub. If setup assistance with a SKALA Hub is needed,
please contact Customer Support.
SKALA Mobile by METER, an application available from the Apple App Store, will need to be
downloaded onto the iPad. The app is used to register a new customer site, create products
and batches, and operate the equipment. Everything that is created in SKALA Mobile is
stored in the SKALA Control cloud service.
SKALA Control is a cloud-based software program where data can be analyzed and
downloaded and where more advanced settings can be made. SKALA Control stores all
historic readings, displays readings in charts, modifies customer site settings and users,
modifies existing tests, plus much more.
Freemium version. The first time a customer site is set up, there is no charge for the use of
basic features available in the SKALA Mobile app (referred to as Freemium). In the Freemium
version, only water activity features are available.

2
AQUALAB 3
Subscriptions. Monthly SKALA Control subscriptions are needed to utilize additional
features such as total moisture readings (Section2.5.2) and one-minute reading mode
(Section2.5.3). To learn more about SKALA Control subscription plans, go to metergroup.
com/skala-upgrade or contact Customer Support.
SKALA training documents and videos can assist when learning how to use SKALA Control.
For more information on SKALA Control, please contact Customer Support.

3
OPERATION
2. OPERATION
Please read all instructions before operating the SKALA Mobile app and the
AQUALAB3 meter to ensure everything performs to its full potential.
Please observe the following considerations carefully.
• Only allow personnel who have been qualified by METER to carry out service work on the
electrical components.
• Only operate this instrument with the main power voltage specified (100 to 240 VAC at
50 to 60 Hz).
• Plug the instrument into a grounded outlet or power strip.
• Only use the fuse type and rating specified for this instrument (Section3.1).
If the instrument is used in a manner not specified by the manufacturer, the protection
provided by the equipment may be impaired.
PRECAUTIONS
METER instruments are built to the highest standards, but misuse or neglect may damage
the device and possibly void the manufacturer’s warranty. Before using the AQUALAB 3,
follow the recommended user instructions and arrange proper protections to safeguard the
instrument from damage.
2.1 SYSTEM NETWORK REQUIREMENTS
METER Group recommends the following as the network requirements for the SKALA
deployment environment (the environment where the NEXUS and Apple®iPad®mobile digital
device are installed). Implement the security controls that are appropriate for the sensitivity
of the data.
• Internet connection—standard 1 GbE network or faster.
• The devices must be able to connect to the following destinations using the same network:
skalacontrol.com—the primary endpoint for the SKALA server, hosted by METER Group.
websocket.skalacontrol.com—the functional endpoint for the websocket
communications layer.
*.zoho.com—utilized for the METER secure remote support tool.
*.skalanexus.com—connection between the iPad and the NEXUS.
• The iPad and NEXUS devices must be able to communicate over ports listed in Table 1.
METER typically recommends placing them on the same subnet to easily facilitate
communication. However, if the network team desires, utilizing a network address
translation (NAT) to bridge subnets is acceptable.
Table 1 lists the ports that must be available for the SKALA system to function properly.
4
AQUALAB 3
Table 1 Ports for SKALA
Port Direction Destination Usage
80 In/Out PIP/DPKG sources System and package updates
443 In/Out skalacontrol.com
websockets.skalacontrol.com
HTTPS over TLS communication,
used to retrieve and post data to the
SKALACONTROL server
443 In/Out *.zoho.com Utilized for the METER remote support tools,
enables the METER team to help and resolve
issues and outages
123 In/Out NTP provider Used for NTP timy sync
3128 In/Out PIP System and package updates
9001 In/Out *.skalanexus.com Used for secure communication between the
iPad and NEXUS devices. Communication
is made utilizing unicast via a known IP
address.
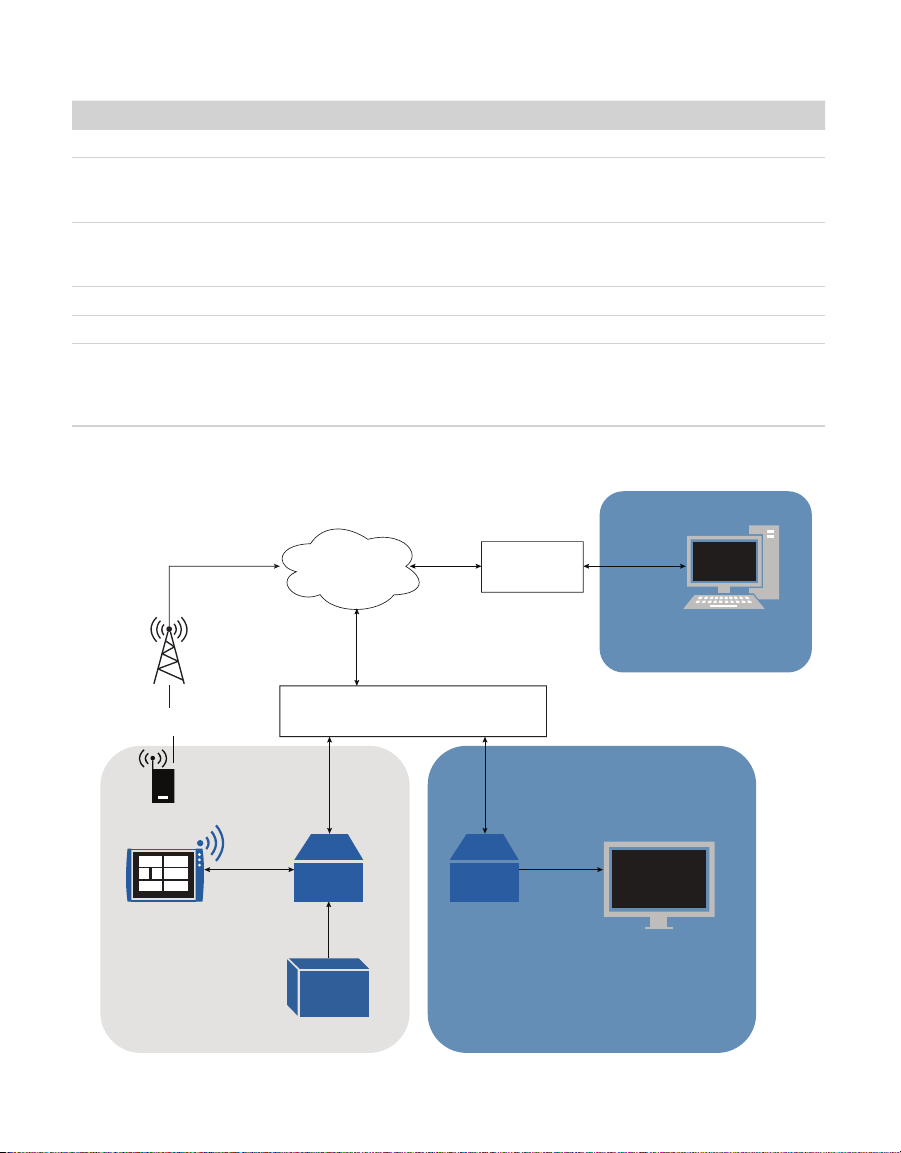
The following diagram illustrates the network connections and communications protocols.
SKALA Control
Server Firewall/Router
Firewall/Router
Access to SKALA Control
Data Access Network
Data Access NetworkData Collection Network
TLS
1.2
Port
443
TLS
1.2
Port
443
TLS
1.2
Port
443
TLS
1.2
TLS 1.2
Port 9001
Data Entry
Using iPad
ZL6 Environmental Logger
Cellular Communication
TLS 1.2
Port
443
TLS
1.2
HDMI
USB Dashboard
Display
Port
443
NEXUS NEXUS
WATER
ACTIVITY

5
OPERATION
2.1.1 CONNECTION OPTIONS
The Apple iPad and/or PC has to be able to communicate with the NEXUS via the user's
internal network. It doesn’t matter whether the different components are connected via a
Wi-Fi®connection or Ethernet cable, respectively.
AQUALAB 3
AQUALAB 3 always connects to the NEXUS via a USB A to B cable.
APPLE IPAD
The Apple iPad connects to the network via a Wi-Fi connection or via an Ethernet cable
through a lightning port-to-Ethernet adapter.
The iPad can also connect to the network via the NEXUS. To do this, please connect the iPad
to the NEXUS using the following configuration:
lightning-to-Ethernet adapter → Ethernet cable → USB-to-Ethernet adapter
NEXUS
METER recommends connecting the NEXUS to the network via an Ethernet cable.
Connecting the NEXUS to WiFi can be configured using the USB-to-USB cable (included)
and the NEXUS Utility software (available at metergroup.com/food/downloads/).
PC INSTEAD OF IPAD
The user will take readings via https://skalacontrol.io accessed from the user's PC web
browser. The PC can connect to either Wi-Fi or Ethernet for a nominal fee.
SKALA CONTROL
SKALA Control is accessible at https://skalacontrol.com/ via a web browser. METER
recommends using Google Chrome for the best possible user experience.
2.1.2 NEXUS STATIC IP ADDRESS
To allow for encrypted communication between the iPad and the NEXUS, METER registers a
subdomain pointing to the local IP address of the NEXUS. The iPad will connect to the NEXUS
via *.skalanexus.com. If the local IP address changes, it could take between 5 min and a few
hours for the DNS update to be propagated to the customer DNS server. During this time, the
iPad will not be able to communicate with the NEXUS.
To prevent the local IP address from changing, follow these recommendations:
• Use a static IP address for every NEXUS
• Refrain from switching between Wi-Fi®and Ethernet interfaces

6
AQUALAB 3
If changing the NEXUS local IP address cannot be avoided, Cloudflare®can be used to help
changes propagate quickly. Both the iPad or Windows®PC can be set to use Cloudflare as the
DNS server.
To set Cloudflare as the DNS server on an Apple iPad (iOS), use the following steps:
1. Navigate to Settings
2. Select Wi-Fi
3. Select the iicon next to the Wi-Fi network in use
4. Press Configure DNS
5. Choose Manual
6. Press Add Server
7. Add the server 1.1.1.1
8. Select Save
To set Cloudflare as the DNS server on a Windows PC (Windows 10), follow these instructions
(privateinternetaccess.com/blog/changing-your-dns-settings-on-windows-10).
2.1.3 USING A METER DATA LOGGER
METER data loggers do not require a Wi-Fi network or Ethernet. The data loggers have an
LTE cellular modem that connects directly to METER cloud services. The loggers operate
with T-Mobile® and AT&T®cellular carriers and usually find a good signal. If the location
is notorious for poor cell coverage, inform METER so other hardware solutions can be
considered.
Please review the network requirements prior to the arrival of a member of METER
Professional Services to ensure a smooth, quick, and efficient installation process.
2.2 AQUALAB 3 FIRST TIME SETUP
Place the AQUALAB3 on a clean, level surface in a location where the ambient temperature
remains relatively constant.
NOTE: The AQUALAB3 should be positioned well away from all heating and air-conditioning vents, open windows,
outside doors, refrigerator exhausts, and other sources of temperature fluctuation.
This section explains how to connect the AQUALAB3 and the NEXUS (Section2.2.1), connect
the iPad device to a local Wi-Fi®network and download the SKALA Mobile app to the iPad
device (Section2.2.2), register a new company site (Section2.2.3), connect and verify the
first NEXUS (Section2.2.4), enter SKALA Mobile the first time (Section2.2.5), and set up the
first product (Section2.2.6).

7
OPERATION
2.2.1 CONNECT AQUALAB3 AND NEXUS
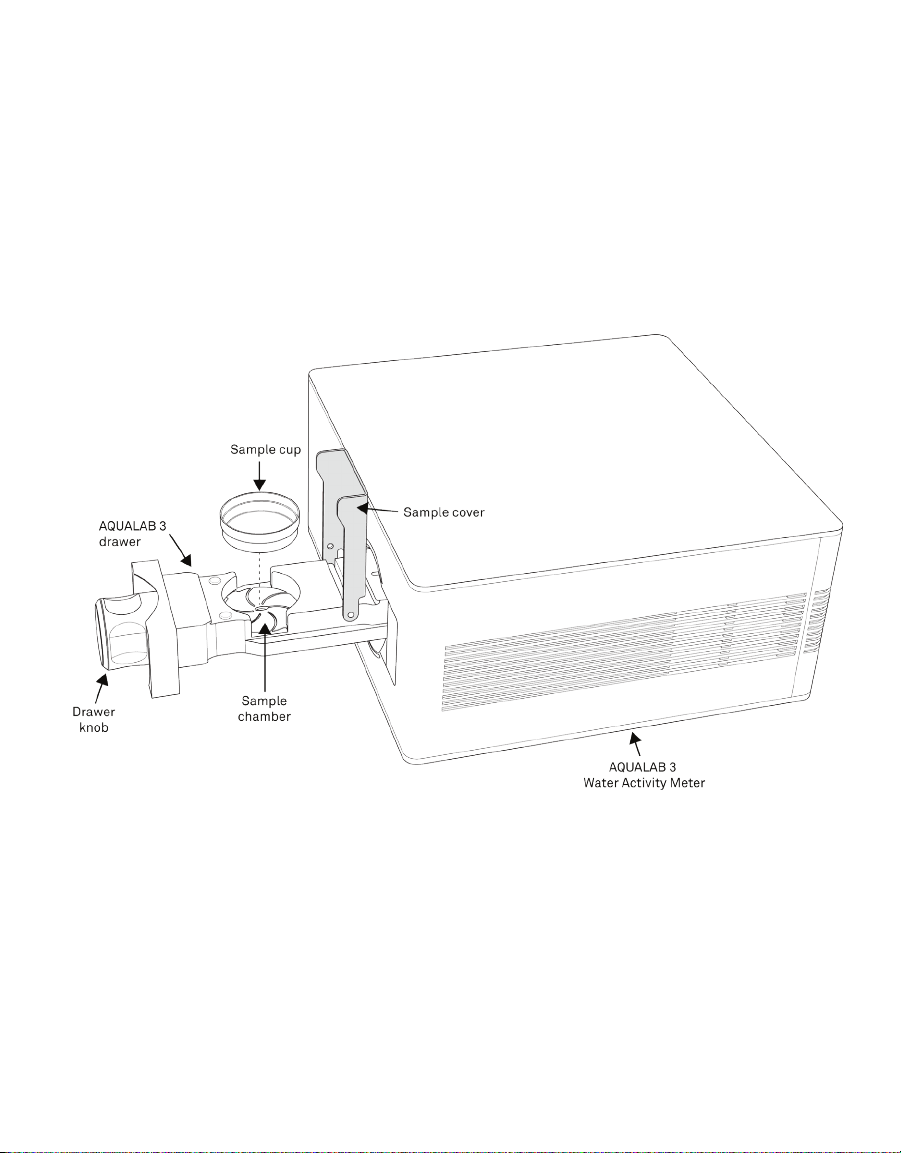
The steps below explain how to connect the AQUALAB3 and the NEXUS (Figure1).
1. Plug the AQUALAB3 power cable into the back of the AQUALAB3 and into a grounded
outlet or power strip.
2. Plug the NEXUS power cable into the micro USB port on the side of the NEXUS and into a
grounded outlet or power strip.
3. Plug the USBA connector of the USBAtoB cable into the USBA port on the NEXUS.
4. Plug the USBB connector of the USBAtoB cable into the USBB port on the AQUALAB3.
5. Plug the Ethernet cable into the NEXUS and into an Ethernet wall jack.
Figure1 AQUALAB3 system
Please see System Network Requirements for additional setup information.
8
AQUALAB 3
2.2.2 CONNECT IPAD AND DOWNLOAD SKALA MOBILE APP
The steps below explain how to connect the iPad (Figure2) to the Wi-Fi network.
1. Connect the iPad mobile digital device to a Wi-Fi network (not cellular).
ATTENTION: Both the NEXUS and iPad must be connected to the same local area or Wi-Fi network.The network
must also be able to communicate with SKALA cloud-based servers (i.e.,must have access to the internet).
2. Ensure the iPad is associated with a valid Apple ID.
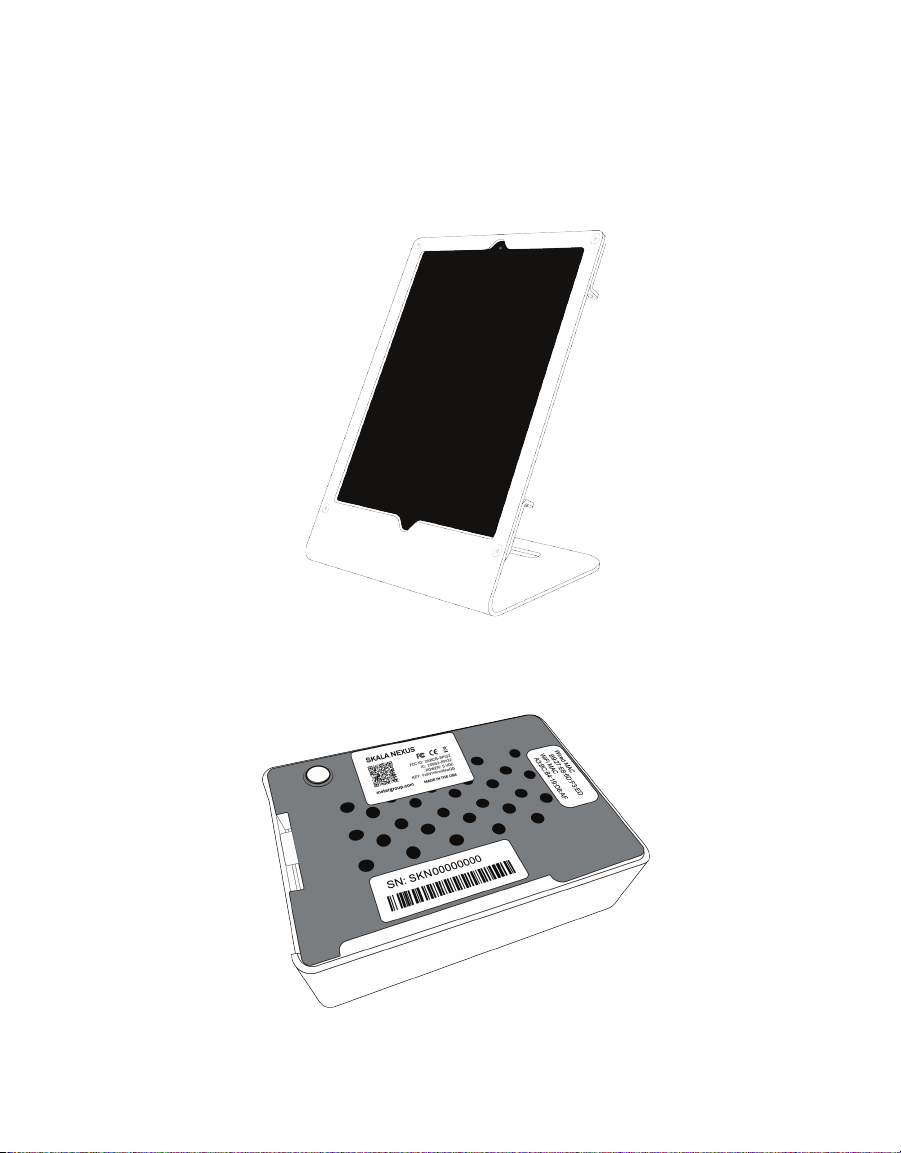
Figure2 Apple iPad with stand
3. Open the Apple App Store by scanning the QR code on the back of the NEXUS device
(Figure3).
Figure3 NEXUS back view
4. Download the SKALA Mobile by METER app (Figure4).

9
OPERATION
Figure4 SKALA Mobile by METER screen
NOTE: The application can also be found by searching in the Apple App Store for SKALA Mobile by METER.
2.2.3 REGISTER NEW COMPANY SITE
Registering a new company site using the SKALA Mobile wizard bar is a one-time step.
Figure5 shows the wizard bar that appears at the top of SKALA Mobile screens when the
wizard is active. The wizard is only available for the first setup.
Figure5 SKALA Mobile wizard bar
The new company SKALA account is created and the initial AQUALAB3 is registered
(Figure7 through Figure10).
When setting up the AQUALAB3 system for the first time, a setup wizard will take the user
through the steps of registering the new company site (Section2.2.3), connecting the first
NEXUS (Section2.2.1), and creating the first product (Section2.2.6).
NOTE: Please consult with the information technology department for help in setting an AQUALAB3 system up to
ensure that everything is set up on the same network.
The Register device screen (Figure6) will show up in the following situations.
• SKALA Mobile app is downloaded onto a new iPad on a new AQUALAB3 system being set
up for the first time.
• SKALA Mobile app is reloaded onto an iPad on an existing AQUALAB3 system
(Section2.3.1).
10
AQUALAB 3
The following steps explain how to go through the process of registering a new company site
using the wizard. For subsequent additions or changes, refer to Section. Contact Customer
Support with any questions or issues.
1. Adjust the iPad Display Auto-Lock settings to the desired length of time to keep the
SKALA Mobile active.
If the iPad goes to sleep during initial system setup, the SKALA Mobile app will close.
When the SKALA Mobil app wakes up, the screen shown in Figure24 will appear and the
user will need to log back into the app.
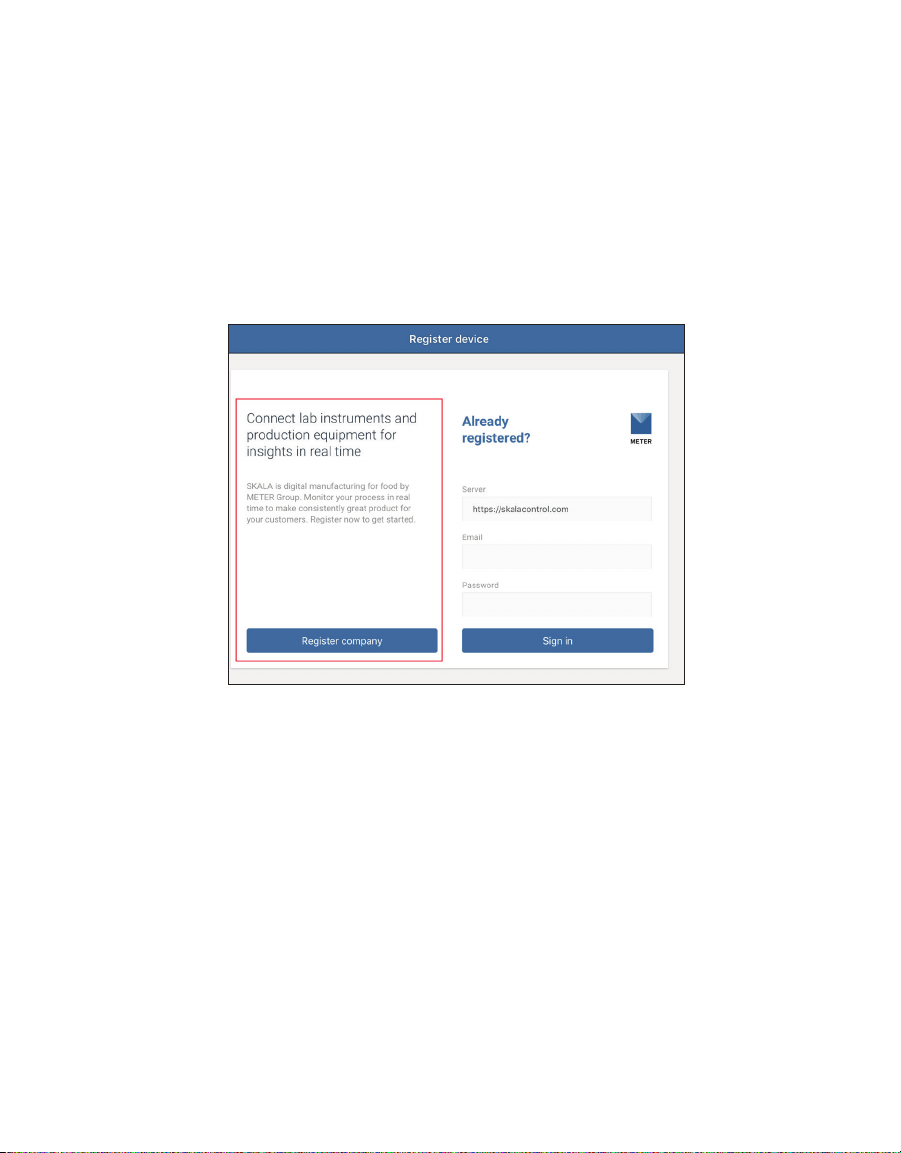
2. Open the SKALA Mobile app on the iPad to get to the Register device dialog window
(Figure6).
Figure6 Register device window
3. Select the Register company button on the left (Figure6).
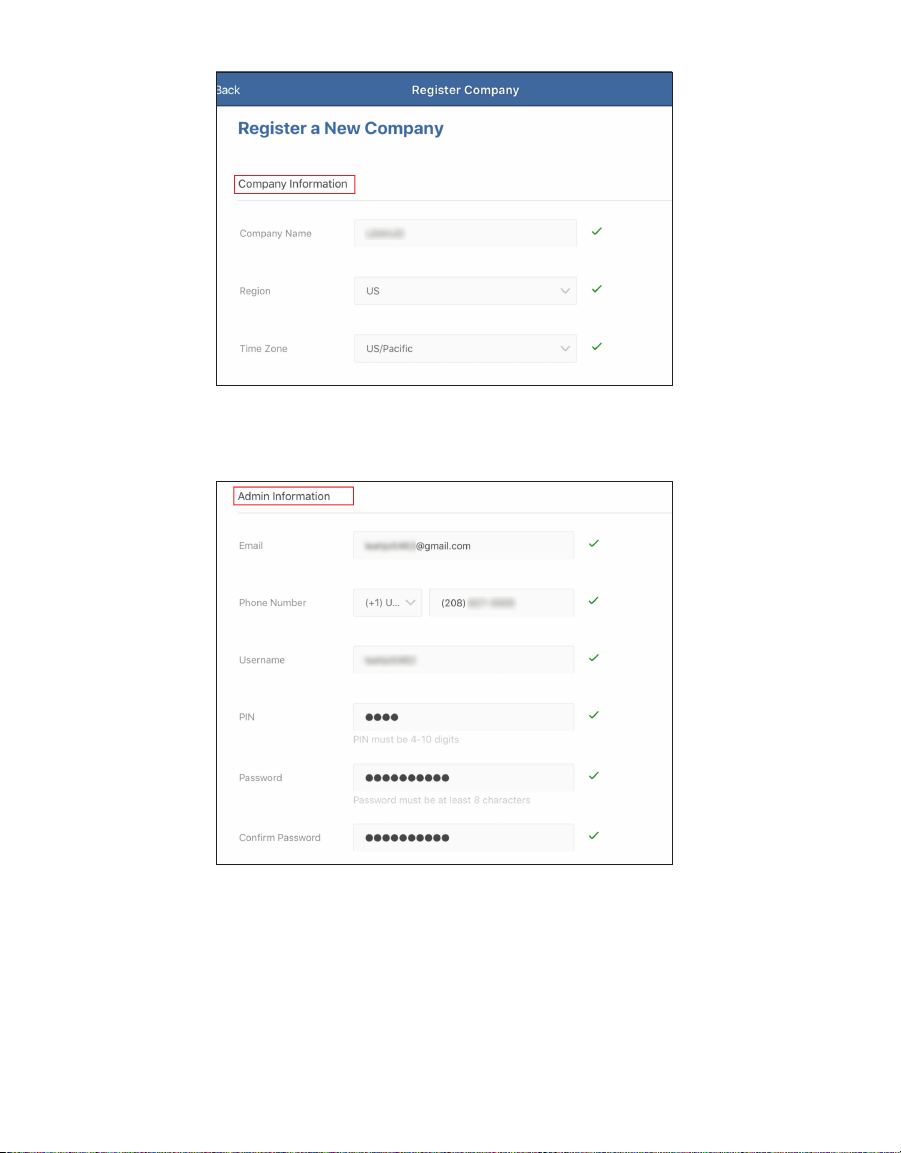
4. Enter the company information in the upper half of the Register company window
(Figure7).
11
OPERATION
Figure7 Company information section
5. Enter the administrator account information in the lower half of the Register company
window (Figure8).
Figure8 Admin information section
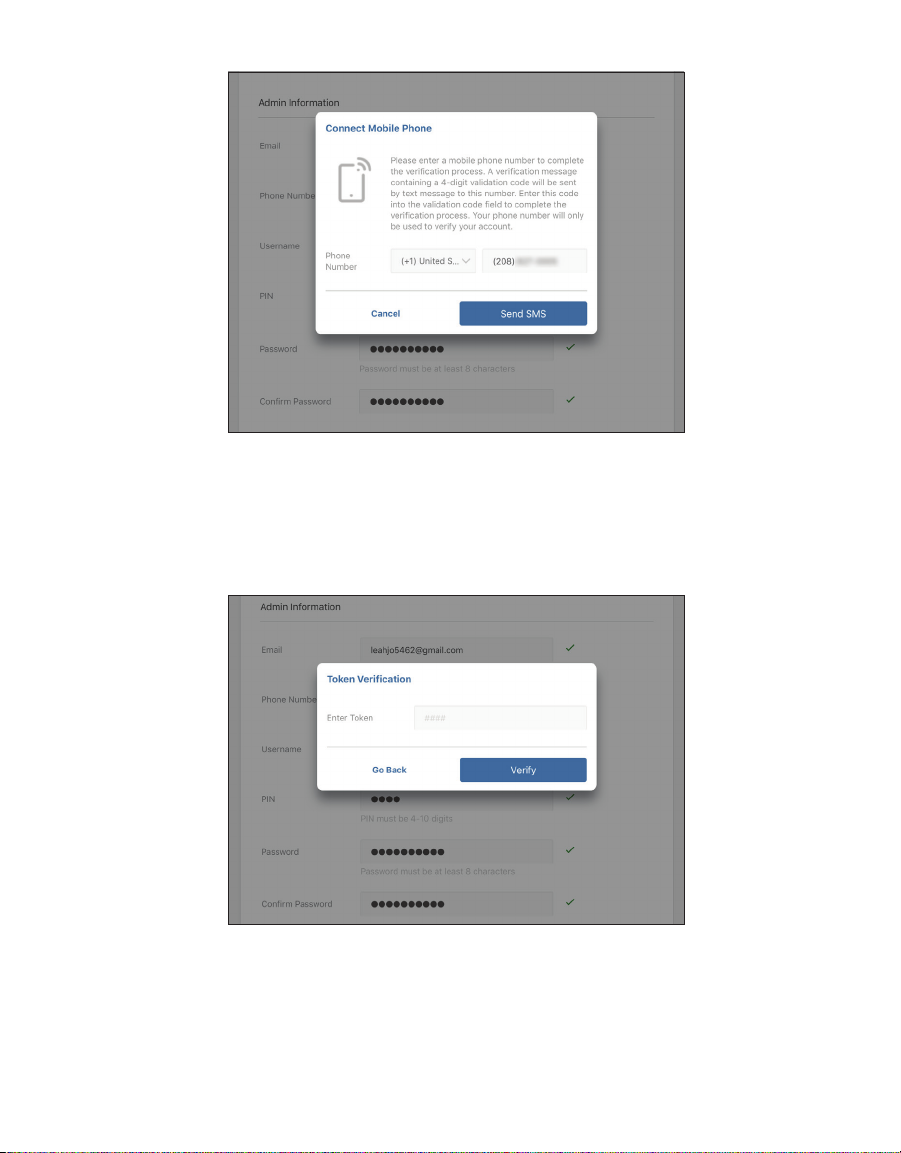
6. Enter a mobile phone number in the Connect Mobile Phone dialog window (Figure9).
7. Select the Send SMS button.
12
AQUALAB 3
Figure9 Connect Mobile Phone screen
A 4-digit code will be texted to the entered mobile phone number.
A Token Verification dialog window will appear (Figure10).
8. Enter the received Token Verification code in the Enter Token field (Figure10).
9. Select the Verify button (Figure10).
Figure10 Token Verification screen
13
OPERATION
2.2.4 CONNECT FIRST NEXUS
The wizard automatically moves from the Register new company to Connect NEXUS. The
following instructions explain how to register the first NEXUS.
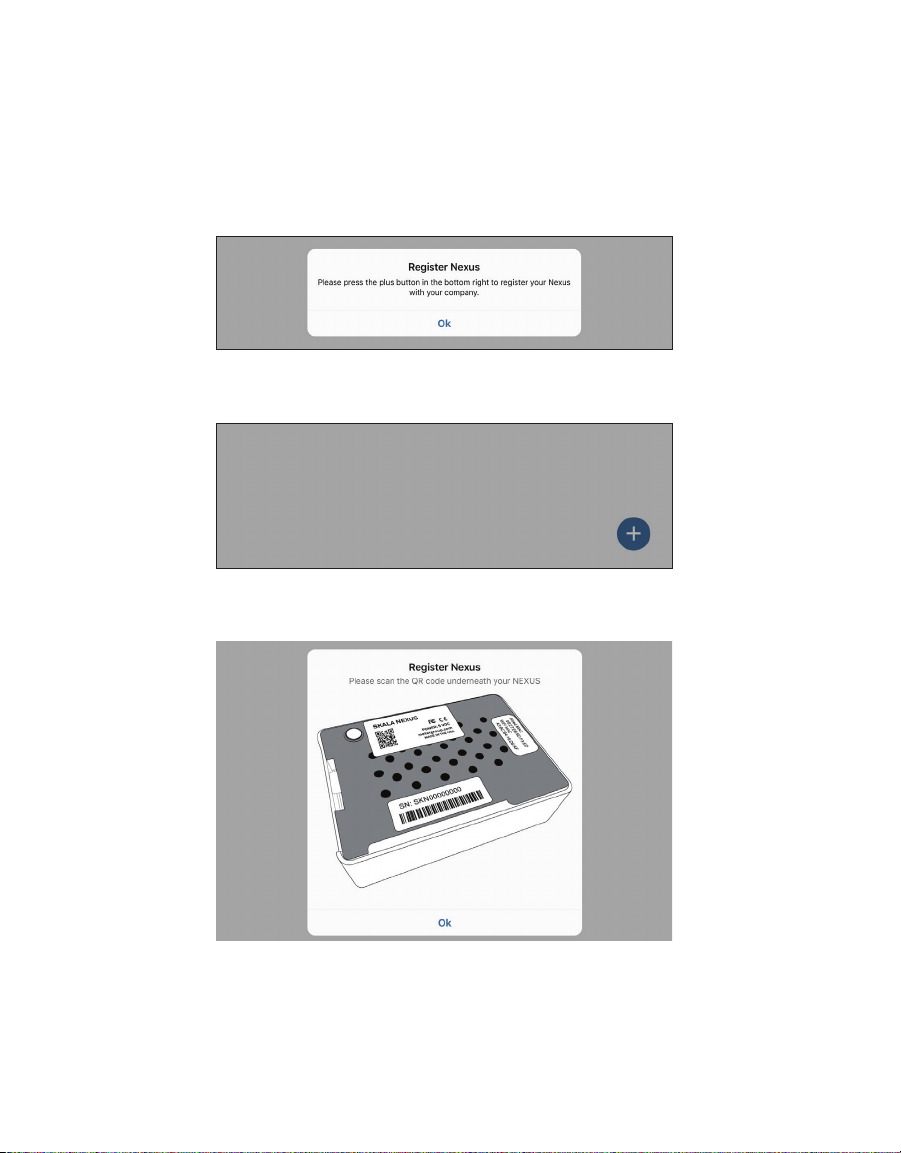
1. Select Ok in the Register NEXUS dialog window (Figure11).
This popup window automatically appears as part of the setup wizard function. If an
error message appears, contact Customer Support.
Figure11 Register NEXUS inquiry window
2. Select the plus symbol on the screen to add a NEXUS (Figure12).
Figure12 Plus symbol in blue circle
3. Select Ok in the Register NEXUS popup window (Figure13).
Figure13 Register NEXUS window
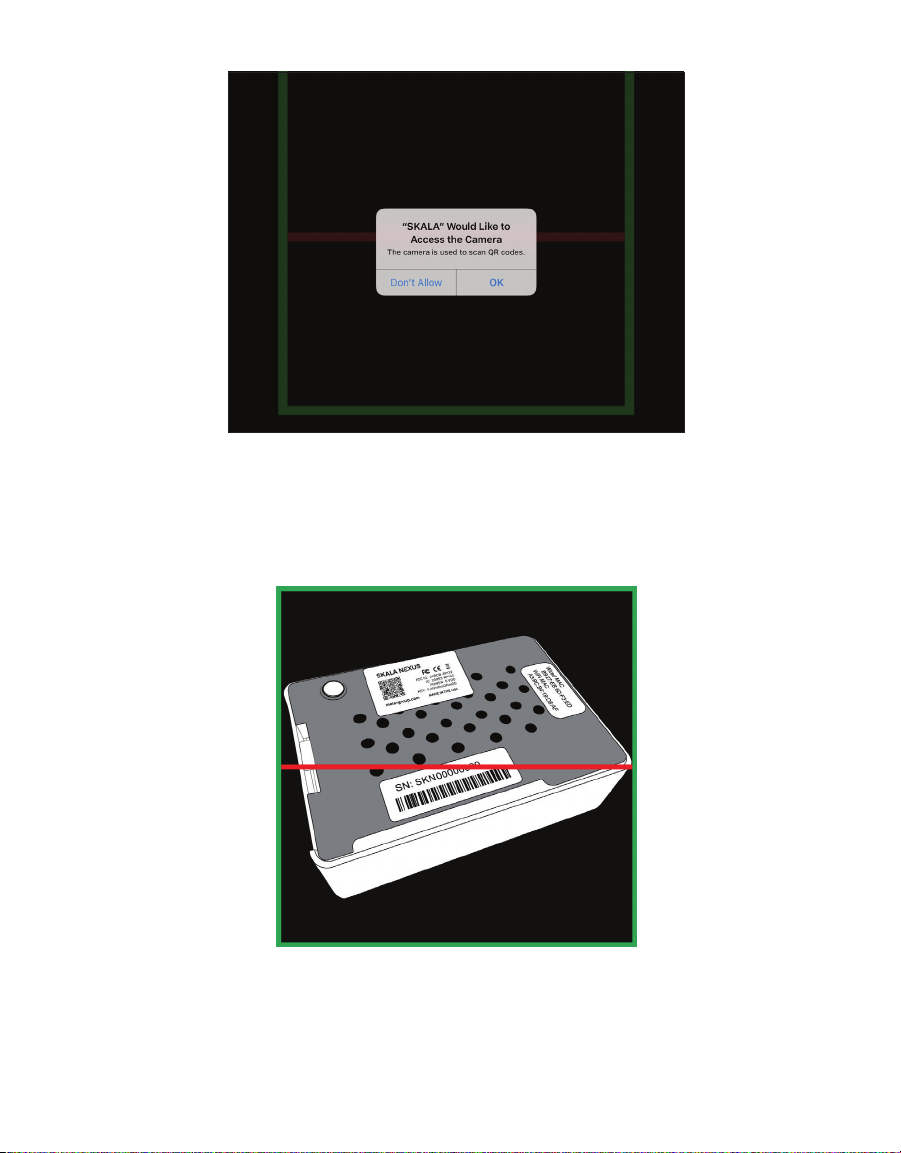
The iPad camera app will open, and a dialog will appear asking for permission to access
the camera (Figure14).
4. Select OK in the Camera app dialog window message to give SKALA access to the iPad’s
camera (Figure14).
14
AQUALAB 3
Figure14 SKALA requests access to iPad camera
5. Turn the NEXUS over to show the labels on the bottom.
6. Place the QR code in front of the camera window and inside the green box (Figure15).
When the camera recognizes the QR code, SKALA Mobile will automatically register the
QR Code.
Figure15 NEXUS in camera window
A dialog (Figure16) will appear indicating registration success!

15
OPERATION
Figure16 Registration success!
7. Select Ok.
8. Verify that the AQUALAB3 system is able to locate registered NEXUSES by opening the
NEXUS window from the SKALA Mobile app Main menu (Figure17).
Any NEXUS devices should be listed here when properly registered and online.
Figure17 NEXUSES option on Main menu
The AQUALAB3 system is now ready to add product and batch information. Please contact
Customer Support if experiencing any problems registering a NEXUS.
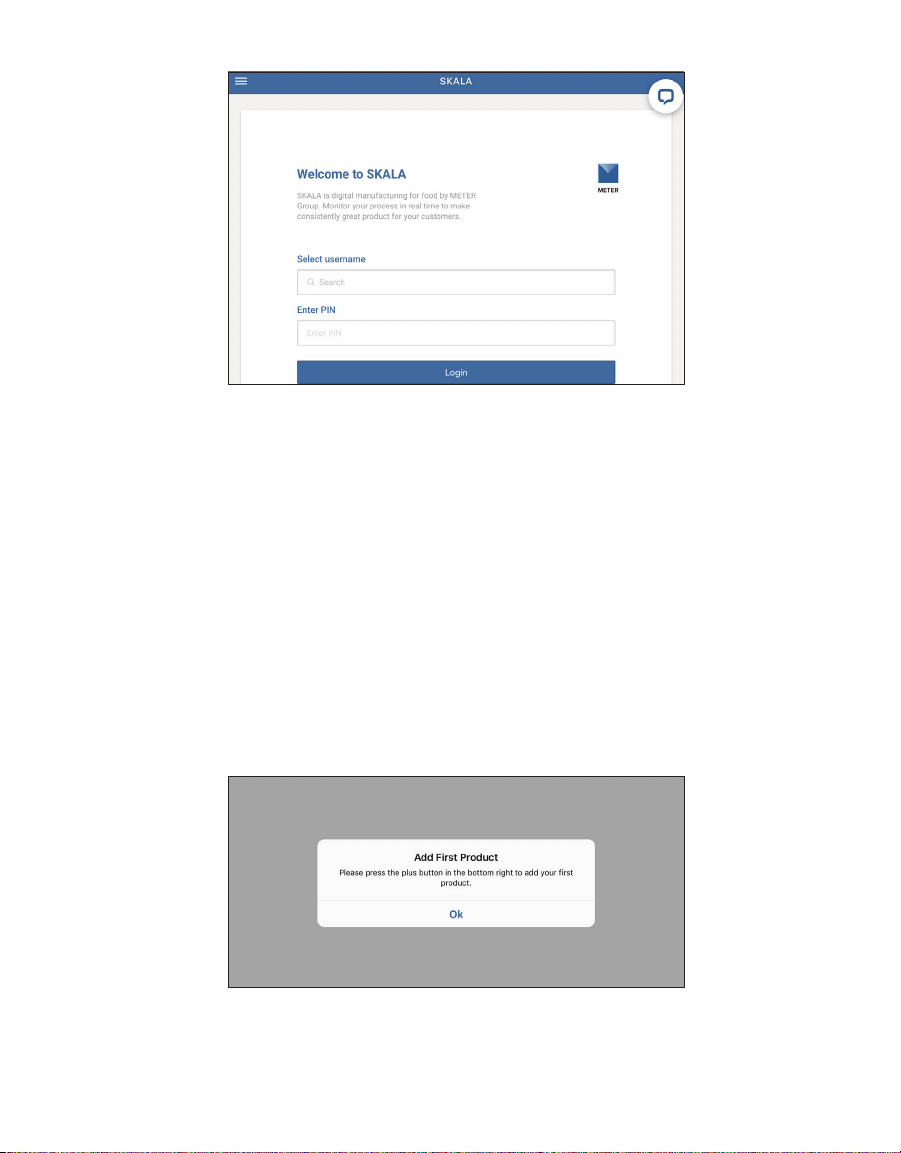
2.2.5 ENTER SKALA MOBILE FIRST TIME
To enter SKALA Mobile the first time after registering the company, re-entering SKALA Mobile
when the iPad goes to sleep, or to enter after downloading a new version of the SKALA Mobile
app, please enter the following information into the Welcome to SKALA screen (Figure18).
1. Select the dropdown menu.
2. Scroll through the list of usernames until the desired name appears.
3. Select the desired username.
4. Enter the 4-digit pin number.
5. Select the Login button to enter the SKALA Mobile app.
16
AQUALAB 3
Figure18 User login window
2.2.6 CREATE FIRST PRODUCT
Products (e.g., apple, beef jerky) must be created in the SKALA Mobile app before readings
can be run or at any time from the Products page (Section2.3.3). Products must be added
prior to adding a batch (a batch refers a grouping of the product given a batch number to
separate it from other batches of the same product).
The first product being added will only be available for use with the water activity reading
feature as it is in the freemium version of SKALA. Water activity tests are the only tests
available through the freemium version. Additional tests and features can be accessed with
a monthly subscription to a premium plan. To learn more about SKALA Control subscription
plans, go to metergroup.com/skala-upgrade or contact Customer Support.
To create the first product, use the following steps via the SKALA Mobile app wizard.
1. Select Ok to begin the process of adding the first new product (Figure19).
Figure19 Add first product prompt
2. Select the plus symbol on the Products screen to add a product (Figure20).
Other manuals for AQUALAB 3
2
Table of contents
Other METER Laboratory Equipment manuals

Popular Laboratory Equipment manuals by other brands

Heraeus
Heraeus Labofuge 300 Instructions for use

Koehler
Koehler K19404 Operation and instruction manual

HACH LANGE
HACH LANGE AMTAX inter2 Basic user manual

Endress+Hauser
Endress+Hauser Analytik Jena Biometra TRIO operating manual

HACH LANGE
HACH LANGE BUHLER 3010 Short manual

Bruker
Bruker D2 PHASER user manual


