Metos MINI ROTOR 7M User manual

BAKERY OVEN
MINI ROTOR 7M
MINI ROTOR 10M
Installation and Operation Manual
S/N: Rev.: 1.0
4570102, 4570103, 4570104, 4570105


1.7.2008 Rev. 1.0
Dear Customer,
Congratulations on deciding to choose our appliance for your kitchen activities. You
made an excellent choice. We will do our best to make you a satisfied customer like thou-
sands of customers we have around the world.
Please read this manual carefully. You will learn correct, safe and efficient working meth-
ods in order to get the best possible benefit from the appliance. The instructions and hints
in this manual will give you a quick and easy start, and you will soon note how nice it is
to use our equipment.
All rights are reserved for technical changes.
You willfind the main technical dataon the rating plate fixed to theequipment. When you
need service or technical help, please let us know the serial number shown on the rating
plate. This will make it easier to provide you with correct service.
For your convenience, space is provided below for you to record your local service con-
tact information.
Service phone number:...............................................................................................
Contact person:....................................................................................................................

1.7.2008 Rev. 1.0

1.7.2008 Rev.
1. General .......................................................................................................... 1
1.1 Symbols used in the manual .......................................................................................... 1
1.2 Symbols used on the appliance ...................................................................................... 1
1.3 Checking the relationship of the appliance and the manual .......................................... 1
2. Safety .............................................................................................................. 2
2.1 How to operate the oven safely ..................................................................................... 2
2.2 Disposal of the oven ...................................................................................................... 2
3. Functional description .................................................................................. 3
3.1 Intended use of the appliance ........................................................................................ 3
3.1.1 Restrictions governing the oven use ...................................................................... 3
3.2 Operating principle ........................................................................................................ 3
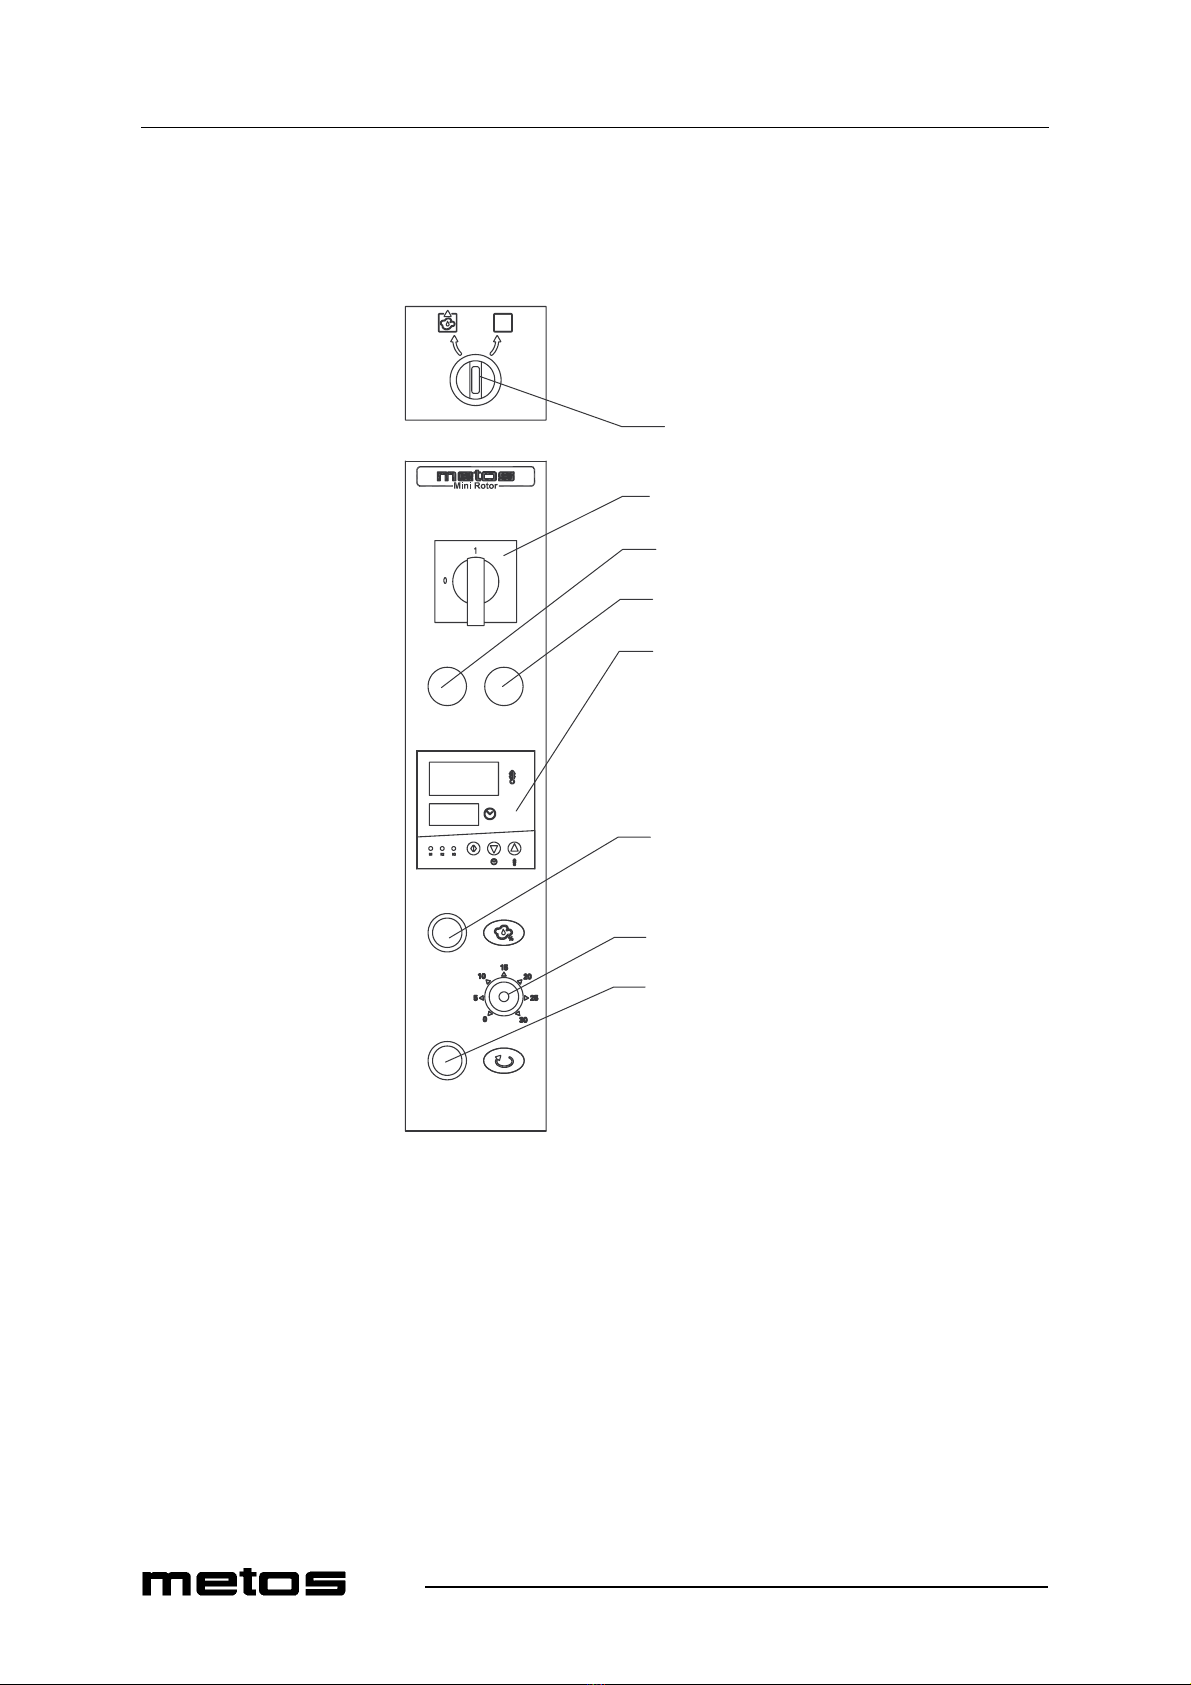
3.3 Control panel ................................................................................................................ 4
3.4 Time and temperature adjuster ...................................................................................... 5
3.4.1 Temperature setting ............................................................................................... 5
3.4.2 Cooking time setting .............................................................................................. 5
4. Operation instructions ................................................................................. 6
4.1 Before using the oven .................................................................................................... 6
4.1.1 Before baking ......................................................................................................... 6
4.2 Baking ............................................................................................................................ 6
4.2.1 Moistening ............................................................................................................. 7
4.2.2 Tips for the baking and proving of frozen foods ................................................... 7
4.3 After use ........................................................................................................................ 8
4.3.1 Cleaning ................................................................................................................. 8
4.3.2 Service ................................................................................................................... 9
5. Installation ................................................................................................... 10
5.1 General ........................................................................................................................ 10
5.2 Moving the oven to the installation place and unpacking ........................................... 10
5.3 Positioning the oven .................................................................................................... 10
5.4 Electricity connection .................................................................................................. 11
5.5 Water connection ......................................................................................................... 11
5.6 Drain connection ......................................................................................................... 11
5.7 Steam exhaust from inside the baking chamber .......................................................... 11
5.8 Exhaust ventilation ...................................................................................................... 11
5.9 Starting up ................................................................................................................... 11
5.10 Factory settings ...................................................................................................... 12

1.7.2008 Rev.
6. Troubleshooting .......................................................................................... 14
7. Technical specifications .............................................................................. 15

1.7.2008 Rev. 1.0
General
1
1. General
Carefully read the instructions in this manual as they contain important information re-
garding proper, efficient and safe installation, use and maintenance of the appliance.
Keep this manual in a safe place for eventual use by other operators of the appliance.
The installation of this appliance must be carried out in accordance with the manufactur-
er’s instructions and following local regulations. The connection of the appliance to the
electric and water supply must be carried out by qualified persons only.
Persons using this appliance should be specifically trained in its operation.
Switch off the appliance in case of failure or malfunction. The periodical function checks
requested in the manual must be carried out according to the instructions. Have the appli-
ance serviced by a technically qualified person authorized by the manufacturer and using
original spare parts.
Not complying with the above may put the safety of the appliance in danger.
1.1 Symbols used in the manual
This symbol informs about a situation where a safety risk might be at hand.Given instruc-
tions are mandatory in order to prevent injury.
This symbol informs about the right way to perform in order to prevent bad results, appli-
ance damage or hazardous situations.
This symbol informs about recommendations and hints that help to get the best perform-
ance out of the appliance.
1.2 Symbols used on the appliance
This symbol on a part informs about electrical terminals behind the part. The removal of
the part must be carried out by qualified persons only.
1.3 Checking the relationship of the appliance and the manual
The rating plate of the appliance indicates the serial number of the appliance. If the man-
uals are missing, it is possible to order new ones from the manufacturer or the local rep-
resentative. When ordering new manuals it is essential to quote the serial number shown
on the rating plate.

1.7.2008 Rev. 1.0
Safety
2
2. Safety
2.1 How to operate the oven safely
An oven is a warming device, which heats up when used. For this reason, please observe
the following instructions to avoid risk of burns.
• During long-time operation even the edges of the oven door become hot.
• Use the oven gloves when handling hot ovenware and baking plates.
• Watch out for discharging steam when opening the oven door.
• Do not leave the oven on for long periods totally without supervision.
• Liquid products should be cautiously taken out of the oven, because hot liquid may
cause scalds.
2.2 Disposal of the oven
Once the oven has reached the end of its useful life, it must be disposed of in compliance
with local rules and regulations. The best way of dealing with or recycling any substances,
which potentially have an adverse impact on the environment, is to dispose of them
through a proper problem waste company.

1.7.2008 Rev. 1.0
Functional description
3
3. Functional description
3.1 Intended use of the appliance
Mini Rotor 7M/10M is a convection oven intended for baking and roasting. The oven can
be used as asingle unit or combined with a stand or a proving cabinet. The proving cabinet
has a separate manual.
3.1.1 Restrictions governing the oven use
Use of the oven for any purpose other than that mentioned above is prohibited.
The manufacturer shall not be held liable for any situations, which may arise from failure
to comply with the warnings and instructions given in this manual.
3.2 Operating principle
The oven is a convection oven dimensioned for 450x600 mm baking plates.
Heating elements heat up the air in the oven chamber. The elements are located behind
the suction wall on the left side of the oven, separate from the oven chamber. A fan gen-
erates the necessary air circulation. The fan sucks the heated air and blows it through the
nozzle wall into the oven chamber and through the suction wall back to the heating ele-
ments.
The necessary air humidity is generated by spraying water onto the steel mass, which has
been heated by means of air circulation. Water vaporizes and steam is conveyed along
with air circulation through the nozzle wall into the oven chamber.
A rotating oven rack guarantees an even baking and roasting result.

1.7.2008 Rev. 1.0
Functional description
4
3.3 Control panel
The oven functions are operated from the control panel.
1. MAIN SWITCH
2. YELLLOW PILOT LIGHT. Yellow pilot light is on when the rotation or fan mo-
tor is overloaded. Contact the service.
3. GREEN PILOT LIGHT. Green pilot light is on when voltage has been turned on
with the main switch.
4. TIME AND TEMPERATURE ADJUSTER
5. PUSH BUTTON FOR STEAMING. Steaming starts when the oven door is closed
and the push button for steaming is pushed.
6. STEAMING TIME SETTING. Steam amount in the oven chamber can be regu-
lated by changing the steaming time. The steaming time is adjustable between 0-
30 sec. After steaming there is a delay of 45 sec. before the fan and heating turn
on. The lowest temperature for steaming is 200°C.
1
2
3
4
5
6
7
8

1.7.2008 Rev. 1.0
Functional description
5
7. TURNTABLE STOP BUTTON. When you open the oven door, push the button
until the rack is in a position where the baking plates can be removed.
8. STEAM EXHAUST VALVE. Knob is located on the exhaust hood. Turning the
knob to the left will open the steam valve. This operation will decrease the steam
output when you open the oven door.
3.4 Time and temperature adjuster
1. Temperature display
2. Time display
3. START key
4. Time setting/decrease key
5. Temperature setting/increase key
3.4.1 Temperature setting
Push the key (5). The temperature display (1) will show SP (set point). The temperature
digits starts to blink. Increase or decrease the temperature value using the keys (4) or (5).
When the value has been chosen, the display stops blinking after 5 seconds.
3.4.2 Cooking time setting
Push the time setting/decrease key (4). On the time display (2) green digits will appear.
Digits on the display start to blink. Set the cooking time with the keys (4) or (5). After
choosing the requested time the display will still blink for 5 seconds. Turn the oven on by
pushing the START key (3). The time is first shown in minutes, but the last minute is
shown in seconds. Hold down the key (3) to switch off or turn on the timer.

1.7.2008 Rev. 1.0
Operation instructions
6
4. Operation instructions
4.1 Before using the oven
Before using the oven check the following:
• Has the oven been connected to the water supply network and is it fitted with a
shut-off valve.
• Is the shut-off valve on the network water pipe in the open position.
• Is the mains switch in the ON position
There is a slight smell of metal and thermal insulation when the oven is heated for the first
time. This is completely normal and disappears by heating the oven. Before using the
oven for the first time, heat the oven to a temperature of 250°C until the smell disappears.
4.1.1 Before baking
The oven must be preheated to the baking temperature before actual baking to obtain the
best baking results. Preheating to +200°C takes about 15 minutes.
4.2 Baking
Make sure that the rack is properly in place, both at the top and at the bottom.
Placeproductson thebakingplate as shown in thefigurebelow.Do notoverload the plate,
leave an air gap between the products to ensure the best baking result. Set the baking tem-
perature. For indicative baking temperatures, see Table "Tips for the baking and proving
of frozen foods".
&255(&7/2$' 29(5/2$'('

1.7.2008 Rev. 1.0
Operation instructions
7
During baking the steam exhaust valve is normally closed. If there is too much steam in-
side the oven, open the steam exhaust valve to remove the excessive moisture. When bak-
ing products that bind a lot of water, the steam exhaust valve can be kept totally open.
When baking products that require a high temperature and a short baking time, it is rec-
ommended to keep the steam exhaust valve open, as oxygenous air contributes to brown-
ing and improves the flavour.
In the event of interruptions in the electricity supply when the oven is in use, turn all
switches to the “0”position toprevent unexpected start-up of the oven after the electricity
supply is restored.
When you finish baking, take the products out of the oven using heat protective gloves,
because the oven is hot.
4.2.1 Moistening
It is recommended to use moistening at temperatures above 200°C. At lower temperatures
part of the water used for moistening might not vaporise and will thus gather on the oven
bottom.
• Set the steaming time as described in Chapter “Control panel”.
• Push the steaming button once.
The heating, rotation and blowing functions go off for the period of steaming (0-15 sec.)
and stabilization time (1 min.). Repeat steaming as many times as necessary to obtain the
desired baking result.
Do not open the oven door immediately after moistening to avoid scalding by hot steam.
4.2.2 Tips for the baking and proving of frozen foods
Product Load Defrost Proving Baking
Pcs/
plate Time
min. Time
min Humidity
%Temp
°C Time
min Temp
°C Steaming
sec.
Pastry 12 - - - - 30 200 -
Roll 16 60 60 75 38 15 230 10-15
Baguette 4 60 60 75 38 25 240 10-15
Croissant 12 60 60 75 38 17 200 -
Danish pastry 20 60 60 75 38 15 210 -

1.7.2008 Rev. 1.0
Operation instructions
8
4.3 After use
4.3.1 Cleaning
Use of a hose or pressure washer to clean the oven is forbidden.
Before cleaning the oven, please remember that it remains hot for a long time after use.
The oven cools down faster, if the door is opened.
The oven is an electrical appliance.This means that there are restrictions regarding clean-
ing the oven with water. Both inner and outer surfaces of the oven may only be wiped off
with a damp cloth. Particularly, avoid excessive use of water when cleaning the outer sur-
faces of the oven near the vent holes.
The turntable can be removed from the oven before cleaning by slightly lifting it upwards,
so that the guiding pin heads come loose from the fixing holes. After that, pull the turnta-
ble out of the oven by the turntable handles.
Use a slightly alkaline (pH 8-10) detergent for cleaning the oven. Dilute the detergent and
spray it into the oven chamber and on the inside of the oven door. Heat the oven to about
+60°C, switch off the oven and let the detergent work for about 15 minutes. Rub burnt
spots with a brush or cleaning pad. Do not use steel wool and prefer chemical cleaning
rather than mechanical.
Wipe off loose particles. After washing, the oven should be dried by heating. After clean-
ing the inside, wipe off the outer surfaces, knobs, and the handle.
Clean the oven often enough. A clean oven contributes to a good baking and roasting re-
sult.
Cleaning the heating chamber
To clean the heating chamber, spray diluted detergent solution on the chamber walls and
bottom, the inner glass of the oven door and the inner door surface. Heat the oven to about
60°C (not necessary), switch it off and let the detergent work for about 15 minutes. Rub
burnt spots with a brush or cleaning pad. Do not use a steel brush or abrasive pads and
generallypreferchemical cleaning rather than mechanical. Wipe off loosened dirtand de-
tergent carefully with a damp cloth. After washing, dry the oven by heating at 150°C for
5 minutes.

1.7.2008 Rev. 1.0
Operation instructions
9
Cleaning the turntable
To soak and clean the turntable, remove it first from the heating chamber.
To remove the rotating rack, do the following:
• Turn the turntable with your hands so that it moves to the normal position for load-
ing baking plates.
• Lift the turntable upward so that the upper part of it will get loose from the sleeve
and the lower part from the guide pin heads on the bottom of the heating chamber.
Be careful not to scratch the chamber bottom when removing the turntable.
• Pull the turntable out of the heating chamber holding it by the handles.
When you put the turntable back to its place in the oven, repeat the procedure in the op-
posite order.
Clean the turntable manually, using the same detergent solution as for the oven chamber.
The parts can also be washed in a dishwasher.
Cleaning the door
The oven door is made of two glass sections. Both inner and outer glasses are placed in
separate stainless steel frames. Frames are joined together by means of two hinges and
fixed by two plates.
To clean the door, do the following:
• Open the oven door.
• Push the door fixing plates.
• Open inner door frame.
• Clean surface of glasses and surfaces of frames. Use the same method of cleaning
as describe above.
• Close frames after cleaning. Be sure that frames are fixed.
Cleaning the outside surfaces of the oven
After cleaning the heating chamber, wipe the outside surfaces of the oven. Avoid exces-
sive usage of water when cleaning the control panel and its side with air inlet elements.
Clean the oven daily or as often as possible. A clean oven will help you to get a good bak-
ing result.
4.3.2 Service
In the event of fault or malfunction, switch the appliance off at the mains. Use an agent
authorized by the manufacturer and original spare parts.

1.7.2008 Rev. 1.0
Installation
10
5. Installation
5.1 General
Please read these instructions carefully as they contain important information regarding
installation.
The installation of this appliance must be carried out in accordance with the manufactur-
er’s instructions and in compliance with local rules and regulations. These instructions
must be used together with the installation drawings.
This appliance may be connected to the mains electricity and water supply by qualified
persons only.
5.2 Moving the oven to the installation place and unpacking
The oven is best transported in its own package, which protects it from outside damage.
The oven can be delivered without a stand or a proving cabinet, but it cannot be installed
directly on a floor surface. The client must provide a table or other flat surface on which
the oven can beinstalled. Inthis case the oven can be lifted by a woodenbase placed under
the oven withe.g. forklifts to the same heightas the table surface and then carefully slided
onto the table. If the oven is delivered installed on a stand or a proving cabinet, the com-
bination can be lifted under the stand or proving cabinet. In order to avoid damage it is
not allowed to use the oven top as a workbench during installation.
5.3 Positioning the oven
It is recommended to install the oven so that there is a free passage for air around the oven
and there are no other sources of heat near the cooling vents.
It is important to install the oven in a horizontal position. Tilting and unevenness may
have an adverse effect on the baking result.
A single oven (table model) must be placed on a flat surface and levelled into ahorizontal
position by using the adjustment screws on the table legs.
An oven combined with a stand or proving cabinet must be levelled by means of the ad-
justment screws on the stand or proving cabinet legs.
When the single oven is in the right place and in a horizontal position, fix it firmly to the
table. The oven installed on a stand or a proving cabinet must be fixed to the floor by the
flanges of the back legs of the stand or the proving cabinet.

1.7.2008 Rev. 1.0
Installation
11
5.4 Electricity connection
To facilitate future maintenance and to increase safety, install a separate mains switch
near the appliance. This switch must disconnect the appliance completely from the elec-
trical supply network.
After the electrical connections have been made, the rotation direction must be checked.
An arrow indicates the direction of rotation of the fan motor. The rotation direction of the
baking carrier is clockwise.
The supply cable inlet is located on the top of the oven, behind the steam hood. All infor-
mation needed for connecting the oven is to be found on the rating plate, connection dia-
gram and installation drawing.
5.5 Water connection
The appliance must be connected to the cold water supply. The water connection must be
equipped with a shut-off globe valve.
5.6 Drain connection
The drain pipe should be made of stiff material and be large enough. It must be installed
with a sufficient slope towards the floor drain. A plastic pipe must not be used. If there is
no floor drain available near the oven, the drain water is led into a shallow trough. The
trough should be placed so that it can be easily emptied.
5.7 Steam exhaust from inside the baking chamber
Excess steam after moistening and baking is removed from inside the baking chamber
through a steam outlet pipe. The steam outlet pipe is in the back left-hand corner of the
oven. It is recommended to have a ventilation exhaust hood close to the steam outlet pipe.
It is advisable to fit a grease filter between the steam outlet pipe and the exhaust duct.
5.8 Exhaust ventilation
It is possible to attach the steam hood of the oven to exhaust ventilation, if there is not a
ventilation exhaust hood over the oven. It is advisable to fit a grease filter between the
steam hood and the ventilation duct.
5.9 Starting up
Test the oven when it has been connected to the mains electricity and after you have
checked that all connections have been correctly made.

1.7.2008 Rev. 1.0
Installation
12
Before using the oven:
• check the rotation directions of fan and rotation motors.
• pour some water in the drain.
• make sure that water flows out of the drain water pipe.
After checking, heatthe oven to about250°Cand keep it at this temperature until the smell
of protective grease and insulation has disappeared.
New baking plates must be heated for about 30 minutes at 250°C before they are taken
into use.
5.10 Factory settings
Mini Rotor 10M:
Nozzle holes have been set at the factory according to the following table:
Nozzle settings (see figure below):
Use wrench No. 10 to adjust fastening places.
Nozzle line 1
mm Nozzle line 2
mm Nozzle line 3
mm
Fastening place A 4 3 3
Fastening place B 4,5 3,5 4
Fastening place C 6 4 6
Fastening place D 8 8 8
1R]]OHKROH
)DVWHQLQJSODFH$
)DVWHQLQJSODFH%
)DVWHQLQJSODFH&
)DVWHQLQJSODFH'
HQL/
HQL/
HQL/

1.7.2008 Rev. 1.0
Installation
13
Mini Rotor 7M:
Nozzle holes have been set at the factory according to the following table:
Nozzle settings (see figure below):
Nozzle line 1
mm Nozzle line 2
mm Nozzle line 3
mm
Fastening place A 1 3 3
Fastening place B 5 5,5 5,5
Fastening place C 8 8 8
12==/(/,1(
12==/(/,1(
12==/(/,1(
)$67(1,1*3/$&(%
)$67(1,1*3/$&(&
)$67(1,1*3/$&($

1.7.2008 Rev. 1.0
Troubleshooting
14
6. Troubleshooting
PROBLEM REASON WHAT TO DO
Oven does not function ON/OFF key is in OFF position Press the ON/OFF key
Fuse is off Call the service
No light inside the heating chamber Fuse is off Call the service
Bulbs burnt out Change the bulbs
Fans do not function. Overload protection has been activated Call the service
Motor is damaged Call the service
Rotation does not function Overload protection has been activated Call the service
Baking plates hinder rotation Check the location of baking plates
Shaft fixing screw is loose Call the service
Motor is damaged Call the service
Abnormal noise Fan motor bearing is damaged Call the service
Baking plates rub against oven walls Check the location of baking plates
The oven does not heat up Thermostat does not work Call the service
Wrong baking temperature setting Check temperature setting
Fuse has blown Call the service
Heating element has burnt out Call the service
Thermocouple is damaged Call the service
The oven is overheated Thermostat does not work Call the service
Moistening does not work Shut-off valve closed Open the shut-off valve
Temperature is too low (<200°C) Increase temperature
Nozzle is clogged Call the service
Filter is clogged (if any) Call the service
Uneven baking result Incorrect loading (poor air circulation) Check loading
Air guides adjusted incorrectly Call the service
Inadequate preheating Preheat the oven for 30 min.
This manual suits for next models
1
Table of contents
Other Metos Oven manuals