METVISA BIMG MCG8110M604 User manual

1

2
CONGRATULATIONS,
You have just purchased a IMG-BRASIL equipment, product of the highest quality, safety
and efficiency.
Founded in 1989, IMG-BRASIL is a respected company as one of the best and most
complete companies in the field of gastronomy equipment manufacturing.
Constant innovation and improvement of its products, using top-of-line raw materials, ensure
superior products consumed in Brazil and in more than 25 countries worldwide.
THE RELIABILITY AND CERTAINTY OF A GOOD PRODUCT ARE IN THE NAME
IMPORTANT:
PRODUCT FOR PROFESSIONAL USE. DONOT USE BEFORE READING THE MANUAL CAREFULLY.
IN CASEOFQUESTIONS,PLEASECONTACTUS:
IMG-BRASIL Gastronomy Machinery Industry Ltda.
CNPJ 11.193.347/0001-14 - CREA 131726-3
Road. Antônio Heil –KM 23 Nº 5825 –Neighborhood: Limoeiro –ZIP CODE 88352-502
Phone/fax. +55 47 3251-5555 - Website: www.metvisa.com.br

3
INDEX
1. Safety Information......................................................................................................................... 4
1.1 General Warnings...................................................................................................................... 4
2. Technical Characteristics............................................................................................................. 5
2.1 Main Components...................................................................................................................... 5
2.2 Technical Data........................................................................................................................... 6
3. Installation..................................................................................................................................... 6
3.1 Equipment Layout...................................................................................................................... 6
3.2 Electrical Connection................................................................................................................. 7
4. Equipment Use.............................................................................................................................. 9
4.1 Utility.......................................................................................................................................... 9
4.2 Commands................................................................................................................................ 9
4.3 Operating Procedures.............................................................................................................. 10
5. Cleaning and Maintenance ......................................................................................................... 13
5.1 Cleaning Procedures and Products Used ................................................................................ 13
5.2 Breakdown Maintenance and Procedures................................................................................ 14
6. ANEXXES..................................................................................................................................... 16
Electrical Schematic Single-phase –Voltage 110 V or 220 V ........................................................ 16
Exploded View Drawing................................................................................................................. 17
Exploded View Drawing................................................................................................................. 18
Spare Parts List............................................................................................................................. 19
ATTENTION!
The characteristics, pictures and figures presented in this manual should be considered for
information. IMG BRASIL reserves the right to make such modifications as may be deemed
necessary without prior notice.

4
1. Safety Information
1.1 General Warnings
• Cautions / precautions must be observed when installing, using, maintaining and discontinuing use
of this equipment;
• Before carrying out any operation (assembly, use, maintenance and reuse after prolonged use of the
equipment), read the manual carefully;
• The equipment must be used by trained personnel familiar with the use and safety regulations
described in this manual;
• This equipment is not intended for use by persons (including children) with reduced physical,
sensory or mental capacities, or people with lack of experience and knowledge, unless they have
received instructions regarding the use of the appliance or are under the supervision of a person
responsible for their safety.
• It is recommended that children be supervised to ensure that they are not playing with the
equipment;
• In case of rotation of the personnel that will work with the equipment, the new operator must be
educated about the standards and the operation of the same one;
• The operator must use the Adequate PPE (Personal Protective Equipment). As for example: use a
hair cap to prevent them from getting stuck in the moving parts of the equipment;
• The operator must always be aware of situations that can cause a risk of accidents and avoid them.
For example: avoid working with loose uniform sleeves, where they can lock in moving parts, causing
accidents;
• After reading and clarifying all doubts, this manual should be carefully stored in an easily accessible
location, known to all persons who will operate the equipment and make it available to those who will
carry out maintenance for any inquiries. Whenever any questions arise, be sure to check the manual.
Do not operate the equipment in any way with doubts;
• In the installation, it is essential to make this manual available to the professionals who will do the
same;
• Never put your hands, fingers or objects inside the head with the equipment on, as this may cause
an accident. Do not start the grinder without the funnel attached to the head;
• Before starting cleaning and any type of maintenance, it is essential to disconnect the equipment
from the power supply;
• Periodically check the condition of cables and electrical parts;
• Do not leave the equipment switched on unattended.
• This equipment is intended to be used for commercial applications, for example in restaurant
kitchens, canteens, hospitals and in commercial enterprises such as bakeries, butchers, etc., but not
for continuous mass production of food.
5
ATTENTION!
Do not perform repairs on your own. Refer servicing to qualified service personnel. Only use
original parts in your equipment.
2. Technical Characteristics
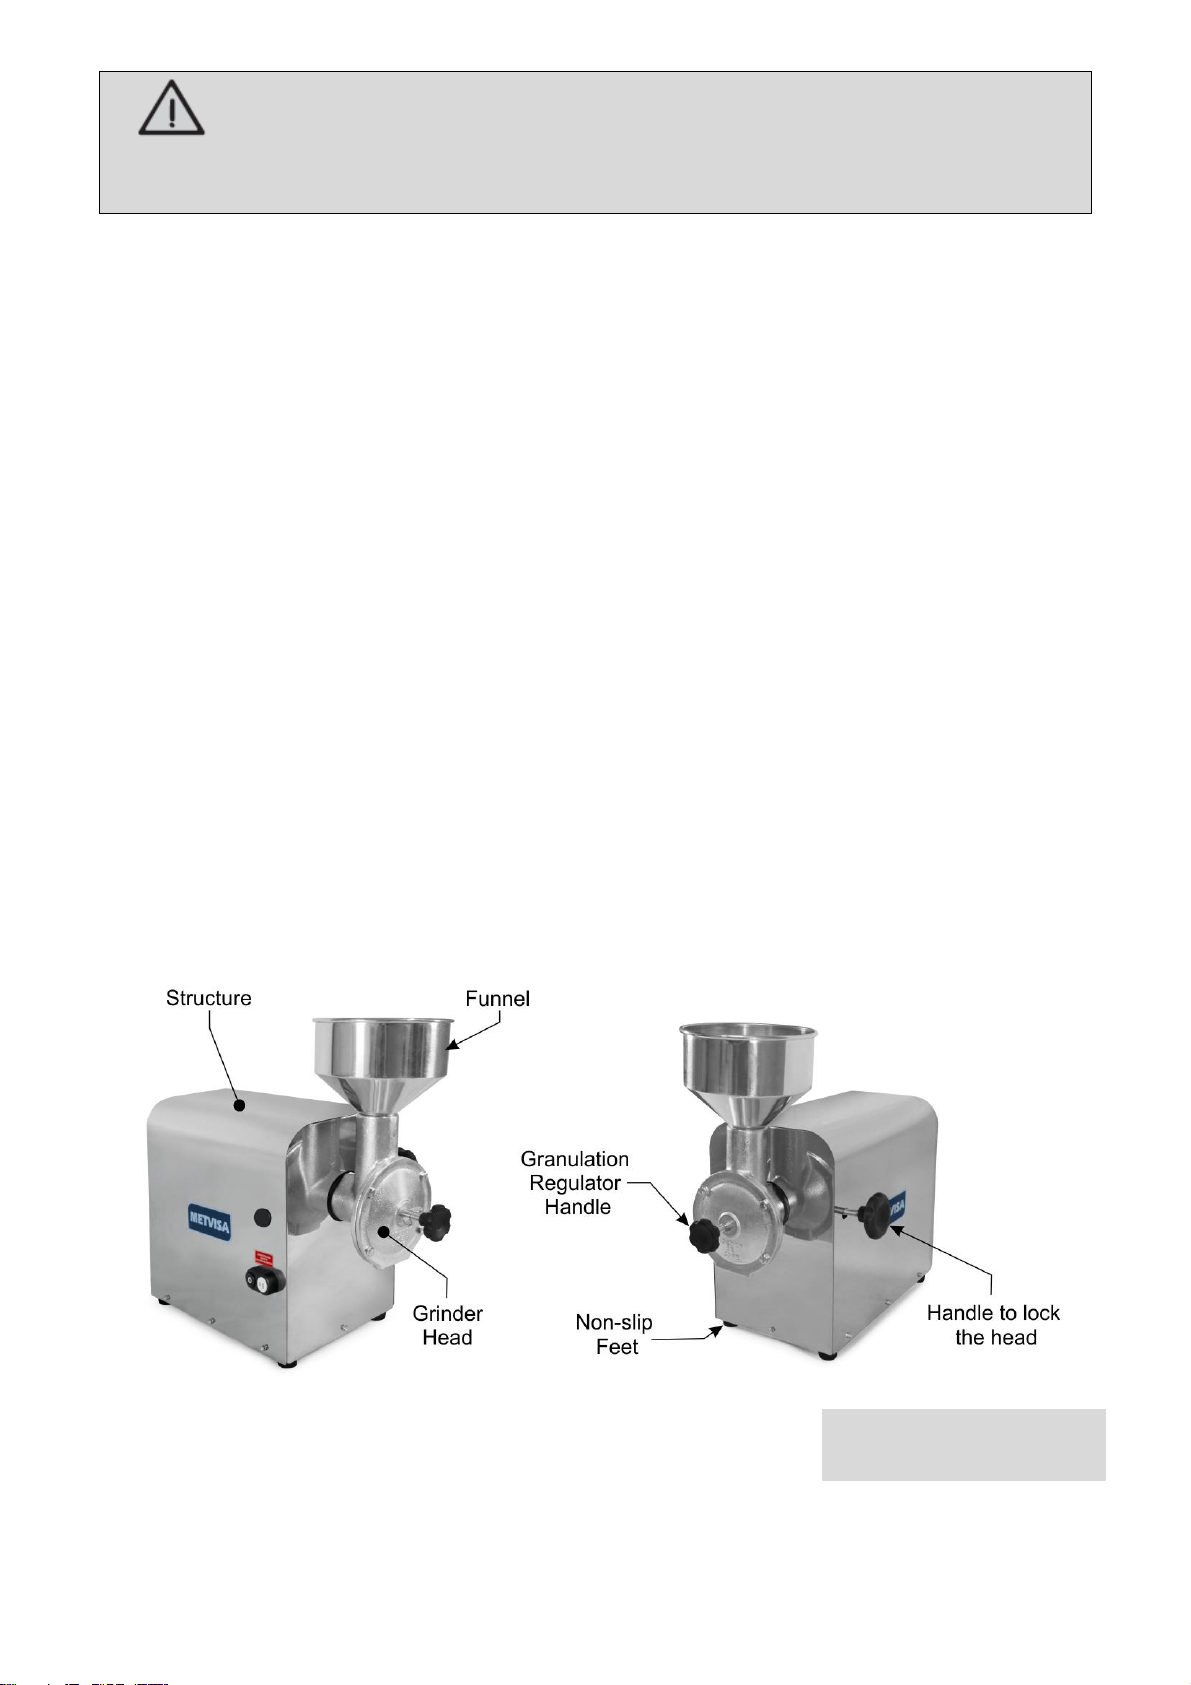
2.1 Main Components
For the equipment described in this manual, safety in use, cleaning, maintenance and
maximum hygiene are guaranteed by the design and special design of all parts, as well as the use of
stainless steel and other materials suitable for contact with the foods.
The equipment was designed with the following characteristics:
• Structure made of stainless steel, which has superior corrosion resistance than other steels. It is a
material resistant to the attack of several corrosive agents;
• Grinding head is made of tin-coated carbon steel, protecting the steel surface against corrosion.
Non-toxic material and ideal for contact with food.
• Funnel made of aluminum. It is a lightweight material, durable and resistant to the attack of corrosive
agents.
See below the main components of the equipment:
Note: For exploded drawing with
spare parts list, see annexes.

6
2.2 Technical Data
Model
Nominal Measures
LxHxW
(mm)*
Net
Weight
(kg)
Voltage
(V)
Rate
(A)
Capacity
(kg/h) **
Lubricant
SAE140
(ml)
MCG8110M604
280x480x500
20.9
127
4.4
8
200
MCG8220M501
280x480x500
20.9
220
2.15
8
200
MCG8220M502
280x480x500
20.9
220
2.15
8
200
MCG8220M504
280x480x500
20.9
220
2.15
8
200
MCG8220M507
280x480x500
20.9
220
2.15
8
200
MCG8220M604
280x480x500
20.9
220
2.5
8
200
* For all grinder models, the height measurement was considered with the funnel mounted.
** It may vary due to the user's working speed and according to the thickness used and product processed.
Noise level: 75 dB.
ATTENTION!
Characteristics like: model, serial number and voltage of the equipment are provided on the
label (figure below). Before installation, check that the power supply voltage of the
equipment corresponds to that of the mains.
3. Installation
3.1 Equipment Layout
Connection to the electrical network and provision for operation must be carried out by a
qualified professional. Check that the voltage of the equipment is in accordance with that of the
electrical network.
When installing, it is essential to make this manual available to the professionals who will
carry it out.
To ensure correct operation and safety, the appliance must be positioned in an airy
environment and on a sufficiently wide, well-leveled, dry and stable bench, away from sources of heat

7
and water taps, and at an average height of 80 m. cm. Install your equipment leaving a clear area at
the front, a distance of at least 60 cm above the equipment and a distance of at least 30 cm around it,
so that you have enough space for inspection, maintenance, cleaning and use.
ATTENTION!
The installation and the place where the equipment will be placed must comply with the
rules of risk prevention and safety at work (Regulatory Norm NR-12 for Brazil or according
to the regulatory standard in force in your country).
The manufacturer is not responsible for possible direct or indirect damages caused by non-
compliance with said standards and other instructions presented in this manual.
3.2 Electrical Connection
The equipment is supplied with a power cord to be connected to an electrical network.
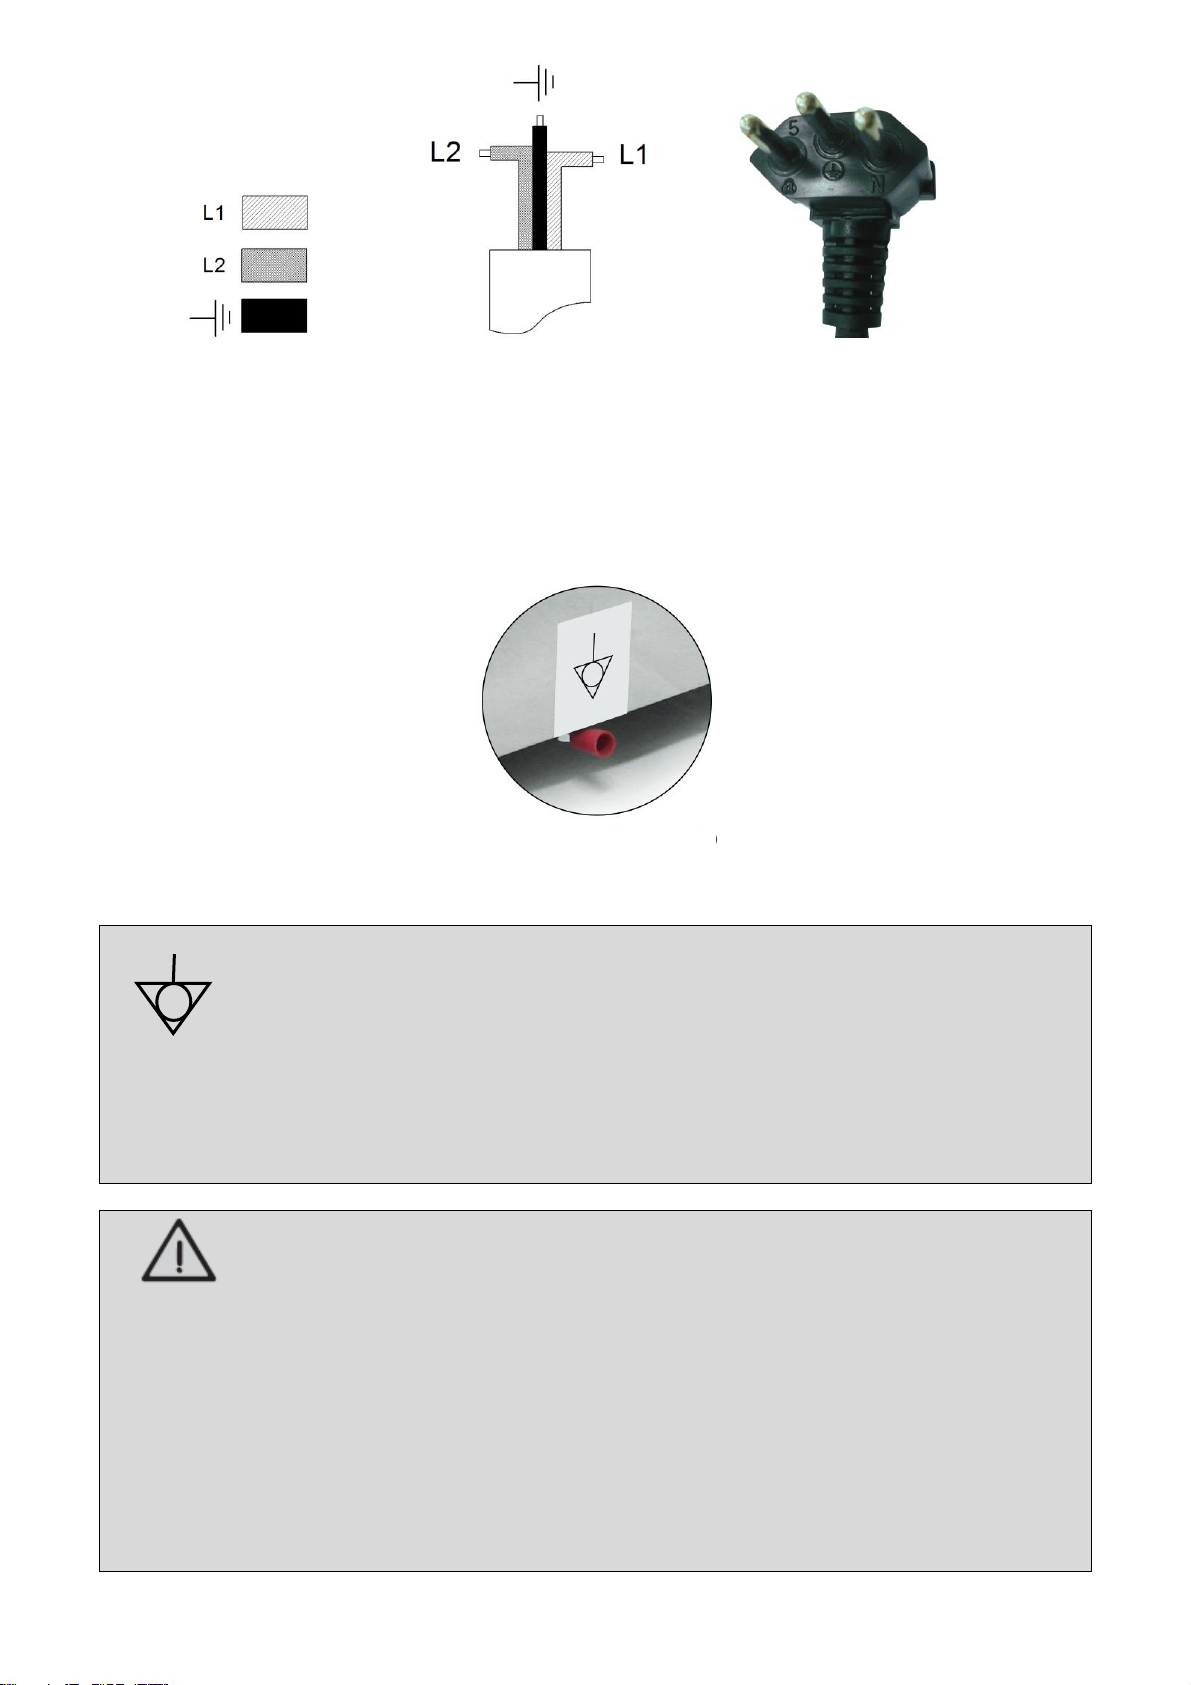
The grinders described in this manual are single-phase and supplied with power cables with
stamped plugs of the 2P+T type (2 poles + ground), following current regulations. These plugs have 3
round pins, there being just below each pin, a corresponding marking for each one (phase, ground
and neutral). It is mandatory to make a good ground connection, following current regulations.
8
The maintenance procedure on the power cord and/or the power plug of the appliance must
be carried out by an authorized agent or qualified person.
The equipments are shipped with a single voltage, that is, 110 V or 220 V. If it is necessary
to change the voltage, contact the manufacturer or an authorized dealer.
The equipments are supplied with an equipotential grounding terminal, located on the right
side base.
The terminal identified in the figure aside is an additional protection to
the grounding that is provided for in the electrical network, it must be
connected to a grounding terminals, regardless of the connection to the
electrical network, and the other products that have accessible metallic parts,
and that are stationary, must also be connected to this bus as well as the
service bench itself, if it is made of metallic material. In this way, all these
products will be under the same electrical potential, avoiding undesirable
leakage currents.
ATTENTION!
Before turning on your equipment, always check that the mains supply voltage is the same
as the equipment voltage. If it is not the same, contact the manufacturer or authorized
dealer.
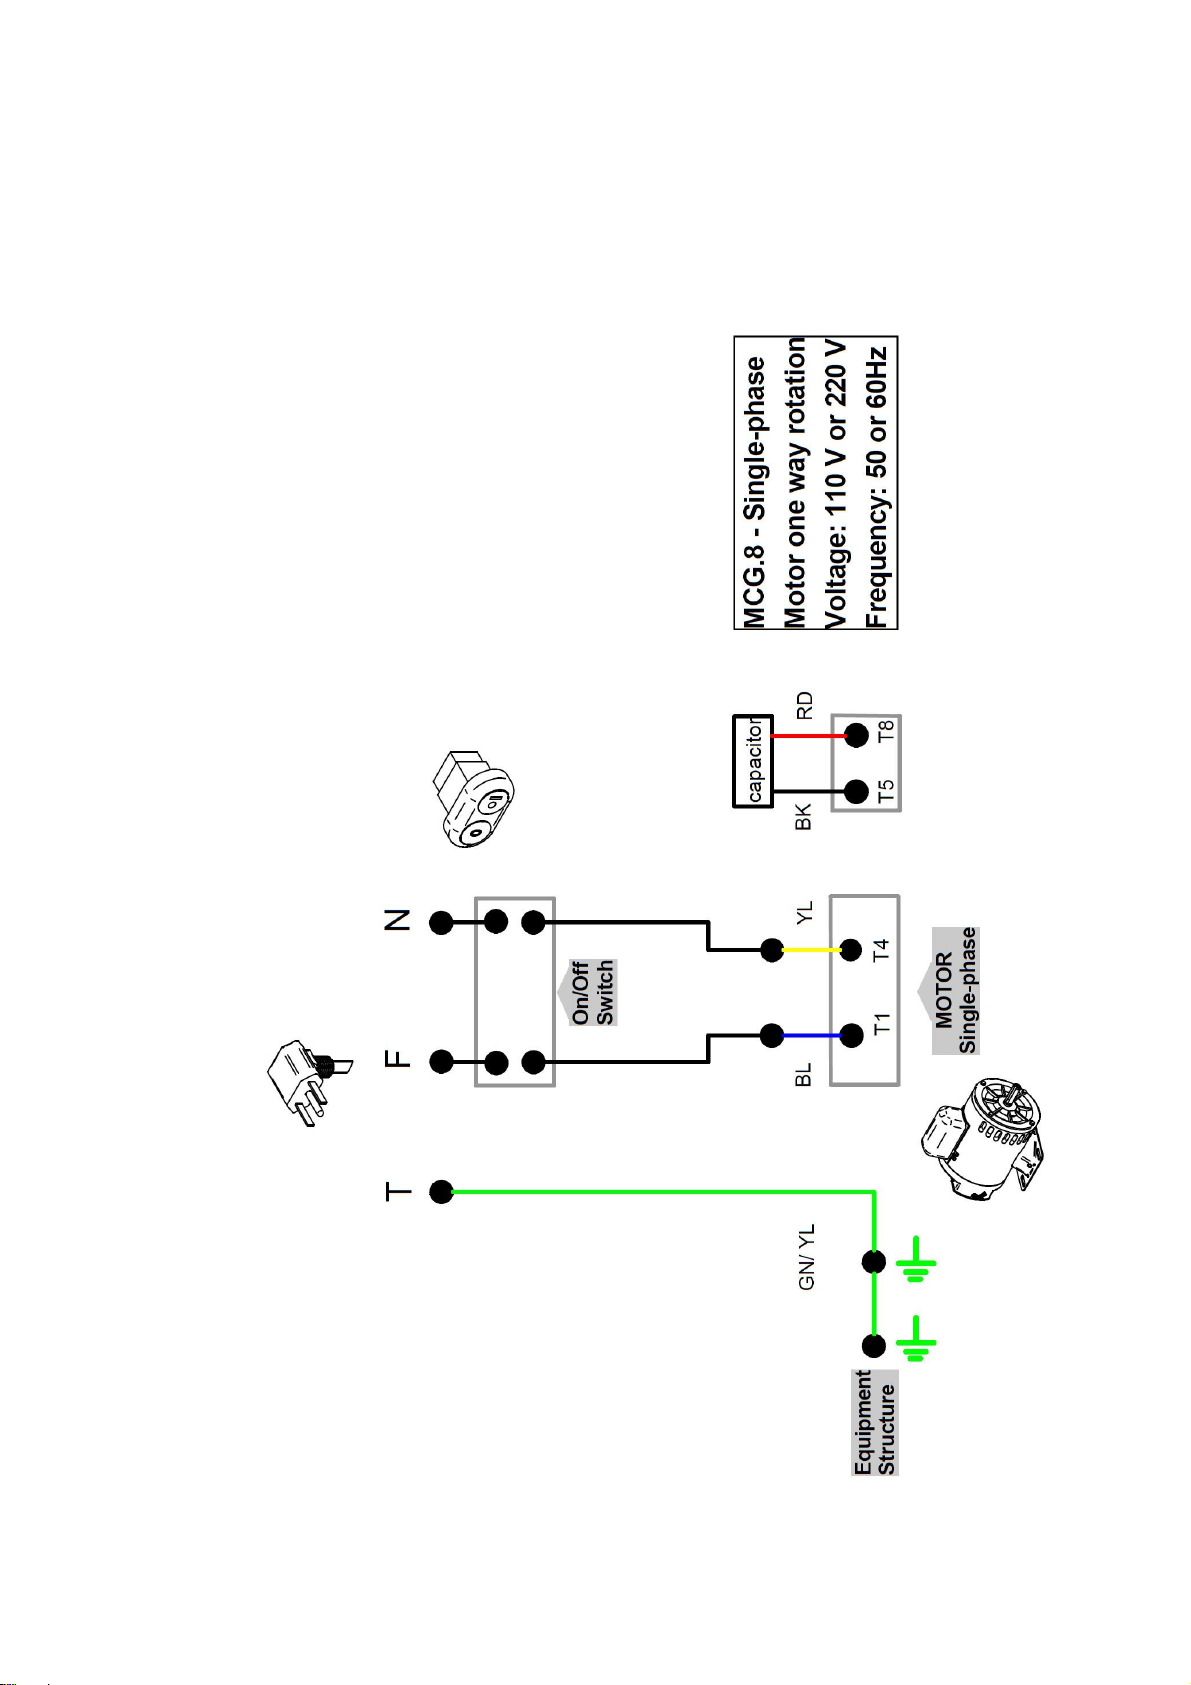
The supply voltage of this equipment is 110 V (60 Hz) or 220 V (50 or 60 Hz) single-phase, as
can be verified on the voltage label affixed to the power cable or as indicated on the
nameplate data label, which is located on the right side of the equipment (see the figure on
this label in item 2.2 of this manual).
Make sure that the voltage of the electrical network where the equipment will be installed is
compatible with the voltage indicated on these labels.
Phase
Neutral
Ground
Equipotential
Grounding Terminal
9
For more details on the rest of the electrical part of the equipment, refer to the electrical diagram in
the annexes of the manual.
IMPORTANT
The manufacturer is not responsible for possible direct or indirect damages caused by non-
compliance with said standards and other instructions presented in this manual.
4. Equipment Use
4.1 Utility
This equipment is exclusively intended for grinding coffee and some types of dry grains, cereals and
spices.
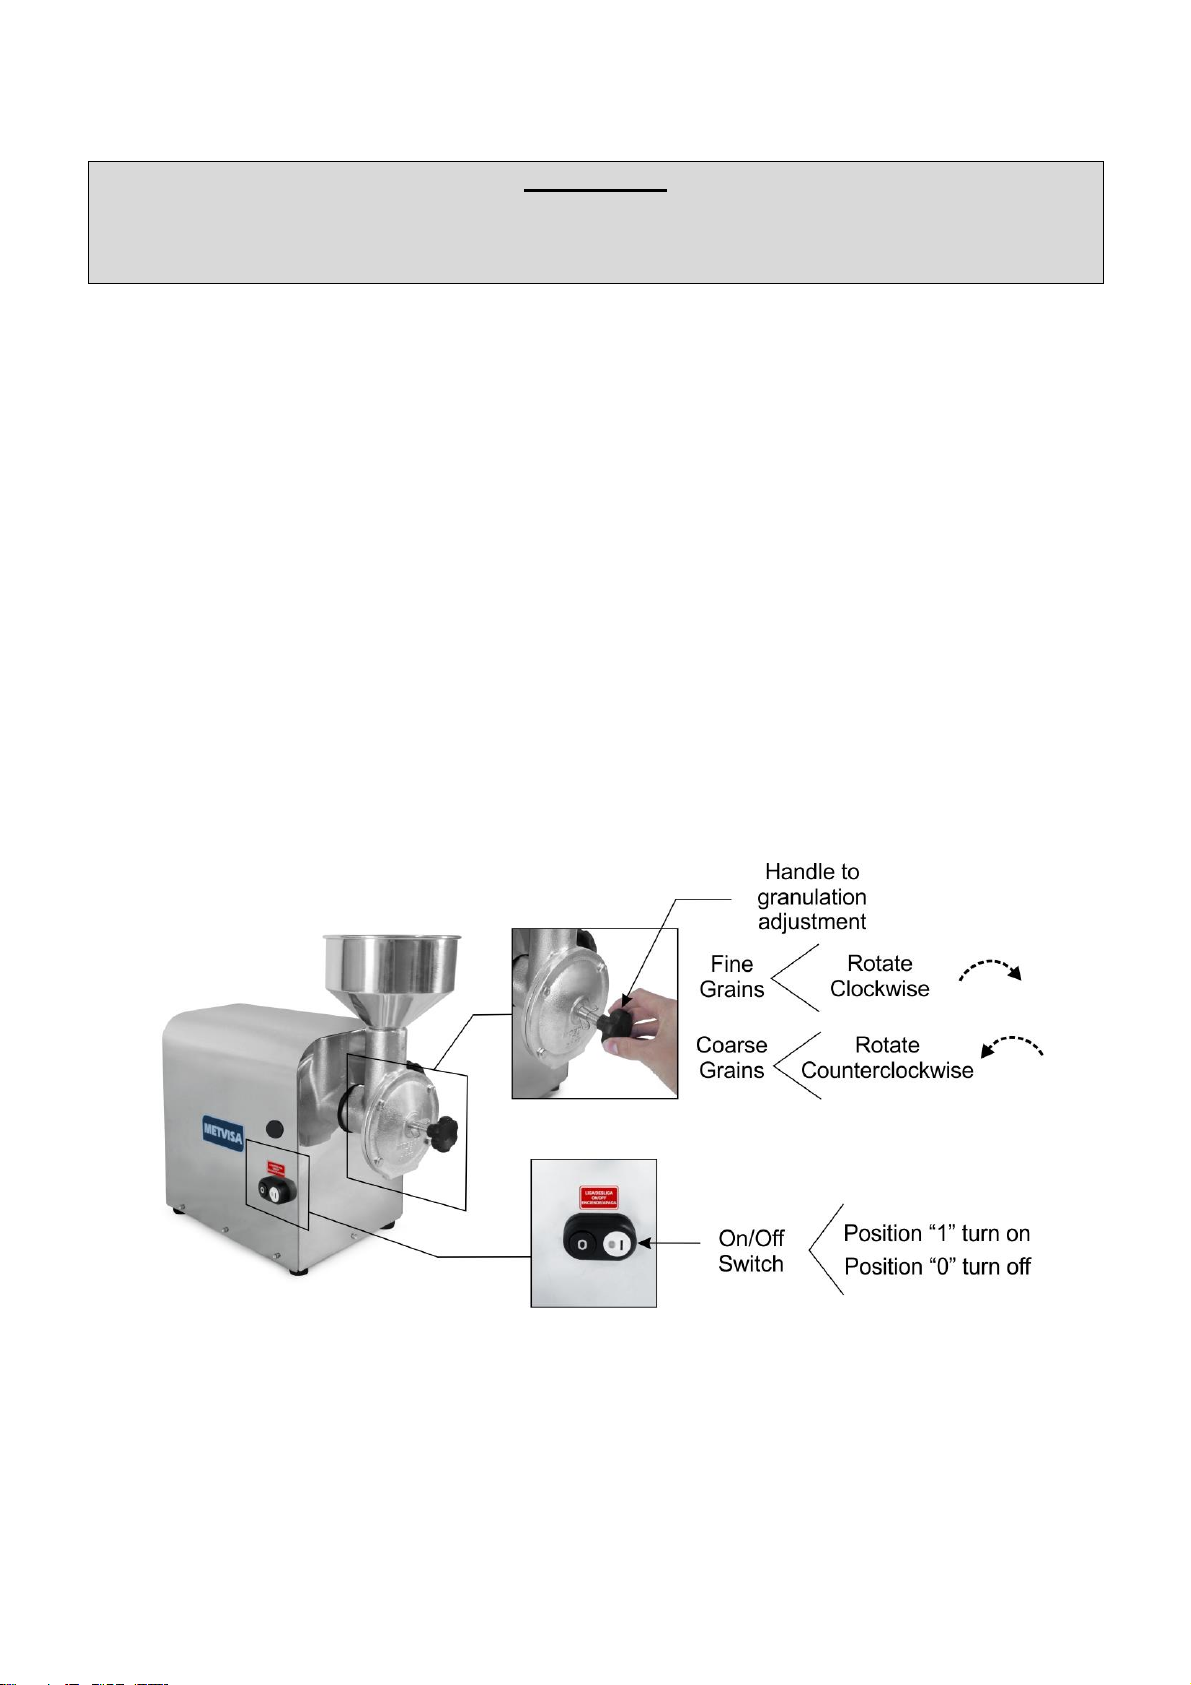
4.2 Commands
The equipment has an on/off switch and a handle for granulation adjustment.
When positioning itself in front of the grinder head, the switch is located on the left side of the
equipment and the granulation adjustment handle is located on the front of the grinder head.
See description of each command below:
• Handle for Granulation Adjustment –regulates the type of granulation of the grains to be ground.
Before turning the handle, it is necessary to loosen the wing nut. To obtain a fine grain, rotate the
handle clockwise. For coarse grain, rotate counterclockwise. Tighten the wing nut at each granulation
setting.

10
ATTENTION!
Be careful when adjusting the granulation. The handle cannot be tightened excessively, it must
simply be pressed against the end of the thread. Tightening it excessively will wear out and
strain the engine, possibly burning it.
The handle cannot be loosened too much either, as in this case a ball located between the
handle and the back of the head could come loose. Without the ball, the operator will have
difficulties to regulate the granulation. Do not adjust the granulation without the handle ball.
• On/off Switch –used to turn the equipment on and off. In position “1” it switches on, in position “0” it
switches off.
4.3 Operating Procedures
Before operating your equipment, disassemble the components (instructions below) that will
have contact with the grains (funnel and grinding head), and clean them. Carry out cleaning with the
appliance disconnected from the mains. Follow the cleaning instructions in item 5 of this manual.
Check the disassembly and assembly processes described below.
• Disassembly:
11
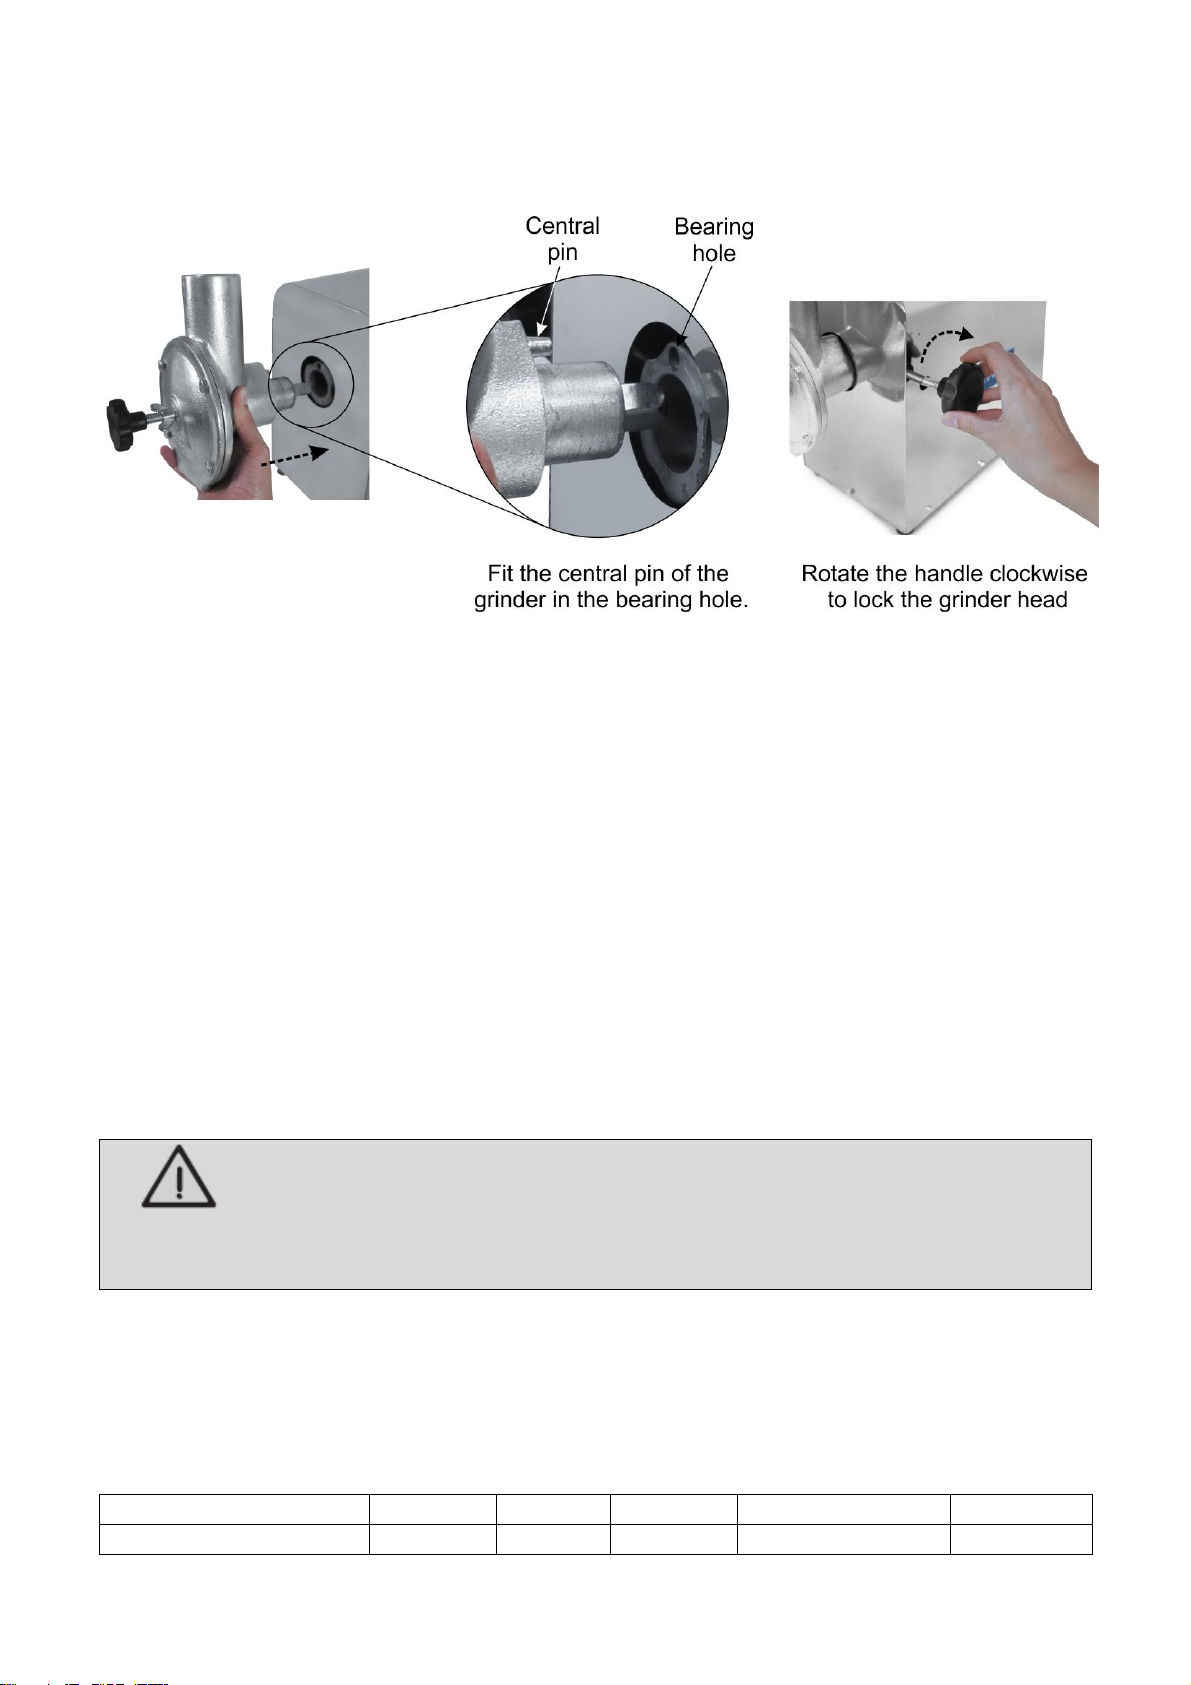
• Assembly: The assembly procedure is the reverse of disassembly. With the grinder head mounted,
fit it into the bearing according to the instructions below:
All parts must be fixed perfectly so that there is no jamming or wear, and so that the safety of
the operator is guaranteed. If any part has not been fitted correctly, repeat the operation and without
success, contact technical assistance.
• Operation: Before turning on the equipment, make sure that the supply voltage of the
equipment is in accordance with that of the electrical network. Also check that the funnel is fitted to
the head and filled with grains.
After checking these items, follow the equipment operation processes below:
• Connect the power cord to the electrical network;
• Place a container to store the ground grains below the outlet head;
• With the funnel already filled with the roasted grains, activate the on/off switch in position
“0” (off) and then “1” (on);
ATTENTION!
Always fill the funnel with roasted and low-moisture grains so that they do not adhere to the
grinding disc, causing poor performance and engine stalling.
• Leave the equipment on for a few seconds to check the grain granulation;
• Adjust the grinding setting using the handle for granulation adjustment (adjustment instructions in
item 4.2).
Type of the Granulation
Turkish
Express
Italian
Filtered
Pressed
Granulation
Very Fine
Fine
Medium
Medium to Coarse
Coarse

12
• With the setting defined, start grinding by pressing the on/off switch in position “1” (on);
• Leave the equipment working until the grinding is finished;
• After the end of the process, turn off the equipment by pressing the on/off switch in position “0” (off).
ATTENTION!
Do not start the appliance without grains, as this will damage the grinding disc and the
motor.
After ground coffee, we do not recommend putting the powder back into the funnel for a
smaller granulation, as the powder clogs the head causing damage to the appliance.
Only use the grinding disc supplied with this unit. Under no circumstances make use of
discs with other formats or dimensions.
TIP
Buy grains in small quantities to reduce storage time, and only store for a maximum of one
week at a time.
Do not store the grains in the grinder. After the process is complete, store them in an
airtight container.
For optimal flavor, use the coffee grains between 5 and 20 days after the roast date.
Store ground coffee grains in a dark, cool, dry place. If possible, vacuum pack.
Once ground, coffee quickly loses its flavor and aroma.
Regularly clean the funnel and grinding disc.
ATTENTION!
If you notice that the equipment is unable to process the grains or that it is stopping
processing, reduce the amount or check that the grains are toasted and free of moisture
before inserting them into the funnel.
Also check if the granulation adjustment handle is too tight. Excessively tightened handle
(setting for grinding too fine) can force and stop the motor causing damage.
Failure to observe this guideline will be considered an unsafe act and abusive use of the
equipment.
In case of any irregularity, contact the nearest authorized technical assistance service.
13
ATTENTION!
Do not remove the funnel from the grinder head with the equipment on, nor should you put
your fingers, hands or objects (such as spoons and knives) inside the feeding head, as this
may cause accidents. In case of any irregularity, contact the nearest authorized technical
assistance service.
IMPORTANT
The operator must use the appropriate PPE (personal protective equipment). For example:
use a hair cap to prevent it from getting stuck in the moving parts of the equipment and
appropriate gloves that, in addition to guaranteeing hygiene in grain handling, protect the
operator during food processing.
5. Cleaning and Maintenance
5.1 Cleaning Procedures and Products Used
Your equipment was built with first-line materials, so use it properly and you will obtain great
satisfaction. Always keep your equipment clean and well-cared for, which will make it much more
durable.
Daily cleaning of the equipment must be carried out for good operation and durability.
Preventing the accumulation of bacteria which can cause contamination in food.
ATTENTION!
Before carrying out maintenance or cleaning, make sure that the on/off switch is in the “0”
(off) position, that the plug is disconnected from the mains.
ATTENTION!
Do not use a water jet or steam cleaner to clean the equipment.
IMPORTANT
This equipment is not intended to be immersed in water for cleaning.
Follow the instructions below to learn the parts that can be immersed and what special care
is taken with the other parts.
Removable parts (funnel and grinder head) must be removed from the equipment and washed
with hot water and neutral soap. Clean the corners well, eliminating grain residues.
The rest of the equipment should be cleaned as often as possible to prevent food residues
from drying out and sticking to the parts. For cleaning, dilute the soap or neutral detergent in warm
water and apply with a soft, damp cloth. With a cloth dampened with water, rinse and then dry the
parts with a soft, dry cloth.

14
Never use abrasive products or sponges and substances containing acids or chlorine to clean
metal parts, as they can scratch or damage the surface of the parts causing corrosion points. Do not
pour water over the motor and electrical parts for cleaning, otherwise, when turning it on, it may cause
an electric shock or even burn the equipment.
ATTENTION!
It is extremely important that the products used for cleaning ensure maximum hygiene and
that they are non-toxic.
5.2 Breakdown Maintenance and Procedures
The operator must be instructed to carry out routine inspections, making small adjustments,
cleaning and observing signs of breakdowns that may occur. Examples include: checking for strange
noises; equipment power loss; the non-execution by the equipment to the service to which it is
proposed; among others. Actions like these are indispensable to guarantee a longer equipment life.
ATTENTION!
When maintenance is carried out (even if minor adjustments are made), always check that the
equipment is turned off and disconnected from the network.
It is recommended that each 6 months be made preventive maintenance, checking and
adjusting the loose, cleaning the internal parts, and others. Detecting broke parts or without the
correct functionality the worker needs to exchange the parts, always using original parts only.
ATTENTION!
Never let your equipment work without oil in the gearbox, as it will damage your equipment.
Always check the oil level.
It is recommended to change the oil after 6 months of use.
To find out about the quantity and type of oil used in each equipment model, consult the table
in item 2.1 (Technical Data) of this manual.
When changing the oil, use Personal Protective Equipment (PPE) to avoid direct contact with
the oil, such as waterproof PVC gloves.
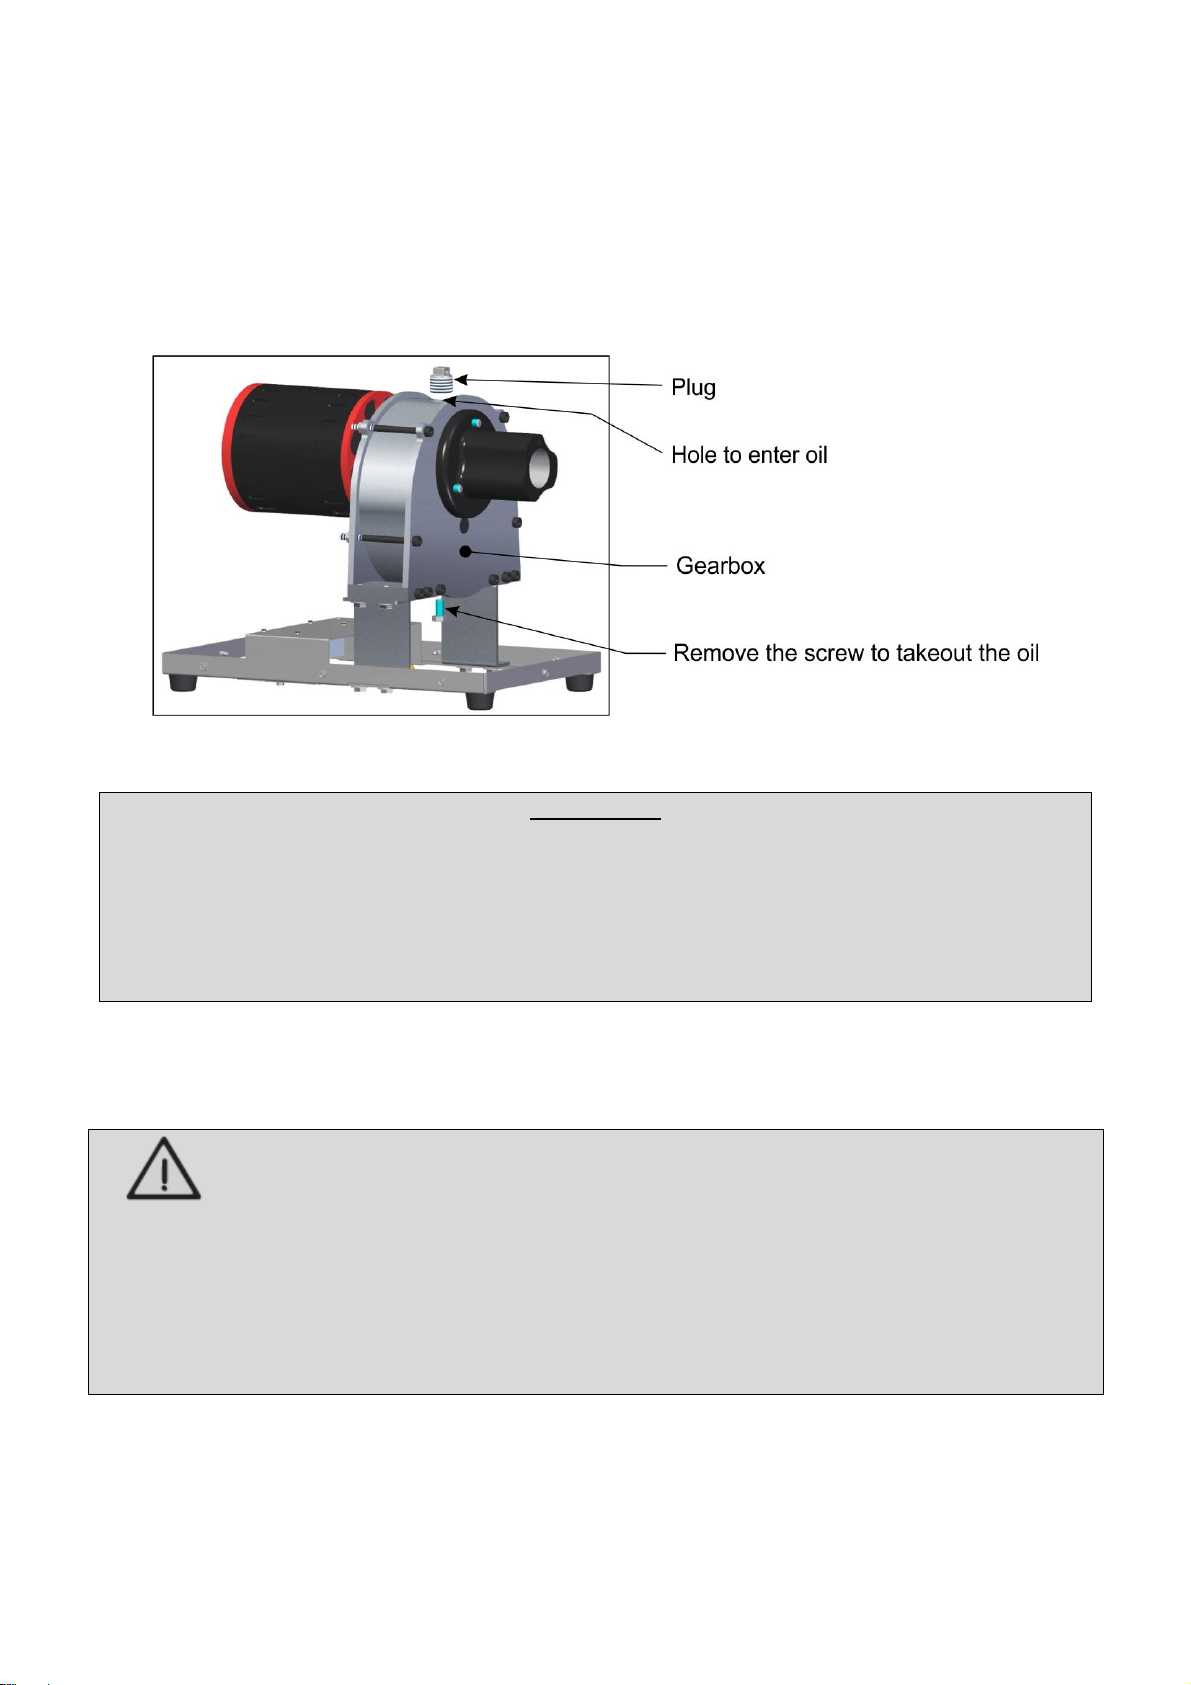
Follow the instructions below to change the oil in your equipment:
•Disconnect the equipment from the mains;
•Remove the funnel and the grinder head (instructions in item 4.3). Remove the case by removing the
fixing screws;
•Place a container under the gearbox to store the oil to be removed;
•Remove the screw located under the gearbox. Wait until all the oil comes out of the screw hole.
15
•After all the oil is removed, screw the screw with sealing tape again;
•To put in the new oil, remove the plug located on top of the gearbox;
•Using a funnel, add the oil. Check the amount of oil for each model of grinder in the table in item 2.2
(Technical Data);
•Screw the plug with thread sealing tape. Reassemble the case fixing it with the screws.
IMPORTANT
After changing the oil, the equipment must work level. Follow the instructions in item 3.1
(Equipment Layout) for optimal equipment positioning.
Oil is a recyclable product. Dispose of it at authorized service station facilities in accordance
with local laws and regulations regarding the disposal of waste petroleum products. Do not
pour into sewers, surface waters.
By carrying out preventive maintenance, the inconvenience of having the equipment stopped
when it is most needed is eliminated, the cost of maintenance is reduced and the risk of accidents is
reduced.
ATTENTION!
Preventive maintenance requires a trained professional.
Always check if the equipment is disconnected from the network.
Whenever an item related to the safety of the equipment is removed (such as when performing
maintenance), put it back in its proper place and confirm that they are performing their
function correctly.
Detecting broke parts or without the correct functionality, please contact the nearest
authorized service center.
16
6. ANEXXES
Electrical Schematic Single-phase –Voltage 110 V or 220 V

17
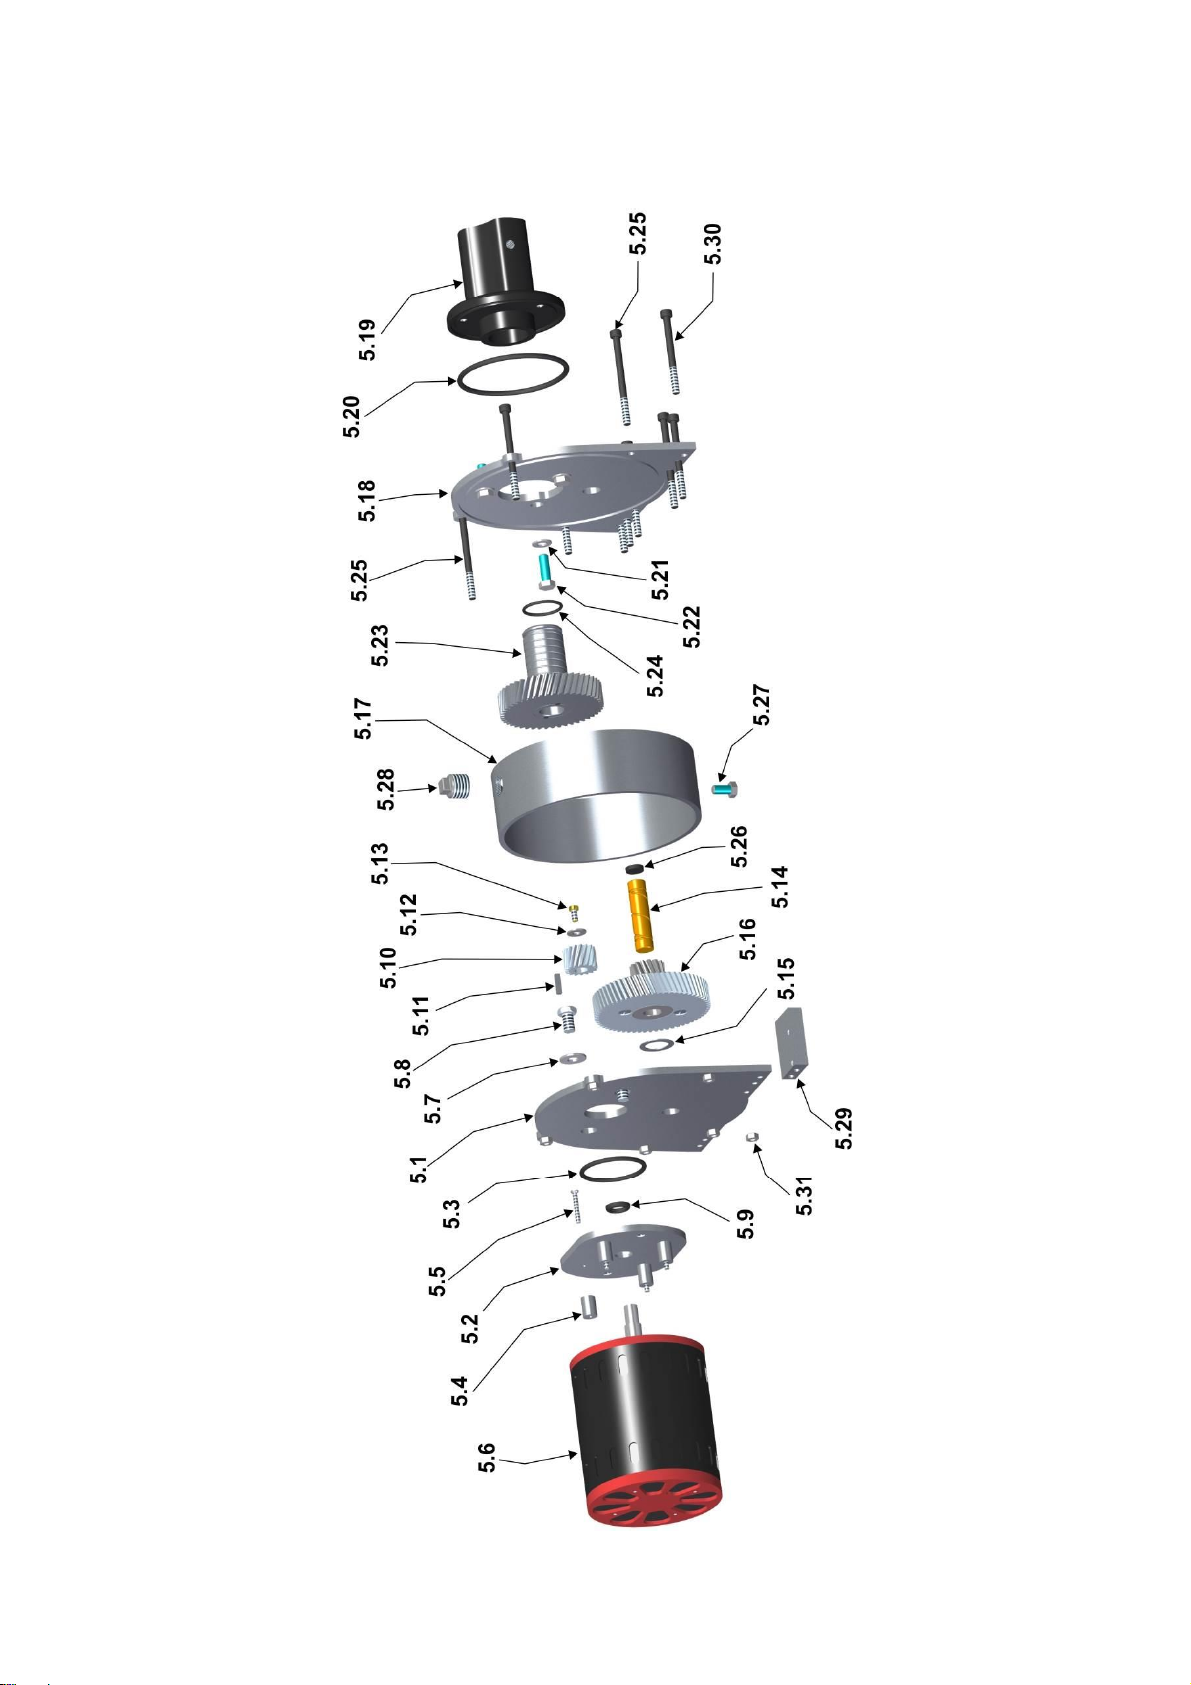
Exploded View Drawing
18
Exploded View Drawing

19
Spare Parts List
Position
Code
Description
Quantity
1
BAS138
Base
01
1.1
PEP004
Rubber Foot Hole
04
1.2
PRR015
Round Machine Screw
04
2
SBT518
Gearbox Support
02
3
ARL004
Flat washer
08
4
PRS010
Hex Screw
08
5
CAIXA
Full Transmission
01
5.1
CRC1387
Transmission Box Bottom Plate
01
5.2
CRC1304
Flange Coupling
01
5.3
ORG027
O-ring
01
5.4
BGT100
Motor Spacer
04
5.5
PRC011
Stainless Steel Flat Machine Screw
04
5.6
MTE294
Electric Motor 1/3 HP 4P 220 V 50 Hz
01
MTE295
Electric Motor 1/3 HP 4P 110 V 60 Hz
01
MTE296
Electric Motor 1/3 HP 4P 220 V 60 Hz
01
5.7
ARL002
Flat washer
02
5.8
PRS027
Hex Screw
02
5.9
RET011
Retentor
01
5.10
EGG052
Motor Helical Gear
01
5.11
CHV014
Square Key
01
5.12
ARL004
Flat washer
01
5.13
PCC003
Machine Screw Cylindrical
01
5.14
EIX124
Intermediate Axis
01
5.15
ARE003
Flat washer
01
5.16
EGG054
Fiber Helical Gear
01
5.17
PCT078
Transmission Box Body
01
5.18
CRC1388
Transmission Box Cover Plate
01
5.19
MAC079
Head Bearing
01
5.20
ORG011
O-ring
01
5.21
ARL007
Flat washer
03
5.22
PRS006
Hex Screw
03
5.23
EGG055
Helical Gear
01
5.24
ORG002
O-ring
01
5.25
PRT055
Allen Screw with Head
06
5.26
BCH069
Oil Seal Rubber
01
5.27
PRS008
Hex Screw
01
5.28
BUJ005
Plug
01
5.29
CRC1389
Fixing Plate Foot Transmission Box
02
5.30
PRT056
Allen Screw with Head
04
5.31
POS018
Hex Nut
06
6
SBT122
Electronic Board Fixation Support
01
7
PRA008
Drilling Hex Screw
10
8
TCE013
Female Terminal
02
9
GAB218
Structure
01
10
MNL047
Stainless Steel Handle
01
11
FNL005
Aluminum Funnel
01
12
TCE073
Cable Gland
01
13
CBE023
Electric Cable Plug Type 1
01
CBE029
Electric Cable Plug Type 2
01
CBE030
Electric Cable Plug Type 4
01
14
BCH058
Straight Frame of the On/Off Button
01
15
CHE064
On/Off Switch
01
16
BCH036
Round Black Cap
01
17
BCA024
Complete Grinder Head
01
18
CBE104
Electric Cable 460 mm Terra
01
19
CBE078
Electric Cable 400 mm
02
20
TCE004
Fit Terminal
02
21
TCE033
Orange Threaded Connector
02

20
IMG BRASIL Gastronomy Machinery Industry Ltda.
CNPJ 11.193.347/0001-14 - CREA 131726-3
Road. Antônio Heil - KM 23 Nº 5825 - Neighborhood: Limoeiro
ZIP CODE 88352-502 - Brusque - SC - Brazil
Phone/fax. +55 47 3251-5555 - Web Site: www.metvisa.com.br
This manual suits for next models
5
Table of contents


