MIB Commuter User manual

1
OWNERS MANUAL

2
Welcome To The MiB™ Family 1
Safety Warning 1
Warranty Information 2/3
General Information 3/4
Electrical: 3
Brakes: 3
Tyres/Wheels: 3
Accessories/Component Changes: 3
Suspension: 4
Battery: 4
Safety/Use: 4
Folding and Unfolding your bike 5/6
MiB E-Bike™ Range 7
Controller and LCD Display Instruction 9/10/11/12
Assembly & Step By Step Instructions 13/14
Operation Instructions 15
Maintenance 15
Contact Us 16
Applies to MiB E-Bikes, Commuter V1, Cruise V1, Discovery V1 and Scrambler V1

1
Welcome & Thank You
Welcome to the MiB™ family! You are now among a select group of customers that we
have had the pleasure of doing business with! We would like to start by thanking for
choosing MiB and for putting your trust in our product, and in return, we aim to give you
the best quality and service possible.
Safety Warning
MiB reserves the right to a final explanation of all clauses in this manual. We
understand that the manual does not, and cannot, fully cover all situations that may
arise from riding an electric bicycle, but we want to take this time to remind you to be
safe while on your MiB E-Bike™. Please make sure that you research your local laws
and regulations in regards to E-Bikes and ensure that you abide by these laws and
regulations. Please make sure that you wear the proper protection when riding. Here at
MiB™ we recommend that a helmet is worn at all times.
Failure to follow instructions in this manual properly may lead to an improperly
assembled, maintained, or operating bicycle. This can lead to a damaged product,
serious injury, or death. Please follow the instructions to the best of your ability; if you
get stuck or need some advice, please feel free to contact us for any and all support.
We strongly recommend that you use your local bike servicing workshop to have a
certified professional to properly build and service your new MiB E-Bike™. If you feel
you are completely capable of doing this yourself then please do so following the
assembly instructions provided. However, if you do assemble the bike yourself, please
understand that any damages that come from improper assembly, maintenance, or
operation of the vehicle at the hands of the owner, may result in the void of
warranty.

2
MiB E-Bikes™ come with warranties which cover any manufacture/hardware defects,
with electrical systems covered for 12 months, please see below for more detail:
Warranty on the Motor:
MiB E-Bikes come with a 12 month warranty on all motors from the date of purchase.
This warranty covers faulty motors only. The warranty becomes void if the motor has been
tampered with or misused e.g. de-restricted or dropped in a lake (yes it has happened!)
Always follow the instructions provided for safe maintenance of the motor
Warranty on the Battery:
MiB E-Bikes come with a 12 month warranty on all batteries from the date of
purchase. The warranty is to cover faulty batteries only. The warranty become void if the
battery has been misused or show signs of tampering.
Always follow the instructions provided for safe maintenance of the Battery
Warranty on the Controller:
MiB E-Bikes come with a 12 month warranty on all controllers from the date of
purchase. The warranty covers faulty controllers only. The warranty becomes void if the
controller has been misused or show signs of tampering.
Warranty on the Frame:
MiB E-Bikes come with a 36 month warranty on all frames. This does not include wear
and tear items like Suspension Forks, Tyres, Chains, Gearing, Brakes and Cables, Grips,
Pedals, Lights, Seats. The warranty becomes void if the frame has been misused or show
signs of tampering.
CE Certification:
All our bikes are CE Certified and we are happy to produce these upon request.
Please email us at mibhere[email protected] to request a copy.
Our E-Bikes conform to the following CE Directives:
CE 2006/42/EC (Machinery), CE 2014/35/EU (Low Voltage), CE 2014/30/EU
(Electromagnetic Compatibility)
As well as EN Standards:
EN ISO 12100:20010, EN 60204-1:2006+A1:2009+AC: 2010.

3
EN 15194-1:2006+A1:2011
EN 55014-1:2006+A1:2009+A2:2011
EN 55014-2:2015, EN 61000-3-2:2014
EN 61000-3-3:2013
Electrical Equipment:
The electrical equipment should already be set to the frame so no wiring will be
required. Please make sure to charge your battery fully before use. All relevant
information will be available on your Big Stone C600E LCD Display on your handlebars.
This includes showing your speed, the miles you’ve ridden, the level of pedal assist you
are currently using, and the battery life left on your battery.
Brakes:
Please make sure that you test the brakes before you ride it. Being able to stop is
pertinent to your safety. If the brakes require tuning or fixing of any kind bring your
bicycle to a professional. If however you would like to do this yourself YouTube have
several videos that you can find by searching “Tektro Disc Brake Adjustments” or
look at the embedded videos on our website www.mibebikes.co.uk
Tyres/Wheels:
Please make sure all wheels and tires are trued properly by a professional. An
improperly trued alignment may result in an improperly operating e-bike. Make sure the
tires are not compromised, and are able to hold the desired amount of tire pressure. If
they are not able to hold pressure, this will directly influence driving distance, and may
destroy the tire. Please follow inflation limits written on the tyre wall.
Accessories/Component Changes:
MiB recommends that you use a bike maintenance professional to install any
accessories on your e-bike. If you do wish to install any accessories yourself, please

4
keep in mind that if you damage your e-bike through botched alterations without the
assistance of an authorized professional, this can void your warranty.
Suspension:
Your suspension, like many parts of your e-bike, can be altered or modified to best suit
you. The suspension (if it has one), can be set to be more stiff or relaxed, based on how
you want to use your e-bike, and what you want out of your ride. This switch can be
found on the right of your suspension fork.
Battery:
Please charge your battery to full before using and make sure to store your batteries
indoors, at room temperature or below, between 50%-75% charge, to prevent overload
or damage due to extreme heat or cold. Our batteries have no “memory,” but it is
important that repeated use and repeated recharges from wear does naturally wear a
battery down. Our battery guarantee is that after 500 charges, our batteries will
still hold at LEAST 70% of their charge!
Safety/Use:
You, the rider, are solely responsible for learning the rules and laws regarding where
you are permitted to ride your e-bike in your country, city or rural area. You must have
your e-bike programmed to abide by the local laws. We here at MiB™ urge you to wear
the proper safety gear, and abide by any applicable laws of the road. We will not be
held liable for any damages or harm to bicycles and/or riders from rider decisions. We
care about your safety, however, and we do this by standing by our manufacture
warranty, and the quality of our product.

5
Follow these simple steps to fold your electric bike
STEP 1: Fold the Pedals (If you have folding pedals)
Push the outside edge of the pedal
Towards the frame and twist until the folding section is parallel to the
frame.
STEP 2: Fold the Handlebar and Stem
Release the 'safety catch' mechanism on the stem by pushing it
up.
Then open the quick release lever by pulling away from the stem
and lowering the handle bars slowly.

6
STEP 5
Then holding the handle in the center of the bike and lift
the kickstand
Then lift and rotate the front wheel of the bike slowly
towards the rear wheel until they both meet.
(The bike can now be supported by the metal
Stand situated under the bottom bracket.)
.
STEP 3
Fold handlebars to the side of the bike frame as shown in the
picture.
(Pay attention not to force cabling. The cables .should fall in front
or behind the stem when folded, not forced over the folding
mechanism.)
.
STEP 4 (frame)
Release the 'safety catch' mechanism in
picture 1 by lifting it upwards.
Then pull the quick release lever towards
the rear of the bike to unlock the frames
folding mechanism.

7
MiB Commuter
MiB Cruise

8
MiB Discovery
MiB Scrambler

9
1. Button definition

10
2. Function summary

11
3. Setup summary
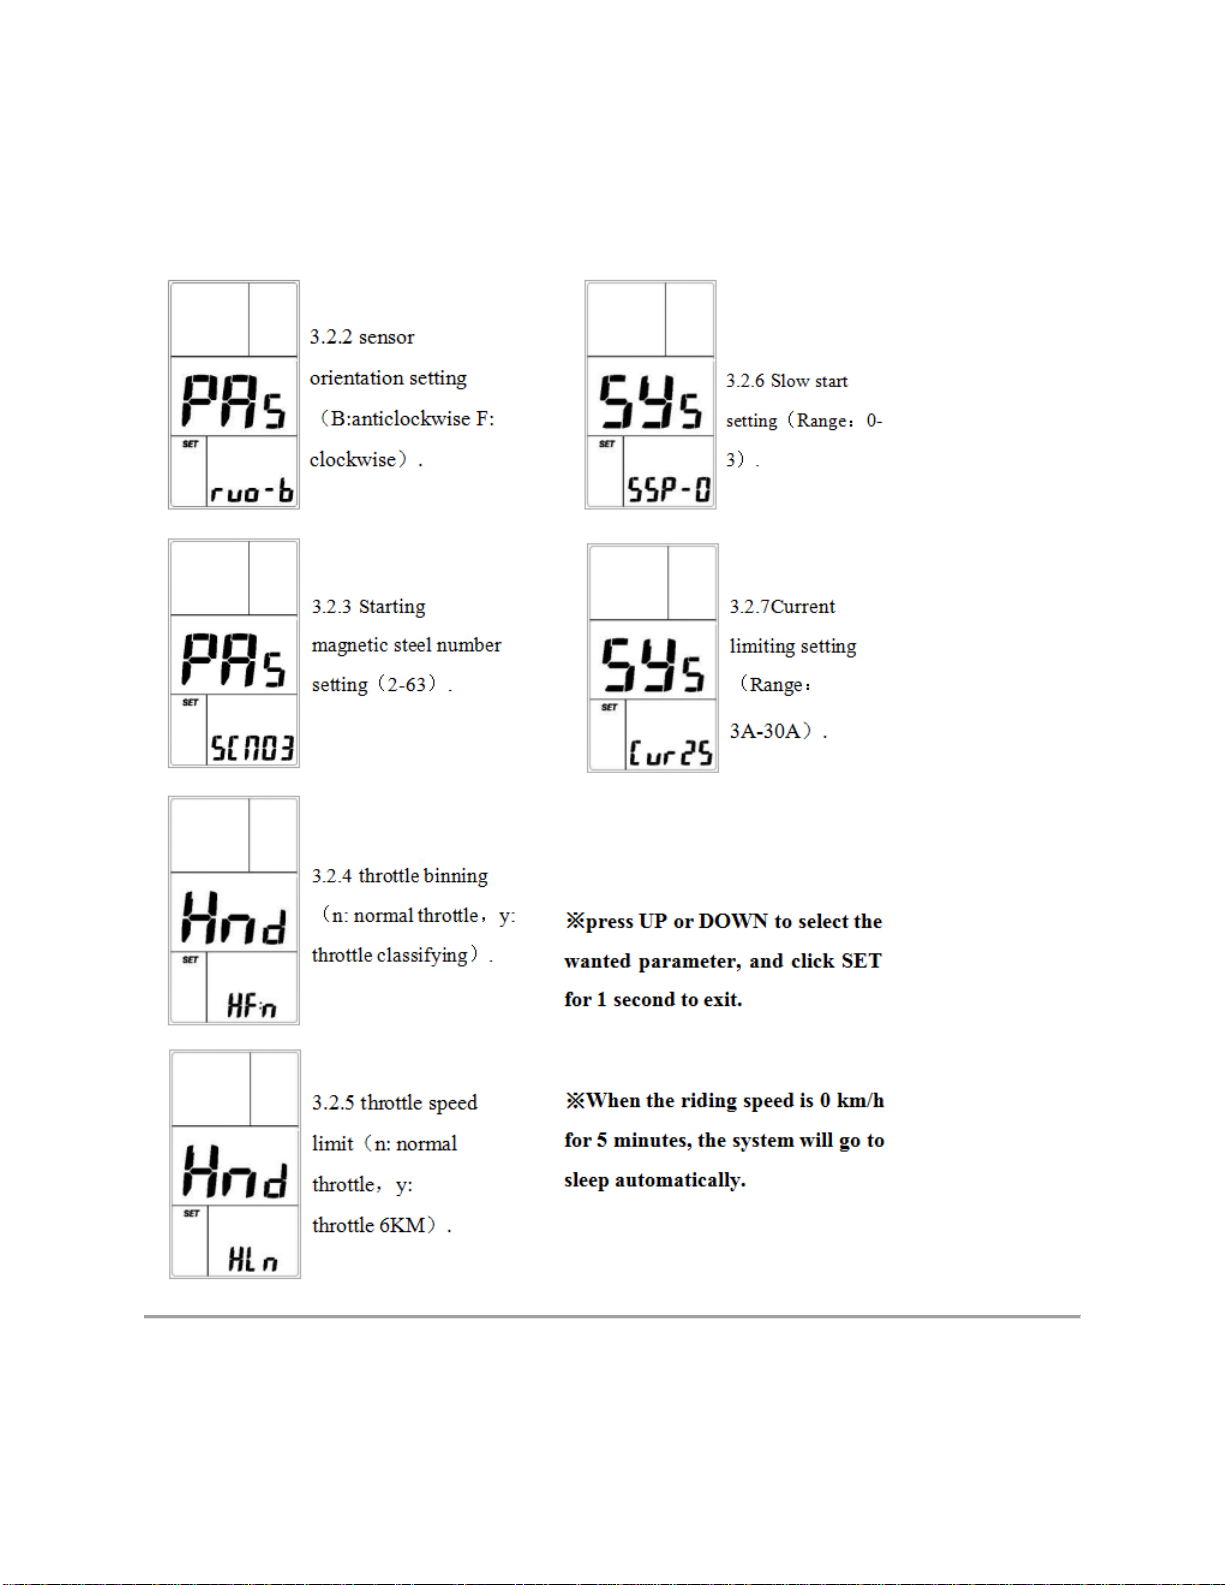
12

13
Alright! Let’s get to setting up your brand new MiB E-Bike™ Please look online for video
instructions on how to set assemble you MiB E-Bike™. Alternatively please see below
for written instructions on setting up your E-Bike™. If you are not fully confident in
assembling your E-Bike we recommend strongly that you contact a local bicycle
specialist.
Please note that the written instructions below are for all MiB E-Bikes™ in our range
and therefore there may be some sections that may not relate to your specific model. If
you are unsure at any point in what do please feel free to contact us.
Take a look and make sure you have all of the following items in your box:
- Bicycle (with both tyres, motor, chain etc.)
- Battery
- Charger
- Pedals
- Lights
- Quick release mechanism for the front wheel (if you have MiB Urban Scrambler)
- Tool Kit
Step by Step Guide
1. Remove bicycle from box and remove all packaging including bubble wrap and foam
coverings carefully.
2. Attaching your front wheel (please skip to step6 if you have a MiB Commuter, Cruise or
Discovery) Locate your quick release mechanism unscrew the end cap removing the cap
and spring. Then put this through middle of your front wheel hub (See Image) then put
the spring back on and loosely screw the cap back on.
3. Align the front wheel with the front forks of the E-Bike making sure that brake disc is
aligned with the brake caliper. The bike should now rest comfortably on the front
wheel.
4. Once the wheel is on hold then end cap with your fingers and then rotate the quick
release lever clockwise until you feel a slight resistance, then push the quick release

14
lever towards the wheel (This should be firm enough that it leaves a mark on your hand
but so firm that you need to use two hands)
5. Attach your handle bars using the 5 bolts on your bike attached the handles bar
mounting plate as seen below.
6. Attaching your mud guards place your mudguard between your tyre and the frame.
Then take the metal arms and attach to the frame using the screws that are in the
frame ready to use (Pic 1) then using the bolt already in the frame I the middle of the
front forks attach as seen below (Pic 2)
7. Inflate all tyres to correct pressure as labelled on the tyre walls.
8. Fit the pedals, Each pedal is labelled L and R. Screw the L pedal onto clockwise
tightening the bolt using the tool as seen below. Screw the R pedal on anti-clockwise
tightening the bolt as seen below.
9. Brakes and Derailleurs may need adjusting before use if you are not sure how to do this
please see our website under the important info tab –How to Adjust and Maintain Your
E-Bike pages and click on the links to the hand selected YouTube instruction videos or
alternatively take the bike to your local specialist.

15
The operation is quite simple - turn on the electrical component using the controller to
the left on your handlebar and select your PAS level and start pedalling. You will have a
LCD display up by the handlebars that will show your PAS level, battery charge level,
and your speed in either mph or kmh.
If there is a strange noise, if gears are failing or struggling to shift, if the e-bike is overly
loud, this could mean that there are e-bike parts that are in need of replacement and/or
maintenance.
A lot of the basic maintenance on an e-bike is similar to that of a regular bicycle. Things
like keeping chains oiled, and regularly washing bicycles to promote longevity, are key.
However, this need is significantly amplified, because the torque and velocity of the
motor makes the individual parts work harder. It is important to note that we believe
that customers should replace parts upon wear - not upon fail. All pieces and parts
should be as new as possible, so maintenance upkeep of the e-bike is important!
The electrical component, like the LCD display, the motor, the battery, and the circuit
wiring, make it so prolonged water contact is not suitable for the electric components.
Do not submerge this e-bike in any body of water. If wiring is causing the e-bike to
spark, please refrain from riding, kill the electrical current, and contact us to replace the
electrical system. If the system is faulty, or becomes faulty without outside tampering or
changes to the e-bike, you are under a 12-month warranty for electrical systems issues.

16
We thank you again for choosing MiB E-Bikes™. We want you to have the most fun
possible with your new e-bike, so if you have any problems, or want to know more about
e-bikes and e-bike culture, please do not hesitate to contact us on:
Email: [email protected]
Or through our website: www.mibebikes.co.uk
ENJOY YOUR NEW MiB E-BIKE™
Please do let us know how you much you enjoy your MiB E-Bike
through our Facebook page. We love hearing about our customers
adventures. Any pictures and stories are always welcome.
This manual suits for next models
3
Table of contents


