Micca EP350 G2 User manual
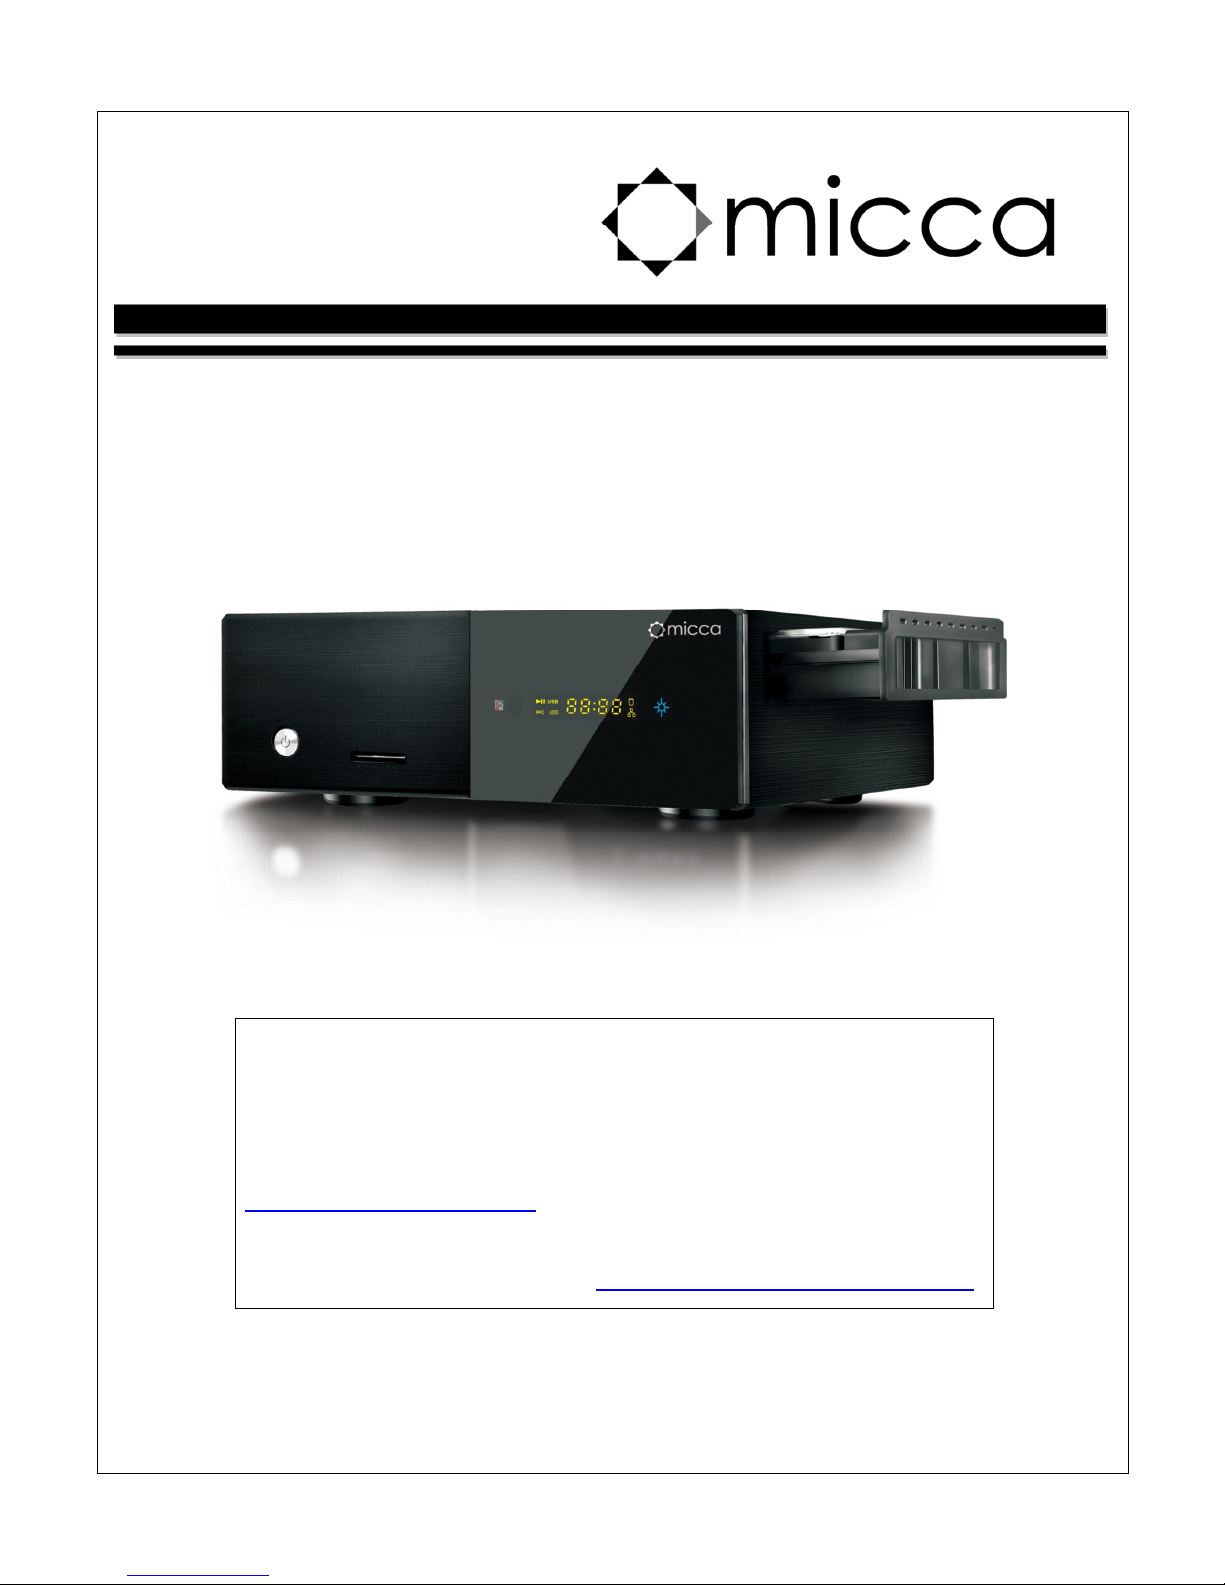
EP350 G2 Network Digital Media Player
Owner’s Manual
Attention Customers!
Thank you for purchasing a Micca product. Should you have any
enquiries or need assistance, please contact our technical
support team before contacting the store for assistance email
Most common questions and answers regarding this product can
be found at the following FAQ http //content.miccastore.com/faq
Copyright © 2009-2011 Micca, Ltd. All rights reserved.
This manual may not be reproduced in whole or in part
without permission for any purpose other than personal use.

1 Introduction
1.1 Preface
Thank you very much for purchasing this media player. We hope you will enjoy using it as a
great home entertainment device. This player has the following functionality:
1.1.1 A/V Output
HDMI V1.3 for high-definition video and digital audio
Composite & component video and stereo audio for analog audio-visual connection
S/PDIF coaxial & optical interface for high-fidelity digital audio
Adjustable video output resolution (NTSC, PAL, 480p, 576p, 720p, 1080i, 1080p)
1.1.2 Multimedia Playback
Supports major audio, video and image file formats (1080p HD video decoding)
Video format: AVI, MKV, TS, TP, TRP, M2TS, MPG, MP4, M4V, MOV, VOB, ISO, IFO, DAT,
WMV, ASF, RM, RMVB, FLV
Audio format: MP3, OGG, WMA, WAV, AAC, FLAC
Photo format: JPEG, BMP, GIF, TIF, PNG
Photo slide show with background music
1.1.3 Network Feature
A/V streaming via Ethernet (10M/100M) & Wi-Fi (802.11b/g/n, optional)
A/V streaming via UPnP Media Server
Samba file server for sharing files to other network devices
BitTorrent download (controlled and managed through web browser)
1.1.4 File Copy
Supports copying & moving files among Card, USB, HDD, and Network
1.1.5 USB 2.0 Support
USB device port for connecting to a computer
USB HOST ports (2) for connecting USB storage devices
Note: All the information contained in this manual was correct at the time of publication.
However, as our engineers are always updating and improving the product, your device’s
software may have a slightly different appearance or modified functionality than presented in
this manual.
1.2 Packing List
Part
Quantity
Player
1
Composite A/V C
able
1
USB Data C
able
1
Remote Control
1
AC/DC A
daptor
1
Hard Drive Screws
2
User Manual (printed)
1
Note: The actual contents in the package might be different from the packing list in this manual.
1.3 Precautions
This player’s design has your safety in mind. In order to safely and effectively use this player,
please read the following before usage.
1.3.1 Usage Cautions
Users should not modify this player. If a commercial hard disk drive is being used, the
environmental temperature should be between 40 to 95 degrees Fahrenheit.
1.3.2 Power
The player’s power supply voltage is DC 12V 3A.
When using this player, please connect the supplied AC adapter or AC adapter cable to the
player’s power jack. When placing the adapter cable, make sure it is not damaged or subject to
pressure. To reduce the risk of electric shock, unplug the adapter first before cleaning it. Never
connect the adapter to the player in a humid or dusty area. Do not replace the adapter or cable’s
wire or connector.
1.3.3 Radio Interference
If not properly shielded, almost all electronic devices will get radio interference. Under some
conditions, your player might get interference.
The design of this player has followed the FCC/CE standard, and adheres to the following
rules:
1) This player may not cause harmful interference;
2) This player could accept some interference received including interference that may
cause undesired operation.
1.3.4 Repair
If the player has a problem, you should take it to an appointed repair center and let the
specialists do the repair, never repair the player yourself, you might damage the player or
endanger yourself or your data.

1.3.5 Disposing of the Player
When you dispose of the player, be sure to dispose it appropriately. Some countries may
regulate disposal of electrical device, please consult with your local authority.
1.3.6 Hard Disk Cautions
The player uses an internal hard disk for data storage. New hard drives need to be properly
formatted prior to use.
Users should carefully read the Frequently Asked Questions chapter and check our website for
latest information before formatting the hard disk.
Physical impact may damage the hard disk drive. When hard drive errors occur, please use
CHKDSK to scan and fix problems.
All data stored in the player may be lost due to physical impact, electrical shock, power lost,
HDD format etc. Please backup your data.
It is suggested to perform a disk defragment after a long period of usage.
Regularly backup the data in the hard disk so that it can be recovered in the event of data
corruption or loss. Our company takes no responsibility for loss of data stored on the hard
disk.
1.3.7 Additional Precautions
When using this player, please do not let the player come into contact with water or other liquid.
If water is accidentally spilled on the player, please use a dry cloth to absorb the spillage.
Electronic products are fragile. Please be gentle during use; avoid shaking or hitting the player,
and do not press the buttons too hard.
Do not let the player come into contact with water or other liquids.
Do not disassemble, repair or change the design of the player, any damage done will not be
included in the repair policy.
Do not press the buttons of the player too hard.
Avoid hitting the player with hard objects, shaking the player, and stay away from magnetic
fields.
Electrostatic discharge may cause the product to malfunction. When this happens, unplug
the power cable and the product will return to normal operation next time it is powered on.
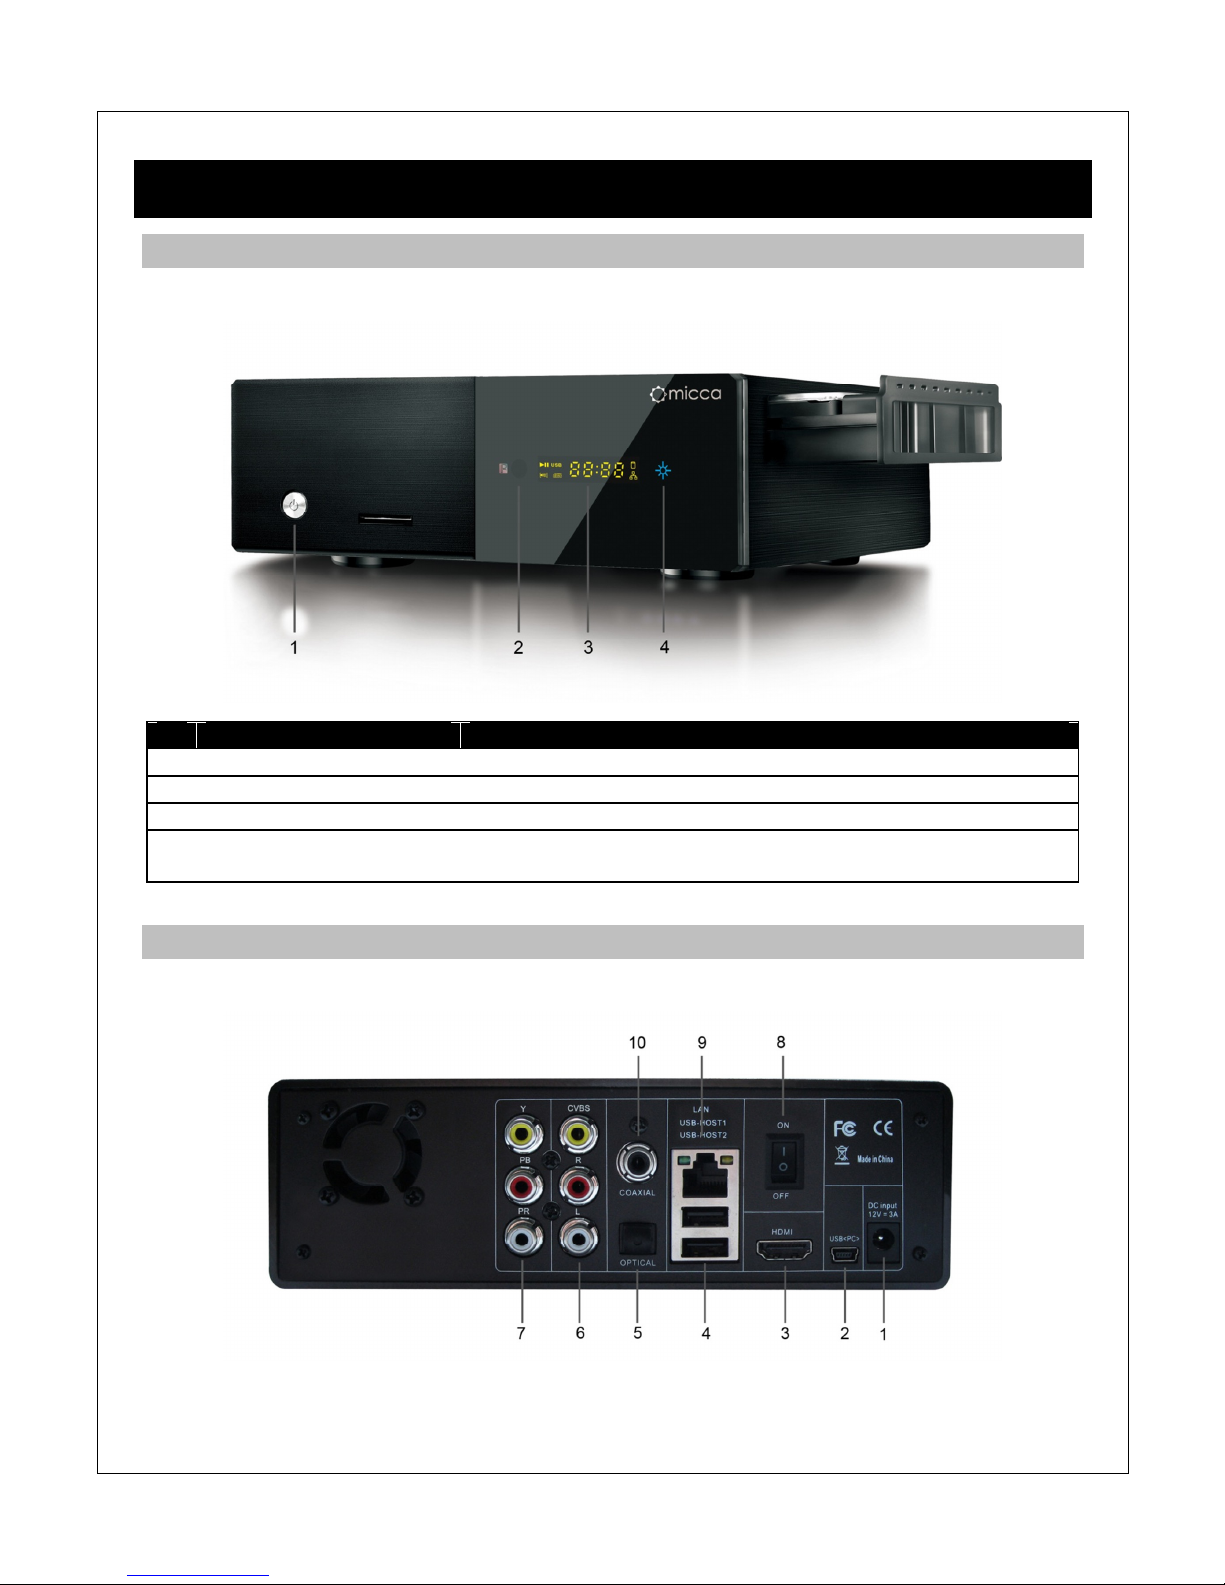
2 Player and Remote Overview
2.1 ront Panel
The front panel contains the stand-by button, remote sensor, and indicator displays
Name
Description
1
On/
Stand By
Button
Turns the player on or places it into stand-by mode.
2
IR Sensor
The sensor for receiving remote control commands
3
LCD Display
Shows basic player status and current time.
4
Status Light
A blue light indicates that the player is powered on, a red light
indicates that the player is in stand-by.
2.2 Rear Panel
The rear panel of the player contains various audio, video, and data connectors
Name
Description
1
DC IN DC power input, 12V 3A. Only use the AC adapter provided
with the player.
2
USB(PC) Used to connect the player to a PC and copy media files to or
from the player’s internal hard drive.
3
HDMI Provides digital audio/video to a TV or home theater with
HDMI input.
4
USB HOST Two connectors for connecting USB devices such as USB
hard drives, USB flash drives, or the optional Wi-Fi adapter.
5
OPTICAL S/PDIF optical digital audio output to a TV or home theater
with optical audio input.
6
CVBS/R/L Composite video and analog Left/Right audio output to a TV
or home theater with analog AV input.
7
Y/Pb/Pr Component video output to a TV or home theater with
component video input.
8
Power Switch To turn the player on or off. Set this switch to “On” for normal
use. When not using the player, use the remote control to put
the player on Stand By instead of turning off the player with
this switch.
9
LAN 10/100mbps Ethernet for Internet or LAN network access.
10
COAXIAL S/PDIF coaxial digital audio output to a TV or home theater
with coaxial audio input.

2.3 Remote Control
All player functions can be controlled by using the remote control. See the following for details
on the function of each button.
1. EJECT 2. MUTE
3. EPG 4. REC
5. ZOOM 6. TV SYSTEM
7. Numeric Keys 8. BOOKMARK
9. PREV 10. FR
11. SETUP 12. FF
13. GUIDE 14. OPTION
15. Navigation Keys 16. SLOW
17. SUBTITLE 18. PLAY/PAUSE
19. REPEAT 20. GREEN
21. RED 22. POWER
23. TIME SHIFT 24. A-B
25. MUSIC 26. AUDIO
27. GOTO 28. VOL+
29. NEXT 30. VOL-
31. RETURN 32. OK/ENTER
33. DISPLAY 34. STOP
35. YELLOW 36. BLUE
Button
Description
POWER
Press to power on/off the player.
EJECT
Press to stop a storage device for safe removal.
Press and hold for 2 seconds to eject a DVD-ROM drive.
MUTE
Press to mute audio output; press again to unmute.
REC
Not Used
EPG
Not Used
TIME SHI T
Not Used
A
-
B
Press to set repeat points A and B.
TV SYSTEM
Press to switch between available video output modes NTSC,
PAL, 480p, 576p, 720p, 1080i/p.
ZOOM
Press to zoom when viewing photos or playing videos.

Photo zoom levels: 2x, 4x, 8x, 16x.
Video zoom levels: 2x, 3x, 4x, 8x.
MUSIC
Direct access button for music playback
AUDIO
Press to change audio tracks when playing videos.
Numeric Buttons
Used when settings require numeric input.
BOOKMARK
Press to add the current playing video to the bookmark list.
At the main menu, press to view the bookmark list.
GOTO
Press to jump to a specific time mark when playing a video.
FR
Press to fast rewind the current playback. Press repeatedly to
change fast rewind speed.
FF
Press to fast forward the current playback. Press repeatedly to
change fast forward speed.
PREV
Press to go to the previous photo, music, or video file.
Press to go up one page when browsing files.
NEXT
Press to go to the next photo, music, or video file.
Press to go down one page when browsing files.
SETUP
Press to enter the setup menu for changing player settings.
GUIDE
Press to view the guide menu.
VOL+
Press to increase the volume (set volume to max during normal
use and use the TV or home theater receiver to control volume).
VOL
-
Press to decrease the volume (set volume to max during normal
use and use the TV or home theater receiver to control volume).
OPTION
Press to view the options menu if available.
RETURN
Press to return to the previous screen when navigation menus.
Press to exit the current folder when browsing files.
Navigation Keys
Press the arrow buttons to highlight items whenever needed.
OK/ENTER
Press to proceed with the highlighted item.
SUBTITLE
Press to open the subtitle menu when viewing videos.
SLOW
Press to playback in slow motion. Press repeatedly to change slow
motion speeds of 3/4, 1/2, 1/4, 1/8, 1/16. Press the PLAY button to
resume normal playback.
DISPLAY
Press to display information about currently playing video.
REPEAT
Press to set repeat option for the current file.
PLAY/PAUSE
Press to begin or pause playback.
STOP
Press to stop playback.
RED
Context button, will be shown on the screen when available.
GREEN
Context button, will be shown on the screen when available.
YELLOW
Context button, will be shown on the screen when available.
BLUE
Context button, will be shown on the screen when available.

3 Connections
3.1 Basic Connections
3.1.1 Connecting the Power Supply
To connect power to the player:
1) Make sure the power switch on the back of the player is in the off position
2) Connect the barrel connector of the AC adapter to the player’s DC IN jack
3) Connect the plug of the AC adapter to the power outlet
3.1.2 Installing an Internal Hard Disk Drive
The player has an internal drive bay for holding a hard disk drive. Media files can be stored on
the internal hard disk drive for playback, thus avoiding the need for an external storage device
during playback.
Install the hard drive by following these steps:
1) Squeeze and pull the tabs on the side of the player to slide out the drive tray.
2) Secure the 3.5” drive with the supplied hard drive screws onto the drive tray.
3) Gently slide the drive tray back into the player until the tabs lock in place. If any
resistance is felt, inspect the drive and drive tray for damage - do not force the drive tray.
It’s strongly recommended that the player be used to format the internal hard disk drive. Refer to
‘8.1.11 Format’ for more details.
3.1.3 Connecting to a Computer
The player can be connected to the PC to transfer files to and from the player’s internal hard
disk drive at high speeds.
1) Plug the small mini 5-pin connector of the USB data cable to the player’s USB(PC) port;
2) Plug the other end of the USB data cable to a USB jack on the computer.
3) Turn on the player using the POWER button on the remote control. The player will be
detected by the computer and the player’s hard drive will show up as a USB hard drive
on the computer. It may take 30-60 seconds for the computer to recognize the player and
mount the drive; please be patient while this mounting process is going on.
3.1.4 Connecting a USB Storage Device
Storage devices such as USB hard drives or flash drives can be connected to the player for
playback of media files.
1) Power on the player.
2) Plug in the USB device to one of the USB HOST ports on the back of the player.

3) After about 5-10 seconds, the USB drive will be detected and can be accessed through
the player.
3.1.5 Connecting a Memory Card
SD or SDHC flash memory cards can be connected to the player for playback of media files.
1) Power on the player.
2) Insert the flash memory card into the card reader on the side of the player.
3) After about 5-10 seconds, the flash memory card will be detected and can be accessed
through the player.
3.2 Audio and Video Connections
The player can be connected to a TV/HDTV or home theater system in a variety of methods. For
best results, always use the best method available for connection:
Results
Video
Audio
Requirement
Best
HDMI HDMI TV with HDMI input and home theater
receiver that can decode Audio over HDMI.
Better
HDMI Digital coaxial
or optical TV with HDMI input and home theater
receiver with Coaxial or Optical input.
Good
Component Digital coaxial
or optical TV with component input and home theater
receiver with Coaxial or Optical input.
Okay
Composite Analog L/R TV with composite video and analog audio
inputs.
3.2.1 HDMI Connection
HDMI provides the best possible video and audio connection. Use this connection whenever
possible.
1) Plug one end of the HDMI cable to the player’s HDMI output jack.
2) Plug the other end of the HDMI cable to your TV’s HDMI input jack.
3) Consult the TV’s manual for configuring its inputs.
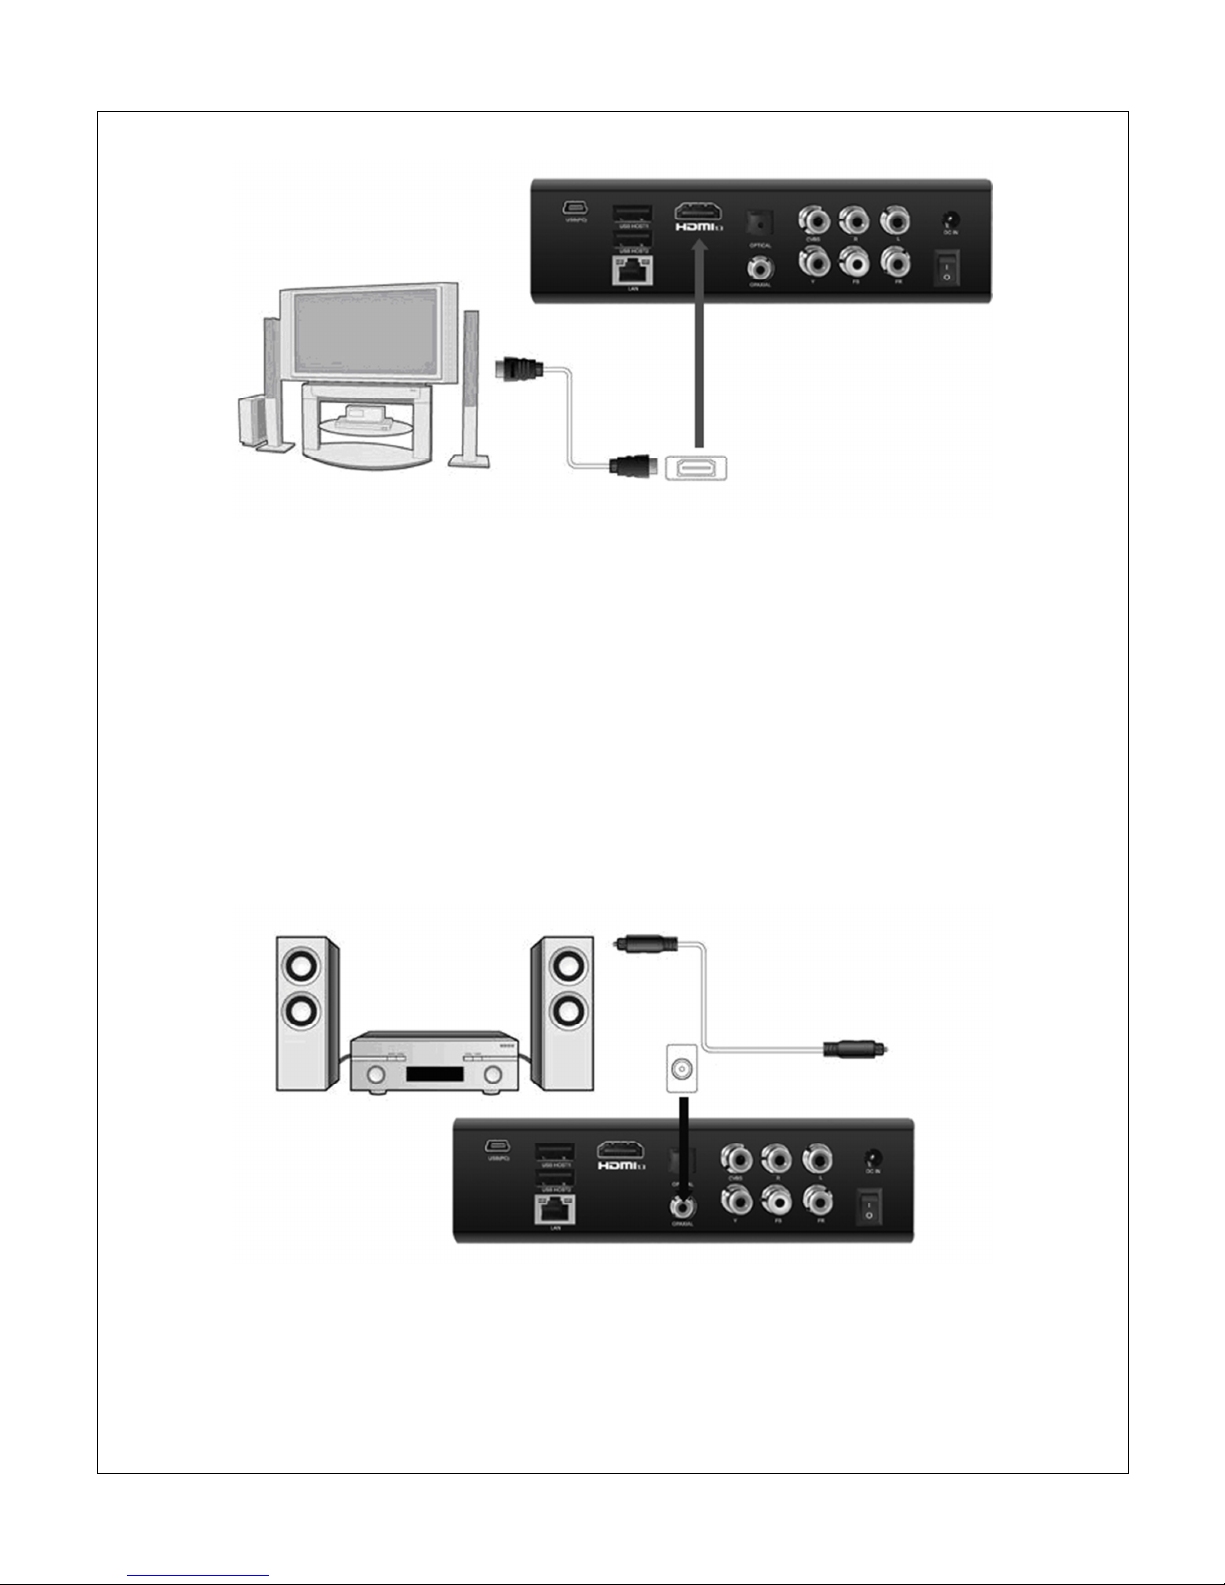
Note: If you have a home theater receiver with HDMI input and output jacks, connect the other
end of the HDMI cable to an available HDMI input on the receiver instead of the TV. Consult the
receiver’s manual for configuring its inputs.
3.2.2 Digital Audio Connection
When using a home theater receiver or sound system that lacks HDMI input, the player’s coaxial
or optical digital audio output can be used.
1) Plug one end of the coaxial or Toslink optical cable to the player’s digital audio jack.
2) Plug the other end of the coaxial or Toslink optical cable to the home theater receiver or
sound system’s digital audio input jack.
3) Consult the receiver or sound system’s manual for configuring its inputs.
3.2.3 Component Video Connection
When using a TV that does not have HDMI input but has component video, the player’s
component video output can be used.
1) Plug one end of the red/blue/green component video cable to the player’s component
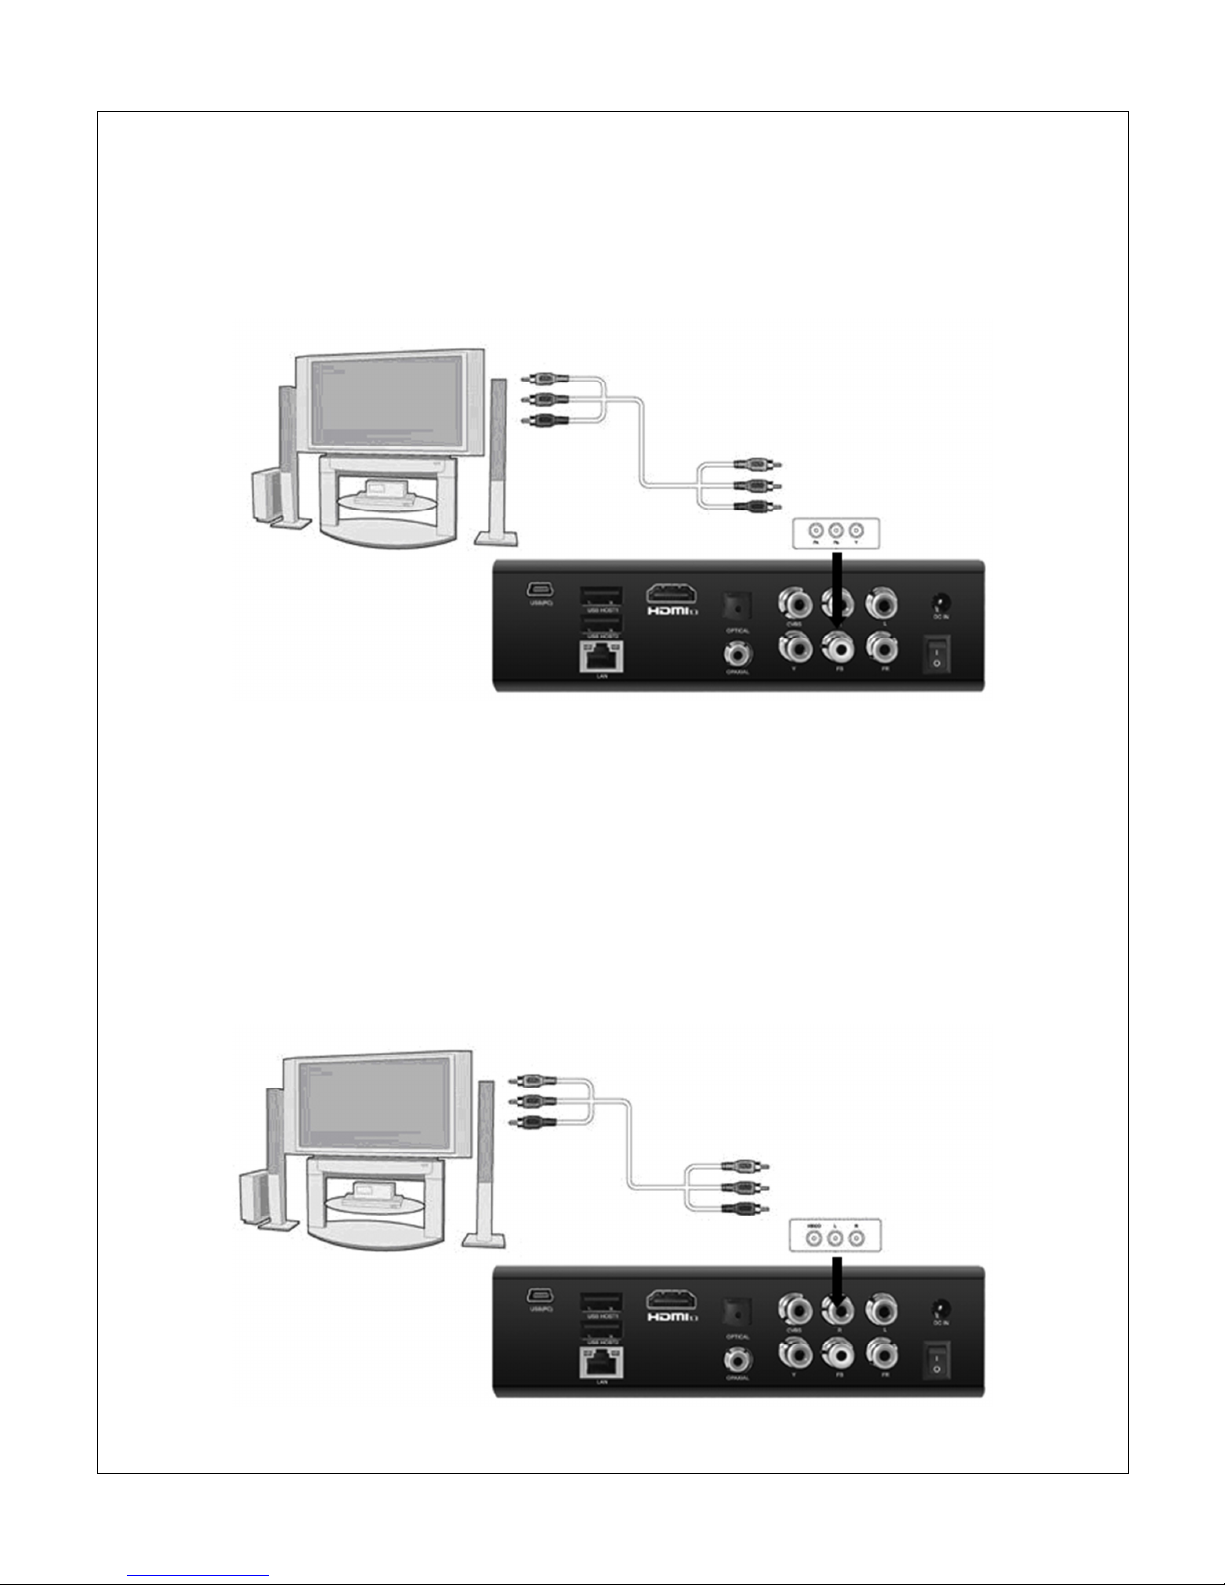
video jacks.
2) Plug the other end of the red/blue/green component cable to an available component
video input on the TV.
3) Consult the TV’s manual for configuring its inputs.
Note: Component video connection only carries video signal. The audio signal must be
connected separately, such as through digital coaxial/optical or analog AV connection.
3.2.4 Composite Video and Analog Audio Connection
When using a TV that only has composite video input, the player’s composite video and analog
audio output can be used.
1) Plug one end of the red/white/yellow AV cable to the player’s AV jacks.
2) Plug the other end of the red/white/yellow AV cable to an available AV input on the TV.
3) Consult the TV’s manual for configuring its inputs.

3.3 Network Connections
3.3.1 Connecting to a Wired LAN Network
A wired Ethernet connection provides the best results for streaming A/V content through the
network. Use a wired Ethernet connection whenever it is possible to do so.
1) Plug one end of a Cat5/5e/6 Ethernet network cable to the player’s LAN jack.
2) Plug the other end of the Cat5/5e/6 Ethernet network cable to an available port on a LAN
switch, router, or networked wall plate.
3.3.2 Connecting to a Wireless Network
When a wired network connection is not available, the player can stream A/V content through
the network by using a Wi-Fi USB adapter (sold separately).
1) Power on the player.
2) Plug the Wi-Fi USB adapter to one of the USB HOST ports on the back of the player.
3) Refer to ‘8.4 Network Settings’ for more details about WLAN setup.
4 irst Time Startup
4.1 Power On
After connecting the AC power adapter to the player’s DC IN jack, turn the power switch on the
back of the player to the On position. The player will power on and the power indicator light on
the front of the player will turn blue.
To turn off the player, turn the power switch on the back of the player to the Off position. The
player will now be powered off. The player should not be powered off during normal use; put the
player into power saving Stand By instead.
During normal use, place the player into power saving Stand By mode when not in use. To place
the player into Stand By, press the POWER button on the front of the player or on the remote
control. The red Stand By indicator light will illuminate. To turn the player on, press the POWER
button on the front of the player or on the remote control again.
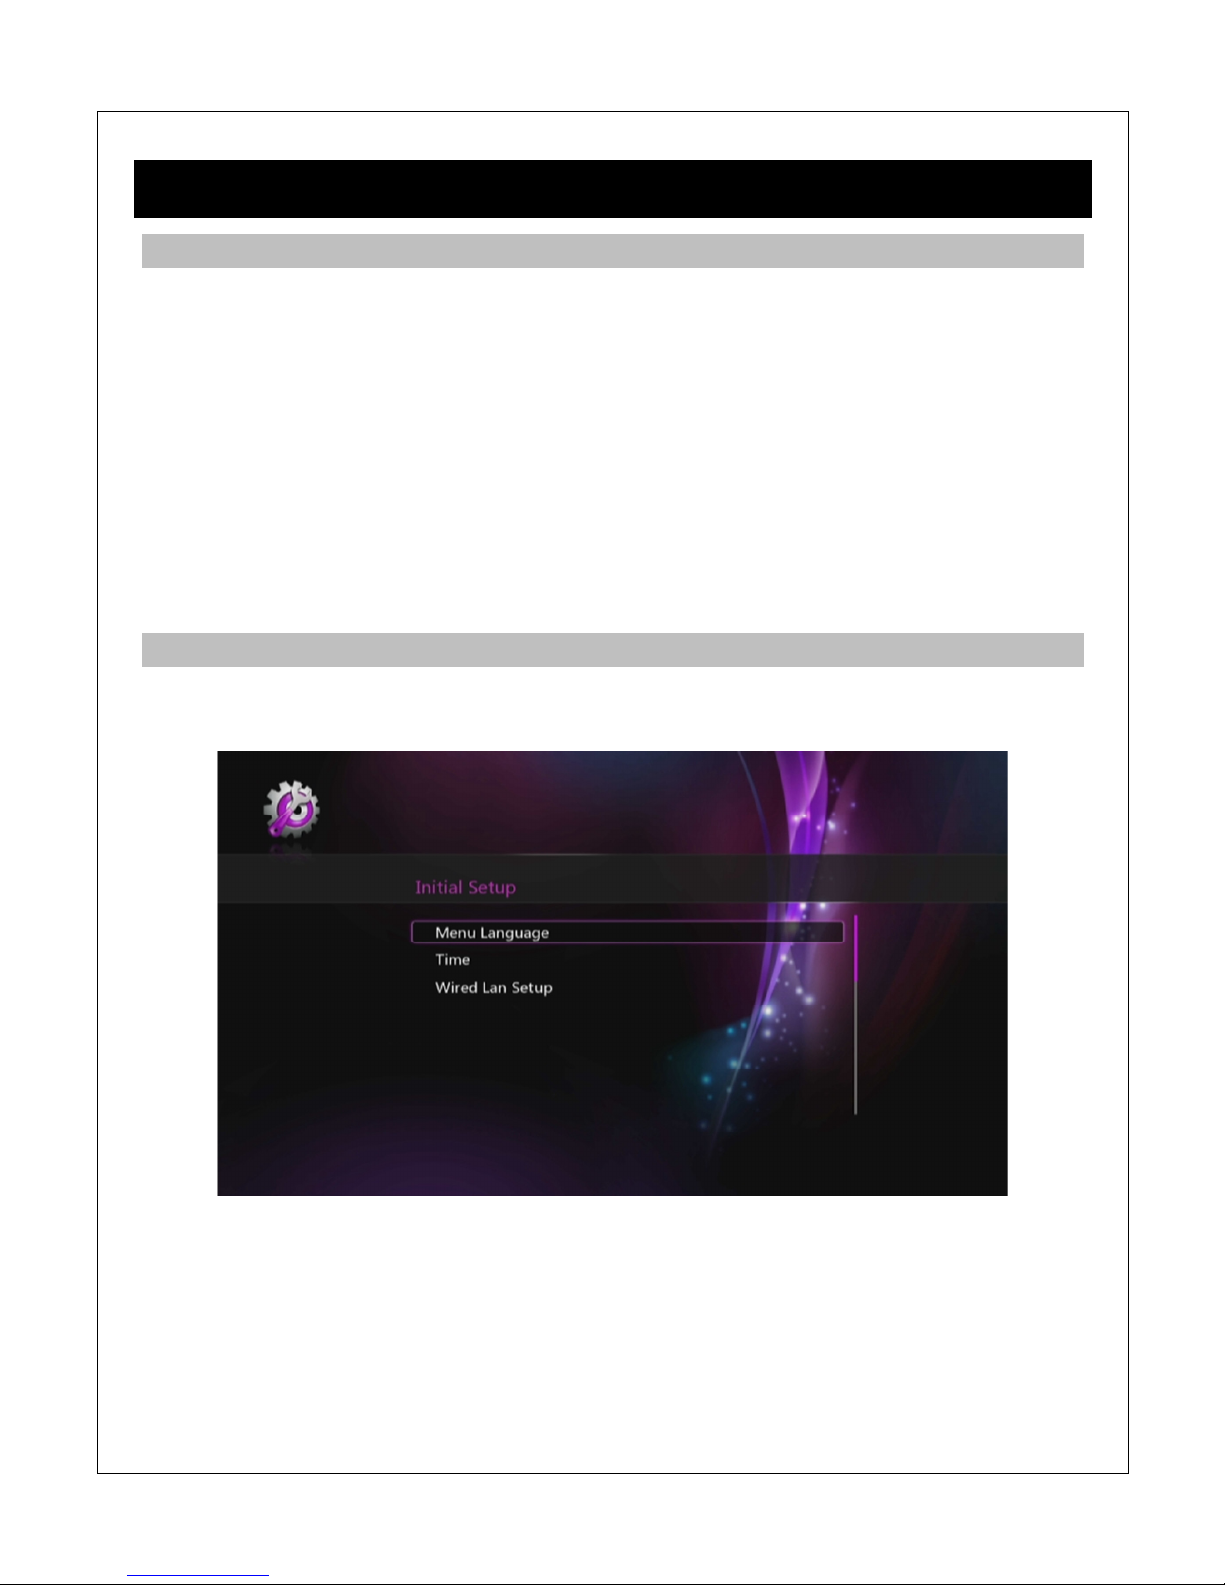
4.2 Initial Setup
When turning on the player for the first time, it will prompt the user to select the menu language,
time, and wired LAN settings.
4.2.1 Menu Language
Choose the desired language. This is the language that will be used for menus and interface.
This setting does not affect audio track or subtitle language settings.
4.2.2 Time
Setting the time of the player is optional. To set the time, first select Time Zone relative to GMT.
Next the user is prompted to enter the date and time. Use the navigation buttons to set each
field and press Enter when finished. If the user skips this step during initial setup, please refer to
‘8.1.3 Time’ for instructions on how to set the player’s time through the Settings menu.
4.2.3 Wired LAN Setup
This step of the initial setup is optional. Refer to ‘8.4 Network Settings’ for more details about
network setup. If the user skips this step during initial setup, the settings can be performed
through the player’s Settings menu. For most cases, the “DHCP IP (Auto)” setting is the correct
setting. Only advanced users should choose the “FIX IP (Manual)” setting.
4.3 Main Menu
When the initial setup is complete, the player will display the main menu.
The player is now ready for use. For best results, refer to ‘0 Settings’ to setup the player for
best results.
The main menu contains a column of menu items on the left, and a row of status icons in the
middle that shows various connectivity and storage devices currently in use. The main menu
items have the following functionality
Menu Item
Description
ile Manager
Browse for media files on hard drives, USB drives, flash memory
cards, network folder shares, or UPnP servers. Media files will be
organized in their original folder structure.
Videos
Use the media library feature to browse and play video files on
storage devices attached directly to the player. All video files on hard
drives, USB drives, and memory cards will be displayed together.
Music
Use the media library feature to browse and play music files on
storage devices attached directly to the player. All music files on hard
drives, USB drives, and memory cards will be displayed together.

Photos
Use the media library feature to browse and play photos on storage
devices attached directly to the player. All photos on hard drives, USB
drives, and memory cards will be displayed together.
Internet
Access various Internet video, music, and photo content. Availability of
content may change and is not guaranteed as content providers may
decide to make their content unavailable at any time without notice.
Bookmark
View videos that have been added as bookmarks.
Setup
Access the setup menu to change player settings.
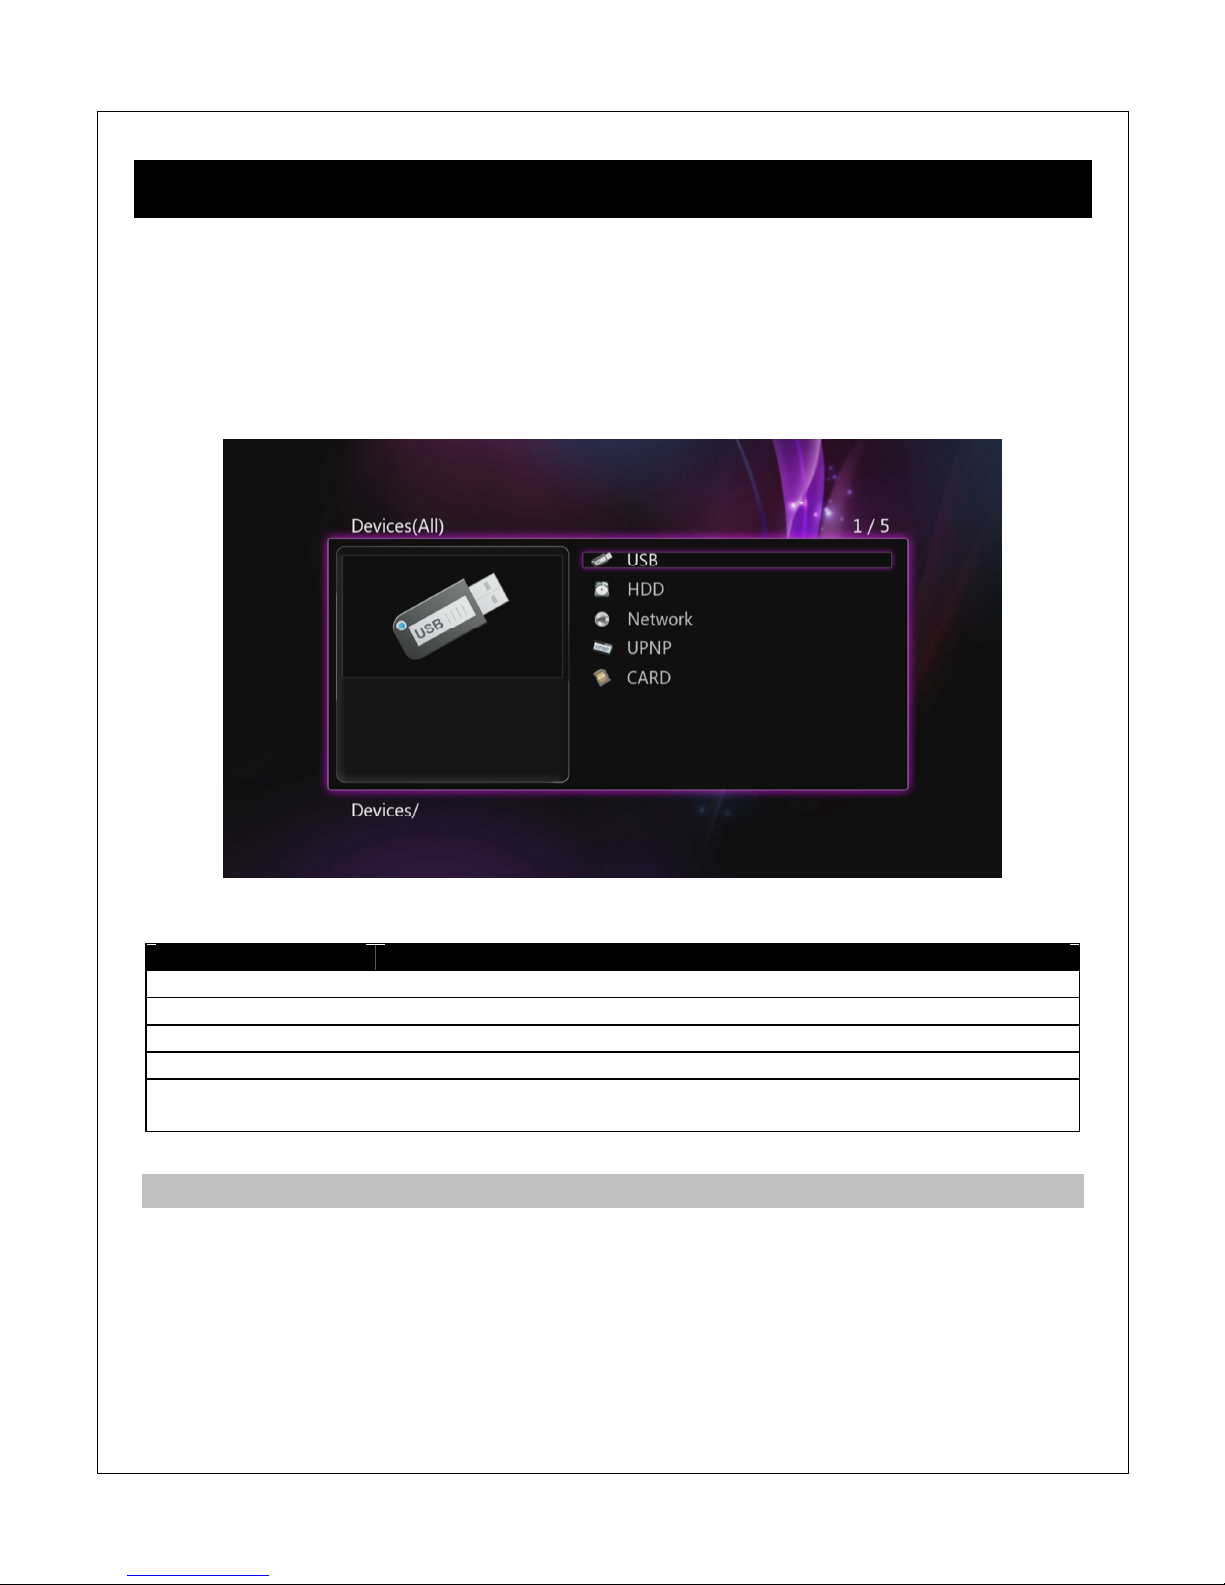
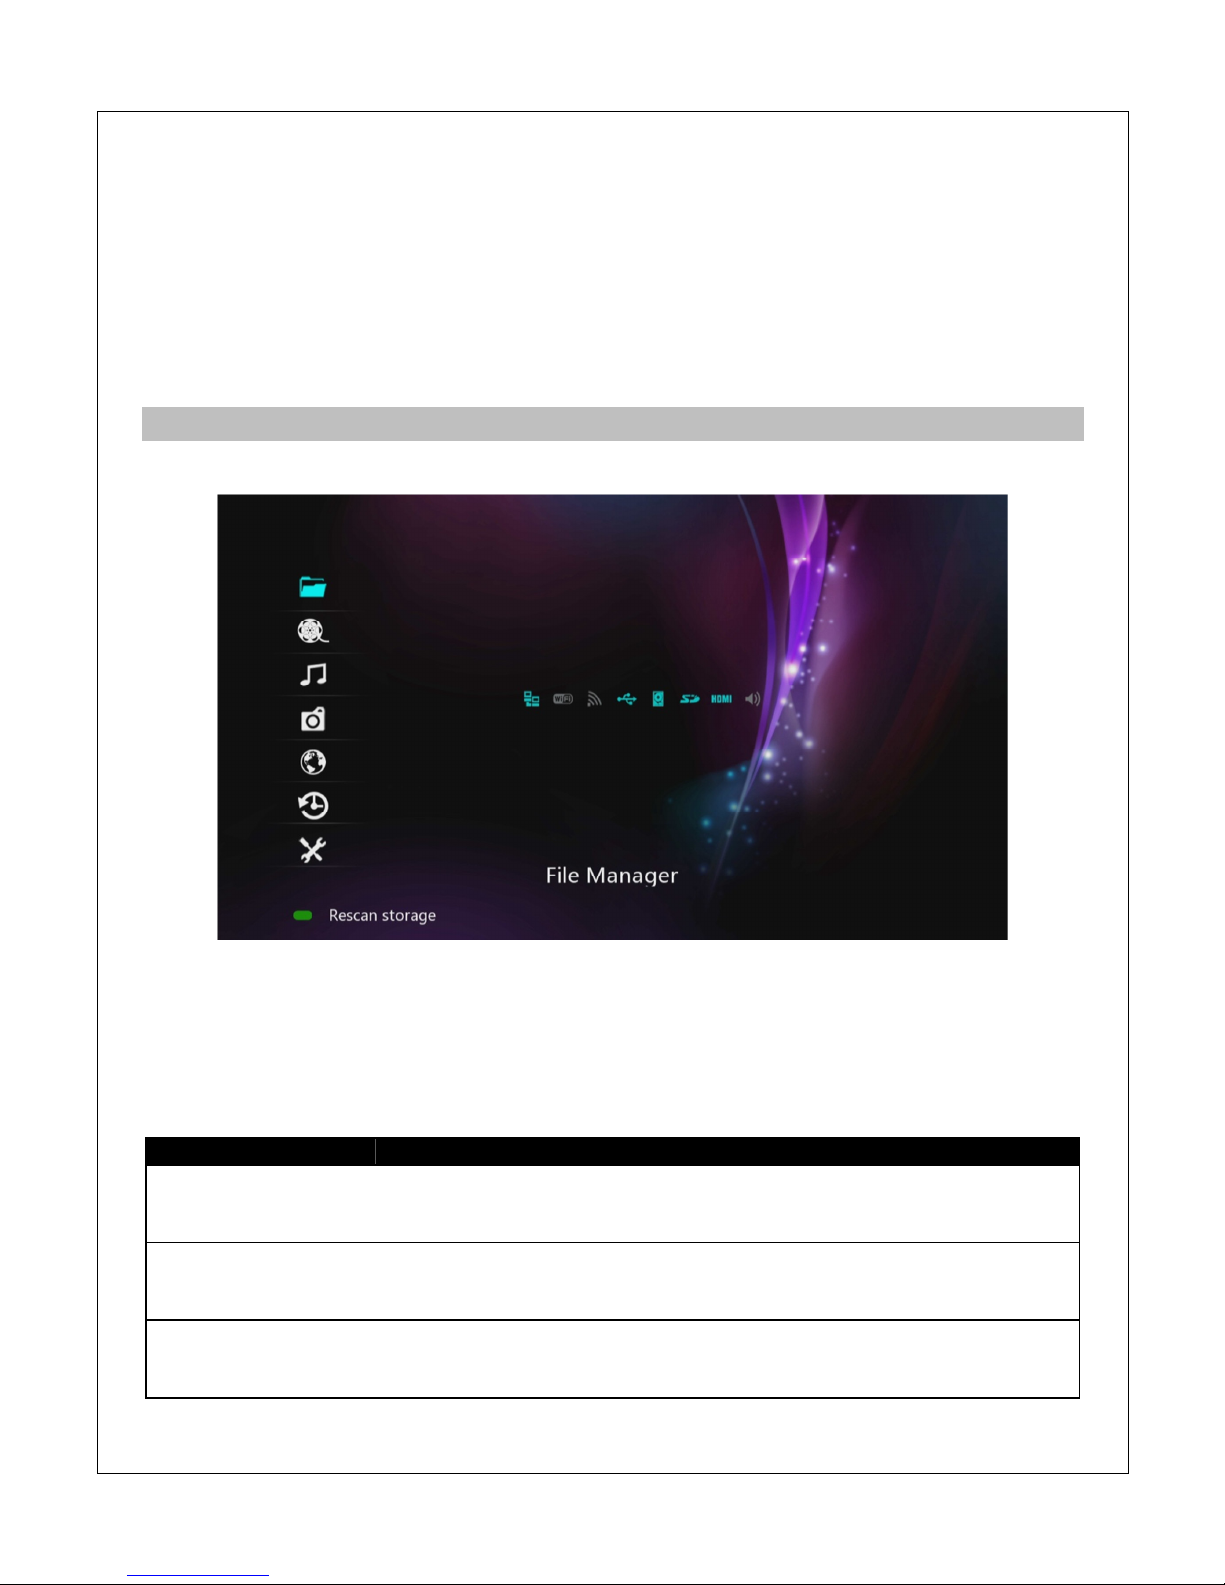
5 ile Manager
The file manager is the default method for browse media files on hard drives, USB drives, flash
memory cards, network folder shares, or UPnP servers. Media files will be organized in their
original folder structure. The file manager can also be used to copy/move/rename/delete files.
To access the file manager, select the File Manager icon from the main menu and press
OK/ENTER on the remote control. All available storage devices and network connections will be
listed. Select the desired device to browse media files on
Menu Item
Description
USB
Browse media files on an external USB drive attached to the player.
HDD
Browse media files on the internal hard disk drive.
Network
Browse media files on local network folder shares.
UPnP
Browse media files on local UPnP servers.
CARD
Browse media files on a flash memory card inserted into the player’s
card reader.
5.1 Browsing or Media iles
After selecting a storage device media files will be displayed in the same folder structure as they
are stored. Use the directional LE T/RIGHT and UP/DOWN buttons on the remote control to
select folders or files and press OK/ENTER to enter a folder. To exit from a folder, press the
RETURN button. To play a media file, highlight it and press the OK/ENTER button.
To make it easier and more intuitive to browse media files, three different media display modes
are available Thumbnail, List, Preview. To change the display mode, press the OPTION button
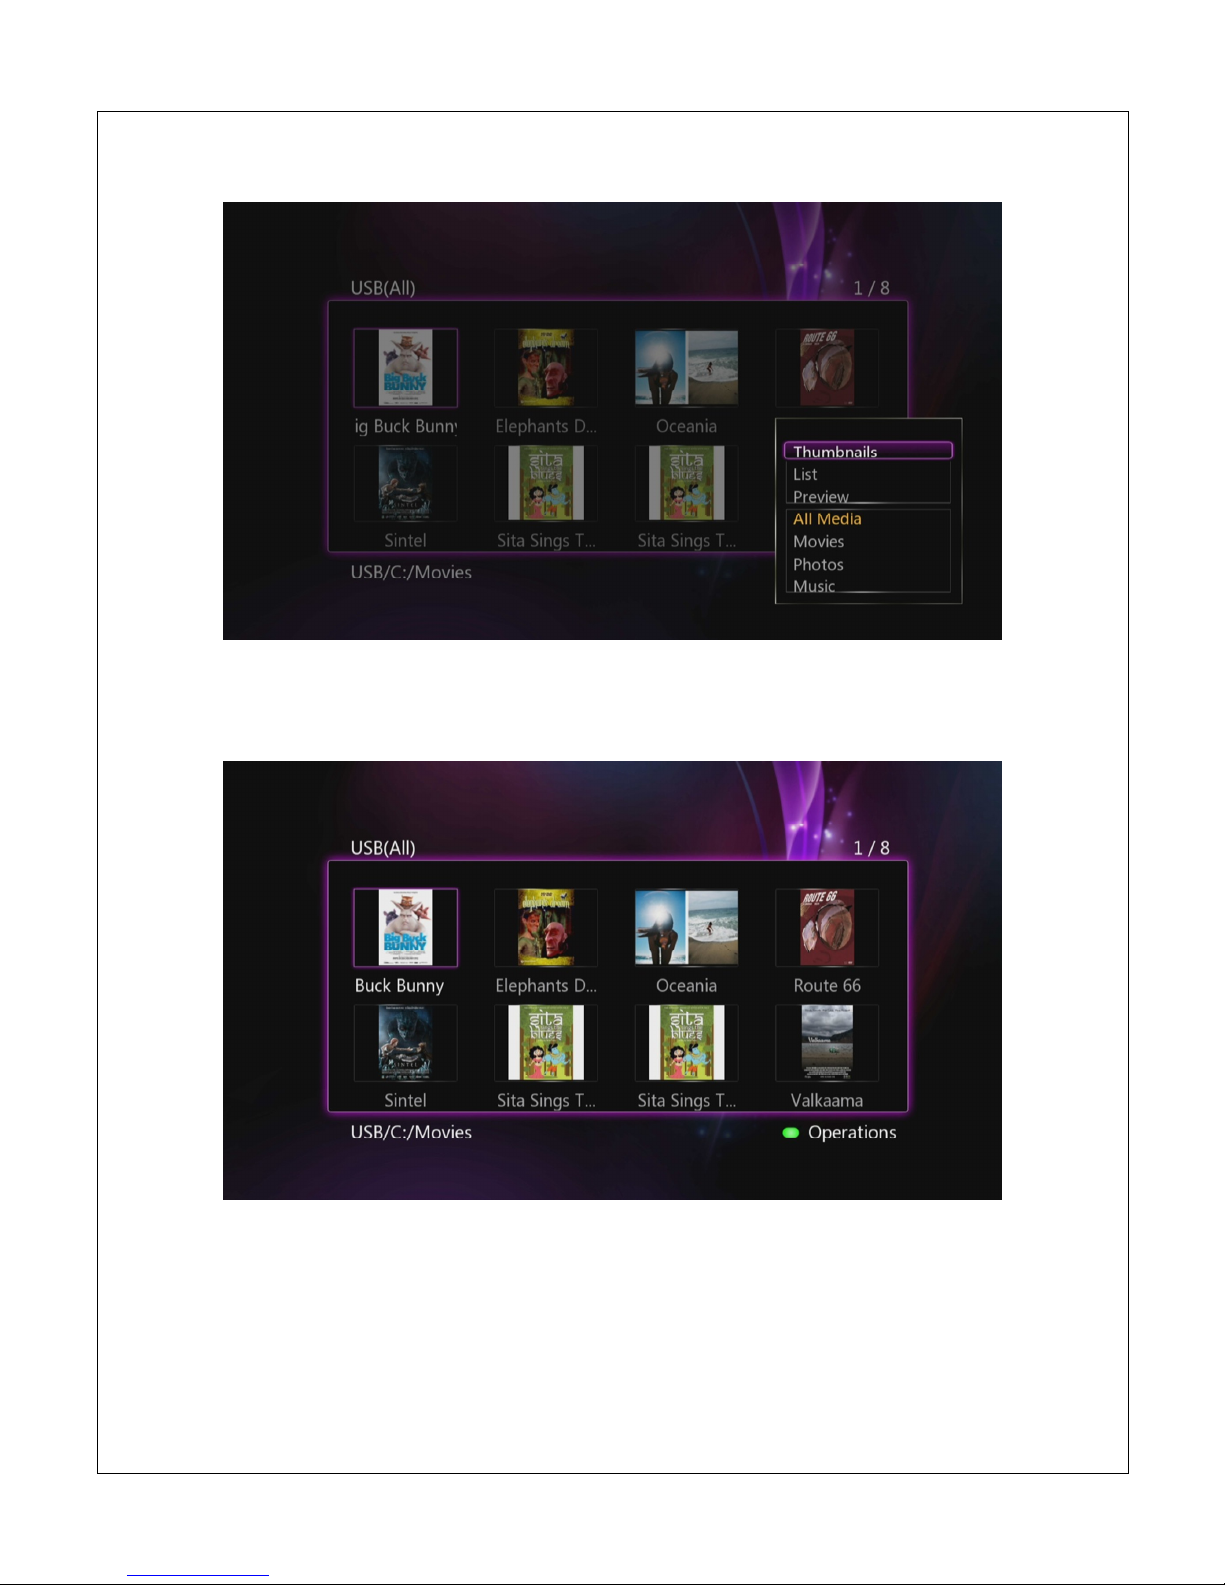
on the remote to bring up the options menu and select the desired display mode
5.1.1 Thumbnail View
Thumbnail view displays folders and media files as thumbnails on the screen with a partial file
name underneath. This is useful for browsing photos and movies with associated cover art.
5.1.2 List View
The list view displays folder and media files as a simple list with the full file name displayed. This
view loads faster and is suitable for navigating large collections of folders and files.

5.1.3 Preview
In preview mode, folders and media files are displayed as a list on the right side of the screen
and a preview window on the left side. When a folder or media file is highlighted in the list, the
preview window displays a thumbnail or video preview.
5.2 Browsing Network older Shares
Select “Network” from the file manager to browse for media files in local network shared folders.
On the next screen, select WORKGROUP and a list of available host names will be shown.
Select one of the host names and all available folder shares from that host name will be
displayed. If the host requires a username and password for accessing a folder share, a login
box will popup

Once the shared folder has been opened, browsing for media files works the same as browsing
on storage devices attached to the player.
5.3 Using Network Shortcuts
Frequently accessed network hosts or folder shares can be added to the shortcuts folder for
quicker access. Shortcuts also allows accessing network devices that only has an IP address
and no host name.
To setup and use network shortcuts, select “Network” from the file manager and select
“My_Shortcuts” on the next screen. Press the RED button on the remote control to bring up the
shortcuts menu and select “Add”. Next enter the username, password, and IP address of the
host. If a username and password is not needed, leave these fields blank.
This manual suits for next models
1
Table of contents
Other Micca Media Player manuals


Popular Media Player manuals by other brands

Rockford Fosgate
Rockford Fosgate RFX4000 Operation manual

ViewSonic
ViewSonic NMP599-W-2 quick start guide

Samsung
Samsung HARMAN JBL MP350 Classic owner's manual

Amerec
Amerec BLUECUBE + User & installation manual

PROEM
PROEM MDC-2F4 user manual

CUT THE CORD CANADA
CUT THE CORD CANADA RIPCORD quick start guide


