Micca EP250 User manual

EP250/EP350 Network Digital Media Player
Owner’s Manual
Attention Customers!
Thank you for purchasing a Micca product. Should you have any
enquiries or need assistance, please contact our technical
support team before contacting the store for assistance email
Most common questions and answers regarding this product can
be found at the following FAQ http //content.miccastore.com/faq
Copyright © 2009-2011 Micca, Ltd. All rights reserved.
This manual may not be reproduced in whole or in part
without permission for any purpose other than personal use.

1 Introduction
1.1 Preface
Thank you very much for purchasing this media player. We hope you will enjoy using it as a
great home entertainment device. This player has the following functionality:
1.1.1 A/V Output
HDMI V1.3 for high-definition video and digital audio
Composite & component video and stereo audio for analog audio-visual connection
S/PDIF coaxial & optical interface for high-fidelity digital audio
Adjustable video output resolution (NTSC, PAL, 480p, 576p, 720p, 1080i, 1080p)
1.1.2 Multimedia Playback
Supports major audio, video and image file formats (1080p HD video decoding)
Video format: AVI, MKV, TS, TP, TRP, M2TS, MPG, MP4, M4V, MOV, VOB, ISO, IFO, DAT,
WMV, ASF, RM, RMVB, FLV
Audio format: MP3, OGG, WMA, WAV, AAC, FLAC
Photo format: JPEG, BMP, GIF, TIF, PNG
Photo slide show with background music
1.1.3 Network Feature
A/V streaming via Ethernet (10M/100M) & Wi-Fi (802.11b/g/n, optional)
A/V streaming via UPnP Media Server
Samba file server for sharing files to other network devices
BitTorrent download (controlled and managed through web browser)
1.1.4 File Copy
Supports copying & moving files among Card, USB, HDD, and Network
1.1.5 USB 2.0 Support
USB device port for connecting to a computer
USB HOST ports (2) for connecting USB storage devices
Note: All the information contained in this manual was correct at the time of publication.
However, as our engineers are always updating and improving the product, your device’s
software may have a slightly different appearance or modified functionality than presented in
this manual.

1.2 Packing List
Part
Quantity
Player 1
A/V cable 1
USB data cable 1
External SATA cable 1
Remote Control 1
AC/DC adaptor 1
User Manual (printed) 1
Note: The actual contents in the package might be different from the packing list in this manual.
1.3 Precautions
This player’s design has your safety in mind. In order to safely and effectively use this player,
please read the following before usage.
1.3.1 Usage Cautions
Users should not modify this player. If a commercial hard disk drive is being used, the
environmental temperature should be between 40 to 95 degrees Fahrenheit.
1.3.2 Power
The player’s power supply voltage is DC 12V 3A.
When using this player, please connect the supplied AC adapter or AC adapter cable to the
player’s power jack. When placing the adapter cable, make sure it is not damaged or subject to
pressure. To reduce the risk of electric shock, unplug the adapter first before cleaning it. Never
connect the adapter to the player in a humid or dusty area. Do not replace the adapter or cable’s
wire or connector.
1.3.3 Radio Interference
If not properly shielded, almost all electronic devices will get radio interference. Under some
conditions, your player might get interference.
The design of this player has followed the FCC/CE standard, and adheres to the following
rules:
1) This player may not cause harmful interference;
2) This player could accept some interference received including interference that may
cause undesired operation.
1.3.4 Repair
If the player has a problem, you should take it to an appointed repair center and let the
specialists do the repair, never repair the player yourself, you might damage the player or

endanger yourself or your data.
1.3.5 Disposing of the Player
When you dispose of the player, be sure to dispose it appropriately. Some countries may
regulate disposal of electrical device, please consult with your local authority.
1.3.6 Hard Disk Cautions
The player uses an internal hard disk for data storage. New hard drives need to be properly
formatted prior to use.
Users should carefully read the Frequently Asked Questions chapter and check our website for
latest information before formatting the hard disk.
Physical impact may damage the hard disk drive. When hard drive errors occur, please use
CHKDSK to scan and fix problems.
All data stored in the player may be lost due to physical impact, electrical shock, power lost,
HDD format etc. Please backup your data.
It is suggested to perform a disk defragment after a long period of usage.
Regularly backup the data in the hard disk so that it can be recovered in the event of data
corruption or loss. Our company takes no responsibility for loss of data stored on the hard
disk.
1.3.7 Additional Precautions
When using this player, please do not let the player come into contact with water or other liquid.
If water is accidentally spilled on the player, please use a dry cloth to absorb the spillage.
Electronic products are fragile. Please be gentle during use; avoid shaking or hitting the player,
and do not press the buttons too hard.
Do not let the player come into contact with water or other liquids.
Do not disassemble, repair or change the design of the player, any damage done will not be
included in the repair policy.
Do not press the buttons of the player too hard.
Avoid hitting the player with hard objects, shaking the player, and stay away from magnetic
fields.
Electrostatic discharge may cause the product to malfunction. When this happens, unplug
the power cable and the product will return to normal operation next time it is powered on.
2 Layout Overview
2.1 Front Panel
The front panel contains indicator lights and the IR remote control sensor:

Name
Description
1Stand By A red LED that indicates when the player is in stand-by mode
2IR Sensor The sensor for receiving remote control commands
3Power A blue LED that indicates when the player is powered on
2.2 ear Panel
The rear panel of the player contains various audio, video, and data connectors
Name
Description
1USB(PC) Used to connect the player to a PC and copy media files to
or from the player’s internal hard drive.
2USB HOST Two connectors for connecting USB devices such as USB
hard drives, USB flash drives, or the optional Wi-Fi adapter.
3HDMI Provides digital audio/video to a TV or home theater with
HDMI input.
4OPTICAL S/PDIF optical digital audio output to a TV or home theater
with optical audio input.
5CVBS/R/L Composite video and analog Left/Right audio output to a TV
or home theater with analog AV input.
6DC IN DC power input, 12V 3A. Only use the AC adapter provided

with the player.
7LAN 10/100mbps Ethernet for Internet or LAN network access.
8COAXIAL S/PDIF coaxial digital audio output to a TV or home theater
with coaxial audio input.
9Y/Pb/Pr Component video output to a TV or home theater with
component video input.
10 Power Switch
To turn the player on or off. Set this switch to “On” for normal
use. When not using the player, use the remote control to put
the player on Stand By instead of turning off the player with
this switch.
2.3 emote Control
All player functions can be controlled by using the remote control. See the following for details
on the function of each button.
1. MUTE 2. ZOOM
3. MENU 4. TITLE
5. TV SYSTEM 6. REPEAT
7. Numeric Keys 8. COPY
9. 4 3 10. SELECT
11. 16 9 12. CONFIRM
13. SETUP 14. GUIDE
15. BROWSER 16. Navigation Keys
17. ENTER 18. SUBTITLE
19. SLOW 20. PAUSE/STEP
21. PLAY 22. PREV
23. NEXT 24. POWER
25. ANGLE 26. EJECT
27. AUDIO 28. OPTION
29. GOTO 30. VOL+
31. VOL- 32. RETURN
33. DISPLAY 34. STOP
35. Fast Forward 36. Fast Rewind

Button
Description
1 MUTE Press to mute audio output; press again to unmute.
2 ZOOM
Press to zoom when viewing photos or playing videos.
Photo zoom levels: 2x, 4x, 8x, 16x.
Video zoom levels: 2x, 3x, 4x, 8x.
3 MENU Press to return to the main menu during DVD playback
4 TITLE Press to show HDD or DVD title list
5 TV SYSTEM Press to switch between available video output modes:
NTSC, PAL, 480p, 576p, 720p, 1080i/p.
6 REPEAT Press to set repeat option: repeat one, repeat all, and off.
7 Numeric Buttons Used when settings require numeric input.
8 COPY Press to start the file copy function of the player.
9 4:3 Press to select a 4:3 output aspect ratio.
10 SELECT Press to select files when in the media browser, or in file copy
function.
11 16:9 Press to select and toggle between 16:9 or 16:10 output
aspect ratio.
12 CONFIRM Press to add selected files to the playlist.
13 SETUP Press to enter the setup menu for changing player settings.
14 GUIDE Press to view the guide menu.
15 BROWSER Press to enter to media browser.
16 Navigation Keys Press the arrow buttons to highlight items whenever needed.
17 ENTER Press to proceed with the highlighted item.
18 SUBTITLE Press to open the subtitle menu when viewing videos.
19 SLOW Press to playback in slow motion. Press the PLAY button to
resume normal playback.
20 PAUSE/STEP Press to pause playback; press again to step to next frame.
Press the PLAY button to resume normal playback.
21 PLAY Press to begin playback of media file.
22 PREV
Press to go to the previous file when playing photos, music, or
videos.
Press to go up one page in the media browser.
23 NEXT
Press to go to the next file when playing photos, music, or
videos.
Press to go down one page in the media browser.
24 POWER Press to power on the player.

25 ANGLE Press to change the view angle during DVD playback (when
multi-angle view is available).
26 EJECT Press to eject a DVD from a DVD-ROM drive.
27 AUDIO Press to change audio tracks when playing videos.
28 OPTION Press to select option bar.
29 GOTO Press to jump to a specific time mark when playing a video.
30 VOL+
Press to increase the volume (set volume to max during
normal use and use the TV or home theater receiver to
control volume).
31 VOL-
Press to decrease the volume (set volume to max during
normal use and use the TV or home theater receiver to
control volume).
32 RETURN
Press to return to the previous screen when navigation
menus.
Press to exit the current folder when in the media browser.
33 DISPLAY Press to display current status when playing videos.
34 STOP Press to stop playback.
35 FF Press to fast forward the current playback. Press repeatedly
to change fast forward speed.
36 FR Press to fast rewind the current playback. Press repeatedly to
change fast rewind speed.

3 Connections
3.1.1 Connecting the Power Supply
To connect power to the player:
1) Make sure the power switch on the back of the player is in the off position
2) Connect the barrel connector of the AC adapter to the player’s DC IN jack
3) Connect the plug of the AC adapter to the power outlet
3.1.2 Installing an Internal Hard Disk Drive
The player has an internal drive bay for holding a hard disk drive. Media files can be stored on
the internal hard disk drive for playback, thus avoiding the need for an external storage device
during playback.
Depending on the player mode, either a 2.5” or 3.5” SATA hard disk drive can be installed:
EP250: 2.5” SATA hard disk drive
EP350: 3.5” SATA hard disk drive
For models with a 2.5” drive bay, install the hard drive by following these steps:
1) Press the tab on the bottom of the player to open the drive tray.
2) Secure the 2.5” drive with the supplied hard drive screws onto the drive tray with the
circuit side of the drive facing down.
3) Connect the SATA data and power cables to the hard drive.
4) Snap the drive tray back into the player; make sure the cables are not touching the
cooling fan blades.
For models with a 3.5” drive bay, install the hard drive by following these steps:
1) Squeeze and pull the tabs on the side of the player to slide out the drive tray.
2) Secure the 3.5” drive with the supplied hard drive screws onto the drive tray, with circuit
side of the drive facing up.
3) Gently slide the drive tray back into the player until the tabs lock in place. If any
resistance is felt, inspect the drive and drive tray for damage - do not force the drive tray.
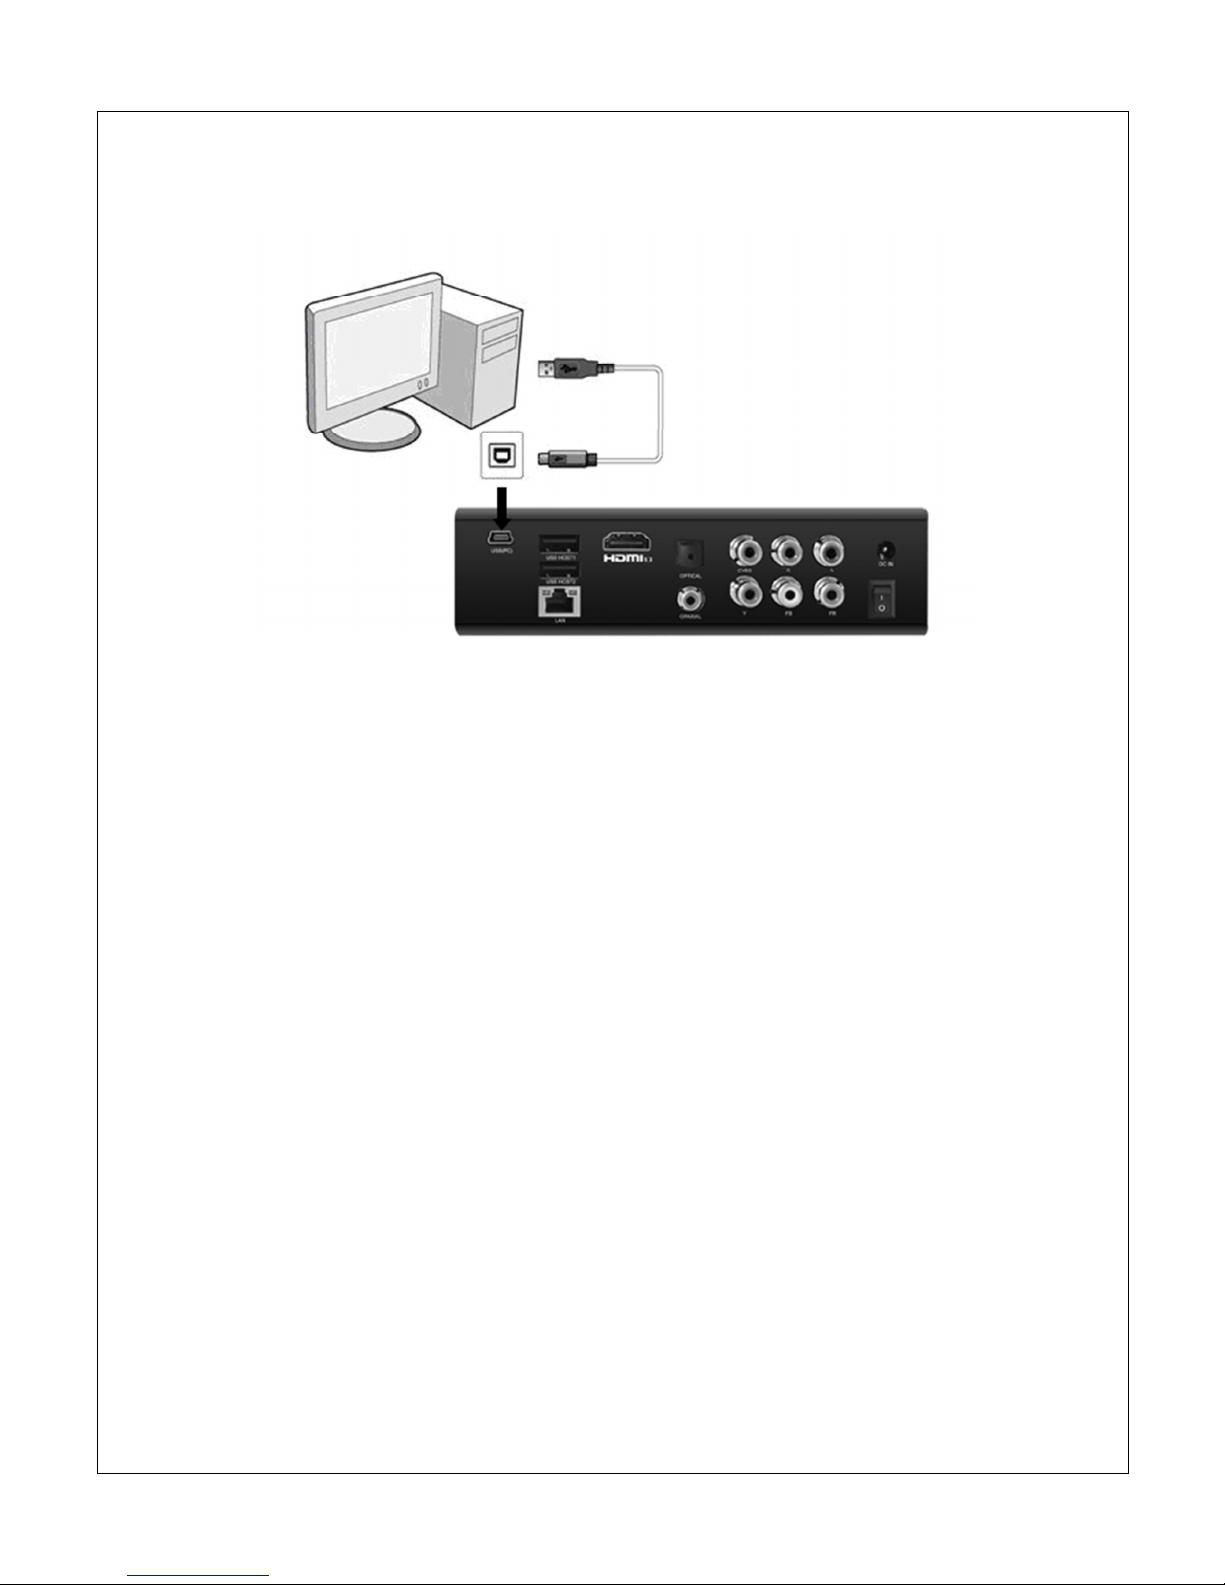
3.1.3 Connecting to a Computer
The player can be connected to the PC to transfer files to and from the player’s internal hard
disk drive at high speeds.
1) Plug the small mini 5-pin connector of the USB data cable to the player’s USB DEVICE
port;
2) Plug the large rectangular connector of the USB data cable to a USB jack on the
computer.
3) Turn on the player using the POWER button on the remote control. The player will be
detected by the computer and the player’s hard drive will show up as a USB hard drive
on the computer. It may take 30-60 seconds for the computer to recognize the player and
mount the drive.
3.1.4 Connecting a USB Device
USB storage devices such as USB hard drives or USB flash drives can be connected to the
player for playback of media files.
1) Power on the player.
2) Plug in the USB device to one of the USB HOST ports on the back of the player.
3) After about 5-10 seconds, the USB drive will be detected and can be accessed through
the player.
3.1.5 Connecting a Memory Card
Flash memory cards, including SD, SDHC and Memory Stick, can be connected to the player for
playback of media files.
1) Power on the player.
2) Insert the flash memory card into the card reader on the side of the player.
3) After about 5-10 seconds, the flash memory card will be detected and can be accessed
through the player.

3.1.6 Audio and Video Connections
The player can be connected to a TV/HDTV or home theater system in a variety of methods. For
best results, always use the best method available for connection
esults
Video
Audio
equirement
Best HDMI HDMI TV with HDMI input and home theater
receiver that can decode Audio over HDMI.
Better HDMI Digital coaxial
or optical
TV with HDMI input and home theater
receiver with Coaxial or Optical input.
Good Component Digital coaxial
or optical
TV with component input and home theater
receiver with Coaxial or Optical input.
Okay Composite Analog L/R TV with composite video and analog audio
inputs.
3.1.6.1 HDMI Connection
HDMI provides the best possible video and audio connection. Use this connection whenever
possible.
1) Plug one end of the HDMI cable to the player’s HDMI output jack.
2) Plug the other end of the HDMI cable to your TV’s HDMI input jack.
3) Consult the TV’s manual for configuring its inputs.

Note: If you have a home theater receiver with HDMI input and output jacks, connect the other
end of the HDMI cable to an available HDMI input on the receiver instead of the TV. Consult the
receiver’s manual for configuring its inputs.
3.1.6.2 Digital Audio Connection
When using a home theater receiver or sound system that lacks HDMI input, the player’s coaxial
or optical digital audio output can be used.
1) Plug one end of the coaxial or Toslink optical cable to the player’s digital audio jack.
2) Plug the other end of the coaxial or Toslink optical cable to the home theater receiver or
sound system’s digital audio input jack.
3) Consult the receiver or sound system’s manual for configuring its inputs.
3.1.6.3 Component Video Connection
When using a TV that does not have HDMI input but has component video, the player’s
component video output can be used.
1) Plug one end of the red/blue/green component video cable to the player’s component
video jacks.

2) Plug the other end of the red/blue/green component cable to an available component
video input on the TV.
3) Consult the TV’s manual for configuring its inputs.
Note: Component video connection only carries video signal. The audio signal must be
connected separately, such as through digital coaxial/optical or analog AV connection.
3.1.6.4 Composite Video and Analog Audio Connection
When using a TV that only has composite video input, the player’s composite video and analog
audio output can be used.
1) Plug one end of the red/white/yellow AV cable to the player’s AV jacks.
2) Plug the other end of the red/white/yellow AV cable to an available AV input on the TV.
3) Consult the TV’s manual for configuring its inputs.
3.1.6.5 Connecting to a LAN
A wired Ethernet connection provides the best results for streaming A/V content through the

network. Use a wired Ethernet connection whenever it is possible to do so.
1) Plug one end of a Cat5/5e/6 Ethernet network cable to the player’s LAN jack.
2) Plug the other end of the Cat5/5e/6 Ethernet network cable to an available port on a LAN
switch, router, or networked wall plate.
3.1.6.6 Connecting to a WLAN
When a wired network connection is not available, the player can stream A/V content through
the network by using a Wi-Fi USB adapter (sold separately).
1) Power on the player.
2) Plug the Wi-Fi USB adapter to one of the USB HOST ports on the back of the player.
3) Refer to ‘4.3 Network Settings’ for more details about WLAN setup.

3.2 Power On/Off
3.2.1 Power On
After connecting the AC power adapter to the player’s DC IN jack, turn the power switch on the
back of the player to the On position. The player will power on and the power indicator light on
the front of the player will turn blue.
3.2.2 Power Off
To turn off the player, turn the power switch on the back of the player to the Off position. The
player will now be powered off. The player should not be powered off during normal use; put the
player into power saving Stand By instead.
3.2.3 Stand By
During normal use, place the player into power saving Stand By mode when not in use. To place
the player into Stand By, press the POWE button on the front of the player or on the remote
control. The red Stand By indicator light will illuminate. To turn the player on, press the POWE
button on the front of the player or on the remote control again.
3.3 Initial Setup
When turning on the player for the first time, it will prompt the user to select the menu language,
time, and wired LAN settings.
3.3.1 Menu Language
Choose the desired language. This is the language that will be used for menus and interface.
This setting does not affect audio track or subtitle language settings.
3.3.2 Time
Setting the time of the player is optional. To set the time, first select Time Zone relative to GMT.
Next the user is prompted to enter the date and time. Use the navigation buttons to set each

field and press Enter when finished. If the user skips this step during initial setup, please see
‘4.4.6 Time’ for instructions on how to set the player’s time through the Settings menu.
3.3.3 Wired LAN Setup
This step of the initial setup is optional. Refer to ‘4.3 Network Settings’ for more details about
network setup. If the user skips this step during initial setup, the settings can be performed
through the player’s Settings menu. For most cases, the “DHCP IP (Auto)” setting is the correct
setting. Only advanced users should choose the “FIX IP (Manual)” setting.
3.3.4 Home Screen
When the initial setup is complete, the player will display the home screen.
The player is now ready for use. For best results, refer to ‘4 Settings’ to setup the player for
best results.

4 Settings
The Setup menu allows users to personalize and configure usage preferences for the player. To
go into the setup menu, select the Setup icon on the home screen, or press the SETUP button
on the remote control.
There are five setting groups in the Setup menu, including Audio, Video, Network, System and
Misc. Use the directional LEFT/ IGHT and UP/DOWN buttons on the remote control to select
options and press ENTE to confirm. To cancel a setting change, press the ETU N button.
4.1 Audio Settings
4.1.1 Night Mode
When turned on, night mode compresses the dynamic range of audio output by the player. This
allows the quiet sounds of a movie to be more clearly heard while lowering the volume of loud
sounds so as not to bother other people in the home.
Available settings Off, On, Comfort
4.1.2 HDMI Output
HDMI Output sets the format of the digital audio carried over the player’s HDMI output.
Available settings
Setting
Description
RAW
Audio is sent without being decoded by the player. The TV or home
theater receiver must be able to decode the audio. This setting is also
known as “bit stream output”. Use this setting for best audio quality if
using a home theater receiver with HDMI audio capabilities.
LPCM DUAL CH Audio is decoded by the player and down-mixed into two channels for

output over HDMI. Use this setting if the TV or home theater receiver
lacks multi-channel audio decoding capabilities (i.e. Dolby Digital, DTS).
LPCM MULTI CH
Audio is decoded by the player and output over HDMI. Multi-channel
soundtracks will not be down-mixed into fewer channels. Use this
setting if the home theater is a multi-channel model but cannot decode
raw multi-channel sound tracks.
4.1.3 SPDIF Output
SPDIF Output sets the format of the digital audio carried over the player’s SPDIF coaxial or
optical outputs.
Available settings
Setting
Description
RAW
Audio is sent without being decoded by the player. The TV or home
theater receiver must be able to decode the audio. This setting is also
known as “bit stream output”. Use this setting for best audio quality if
using a home theater receiver with multi-channel decoding capabilities.
LPCM DUAL CH
Audio is decoded by the player and down-mixed into two channels for
output over HDMI. Use this setting if the TV or home theater receiver
lacks multi-channel audio decoding capabilities (i.e. Dolby Digital, DTS).

4.2 Video Settings
4.2.1 Aspect atio
Aspect Ratio affects how the player will display content on the TV. It is very important to set the
aspect ratio to match the TV, incorrect setting will result in distorted image output.
Available settings
Setting
Description
Pan Scan 4 3
This is one of two settings for use with 4 3 TVs; both settings will
correctly display 4 3 videos on a 4 3 TV. The difference is in how wide-
screen video will be displayed. In Pan Scan 4 3 mode, wide screen
videos will have the left and right side cut off, with the center portion of
the image filling the 4 3 TV screen.
Letter Box 4 3
This is one of two settings for use with 4 3 TVs; both settings will
correctly display 4 3 videos on a 4 3 TV. The difference is in how wide-
screen video will be displayed. In Letter Box 4 3 mode, wide screen
videos will be displayed with black bars on the top and bottom of the
image.
16 9 Choose this setting if the TV has a 16 9 aspect ratio.
16 10 Choose this setting if the TV has a 16 10 aspect ratio. Many computer
monitors have a 16 10 aspect ratio.

4.2.2 Zoom Out
When turned on, Zoom Out has the effect of zooming out slightly when playing video. This
setting is useful when used with TVs that have severe over-scan problems.
Available settings
Setting
Description
Off Videos are displayed as normal. Use this setting unless the TV has
severe over-scan problems.
On Videos are displayed slightly zoomed out. Use this setting only if the TV
has severe over-scan problems.
4.2.3 Brightness, Contrast, Hue, Saturation
These four settings are used to adjust the video output of the player. It is recommended to use
the TV’s picture controls first, and change these player settings only when the TV’s settings are
inadequate.
Available settings
Setting
Description
Brightness
Sets the black level of the image. Set this so that the darkest details of a
dark scene are just barely visible. Setting this value too high will result in
poor image quality. Always set the brightness first.
Contrast Sets the ratio between the brightest and darkest part of the image. Set
this for a comfortable viewing brightness on bright scenes.
Hue Sets the color balance of the image. Adjust this setting for natural skin
tones.
This manual suits for next models
1
Table of contents
Other Micca Media Player manuals

Micca
Micca MPLAY-HD User manual

Micca
Micca EP950 User manual

Micca
Micca EP100 User manual

Micca
Micca MPLAY-HD User manual

Micca
Micca Slim-HD User manual

Micca
Micca MPLAY-HD User manual

Micca
Micca EP350 G2 User manual

Micca
Micca EP600 User manual

Micca
Micca MPLAY-HD 1080P User manual

Micca
Micca Slim User manual


