MICHELANGELO CMAF-516T User manual

MICHELANGELO AIR FRYER OVEN
CMAF-516T
INSTRUCTION MANUAL
Please Read Carefully and Save This Instruction

TABLE OF CONTENT
IMPORTANT SAFEGUARDS
FEATURES AND BENEFITS
CONTROL PANEL
OPERATING INSTRUCTIONS
PRESET MENUS
CLEANING AND MAINTENANCE
TROUBLESHOOTING
LIMITED WARRANTY
1

IMPORTANT SAFEGUARDS
When using an electrical appliance, especially when children are present,
basic safety precautions should always be taken, including the following:
1. Read all instructions carefully before using.
2. UNPLUG FROM OUTLET WHEN NOT IN USE AND BEFORE
CLEANING.
3. Allow to cool before cleaning or handling, putting on or taking off parts.
4. Do not touch hot surfaces. Use handles or knobs.
5. To protect against electric shock, do not place any part of the Air Fryer
Oven in water or other liquids. See instructions for cleaning.
6. This appliance should not be used by or near children or individuals with
certain disabilities.
7. Do not operate any appliance with a damaged cord or plug, or after the
appliance has malfunctioned or has been dropped or damaged in any way
or has been dropped in water. Return the Air Fryer Toaster Oven to the
store or retailer where purchased for examination or repair or adjustment.
8. The use of accessory attachments not recommended by Michelangelo
may cause injury.
9. Do not use outdoors.
10. Do not let cord hang over the edge of the table or countertop where it could
be pulled on inadvertently by children or pets, or touch hot surfaces, which
could damage the cord.
11. Do not place Air Fryer Toaster Oven on or near a hot gas or electric burner
or in a heated oven.
12. Do not use this Air Fryer Toaster Oven for anything other than its intended
purpose.
13. Extreme caution should be exercised when using containers constructed
of materials other than metal or glass in the oven.
14. To avoid burns, use extreme caution when removing Air Fryer Toaster
Oven accessories or disposing of hot grease.
15. When not in use, always unplug the unit. Do not store any materials other
than manufacturer’s recommended ovenproof accessories in thisAir Fryer
Toaster Oven.
16. Do not place any of the following materials in the Air Fryer Toaster Oven:
paper, cardboard, plastic and similar products.
17. Do not cover Crumb Tray or any part of the oven with metal foil. This will
cause overheating of the oven.
18. Oversize foods, metal foil packages and utensils must not be inserted in
the Air Fryer Toaster Oven, as they may involve a risk of fire or electric
shock.
19. A fire may occur if the Air Fryer Toaster Oven is covered or touching
flammable materials such as curtains, draperies or walls when in
operation.
2

20. Do not store any items on top of the appliance when in operation. Do not
operate under wall cabinets.
21. Do not clean with metal scouring pads. Pieces can break off the pad and
touch electrical parts, involving a risk of electric shock.
22. Do not attempt to dislodge food when the Air Fryer Toaster Oven is
plugged into electrical outlet.
23. Warning: To avoid possibility of fire, NEVER leave Air Fryer Toaster Oven
unattended during use.
24. Use recommended temperature settings for all cooking/baking, roasting
and Air Frying.
25. Do not rest cooking utensils or baking dishes on glass door.
26. Do not operate your appliance in an appliance garage or under a wall
cabinet. When storing in an appliance garage, always unplug the unit from
the electrical outlet. Not doing so could create a risk of fire, especially if the
appliance touches the walls of the garage or the door touches the unit as it
closes.
27. Extreme caution must be used when moving an appliance containing hot
oil or other hot liquids.
28. To disconnect, press Start/Stop to ensure cooking is stopped, then remove
plug from wall outlet.
3
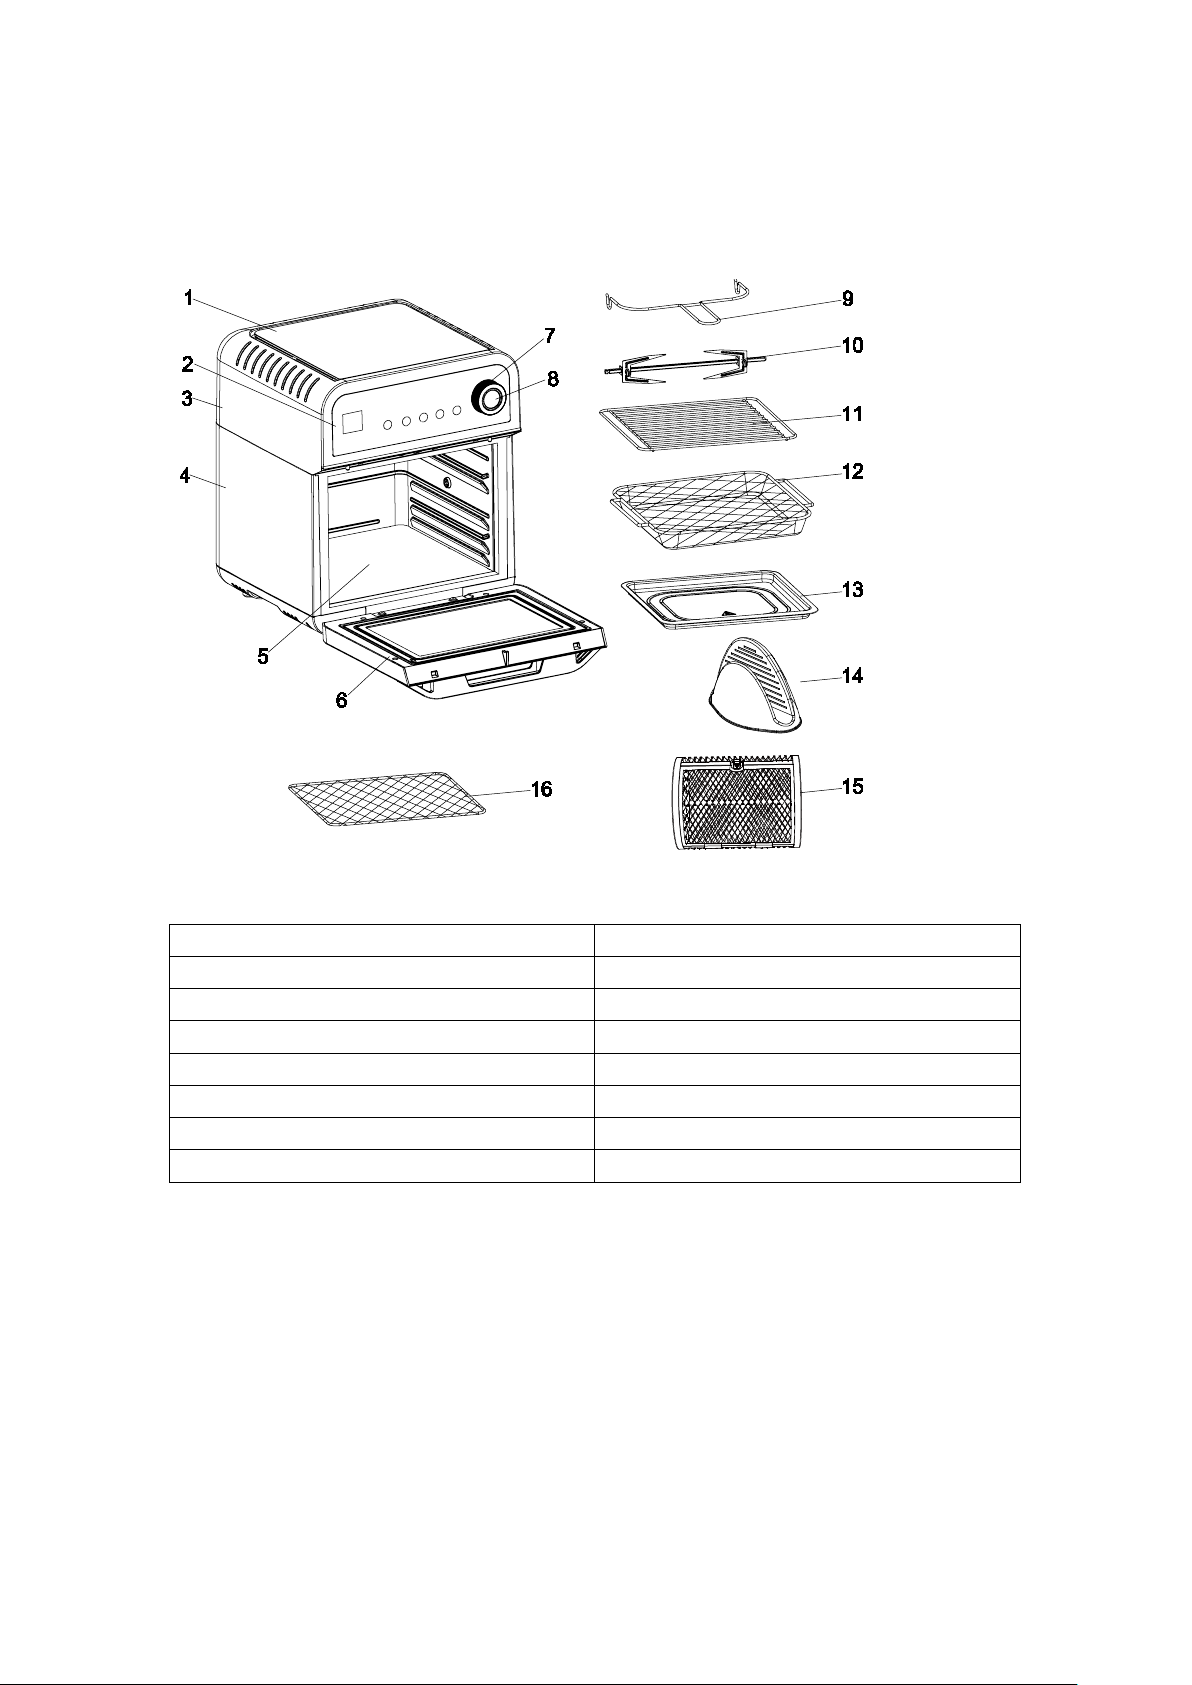
FEATURES AND BENEFITS
Product Components:
1
.
Top cover
9
.
Cage Tong
2
.
Control panel
10
.
Rotisserie fork
3
.
Upper cover
11
.
Wire rack
4
.
Housing
12
.
Mesh basket
5
.
Inner case
13
.
Drip tray
6
.
Door
14
.
Glove
7
.
Selecting Knob
15
.
Rolling cage
8
.
Button
16
.
Mesh tray
4

Use of Accessories:
Choose proper accessories for different cooking purposes.
1. Cage Tong:use the cage tong to hold and remove rotisserie fork or rolling
cage as shown below.
2. Rotisserie Fork: Specially designed for rotisserie. Use cage tong to hold
or remove.
- Slide a spit fork on the spit shaft with the forks pointing towards the
center and tighten the thumbscrew.
- Slide your chicken onto the shaft and onto the forks closest to the
handle. Make sure the chicken is centered on the shaft.
- Slide the other spit fork onto the shaft and push the fork into the
chicken’s breast just above the wings. Then tighten the thumbscrew.
(1) (2) (3)
(4) (5) (6)
Attentions:
a. You can adjust the screws closer to the middle if needed, but never
outwards towards the ends.
b. Ensure that the roast meat or chicken are not too large and is able to
rotate freely inside the air fryer.
c. Tie up the chicken or other roast meat with cooking string to hold it tightly
around the rotisserie stick.
5
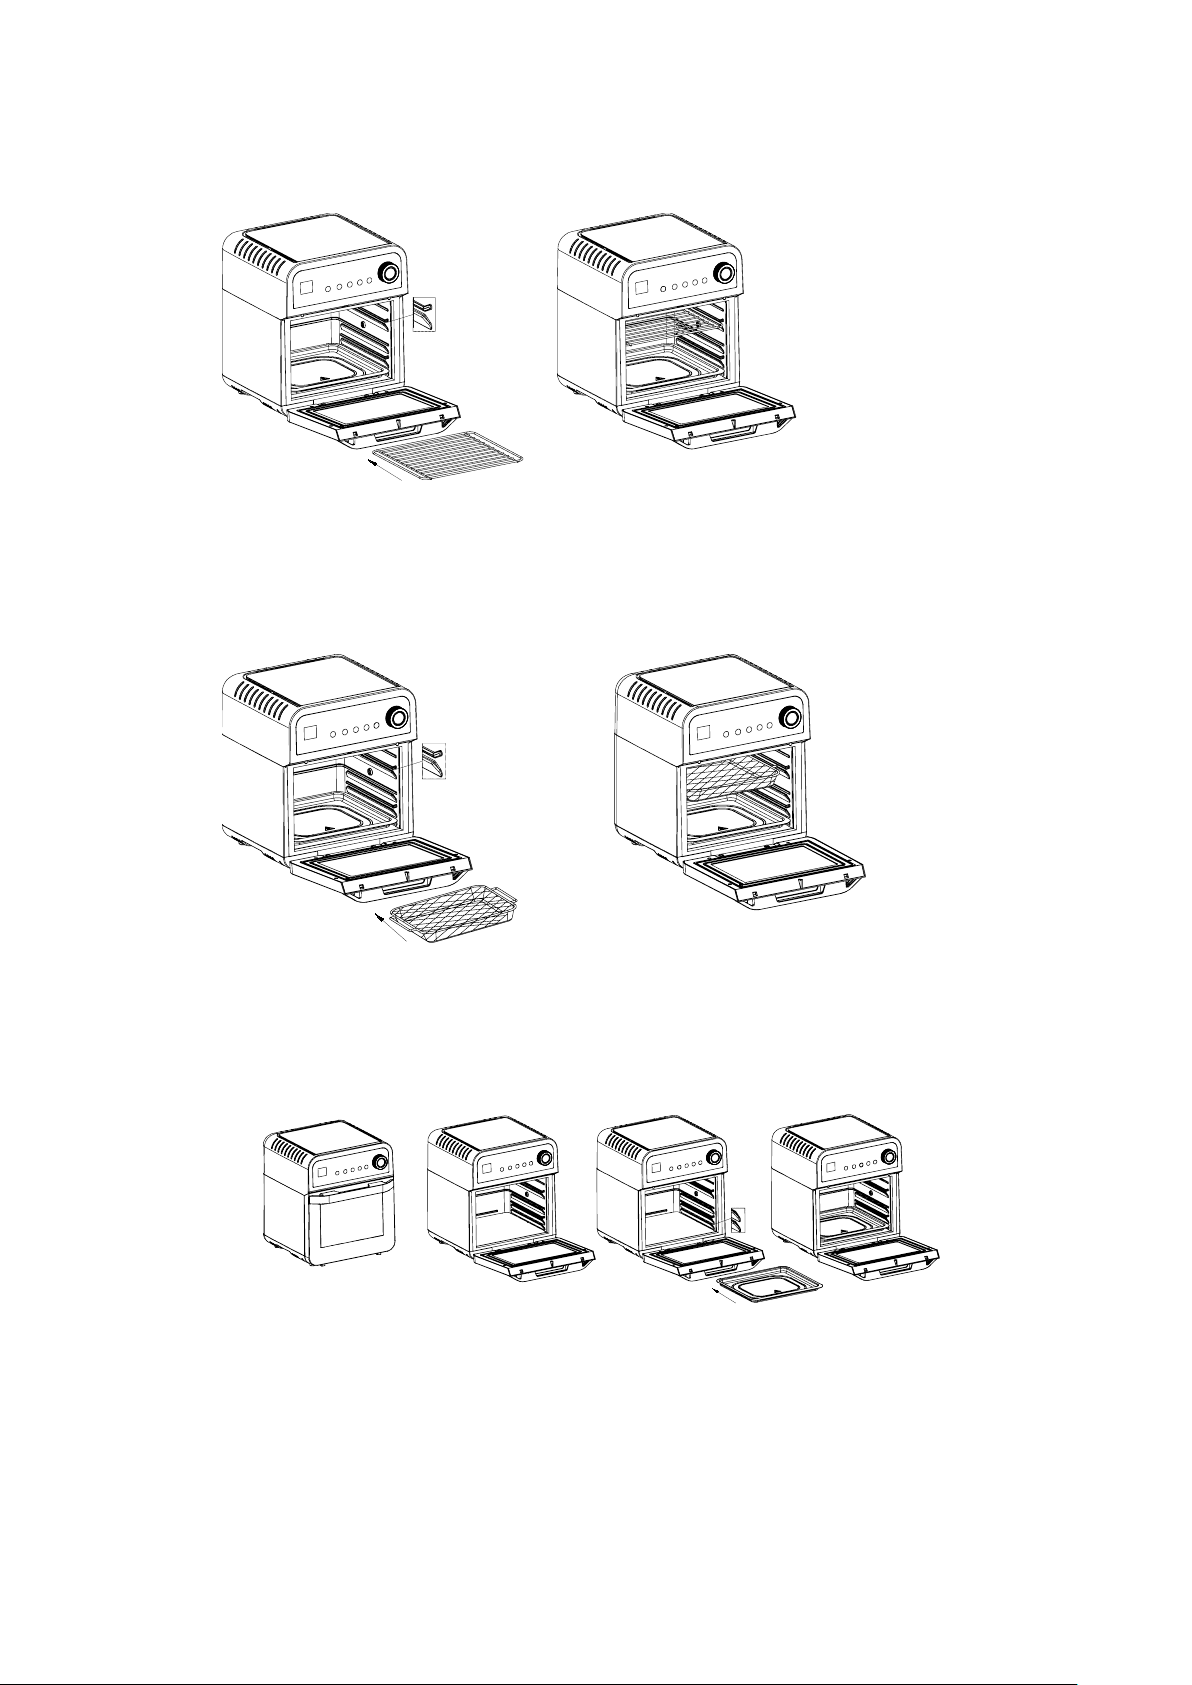
3. Wire Rack & Mesh Tray: Insert the Steam Rack into the unit as shown
below:
4. Mesh Basket: Use the basket when using the Air Fry, Broil or Dehydrate
functions to optimize your cooking results. We recommend using the mesh
basket together with the drip tray.
5. Drip Tray: A Drip Tray is included for your convenience. Use alone when
baking or roasting. Put the tray as directed below into the lower rack and
slide it out from the lower front of the oven to clean.
6. Gloves: Use the gloves to avoid burns. Use with caution.
6

7. Rolling Cage: Insert mesh basket as shown below.
Note:
* Make sure you leave enough space for food to grow with heat.
* There is a safety switch shows in Pic as below. Only when the door is closed,
the machine can work properly. If the door is open during operation, the safety
switch will be detached and the machine will stop working.
7

INTELLIGENT CONTROL PANEL
1. ON/OFF
Press the "ON/OFF" key, indicator light and digital screen light up, unit into
standby mode.
2. TEMP & TIME
After selecting the menu function, if you need to adjust cooking temperature
and/or time, press "TIME” or “TEMP" to change cooking time and cooking
temperature by turning knob.
3. DELAY TIME
When you press the "DELAY TIME" button, the screen will show the default
reservation time of 1 hour. Turn knob to adjust the delay time up to 9 hours and
50 mins. Press Delay Time button again to cancel the reservation function
4. LIGHT
Press this button to turn on or off the interior light
5. KNOB
Turn the knob to choose the desired preset menu
BEFORE THE FIRST USE
1. Place your Air Fryer Toaster Oven on a flat, level surface.
2. Move oven 2 to 4 inches away from the wall or from any objects on the
countertop. Do not use on heat-sensitive surfaces.
3. Check that the drip tray is in place and that there is nothing in the oven.
4. Install the air outlet partition board manually as shown in the picture.
5. Plug power cord into the wall outlet.
**WARNING**: Objects should not be stored on the top of
the oven. If they are, remove all objects before you turn on
your oven. The exterior walls get very hot when in use.
Keep out of reach of children.
8

OPERATING INSTRUCTIONS
1. Plug into the outlet. The buzzer rings and the digital screen flashes. Press
the "ON/OFF" button, and the indicator light and digital screen light up.
Unit is on standby mode. On standby mode, if no operation within 60
seconds, machine will be shut down automatically.
2. Turn the knob to select the desired preset function. Please be noted that
before preset function is selected, temperature and time buttons are
locked.
3. To use the default preset settings, press ON/OFF button to begin the
operation.
4. To change settings and adjust cooking time and temperature:
- Press TEMP button to adjust cooking temperature. Indicator lights
up and digital screen flashes. Turn the knob clockwise to increase and
counterclockwise to decrease temperature. Press ON/OFF button to
confirm. Each dial will add or minus 10°C. Temperature range: 50 to
220°C. Please note that in Dehydration mode, temperature can be
adjusted from 50 to 70°C.
- Press TIME button to adjust cooking time. Indicator lights up and
the digital screen flashes. Turn the knob clockwise to increase and
counterclockwise to decrease cooking time. Press ON/OFF button to
confirm. Each dial add or minus 1 minute. Cooking time range: 60
minutes. In dehydration mode, cooking time is up to 8 hours.
5. Preheat:As air fryer oven heats up more efficiently and quickly than
traditional oven. For most of the recipes, it doesn’t require preheat. If the
recipe particularly requires preheat, you can follow the instructions below:
Turn the knob to select the menu – press temp button to set up preheat
temperature – press time button and set up for 1-2 minutes – Press on/off
button to start preheating. When preheat is completed, the unit will beep
and stop heating. Thereafter you can select the menu and set up cooking
time and temperature.
6. Pause function: If the door is open during cooking cycle, the unit will stop
working automatically. In this case, only "ON/OFF" “LIGHT” and
"Rotisserie" buttons are in working mode. Other buttons will be locked.
When the door is closed, the unit will resume previous cooking. If the door
is not closed within 10 minutes, the unit will shut down automatically.
Note:Use pause function to turn your food from time to time will help
9

cooking more evenly thus delivering better cooking results.
Caution: During cooking cycle, baskets, loaves, grids, racks, baskets,
rolling cages, Rotisserie forks and oil trays will be very hot and cannot be
touched directly by hand. Please wear heat resistant gloves with caution to
avoid any burns.
7. Rotisserie function: This function can make food cooked more evenly.
Press the Rotisserie button , the control panel icon indicator will light
up. Press again to cancel the rotisserie function. Use the rotisserie fork to
hold chicken or other food as shown below:
Note: The rotisserie fork can hold up to 2.7lb. If food is beyond 2.7lb,
please use mesh basket or wire rack instead. For roasted chicken, make
sure to tie up chicken legs and wings. It is suggested to carve a few holes
in chicken legs for better heat penetration.
8. Cooking Complete: When countdown reaches 0:00, oven will beep three
times and heaters will turn off. However, fan will remain on for another 1
minute for cooling purposes. After fan is off, the appliance will turn off
automatically, then take out the plug from wall outlet.
There might be hot oil or splatters when you open the door, although
cooking is completed. Please use caution to avoid any burns. Please wear
heat resistant gloves to remove any items from the oven.
10

PRESET MENUS
Michelangelo’s Air Fryer Oven has convenient, easy-to-use presets with
default combination of cooking time and cooking temperature to meet your
different cooking needs.
1. Turn the knob to select the desired preset menu.
2. To adjust cooking temperature, after selecting preset menu, press temp
and turn knob to increase or decrease the temperature.
3. To adjust cooking time, after selecting preset menu, press time button and
turn knob to increase or decrease the cooking time.
4. Press ON/OFF button to start cooking
Default Settings for Each Preset Menu
Preset Menu Temperature Cooking Time
Fries 220°C 25 minutes
Frozen Food 80°C 10 minutes
Wings 200°C 15 minutes
Dehydrate 70°C 8 hours
Steak 180°C 12 minutes
Chips 220°C 20 minutes
Fish 180°C 15 minutes
Vegetables 180°C 12 minutes
Popcorn 220°C 10 minutes (
preheat for 2
minutes for best results)
Chicken 220°C 30 minutes
Cake 180°C 30 minutes
Skewer
200°C
15 minutes
Pizza 180°C 15 minutes
Keep Warm 80°C 30 minutes
Toast 200°C 4 minutes
Cookie 180°C 12 minutes
Note: Never leave your food in the air fryer oven unattended, even it’s on
default preset settings.
11

Delay function
Press “ON/OFF”, the digital screen shows "0000", select the function and then
press "DELAY TIME ", the digital screen shows the preset time and it will
flash, turn the knob to increase or decrease preset beginning working time.
Each rotation will change by 10 minutes. The maximum time to be preset is 9
hours and 50 minutes, and the shortest time is 10 minutes. After selected the
preset time, press “ON/OFF” to start. All other keys are locked except for
“ON/OFF”, “Light”. When you press “ON/OFF”, it will cancel the preset
function.
You must select the function menu first before entering preset function.
12

CLEANING AND MAINTENANCE
1. Always unplug the oven from the electrical outlet and allow it to cool
completely before cleaning.
2. Do not use abrasive cleaners, as they will damage the finish. Simply wipe
the exterior with a clean, damp cloth and dry thoroughly. Apply the
cleansing agent to a cloth, not directly onto the toaster oven, before
cleaning.
3. To clean interior walls, use a damp cloth and a mild liquid soap solution or a
spray solution on a sponge. Remove any residue from cleaners with a
clean, damp rag. Never use harsh abrasives or corrosive products. These
could damage the oven surface. Never use steel wool pads, etc., on interior
of oven.
4. Cleaning the accessories:
- All the accessories should be hand-washed in hot, sudsy water, or use
a nylon scouring pad or nylon brush, and thoroughly rinsed. These
items are not dishwasher safe.
5. After cooking greasy foods and once your oven has cooled, always clean
top of oven interior. If this is done on a regular basis, your oven will perform
like new. Removing the grease will help to keep toasting consistent, cycle
after cycle.
6. To remove crumbs, slide out the front Crumb Tray and discard crumbs.
Wipe clean and replace. To remove baked-on grease, soak the tray in hot,
sudsy water or use nonabrasive cleaners. Never operate the oven without
the Crumb Tray in place.
7. Any other servicing should be performed by an authorized service
representative.
13

TROUBLESHOOTING
Questions Solutions
W
hy won’t my unit turn
on? Make sure the unit is plugged into a functional outlet
Make sure the oven door is closed
Why does the fan remain
on after cooking? The fan remains on for cooling purposes
Can I change my cooking
function when the unit is
already cooking?
Y
ou need to first interrupt the current cooking function by
pressing ON/Off button. Then the unit will go back to
selection menu and desired cooking function can be chosen.
Can I change the time or
temperature when the unit
is already cooking?
Yes, simply press time button and turn the knob to add time.
To change temperature, press temp button and turn knob to
change temperature.
Why is my food not crispy
or fried evenly?
Some foods may require more oil than others. If not crispy
enough, spray, brush or add some oil on the food.
Make sure food is spread evenly in one single layer in the
mesh basket or wire rack with no overlap. If food overlaps,
toss or flip food halfway through the cooking cycle
Use cage basket for fries to be cooked more evenly
P
ut the food in for additional cooking time. Make sure to
check periodically until food reaches desired brownness. Do
not leave oven unattended.
Why is my food
undercooked? I
f you put too much food in the basket, try with smaller
batches of food and single layers, rather than stacking food
on top of each other
The temperature might be too low. Use the knob to increase
cooking temperature
Why does condensation
and steam come out of my
unit?
When preparing greasy foods, oil my leak into the pan and it
produces steam. This will not affect the unit or the cooking
results. It may fog up the viewing window on tides or corners.
The pan, basket, wire or other accessories may contain
grease residue from previous use. Make sure to clean the
accessories properly after each use.
Are the accessories
dishwasher safe? Not Dishwasher safe
E1-
NTC sensor open
circuit Might be loose or not connecte
d, please contact
Michelangelo customer service for repairing or replacing
E2 - Sensor short circuit
Might be sensor damage, please contact Michelangelo
customer service for repairing or replacing
E3 - Circuit board
communication error Might be wrong wire installation or even broken wires, please
contact Michelangelo customer service for repairing or
replacing
14

LIMITED WARRANTY
Michelangelo warrants this product against defects in materials and
workmanship for a period of one year from the date of purchase. During this
period, Michelangelo will either repair or replace, at its discretion, any defective
products at no charge to the owner. Replacement products or repaired parts
will be guaranteed for only the unexpired portion of the original warranty or six
months, whichever is greater.
This limited warranty does not apply to any defect resulting from accident,
misuse, improper maintenance or normal wear and tear.
Except to the extent allowed by applicable law, the terms of this limited
warranty do not exclude, restrict or modify, and are in addition to, the warranty
statutory rights applicable to the sale of the product to you.
If you believe your product is defective, contact Michelangelo for instructions
on where to send or take for repair.
Michelangelo Customer Service can be reached by:
Email: Service@michelangelokitchen.com
15
Table of contents
Other MICHELANGELO Oven manuals


