MicMol THOR User manual

Congratulations on purchasing your THOR
Read this guide to get started to installing and setting your lighting
THOR overview
THOR & X Smart Controller Power SupplyConnect CablePro Stand
How to install the Pro Stand
How to install the Hanging Kits
Lock the THOR to the Pro Stand.There are 4 angles choosable,
Make sure the gear is coincide.
90°
60°
30°
00°
Adjust the angle and locked it.
Assembly hanging kits Lock the THOR to the hanging bracket Hang to the ceiling
3
21
3
21
Quick Start Guide
THOR &X
Storing your Light If you are going to store your Light for an extended period of time, keep it in a cool location (ideally, 71°
F or 22° C).
When cleaning the outside of your Light, first shut down your Light and unplug the power cord. Then use a damp, soft,
lint-free cloth to clean the lamp exterior. Avoid getting moisture in any openings. Do not spray liquid directly on the lamp.
Do not use aerosol sprays, solvents, or abrasives that might damage the finish.
MicMol. recognizes its responsibility to minimize the environmental impact of its operations and products.
ATTENTION: Never put the light and the smart controller in the water. Doing so will dangerous and damage your light.
NOTICE: Failure to follow these handling instructions could result in damage to your Light or other property.
WARNING: Do not touch the lights body when it working which will generate heat and may let your hands uncomfortable.
WARNING: Make sure all the cables are connected before plug to electricity or will damage your light.
Important Handling Information
Carrying your Light before you move your Light, shut it down and disconnect all cables and cords connected to it. Using
power cord Never force a connector into a port. Don't put the power cord into your tank when it connected. When you
Setup your Light please make sure that it locate power supply where it will not be exposed to any water or moisture.
Mount your power supply where it won’t get wet. Include a “drip loop” - a tied loop of cord hanging down below the level
of the electrical outlet. That way, if water happens to run down the cord from the tank, it will drip off onto the floor rather
than into the outlet. Drip Loops should always be used to help prevent water from traveling along the cord and coming
into contact with an electrical outlet. Drip loops must always be below the level of the outlet. If the plug or outlet does get
wet, DO NOT TOUCH the cord.
MicMol and the Environment
Information
MicMol warrants all MicMol products to be free from manufacturing
defects for one year from the original purchase date when purchased
through an authorized MicMol retailer. This warranty does not cover any
damages caused by misuse, neglect, alterations or improper handling /
transport / maintenance / installation. Physical damages are not covered
by warranty. MicMol does not cover personal injury, personal loss, or
other damages associated with the use of our products. In order to
purchase receipt is required for any warranty service. Products requiring
warranty service must be returned to MicMol or authorized MicMol
retailer. You are responsible for the cost of shipping a warranty claim to
MicMol and any damages that may occur during transit. Once a returned
product has been inspected, it will be repaired or exchanged at our
discretion and returned to you. Thank you very much.
Warranty
© 2012~2021 MicMol Limited. All rights reserved.
MicMol, the MicMol Logo, THOR, Aqua CC, Aqua mini, Aqua Pro, Aqua Air, BloomBee are trademarks of MicMol registered.
WWW.MICMOL.COM - ACC008-1806-A Printed in China.
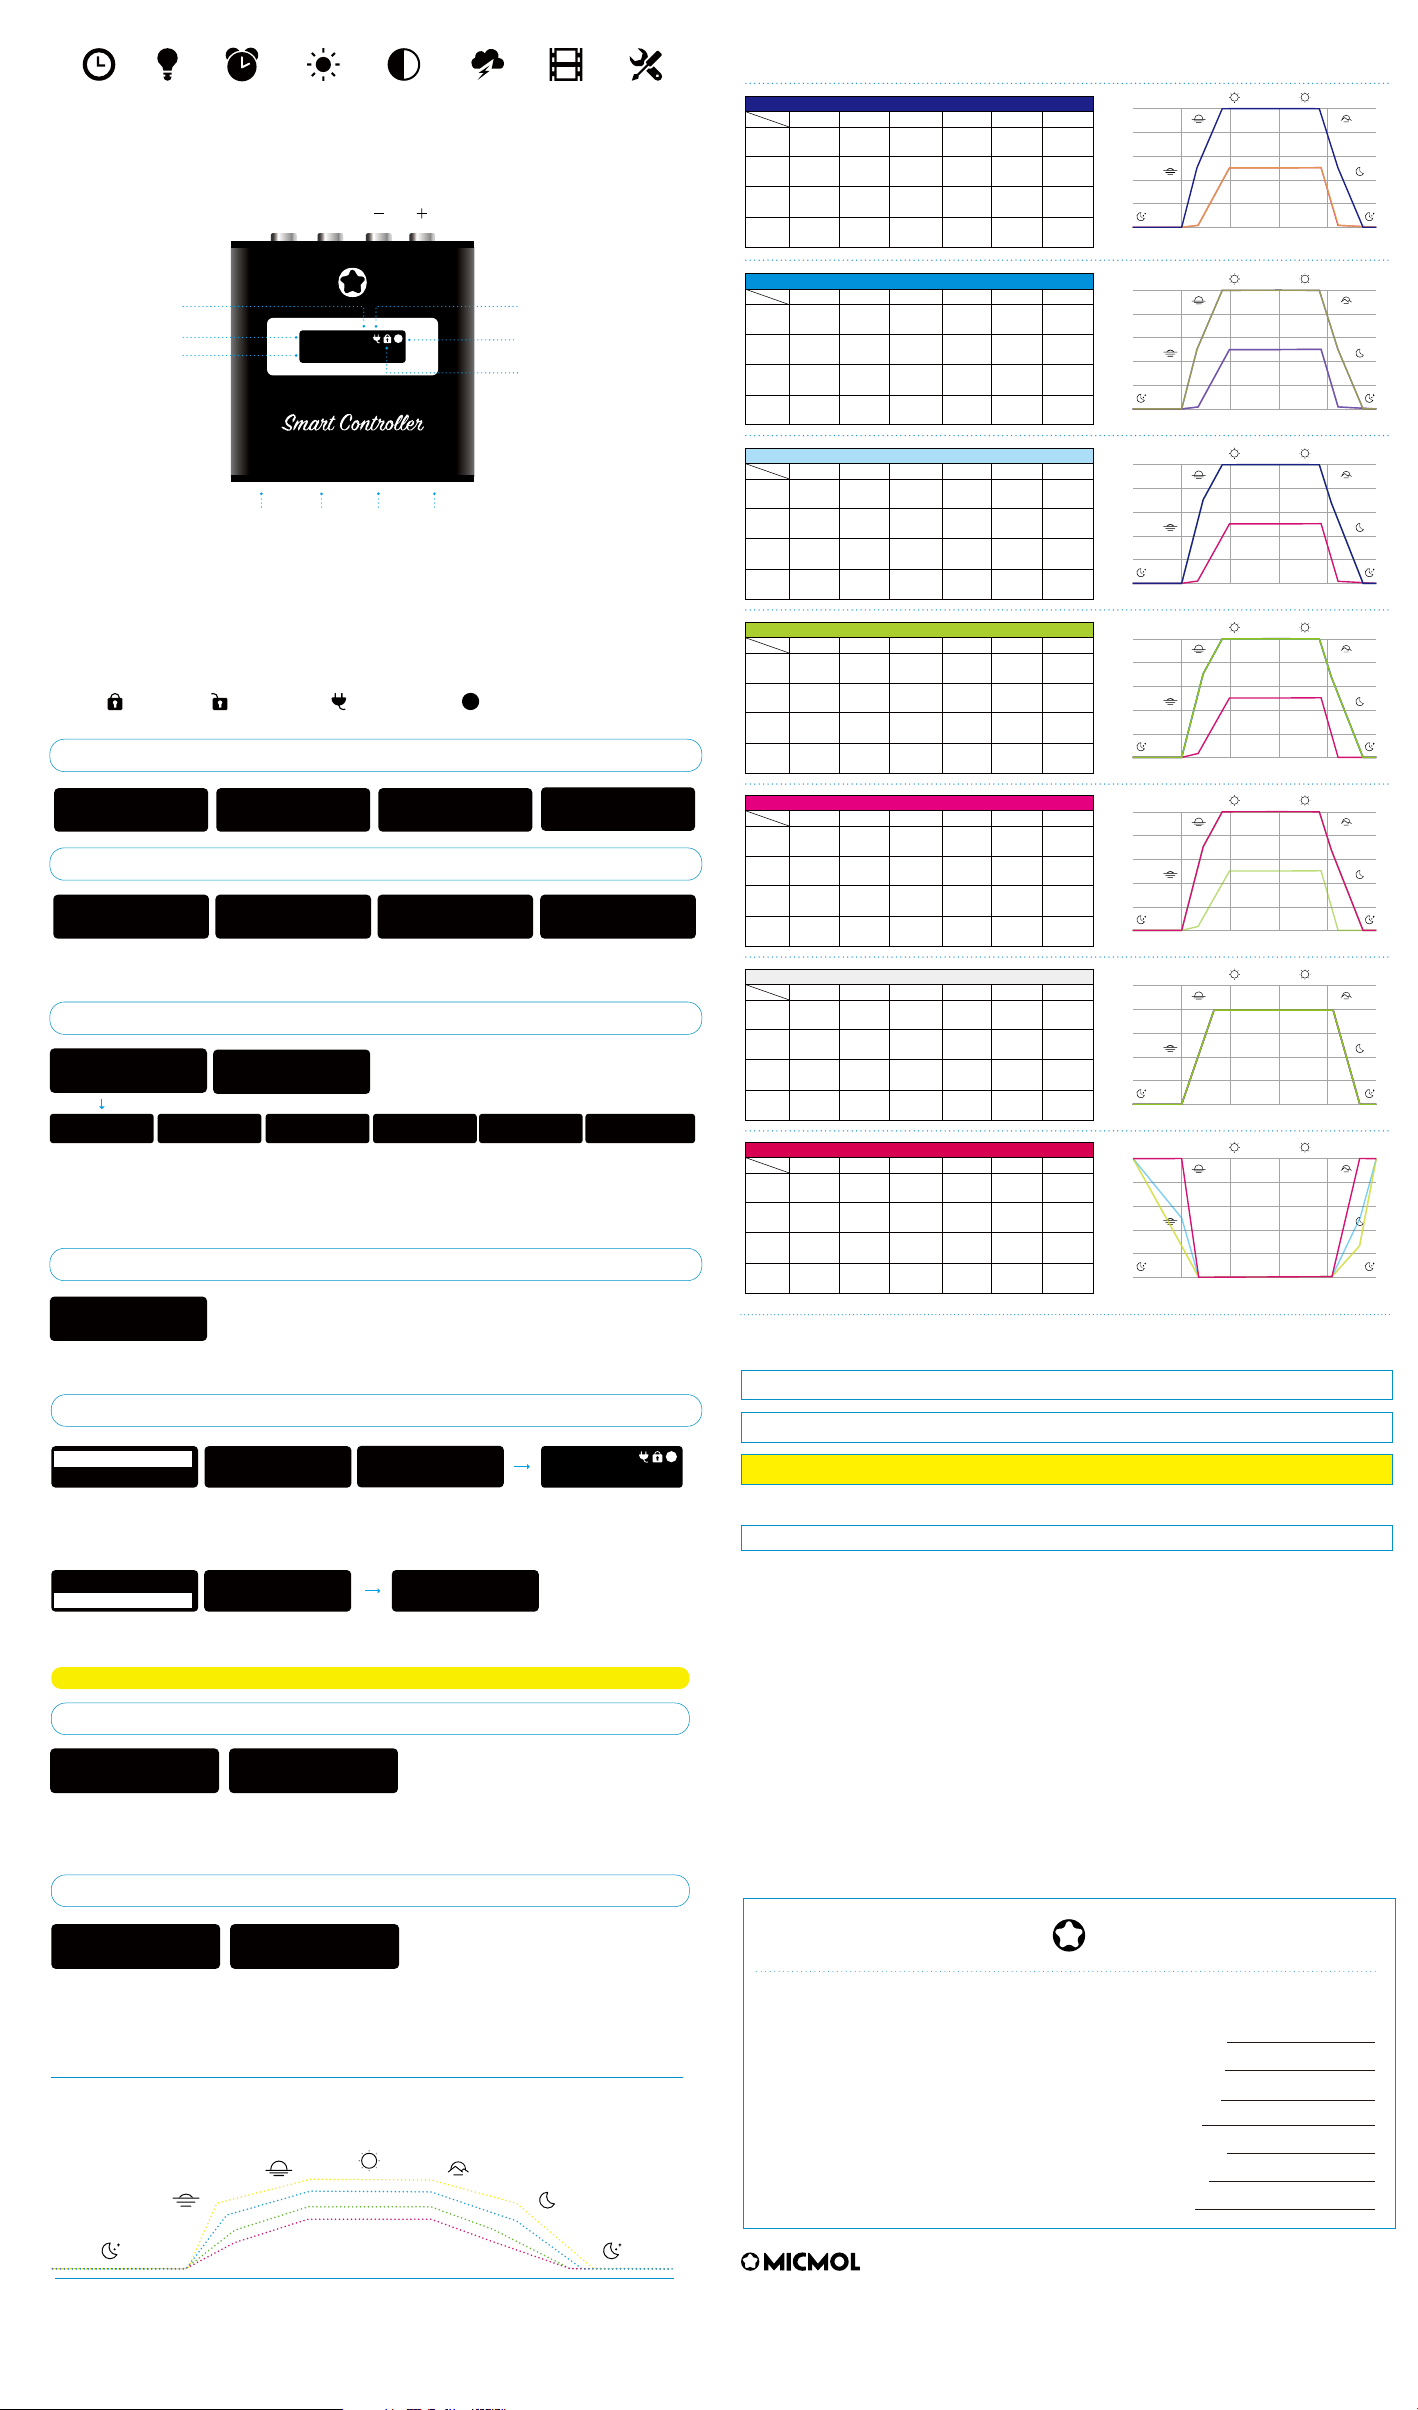
There are 7 presets for quick set your lighting, and prepare 3 DIY presets, you can save the
customize settings as you like.
The Channel A, B, C have 6 time points and can be adjust the intensity for each channels.
Note: If select "ALL" to set, then all the channels will overwrite as the "ALL" settings.
DEMO: The DEMO will show all your settings in 1 minute.
Save Settings: You can save the current settings to the DIY1, 2, 3.
The Manual Mode is easy to set the intensity from 1~100% for all or separate channels.
Smart Controller Menu Overview
Quick Set
Auto Mode
Manual Mode
Clock
System Lock
Signal Channel
INPUT
DC12~36V
Antenna
2.4G
Output
LED
Output
Expand
ExpandMode
IMOS 4.0 Smart Controller
Special Function 1: Hold on “OK” 3 second under locked to switch Auto & Manual Mode quickly.
Special Function 2: Hold on “BACK” 3 second to unlock and lock system.
Special Function 3: Hold on “OK” + “BACK” turn to the Receiver Mode quickly.
Note: “A” = Auto Mode, “M” = Manual Mode, “A:100%” = Intensity for each Channels
“ ” = Locked, “ ” = Unlocked, “ ” = Expand ON, “ ” = Channel Signal.
Intensity
AM 11:22 A
A:100% B:100%
BACKOK
1
1
Quick Set
Auto Mode
Manual Mode
Broadcaster
Settings
Receiver
Expand
SPS - 20K
LPS - 15K
Mixed Reef
Green Planted
Red Planted
Mixed Planted
Refugium
DIY 1
CH-A CH-B
CH-C ALL
A:100% B:100%
C:100% ALL
Demo
Save Settings
Dawn 08:00 AM
Intensity 000%
Sunrise 10:00 AM
Intensity 080%
Midday 12:00 PM
Intensity 100%
Sunset 03:00 PM
Intensity 100%
Dark 06:00 PM
Intensity 080%
Night 08:00 PM
Intensity 000%
The Control system will gradually ramp the intensity of LED between set points.
The graph below outlines how the LEDs will ramp up and down between settings.
24 Hours Lighting Cycle Overview
The Expand plug which are adapt for more devices such as Pump, Fan, Valve etc.
You can use the timer to turn the expand devices ON/OFF easily, the power is available to adjust the
speed for fan, intensity for lights and energy for valve.
Broadcaster (Father): Use one controller as the Broadcaster to control the other controller direclty.
Signal: There are 9 signals optional, so you can setup 9 controller as Broadcaster to pairing.
Note: Eanble the Broadcaster will show the channel signal number on home screen.
Receiver (Child): Switch to receiver will connect automatically when Broadcaster turn on.
Signal: The controller Home Screen will only show “Receiver” and the Pairied Signal number.
Set Clock: Set the controller time as your local time.
Languages: There are two languages optional “English” and “Chinese”
24 HOUR: You can switch 24 HOUR or AM/PM mode as you like.
Factory Reset: Reset all settings as default once your system got some chaos.
Linkage Mode (Broadcaster - Receiver)
Expand
Settings
00am 05am 09am 12pm 03pm 08pm
12am
Sunrise
Dawn
Midday
Sunset
Dusk
Night Night
Pairing Mode
Pairing...
Receiver
Pairied CH 1
YES
Pairing
Signal
Receiver Pairing...
CH 1
Broadcaster
Receiver
Broadcaster
AM 11:22 A
A:100% B:100%
1
Enable YES Start Time 08:00 AM
End Time 08:00 PM
Power 100%
Set Clock
Languages
24 HOUR
Factory Reset
Note: The 2.4G antenna signal covers is about 5 square meters, unavailable wall penetrating.
Preset (Quick Set)
0
20
40
60
80
100
00am 06am 12pm 03pm 07pm
12am
0
20
40
60
80
100
00am 06am 12pm 03pm 07pm
12am
SunriseDawn Midday Sunset Dusk Night
0%
@ 6:00AM
Channel A 1%
@ 8:00 AM
50%
@ 12:00 PM
50%
@ 5:00 PM
1%
@ 8:00 PM
0%
@ 10:00 PM
Channel B 0%
@ 6:00AM
50%
@ 7:00 AM
100%
@ 12:00 PM
100%
@ 5:00 PM
50%
@ 8:00 PM
0%
@ 10:00 PM
0%
@ 6:00AM
50%
@ 8:00 AM
100%
@ 12:00 PM
100%
@ 5:00 PM
50%
@ 8:00 PM
0%
@ 10:00 PM
Channel C
Channel D 50%
@ 12:00 PM
0%
@ 6:00AM
1%
@ 8:00 AM
50%
@ 5:00 PM
1%
@ 8:00 PM
0%
@ 10:00 PM
SPS 20K - Heavy Blue
SunriseDawn Midday Sunset Dusk Night
0%
@ 6:00AM
Channel A 50%
@ 8:00 AM
100%
@ 12:00 PM
100%
@ 5:00 PM
50%
@ 8:00 PM
0%
@ 10:00 PM
Channel B 0%
@ 6:00AM
50%
@ 7:00 AM
100%
@ 12:00 PM
100%
@ 5:00 PM
50%
@ 8:00 PM
0%
@ 10:00 PM
0%
@ 6:00AM
1%
@ 8:00 AM
50%
@ 12:00 PM
50%
@ 5:00 PM
1%
@ 8:00 PM
0%
@ 10:00 PM
Channel C
Channel D 50%
@ 12:00 PM
0%
@ 6:00AM
1%
@ 8:00 AM
50%
@ 5:00 PM
1%
@ 8:00 PM
0%
@ 10:00 PM
LPS 15K -White + Blue
0
20
40
60
80
100
00am 06am 12pm 03pm 07pm
12am
SunriseDawn Midday Sunset Dusk Night
0%
@ 6:00AM
Channel A 50%
@ 8:00 AM
100%
@ 12:00 PM
75%
@ 5:00 PM
50%
@ 8:00 PM
0%
@ 10:00 PM
Channel B 0%
@ 6:00AM
50%
@ 7:00 AM
100%
@ 12:00 PM
75%
@ 5:00 PM
50%
@ 8:00 PM
0%
@ 10:00 PM
0%
@ 6:00AM
50%
@ 8:00 AM
100%
@ 12:00 PM
75%
@ 5:00 PM
50%
@ 8:00 PM
0%
@ 10:00 PM
Channel C
Channel D 50%
@ 12:00 PM
0%
@ 6:00AM
1%
@ 8:00 AM
50%
@ 5:00 PM
1%
@ 8:00 PM
0%
@ 10:00 PM
Mixed Reef - 10K White + Blue
0
20
40
60
80
100
00am 06am 12pm 03pm 07pm
12am
SunriseDawn Midday Sunset Dusk Night
0%
@ 6:00AM
Channel A 100%
@ 8:00 AM
100%
@ 12:00 PM
100%
@ 5:00 PM
100%
@ 8:00 PM
0%
@ 10:00 PM
Channel B 0%
@ 6:00AM
10%
@ 7:00 AM
10%
@ 12:00 PM
10%
@ 5:00 PM
10%
@ 8:00 PM
0%
@ 10:00 PM
0%
@ 6:00AM
100%
@ 8:00 AM
100%
@ 12:00 PM
100%
@ 5:00 PM
100%
@ 8:00 PM
0%
@ 10:00 PM
Channel C
Channel D 10%
@ 12:00 PM
0%
@ 6:00AM
10%
@ 8:00 AM
10%
@ 5:00 PM
10%
@ 8:00 PM
0%
@ 10:00 PM
Green Planted - WRGB
0
20
40
60
80
100
00am 06am 12pm 03pm 07pm
12am
SunriseDawn Midday Sunset Dusk Night
0%
@ 6:00AM
Channel A 90%
@ 8:00 AM
90%
@ 12:00 PM
90%
@ 5:00 PM
90%
@ 8:00 PM
0%
@ 10:00 PM
Channel B 0%
@ 6:00AM
80%
@ 7:00 AM
80%
@ 12:00 PM
80%
@ 5:00 PM
80%
@ 8:00 PM
0%
@ 10:00 PM
0%
@ 6:00AM
20%
@ 8:00 AM
20%
@ 12:00 PM
20%
@ 5:00 PM
20%
@ 8:00 PM
0%
@ 10:00 PM
Channel C
Channel D 100%
@ 12:00 PM
0%
@ 6:00AM
100%
@ 8:00 AM
100%
@ 5:00 PM
100%
@ 8:00 PM
0%
@ 10:00 PM
Red Planted - WRGB
0
20
40
60
80
100
00am 06am 12pm 03pm 07pm
12am
SunriseDawn Midday Sunset Dusk Night
0%
@ 6:00AM
Channel A 80%
@ 8:00 AM
80%
@ 12:00 PM
80%
@ 5:00 PM
80%
@ 8:00 PM
80%
@ 8:00 AM
80%
@ 12:00 PM
80%
@ 5:00 PM
80%
@ 8:00 PM
80%
@ 8:00 AM
80%
@ 12:00 PM
80%
@ 5:00 PM
80%
@ 8:00 PM
80%
@ 8:00 AM
80%
@ 12:00 PM
80%
@ 5:00 PM
80%
@ 8:00 PM
0%
@ 10:00 PM
Channel B 0%
@ 6:00AM
0%
@ 10:00 PM
0%
@ 6:00AM
0%
@ 10:00 PM
Channel C
Channel D 0%
@ 6:00AM
0%
@ 10:00 PM
Mixed Planted - WRGB
0
20
40
60
80
100
00am 06am 12pm 03pm 07pm
12am
SunriseDawn Midday Sunset Dusk Night
25%
@ 6:00AM
Channel A 0%
@ 8:00 AM
0%
@ 12:00 PM
0%
@ 8:00 PM
25%
@ 10:00 PM
100%
@ 00:00 AM
50%
@ 6:00AM
0%
@ 8:00 AM
0%
@ 12:00 PM
0%
@ 8:00 PM
50%
@ 10:00 PM
100%
@ 00:00 AM
25%
@ 6:00AM
0%
@ 8:00 AM
0%
@ 12:00 PM
0%
@ 8:00 PM
50%
@ 10:00 PM
100%
@ 00:00 AM
100%
@ 6:00AM
0%
@ 8:00 AM
0%
@ 12:00 PM
0%
@ 8:00 PM
100%
@ 10:00 PM
100%
@ 00:00 AM
Channel B
Channel C
Channel D
Refugium Planted - WRGB
Product Name:
Product Mode:
Dealer Name:
Dealer Tel:
Purchase Date:
User Name:
User Tel:
Warranty Card
This manual suits for next models
1
Other MicMol Aquarium manuals


