happet BIO Filtr UV PLUS User manual

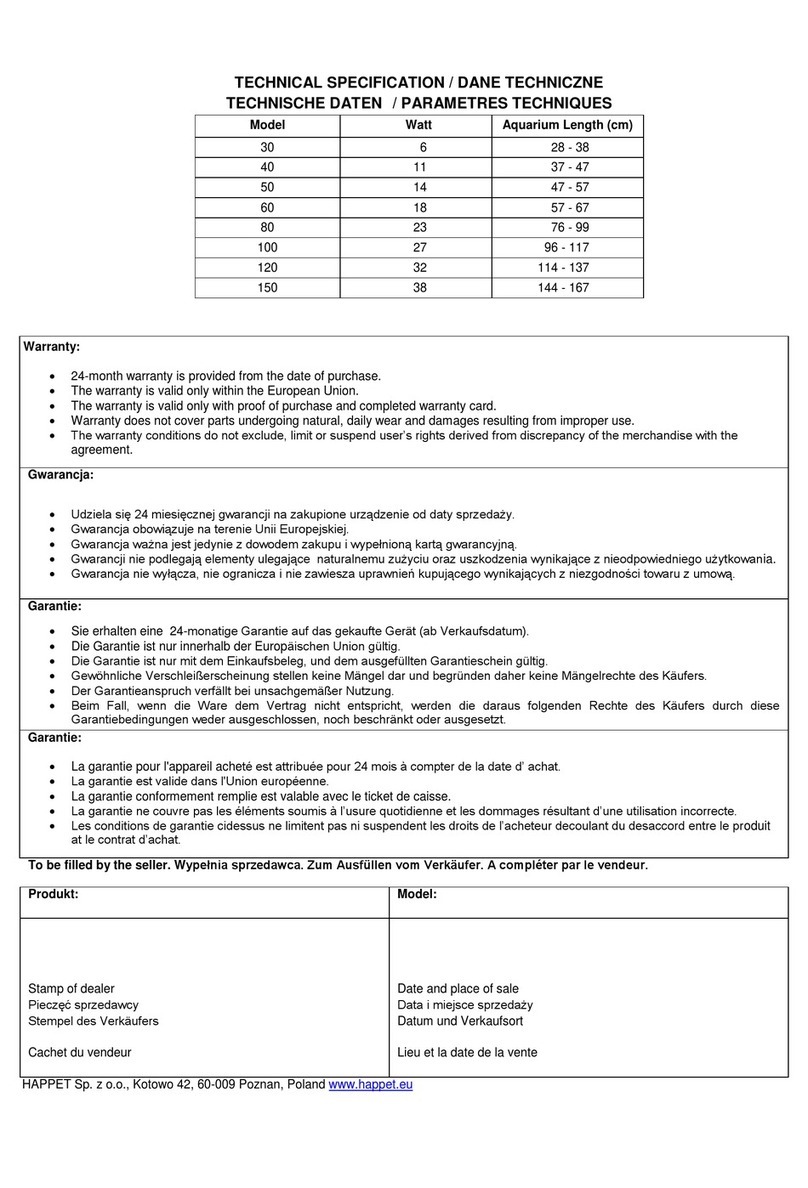
WARRANTY:
The product has a two-year warranty for hidden defects in the material.
The warranty is valid only with proof of purchase and completed warranty card.
Damages resulting from improper use and self-willed modifications of the
device are not covered by the guarantee.
GWARANCJA:
Produkt posiada dwuletniągwarancjęna ukryte wady materiału.
Gwarancja ważna jest jedynie z dowodem zakupu i wypełnionąkartą
gwarancyjną.
Gwarancji nie podlegająuszkodzenia wynikające z niewłaściwego użytkowania
i samowolnych modyfikacji urządzenia.
GARANTIE:
Das Produkt besitzt zweijährige Garantie für versteckte Materialmängel.
Die Garantie ist nur mit dem Kaufbeleg und dem ausgefüllten Garantieschein
gültig.
Die Garantie umfasst keine Beschädigungen, die infolge der
unordnungsgemäßen Nutzung und der eigenmächtigen Modifizierungen am
Gerät entstehen.
To be filled by the seller.
Wypełnia Sprzedawca.
Zum Ausfüllen vom Verkäufer.
PRODUKT: MODEL:
Stamp of dealer
Pieczęć sprzedawcy
Stempel des Verkäufers
Date and place of sale
Data i miejsce sprzedaży
Datum und Verkaufsort
HAPPET Sp. z o.o. Kotowo 42, 60-009 Poznań
INSTRUKCJA OBSŁUGI
Kotowo 42, 60-009 Poznań
www.happet.eu Poland
Zestaw z pompą, lampąUV 11W oraz wężem długość ok. 4 m.
Podstawowy filtr odpowiedni dla większości niedużych stawów, o pojemności do
10 000 litrów.
ZASADA DZIAŁANIA BIOfiltra:
Filtr posiada bogate wypełnienie materiałem filtracyjnym, dzięki czemu działa
wielotorowo:
Mechanicznie - zatrzymuje na gąbce jak równieżna wacie filtracyjnej i macie
japońskiej wszelkie zanieczyszczenia i zawiesinęunoszącąsięw wodzie.
Biologicznie - utrzymuje równowagębiologicznąw stawie dzięki wypełnieniu
biobalami oraz pozostałymi materiałami filtracyjnymi. Pożyteczne bakterie znajdują
idealne siedlisko we wszystkich warstwach filtracyjnych. Mająone szczególnie dużą
powierzchnięczynną, a namnażające siębakterie rozkładająwszelkie szkodliwe
substancje.
PODŁĄCZENIE
Zamontuj króciec wlotowy w otworze w górnej części obudowy. Załączony króciec
należy skierowaćna zewnątrz i dokręcićod wewnątrz nakrętkąz uszczelką.
Umieść BIOfiltr na brzegu stawu.
Podłącz wężem pompęznajdującąsięw stawie do króćca wlotowego. Króciec jest
dostosowany do różnych średnic węża. W przypadku zastosowania węża o średnicy
większej niż20 mm, należy odpowiednio dociąć króciec.
Oczyszczona woda wypływa poprzez króciec wylotowy filtra. Można podłączyćtam
wąż odprowadzający lub pozostawićswobodny wypływ do stawu.
OBSŁUGA
BIOfiltr należy regularnie czyścić, co 2-4 tygodnie. W początkowym okresie
po zainstalowaniu oraz gdy woda w stawie jest szczególnie zanieczyszczona należy
czyścićgo częściej.
W tym celu wyłącz pompędoprowadzająca wodę, wyjmij wszystkie materiały
filtracyjne, oczyść je i wypłucz wiele razy w wiadrze z wodą, usuńewentualny osad
na dnie filtra, a następnie umieść wszystkie materiały w filtrze w pierwotnej
kolejności.
Materiały filtracyjne zastosowane w BIOfiltrze nie wymagająokresowej wymiany.
UWAGA
Niekorzystne sądłuższe przerwy w przepływie wody przez filtr, ponieważginie cała
flora bakteryjna odpowiedzialna za filtracjębiologiczną.
PL
BIO Filtr UV PLUS

User's manual
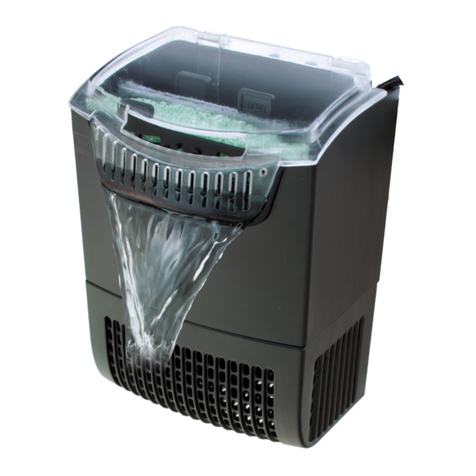
Set with the UV lamp 11 W, pump and spiral hose –- 4m.
UV filter suitable for most small ponds up to 10 000 liters.
OPERATION
BIOfiltr is fully equipped with filtration media to work in many ways:
mechanically - retain any impurities and floating suspension in the water
on a sponge, as well as on the fibre cotton and Japanese mat
biological - keeps the biological balance in the pond thanks to bio-balls
and other filter materials. Friendly bacteria are an ideal habitat for all layers
of the filter. They have particularly high active surface and multiplying
bacteria decomposes harmful substances.
CONNECTION
Install the inlet connector into the hole at the top of the filter housing. The
connector should be directed to the outside and tighten from inside with nut
and seal.
Place the BIOfiltr at the edge of the pond.
Using the hose, connect the pump located in the pond to the inlet
connector. The inlet connector is suitable for different hose diameters. In
case of the hose with the diameter of more than 20 mm, appropriate cutting
of the inlet connector is required.
Purified water flows out of the filter outlet in the bottom filter part. You can
connect the drain hose there or leave the free flow into the pond.
OPERATION
BIOfiltr should be cleaned regularly, every two to four weeks. In the initial
period after the installation, and when the water in the pond is particularly
dirty it should be cleaned more often.
To do this, turn off the water supply pump, remove all filter materials, clean
them and rinse several times in a bucket of water, remove possible residue
on the bottom of the filter, and place all the material in the filter in the
original order.
The materials used in the BIOfiltr does not require periodic replacement.
NOTE
Longer interruptions in the flow of water through the filter are unfavorable,
since all bacterial flora responsible for biological filtration is killed.
EN
BIO Filtr UV PLUS
Bedienungsanleitung
Der Satz mit der Pumpe, dem UV-Klärer 11W und dem Schlauch von ca. 4 Meter
Länge. Der UV-Filter geeignet für die meisten, kleinen Teiche mit dem Volumen bis
zu 10 000 Liter.
DAS WIRKUNGSPRINZIP
Der Filter besitzt eine reiche Füllung mit dem Filtermaterial, dank dem er vielseitig
wirkt:
mechanisch - auf dem Schwamm sowie auf der Filterwatte und der japanischen
Matte werden alle Verunreinigungen und die Suspension, die es im Wasser gibt,
zurückgehalten.
biologisch - das biologische Gleichgewicht im Teich wird dank der Füllung mit den
Bio-bällen und den anderen Filtereinsätzen gehalten. Die nützlichen Bakterien haben
einen idealen Lebensraum in allen Filtrationsschichten. Diese Schichten haben
besonders groβe Fläche und die steigende Zahl der Bakterien zersetzt alle
Schadstoffe.
ANSCHLUSS
Installiere die Einlaufsdüse in die Öffnung im Oberteil des Filtergehäuse. Die
beigefügte Düse sollte nach auβen gerichtet werden und von innen mit Hilfe von der
Mutter mit Dichtung festgezogen werden.
Stelle den BIOfilter am Rand eines Teiches.
Verbinde mit Hilfe von Schlauch die sich im Teich befindete Pumpe mit dem
Einlaufverbinder. Der Einlaufverbinder ist an unterschiedliche Durchmesser des
Schlauches angepasst. Bei Verwendung des Schlauches mit dem Durchmesser größer
als 20 mm, sollte der Einlaufverbinder angemessen geschnitten werden.
Das gereinigte Wasser flieβt aus dem Auslauf des Filters. Man kann da den Schlauch
anschliessen oder einen freien Auslauf zu dem Teich lassen.
BEDIENUNG
Der BIOfilter soll regelmäβig gereinigt werden, jede zwei bis vier Wochen. In der
Anfangszeit nach der Instalation und wenn das Wasser im Teich besonders schmutzig
ist, sollte der Filter öfters gereinigt werden.
Zu diesem Zweck schalte die Wasserversorgungspumpe aus, nimm alle Filtermedien
heraus, reinige sie und spüle im Eimer mit Wasser, entferne den Bodensatz und lege
alle Medien in den Filter in der ursprünglichen Reihenfolge.
Die in dem BIOfilter verwendeten Filtermedien benötigen keinen regelmäβigen
Austausch.
ACHTUNG
Ungünstig sind die längeren Pausen im Wasserdurchfluss durch den Filter, weil die
gesamte, für die biologische Filtration verantwortliche Bakterienflora, verschwindet.
DE
BIO Filtr UV PLUS
Other happet Aquarium manuals
