Micron Herbi-4 CDA User manual

Instruction Manual

CONTENTS Page
Description ............................................................................................................................... 1
Safety ....................................................................................................................................... 2
Operator protection ................................................................................................................... 2
Preparing for spraying .............................................................................................................. 3
Mixing, filling and calibration .............................................................................................. 4 - 7
Before spraying ........................................................................................................................ 8
To start spraying ....................................................................................................................... 8
To stop spraying ....................................................................................................................... 9
After spraying ........................................................................................................................ 10
Storage, recharging and maintaining the battery ...................................................................... 11
Troubleshooting ..................................................................................................................... 12
Diagram/Parts List ........................................................................................................... 13 - 14
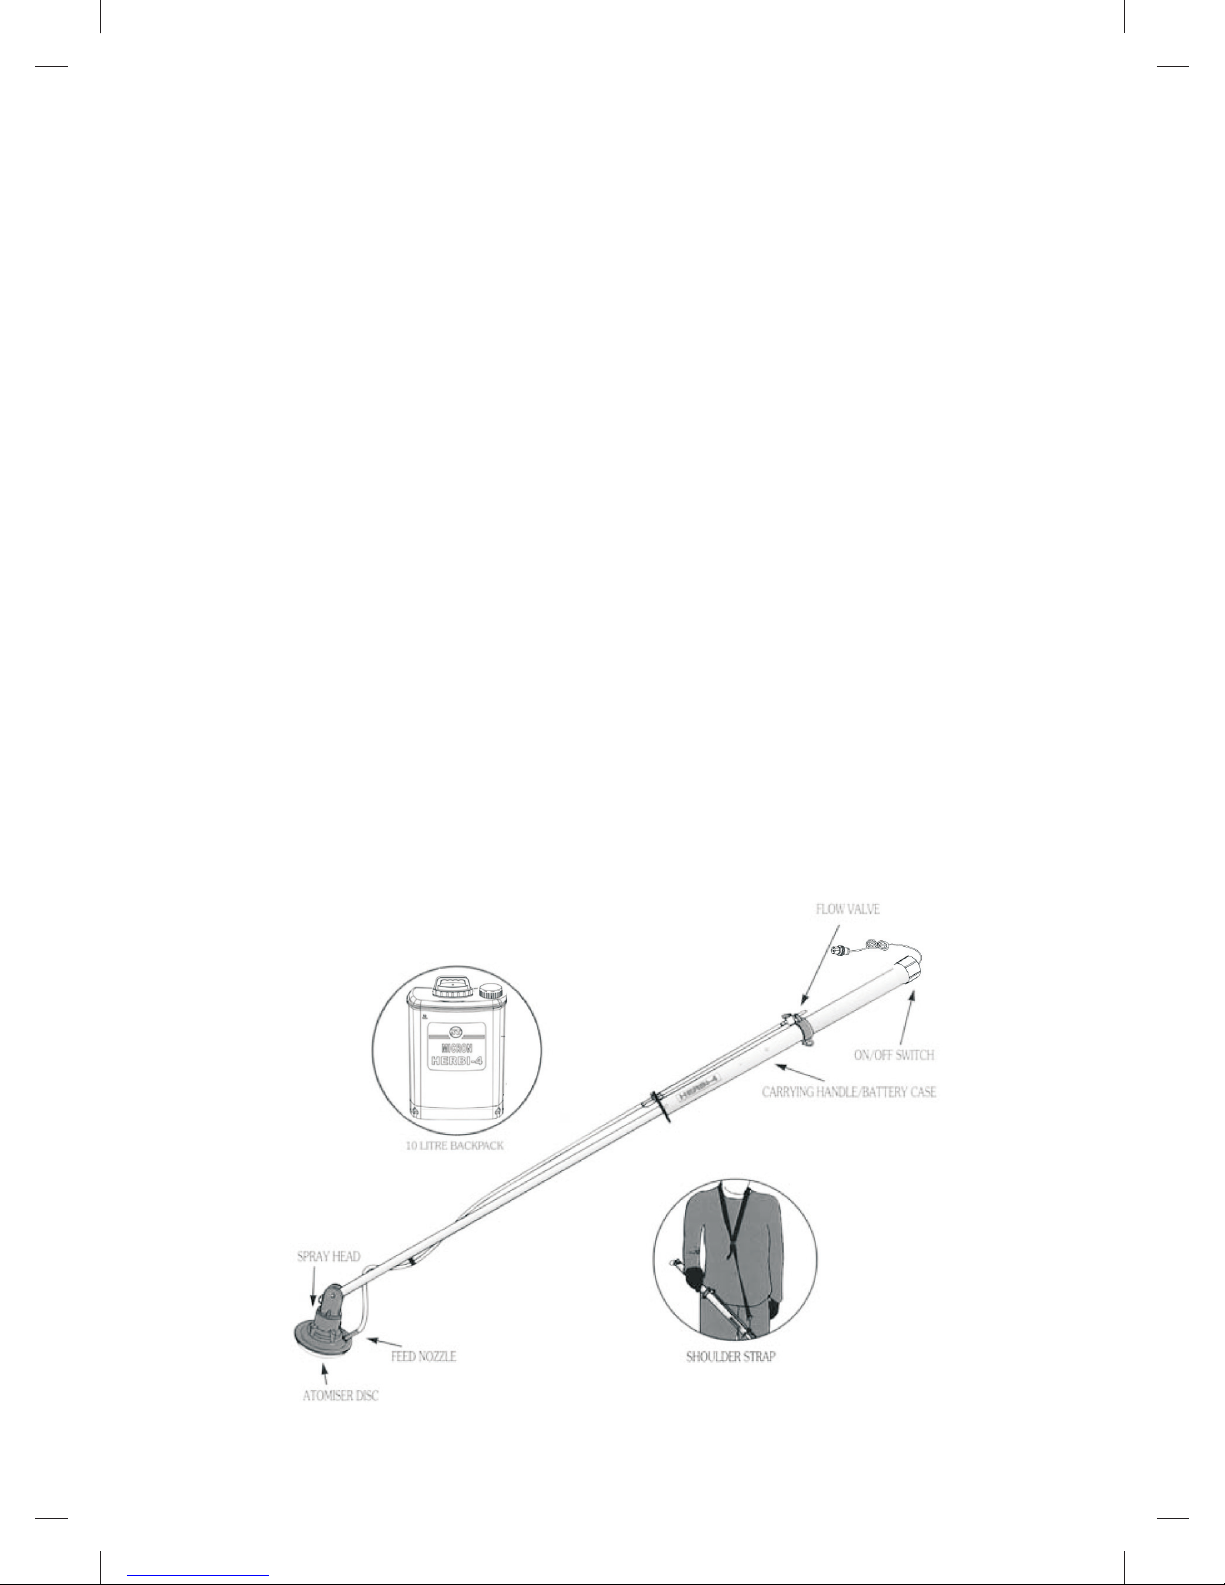
DESCRIPTION
The HERBI-4 is a simple robust hand-held spinning disc Controlled Droplet
Application (CDA) sprayer powered by 6 volt 3 Ah LSA battery, with one set of good
quality battery giving over 20 hours spraying time. It is designed to apply herbicides in
a 1.2m wide band at low volumes (10 to 30 litres/hectare). A governed electric motor
spins the atomiser disc at a constant 2,000 rpm to produce uniform spray droplets of
around 250 micron; large enough to minimise any risk of spray drift. Liquid is fed by
gravity through colour coded feed nozzles. The HERBI-4 can apply herbicides to
borders, pathways, ditches and larger areas by making a series of consecutive spray
passes. The weight of the machine ready to spray, with the ST 10 litre backpack.
1
DIAGRAM 1

Specially designed ST backpacks and a shoulder strap are available for use with the
HERBI-4.
Using agrochemicals is a hazardous process. Operators should comply with all
relevant legislation and/or regulations governing the use of agrochemicals and should
use appropriate personal protective equipment (see ‘OPERATOR PROTECTION’).
use the HERBI-4 in potentially explosive atmospheres or spray flammable
liquid through it.
The HERBI-4 can be used with most conventional herbicides, as well as specific CDA
formulations (only available in some countries) to provide a closed transfer system to
improve operator safety.
read the product label carefully to discover:-
• approved applications
N.B. ‘Dose rate’refers to the amount of chemical applied per hectare.
eat, drink, or smoke when working with agrochemicals. After using
agrochemicals or handling equipment wash your hands thoroughly. Keep people
(especially children) and animals out of areas being sprayed.
store agrochemicals safely to protect people and animals, and to safeguard the
environment (take special care to avoid water pollution). See ‘SPRAYING’ sections
for guidelines on safe use of the HERBI-4 in operation.
wear the protective clothing items listed on the product label for mixing and
filling. The protective clothing required for with the HERBI-4 is:
SAFETY
OPERATOR PROTECTION
Always
Never
Always
Never
Always
minimum
• maximum dose rates
• maximum number of treatments
• operator protection required
• necessary environmental protection measures
• rubber gloves
• boots/shoes and long trousers
• eye protection
• long sleeved shirt
spraying
2

Note:
PREPARING FOR SPRAYING
1
4
3
a) the sound pressure level at the operator’s ear should not
exceed 70 dB(A).
b) the weighted RMS acceleration value at the hands when using this
machine should not exceed 2.5 m/sec.
The sprayer is delivered in a collapsed form. To assemble ready for spraying:
1) Extend the sprayer and securely connect the feed tube to the flow valve.
3) Remove the atomiser protective cover and check by hand that the atomiser
disc spins freely.
4)Turn on the switch .
N.B. Before spraying for the first time with the HERBI-4, the spray pattern
produced should be checked using only water (see ‘BEFORE SPRAYING’).
Acoustic information:
Vibration:
2) Connect the male 3 pole connector from the lance to the tank female 3 pole
connector and lock the both connector.
2
5
3
DIAGRAM 2

MIXING, FILLINGAND CALIBRATION
Mixing and filling is generally the most hazardous process in the spraying operation.
follow the label instructions. use a filter (fitted in the )
and use a funnel if filling a container with a small neck. mix enough spray for the
area to be treated thereby avoiding the need for disposal of unused spray mix.
wash off any skin
contamination.
With the HERBI-4 herbicides are usually applied in around 20 litres total spray
volume per hectare, except for glyphosate which can be applied at volumes as low as
10 litres per hectare. These are lower volumes than recommended for high volume
application with knapsack sprayers.
Always Always
Only
Always
ST backpacks
Always Always
Always
wear gloves when handling use the correct equipment when
agrochemicals and equipment. mixing and measuring.
clean all equipment after use.
4

Do not
Never
use herbicide concentrations greater than the maximum recommended on the
label (unless specific training or recommendations have been given) if the label:
a) specifically prohibits use of ‘Reduced Volumes’i.e. increased concentrations;
b) has a requirement for use of personal protective equipment when using the
diluted product at high volumes (N.B. this will appear in the statutory box on the
label);
or
c) carries one of the following hazard ratings: ‘very toxic’, ‘toxic’ or ‘corrosive’ or
carries the warning ‘risk of serious damage to the eyes’ e.g. paraquat (Gramoxone)
which is classified as toxic should not therefore be used through the HERBI-4 at
concentrations greater than recommended on the label. Micron do not generally
recommend using spray mixes of more than ten times the maximum concentration
recommended for high volume application with knapsack sprayers. The safest
product and lowest dose rate appropriate for the treatment should be used at all
times.
To prepare the spray mix first read the product label to determine the quantity of
product to be applied per hectare e.g. 2 litres of glyphosate per hectare. Then determine
the total spray volume to be applied per hectare with the Herbi-4 i.e. 10 or 20 litres per
hectare. Calculate the ratio of product in water e.g. 2 litres glyphosate + 8 litres water =
10 litre mix = 1: 4. Use this ratio to prepare the correct dose for the spray tank or bottle
e.g. with a 5 litre backpack mix 1 litre glyphosate with 4 litre of water.
Measure out the exact amount of
product.
use leaking equipment. Take care to avoid spillage when filling or lifting the
tank.
statutory
Half fill the tank with clean water.
Check for leaks.Add the measured
product.
5

Fill the tank. Wipe the tank with a dry cloth
Mix well by gently shaking the tank. Place the tank on the operator‘s back.
a) glyphosate (360 g/l) 2 litres
add water: +8 litres
Total volume: 10 litres
i.e. 1 part glyphosate : 4 parts water
b) 2,4-D (500 g/l) 3 litres
add water: +17 litres
Total volume: 20 litres
i.e. 3 parts 2,4-D : 17 parts water
Examples of mixing spray – for 1 hectare
6

The table below indicates the relationship between total spray volume, flow rate
and walking speed for the HERBI-4 as per the following formula:
Flow rate (ml/min)=6xtotal spray volume (l/ha) x walking speed (m/s) x band width (m)
Note: The flow rates in this table were measured with the spray head 65cm below the level of the liquid in the
tank, using water only. The flow rate will vary with differences in this height and the viscosity of the spray
mix (for very viscous spray mixes it may be necessary to use a larger feed nozzle).
CALIBRATION
not
Choose and fit the feed nozzle that is likely to be required. The actual flow rate should
be checked holding the HERBI-4 in the spraying position. Remove the feed nozzle
from the spray head by and pulling out, then, once liquid has reached the feed
nozzle, allow the liquid to flow into a suitable container for one minute and measure
the volume dispensed. If the flow rate is in the recommended flow rate range of 60
to 150 ml/min change the feed nozzle and repeat the above procedure.
N.B. It is preferable to walk more slowly to achieve the required spray volume than to
use higher flow rates.
twisting
Total spray volume
(l/ha)
Band width Feed nozzle Flow rate Walking speed
(m) (ml/min) (m/s)
10 (i.e. glyphosate) 1.2 Blue 72 1
20 (i.e. other herbicides) 1.2 Blue
Yellow
72 0.5
144 1
Example: Required spray volume rate = 20 l/ha; Flow rate measured = 100 ml/min
i.e. 0.7 m/s or 42 metres in one minute (0.7m x 60s)
Mark out a distance of 42 metres and practice walking it in one minute.
Walking speed (m/s) = = = 0.7
Flow rate (ml/min)
6 x 1.2 x total spray volume (l/ha)
100
7.2x20
7

BEFORE SPRAYING
Always
TO START SPRAYING
Do not
Check the wind speed and direction (below 5 kph) is safest. Take special care to avoid
drift by keeping the spray head as low as possible. spray into the wind and avoid
walking into the spray. keep the spray head at least 60cm from any part of the
body to avoid direct contamination by the spray.
Before spraying for the first time use water to check the spray pattern produced.
Put some clean water in the tank and add a small amount of detergent. Check for leaks.
Switch on the sprayer and then open the flow valve. Spray on one spot, preferably on
clean dry concrete, for around 30 seconds with the spray head held about 20cm above
the ground; a wet ring 1.2m wide should appear on the ground. Practice using the
sprayer by walking along a few metres and then stopping spraying (see ‘TO STOP
SPRAYING’).
Hold the spray head about 20cm above the ground or weed foliage. Switch on the
sprayer, check the atomiser disc starts spinning ( touch the atomiser disc when
spinning or hold the spray head too close to the operator) and then open the flow valve.
Start walking immediately the spray liquid reaches the feed nozzle. N.B. with the
HERBI-4 Extra both flow valves must be opened.
The HERBI-4 is normally held at an angle of around 35° to 40° to the ground with the
head inclined slightly away from the operator. spray with the HERBI-4 held on
the shoulder, since spray may contaminate the operator. N.B. the machine will not
spray with the spray head above the level of liquid in the tank.
Never
only
never
8

It is best to hold the HERBI-4 to the side or the rear so that the operator does not have to
walk over the treated area.
Close the flow valve and switch off the sprayer. When the atomiser disc has
stopped spinning raise the sprayer to an angle of 45°(see below). raise the spray
head until the atomiser disc has stopped spinning. open the flow valve and drain
any remaining liquid in the feed tube back into the tank (by raising the feed tube above
the level of liquid in the tank). Then close the flow valve.
For ease of transport the tank can be disconnected (use the flow valve to isolate any
liquid left in a backpack) and the sprayer collapsed (OFF the switch and disconnect the
3 pole connector).
TO STOPSPRAYING
then
Then
Never
9

AFTER SPRAYING
1. Dispose of any surplus spray mix according to the product approval. Store products
safely, locked up and out of the reach of children.
2. It is to clean the sprayer and tank thoroughly using water and detergent
after use. immerse the spray head in water or under a tap, since this will
destroy the electric motor. A water and detergent mix should be put in the tank,
swilled around, and then sprayed out onto the treated area of waste ground. The
sprayer and tank should be wiped down externally using a cloth. Periodically
remove the atomiser disc with a pair of pliers and clean with a soft brush.
essential
Never
10

3. After working with agrochemicals, or handling spraying equipment,
thoroughly wash hands and exposed skin. All protective clothing should be washed
separately from other clothing and stored. Contaminated gloves should be washed
inside and out.
Before storing the HERBI-4, clean all the electrical contacts with wire brush or
similar. The machine should be stored in a dry cool place.
RECHARGINGAND MAINTAINING THE BATTERY(DIAGRAM 2)
i. Connect the battery charger male 3-pole connector to the tank female 3-pole
always
STORAGE
6
5
3ON
6
connector and lock the both connectors.
ii. The tank’s switch should be in position.
iii. Connect the battery charger plug to the main electric power and switch on. The Red
static ‘in charging’ and the red blinking ‘done charging’ indicator will glow. The
battery will need to recharge for 8 hours.
iv. After done with charging, remove the battery charger from the main electric
power and disconnect the 3-pole connector.
11

TROUBLESHOOTING
3
A) Atomiser disc spins but does not spray or sprays irregularly. Check:
- The feed nozzle. If the feed nozzle is blocked remove and soak in soapy water.
blow through the nozzle with your mouth. Check that the feed nozzle
gives a flow rate within the operating range.
- The atomiser is clean and undamaged. Clean or replace.
- The flow valve for blockage. Rinse through with soapy water.
B) Atomiser disc fails to spin or spins unevenly. Check:
- Charging was done correctly.
Switch should be in ON position when charging, 3 pole connector is connected
properly.
- The condition of the batteries. Replace if necessary.
- That electrical terminals and contact points are clean and that electrical wires are
not broken or corroded.
- If the atomiser disc is rubbing on the motor base plate or the motor shaft is bent.
Replace the disc or motor if necessary.
- The motor for corrosion or obvious signs of wear. Replace if necessary.
N.B. Battery condition can be checked with a torch (or a torch lightbulb and electrical
wire).
Never
12


MICRON HERBI-4 SPRAYER PARTS Listing
ITEM PARTS NO. DESCRIPTION
1. STMC-021-10000 SCREW NO. 6 X 1/4" S/T (B)
2. STMC-021-10001 AIR VENT TUBE - 0.15M
3. STMC-021-10002A (NEW) ELECTRIC WIRE BLACK / RED (3-POLE CONNECTOR)
4. STMC-021-10005 SPRING HOLDER PIN
5. STMC-021-10006 SPRING 9/32" TERMINAL CONNECTING
6. STMC-021-10007 ATOMISER PROTECTIVE COVER (GREEN)
7. STMC-021-10008 SCREW NO 6 X 3/8" S/STEEL
8. STMC-021-10009 TUBE CLIP
9. STMC-021-10010 WING NUT
10. STMC-021-10011 PVC TUBE 6MM X 9MM - 1.21M
11. STMC-021-10012 ATOMISER DISC
12. STMC-021-10013 SLINGGER DUMMY SHAFT
13. STMC-021-10014 SCREW M5 X 25MM
14. STMC-021-10015 FEED NOZZLE BLUE
15. STMC-021-10016 FEED NOZZLE YELLOW
16. STMC-021-10053 NECK STRAP
17. STMC-021-10017 SPRING BATTERY CASE
18. STMC-021-10018 CENTRE CONNECTOR
21. STMC-021-10023 SCREW NO 6 X 3/8" S/T POZI PANHEAD (B)
22. STMC-021-10026 FRONT PLATE
23. STMC-021-10027 MOTOR HOUSING C/W AIR BLEED TUBE
24. STMC-021-10028 MOTOR HERBI - 4
25. STMC-021-10029 EXTENSION TUBE 1.15M
26. STMC-021-10030 BATTERY CASE
27. STMC-021-10032 O - RING (BS 611)
28. STMC-021-10033 O - RING (BS 365-30)
29. STMC-021-10034 INLINE SYPHONE TAP (NEW MODEL)
30. STMC-021-10035 INLINE SYPHONE TAP CONNECTOR
31. STMC-021-10036 JOINT NUT
32. STMC-021-10037 SYPHONE TAP HOLDER
33. STMC-021-10038 SCREW
34. STMC-021-10039 HOSE CLIP
35. STMC-021-10040 HOSE CLIP
36. STMC-021-10054 NYLON 80 MESH FILLING STRAINER
37. STTK-011-10008 FILLING CAP COMPLETE
38. STMC-021-10041 SPARE CUP COVER
39. STMC-021-10042 SPARE CUP
40. STMC-021-10043 10 LITER TANK
41. STTK-012-10016 BATTERY BOTTOM COVER
42. STMC-021-10044 BATTERY COVER BOTTOM SCREW
43. STTK-012-10006 STAND GUARD
44. STTK-012-10019 OUTLET WASHER
45. STMC-021-10045 OUTLET VALVE
46. STMC-021-10046 OUTLET VALVE NUT
47. STTK-011-10003 STRAPS STOPPER
48. STTK-011-10002 SHOULDER STRAP
49. STMC-021-10048 A (NEW) SWITCH C/W
50. STMC-021-10050 6V 3AH LEAD SEALED BATTERY
51. STMC-021-10051A (NEW) 6V BATTERY CHARGER
52. STMC-021-10052 A (NEW) WIRE HARNESS FROM BATTERY(3-POLE CONNECTOR)
53. STMC-021-10057 PVC TUBE
19. STMC-021-10060 SCREW SWITCH PLUG
20. STMC-021-10061 SCREW SWITCH SLEEVE
SWITCH COVER
35A. STMC-022-10039 BATTERY CASE END CAP
TANK (NEW MODEL)
BATTERY CONVERSION KIT

YOUR KEY TO SMART TECHNOLOGY
RB Spray Tech Sdn Bhd (627487-P)
Head Office
No. 44, Lorong Sanggul 1E, Bandar Puteri Klang, 41200 Klang, Selangor Darul Ehsan, Malaysia.
MICRON HERBI-4 PERIODIC INSPECTION CHECK LIST
ITEM PARTS NO DESCRIPTION 4 MONTHS 8 MONTHS 12 MONTHS
1 STMC-021-10002A (NEW) Electric Wire Black / Red (3-Pole Connector)
2 STMC-021-10006 Spring 9/32" Terminal Connecting 0
3 STMC-021-10011 Pvc Tube 6mm X 9mm - 1.21M
4 STMC-021-10012 Atomiser Disc 0
5 STMC-021-10013 Slingger Dummy Shaft 0
6 STMC-021-10016 Feed Nozzle Yellow 0
7 STMC-021-10053 Neck Strap
8 STMC-021-10028 Motor Herbi - 4 0
9 STMC-021-10032 O - Ring (BS 611) 0
10 STMC-021-10033 O - Ring (BS 365-30) 0
11 STMC-021-10034 Inline Syphone Tap (New Model) 0
12 STTK-011-10002 Shoulder Strap
13 STMC-021-10057 Pvc Tube 0
14 STTK-012-10016 Battery Bottom Cover
15 STMC-021-10044 Battery Cover Bottom Screw
16 STMC-021-10048A (NEW) Switch c/w Switch Cover 0
17 STMC-021-10050 6v 3ah Lead Sealed Battery 000
18 STMC-021-10025A (NEW) Wire Harness Battery(3-Pole Connector) 0
0
0
0
0
0
0
0
0
0
0
0
0
0
0
0
0
0- Complusory change for continuous use at indicated intervals.
The rest change when necessary.
Other manuals for Herbi-4 CDA
2
Table of contents
Other Micron Lawn And Garden Equipment manuals