Apollo Mighty-Mist T6000 User manual

1
Mighty-Mist®
INSTRUCTION MANUAL
(For Professional Use Only)
DO NOT USE EQUIPMENT BEFORE READING THIS MANUAL
This manual contains important warnings and instructions.
Please read these instructions carefully and keep for your reference.
©2013 Apollo Sprayers International, Inc.

2
DO NOT USE EQUIPMENT BEFORE READING THIS SECTION
The Apollo Mighty-Mist™ should only be used with approved non-flammable spray solutions.
In order to assure safe operation of your spray tanning system, please read the following instructions
carefully.
• Always follow solution manufacturer’s safety instructions and warnings.
• Always spray in a well-ventilated area.
• We recommend that you use an approved face mask. Always store indoors, never allow unit to
freeze.
• Always use original manufacturers replacement parts
• Never spray flammable materials from the Spray Tanning Center. .
• Never alter or modify any part of this equipment; doing so can cause equipment malfunction and/or
bodily injury.
• Never attempt to clean any part of the turbine motor while it is plugged in.
• CAUTION: TO REDUCE THE RISK OF ELECTRIC SHOCK, DO NOT EXPOSE TO WATER.
• Never leave spray equipment unattended. Keep away from children or any person not familiar with
spray equipment.
GROUNDING INSTRUCTIONS
This product should be grounded. In the event of an electrical short circuit, grounding reduces the risk of
electrical shock by providing an escape wire for the electric current. This product is equipped with a cord that
has a grounding wire and appropriate grounding plug. The plug must be plugged into an outlet that is properly
installed and grounded in accordance with all local codes and ordinances. Do not operate unit with a damaged
cord or plug. Do not pull or carry unit by the cord. Keep away from heated surfaces. Do not unplug by pulling
on the cord. Improper installation of the grounding plug can result in the risk of electric
shock. Check with a qualified electrician or service member if in doubt as to
whether the product is properly grounded. Do not modify the plug provided. If it
will not fit the outlet, have the proper outlet installed by a qualified electrician. Make sure that the spray-tanning
center is connected to an outlet with the same configuration as the plug. DO NOT USE ANY ADAPTERS
WITH THIS PRODUCT.
Be sure that you are plugging the unit into a proper outlet for the electric current designed for your spray
system. Incorrect voltage will damage or burn out the motor.
USING EXTENSION CORDS
Use only a three-wire extension cord with a 3-slot receptacle similar to the plug on the turbine. Make sure your
extension cord is in good condition. When using an extension cord, be sure to select one that will carry a
heavy enough current for the turbine motor. An undersized cord will cause a drop in the line voltage resulting
in loss of power and overheating. If in doubt use the next heavier gauge. The smaller the gauge number, the
heavier the wire thickness. Please use the chart below as a guide to selecting the proper size extension cord.
For length less than:
Use extension gauge:
25ft (7.62m)
16AWG
50ft (15.24m)
14AWG
100ft (30.48m)
12AWG
150ft (45.72)
10AWG

3
CONGRATULATIONS! You have just purchased the finest HVLP Tanning system available and the
only TrueHVLP™ system on the market that has been completely designed to apply Tanning
Solutions, not paint. You are about to enjoy the great benefits of TrueHVLP™ spray tanning, flawless
applications and a very short learning curve. Our designs are the result of many years experience in
manufacturing TrueHVLP™ Turbine spray systems, and TrueHVLP™ spray guns.
Whether you are new to spraying tanning, you have spray tanned before, or are just new to HVLP
spray tanning; there are some basic spraying guidelines that will help you to achieve the best results
and optimum success from your new equipment. Reading this information carefully and following
these simple steps will ensure that you get the best performance and results from your new Apollo
Mighty-Mist® Spray Tanning System.
Check the contents of your box. The following are included:
1. Turbine Spray Tanning unit
2. Spray Gun
3. Air hose
4. This Instruction Manual

4
How your Apollo Mighty-Mist® Spray Tanning System Works
Your Apollo Mighty-Mist™ Spray Tanning System has three components: the turbine (motor) unit, an
air hose and the spray gun. The Turbine unit, when connected to the correct electrical power supply
and with the on/off switch in the “on” position provides a continuous source of clean, warm, dry, low
pressure turbo air. The air hose connects the turbine unit to the spray gun. Air flows through the hose
to the nozzle of the Apollo T6000 spray gun. Atomization of the tanning solution is achieved when the
high Cubic Feet per Minute (CFM) of airflow mixes with the stream of fluid passing through the
specialty designed tip/nozzle. This low-pressure atomization principle achieves minimum misting
(overspray) to the spray environment and maximum solution transfer efficiency to the client because
of less “Bounce Back”.
Bounce Back Comparisons
Air Brush Spray Systems Apollo Mighty-Mist™ Spray Tanning System
Conventional spray systems: TrueHVLP™ Tanning System
12-20 PSI @ 8 CFM 3.2 PSI @ 85 CFM
- 30-50% transfer efficiency - Up to 90% transfer efficiency
- Excessive, costly Solution waste - Substantial Solution savings - Unhealthy for
operator and - Cleaner and safer for both harmful to the environment operator
and environment
The Mighty-Mist™ Turbine has one air hose outlet on the front of the unit and is designed to run one
spray gun.

5
Preparing to use your Apollo Mighty-Mist™ Spray Tanning System
Connect the air hose to the Turbine, pull back the spring-loaded quick disconnect coupler and insert
the male connector on the air hose into the turbine connector. Release the ring. Your air hose will be
locked into place, when you hear a click. To disconnect, push back on the connector to release.
If you have just finished spraying, the metal coupler at the turbine
end may be hot!
Plug the electric cord into a correctly grounded electrical outlet. Be sure the electric current is the
correct voltage. If you need to use an extension cord, be sure to follow the chart on page 2 and make
sure to use a correctly grounded outlet.
Select a safe, well-ventilated area where you will spray your client. Locate your Turbine unit as far
away from the area where you will be directly spraying.
Familiarizing yourself with your Apollo T6000 Spray Gun
1. Follow the diagram to prepare the Spray Gun
a. Unscrew the plastic cup from the Spray Gun. Pour tanning solution into the cup. Do not fill
more than ¾ full.
b. Carefully screw the cup back onto the main body of the Spray Gun. Screw the cup on firmly
but DO NOT over tighten. Over tightening will cause the cup to “pop” and damage the
threads. Leakage can then occur requiring replacement of the cup.
c. Locate the air cap (#2) on the T6000 diagram. Slightly turn the air cap ring (#1) anti or
counter clockwise to loosen the air cap. Notice that you can now rotate the air cap freely.
d. Look at Mist Applicator Patterns diagram below. Note the position of the air cap and the
direction of the spray pattern. Pattern 1 is for spraying across from side to side. Pattern 2 is for
spraying up and down. Pattern 3 will produce a spot or circle. Patterns 1 and 2 are the most
common positions for applying tanning solutions.
e. Turn the air cap (#2) to the position you want. Turn the air cap ring (#1) clockwise to lock the
air cap in place.

6
1. Next, position the T100 Turbo Unit as far away as practical and possible from the area where you
will spray.
2. Attach the remaining end of the hose to the T6000 Spray Gun as follows:
a. Locate the coupler at the rear top of the T6000 Spray Gun. See T6000 diagram.
b. Pull back on the collar of the black connector on the air hose.
c. Push the connector over the coupler and release. Figure 7.
d. Your Spray Gun should now be firmly attached to the air hose.
Using Your Apollo T6000 Spray Gun
Your Apollo T6000 spray gun is certified by Apollo Sprayers. This means your spray gun only uses
about 3 PSI and is genuine HVLP. There are many small passageways for the air to travel inside the
spray gun. If one of these air passages becomes blocked, or build-up of material starts to occur, your
spray pattern will become distorted, therefore, always keep your spray gun clean. Your Apollo T6000
spray gun comes fitted with a custom tanning needle and nozzle specifically designed for spraying
tanning solutions. Using this size tip/nozzle and needle you can achieve from a 1/4" line up to a 6"
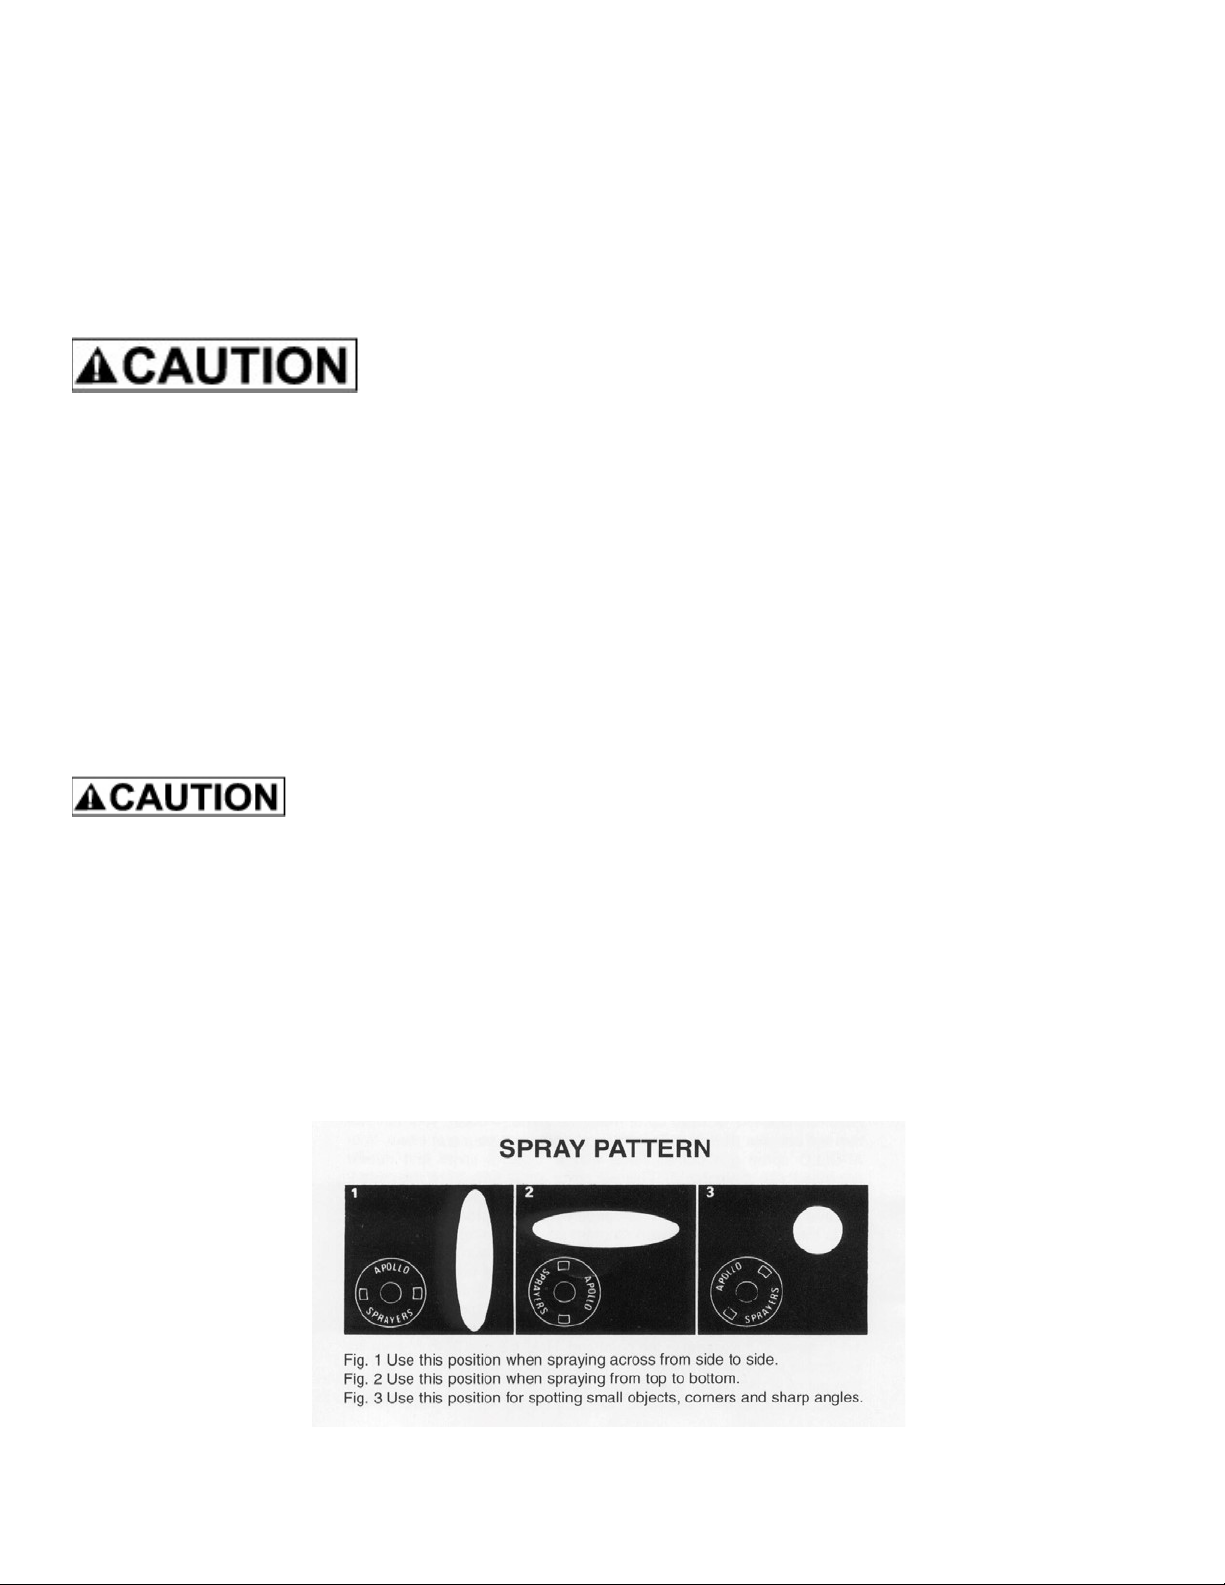
wide fan pattern. To do this, rotate the Air Cap (#2) to the desired fan pattern type, then open the
solution flow screw (#10) counter-clockwise and move the spray gun closer or further away from your
work piece until you get the desired width of pattern. The closer you are to the clients body the
smaller the fan. The farther back you hold the spray gun from the clients body the larger the fan
pattern will be. A little practice will enable you to master this technique in no time flat! Never hold the
spray gun more than 6-8” away from the client.
PRACTICE:
VERY IMPORTANT!! To fill the cup with solution hold the black cup lid tight and remove the cup from
your spray gun. DO NOT HOLD THE SPRAY GUN HANDLE AND REMOVE THE CUP. Fill the cup
approximately half way with some water. Hold the black lid assembly and re-attach the cup to the
body of the spray gun and hand tighten to create a good seal. Attach the spray gun to the air hose.
Attach the other end of the air hose to the turbine unit. Turn the turbine unit on. You will notice air
is now flowing through the air cap all the time, this is normal and correct. Position the air cap
(#2) in the horizontal or vertical position, turn the solution flow screw (#10) clockwise until closed.
Now open the solution screw slowly until you have it open 1 full turn. Point the spray gun away from
yourself (and anyone else) and pull the trigger all the way back. You should see a “V” shaped mist (or
triangle) called a fan pattern. Now, with the trigger depressed, if you turn the material flow screw,
(#10) clockwise (closing) making very small adjustments at a time, you will notice that the fan pattern
is beginning to get smaller. Now, reverse this and notice the pattern will get larger. Take a large piece
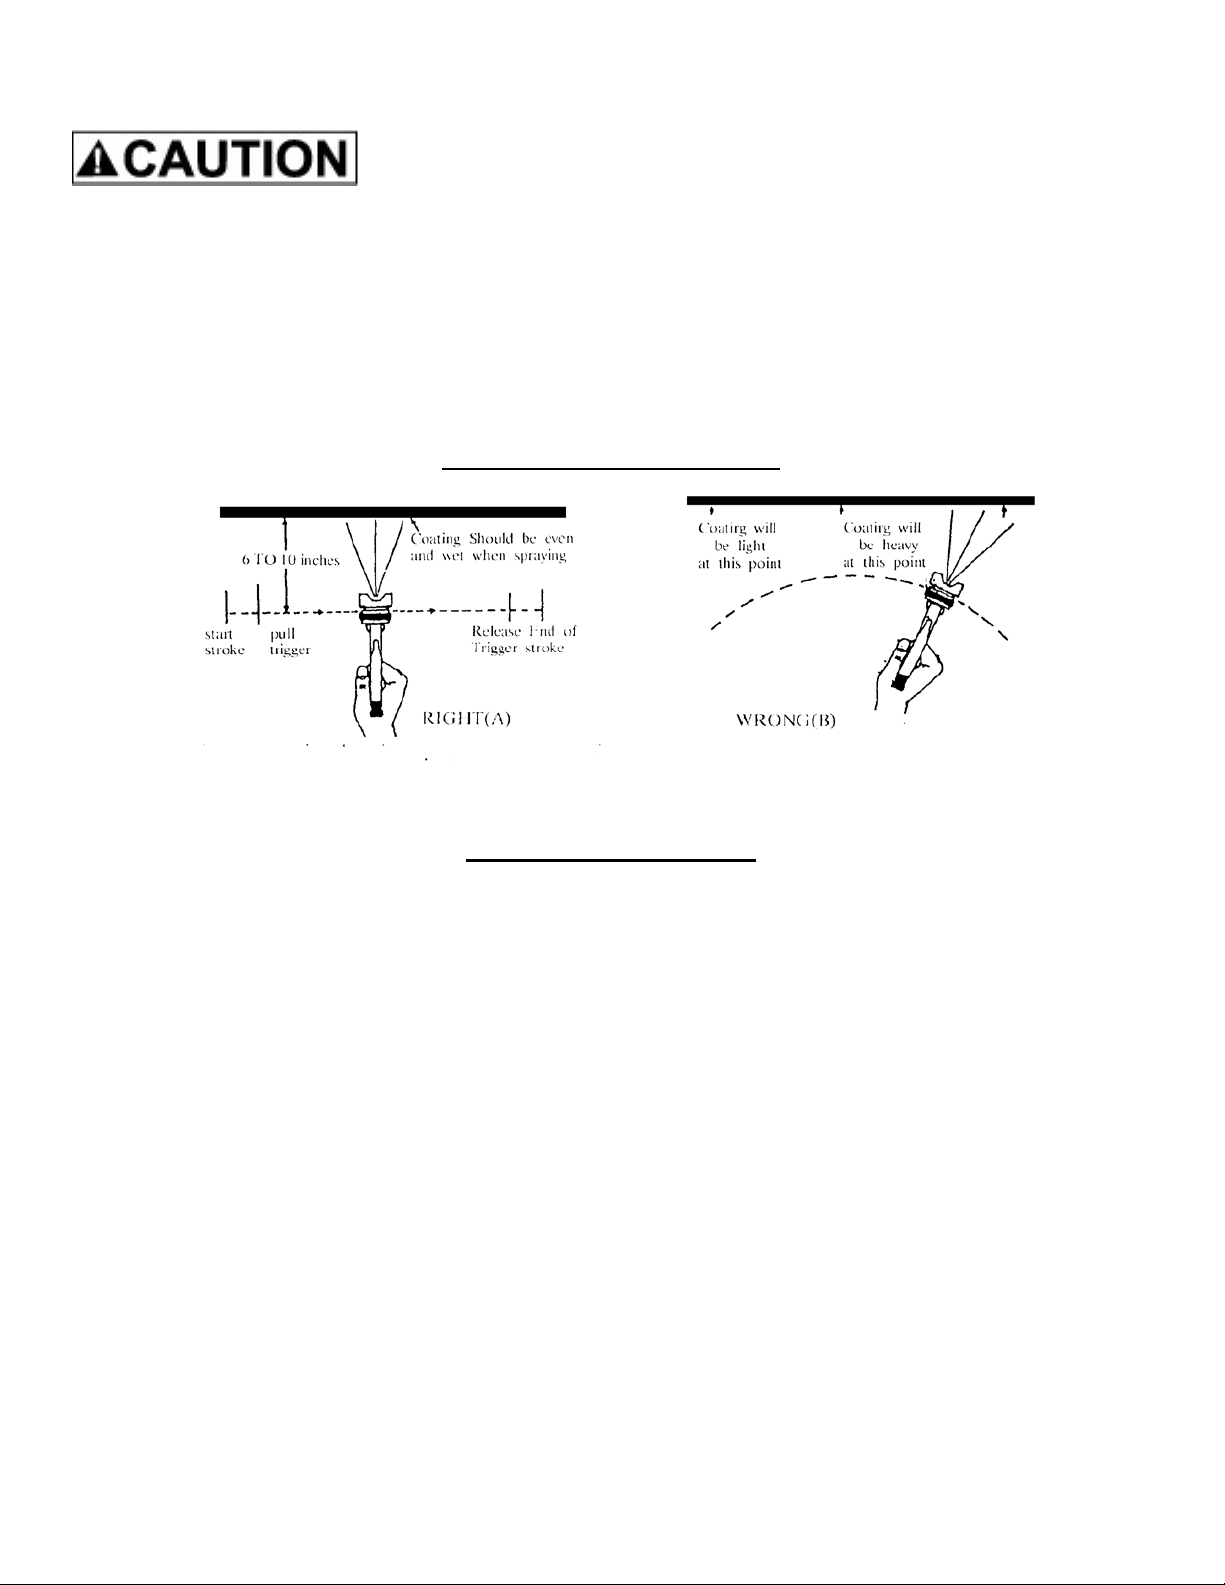
of cardboard and direct the pattern at the surface, hold the spray gun approximately 6" from the
surface. Pull the trigger. Observe the outline and size of the pattern. Now, turn the solution flow
screw clockwise (closing). Move the spray gun an inch or two closer to the surface. Pull the trigger.
Notice the pattern has become smaller. You can continue reducing the solution flow and move the
spray gun even closer to the surface and the pattern will continue to get smaller and smaller. Next,
rotate the air cap to a diagonal position (See Spray Patterns, Pg. 5). Vary the solution flow and the
distance of the spray gun from the work surface. Notice the change in pattern size.

7
Even when the turbine unit is off, pressure will remain in the spray
cup. If you pull the trigger back, a stream of solution will flow. To
prevent accidents, turn solution flow screw (#10) clockwise until it
is completely closed. The trigger is
now locked in the closed position. You can also simply aim the gun at a towel and pull the
trigger to release any pressure in the cup.
Note: It is not necessary to empty and clean your spray gun when you pause between
applications. Be sure, however, to clean your spray gun thoroughly at the end of your work
session. It is a bad idea to leave solution in your spray gun overnight.
PROPER SPRAY TECHNIQUE
TURBINE MAINTENANCE
The Apollo Mighty-Mist™ Turbine unit needs virtually no maintenance. The motor has sealed
bearings that are prelubricated. No service is necessary. Each week it is a good idea to clean the
Mighty-Mist™ turbine air filters. Clean filters are critical to good performance and equipment
longevity. Your Mighty-Mist™ turbine has 2 replaceable filters. Remove the two hex-head securing
nuts in order to remove the filters for cleaning or replacement. Periodically wash the filter element
with warm water and dishwashing soap. Make sure you fully dry the filter element before re-installing
them in the turbine. Dirty filters will reduce the air being drawn through the motor, causing the unit to
run abnormally hot, diminish spray performance and reduce the life of the motor. Clean and/or
replace your filters regularly. Use the maintenance record sheet to keep track of your equipment use.

8
TROUBLESHOOTING YOUR SYSTEM
1. Turbo unit turned ON. Air blows out of T6000 Spray Gun?
This is correct. Air blows constantly when Turbo unit is ON.
2. Turbo unit turned ON. Unit does not operate or blow air?
Check that the unit is plugged in to proper electric source. Be sure there is power at the
electric source.
If there is no problem with electric supply, call for technical support.
3. Turbo unit is turned ON, the trigger is pulled back on Spray Gun, but no solution comes out?
Check that the cup is screwed firmly to Spray Gun.
Check that there is no solution bubbling or leaking around the cup.
Turn Turbo unit OFF. Unscrew cup. Be sure that Solution Tube and Disc (#14) are
connected and have not come loose. Locate the two small holes in the Disc around
the Solution tube. Be sure that these two small holes are not clogged with dried
solution. To clean, carefully insert a pin through each hole ensuring that they are clear.
Turn Turbo unit OFF. Remove air cap ring, remove air cap, remove Air Distributor Plate.
Remove Solution nozzle (#3) with an adjustable wrench or spanner. There is a Solution
nozzle gasket (#4) on the Solution nozzle. Do not lose it. Rinse Solution Nozzle under
running water and check for dried solution that may have blocked the hole. Reinstall
Solution Nozzle Gasket. Reinstall Solution Nozzle, Air distributor plate, air cap and air
cap ring. Try spraying again. If you still have a problem call for technical support.
4. Solution leaks in front of trigger.
With an adjustable wrench or spanner tighten Solution Needle Packing Screw (#7). Do
not over tighten. This can cause Solution needle to stick and not spring back. Try
spraying again. If leaking continues the Solution Needle Packing needs to be replaced.
(Rare). Remove Solution Needle Packing Screw (#7). Pry out the Solution Needle
Packing’s (4). Replace. Reinstall Solution Needle Packing Screw. Tighten
all the way, and then back off slightly. (1/8 turn) Test spray gun for leakage. If you still
have a problem call for technical support.
5. When Turbo unit is ON, Solution continues to spray from Spray Gun without trigger being
pulled.
Immediately turn Turbo unit OFF.
Disconnect spray gun from air hose.
Slightly adjust (loosen) Solution Needle Packing Screw (#7). Test to see if problem is
resolved.
Check to see that Needle Spring is installed. (#9). Remove Solution Flow Screw (#10).
Look for Needle Spring around the back of the Solution Needle. (See diagram). If lost,
call for replacement.
Check Solution nozzle. Remove and clean following directions 9.c.iv. above.
6. Solution leaks around the top of the cup.
Make sure the cup is screwed firmly to the body of the Spray Gun.
Make sure the threads around the cup are clean and the threads inside the cup top
assembly are clean.
Replace the cup top gasket. Pry out old gasket. Install new gasket. Test spray gun.

9

10
Service and Parts
For parts to technical service on your Mighty-Mist™ UV Sunless Tanning System please visit our
website at www.hvlpsun.com or call our Customer Service line toll free at 1-888-900-4857 during our
normal business hours of Monday – Friday 8-4pm, PST. We are closed on Saturday and Sunday.
Warranty Information
Two Year Limited Warranty
Your Mighty-Mist™ tanning system is WARRANTED by APOLLO SPRAYERS INTERNATIONAL,
INC. for a total period of TWO YEAR on a PRO-RATED Basis (see schedule below) from the ORIGINAL date of purchase
by the ORIGINAL PURCHASER. Proof of purchase to be included and all SHIPPING CHARGES to be pre-paid.
APOLLO SPRAYERS INTERNATIONAL, INC. upon examination of the machine/equipment will replace or repair at their
discretion any defects in material or workmanship.
WARRANTY SCHEDULE
First Year…………..Parts NO CHARGE……………………….Labor NO CHARGE
Second Year………Parts NO CHARGE……………………….Labor CHARGED
Labor will be CHARGED at the current hourly rate of $65, or specified Job Rate.
This WARRANTY does NOT include: miss-use, damage, neglect, alterations, disassembled equipment or modifications,
lack of maintenance, cleaning, water damage to electrical parts and INCORRECT VOLTAGE CONNECTION. This
WARRANTY is in lieu of all other express warranties, any WARRANTY implied by law, including but not limited to implied
warranties of merchantability or fitness, is excluded to the maximum extent permitted by law and, if not excludable, it is
limited to the duration of the express Warranty. No representative or person is authorized to extend this Warranty or to
create for APOLLO SPRAYERS INTERNATIONAL, INC. any other liability in connection with the sale of any APOLLO
SPRAYERS product. APOLLO SPRAYERS INTERNATIONAL, INC. shall
not be liable for any consequential, incidental, or special damages of any kind directly or indirectly resulting from breach of
any express or implied Warranty. Some States do allow the exclusion of limitation of incidental or consequential damages
or limitations on the length of any Warranty so that the above limitations and exclusions may not apply to you; however, to
the maximum extent permitted under applicable law, the only rights and remedies shall be to obtain a replacement for any
defective product. This Warranty gives you specific legal rights and you may also have other rights which vary from State
to State.
For warranty repairs inside the United States please call 888-900-4857 or outside the United States
call, 760-727-8300. All repairs must be accompanied by an RMA number from the factory.
Please call first before sending any equipment back to the factory for repair. If you do not include a
valid RMA number your repair will be refused.
Apollo Sprayers International, Inc.
1030 Joshua Way Vista, CA 92081
Toll Free: 888-900-4857
www.hvlpsun.com
WARNING: This product can expose you to chemicals including Chromium,
which is known to the State of California to cause cancer and birth defects or other
reproductive harm. For more information go to www.P65Warnings.ca.gov.
Table of contents
Other Apollo Paint Sprayer manuals

Apollo
Apollo Happy-Mist User manual

Apollo
Apollo POWER SERIES User manual

Apollo
Apollo POWER VS Series User manual

Apollo
Apollo Mini-Mist PRO Deluxe T100 User manual

Apollo
Apollo Atomizer 7700 Series Operating manual

Apollo
Apollo PRECISION-5 PRO PLUS Operating manual

Apollo
Apollo Mini-Mist PRO User manual