Microscan MS-Connect 5100 User manual

MS-Connect 5100
User’s Manual
P/N 84-005100 Rev A

ii MS-Connect 5100 User’s Manual
Copyright and Disclaimer
Copyright ©2007
Microscan Systems, Inc.
1201 S.W. 7th Street, Renton, WA, U.S.A. 98057
(425) 226-5700 FAX: (425) 226-8250
ISO 9001:2000 Certification No. 06-1080
Issued by TüV USA
All rights reserved. The information contained herein is proprietary and is provided solely for the purpose
of allowing customers to operate and/or service Microscan manufactured equipment and is not to be
released, reproduced, or used for any other purpose without written permission of Microscan.
Throughout this manual, trademarked names might be used. Rather than put a trademark (™) symbol in
every occurrence of a trademarked name, we state herein that we are using the names only in an editorial
fashion, and to the benefit of the trademark owner, with no intention of infringement.
Disclaimer
The information and specifications described in this manual are subject to change without notice.
Latest Manual Version
For the latest version of this manual, see the Download Center at: www.microscan.com.
Microscan Systems, Inc.
1201 S.W. 7th Street
Renton, WA 98057
U.S.A.
Tel: 425 226 5700
Fax: 425 226 8250
helpdesk@microscan.com
Microscan Europe
Tel: 31 172 423360
Fax: 31 172 423366
Microscan Asia Pacific R.O.
Tel: 65 6846 1214
Fax: 65 6846 4641

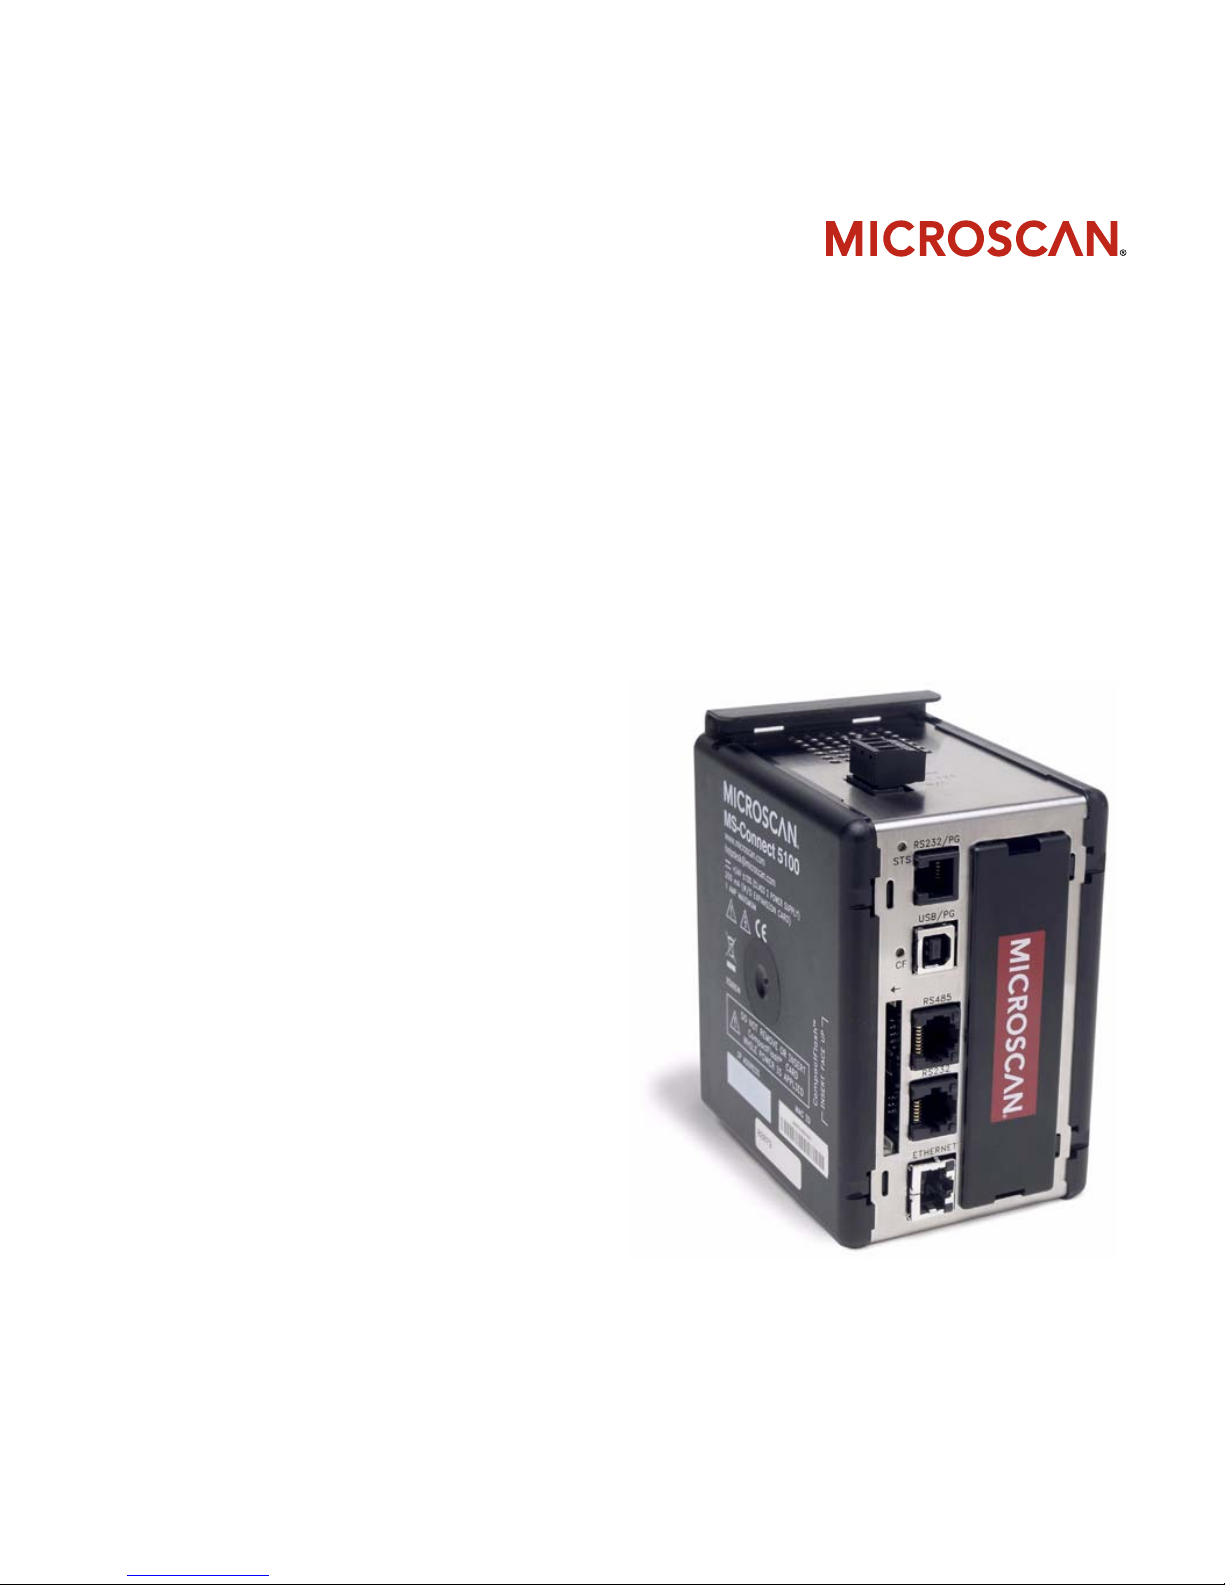
MS-Connect 5100 User’s Manual iii
Introduction
Microscan Limited Warranty Statement and Exclusions
What Is Covered?
Microscan Systems Inc. warrants to the original purchaser that products manufactured by it will be free
from defects in material and workmanship under normal use and service for a period of one year from the
date of shipment. This warranty is specifically limited to, at Microscan’s sole option, repair or replacement
with a functionally equivalent unit and return without charge for service or return freight.
What Is Excluded?
This limited warranty specifically excludes the following: (1) Any products or parts that have been subject
to misuse, neglect, accident, unauthorized repair, improper installation, or abnormal conditions or operations;
(2) Any products or parts that have been transferred by the original purchaser; (3) Customer mis-adjustment
of settings contrary to the procedure described in the Microscan Systems Inc. user’s manual; (4) Upgrading
s
oftware versions at customer request unless required to meet specifications in effect at the time of purchase
;
(5) Units returned and found to have no failure will be excluded; (6) Claims for damage in transit are to be
directed to the freight carrier upon receipt. Any use of the product is at purchaser’s own risk. This limited
warranty is the only warranty provided by Microscan Systems Inc. regarding the product. Except for the
limited warranty above, the product is provided “as is.” To the maximum extent permitted by law, this
express warranty excludes all other warranties, express or implied, including, but not limited to, implied
warranties of merchantability. Technical support questions may be directed to: http://www.microscan.com/
support/helprequest.htm. Microscan Systems Inc. does not warrant that the functions contained in the
product will meet any requirements
or needs purchaser may have, or
that the product will operate error free,
or in an uninterrupted fashion, or that any defects or errors in the product will be corrected, or that the
product is compatible with any particular machinery.
Limitation of Liability
In no event shall Microscan Systems Inc. be liable to you or any third party for any special, incidental, or
consequential damages (including, without limitation, indirect, special, punitive, or exemplary damages for
loss of business, loss of profits, business interruption, or loss of business information), whether in contract,
tort, or otherwise, even if Microscan Systems Inc. has been advised of the possibility of such damages.
Microscan Systems Inc.’s aggregate liability with respect to its obligations under this warranty or otherwise
with respect to the product and documentation or otherwise shall not exceed the amount paid by you for
the product and documentation. Some jurisdictions do not allow the exclusion or limitation of incidental or
consequential damages or limitations on an implied warranty, so the above limitation or exclusion may not
apply to you. This warranty gives you specific legal rights, and you may also have other rights which may
vary from state to state.
Tel: 425.226.5700 | Fax: 425.226.8250 | helpdesk@microscan.com

iv MS-Connect 5100 User’s Manual
Table of Contents
Table of Contents
Chapter 1 Setup and Operation
Step 1 Check Required Hardware...........................................................1-2
Step 2 Install Hardware...........................................................................1-3
Step 3 Connect the System.....................................................................1-4
Step 4 Install ESP and Launch ESP-5100 ..............................................1-8
Step 5 Configure Communication Settings ...........................................1-10
Step 6 Apply Power to the System........................................................1-12
Step 7 Configure the Connected Reader ..............................................1-13
Step 8 Begin Active Operation of System .............................................1-13
Chapter 2 Using ESP
Installing ESP..........................................................................................2-2
Installing USB Driver ...............................................................................2-3
Model Menu.............................................................................................2-4
Communications Window........................................................................2-5
Menu Toolbar ..........................................................................................2-6
Configuring Communications ................................................................2-12
Time Manager .......................................................................................2-25
Appendices
Appendix A General Specifications.........................................................A-2
Appendix B EMI Installation Guidelines ..................................................A-3
Appendix C Interface Standards .............................................................A-4
Appendix D Indicator LEDs .....................................................................A-5
Appendix E CompactFlash Card.............................................................A-6
Appendix F Mounting Options.................................................................A-7
Appendix G Multidrop Communications..................................................A-9
Appendix H ASCII Table .......................................................................A-13
Appendix I Protocol Command Table....................................................A-14
Appendix J Glossary of Terms ..............................................................A-15
Index

MS-Connect 5100 User’s Manual v
Introduction
About the MS-Connect 5100
The key features of the MS-Connect 5100 are:
• Compact size
• Multidrop support for up to 32 readers
• Three built-in serial ports
• 10 Base-T / 100 Base-TX Ethernet port (TCP/IP and EtherNet/IP protocols)
• USB and RS-232 programming ports
• ESP®Software for configuration and testing
•CompactFlash
® drive for troubleshooting and loading configuration profiles
• Easy DIN rail mounting
About This Manual
This manual provides complete information on setting up the MS-Connect 5100 and using
it in an application setting. The sections are presented in the order that an MS-Connect
5100 is typically set up and made ready for operation.
Highlighting
Cross-references and web links are highlighted in blue bold. M
enu topics and other
points of emphasis are highlighted in Bold Initial Caps. References tothe titles of external
documents are italicized.

vi MS-Connect 5100 User’s Manual
Statement of Agency Compliance
The MS-Connect 5100 has been tested for compliance with FCC (Federal Communications
Commission) regulations and has been found to conform to all applicable FCC Rules
and Regulations.
To comply with FCC RF exposure compliance requirements, this device must not be co-located
or operate in conjunction with any other antenna or transmitter.
Changes or modifications not expressly approved by the party responsible for compliance
could void the user’s authority to operate the equipment.
The MS-Connect 5100 has been tested for compliance with CE (Conformité Européenne)
standards and guidelines, and has been found to conform to applicable CE standards,
specifically the EMC requirements EN 55024, ESD EN 61000-4-2, Radiated RF Immunity
EN 61000-4-3, ENV 50204, EFT EN 61000-4-4, Conducted RF Immunity EN 61000-4-6,
EN 55022, Class B Radiated Emissions, and Class B Conducted Emissions.
The MS-Connect 5100 has been tested by an independent electromagnetic compatibility
laboratory in accordance with the applicable specifications and instructions.

MS-Connect 5100 User’s Manual vii
Introduction
Statement of RoHS Compliance
All Microscan readers with a ‘G’ suffix in the FIS number are RoHS-Compliant. All compliant
readers were converted prior to March 1, 2007. All standard accessories in the Microscan
Product Pricing Catalog are RoHS-Compliant except 20-500013-01 and 98-000039-02.
These products meet all the requirements of “Directive 2002/95/EC” European Parliament
and the Council of the European Union for RoHS compliance. In accordance with the latest
requirements, our RoHS-Compliant products and packaging do not contain intentionally
added Deca-BDE, Perfluorooctanes (PFOS), or Perfluorooctanic Acid (PFOA) compounds
above the maximum trace levels. To view the document stating these requirements,
please visit:
http://eur-lex.europa.eu/LexUriServ/LexUriServ.do?uri=CELEX:32002L0095:EN:HTML
and
http://eur-lex.europa.eu/LexUriServ/LexUriServ.do?uri=OJ:L:2006:372:0032:0034:EN:PDF
Please contact your sales manager for a complete list of Microscan’s RoHS-Compliant products.
This declaration is based upon information obtained from sources which Microscan believes to be reliable, and
from random sample testing; however, the information is provided without any representation of warranty,
expressed or implied, regarding accuracy or correctness. Microscan does not specifically run any analysis on our
raw materials or end product to measure for these substances.
The information provided in this certification notice is correct to the best of Microscan’s knowledge at the date of
publication. This notice is not to be considered a warranty or quality specification. Users are responsible for
determining the applicability of any RoHS legislation or regulations based on their individual use of the product.
Regarding “RoHS Directive 2011_65_EU” Microscan produces Monitoring and Control Instruments as well as
Industrial Monitoring and Control Instruments as defined within the directive. Microscan has developed and is
implementing a RoHS2 compliance plan with the intention of bringing all active products listed in our current
marketing literature within full compliance as per the directive deadlines.
Key milestones for the transition plan are as follows:
• Complete internal product audit and supplier transition by July 2013.
• Initial “Monitoring and Control Instruments” RoHS2-compliant products available by July 2014.
• Initial “Industrial Monitoring and Control Instruments” RoHS2-compliant products available by July 2015.
• All new products introduced in 2014 are expected to be WEEE and RoHS2 compliant.
Microscan will mark the products with the ‘CE’ marking that complies with the RoHS2 process to acquire ‘CE’ certification
per the example given: Example 1 >> Machinery directive + EMC directive + RoHS2 = Declaration of Conformity.

MS-Connect 5100 User’s Manual 1-1
1 Setup and Operation
Contents
This section is designed to get your MS-Connect 5100 up and running quickly.
Following these steps will allow you to get a sense of the product’s capabilities while you
set it up for active operation.
Step 1 Check Required Hardware................................................................................................1-2
Step 2 Install the MS-Connect 5100 Unit......................................................................................1-4
Step 3 Connect Hardware for Multidrop........................................................................................1-5
Step 4 Apply Power to the Multidrop Network ..............................................................................1-6
Step 5 Install ESP.........................................................................................................................1-7
Step 6 Run ESP and Select Programming Port............................................................................1-8
Step 7 Configure the RS-485 Port Settings................................................................................1-13
Step 8 Select Host Port...............................................................................................................1-16
Step 9 Configure the Reader......................................................................................................1-19
Step 10 Begin Active Operation of the Network..........................................................................1-19

1-2 MS-Connect 5100 User’s Manual
Check Required Hardware
Step 1 — Check Required Hardware
Item Description Part Number
1MS-Connect 5100 FIS-5100-0001G
2Microscan Reader (one per Multidrop address) FIS-XXXX-XXXXG
3MS-Connect 5100 Power Supply (24VDC)
Reader Power Supply (24VDC; one required per reader) 97-100004-15
4Programming Cable, USB, Type A to Type B, 6 ft. 61-000112-01
5RS-232 Host Cable, 9-pin to RJ12, 6 ft. 61-000108-01
6MS-Connect 5100 Concentrator Cable, 25-pin to RJ45, 10ft., gender changer 61-000113-01
7IC-332 Adapter (5-volt readers only) FIS-0001-0035G
8IB-131 Interface Box 99-000018-01
9
IB-150 Kit, with reader cable, 6 ft.
98-000040-02
10 Multidrop Cable, 10 ft. (Gender changer required to connect IB-131 and IB-150) 61-100030-03
11 Object Detector (optional) 99-000017-01
Note: The Multidrop configuration shown above is just one example of configuration options. Any
combination of Microscan readers and interface boxes can be used in the Multidrop network. See
Step 7, Set Up Software, for more specific information about the cabling for each MS-Connect
5100 port.
Multidrop Network Hardware

MS-Connect 5100 User’s Manual 1-3
Setup and Operation
Step 1 — Check Required Hardware (cont.)
MS-Connect 5100 Port Pinouts

1-4 MS-Connect 5100 User’s Manual
Install the MS-Connect 5100 Unit
Step 2 — Install the MS-Connect 5100 Unit
Mount the MS-Connect 5100 to a DIN Rail
The DIN rail should be positioned horizontally so that the unit’s ventilation holes are vertical
in relation to cabinet orientation.
Attach the MS-Connect 5100 to the DIN rail as shown below.
1 2
DIN rail
Note: A minimum clearance of 1 inch
(25.4 mm) should be maintained above
and below the unit in order to ensure
proper thermal regulation.
The clamps at the back of
the unit should snap
securely onto the DIN rail.
3
1.00” min. clearance
DIN rail
1.00” min. clearance
Note: For an alternate mounting option,
see Mounting to Flat Surfaces on
page A-8.

MS-Connect 5100 User’s Manual 1-5
Setup and Operation
Step 3 — Connect Hardware for Multidrop
Power Connection Wiring
Once the MS-Connect 5100 unit has been physically installed in your application, the
power supply can be wired to the unit.
Multidrop Hardware Configuration
The MS-Connect 5100 can support up to 32 Microscan readers in Multidrop configuration.
Important: All readers must be configured for Multidrop before they can be added to the
Multidrop network.
The Microscan power supply (97-100004-15) comes with a standard Micro-Change connector.
You must remove the Micro-Change connector from the end of the cable and wire the cable
directly to the screw terminal block at the top of the unit.
1
2• Pin 1 = GND (black)
• Pin 2 = Shield
• Pin 3 = +24VDC (white) 1
23
Remove the Micro-Change connector and wire-strip the power supply cable.
Use the RS-485 port for
the Multidrop network.
Note: The Multidrop configuration shown above is just one example of configuration
options. Any combination of Microscan readers and interface boxes can be used in the
Multidrop network. See Step 7, Set Up Software, for specific information about the uses of
each MS-Connect 5100 port.

1-6 MS-Connect 5100 User’s Manual
Apply Power to the Multidrop Network
Step 4 — Apply Power to the Multidrop Network
Once you have configured your hardware for Multidrop and securely connected all other
cabling, you can safely apply power to the MS-Connect 5100 and the connected readers.
Important Notes
It is very important that the power supply is mounted correctly if the unit is to operate reliably.
Please be sure to observe the following points:
• The power supply must be mounted close to the unit, with no more than 6 feet (1.8 m) of
cable between the supply and the unit. Ideally, the shortest length possible should be
used.
• The wire used to connect the unit’s power supply should be at least 22-gauge wire. If a
longer cable run is used, a heavier gauge wire should be used. The routing of the cable
should be kept away from large contactors, inverters, and other devices which may
generate significant electrical interference.
• A power supply with a Class 2 or SELV rating must be used. A Class 2 or SELV power
supply provides isolation to accessible circuits from hazardous voltage levels generated
by a mains power supply due to single faults. SELV is an acronym for “safety extra-low
voltage”. Safety extra-low voltage circuits shall exhibit voltages safe to touch both under
normal operating conditions and after a single fault, such as a breakdown of a layer of
basic insulation or after the failure of a single component has occurred.
CAUTION: Be sure that all cables are connected BEFORE applying power to the
system. Always power down BEFORE disconnecting any cables.

MS-Connect 5100 User’s Manual 1-7
Setup and Operation
Step 5 — Install ESP
Easy Setup Program (ESP) is Microscan’s proprietary setup and testing application. The
purpose of ESP is to provide a quick and easy way to set up and configure Microscan
products.
When the MS-Connect 5100 is connected to a host computer (Windows Vista, XP, or 2000),
ESP can be used to configure Multidrop settings and set up communication with a host.
If installing from the Microscan Tools CD:
1. Insert the Microscan Tools CD in your computer’s CD drive.
2. Select ESP Software from the navigation bar at the left of the screen.
3. Click on ESP Software under the Current Version heading.
4. Click the Run button and follow the prompts in the ESP Setup Wizard.
Note: During installation, you may see an Internet Explorer Security Warning that
states: “The publisher could not be verified.” If you see this warning, click Run to
continue installation.
If downloading from the web:
1. Go to the Download Center at www.microscan.com.
2. Create a new member account or, if you are already a member, enter your user name
and password.
3. Navigate to the “Microscan Software” section of the Download Center (near the top of
the page).
4. Click on the link showing the latest version of ESP. Extract the ESP installation files to
a location of your choice on the host computer. Note where your ESP.exe file is stored
on your hard drive.
5. At the end of the installation process, the following icon will appear on your desktop:
6. Click the ESP icon to start the program.
System Requirements for ESP
• 166 MHz Pentium processor (recommended)
• Windows Vista, XP, or 2000 operating system
• Internet Explorer 5.0 or higher
• 64 MB minimum RAM
• 40 MB minimum disk space
• 800 x 600 pixel minimum 256 color display

1-8 MS-Connect 5100 User’s Manual
Install USB Driver
Step 6 — Install USB Driver
When the MS-Connect 5100 is connected to a 24V power supply and the USB programming
cable is connected to the host computer for the first time, you will be prompted to install
the USB driver.
1. When you see the Found New Hardware Wizard, select Install from Specific
Location.
2. Navigate to the ESP-5100\Device folder.
Note: When ESP is installed, the MS-Connect 5100 USB driver is automatically
placed on the host hard drive along with the other ESP installation files.
Example Location: “C:\Program Files\Microscan\ESP-5100\Device”.
3. If the driver is selected, a non-compatibility warning will occur. this warning can be
ignored.
4. After the driver is installed, an extra USB controller is displayed in the hardware
Device Manager.

MS-Connect 5100 User’s Manual 1-9
Setup and Operation
Step 7 — Set Up Software
1. After installing ESP and the USB driver, run the program and select the MS-Connect
5100 from the model menu.
Note: It may take several seconds for the next screen to appear if this is the first time
you have selected the MS-Connect 5100.
Select the MS-Connect 5100 and
click OK, or simply double-click
the MS-Connect 5100 button to
make your selection.
You will see this window after selecting the MS-Connect 5100.
Important: Each port is shown in the Communications tree control, and must be
configured separately. When you click on the name of a port, that port’s configuration
options will appear to the right of the tree control.

1-10 MS-Connect 5100 User’s Manual
Set Up Software
Set Up Software (cont.)
2.
Once the
ESP
interface has appeared, select
Link > Options
to configure the programming
port. Select USB from the list of options.
3. Select Link > Receive and save the configuration file.
Select the USB
programming
port and click OK.
The Receive function will load the
MS-Connect 5100’s configuration
profile in ESP.

MS-Connect 5100 User’s Manual 1-11
Setup and Operation
Set Up Software (cont.)
4. Set RS-232 Port Settings as required for communication between the host and the
MS-Connect 5100. Verify that Driver is set to Raw Serial Port.
5. Set RS-485 Port Settings to the required connection settings for communication
between the readers in the Multidrop network and the MS-Connect 5100.
Verify that Driver is set to Microscan Multidrop, Concentrator Mode is set to
Enabled, Host Port is set to RS-232 Host Port, and Port Mode is set correctly for the
current application.

1-12 MS-Connect 5100 User’s Manual
Set Up Software
Set Up Software (cont.)
6. The reader name and address can be configured in the RS-485 Communications
Port tree.
The MS-Connect 5100 uses address 50. Do not use this address for a reader. Select
the Enable Device check box to enable the device.
The system is now ready for operation.

MS-Connect 5100 User’s Manual 1-13
Setup and Operation
Additional Options
For additional RS-485 communications options, click the Click for more configuration...
button in the Additional Options section of the RS-485 communications view. The
Additional Options dialog will appear.
Time Stamp and Date Stamp
allow you to append the time
and date to symbol data that is
decoded and displayed.
Separator lets you determine
the ASCII character that will
separate the time and date
stamps from symbol data.
Location
allows you to determine
whether you want the time and
date stamps to appear before
or after symbol data.
Preamble
and
Postamble
allow
you to set the ASCII character(s)
or control characters (such as
^M
for
Carriage Return
) that will
precede and follow the displayed
symbol data.
Include Address
allows you to
append the
reader’s Multidrop
address to the
beginning of each
reader’s data output.
Host Protocol
defines the type of
connection to the host.
LRC Enabled letsyou
turn Longitudinal
Redundancy Check
on or off.
Intercharacter Timeout allows you to set the amount of time that must pass before the end of a read cycle.
Line Terminator is the end-of-message character that must be sent at the end of a message stream to or
from the MS-Connect 5100 or host device.
Table of contents
Other Microscan Media Converter manuals