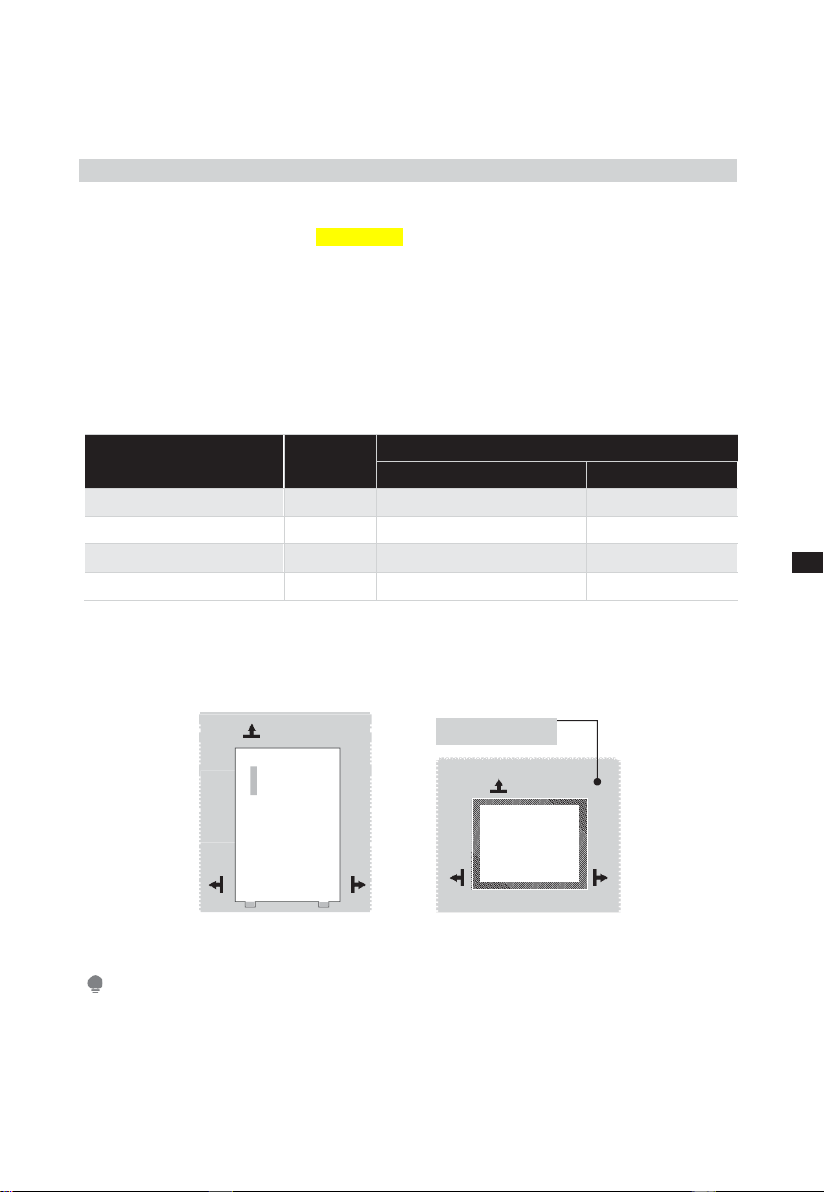
Midea HS-121LN User manual

SINGLE DOOR BAR FRIDGE
USER MANUAL
HS-121LN
Warning notices: Before using this product, please read this manual carefully and keep it for future reference.
The design and specifications are subject to change without prior notice for product improvement.
Consult with your dealer or manufacturer for details.
The diagram above is just for reference. Please take the appearance of the actual product as the standard.


01
CONTENTS
THANK YOU LETTER
01
SPECIFICATIONS
02
PRODUCT OVERVIEW
03
PRODUCT INSTALLATION
05
OPERATION INSTRUCTIONS-----------------------------------------
09
CLEANING AND MAINTENANCE ---------------------------------------
12
TROUBLESHOOTING 13
EN
THANK YOU, LETTER,
Thank you for choosing Midea! Before using your new Midea product, please read
this manual thoroughly to ensure that you know how to operate the features and
functions that your new appliance offers in a safe way.

02
EN
SPECIFICATIONS
Product model
HS-121LN
Fresh Food Storage Compartment Volume
93L
Rated Voltage
220-240V~
Frequency
50Hz
Rated Current
0.5A
Overall Dimension (H x W x D)
860x472x450mm

03
PRODUCT OVERVIEW
Names of components
A
EN
B
1
Little door
4
Shelf
2
Drain tray
5
Fruits and vegetables
compartment
3
Temperature control knob
6
Fence
ATTENTION
The picture above is only for reference. The actual configuration will depend on the physical
product or statement by the distributor

04
C
EN
D
1
Door Shelf
4
Shelf
2
Drain tray
5
Fruits and vegetables box
3
Thermostat and light
6
Door tray
ATTENTION
The picture above is only for reference. The actual configuration will depend on the physical
product or statement by the distributor

05
PRODUCT INSTALLATION
Install Instruction
For refrigerating appliances with climate class
•
Depending on the climate class, This refrigerating appliance is intended to be
used at ambient temperatures range as specified following table.
•
The climate class can be found on the rating plate. The product may not
operate properly at temperatures outside of the specific range.
•
You can find the climate class on the product label.
Effective temperature range
•
The product is designed to operate normally in the temperature range
specified by its class rating.
EN
Dimensions and Clearances
•
Too small of a distance from adjacent items may result in the degradation
of freezing capability and increased electricity costs. Allow over 100 mm of
clearance from each adjacent wall when installing the appliance.
ATTENTION
The picture above is only for reference. The actual configuration will depend on the physical
product or statement by the distributor
>100mm
Top View
Required space
for air circulation
>100mm
>100mm
>100mm
>100mm
>100mm
Class
Symbol
Ambient temperature range °C
IEC 62552 (ISO 15502)
ISO 8561
Extended temperate
SN
+ 10 to + 32
+ 10 to + 32
Temperate
N
+ 16 to + 32
+ 16 to + 32
Subtropical
ST
+ 16 to + 38
+ 18 to + 38
Tropical
T
+ 16 to + 43
+ 18 to + 43

06
E
135 °
D
Space requirement diagram (when the door is open and when the door is closed)
B
A C
EN
Width
Overall
Height
Depth
Width
doors open
135
o
Depth
doors open
135
o
A
B
C
D
E
472
860
450
918
520
Notice: All dimensions in mm
B

07
Door right-left change
List of tools to be provided by the user
Cross screwdriver
Putty knife / Thin-blade screwdriver
Masking tape
5/16” soc ket spanner
EN
1.
Power off the refrigerator and remove all objects from the door trays.
2.
Fix the door with tape.
The upper hinge cover.
Upper hinge
Hole cap
3.
Dismantle the upper hinge cover, screws and upper hinge, and remove the plastic
screw hole caps from the other side.
optional
4.
dismantle the door and the bottom hinge assembly and adjustable foot, then
assemble the bottom hinge assembly and adjustable foot on other side.
5.
Dismantle the stopper under the door then assemble the stopper on the other
side. Put the door on bottom hinge and assemble the upper hinge, upper
hingecover and plastic screw hole caps successively.

08
Leveling feet
To avoid vibration, the unit must be leveled.
If required, adjust the leveling screws to compensate for the uneven floor.
The front should be slightly higher than the rear to aid in door closing.
Leveling screws can be turned easily by tipping the cabinet slightly.
Turn the leveling screws counterclockwise
to raise the unit, clockwise
to
lower it.
Changing the Light(optional)
Replacement of incandescent lamps:
•
Disconnecting the power supply before carrying out the bulb replacement
hold and remove the light bulb cover.
•
Dismantle the old bulb by unscrewing it counterclockwise. Replace by a new
bulb (Max. 15W) by screwing it clockwise, and make sure it is fixed in the bulb
holder tightly.
•
Reassemble the light cover and re-connect your Fridge to the power supply.
ATTENTION
EN
Any replacement or maintenance of the LED lamps is intended to be made by the
manufacturer, its service agent or similar qualified person.
Tips for energy saving.
•
Do not place the appliance near cookers, radiators or other heat sources. If the
ambient temperature is high, the compressor will run more frequently and for
longer, resulting in increased energy consumption.
•
Ensure that there is sufficient ventilation at the base of the appliance, on the
sides of the appliance and at the back of the appliance. Never cover ventilation
openings.
•
Please also observe the spacing dimensions in the chapter “Installation”.
•
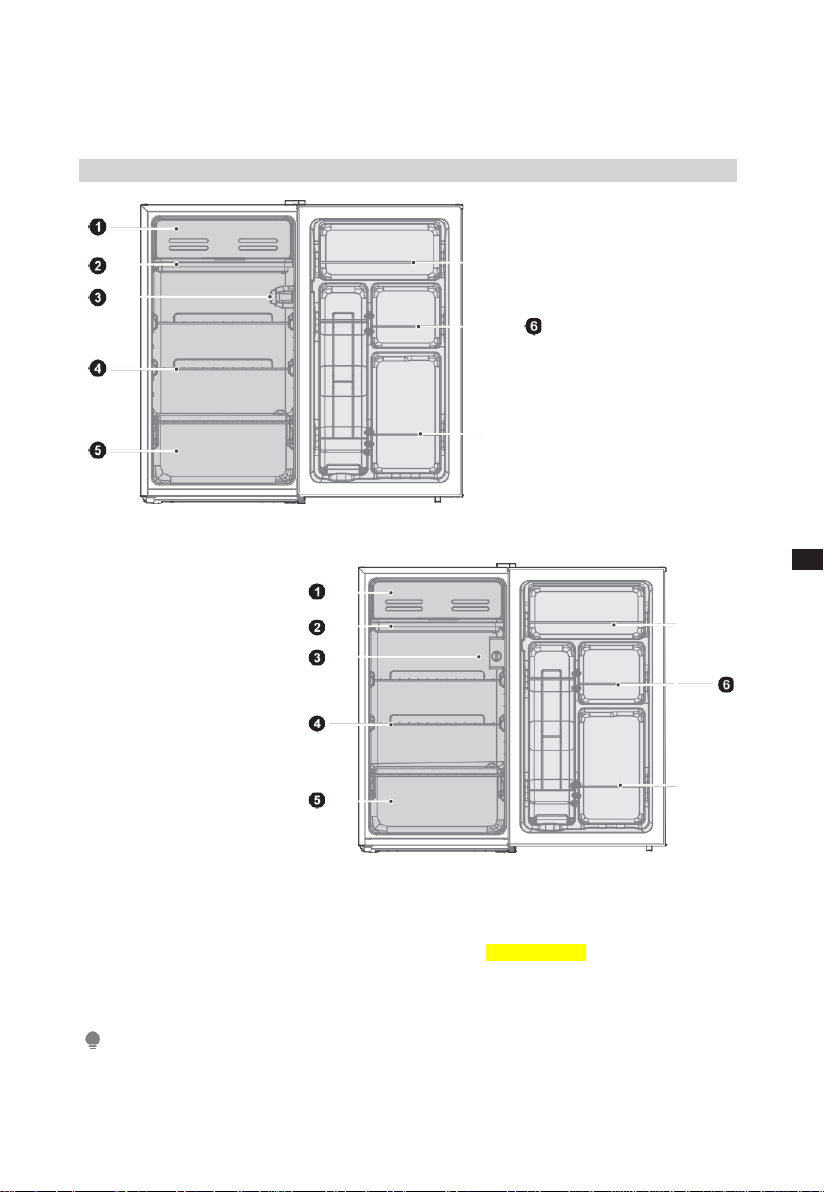
The arrangement of drawers, shelves and racks as shown in the illustration
offers the most efficient use of energy and should therefore be retained as far
as possible. All drawers and shelves should remain in the appliance to keep the
temperature stable and save energy.
•
An evenly filled refrigerator/freezer compartment contributes to optimal
energy use. Therefore, avoid empty or half-empty compartments.
•
Allow warm food to cool before placing it in the refrigerator/freezer. Food that
has already cooled down and increases energy efficiency.
•
Open the door only as briefly as necessary to minimize cold loss. Opening the
door briefly and closing it properly reduces energy consumption.
•
The door seals of your appliance must be perfectly intact so that the doors
close properly and energy consumption is not increased unnecessarily.

09
OPERATION INSTRUCTIONS
Control panel
EN
•
Drain tray is used for receiving water when defrosting. Please empty the water
in the drain tray regularly in case the water overflows into the cabinet.
ATTENTION
Storage of too much food during operation after the initial connection to power may
adversely affect the freezing effect of the refrigerator. Foods stored shall not block the air
outlet; or otherwise, the freezing effect will also be adversely affected.
A
B
ATTENTION
The actual control panel may differ from model to model.
•
Turn the temperature control knob to MAX, the internal temperature of the
refrigerator becomes lower.
•
Turn the temperature control knob to MIN, the internal temperature of the
refrigerator becomes higher.
•
The letter on the knob only represents the level, but does not mean the
specific temperature, the “OFF” means stop working.
•
Recommended gear: “MED.”
NOTE: Please adjusting and using between “MAX” and” MIN”.

10
Tips on storing food.
Cooling compartment
•
To reduce moisture and subsequent ice build-up, never put liquid into the
refrigerator in unsealed containers. Frost tends to concentrate in the coolest parts
of the evaporator. Storing uncovered liquids results in a more frequent need for
defrosting.
•
Never put warm foods in the refrigerator. These should first cool down at room
temperature and then be placed so as to ensure adequate air circulation in the
refrigerator.
•
Foods or food containers should not touch the back wall of the refrigerator because
they could freeze to the wall. Do not keep regularly opening the door of the
refrigerator.
•
Meat and clean fish (packed in a package or plastic foil) can be placed in the
refrigerator, which can be used in 1–2 days.
•
Fruit and vegetables without packaging can be placed in the part designated for
fresh fruit and vegetables.
ATTENTION
The optimal temperature setting of each compartment depends on the ambient temperature.
The above optimal temperature is based on the ambient temperature of 25 °C.
Drain tray is used for receiving water when defrosting. Please empty the water in the drain
EN
tray regularly in case the water overflowing into the cabinet.
Note: Storage of too much food during operation after the initial connection to power may
adversely affects the freezing effect of the refrigerator. Foods stored shall not block the air
outlet; or otherwise, the freezing effect will also be adversely affected.

11
EN
ATTENTION
please store different foods according to the compartments or target storage temperature of
your purchased
Order
Compartments
TYPE
Target
storage
temp. [°C]
Appropriate food
1
Fridge
+2
+8
Eggs, cooked food, packaged food, fruits and
vegetables, dairy products, cakes, drinks and
other foods are not suitable for freezing.
2
(***) *-
Freezer
-18
Seafood (fish, shrimp, shellfish), freshwater
aquatic products and meat products
(recommended for 3 months, the longer the
storage time, the worse the taste and nutrition),
suitable for frozen fresh food.
3
***-Freezer
-18
Seafood (fish, shrimp, shellfish), freshwater
aquatic products and meat products
(recommended for 3 months, the longer the
storage time, the worse the taste and nutrition),
suitable for frozen fresh food.
4
**-Freezer
-12
Seafood (fish, shrimp, shellfish), freshwater
aquatic products and meat products
(recommended for 3 months, the longer the
storage time, the worse the taste and nutrition),
suitable for frozen fresh food.
5
*-Freezer
-6
Seafood (fish, shrimp, shellfish), freshwater
aquatic products and meat products
(recommended for 3 months, the longer the
storage time, the worse the taste and nutrition),
suitable for frozen fresh food.
6
0-star
-6
0
Fresh pork, beef, fish, chicken, some packaged
processed foods, etc. (Recommended to eat
within the same day, preferably no more than 3
days).
Partially encapsulated processed foods (non-
freezable foods).
7
Chill
-2
+3
Fresh/ frozen pork, beef, chicken, freshwater
aquatic products, etc. (7 days below 0°C and
above 0°C is recommended for consumption
within that day, preferably no more than 2
days). Seafood (less than 0 for 15 days, it is not
recommended to store above 0°C.
8
Fresh food
0
+4
Fresh pork, beef, fish, chicken, cooked food,
etc. (Recommended to eat within the same day,
preferably no more than 3 days)
9
Wine
+5
+20
Red wine, white wine, sparkling wine, etc.

Table of contents
Other Midea Refrigerator manuals

Midea
Midea MTM215W User manual

Midea
Midea MRB19B7AWW User manual

Midea
Midea MDRF692MIE User manual

Midea
Midea TMF Series User manual

Midea
Midea HD-423FWWD User manual

Midea
Midea MRT14B3AWW User manual

Midea
Midea HQ-827WEN User manual

Midea
Midea TMF Series User manual

Midea
Midea HD-113FN Series User manual

Midea
Midea French-Door Series User manual

Midea
Midea MRS26D5AST User manual

Midea
Midea MRQ23P4AST User manual

Midea
Midea MTM258W User manual

Midea
Midea MRF18B4AST User manual

Midea
Midea FDB Series User manual

Midea
Midea COMBI Series User manual

Midea
Midea HS-507FWEN User manual

Midea
Midea MRQ22D7AST User manual

Midea
Midea MB112W User manual

Midea
Midea HD-468RWEN User manual