5
Refrigerator
Safety
Operating
Requirements
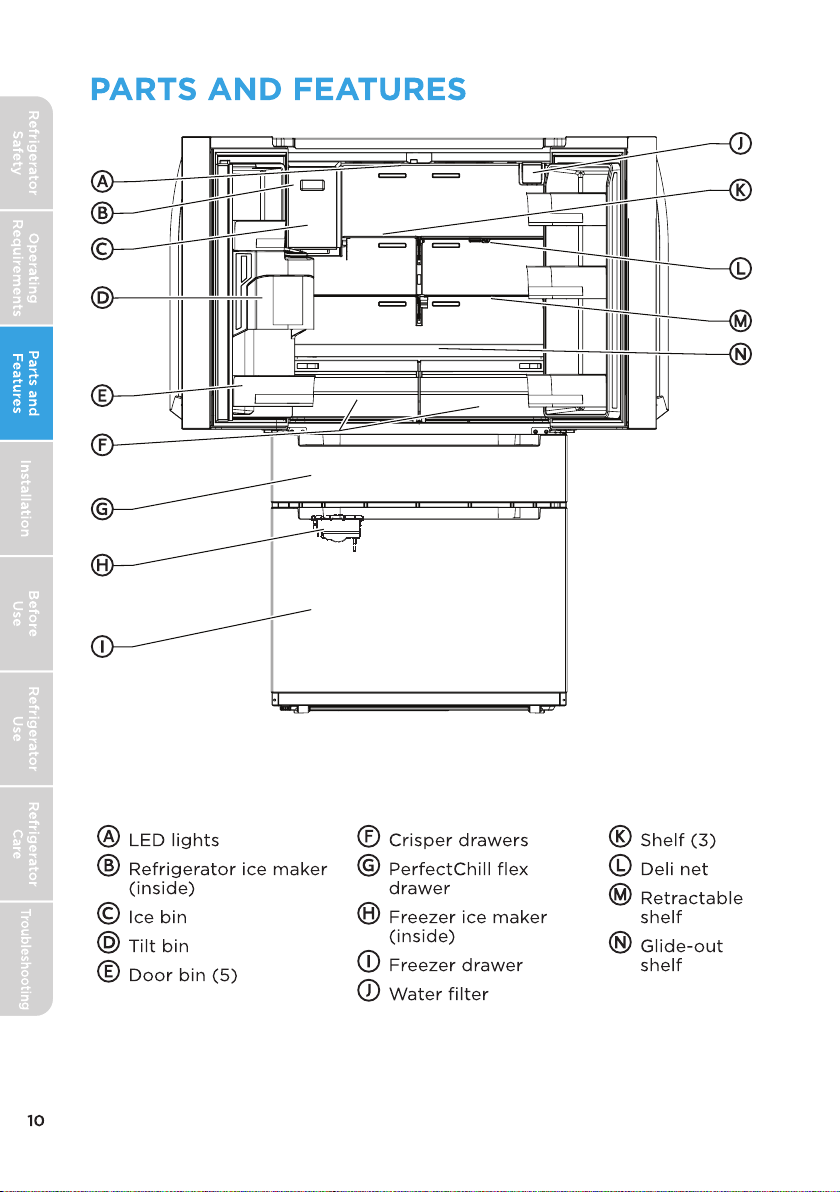
Parts and
Features Installation Refrigerator
Use
Refrigerator
Care
Troubleshooting
Before
Use
USE AND CARE SAFETY
• Flammable refrigerant used. Follow handling instructions carefully.
Risk of fire or explosion due to puncture of refrigerant tubing.
• Flammable refrigerant used. Do not use mechanical devices to
defrost freezer. Do not puncture refrigerant tubing.
• Do not store or use gasoline or any flammable liquids inside or in the
vicinity of this refrigerator.
• Use two or more people to move and install refrigerator.
• Connect refrigerator to a potable water supply only for ice maker
and dispenser use.
• This appliance is not intended for use by persons (including children)
with reduced physical, sensory or mental capabilities, or lack of
experience and knowledge, unless they have been given supervision
or instruction concerning use of the appliance by a person
responsible for their safety.
• Children should be supervised to ensure that they do not play with
the appliance.
• Keep fingers out of the “pinch point” areas; clearances between the
doors and between the doors and cabinet are necessarily small. Be
careful closing doors when children are in the area.
• Do not use electrical appliances inside the food storage
compartments of the appliance, unless they are of the type
recommended by the manufacturer.
• Do not touch the interior of the freezer with wet hands. This could
result in frostbite.
• Use nonflammable cleaner. Clean only with a damp cloth.
• In refrigerators with automatic icemakers, avoid contact with the
moving parts of the ejector mechanism, or with the heating element
that releases the cubes. Do not place fingers or hands on the
automatic ice making mechanism while the refrigerator is plugged in.
• Do not use electrical appliances on the top of the refrigerator, unless
they are of the type recommended by the manufacturer.
• Do not place heavy objects on the top of the refrigerator considering
that objects may fall when doors are opened and closed.
• Do not store beer, beverages or other fluid contained in bottles or
enclosed containers in the freezer. The bottles or containers may
crack due to freezing.
SERVICE SAFETY
• Disconnect power before servicing.
• Flammable refrigerant used. To be repaired only by trained service
personnel. Do not puncture refrigerant tubing.


 User manual")