Midea DMWM80 User manual

OWNER’S MANUAL
Washing Machine
Read This Manual
Use all instructions and explanations of
the installation before use. Follow the
instructions carefully. Keep the operation
instructions handy for later use. If the
application is sold or passed on then ensure
that the new owner always receives those
operation instructions.
DMWM80

1
CONTENTS
SAFETY INSTRUCTIONS
Safety Instructions ....................................................
INSTALLATION
Product Description ..................................................
Installation area ......................................................
Unpacking the washing machine ...............................
Installation of drain hose ..........................................
Levelling the washing machine ...................................
Selection of Tap .........................................................
OPERATIONS
Preparation Before Washing.......................................
Washing ....................................................................
After Washing............................................................
Washing matters needing attention ...........................
The usage of detergent and Washing powder...............
Control Pane .............................................................
Option......................................................................
personalized setting of washing program....................
operations of washing process....................................
Washing Programmes Table ........................................
Energy efficiency test program....................................
Maintenances
Cleaning And Care .....................................................
Cleaning the inlet filter...............................................
Cleaning drain pump filter .........................................
Trouble Shooting.......................................................
Technical Information ................................................
2
7
8
8
8
8
10
11
11
11
12
12
13
14
15
15
16
16
17
17
18
19
20

SAFETY INSTRUCTIONS
!Warning!
This combination of symbol and signal word indicates
a potentially dangerous situation which may result in
death or serious injuries unless it’s avoided.
For your safety, the information in this manual must be followed
to minimize the risk of fire or explosion, electric shock, or to
prevent property damage, personal injury or loss of life.
Explanation of the symbols:
Caution!
This combination of symbol and signal word indicates
a potentially dangerous situation which may result in
slight or minor injuries or damage to property and the
environment.
Note!
This combination of symbol and signal word indicates
a potentially dangerous situation which may result in
slight or minor injuries.
manufacturer, its service agent or similarly qualified
persons in order to avoid a hazard.
• If the supply cord is damaged, it must be replaced by the
•
•
•
The openings must not be obstructed by a carpet.
Do not put washing machine at humid place.
This appliance is for indoor use only.
The electric shock!
Warning!
!
2
SAFETY INSTRUCTIONS

• Hands shall not be inserted into running spin-dry tub .
• If the spin-dry tub does not stop within 15 seconds after
opening the cover , please stop using the machine and
have it repaired.
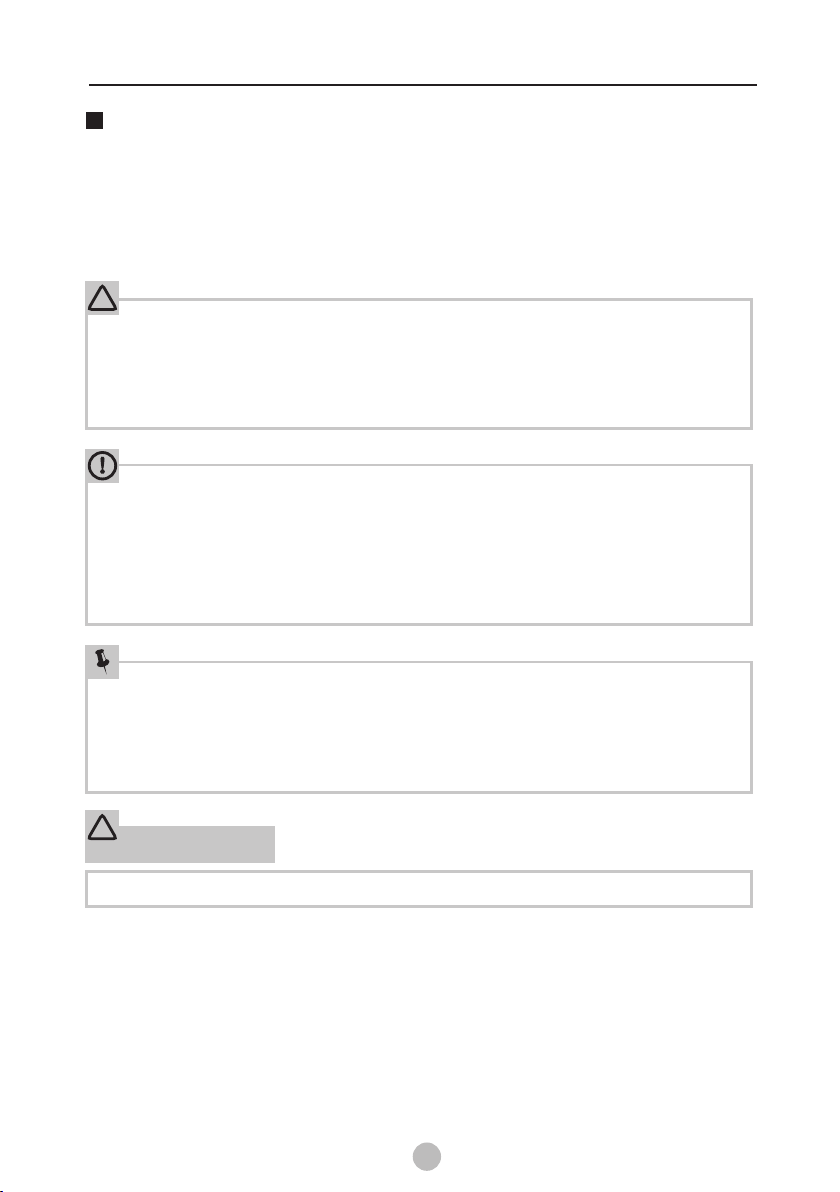
• The new hose-sets supplied with the appliance are to be
used and that old hose-sets should not be reused.
• Before any maintenance the device, unplug the appliance
from the mains.
• Always unplug the machine and turn off the water supply
after use. The max. inlet water pressure, in pascals. The
min. inlet water pressure, in pascals.
• To ensure your safety, power plug must be inserted into
an earthed three-pole socket. Check carefully and make sure
that your socket is properly and reliably earthed.
• Make sure that the water and electrical devices must be
connected by a qualified technician in accordance with the
manufacturer's instructions and local safety regulations.
Risk to children!
from 8 years and above and persons with reduced physical,
sensory or mental capabilities or lack of experience and
knowledge if they have been given supervision or
instruction concerning use of the appliance in a safe way
and understand the hazards involved. Children shall not
play with the appliance. Cleaning and user maintenance
shall not be made by children without supervision.
IEC countries: This appliance is not intended for use by
persons(including children) with reduced
•
•
physical,
sensory or mental capabilities or lack of experience and
knowledge unless they have been given supervision or
instruction concerning use of the appliance by a person
responsible for their safety.
EN countries: the appliance can be used by children aged
3
SAFETY INSTRUCTIONS

• Children should be supervised to ensure that they do not
play with appliance.
• Animals and children may climb into the machine. Check
the machine before every operation.
• Young children should be supervised that they do not play
with the appliance.
• Machine may be very hot during the operation. Keep kids
and pets far away from the machine during the operation
be
with double
to the hot water
• Plug must be accessible after installation.
very wet rooms as well as in the rooms with explosive or
caustic gas.
•
• The washing machine with single inlet valve only can
connected to the cold water supply. The product
inlet valves should be correctly connected
and cold water supply.
Remove all packages before using the appliance. Otherwise,
serious damage may result.
Risk of explosion!
•
•
Do not wash or dry articles that have been cleaned in, washed
in, soaked in, or dabbed with combustible or explosive
substances( such as wax, oil, paint, gasoline, degreasers,
dry-cleaning solvents, kerosene, etc.) This may result in
fire or explosion.
Before hand thoroughly rinse items of washing by hand.
Caution
• This washing machine is for indoor use only.
Installing the product!
4
SAFETY INSTRUCTIONS

• It isn't intended to be built-in using.
• The openings must not be obstructed by a carpet.
• Washing machine shall not be installed in bath room or
very wet rooms as well as in the rooms with explosive
or caustic gases.
• Remove all packages and transport bolts before using
the appliance. Otherwise, serious damage may result.
• The washing machine with single inlet valve only can be
connected to the cold water supply. The product with
double inlet valves should be correctly connected to the
hot water and cold water supply.
• Plug must be accessible after installation.
Risk of damaging appliance!
• Your product is only for home use and is only designed
for the textiles suitable for machine washing.
• Do not climb up and sit on top cover of the machine.
• Do not lean against machine door.
• Cautions during Handling Machine:
1.Transport bolts shall be reinstalled to the machine by
a specialized person.
2.The accumulated water shall be drained out of the
machine.
3.Handle the machine carefully. Never hold each protruded
part on the machine while lifting. Machine door can
not be used as the handle during the conveyance.
4.This appliance is heavy. Transport with care.
• Please do not close the door with excessive forces.
• It is forbidden to wash carpets.
5
SAFETY INSTRUCTIONS

Operating the appliance!
• Before washing the clothes at first time, the product
shall be operated in one round of the whole procedures
without the clothes inside.
• Flammable and explosive or toxic solvents are forbidden.
Gasoline and alcohol etc.Shall not be used as detergents.
Please only select the detergents suitable for machine
washing, especially for drum.
• Make sure that all pockets are emptied. Sharp and rigid
items such as coin, brooch, nail, screw or stone etc. may
cause serious damages to this machine.
• Please check whether the water inside the drum has
been drained before opening its door.Please do not open
the door if there is any water visible.
• Be careful of burning when the product drains hot
washing water.
• Never refill the water by hand during washing.
• After the program is completed, Please wait for two
minutes to open the door.
This marking indicates that this product should not be disposed
with other household wastes throughout the EU.To prevent
possible harm to the environment or human health from
uncontrolled waste disposal,recycle it responsibly to promote
the sustainable reuse of material resources.To return your used
device,please use the collection systems or contact the retailer
where the product was purchased. They return and can take this
product for environmental safe recycling.
Packaging/Old appliance
6
SAFETY INSTRUCTIONS

INSTALLATION
Product Description
• The product line chart is for reference only, please refer to real product as
standard.
Note!
7
Frame
Top lid
Drain hose
Handle
Power case and plug
Control panel
Cabinet
Adjustable foot knob
Water inlet valve
Accessories
spring clamper drain loose ass Inlet hose ass manual screw
cabinet baseboard
• Note: if the drain hose is already installed on the machine, then there is no
spring clamper and drain hose in the accessories.
Note!
Or
Or

Installation area
Before installing the machine, the location characterized
follows shall be selected:
1.Rigid, dry, and level surface
2.Avoid direct sunlight
3.Sufficient ventilation
4.Room temperature is above 0 C
5.Keep far away from the heat resources such as coal or gas.
as
Unpacking the washing machine
1. Remove the cardboard box and styrofoam packing.
2. Lift the washing machine and remove the base packing.
3. Remove the tape securing the power supply cord and
drain hose.
4. Remove the inlet hose from the drum.
•
•
Stability is important to prevent the product from
wandering!
Make sure that the product should not stand on
the power cord.
Warning!
!
•
•
Packaging material (e.g. Films, Styrofoam) can be
dangerous for children.
There is a risk of suffocation ! Keep all packaging
well away from children.
Warning!
!
8
Installation of drain hose
1.Completely sleeve the drain hose over the sewer.
2.Fix and tighten it with a hoop.( As shown in the figure )
• Note: The drain hose of the machine with upper drain system has already been
assembled before leaving the factory. This picture is suitable for lower drain system.
Note!
INSTALLATION
w
w
W> 20mm

9
9
There are two ways to place the end of drain hose:
•
• Position drain hose properly ,otherwise damage might result of water leakage.
Do not kink or protract the drain hose.
• If drain hose is too long, do not force it into washing machine as it will cause
abnormal noises.
Trough
Hose
Retainer
Bind
Min.86cm
Max.100cm
Warning!
!Warning!
!
water trough
Under3m
Under 15cm
Min.86cm
100cm
Max.
1.For lower drain system
2.For upper drain system
1.Check if the legs are closely attached
the cabinet. If not, please turn them to
their original positions tighten the nuts.
2.Check alignment of the product with a
spirit level and if required, correct.
3.Loosen the lock nut and turn the feet
until it closely contacts with
to
the floor.
4.After being locked properly, press four
corners again to make sure that they has
been adjusted properly.
• The lock nuts on all four feet must be screwed tightly against the housing.
Levelling the washing machine
Warning!
!
Lock nut foot
Raise Lower
lockloosen
right
wrong
INSTALLATION

10
10
Wall
滑套
1:Connection between ordinary tap and inlet hose.
2:connection between screw tap and inlet hose.
• To prevent leakage or water damage, follow the instructions in this chapter
Do not kink, crush, modify or sever .
!
• water inlet hose
Warning!
!
Selection of Tap
Please select
tap.
appropriate
Connection of inlet hose, tap and washing machine
clamp nut
tap
1.Loosen clamp nut to
show 5mm thread
2.Loosen four bolts 3.Set connecting base
on tap and tighten
bolts evenly
4.Tighten clamp nut
inlet valve
inlet hose
slide bushing
5.Press slide bushing,
insert inlet hose into
connecting base
6.connection finished 7.After connection and installation,
check if there is water leakage
tap with threads and inlet hose special tap for washing machine
Screw tap Special washing
machine tap
Ordinary faucet
INSTALLATION

Caution!
Before washing, please make sure it’s installed properly.
Before washing it at first time, the washing machine shall be operated in one
of the whole procedures without clothes in as follows.
•
•
round
Open tap
Plug in
Add detergent
After Washing
1 2 3 4
Washing
Power On Start up
1 2
• , If default is selected, step 2 3 can be skipped.
Note!
10
11
load and Close door
Buzzer will beep after washing finished and the power supply will be cut off automatically
Then unload the laundry.
.
3 4
Select Programme Select Level
Preparation Before Washing
OPERATIONS

Knot the long strips,zip or
button
• When washing a single clothes, it may easily cause great eccentricity and give
alarm due to great unbalance. Therefore it is suggested to add one or two
more clothes to be washed together so that draining can be done smoothly.
• Don’t washing the clothes touching with kerosene, gasoline, alcohol and
other flammable materials.
• The working condition of the washer should be(0-40)℃.If used under 0℃,the inlet
valve and draining system may be damaged. If the machine is placed under condition
of 0℃or less, then it should be transferred to normal ambient temperature to ensure
the water supply hose and drain hose are not frozen before use.
• Please check the labels and the explanation of using detergent before wash. Use
non-foaming or less-foaming detergent suitable for machine washing properly.
Take out the items out of
the pockets
Put small clothes into the
pillow slip
Check the label
Washing matters needing attention
Turn easy-pilling and
long-pile fabric inside out
Separate clothes with
different textures
Warning!
!
10
12
• As for the agglomerated or ropy detergent or additive, before they are
poured the detergent box, it is suggested to use some water for
dilution to prevent inlet of detergent box from being blocked and
overflowing while filling water.
•
into
the
Please choose suitable type of detergent for the various washing
temperature to get the best washing performance with less water and
energy consumption.
The uasage of detergent and Washing powder
OPERATIONS

Control Panel
On/Off
Product is switched on or off.
Start/Pause
Press the button to start or pause the
washing cycle.
Programmes
Available according to the laundry type.
Option
This allows you to select an additional
function and will light when selected.
Note!
The chart is for reference only, Please refer to real product as standard.•
1
1
3
1
2
4
Display
The display shows the settings, estimated time remaining, options, and status messages
for your washer. The display will remain on through the cycle.
5
10
13
5
5
3
31
1
2
2
4
4
OPERATIONS
Remain Time(mins)
Water Level
Function
XX
XX
XXXX
XX
XX
Remain Time(mins)
Water Level
Function
XX
XX
XXXX
XX
XX
(Power)
(Power)

Delay
Set the Delay function:
1. Select a programme
2.Press the Delay button to choose the time(the delaying time is 0-24 H.)
3.Press [Start/Pause] to commence the delay operation
Choose the Programme Start
On Setting time
Delay
Cancel the Delay function:
Press the [Delay] button until the display be 0H.It should be pressed before
starting the programme. If the programme already started, should press the
[On/Off] button to reset the programme.
Water Level
Function
Option
Caution!
• If there is any break in the power supply while the machine is operating, a
special memory stores the selected programme and when the power is
restarted, press the [Start/Pause]button the program is continues.
14
Child Lock
To avoid mis operation by children.
Start Press Child Lock
Power on
Cut off the power supply , the kid’s protection is to be released .
• Press the two button 3sec. also to be released the function.
• The “Child Lock” will lock all buttons except [ On/Off ].
•
Caution!
Temp.
Press the button to regulate the Hot、warm、cold water for wash.
select water level according to clothing categories, degree of soiling and washing
habits of customers
combination of soaking, washing, rinsing and spinning light is available
OPERATIONS
(Power)

10
15
Wash Spin+Rinse+
Spin
Start
Start
Function
Start
Water Level
Program Temp.
Delay
personalized setting of washing program
customers can set single process or combinations of washing、rinsing and spinning
freely according to demand. Detailed operations as follows for different models:
keep pressing Function key until
spinning light is on only
keep pressing Function key until
washing、
rinsing、
spinning lights are on
Note: other process combinations are just like above.
operations of washing process
OPERATIONS
Wash
Start
keep pressing Function key
until wash light is on only
Customers can select washing program according to actual demand, and set washing
rinsing 、spinning function 、water volume and appointment timefunction、 function
On
On
On
On
(Power)
(Power)
(Power)
(Power)

Washing Programmes Table
Programmes
10
16
Programmes are available according to the laundry type.
XX XXXX XX
XX XXXX XX
XX XXXX XX
XX XXXX XX
OPERATIONS
The washing machine will select the water level automatically
according to the load weight.
1. When there's water in the tub, this function is not available;
2. Before press [Start/Pause] button, if consumer selected the
water level, there will be no fuzzy weighting function;
3. After press [Start/Pause] button, the washing machine will run
the fuzzy weighting function. Consumer can also select the water
level to set the water level as needed.
Standard
(Normal) Standard fabric washing program, suitable to wash ramie cotton fabric.
Quick
Jeans
During Standard (Normal) washing program, it is identified as Efficiency Program.
Energy efficiency test program:
Fuzzy weighting
Heavy
Delicate wash, especially for silk fabrics.
High wash ability, suitable to wash heavy or serious stained clothes.
Wash time is short. Suitable to wash light stained clothes and clothes
in summer.
Air dry
As for not easily fading, deforming , and non-waterproof clothes ,
can use the function to dry clothes without heating, and to reach
the result of being dried in a room.
Anti-wrinkle The wash time is short, rinses many time with high water level,
thoroughly wash away the garment.
Only for washers having these function
MAM60-505PS/01-AU(15) , AU(2)-AM80-S20PS/0701
MAM80-S2001GPS-AU09, MAM80-S2005GPS-AU09 ,MAM80-808PS/01AU(2)
MAM60-505PS/02-AU(15)
MAM80-S2008GPS/AU09 ,

• Before your maintenance starts, please unplug the machine and close the tap.
Cleaning the cabinet
Proper maintenance on the washing machine can extend its
working life. The surface can be cleaned with diluted
non-abrasive neutral detergents when necessary. If there is
any water overflow, use the wet cloth to wipe it off immediately.
No sharp items are allowed.
Formic acid and its diluted solvents or equivalent are forbidden, such as
solvents or chemical products,etc.
•
alcohol,
Warning!
!
Note!
10
17
Cleaning And Care
Cleaning the inlet filter
• Inlet filter must be cleaned if there is less water.
Washing the filter in washing machine:
1.Screw off the inlet pipe from the backside
of the machine.
2.Pull out the filter with long nose pliers
and reinstall it back after being washed.
3.Use to clean the filter.
4.Reconnect the inlet pipe.
the brush
Note!
1.There is a built-in lint filter in your washer. It
can help to collect lint during washing cycle.
2.It is suggested to clean the lint filter every
10 cycles.
3.Take it out and clean the filter with water.
Then place it back into the washer.
Lint filter clean
magic filter
normal filter
MAINTENANCES

• Make sure that valve cap and emergency drain hose are reinstalled properly, cap
plates should be inserted aligning to hole plates otherwise water may leak;
• Some machines don’t have emergency drain hose, so step 2 and step 3 can be skipped.
Rotate lower cover cap directly to make water run into basin.
• When the appliance is in use and depending on the programme selected there can
be hot water in the pump. Never remove the pump cover during a wash cycle, always
wait until the appliance has finished the cycle, and is empty. When replacing the
cover, ensure it is securely re-tightened.
Cleaning drain pump filter
Be careful of the hot water!
Allow detergent solution to cool down.
•
•
• Unplug the machine to avoid electrical shock before washing.
• Drain pump filter can filter the yarns and small foreign matters from the
washing.
• Clean the filter periodically to ensure the normal operation of washing
machine.
123
5
4
Warning!
!
10
18
Caution!
Open the filter by turning
to the counter clockwise
Remove extraneous matter
Drain the water out of the
pump, under which use a
container to collect.
Restore it and adjust the convex
place to align at the pump hole.
Clean the filter. Tighten the pump
cover clockwise.
6
MAINTENANCES

Trouble Shooting
The start of the appliance does not work or it stops during operation.
First try to find a solution to the problem, If not, contact the service centre.
Description
10
19
No washing
Inspection Items
If the power is off or the fuse is burned out.
If the power supply voltage is too low.
If the water amount reaches to the required water level.(The washer will
not work if the water amount does not reach the required water level)
If it is set to "Delay" washing mode. (It will only start to work until the
reservation time reached)
No water flows in
If the power is off or the fuse is burned out.
If the water supply is cut off or the water pressure is too low.
If the inlet hose is properly connected and the water tap is opened.
If the filtering screen of inlet valve is blocked by dirt.
If the coil of inlet valve is damaged. (The slight electromagnetic sound is
normal phenomenon when the inlet valve is switched on)
If the "Start / Pause" button is pressed after the power switch is pressed.
Abnormal draining
If the water drain hose is placed very high.
If the end of water drain hose is sealed in pond.
If the internal rubber ring of drain valve is blocked by dirt.
Abnormal spin
If the door lid is closed.
If all clothing piled largely at one side of barrel or the clothing is excessively
placed.
If the washer is not placed in stable condition or it is placed in inclination
state. (The ground is not flat).
If the motor belt is loosened.
MAINTENANCES
• or the display
shows other alarm codes
After the check, activate the appliance. If the problem occurs
again, contact the service.
Note!
Description Reason Solution
Please try again first, call up service
line if there are still troubles
Others
E1
EXX
E2
Check the water tap is
opened or not.
Check the water level
sensor and drain pump.
Alarm for abnormal
water intaking.
Alarm for water drain
has not finished.
Alarm for lid not closed
before wash and spin.
E3
Closed the lid.
E4
Manually balance clothes
in the barrel by hands.
Alarm for washing stay
at one side.
Table of contents
Other Midea Washer manuals

Midea
Midea LUNAR 01 User manual

Midea
Midea MT725B User manual

Midea
Midea MFWS712 User manual

Midea
Midea MT100W70 User manual

Midea
Midea MF710W User manual

Midea
Midea MTWM60 User manual

Midea
Midea 360215 User manual

Midea
Midea MLV41N1AWW User manual

Midea
Midea MFH180-G1302DS F01E-US How to use

Midea
Midea MFW-850M2 User manual

Midea
Midea MA200W130 Series User manual

Midea
Midea MWMTL075ZOF User manual

Midea
Midea MTW70 User manual

Midea
Midea MF200W80WB Series User manual

Midea
Midea MAV10-A2804PS/01FM-US User manual

Midea
Midea G06 User manual

Midea
Midea KL15TTGIW User manual

Midea
Midea X8 User manual

Midea
Midea MFW-EC850 User manual

Midea
Midea M Series User manual