Miele Classic C1 Turbo Team User manual

en Operating Instructions Canister Vacuum Cleaner
fr Mode d'emploi Aspirateur-chariot
es Instrucciones operativas Aspiradora de contenedor
SBAN0
SBCN0
M.-Nr. 10 852 951
HS12

2
en ....................................................................................................................... 5
fr ......................................................................................................................... 27
es ........................................................................................................................ 54

3
Only Miele FilterBags, filters and accessories with
the "Original Miele" logo can be used with this
vacuum. Only then can the suction power of the
vacuum cleaner reach its optimum potential creating
the best possible cleaning results.
USE OF NON-MIELE COMPONENTS MAY VOID
THE WARRANTY.
,The use of FilterBags made of paper or a similar
material, or FilterBags with a cardboard retaining
plate can lead to serious damage to the vacuum
cleaner and may void the warranty, just as with the
use of FilterBags without the "Original Miele" logo.
The "Original Miele" Logo will appear on the
packaging or directly on the FilterBag.
Purchasing new FilterBags and filters
Original Miele FilterBags and filters can be purchased
from an authorized Miele vacuum dealer or by visiting the
Miele store at www.mieleusa.com.

en - Contents
4
IMPORTANT SAFETY INSTRUCTIONS ................................................................ 5
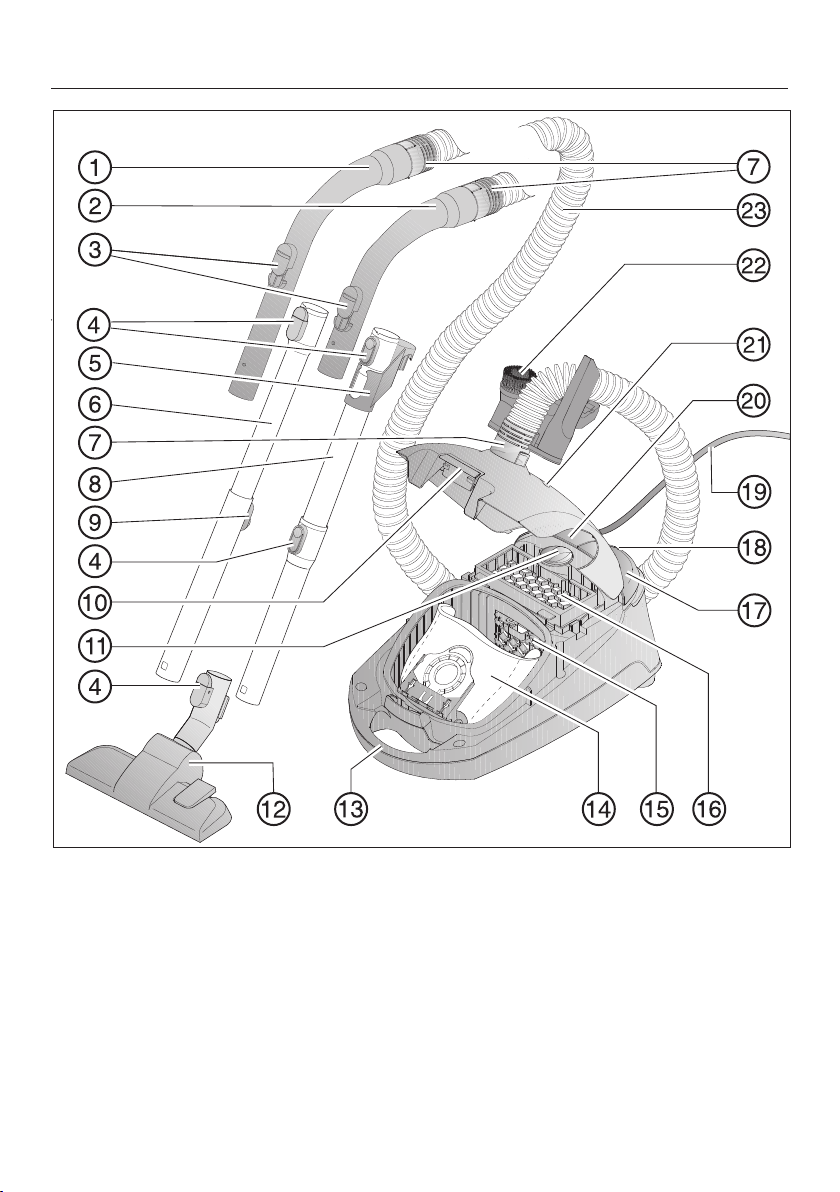
Appliance description ......................................................................................... 10
Caring for the environment ................................................................................ 12
References to illustrations.................................................................................. 13
Preparing for use................................................................................................. 13
Use........................................................................................................................ 15
Setting down and storing the vacuum cleaner................................................. 16
Maintenance ........................................................................................................ 16
Purchasing new FilterBags and filters ................................................................... 17
Ordering the correct FilterBags and filters ............................................................ 17
When to change the FilterBag .............................................................................. 17
How the FilterBag change indicator works ........................................................... 18
How to replace the FilterBag ................................................................................ 18
When to change the motor protection filter........................................................... 18
How to change the motor protection filter ........................................................... 18
When to replace the exhaust filter AirClean .......................................................... 19
How to replace the AirClean exhaust filter ........................................................... 19
When to replace the Active AirClean 30/HEPA AirClean 30 exhaust filter ........... 19
How to replace the Active AirClean 30/HEPA AirClean 30 exhaust filter ............. 19
Replacing one type of exhaust filter with another ................................................ 20
When changing the filter please note.................................................................... 20
When to change the thread catchers? .................................................................. 20
How to replace the thread lifters .......................................................................... 20
Cleaning and care ............................................................................................... 20
Frequently Asked Questions .............................................................................. 21
Technical Service................................................................................................. 22
Contact in case of fault ......................................................................................... 22
Warranty ................................................................................................................ 22
Optional accessories .......................................................................................... 22
Limited Warranty - Vacuum Cleaners USA ....................................................... 24

en - IMPORTANT SAFETY INSTRUCTIONS
5
This vacuum cleaner complies with current safety re-
quirements. Inappropriate use can, however, lead to per-
sonal injury and damage to property.
To avoid the risk of accidents and damage to the vacuum
cleaner, please read the operating instructions carefully
before using it for the first time. They contain important
information on its safety, operation and maintenance.
Keep these operating instructions in a safe place and
pass them on to any future user.
Always disconnect the vacuum cleaner from the power
supply when you have finished using it, before changing
any accessories, as well as for maintenance work and
cleaning. Turn the vacuum cleaner off and unplug it.
Correct use
This vacuum cleaner is intended for cleaning flooring in
domestic households and similar residential environments.
This vacuum cleaner can be used for all normal cleaning
of carpets, rugs and hard flooring.
This vacuum cleaner is not intended for outdoor use.
This vacuum cleaner is intended for use at altitudes of
up to 1300ft (4000m) above sea level.
The vacuum cleaner must only be used to vacuum dry
floor surfaces. Do not use on people and animals. Any
other usage, modification or alteration is not supported by
the manufacturer and could be dangerous.

en - IMPORTANT SAFETY INSTRUCTIONS
6
Persons which lack physical, sensory or mental abilities
or experience with the machine should not use it without
supervision or instruction by a responsible person.
Safety with children
Danger of suffocation! Ensure that any plastic wrap-
pings, bags, etc. are disposed of safely and kept out of the
reach of children.
Do not allow the vacuum cleaner to be used as a toy.
Close attention is necessary when used near children.
Technical safety
Before using the vacuum cleaner and its accessories,
check for any visible signs of damage. Do not use a dam-
aged appliance.
Ensure that the connection data on the data plate of the
vacuum cleaner (voltage and frequency) match the house-
hold power supply. Without modifications, the vacuum
cleaner is suited for 50Hz or 60Hz.
The electrical outlet must be fitted with a 15A fuse.
Reliable and safe operation of this vacuum cleaner can
only be assured if it has been connected to the electricity
supply.
Repairs must only be performed by an authorized ser-
vice agent in accordance with national and local safety
regulations. Unauthorized repairs could cause injury or ma-
chine damage. Otherwise the warranty will be void.

en - IMPORTANT SAFETY INSTRUCTIONS
7
Do not pull or carry the vacuum cleaner by the power
cord, and be careful not to damage the cord when with-
drawing the plug from the socket. Keep the cord away
from sharp edges and do not let it get pinched, for exam-
ple, under a door. Avoid running the vacuum cleaner over
the cord. This could damage the cord, plug or socket. The
appliance must not be used if any of these have suffered
damage.
Do not use the vacuum cleaner if the power cord is
damaged. If the power cord is damaged it must be re-
placed together with the cord reel. For safety reasons this
must only be done by Miele Technical Service or a Miele
authorized service technician.
When vacuuming, in particular fine dust, e.g. sawdust,
sand, plaster, flour, talcum powder etc., electrostatic
charges build up naturally. Under certain conditions these
charges will be released. To avoid the unpleasant effects of
these discharges, a metal inlay has been incorporated into
the underside of the handle. Please make sure that you
keep your hand in constant contact with this metal strip
during vacuuming.
Do not let the vacuum cleaner get wet. Clean only with a
dry cloth or slightly damp cloth when disconnected from
the electrical supply.
Repairs should only be carried out by a Miele-authorized
service technician. Repairs and other work by unqualified
persons can cause considerable danger to users.

en - IMPORTANT SAFETY INSTRUCTIONS
8
Defective components should be replaced by Miele orig-
inal parts only. Only with these parts can safety of the ap-
pliance be assured as intended by the manufacturer.
Proper use
To avoid the risk of damage, do not use the vacuum
cleaner without the FilterBag, dust compartment filter and
exhaust filter in place.
The dust compartment cover will not close without a Fil-
terBag inserted. Do not force it.
Do not vacuum up anything which has been burning or
smoking, e.g., cigarettes, ashes or hot ash, whether glow-
ing or apparently extinguished.
Do not use the vacuum cleaner to vacuum up any water,
liquid or damp dirt. Wait until any freshly cleaned or sham-
pooed rugs or carpets are completely dry before attempt-
ing to vacuum.
Do not use the vacuum cleaner to vacuum toner dust.
Toner, such as that used in printers and photocopiers, can
conduct electricity.
Do not vacuum up any flammable or combustible liquids
or gases and do not vacuum in areas where such sub-
stances are stored.
Do not vacuum at head height and do not let the suction
get anywhere near a person's head.

en - IMPORTANT SAFETY INSTRUCTIONS
9
Accessories
To avoid the risk of injury when vacuuming with a Miele
turbobrush, do not touch the rotating roller brush.
It is not advisable to vacuum directly with the handle,
i.e., without an accessory attached, as the rim could get
damaged and you could hurt yourself on sharp edges.
Only use genuine FilterBags, filters and accessories with
the “Original Miele” logo on them. Otherwise the manufac-
turer cannot guarantee the safety of the product.
California Proposition 65
THE FOLLOWING WARNING IS REQUIRED BY THE STATE OF CALIFORNIA
FOR CALIFORNIA RESIDENTS ONLY:
WARNING:
Cancer and Reproductive Harm -
www.P65Warnings.ca.gov.
SAVE THESE INSTRUCTIONS

en - Appliance description
10

en - Appliance description
11
aXXL handle *
bHandle *
cAir inlet valve
dRelease buttons *
eConnection piece for storage *
fTelescopic suction wand *
gHose connection socket
hEasyLock suction wand *
iTelescopic suction wand release mechanism *
jDust compartment lid release button
kSuction power selector
lFloorhead *
mCarrying handle
nOriginal Miele FilterBag
oMotor protection filter
pAirClean filter *
qOn/off foot switch
rPark system for pauses during vacuuming
sPower cord
tFoot switch for automatic cord rewind
uFilterBag change indicator
vAccessories holder with three accessories
wSuction hose
Underneath - suction wand holder (not illustrated)
* These features are model-specific and may vary or may not be available on your
vacuum cleaner.

en - Caring for the environment
12
Disposal of the packing mate-
rial
The cardboard box and packing materi-
als protect the appliance during ship-
ping. They have been designed to be
biodegradable and recyclable.
Ensure that any plastic wrappings,
bags, etc. are disposed of safely and
kept out of the reach of children. Dan-
ger of suffocation!
Disposing of the FilterBags
and filters
Filterbags and filters are made from en-
vironmentally friendly materials, and can
be disposed of with the normal house-
hold waste, as long as they have been
used exclusively for general household
dust.
Disposing of your old appli-
ance
Before disposing of your old appliance
remove the FilterBag and filters and dis-
pose of them with your household
waste.
Electronic and electrical appliances
contain many valuable materials. They
also contain certain materials, com-
pounds and components which were
essential for their correct functioning
and safety. These could be hazardous
to your health and to the environment if
disposed of with general waste or if
handled incorrectly. Please do not,
therefore, dispose of your old appliance
with general waste.
Instead, please make use of officially
designated collection and disposal
points to dispose of and recycle electri-
cal and electronic appliances. By law,
you are solely responsible for deleting
any personal data from the appliance
prior to disposal. Please ensure that
your old appliance poses no risk to chil-
dren while being stored for disposal.

en-US
13
References to illustrations
The illustrations referred to in the text
are shown on the fold-out pages at
the end of these Operating Instruc-
tions.
Preparing for use
Attaching the suction hose (Fig. 01)
Insert the hose connector into the
suction socket on the vacuum
cleaner until it clicks into position.
Remove the suction hose
Press both release buttons at the
side of the hose connector and lift
the hose from the socket .
Connect the suction hose to the han-
dle (Fig. 02)
Fit the connector at the other end of
the suction hose into the handle until
it clicks into position.
Your vacuum cleaner is fitted with one
of the following suction wands, de-
pending on model.
– EasyLock suction wand
– Comfort telescopic suction wand
To assemble the EasyLock wand
(Fig. 03)
Hold the suction wand by the con-
nection piece and push it into the
second suction wand, turning it
clockwise or counter-clockwise until
it clicks into position.
Slide the connection piece upwards
until it clicks into position.
Connecting the handle to the wand
(Fig. 04)
Insert the handle into the suction
wand until it clicks into position. To
do this, line up the guides on the two
pieces.
To detach the handle
To release the handle from the wand,
press the release button and pull the
handle out of the wand, twisting it
slightly as you do so.
Adjusting the telescopic suction
wand (Fig. 05)
One part of the telescopic suction wand
is packed inside the other and it can be
adjusted to suit your height for comfort-
able vacuuming.
Grasp the release mechanism and
adjust the telescopic suction wand to
the required length.
Connect the suction wand to the
floorhead (Fig. 06)
Push the suction wand into the floor-
head and turn it clockwise or
counter-clockwise until it clicks into
position.
To separate the suction wand from
the floorhead, press the release but-
ton and pull the suction wand away
from the floorhead, twisting it slightly
as you do so.
Adjusting the floorhead (Fig. 06)
(only for models with a reversible floor
head included in the standard version)
This vacuum cleaner can be used for
daily cleaning of carpets, rugs, and ro-
bust hard flooring.

en-US
14
Miele offer a range of other floorheads,
-brushes and accessories for other
types of flooring and special require-
ments.
Please observe the flooring manu-
facturer's cleaning and care instruc-
tions.
Vacuum carpets and rugs with the
brush retracted:
Press the foot switch .
Clean hard floors, especially delicate
flooring susceptible to scratches and
flooring with gaps or deep crevices,
with the brush extended:
Press the foot switch .
Activating the exhaust filter
TimeStrip change indicator®
Depending on the model, your vacuum
cleaner will be fitted as standard with
one of the following exhaust filters (Fig.
07).
a AirClean
b Active AirClean 30 (black)
c HEPA AirClean 30 (white)
If your vacuum cleaner is fitted with ex-
haust filter b or c, you need to activate
the TimeStrip® exhaust filter change in-
dicator.
Pull the release catch for the dust
compartment lid upwards and open
the lid as far as it will go(Fig. 08).
Remove the indicator strip (Fig. 09).
Press the TimeStrip® exhaust filter
change indicator(Fig. 10).
After approx. 10–15 seconds a thin red
line will appear in the left-hand side of
the display (Fig. 11).
Close the dust compartment lid se-
curely, making sure it clicks into posi-
tion. Take care not to trap the Fil-
terBag when doing so.
How the TimeStrip® exhaust filter
change indicator works
The TimeStrip® exhaust filter change
indicator shows the remaining func-
tional life of the exhaust filter. After ap-
prox. 50 operating hours, or approx.
one year of average use, the display will
be completely filled with red (Fig. 12).
Using the accessories supplied
(Figs. 13 + 14)
Dusting brush
Upholstery nozzle
Crevice nozzle
Accessory holder for the three ac-
cessories supplied
Symbols on the holder show where to
attach the different accessories.
Attach the accessories holder to the
hose connector socket at the top or
bottom of the suction hose. Make
sure it clicks into position.
Some models are supplied as standard
with one of the following accessories
which are not illustrated.
– AllergoTeQ floorhead
– Turbobrush

en-US
15
These vacuum cleaners are supplied
with separate operating instructions for
the relevant accessory part.
Convertible floorhead / floor brush
(Fig. 15)
(included as standard depending on
model)
For general use and also for vacuuming
the stairs.
For safety reasons when vacu-
uming stairs, it is best to start at the
bottom of the stairs and move up-
wards.
Parquet floorbrush (SBB Parquet-3)
(included as standard depending on
model)
This brush has natural bristles and is
designed for use on smooth floors that
are susceptible to scratching.
Use
Power cord
Unwind the cord completely to
aid the vacuum in dissipating heat.
Do not pull or carry by the cord, use
the cord as a handle, close a door on
the cord, or pull the cord around
sharp edges or corners. Do not run
the appliance over the cord. Keep
the cord away from heated surfaces.
Do not unplug by pulling the cord. To
unplug grasp the plug, not the cord.
This appliance is equipped with a
power cord reel. Hold the plug when
rewinding onto cord reel. Do not al-
low plug to whip when rewinding.
Unwinding the cord
(Fig. 16)
Pull the power cord out to the re-
quired length.
If vacuuming for longer than
30minutes, the cord must be pulled
out all the way. Danger of overheat-
ing and damage.
Rewinding the cord
Remove the plug from the socket.
Press the rewind foot control. The
cord will rewind automatically.
Turning the vacuum cleaner on and
off (Fig. 17)
Press the On/Off foot control .
During vacuuming
When vacuuming, in particular
fine dust, e.g. dust, sand, plaster,
flour, etc., electrostatic charges build
up naturally. Under certain conditions
these charges will be released. To
avoid the unpleasant effects of these
discharges, a metal inlay has been
incorporated into the underside of
the handle. Please make sure that
you keep your hand in constant con-
tact with this metal strip during vacu-
uming (Fig. 18).
Regulating the suction power
(Fig. 19)
The suction power can be regulated to
suit the type of flooring being cleaned.
Reducing the suction power reduces
the amount of effort required to maneu-
ver the floor brush.

en-US
16
The vacuum cleaner has symbols on
the controls which indicate the type of
use the settings are suitable for.
Curtains, fabric
Upholstery, cushions
Deep pile carpets, rugs and run-
ners
Energy-saving vacuuming. This
setting is also very quiet
Low pile carpet and rugs
Hard flooring and heavily soiled
carpets and rugs
Turn the suction power selector man-
ually to the suction power setting you
require.
Opening the air inlet valve (Fig. 20)
It is easy to reduce the suction power
for a short time, e.g., to prevent rugs or
other objects being sucked into the
vacuum cleaner.
Open the air inlet valve on the handle
far enough to reduce the suction
power.
This reduces the suction on the respec-
tive nozzle used.
Setting down and storing the
vacuum cleaner
Park system for pauses during vacu-
uming (Fig. 21)
The Park system allows you to conve-
niently park the suction wand and floor-
head during pauses.
Slot the floorhead into the parking at-
tachment on the vacuum cleaner.
If your vacuum cleaner is on a slop-
ing surface, e.g. a ramp,
- retract the telescopic suction wand
fully
- do not use the park system if your
vacuum cleaner has an EasyLock
suction wand.
Park system for storage
(Figs. 22 + 23)
Always disconnect the vacuum
cleaner from the power supply when
you have finished using it. Remove
the plug from the socket.
Stand the vacuum cleaner upright.
If your vacuum cleaner has a tele-
scopic suction wand, retract the wand
fully so that it takes up less room for
storage.
Slot the floorhead downwards into
the parking attachment.
If your vacuum cleaner has an Easy-
Lock suction wand you can separate
the two sections for storage purposes.
Press the release button on the lower
section and pull the top section out.
Push the connection piece attached
to the upper wand section into the
lower section.
Maintenance
Always switch off the vacuum
cleaner for maintenance work and
remove the plug from the outlet.
The Miele filtration system consists of
three components:

en-US
17
– Original Miele FilterBag
– Motor protection filter
– Original Miele exhaust filter
These will need to be replaced from
time to time to ensure that your vacuum
cleaner performs efficiently.
We recommend only using genuine
FilterBags, filters, and accessories
with the “Original Miele” logo on
them. This will ensure that the suc-
tion power of the vacuum cleaner is
maintained, giving the best possible
cleaning results.
FilterBags with the “Original Miele”
logo on them are not made from pa-
per or paper-based materials and nor
do they have a cardboard collar. This
is why our FilterBags are particularly
long-lasting and reliable.
Please note that appliance faults and
damage originating from the use of
accessories which do not carry the
“Original Miele” logo will not be cov-
ered by the appliance guarantee.
Purchasing new FilterBags and filters
Original Miele FilterBags and filters are
available from the Miele web store,
Miele Technical Service, and your Miele
dealer.
Ordering the correct FilterBags and
filters
Only use original Miele GN FilterBags
with a blue collar and original Miele fil-
ters. These are identified by the “ORIGI-
NAL Miele” logo on the packaging.
Every packet of original Miele FilterBags
contains four bags, one AirClean ex-
haust filter, and one motor protection fil-
ter. Original Miele multipacks contain 16
FilterBags, four AirClean exhaust filters,
and four motor protection filters.
Original Miele exhaust filters can also
be purchased separately from your
Miele dealer or Miele Technical Service.
Please quote the model number of your
vacuum cleaner when ordering to make
sure you get the correct filter. You can
also order all accessories via the Miele
web store.
When to change the FilterBag
(Fig. 24)
Change the FilterBag when the color
marker in the FilterBag change indicator
turns red.
FilterBags are disposable and in-
tended to be used only once. Dis-
pose of the entire FilterBag. Do not
attempt to re-use. Blocked pores re-
duce the efficiency of the vacuum
cleaner.
Checking the FilterBag change indi-
cator
Attach the floor brush to the vacuum
cleaner (depending on the model).
Switch the vacuum cleaner on and
select the highest power setting.
Lift the floor brush off the floor a little.

en-US
18
How the FilterBag change indicator
works
The FilterBag change indicator is set for
normal household dust. This generally
contains a mixture of dust, hair,
threads, carpet lint, grit, etc.
However, if the cleaner has been used
to vacuum up fine dust, such as plaster,
brick dust, cement or flour, the pores of
the FilterBag will become blocked very
quickly.
This affects the air permeability of the
bag, and the marker will indicate that
the bag is “full” even when it is not. If
this happens you must still change the
FilterBag because suction power will be
greatly reduced by blocked pores in the
FilterBag.
If, on the other hand, a large amount of
hair and carpet lint which typically con-
tains a lot of air is vacuumed up, the in-
dicator may fail to react even though
the bag is full. You should still change it.
Both these extremes can occur.
How to replace the FilterBag (Fig. 25)
Press both release buttons at the side
of the hose connector, and lift the
hose from the socket (Fig. 01).
Pull the release catch for the dust
compartment lid upwards and open
the lid as far as it will go(Fig. 08).
The FilterBag has a flap which closes
automatically when the dust compart-
ment lid is raised to prevent any dust
escaping.
Pull the FilterBag out by the grip on
the collar.
Fit the new FilterBag into the holder
as far as it will go. Leave it folded up
when you take it out of the box.
Close the dust compartment lid se-
curely, making sure it clicks into posi-
tion. Take care not to trap the Fil-
terBag when doing so.
An empty operation lock prevents
the dust compartment lid from clos-
ing without a FilterBag in place. Do
not use force!
Insert the hose connector into the
suction socket on the vacuum
cleaner until it clicks into posi-
tion(Fig. 01).
When to change the motor protection
filter
Replace this filter every time you start a
new packet of filter bags.
Every packet of original Miele filter bags
contains a motor protection filter. Multi-
packs contain four motor protection fil-
ters.
How to change the motor protection
filter (Fig. 26)
Open the dust compartment lid.
Pull the FilterBag out by the grip on
the collar.
Unclip the filter frame and replace the
motor protection filter.
Close the filter frame.
Fit the FilterBag into the holder as far
as it will go.
Close the dust compartment lid.

en-US
19
When to replace the exhaust filter
AirClean
Replace this filter every time you start a
new packet of Miele FilterBags. Every
packet of original Miele FilterBags con-
tains one AirClean exhaust filter. Multi-
packs contain four AirClean filters.
How to replace the AirClean exhaust
filter (Fig. 27)
Do not use more than one exhaust fil-
ter at a time.
Open the dust compartment lid.
Release the filter frame and raise it
upwards. Grasp the used AirClean
filter by the clean, unsoiled section
(see arrow) and take it out.
Replace it with a new AirClean ex-
haust filter.
If you wish to fit an Active AirClean
30 or HEPA AirClean 30 exhaust fil-
ter, see “Replacing one type of ex-
haust filter with another”.
Close the filter grille.
Close the dust compartment lid.
When to replace the Active AirClean
30/HEPA AirClean 30 exhaust filter
(Fig. 12)
Replace this filter when the exhaust fil-
ter TimeStrip® change indicator is
completely red.
The indicator lights up after approxi-
mately 50 operating hours, which is
equivalent to about a year of average
use. You can continue vacuuming when
the light comes on. However, the suc-
tion power will be reduced as will the
effectiveness of the filter.
How to replace the Active AirClean
30/HEPA AirClean 30 exhaust filter
(Fig. 28)
Do not use more than one exhaust fil-
ter at a time.
Open the dust compartment lid.
Lift the exhaust filter and remove it.
Insert a new exhaust filter, making
sure it goes in properly, then push it
down into position.
Press the TimeStrip® exhaust filter
change indicator(Fig. 10).
After approx. 10–15 seconds a thin red
line will appear in the left-hand side of
the display (Fig. 11).
If you wish to fit the AirClean exhaust
filter, see “Replacing one type of ex-
haust filter with another”.
Close the dust compartment lid.

en-US
20
Replacing one type of exhaust filter
with another (Fig. 07)
Depending on the model, your vacuum
cleaner will be fitted as standard with
one of the following exhaust filters :
a AirClean
b Active AirClean 30 (black)
c HEPA AirClean 30 (white)
Do not use more than one exhaust fil-
ter at a time.
When changing the filter please note
1. If you wish to replace exhaust filter a
with filter b or c, you must com-
pletely remove the filter grille before
you install the new exhaust filter.
You must also activate the
TimeStrip® exhaust filter change in-
dicator (Fig. 10).
2. If you wish to replace exhaust filter b
or c with filter a, you must insert the
new filter into a filter grille * before in-
stalling (Fig. 27).
* Filter grille – see “Optional acces-
sories”
When to change the thread catchers?
(only possible for models with a re-
versible floorhead included as standard)
The thread catchers on the suction inlet
of the reversible floorhead can be re-
placed. Check them from time to time
and replace them if the pile has worn
down.
How to replace the thread lifters
(Fig. 29 + 30)
Use a suitable screwdriver to remove
the thread lifters from the slots.
Install new thread lifters.
Replacement parts are available from
your Miele dealer or through Miele
Technical Service.
Cleaning and care
Always disconnect the vacuum
cleaner from the electrical supply be-
fore cleaning it. Turn off and unplug
it.
Vacuum cleaner and accessories
The vacuum cleaner and all plastic ac-
cessories can be cleaned with a propri-
etary cleaner suitable for plastic.
Do not use abrasive cleaning
agents, glass cleaning agents, all-
purpose cleaners or oil-based condi-
tioning agents!
Dust compartment
The dust compartment can, if neces-
sary, be cleaned using a dry duster,
brush or, if available, a second vacuum
cleaner to vacuum the dust out.
Monitor the filter bag change indicator
and inspect all filters regularly. Clean or
replace them when necessary accord-
ing to these Operating Instructions.
Do not let the vacuum cleaner
get wet. If moisture gets into the ap-
pliance, there is a risk of electric
shock.
This manual suits for next models
2
Table of contents
Other Miele Vacuum Cleaner manuals

Miele
Miele Blizzard CX1 Comfort EcoLine User manual

Miele
Miele SGDE0 User manual

Miele
Miele lassic C1 SBxx3 Series User manual

Miele
Miele HS15 User manual

Miele
Miele Classic C1 Exclusive PowerLine User manual

Miele
Miele Classic C1 User manual

Miele
Miele S 5981 PowerPlus User manual

Miele
Miele S 4000 User manual

Miele
Miele S 5281 MedicAir User manual

Miele
Miele Boost CX1 PowerLine User manual