MiLAN MLN TWAIN 6904 Instruction manual

AB
+
MLN TWAIN 6904+4904-4905
DATOS TÉCNICOS
LUMINARIA PORTATIL .
CORRIENTE DE ENTRADA AC 2V 50-Hz.
1 CASQUILLO E PARA LÁMPARAS LED.
INTERRUPTOR INTEGRADO EN LA LUMINARIA.
TECHNICAL DATA
PORTABLE LUMINAIRE.
INPUT CURRENT AC 2V 50-Hz.
1 E SOCKET FOR LED LAMP.
SWITCH INTEGRATE D IN THE LUMINARIE.
Arquimedes, 24 - 08907 L‘HOSPITALET DE LLOBREGAT (Barcelona) - (ESPAÑA) • e-mail:inf[email protected]
Tel f. +34 93 336 99 66 * Mov. 609 00 60 32 - Fax.+34 93 336 99 60 Te lf. International +34 93 264 04 18
Ø
Lista de partes.
Bill of materials.
A
B
Accesorios compatibles
Compatible accessories
Ref. 4904, 4905
1700
180
Anillo de goma.
Rubber ring.
C
D
C
D
AB
+
2Es el momento de colocar la lámpara LED
retrofit que hayamos seleccionado.
El portalamparas incorpora un interruptor
que se acciona tirado de una cuerda.
2 It is time to place the retrofi t LED lamp that
we have selected.
The lamp holder incorporates a switch that is
pulled by a rope.
1
2
1Utilizando el accesorio compatible
A+B, Introducir primero el anillo de
goma C, que servirá para mantener
la pantalla D a la altura deseada.
Posteriormente introducir la pieza
A+B por los orificios que se aprecian
en el dibujo. Repetiremos la acción
por el número de pantallas que
decidamos.
1 Using the compatible accessory
A + B, fi r st insert the rubber ring C,
which will serve to keep the D screen
at the desired height. Then insert
piece A + B through the holes shown
in the drawing. We will repeat the
action by the number of screens that
we decide.
18353/0
MLN TWAIN 6904+3904-3905
DATOS TÉCNICOS
LUMINARIA PORTATIL .
CORRIENTE DE ENTRADA AC 2V 50-Hz.
1 CASQUILLO E PARA LÁMPARAS LED.
INTERRUPTOR INTEGRADO EN LA LUMINARIA.
TECHNICAL DATA
PORTABLE LUMINAIRE.
INPUT CURRENT AC 2V 50-Hz.
1 E SOCKET FOR LED LAMP.
SWITCH INTEGRATED IN THE LUMINARIE.
Arquimedes, 24 - 08907 L‘HOSPITALET DE LLOBREGAT (Barcelona) - (ESPAÑA) • e-mail:inf[email protected]
Tel f. +34 93 336 99 66 * Mov. 609 00 60 32 - Fax.+34 93 336 99 60 Te lf. International +34 93 264 04 18
18353/0
314
600
Lista de partes.
Bill of materials.
T
F G
T
F
S
G
S
K
R
EW P
K
R
E
W
P
X 2
X 2 X 2 X 2
Ø
180
Anillo de goma.
Rubber ring.
C
D
C560
1
4
3
2
4
5
5
K
Ref. 3904, 3905
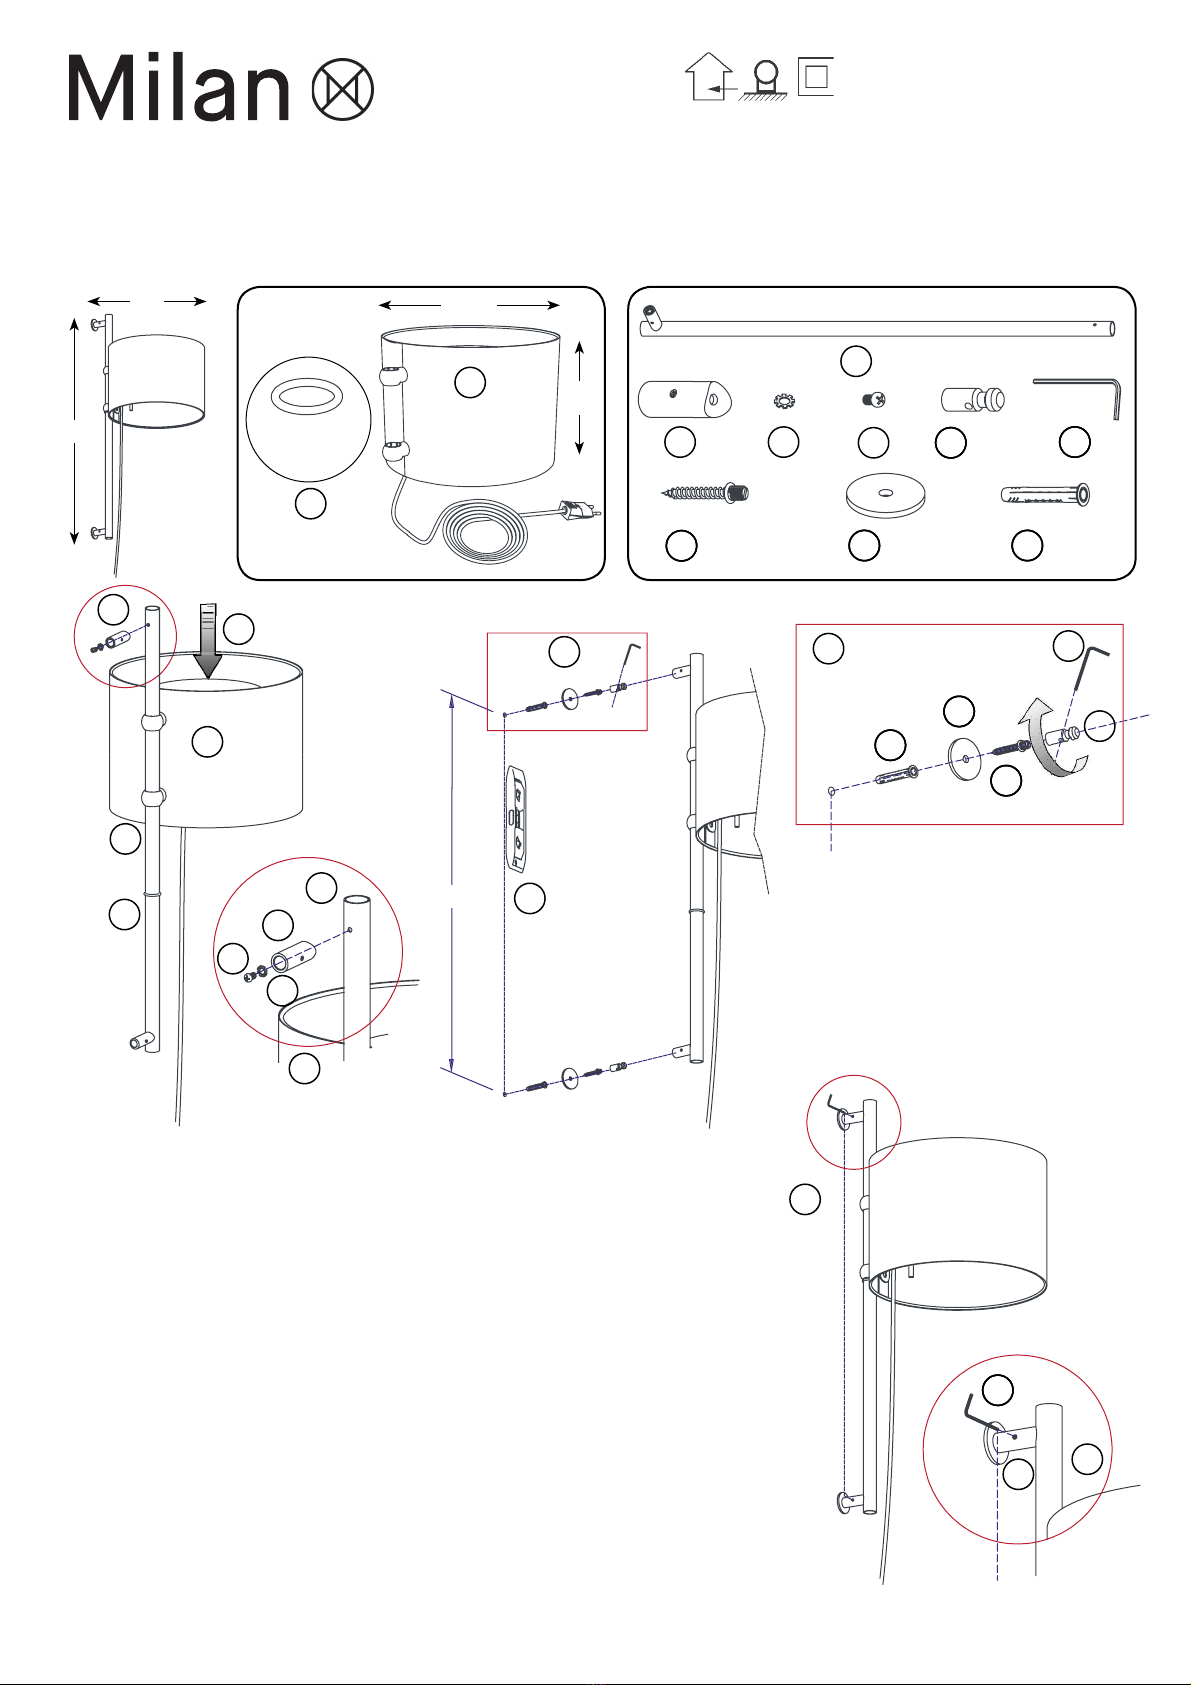
1Utilizando el accesorio ( Cod. 3904, 3905 ), Introducir primero
el anillo de goma (C) por el extremo del tubo (T), que servirá para
mantener la pantalla (D) a la altura deseada. Posteriormente introdu-
cir los ojales de la pantalla (D) por el extremo del tubo (T).
1 Using the accessory (Cod. 3904, 3905), fi r st insert the rubber
ring (C) through the end of the tube (T), which will serve to keep
the screen (D) at the desired height. Then insert the eyelets of the
screen (D) through the end of the tube (T).
2Ensamblar los componentes (F), (G), (S), en el tubo (T) .
2 Assemble the components (F), (G), (S), in the tube (T).
3 Realizar los agujeros sobre la superficie de montaje (560mm.),
con la mayor exactitud posible con la ayuda de útiles de nivel
o plomada.
3 Drill the holes on the mounting surface (560 mm.) As accurately as
possible with the help of level or plumb tools.
D
2
F
4Introducir los tacos de expansión (P), e iniciar el
montaje de las piezas (W) y (E) con un destornillador
hasta quedar asegurado. Posteriormente roscar
(R) sobre (E) y apretarlo haciendo pasar (K) por el
orificio para ayudarnos a realizar fuerza.
4 Insert the expansion plugs (P), and start assembling
parts (W) and (E) with a screwdriver until they are
secure. Then screw (R) over (E) and tighten it by
passing (K) through the hole to help us make force.
5Aproximar e introducir el conjunto de
tubo (T) hacia los conjuntos instalados en
la superfi c ie de instalación del paso (4), y
apretar los tornillos escondidos en el in-
terior de la pieza (F), con la llave allen (K).
5 Approach and insert the tube assembly
(T) towards the assemblies installed on
the installation surface of step (4), and
tighten the screws hidden inside the part
(F), with the key allen (K)..
Ref. 6904
T
This manual suits for next models
2
Popular Lantern manuals by other brands


KYOWA
KYOWA KW-9107 instruction manual

KYOWA
KYOWA KW-9135 instruction manual

Winsome house
Winsome house WHSL446 Instruction, Use & Care Manual

Smart Solar
Smart Solar Chameleon Solar Stake Series instruction manual

Finelite
Finelite HP-6 Recessed Flush Diffuser Tech Zone 6"... installation instructions

LUXX LIGHTING
LUXX LIGHTING LUX-200-277-80 user manual


