Milky 17597 User manual

1
de BETRIEBSANLEITUNG
OPERATING INSTRUCTION
NOTICE D’UTILISATION
en
fr
MILCHZENTRIFUGE FJ 90, FJ 130 EPR, FJ 130 ERR
CREAM SEPARATOR FJ 90, FJ 130 EPR, FJ 130 ERR
CENTRIFUGEUSE À LAIT FJ 90, FJ 130 EPR, FJ 130 ERR
JANSCHITZ GmbH |Eisenstraße 81 | A-9330 Althofen
T: +43 4262-2251-0 | F: +43 4262-2251-13
230 V - Type 17597
115 V - Type 17597-115
230 V - Type 17602
115 V - Type 17602-115
230 V - Type 17598
115 V - Type 17598-115

12
en CONTENT
General safety recommendations
Technical Specifications
Unpacking and Set Up
Accessories
Assembling Procedure
Top Bowl assembling Procedure
Skimming Procedure
Skimming Regulation
Maintenance and Cleaning
Top Bowl cleaning procedure
List of composing parts
List if composing parts top bowl
Spare parts ordering Procedure
Warranty
Page
13
14
14
14
15
16
16
17
17
18
19
20
21
21
Dear Customer!
We are happy, that you have chosen Milky. We hope, that our device will serve you
as a helpful tool for a long time without any problems. We would be happy, if you
could recommend us to your friends.
Version: December 2018
1313
GENERAL SAFETY RECOMMENDATIONS
BEFORE ANY INSTALLATION, READ THIS MANUAL VERY CAREFULLY.
MAKE SURE, THAT YOU HAVE CLOSED TOP BOWL FIXING NUT TIGHTLY.
DISCONNECT DEVICE FROM MAINS BEFORE CLEANING.
DON’T REPAIR THE DEVICE BY YOURSELF, IN CASE OF MALFUNCTION RATHER
CALL AUTHORIZED SERVICE PROVIDED BY YOUR DISTRIBUTOR.
TAKE CARE THAT WATER OR HUMIDITY WILL NOT COME INTO THE DEVICE,
ESPECIALLY BY CLEANING PROCEDURES.
IN CASE OF SERIOUS MALFUNCTIONS, UNPLUG THE DEVICE FROM MAINS AND
CALL AUTHORIZED SERVICE.
IN CASE, THAT THE DEVICE IS NOT FUNCTIONING PROPERLY, EVEN YOU HAVE
EXACTLY FOLLOWED INSTRUCTIONS DESCRIBED IN THIS MANUAL, YOU ARE
ALLOWED TO USE ONLY THOSE PROCEDURES, WHICH ARE ALLOWED BY THE
USER MANUAL. USE OF ANY OTHER PROCEDURES OR ADJUSTMENTS COULD
RESULT IN DEVICE DESTRUCTION OR LONGER SERVICE TIME. INJURIES CON-
NECTED WITH SUCH PROCEDURES CANNOT BE MATTER OF ANY PRODUCT
LIABILITY CLAIMS.

14
Recommended skimming capacity is volume of the milk that can be skimmed within one
skimming cycle. It depends how much solid parts are in the milk. If the flow of the skim-
med milk is reduced than the discs and the bowl must be cleaned.
UNPACKING AND SET UP
Take the device out of the cardboard box and remove packing inserts. Place it on the plain
and stable surface in clear and dry place. Fixing the device on the surface is recommen-
ded. If you want to fix it on the surface, take the screws and fix it on the surface.
ACCESSORIES
In each package you will find also following accessories:
• Operating Manual
• Cleaning brush 371067
• Key for bowl fixing nut and cream screw 3712069
• Spare rubber washer 3711033
• Screws
Please note!
Be careful and do not use the cream separator with damaged mains cord!
Be careful, that the socket is not damaged!
Item MZF FJ 90 MZF FJ 130
Operating Voltage (model 230V) V / Hz 230 / 50 230 / 50
Operating Voltage (model 115V) V / Hz 115 / 60 115 / 60
Motor Power W 70 70
Max. Rotating speed RPM 9500 9500
Max. Capacity l / h 90 130
Max. Container capacity l 12 10
Recommended capacity for skimming l to 60 to 100
Relief disc pcs 7 11
Plain disc pcs 6 10
Net weight kg 3,50 4,70
Protection type IP 23 IP 23
TECHNICAL SPECIFICATION

15
HOW TO ASSAMBLE THE CREAM SEPARATOR
1. Put the housing on a desk or other plain and stable surface.
2. Put assembled top bowl on the conical motor beam and softly press it.
3. Put skimmed milk outlet on the top and then also cream outlet on the top of
the housing
4.
Turn top bowl with hand and check if nothing is touching the outlets. Adjust the outlets to
the desired position for skimming.
5. Put the container holder on the cream funnel (outlet). The floater is placed in the con-
tainer holder. The container is placed on the container holder (please see picture below)
Fixing hooks are only available in FJ 130
6.
Place closing cork in the hole situated in the middle of milk container. The narrow side of
the closing cork handle must be turned away from the cut in the container (see picture). The
milk outflow will be closed.
WHEN FILLING THE CONTAINER WITH MILK, THE CLOSING CORK MUST BE
CLOSED! THE THIN PART OF THE CLOSING CORK MUST POINT TO THE NOTCH IN
THE CONTAINER.
Fixing parts with rubber holder (detail). Only on FJ 130

16
SKIMMING PROCEDURE
Best skimming results are achieved, when starting to skim immediately after milking. If
milk is cooled, warm it up to a temperature between 30 to 35 ºC. Milk cannot be skimmed
with temperature lower 30 °C. When the milk is properly warmed up, pour it in the
container.
• Switch on cream separator with switcher 0 / I and wait 30 seconds. The top bowl will
by then have reached the right speed. Cream separator FJ 130 has above the switcher a
signal lamp which, by switching on the separator, shines red, and when machine reaches
working speed starts to shine green.
• Only when the LED shines green, open the closing cork by turning it into the opening
position. The end of the closing cork is turned to the cut (tooth) in the container and flow
is opened.
If milk is coming out of the housing holes, it means:
• You have opened the closing cork before the motor has reached working speed.
• Top bowl nut was not fixed enough.
• Rubber washer is placed badly, or it is destroyed.
When this is the case, close the closing cork, turn the milk separator OFF and correct the
problem.
CLOSING CORK MUST ALWAYS BE CLOSED BEFORE TURNING OFF THE DEVICE!
AFTER FINISHING THE PROCESS, CLEAN AND DRY THE DEVICE CAREFULLY!
TOP BOWL ASSEMBLING PROCEDURES
1. Put the rubber washer into the notch of top bowl bottom part.
2. Place the metal discs in the top bowl. Take care with the placement of the
discs - device uses two different types of disks - plain and relief discs. First,
insert relief disc, then plain disc and repeat the procedure until all discs are
placed. Avoid any use of strength while placing the discs. With gently shaking
and turning of the top bowl bottom part all the discs will find their place very
easily.
3. Put plastic partition in the top bowl cover part.
4. Place the two parts (top and bottom part) of the top bowl together. Take
care that top bowl top part marked with ˝0˝ and top bowl bottom part ˝0˝
are in the same place and direction.
5. Screw the top bowl fixing nut with hand and fix it strongly with the fixing
key. The mark ˝0˝ must stay in the same direction.
The fixing nut must be strongly fixed, because it is
exposed to high forces.
3 Plain disc
4 Relief disc
17
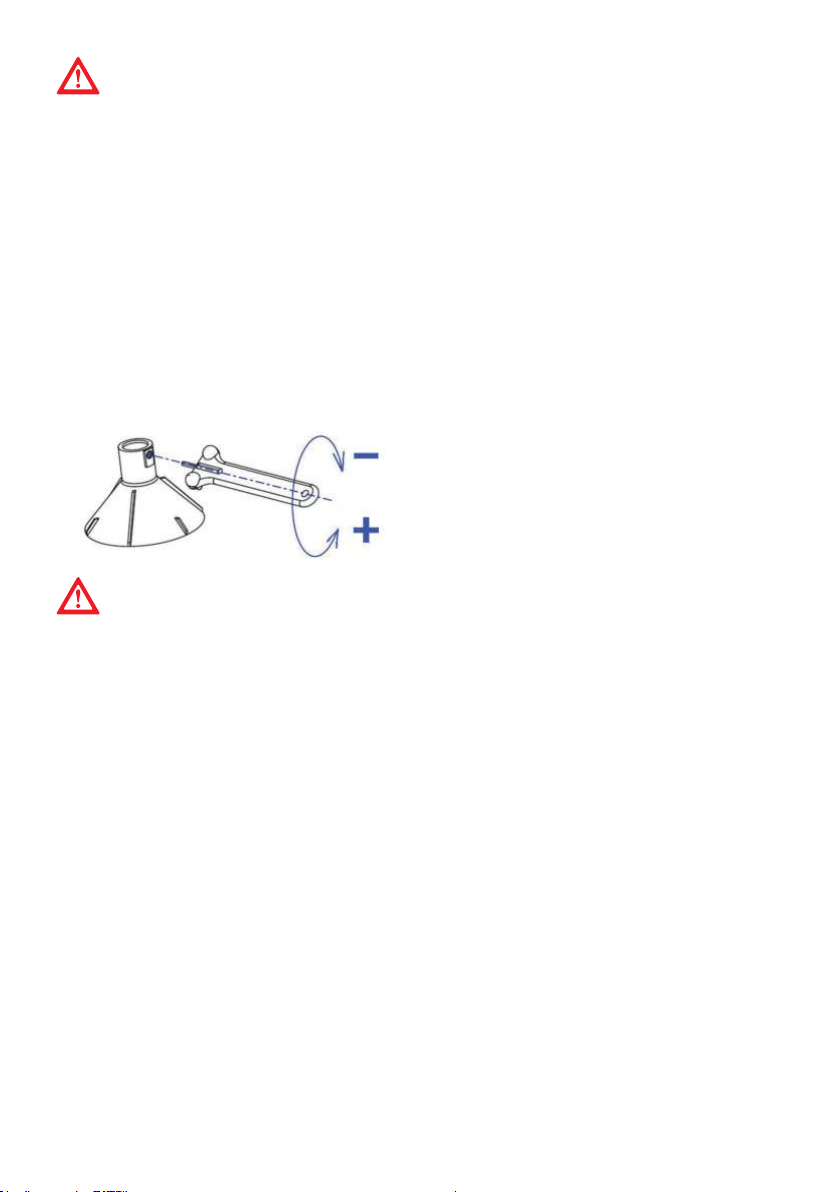
SKIMMING REGULATION
The cream separator is factory adjusted with around 10 % of cream from whole milk volume
at milk temperature 35 °C. It is possible to adjust this percentage due to different conditi-
ons like density or volume of cream. Adjust hexagonal adjusting cream screw by turning it
(placed in the plastic partition in top bowl upper part).
• For more density cream – less volume, turn it towards right (clockwise)
• For less density cream – higher volume, turn it towards left (counter clockwise). In most
cases it is enough to turn the adjusting screw for ¼ of the rotation.
Cream adjusting screw details and function
TAKE CARE, NOT TO FIX THE ADJUSTING CREAM SCREW TOO DEEP. THIS CAN
CAUSE HARM TO THE SCREW COIL. DON’T UNSCREW THE REGULATION SCREW
TOO MUCH. THIS CAN CAUSE PROBLEMS WITH DISASSEMBLING THE PLASTIC
PARTITION AND THE TOP BOWL UPPER PART.
PLEASE NOTE! After you have finished skimming, pour approximately 1/2 l of skim-
med milk back into milk container. This will clean the rest of cream in the top bowl.
After all procedures are finished, simply turn OFF the device and wait until motor
stops. Always check, whether the rubber washer is damaged or too much exten-
ded. In such cases please replace it with a new one.
- less cream volume and higher cream density
+ higher cream volume and less cream density
MAINTENANCE AND CLEANING
• All parts of the top bowl should be cleaned with hot water with some detergent.
• Rests of milk, cream or other impairs should be cleaned with soft duster or cleaning
brush. Especially take care to clean very precisely all the holes in top bowl upper part,
top bowl bottom part and in adjusting screw. For cleaning these parts, a cleaning brush
is strongly recommended! Other parts of the separator, which come in touch with milk,
should also be cleaned with hot water in which a detergent is added. Then rinse parts in
clean water.
• If milk or cream rests get dry, do not remove them with sharp objects or sharp duster. It
can easily happen, that the galvanic protection cover or plastic parts are damaged.
• Before cleaning cream separators housing, disconnect device from mains. Clean it first
with wet duster and then try it with dry duster. Take care, that water doesn’t come into
the device.
Ensure, that no water comes in contact with the motor and other electric parts.
The device is protected against direct water access, please take care and avoid, that
water comes into the device.
Before cleaning, always disconnect the Cream Separator from the mains supply.

18
IF IT IS NOT POSSIBLE TO MOUNT OFF THE TOP BOWL FROM THE MOTOR AFTER
SKIMMING, PLEASE SHAKE IT GENTLY.
PLEASE AVOID TO USE FORCE – IT CAN CAUSE HARM TO THE DEVICE AND MOST
OF THE PARTS.
TOP BOWL CLEANING PROCEDURE
With the key, which is packed with the cream separator, unscrew the top bowl fixing nut
as it is shown on the picture below.
The easiest way to perform this procedure is:
1. Fix key into the holes, which are on the top bowl fixing nut.
2. Press the key down and turn it until the fixing nut is released. It is
now possible to unscrew the fixing nut by hand.
3. Dismount the top bowl cover with the help of the key and separate
all different pieces, which are found under the cover - plastic partition,
metal discs and rubber washer. Clean them with hot water. To achieve
better results, cleaning detergent can be added to the hot water.
4. Wash all the parts with hot water and dry them with dry and
soft duster.
5. Never wash the discs in the dishwasher!
19
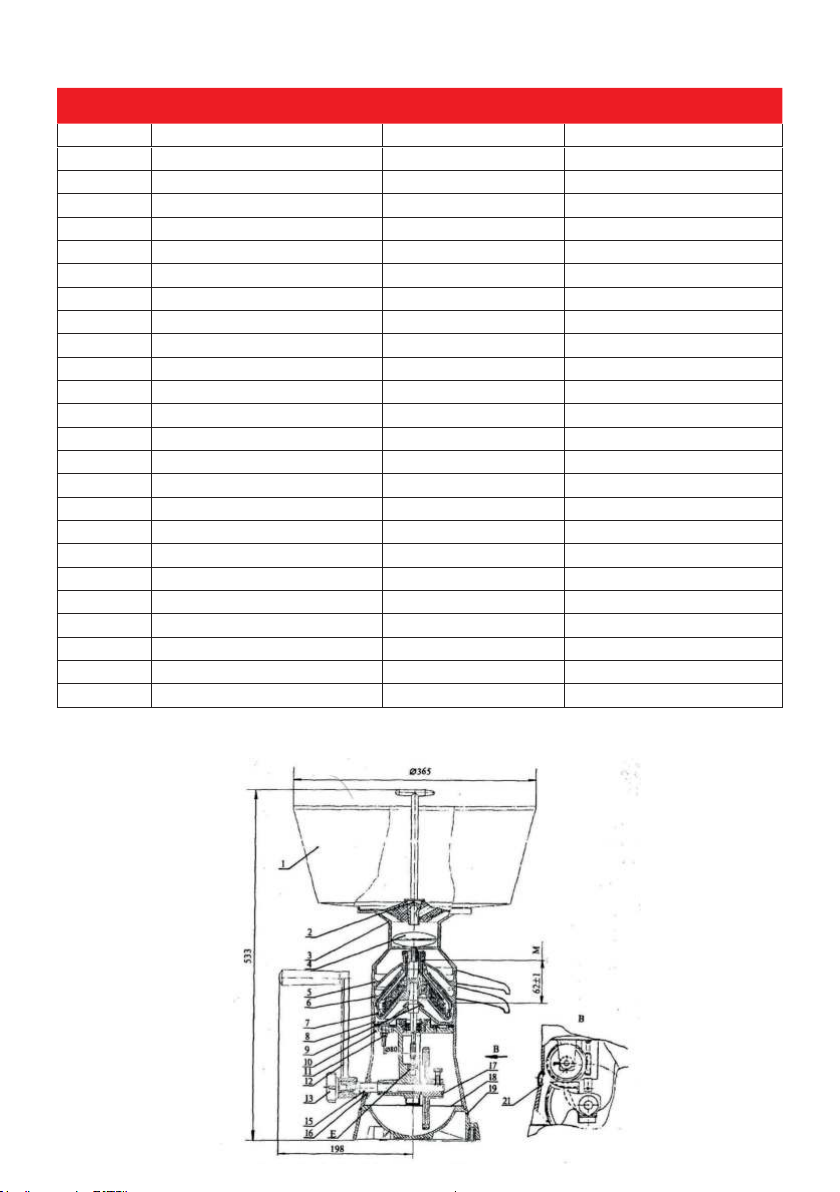
PART LIST
Name Part. no. MZF FJ 90 Part. no. MZF FJ 130
1 Foot 3711019 3711019
2 Bottom cover 3171017 3171017
3 Motor 230 V 17595 26000
3 Motor 115 V 17596 26001
4 Main switch 371151 371151
5 Cover of main switch 371153 371153
6 Housing - green 3712005-G 375005-G
6 Housing - blue 3712005-B 375005-B
6 Housing - silver 3712005-S 375005-S
7 Mains cord assembly 230 V 26002 26002
7 Mains cord assembly 115 V 26003 26003
8 Holder assembly / 375069
9 Bearing cover 3711013 3711013
10 Top bowl assembly 3712021-A 375021-A
11 Outlet for milk 3711037 375037
12 Outlet for cream 3711039 375045
13 Container holder inox / 35051
13 Container holder - green 3711041-G /
13 Container holder - blue 3711041-B /
13 Container holder - silver 3711041-S /
14 Floater inox / 375059
14 Floater plastic 3712045 /
15 Container 371051 375063
16 Container washer / 371055
17 Closing cork 3711061 3711061
DRAWING OF THE CREAM SEPARATOR
20
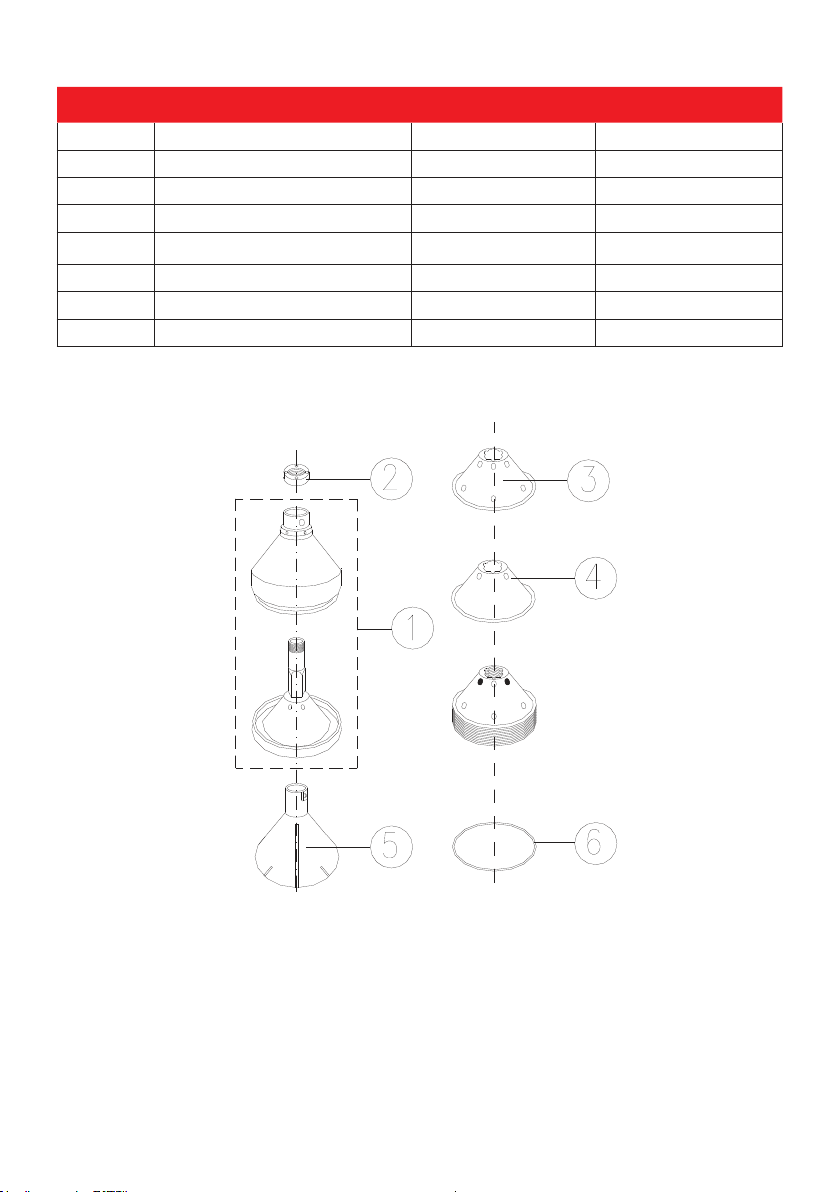
PART LIST TOP BOWL
Name Part. no. MZF FJ 90 Part. No. MZF FJ 130
1 Top bowl balanced 3712021-B 375021-B
2 Rubber washer 3711033 3711033
3 Metal disc relief 3711025 3711025
4 Metal disc plain 3711026 3711026
5 Plastic partition 3711029 3711029
6 Cream regulation screw 103444 103444
7 Fixing key 3712069 3712069
8 Cleaning brush 371067 371067

21
Changes and misprints reserved.
SPARE PARTS ORDERING PROCEDURE
Fast and reliable shipment of spare parts is only possible, if the description is clear
enough. At the time of ordering please state clearly:
• Type of cream separator.
• Serial number printed on the label plate at the bottom side of the device.
• Part name and code number of wished spare part.
WARRANTY
1. In case of troubles consult your distributer or call authorized service.
2. Equipment is warranted to be free from defects in material and workmanship for a period
of 12 months against faulty components and assembly. Our obligation under this warranty is
limited to the repair or replacement of the instrument or part thereof, which shall within 12
months after date of shipment prove to be defective after our examination.
3. Defects or injuries of the device, which are result of improper assembly, use, connect or
maintenance are not covered by this warranty.
4. The warranty also doesn´t cover:
a. Motor, destroyed by water or milk inflow,
b. Mains cord.
5. The given technical specifications are valid only when all conditions in this user`s manuals
are fulfilled.
6. Other rights, that are not mentioned in upper obligations of the manufacturer, especially
responsibility for personal injury, are excluded.
32
Janschitz GmbH
Eisenstrasse 81
9330 Althofen
AUSTRIA
Tel.: +43 4262 2251-0
Fax: +43 4262 2251-13
Email: office@janschitz-gmbh.at
www.janschitz-gmbh.at
This manual suits for next models
9
Table of contents
Popular Water Filtration System manuals by other brands

Philips
Philips AWP1808 user manual

amiad
amiad Filtomat MG-110P Installation, operation and maintenance instructions

Pentair
Pentair OMNIFILTER IN-FF-500-SG-QC-4 Installation and operation manual

LifeSource
LifeSource Premier Series owner's guide

norweco
norweco SINGULAIR BIO-KINETIC 960 owner's manual

Whirlpool
Whirlpool WHAROS5 user manual

Dover
Dover HYDRO AquaBlend Xtreme user manual

Pentair
Pentair EVERPURE EZ-RO 200/2G Installation & operation guide

Antunes
Antunes TAC-02 quick start guide

Watts
Watts E-Treat ETREATWCS Installation, operation and maintenance manual

GE
GE GNSV70RBL Owner's manual and installation instructions

Astral Pool
Astral Pool Combo 27413 Instruction and operation manual


