Milly Mally MAX Quick start guide

PL
KRZESEŁKO / CHAIR MAX
WYPRODUKOWANO ZGODNIE Z NORMĄ PNEN 14988
INSTRUKCJA
OBSŁUGI
OPERATIONAL
MANUAL
INSTRUKCJAINSTRUKCJA
OPERATIONALOPERATIONAL


LISTA CZĘŚCI / PARTS LIST
A
D
G
K
B
E
H
L
I
M
C
F
J

A
D
G
B
E
H
M
K
C
F
J
1

4
2
3

5
7
6

8
9

PL WAŻNE! ZACHOWAĆ W CELU
POWOŁANIA SIĘ W PRZYSZŁOŚCI!
LISTA CZĘŚCI
A Oparcie krzesełka
B Podstawa (siedzenie) krzesełka
C Bok krzesełka (prawy i lewy)
D Poprzeczka (x2)
E Blat
F Nogi (prawe i lewe)
G Górna tacka
H Poprzeczki łączące (x2)
I Sworznie łączące (x2)
J Podnóżek
K Dolna tacka
L Blokada
M Plastikowe nakrętki i śruby
MONTAŻ
KROK 1 Przykręć do lewej części stołu blat (E), dwie poprzeczki (D) i podnóżek (J).
Dokręć mocno plastikowymi nakrętkami (M) tak jak na rysunku, tak samo
dokręć prawą nogę.
KROK 2 Ustaw oparcie krzesła z podstawą tak aby połączyć sworzniem łączącym (I)
KROK 3 Przykręć dwie poprzeczki łączące (H) do lewego boku krzesełka (C)
Umieść skręcone siedzisko i połącz mocno nakrętkami (M) jak na rysunku,
zamontuj tak samo prawą nogę .
KROK 4 Włóż krzesło na cztery otwory stolika, jak pokazano na obrazku
KROK 5 Przeciągnij klamerkę pasów bezpieczeństwa nad siedzisko krzesełka i boczne
klamry zepnij z tym pasem.
KROK 6 Włóż górną tackę (G) w dolną (K) i zabezpieczając blokadą (L). Dopasuj dwa
otwory regulacji tacy do rowków podłokietnika z krzesła.
Montaż regulowany tacki na posiłki
KROK 7 Tacka ma trzy-stopniową regulację. Zwolnij przycisk po obu stronach tacki
oraz wysuń z podłokietników aż przycisk zatrzaśnie się w rowku podłokietnika.
Rozdzielenie krzesła i biurka
KROK 8 Podnieś krzesło do góry i postaw przed blatem
Regulacja siedziska
KROK 9 Trzy pozycje regulacja siedziska. Kąt pochylenia oparcia można regulować
przy zaciśnięciu na tylnym oparciu siedziska przycisku regulacji.

OSTRZEŻENIA
1) Nadaje się dla dzieci do maksymalnej wagi 18 kg, które samodzielnie siedzą.
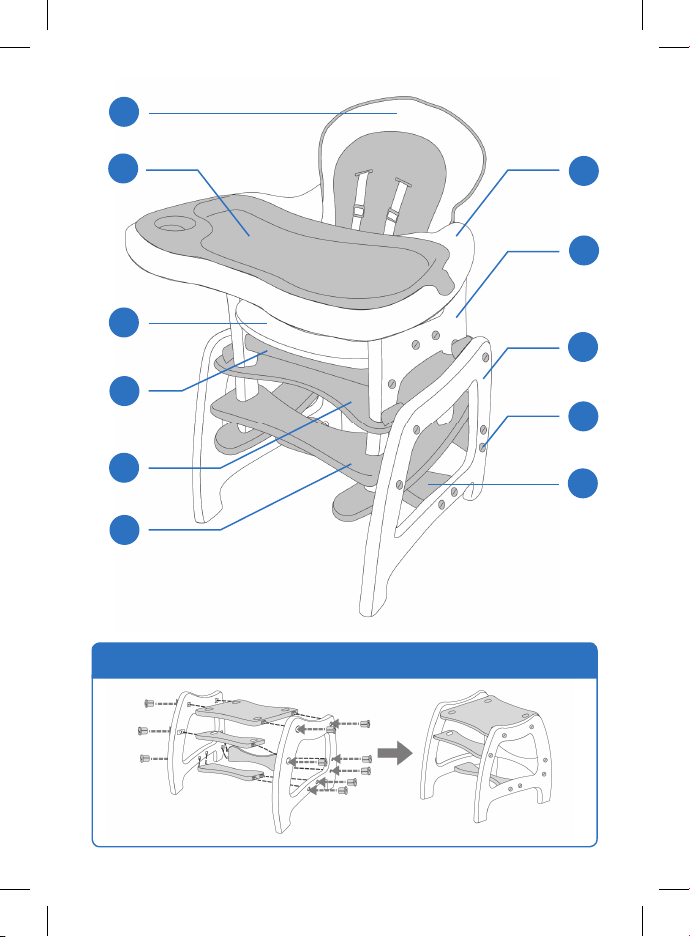
2) Krzesełko można rozłożyć na krzesło i stolik, dla dzieci od 3 lat
3) Krzesełko składać może tylko i wyłącznie osoba dorosła.
4) Krzesełka nie należy używać dopóki dziecko nie potrafi samodzielnie siedzieć.
5) Nie używaj w niebezpiecznych miejscach (schody, ogień, basen).
6) Nie pozostawiać dziecka bez opieki.
7) Nie używać tego wysokiego krzesełka, zanim wszystkie jego części nie zostaną
prawidłowo dopasowane i wyregulowane.
8) Wyrobu wolno używać tylko zgodnie z niniejszą instrukcją.
9) Należy upewnić się, czy uprząż jest prawidłowo dopasowana.
10) Nie używaj krzesełka niekompletnego lub uszkodzonego.
11) Nakrętki należy dokręcać z umiarkowaną siłą aby nie zerwać gwintu na śrubach.
12) Ustawienie wysokiego krzesełka w bezpośredniej bliskości otwartego płomienia i innych
źródeł silnego ciepła, takich jak grzejniki elektryczne, grzejniki gazowe itp. – Grozi
niebezpieczeństwem!
13) Nie wolno zbyt mocno dociskać tacki do dziecka, należy pozostawić przestrzeń
tna swobodne oddychanie.
14) Nie wolno pozwalać dziecku na wstawanie w krzesełku.
15) Dziecko powinno być zabezpieczone w krzesełku za pomocą pasów bezpieczeństwa
CZYSZCZENIE
Czyścić miękką, wilgotną ściereczką z dodatkiem łagodnych środków czyszczących. Nie
używać chloru, nie prać w pralce, nie prasować, nie suszyć mechanicznie. Nie wystawiaj
tapicerki na zbyt długie, bezpośrednie działanie promieni słonecznych może
spowodować utratę koloru

IMPORTANT! READ CAREFULLY
PLEASE KEEP FOR FUTURE REFERENCE!
PARTS LIST
A Seat Backrest
B Chair Base
C Right and Left Chair Arm
D Table link bars (x2)
E Table Base
F Right and left Leg
G Top Tray
H Chair link bars (x2)
I Connecting Pin (x2)
J Footrest
K Tray
L Safety Fixed Block
M Plastic Nuts + Screws Driver
ASSEMBLING PROCEDURES
STEP 1 insert table base, fixable bar into matching holes of left leg. Tight plastic nuts
at relevant holes as the way shown, tight firmly until the same with right leg.
Please be aware of all the projections of table base and fixable bar should
match the holes in right and left leg. Fix plastic nuts tightly.
STEP 2 Align the seat back to connect with the chair base, insert the connecting pin.
STEP 3 Insert footrest and chair base into matching holes of left chair arm. Tight
plastic nuts at relevant holes as the way shown, tight firmly until the same
with right chair arm. Please be aware of all the projections of chair base and
foot rest should match the holes in right and left chair arm. Fix plastic nuts
tightly.
STEP 4 Insert the chair into four holes of table. Finished as picture shown.
STEP 5 Pull strap buckle on chair base out of the seat cushion; Snap all the safety
buckles into strap buckle on chair base.
STEP 6 Insert safety fixed block into the back side of adjustable meal tray. Snap
washable top tray onto the sides of the adjustable meal tray. Align two slots
of adjustable meal tray to the grooves of the armrests of chair. Installation
complete.
How to Assembling Adjustable Meal Tray
STEP 7 The adjustable meal tray has a three-position adjustment. Release buttons
on each side underneath the adjustable meal tray. Slide the tray onto the
armrests. Adjust until the release buttons snap into innermost grooves of the
armrest.
EN

How to Separate the Chair and Desk
STEP 8 Take out the chair. Put the table in front position.
How to Adjust Seat Back
STEP 9 Three-position adjustment seat back. The seat back angle can be adjusted
while pulling up the seatback adjustment button.
WARNINGS
1) Scope of application: It is suitable for children up to the maximum weight 18 kg,
which are able to sit alone.
2) Chair can be broken down into a chair and table, for children from 3 years.
3) Adult assembly required.
4) Do not use the highchair until you baby can not sit alone
5) Never use near stair, fire, swimming pools or any other areas that are not safe.
6) Do not leave child unattended
7) Not to use the highchair until all its parts are not properly aligned and adjusted
8) Use this product only as described in the instructions.
9) You should make sure the harness is properly adjusted
10) Do not use the convertible high chair if any of the parts are missing or broken.
11) Only use the spare pieces that are supplied by the retailer.
12) Be aware of risks related to open fire and other sources of strong heat radiation
such as electric or gas radiators etc. placed in the vicinity of chair.
13) Do not press the tray to closely to the child’s body. Leave enough space
for the child for breathe.
14) Do not allow the child to stand up in the high chair.
15) Child shall be protected inside the high chair using belts (safety harness)
CLEANING
Wash the upholstery with wet cloth with soap or other mild washing agent. Never wash
the upholstery in washing machine no whirl and tumble dry! Do not iron the upholstery
parts! Do not dry clean! Never apply bleachingagents! Exposing the upholstery to direct
sunlight for long period of time, may cause discoloration of the material.

PL
Milly Mally s.c
Marcin Napert,
Paweł Soszyński
Łukówiec 98
05-480 Karczew
Poland
00 48 (22) 394 09 94
info@millymally.pl
www.millymally.pl
Other manuals for MAX
1
Table of contents
Other Milly Mally Indoor Furnishing manuals
Popular Indoor Furnishing manuals by other brands

Drive DeVilbiss Healthcare
Drive DeVilbiss Healthcare GRAVIMED SIMPLEXX Instructions for use

Wren Kitchens
Wren Kitchens Vogue WALL BASE UNIT 700 WALL Assembly guide

Wilding Wallbeds
Wilding Wallbeds Brittany installation instructions

Furniture of America
Furniture of America CM6412-CH Assembly instructions

Allen + Roth
Allen + Roth FELIX 24VG installation manual

Zanzini
Zanzini 09130203 Assembly instructions