MIMAKI OPT-J0536 User manual

MIMAKI ENGINEERING CO., LTD.
https://mimaki.com/
https://japan.mimaki.com/
English
Japanese
Foreword ................................................................... 2
Safety Precautions ................................................... 3
Warning labels .......................................................... 5
Use the heater ........................................................... 7
Heater related error .................................................. 8
Specification ............................................................. 8
はじめに ................................................................... 10
安全にお使いいただくために ................................... 11
警告ラベルについて ................................................. 13
ヒーターを使う ......................................................... 15
ヒーター関連エラー ................................................. 16
仕様 ........................................................................... 16
D203669-10
OPT-J0536 OPT-J0537 OPT-J0538 OPT-J0539
Additional heater option
追加 ヒ ー タ ー オ プ シ ョ ン

2
Foreword
Congratulations on your purchase of the additional heater option.
This operation manual
• This manual explains the operation of the 10kg ink unit.
• Read and fully understand this operation manual before using this machine. It is also necessary to keep this operation
manual on hand.
• Make arrangements to deliver this operation manual to the person in charge of the operation of the 10kg ink unit.
• Although this operation manual has been carefully prepared for your easy understanding, please do not hesitate to con-
tact your local distributor if you have any inquiry.
• The contents of this operation manual are subject to change for improvement without notice. Please note.
• If this manual should become illegible due to damage, or is destroyed due to fire or similar reason, purchase another copy
of the operation manual at our sales office.
CAUTION
THIS LIMITED WARRANTY OF MIMAKI SHALL BE THE SOLE AND EXCLUSIVE WARRANTY AND IS IN LIEU OF ALL
OTHER WARRANTIES, EXPRESS OR IMPLIED, INCLUDING, BUT NOT LIMITED TO, ANY IMPLIED WARRANTY OF MER-
CHANTABILITY OR FITNESS, AND MIMAKI NEITHER ASSUMES NOR AUTHORIZES DEALERS TO ASSUME FOR IT ANY
OTHER OBLIGATION OR LIABILITY, OR MAKE ANY OTHER WARRANTY, OR MAKE ANY OTHER WARRANTY IN CON-
NECTION WITH ANY PRODUCT WITHOUT MIMAKI'S PRIOR WRITTEN CONSENT.
IN NO EVENT SHALL MIMAKI BE LIABLE FOR SPECIAL, INCIDENTAL OR CONSEQUENTIAL DAMAGES, OR FOR LOSS
OF PROFITS OF DEALER OR CUSTOMERS OF ANY PRODUCT.
Reproduction of this manual is strictly prohibited.
© Mimaki Engineering Co., Ltd.
All Rights Reserved.Copyright

3
Safety Precautions
Symbols
In this document, symbols are used for explaining the contents of cautions on operation. The symbol to be displayed differs
depending on the caution content. Understand the meaning of each symbol and use this machine safely and correctly.
Examples of Symbols
Cautions on Installation
Meaning
WARNING Failure to observe the instructions given with this symbol can result in death or seri-
ous injuries to personnel. Be sure to read it carefully and use the printer properly.
CAUTION Failure to observe the instructions given with this symbol can result in minor or
medium injuries to personnel.
GENERAL WARNING This symbol indicates that the items shown need to be noted. Specific notes are
drawn in the figure.
GENERAL MANDATORY
ACTION This symbol indicates that the action shown must be executed. Specific instruction is
shown in the illustration.
GENERAL PROHIBITION This symbol indicates that the action shown is prohibited. Specific action that is pro-
hibited is shown in the illustration.
IMPORTANT Important notes for the use of this unit are given with this symbol. Refer to the oper-
ation.
HINT Useful information is given with this symbol. Refer to the operation.
REFERENCE This symbol indicates the reference page for related contents. Click the text to dis-
play the corresponding page.
Caution
Do not install in the following locations
• A location exposed to direct sunlight.
• On an inclined surface.
• A location that vibrates.
• A location exposed to a direct air flow from an air con-
ditioner, etc.
• Around a location where fire is used.
• A location where the temperature or humidity
changes significantly. (The recommended usage
environment differs depending on the connected
printer. Confirm by referring to the operation manual
of the printer)

4
Warning for Use
Precautions
Warning
Power supply precautions
• Use the power cable provided. Otherwise there is a risk of failure, electric shock, or fire. Do not use the power cable with
other electronic devices.
• Always grasp the plug when unplugging the power cable. Pulling on the power cable itself may damage the cable and result
in failure, electric shock, or fire.
• Do not use the power plug with dust on it. Otherwise there is a risk of failure, electric shock, or fire.
• Avoid touching the blade of the power plug with a metal object. Otherwise there is a risk of failure, electric shock, or fire.
• Do not attempt to modify the cable. Avoid damaging the cable. Avoid placing heavy objects on the power cable or pulling on
or exposing the cable to heat. Doing so may damage the cable, resulting in electric shock or fire.
• Do not use extension cords or multi-outlet extension cords. Otherwise there is a risk of failure, electric shock, or fire.
• Do not use if the power cable appears to be damaged or the core wire
• Do not handle the power plug with wet hands. Disregarding this precaution may result in electric shock.
• Plug the power cable plug into a grounded power outlet. Otherwise there is a risk of failure, electric shock, or fire.
• When installing electrical outlets, perform grounding work to prevent electric shock accidents. All electrical work (Class C
grounding work; formerly Type 3 grounding work) must be handled by a licensed electrician.
Caution
Power Supply
• Use this machine with a power supply that meets specifications.
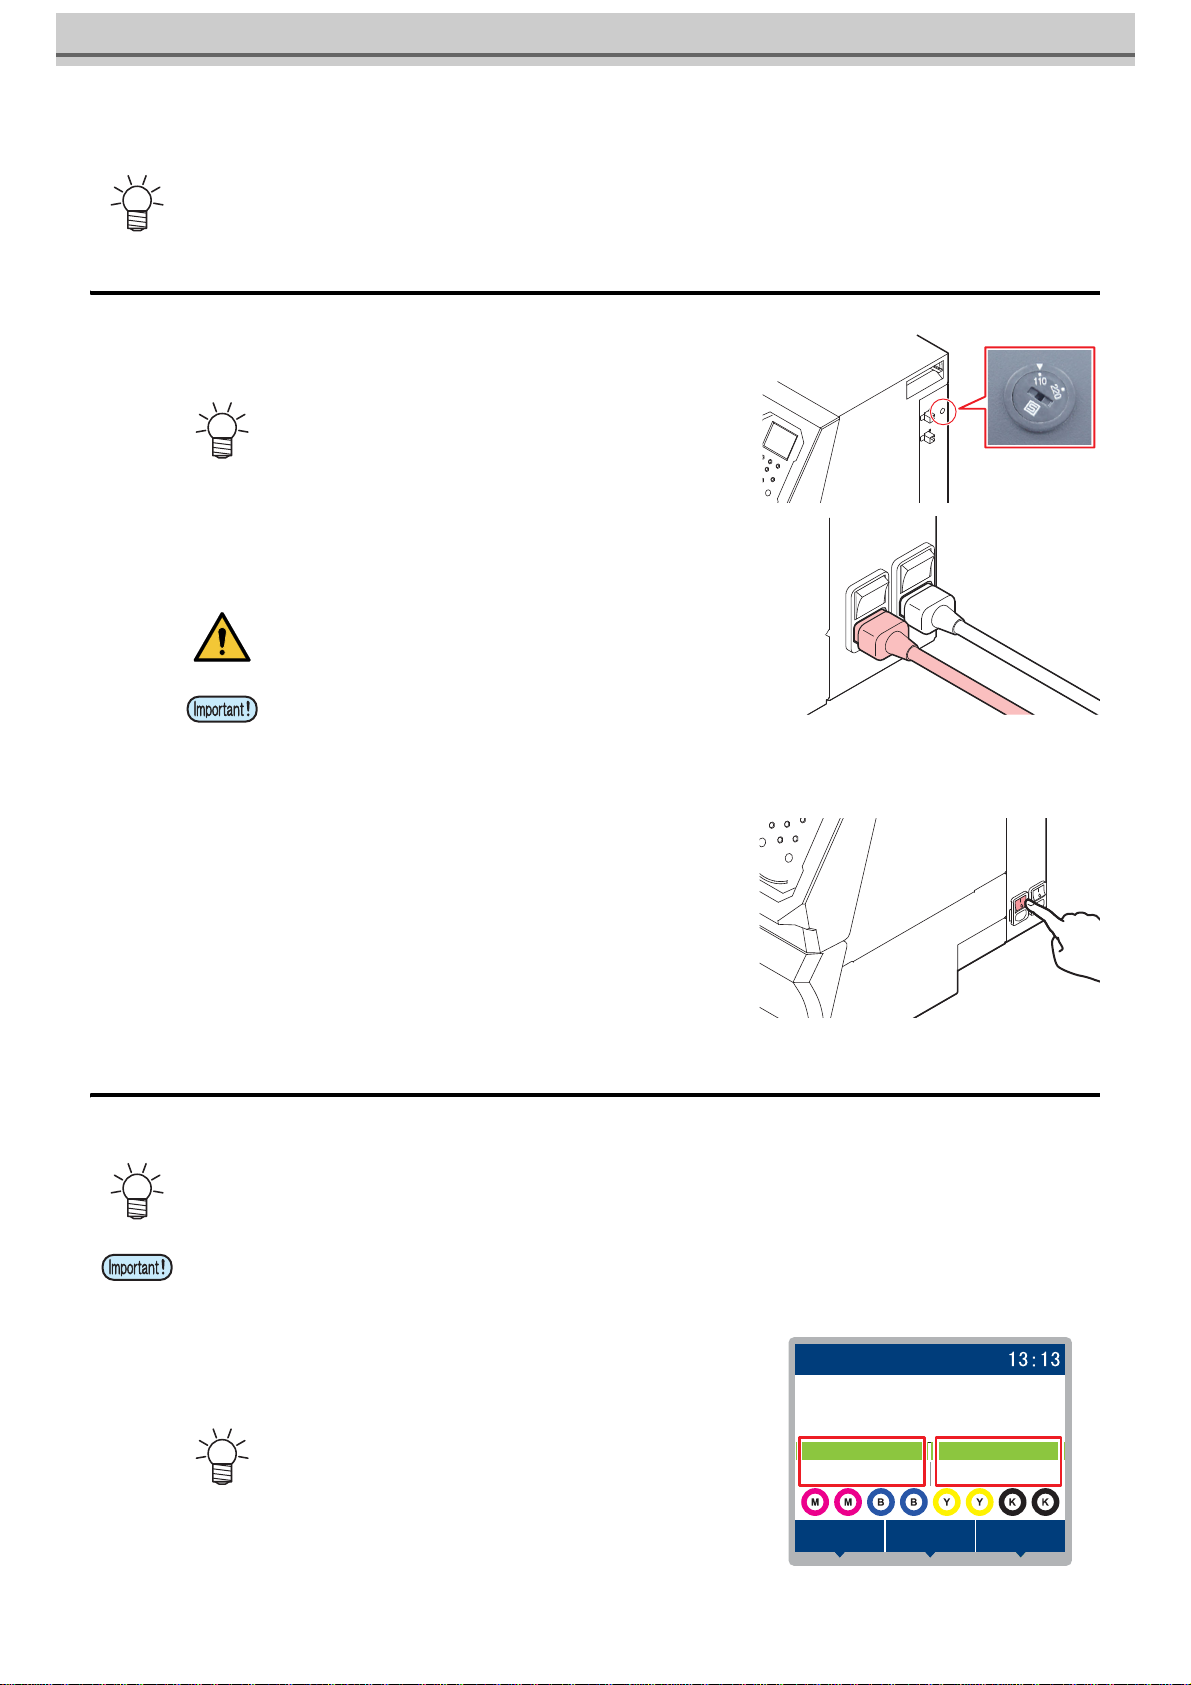
• Be sure to plug the power cable into a power outlet close to the machine. Insert the power plug blade securely.
• When connecting the power cable, check the input voltage of the power outlet and the capacity of the breaker. Also, con-
nect each cable to a separate power source with an independent breaker. Connecting to power outlets linked with the same
breaker may trip the breaker.
Heater • Do not spill liquid on the Media Transfer Surface as this may cause failure of the heater or firing.
• Do not touch heaters with bare hand while it is hot, otherwise, you can get burned.
• Do not spill liquid on the Media Transfer Surface as this may cause failure of the heater or firing.
• Do not touch heaters with bare hand while it is hot, otherwise, you can get burned.
• Condensation may form on the print head nozzle surface depending on the ambient temperature and humidity.The forma-
tion of condensation may cause ejection failures (e.g., nozzle clogging or deflection). Perform head cleaning if any ejection
failures (e.g., nozzle clogging or deflection) occur during printing. Set the print heater to a temperature not exceeding 35 °C,
and ensure that the ambient temperature is within the permissible operating temperature range (20 °C to 30 °C).

5
Warning labels
Warning labels are stuck on the machine. Be sure to fully understand the warning given on the labels.
If a warning label is illegible due to stains or has come off, purchase a new one from a distributor or our sales office.
3
4
7
5
2
2
3
6
1
1
8
9
9
9
11
10
Maintenance cover is open.
Around carriage

6
No. Order No. Label
1M910931
2M907833
3M903330
4M903405
5M907935
6M905811
7M913419
8M905935
9M903239
10 M906031
11 M910966

7
Use the heater
Turn on the heater
1Switch the voltage selector switch to the voltage
value to be used.
2Check the power cable is plugged into the heater
dedicated inlet to the UCJV300.
• In the foreground is the inlet for the heater (INLET2).
3Turn heater power switch ON.
• In the foreground is the power switch for the heater. Turn it to the "I" side.
Setting the Heater Temperature
Set the heater temperature according to the media you are using.
1Press the [ENTER] key to cancel the message dis-
play.
• The Heater Temperature Setup screen appears.
• PRE (Pre-heater): Preheats the media before printing to suppress rapid temperature change.
• PRINT (Print heater): Helps prevent ink bleeding.
• The factory default setting is "220".
• Use only the accessory power cable.
• Connect the power cable to a power outlet near the unit so that
it can be easily routed.
• Connect the plug of the power cable to an outlet with grounding
polarity. Failure to do so may result in a malfunction of the unit,
electric shock, or fire.
• The temperature can be changed even during printing.
• Depending on the ambient temperature, it may take several minutes to several tens of minutes to reach the set heater tem-
perature.
• This printer should be used in an ambient temperature of 20°C~30°C. Depending on the operating environment and printing
conditions, the heater temperature may not rise to the set value.
• In the factory default setting, the heater setting temperature is
displayed as "- - -" and the heater is turned off.
• If [HEATER] is not displayed, press the [SEL] key to switch the
function.
REMOTEMENU TEST PRINT
CLEANING
30°/40°
DATA CLEARADJUST HEATER
PRE PRINT
40°/ 40°40°/ 40°
Local <Setup 1>

8
2Enter the temperature for each heater and press the [ENTER] key.
• Press key, and set the temperature for each heater. (Set value: OFF / 20~70 ℃)
Selecting a heater: Press key.
Setting a temperature: Press key.
• Heater icon on the operation panel turns green if the heater temperature reaches the set value.
3Press the [ENTER] key to complete.
• Exit the Heater Temperature Adjustment screen and return to Local.
Heater related error
If an error occurs in the heater option, a warning message will be displayed. When an abnormality occurs, take the following
actions.
Specification
Refer to UCJV150/300 series for other specifications.
• Printing is possible once the heater temperatures reach the
temperature settings ±3 °C.
• The heater temperature can also be changed from the setup
menu.
• The temperature can be changed while printing is in progress,
but this may cause color variations to occur.
Display Cause Measures
702
THERMISTOR CONNECT The thermistor connection of a heater
is defective.
• Turn off the power on the machine and turn it on after a while.
• When displaying again, contact your local distributor, our sales
office, or service center.
710
HEATER TEMP ERROR
The temperature abnormality of the
heater has been detected.When this
error occurred and if the temperature
abnormality cannot be resolved, the
power supply of the machine is forcibly
turned off.
• Turn off the power on the machine and turn it on after a while.
• When displaying again, contact your local distributor, our sales
office, or service center.
Item Specification
OPT-J0536(160 size) OPT-J0537(130 size) OPT-J0538(107 size) OPT-J0539(75 size)
Power supply specifications Single-phase 100 to 120 V AC ±10 % / 12 A, single-phase 200 to 240 V AC ±10 % / 8 A, 50/60 Hz ±1 Hz
Power consumption 1,440 W (100 to 120 V AC), 1,920 W (200 to 240 V AC)×2 or less
External
dimensions
Width 2900mm 2650mm 2382mm 2090mm
Depth 776mm
Height 1475mm
Weight 188kg 177kg 161kg 144kg

9

10
はじめに
この度は、追加ヒーターオプションをお買いあげいただき、誠にありがとうございます。
取扱説明書について
•本書は、追加ヒーターオプションの操作について説明します。
•本書をお読みになり、十分理解してからお使いください。また、本書をいつも手元に置いてお使いください。
•本書は、追加ヒーターオプションをお使いになる担当者のお手元に確実に届くようお取りはからいください。
•本書は、内容について十分注意して作成していますが、万一不審な点がありましたら、販売店または弊社営業所までご
連絡ください。
•本書は、改良のため予告なく変更する場合があります。ご了承ください。
•本書が焼失/破損などの理由により読めなくなった場合は、新しい取扱説明書を弊社営業所にてお買い求めください。
ご注意
株式会社ミマキエンジニアリングの保証規定に定めるものを除き、本製品の使用または使用不能から生ずるいかなる損害(逸
失利益、間接損害、特別損害またはその他の金銭的損害を含み、これらに限定しない)に関して一切の責任を負わないものと
します。
また、株式会社ミマキエンジニアリングに損害の可能性について知らされていた場合も同様とします。
一例として、本製品を使用したメディア等の損失や、作成された物によって生じた間接的な損失等の責任負担もしないものと
します。
追加ヒーターオプションを使用したことによる金銭上の損害および逸失利益、または第三者からのいかなる請求についても、
当社は一切その責任を負いかねますので、あらかじめご了承ください。
本書の内容を無断で転載することは禁止されています。
©株式会社ミマキエンジニアリング
All Rights Reserved.Copyright

11
安全にお使いいただくために
マーク表示について
本書では、マーク表示により操作上の注意内容を説明しています。注意内容により表示するマークは異なります。各マーク表
示の持つ意味を理解し、本機を安全に正しくお使いください。
マーク表示の例
設置上のご注意
内 容
警告 この指示を無視して誤った取り扱いをすると、死亡または重傷のおそれがある内容
を示しています。必ずよくお読みになり、正しくお使いください。
注意 この指示を無視して誤った取り扱いをすると、軽傷または中程度の負傷のおそれが
ある内容を示しています。
一般警告 注意しなければならない事項を示しています。具体的な注意事項は図の中に描かれ
ます。
一般強制指示 実行しなければならない事項を示しています。具体的な指示内容は図の中に描かれ
ます。
一般禁止 してはいけない事項を示しています。具体的な禁止内容は図の中に描かれます。
重要 「重要」マークは、本機をお使いいただく上で、知っておいていただきたい内容が書
かれています。操作の参考にしてください。
ヒント 「ヒント」マークは、知っておくと便利なことが書かれています。操作の参考にして
ください。
参照情報 関連する内容の参照ページを示しています。文字をクリックすると該当ページが表
示されます。
注意
次のような場所には設置しない
•直射日光が当たる場所
•水平でない場所
•振動が発生する場所
•エアコンなどの風が直接当たる場所
•火を使う場所
•温度や湿度の変化が激しい場所(推奨する使用環境
は、接続するプリンターによって異なります。プリン
ターの取扱説明書をご確認ください。)

12
警告事項
注意事項
警告
電源に関するご注意
•付属の電源ケーブルを使用してください。本機の故障や感電、もしくは火災につながるおそれがあります。なお、本機以
外の電気機器には使用できません。
•電源ケーブルを抜くときは、必ずプラグを持って抜いてください。電源ケーブルを引っ張るとケーブルが破損して、本機
の故障や感電、もしくは火災につながるおそれがあります。
•電源プラグにホコリなどが付着したまま使用しないでください。本機の故障や感電、もしくは火災につながるおそれがあ
ります。
•電源プラグの刃に金属などが触れないようにしてください。本機の故障や感電、もしくは火災につながるおそれがありま
す。
•電源ケーブルを傷つけたり、加工しないでください。また、重い物をのせたり、加熱したり、引っ張ったりしないでくだ
さい。電源ケーブルが破損して、感電や火災につながるおそれがあります。
•延長コードの使用やタコ足配線をしないでください。本機の故障や感電、もしくは火災につながるおそれがあります。
•電源ケーブルの破損や芯線の露出、断線などが見られる場合は使用しないでください。本機の故障や感電、もしくは火災
につながるおそれがあります。
•濡れた手で電源プラグを抜き挿ししないでください。感電のおそれがあります。
•電源ケーブルのプラグは、接地(アース)極性付きのコンセントに接続してください。本機の故障や感電、もしくは火災
につながるおそれがあります。
•コンセントの増設には、感電事故防止のため接地(アース)工事が必要です。必ず電気工事士の免許を持った人が電気工
事(C種接地工事(特別第 3種接地工事))をしてください。
注意
電源について
•本機は指定された電源仕様で使用してください。
•電源ケーブルは、必ず本機の近くにある電源コンセントに接続してください。また、電源プラグの刃を根元まで確実に挿
し込んでください。
•電源ケーブルを接続する際には、電源コンセントの入力電圧、ブレーカーの容量を確認してください。また、それぞれの
ケーブルはブレーカーが独立している別の電源に接続してください。同じブレーカーにつながっているコンセントに接続
すると、ブレーカーが遮断してしまうおそれがあります。
ヒーターについて
•メディア搬送面上に液体をかけないでください。ヒーターの故障や発火の原因になります。
•メディア搬送面のヒーターが熱いうちに素手で触らないください。火傷の原因になります。
•メディアの種類や特性に合わせて、ヒーターの温度を調整してください。種類によっては、メディアが伸縮したり、メディ
アが波打ったりしてしまうおそれがあります。
•設置されている環境温度や湿度によって、プリントヘッドのノズル面が結露してしまうことがあります。結露が起こると、
吐出不良(ノズル詰まり、飛行曲がりなど)の原因になります。プリント中に吐出不良(ノズル詰まり、飛行曲がりなど)
が発生したときは、ヘッドクリーニングをしてください。この時、プリントヒーターの温度を 35°C 以下に設定して、環境
温度は動作可能環境温度(20°C~30°C)にしてください。

13
警告ラベルについて
本機には、以下の警告ラベルが貼ってあります。警告ラベルの内容を十分理解してください。
なお、警告ラベルが汚れて読めなくなったり剥がれた場合は、新しい警告ラベルを販売店または弊社営業所にてお買い求めく
ださい。
3
4
7
5
2
2
3
6
1
1
8
9
9
9
11
10
キャリッジ周辺
メンテナンスカバーが開いている状態

14
No. 注文番号 ラベル
1M910931
2M907833
3M903330
4M903405
5M907935
6M905811
7M913419
8M905935
9M903239
10 M906031
11 M910966

15
ヒーターを使う
ヒーターの電源を入れる
1電圧セレクタスイッチを使用する電圧値に切り替え
る。
2ヒーター専用インレットに電源ケーブルが挿し込ん
であるかどうかを確認する。
•手前がヒーター用のインレット(INLET2)です。
3ヒーター電源スイッチを ON にする。
•手前がヒーターの電源です。「I」側に倒します。
ヒーターの温度設定を行う
お使いになるメディアに合わせて、ヒーター温度を設定してください。
1ローカルモード画面から、[HEATER] を選択する。
•ヒーター温度の設定画面が表示されます。
•PRE(プリヒーター):プリントする前にメディアを予熱して、メディアの急激な温度変化を抑制します。
• PRINT(プリントヒーター):インクのにじみを抑制します。
•工場出荷状態は、「220」に設定されています。
•付属品の電源ケーブル以外は使用しないでください。
•本機付近の電源コンセントに接続し、電源ケーブルの引き回し
を容易に行えるようにしてください。
•電源ケーブルのプラグは、接地(アース)極性付きのコンセン
トに接続してください。本機の故障や感電、もしくは火災につ
ながるおそれがあります。
•プリント中も、温度を変更することができます。
•周囲の環境温度により、設定したヒーター温度に到達するまで、数分から数十分かかることがあります。
•本機は、環境温度 20°C~30°C で使用してください。使用環境や印刷条件によっては設定値までヒーターの温度が上昇しない
場合があります。
•工場出荷状態では、ヒーターの設定温度は「- - -」と表示され、
ヒーターが OFF になっています。
•[HEATER]が表示されていないときは、[SEL] キーを押して、機
能を切り替えてください。
REMOTEMENU TEST PRINT
CLEANING
30°/40°
DATA CLEARADJUST HEATER
PRE PRINT
40°/ 40°40°/ 40°

16
2各ヒーターの温度を入力して、[ENTER] キーを押す。
•を押して、各ヒーターの温度を設定します。(設定値:OFF / 20~70 ℃)
ヒーターの選択 : で選ぶ
温度の設定 : で設定
•ヒーターの温度が設定値に到達すると、操作パネルのヒーターのアイコンがオレンジ色から緑色に変わります。
3[ENTER] キーを押して終了する。
•ヒーター温度調整画面を終了してローカルに戻ります。
ヒーター関連エラー
ヒーターオプションに異常が発生すると、ワーニングメッセージが表示されます。
異常が発生したときは、次のように対処してください。
仕様
その他の仕様は、UCJV150/300series 取扱説明書をご確認ください。
•ヒーターの温度が設定値 ±3°C に到達すると、プリントすることができます。
•設定メニューからも、ヒーター温度を変更することができます。
•プリントしている途中でも温度を変更することができますが、色みが変化するおそれがあります。
表示 原因 対処方法
702
サーミスタ セツゾク サーミスタ接続異常が発生している。 •一度主電源をオフにして、しばらくたってから再度オンにしてく
ださい。
•再度表示する場合は販売店または弊社営業所、コールセンターに
お問い合わせください。
710
ヒーターオンド イジョウ
ヒーターの温度異常を検知した。
本エラー発生後、温度異常が解消され
ない場合、強制的に装置電源をオフに
します。
項目 仕様
OPT-J0536(160 size) OPT-J0537(130 size) OPT-J0538(107 size) OPT-J0539(75 size)
電源仕様 単相 AC 100 - 120V ±10% / 12A, 単相 AC 200 - 240V ±10% / 8A, 50/60 ± 1Hz
消費電力 1,440W (AC100-120V 時), 1,920W (AC200-240V 時)×2 以下
外形寸法
幅2900mm 2650mm 2382mm 2090mm
奥行 776mm
高さ 1475mm
重量 188kg 177kg 161kg 144kg

17

© MIMAKI ENGINEERING CO., LTD.2022
D203669-10-15092022 AT
This manual suits for next models
3
Table of contents
Other MIMAKI Heater manuals
Popular Heater manuals by other brands

MrHeater
MrHeater F271350 Operating instructions and owner's manual

ENERCORP
ENERCORP HEATSTAR HS4030 Operating instructions and owner's manual

MrHeater
MrHeater MHVFRD20NGBT Operating instructions and owner's manual

Johnson & Starley
Johnson & Starley HI-SPEC J25RS Series Installation, commissioning & servicing instructions

Life Smart
Life Smart LS1001HH13 Owners installation and operating manual

Pro Breeze
Pro Breeze PB-H12 instruction manual