MindPX MX400 User manual
!
MX400/450 QUADCOPTER
USER MANUAL
Highlights
- Pure carbon-fiber frame, with foldable arms.
-High performance MindPX flight controller with 168MHz floating point
processor, super fast and accurate.
-Separated power rails for flight controller and peripheral.
-Optimized for multiple radio system deployment.
-Modularized and flexible payload mounting configurations.
-DroneCode compliant sockets.

Ta b l e o f C o n t e n t
Important
Do NOT fly MX400/450 near any people or animal as it may cause serious damage to human or
animal body.
Keep MX400/450 away from any buildings, vehicles, private properties or public facilities.
Pilots need to keep themselves from MX400/450 at a safety distance of at least 15 meters during
the flight.
Physical 3
Quick Installation 4
Power On/Off 10
Propellers 11
RC Pairing 12
Arm/Disarm 12
Select Flight Mode 13
Flight log - Using a SD Card 14
Connect to Ground Station 14
Calibrate the drone in GCS 16
Preflight checks 16
Autonomous flight 19
MX400/450/MindPX Firmware Upgrade 21
Gust-air Firmware Upgrade 22
Color LED Indicator 24
Support 24
Where to buy 24
Page 2

Physical!
Page 3
MX400/450
WheelBase
400mm(450mm) diagonal
Weight
1027g (w/o battery)
Propellers
1045, 1147
Flight controller / Processor
MindPX V2.8 / STM32F427
IMU / Redundancy
10 DOF / Dual redundancy
Motor
2312/960KV brushless
ESC
20A BLHeli
GPS
Ublox M8N
Output power rating
2 BEC power rails:
1. 5V@1A
2. 5V@6A
Antenna mounting rack
2
Battery
5200mah / 4S
Flight time
About 20 minutes
Max. Payload weight
1.5Kg

Quick Installation
MX400/450 quadcopter comes within a ARF(almost-ready-to-fly) package. Users only need few simple
assembly before getting ready for fly. All steps you need to go through simply are:
1. Unfold arms
2. Landing legs
3. Antenna (optional)
4. GPS and battery
5. Propellers
Unfold arms
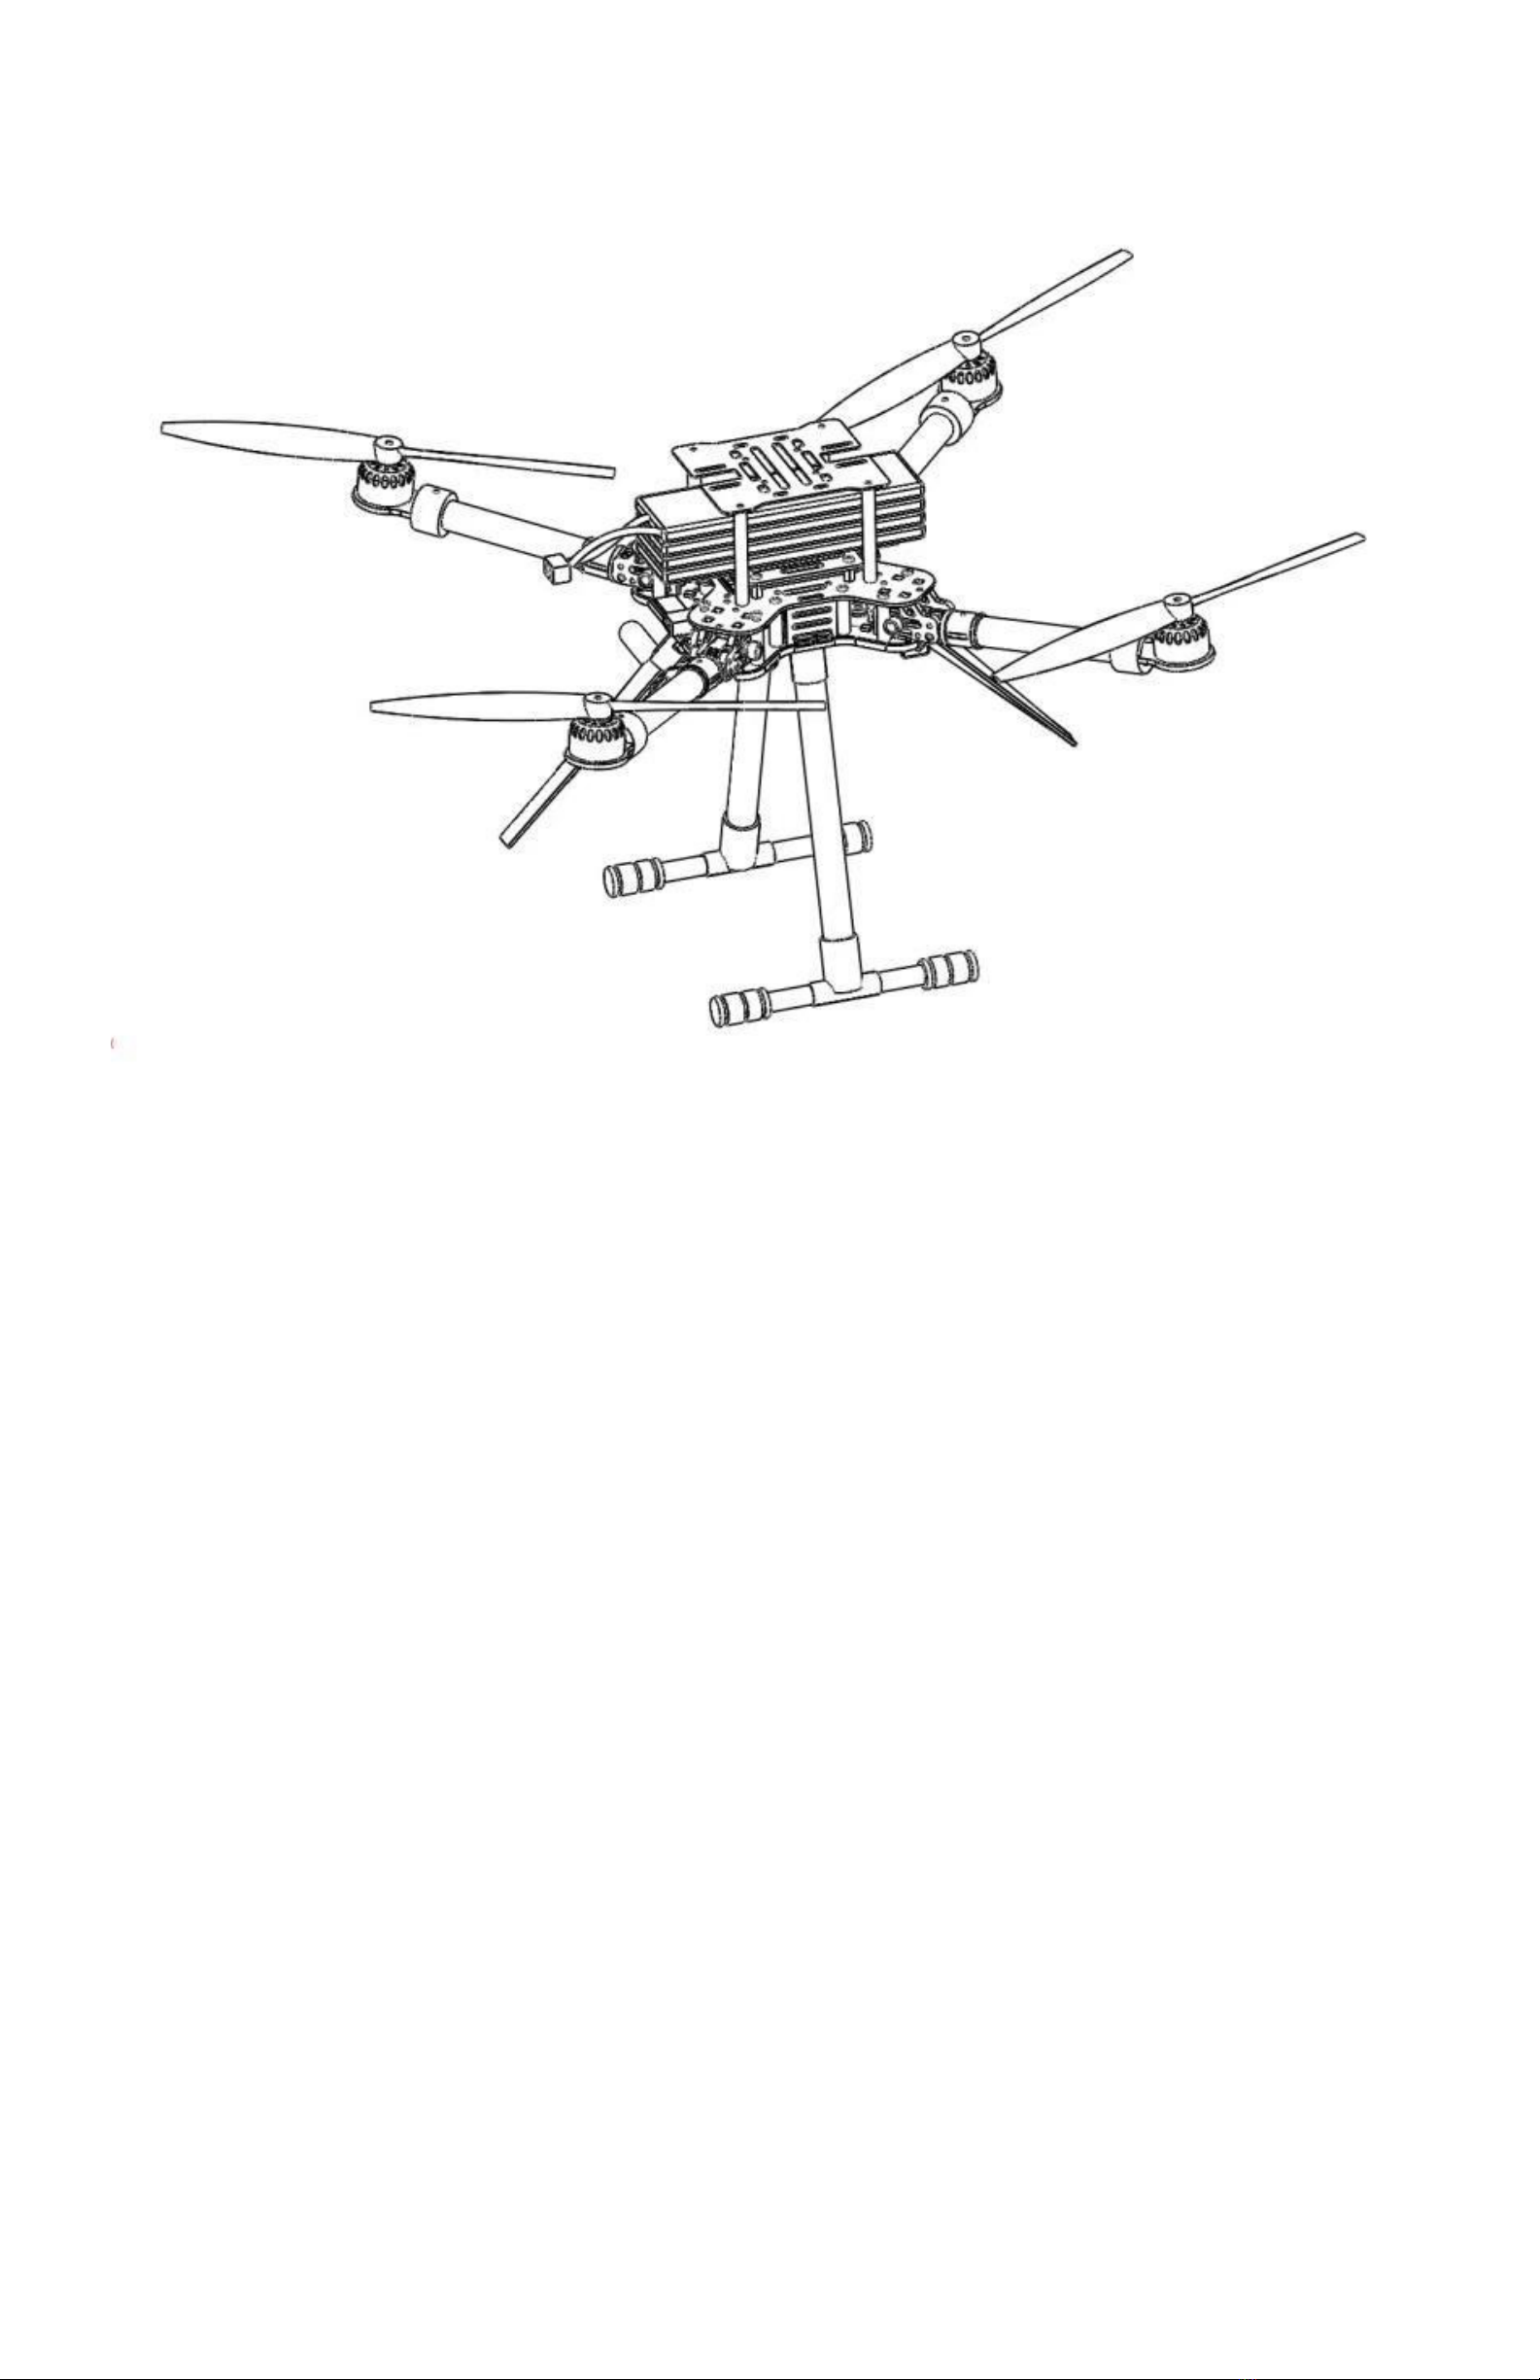
MX400/450 is a foldable quadcopter designed for portability and flexibility. Fig. 1 shows the status of
MX400 upon unboxing.
Fig. 1 Folded MX400 frame body upon unboxing
Users can easily unfold the quad as illustrated in Fig. 2. Rotate the arm following the direction in figure
until you felt the feedback of arm in position and automatically locked. Do the same with other 3 arms left.
Page 4

Fig. 2 Unfold arms
On folding, pull the latch back and rotate arm down, as illustrated in Fig. 3.
Fig. 3 Fold arms back
Page 5
1
2
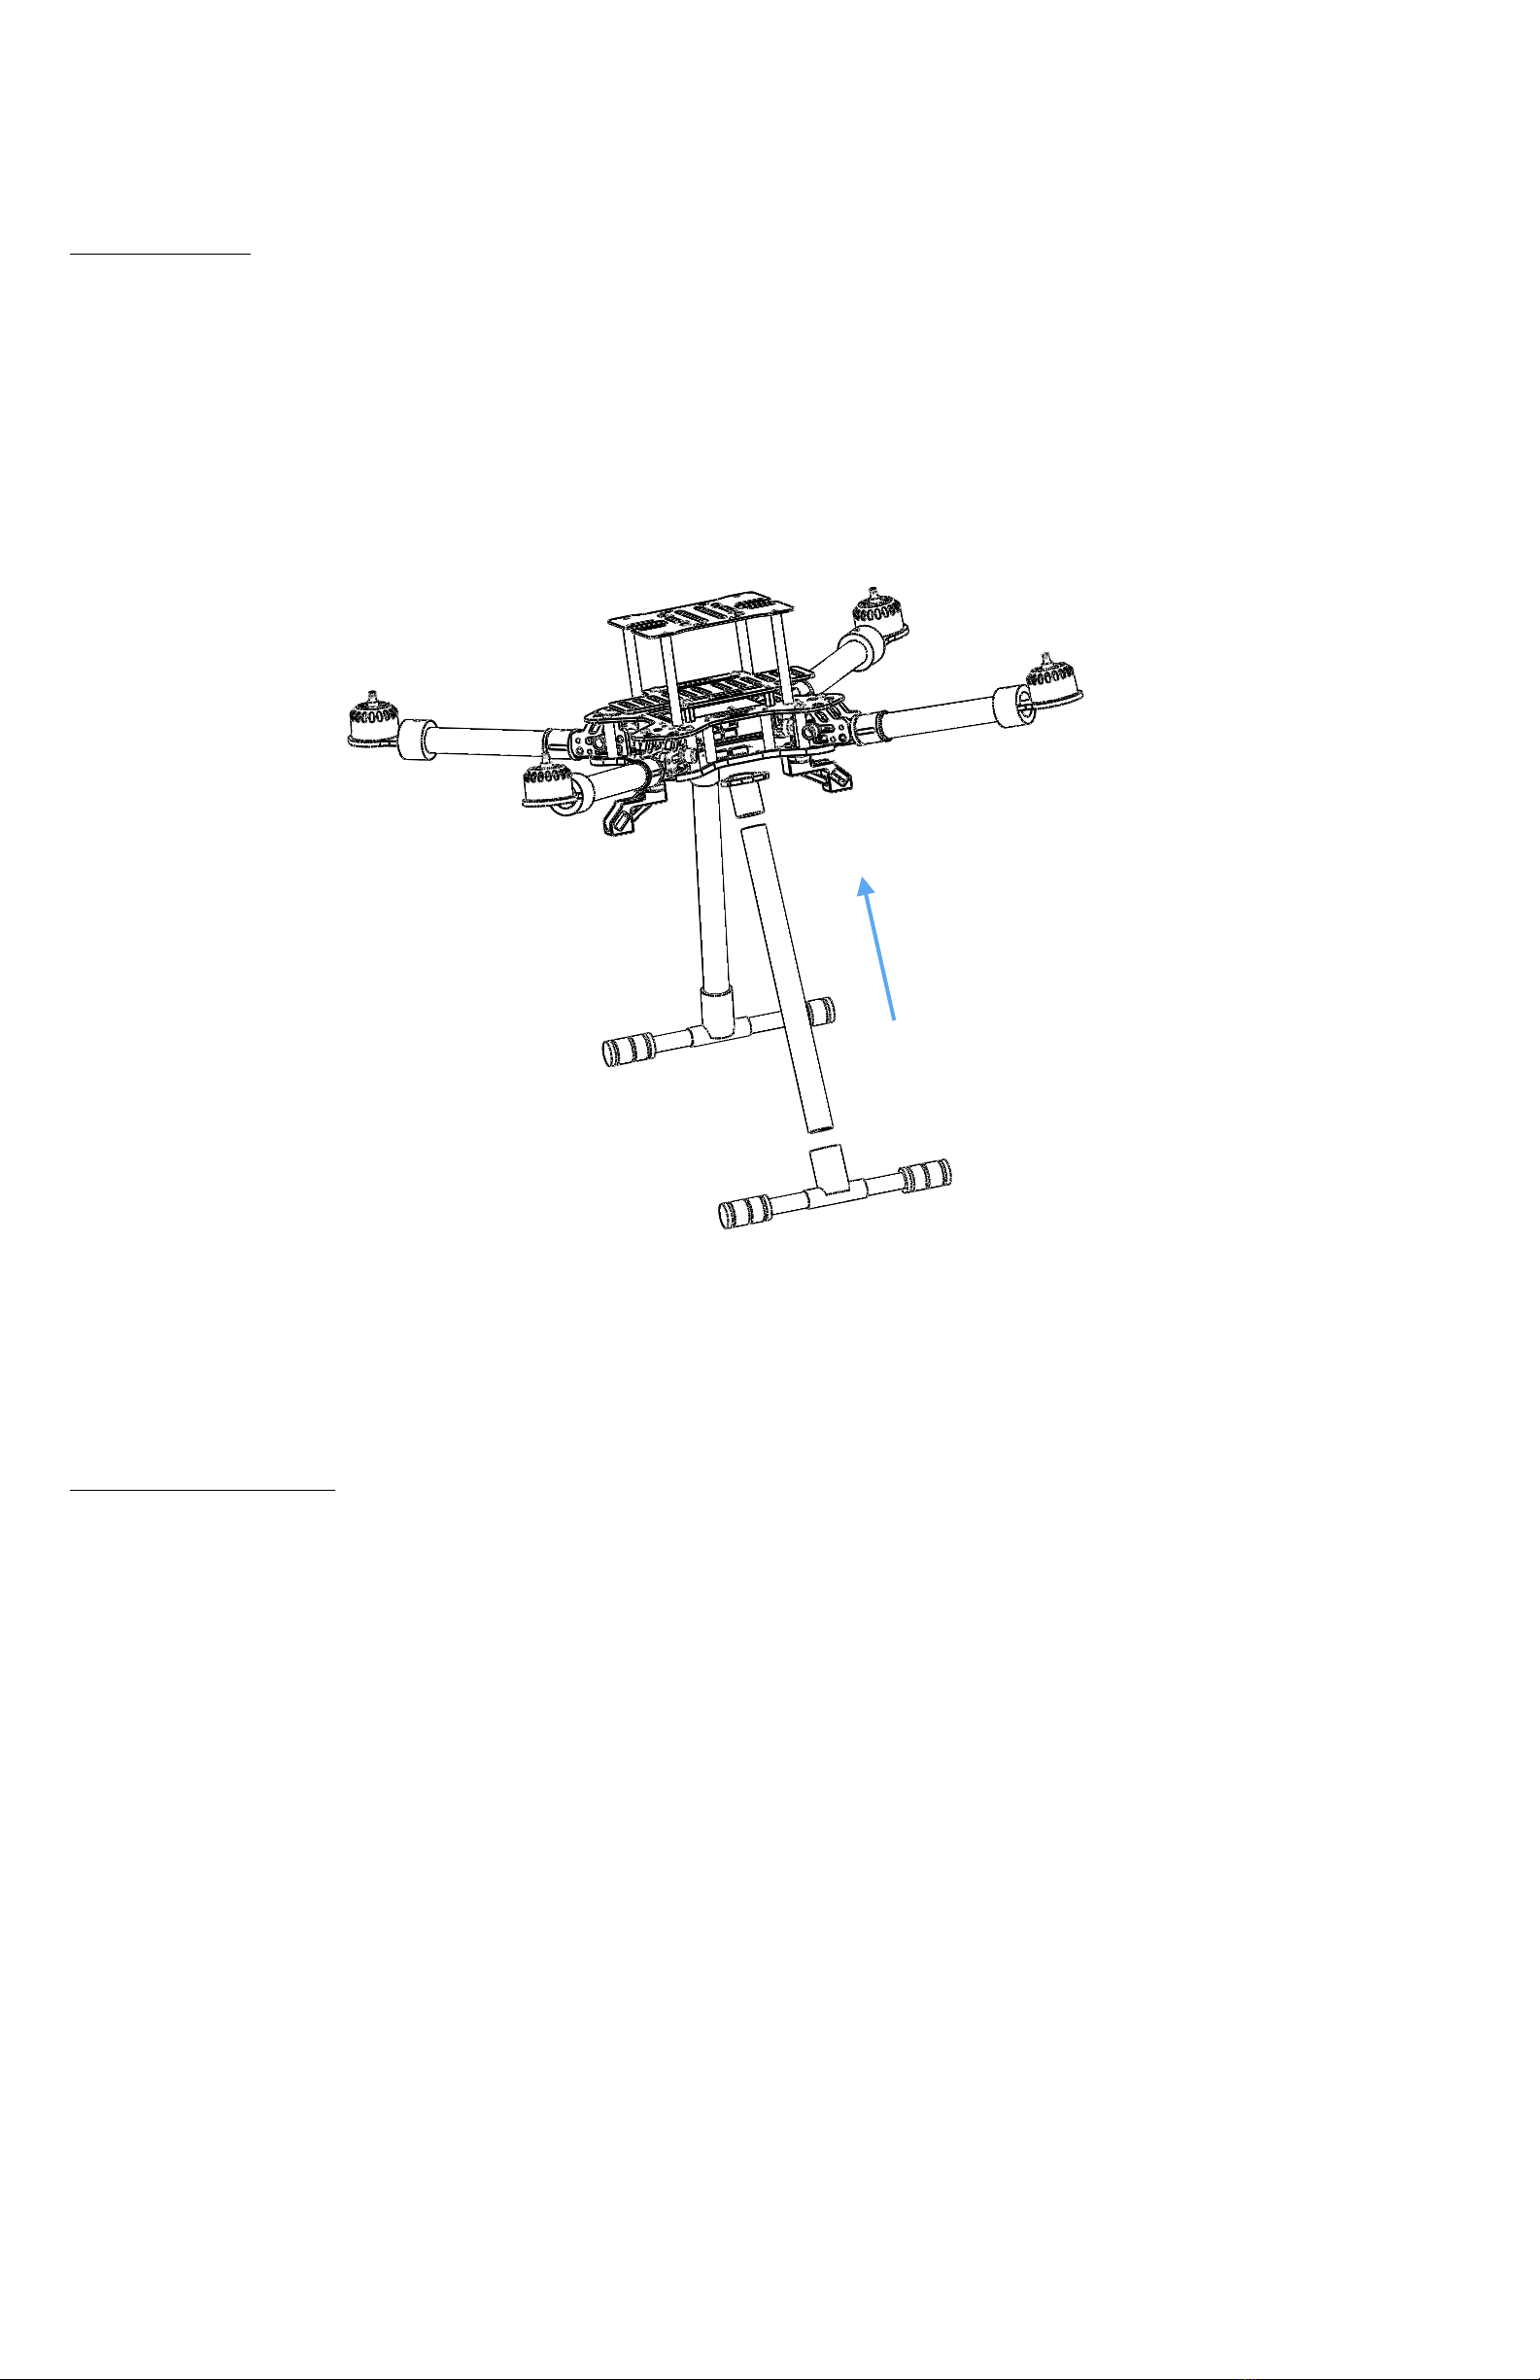
Landing legs
Landing legs support the quadcopter standing during landing and taking off. Legs are detached initially
from the frame body. Insert the leg into the receptacle in the bottom panel, and install the “T” bar as in
Fig. 4. Tightening the screws to lock the position.
Fig. 4 Assemble leg
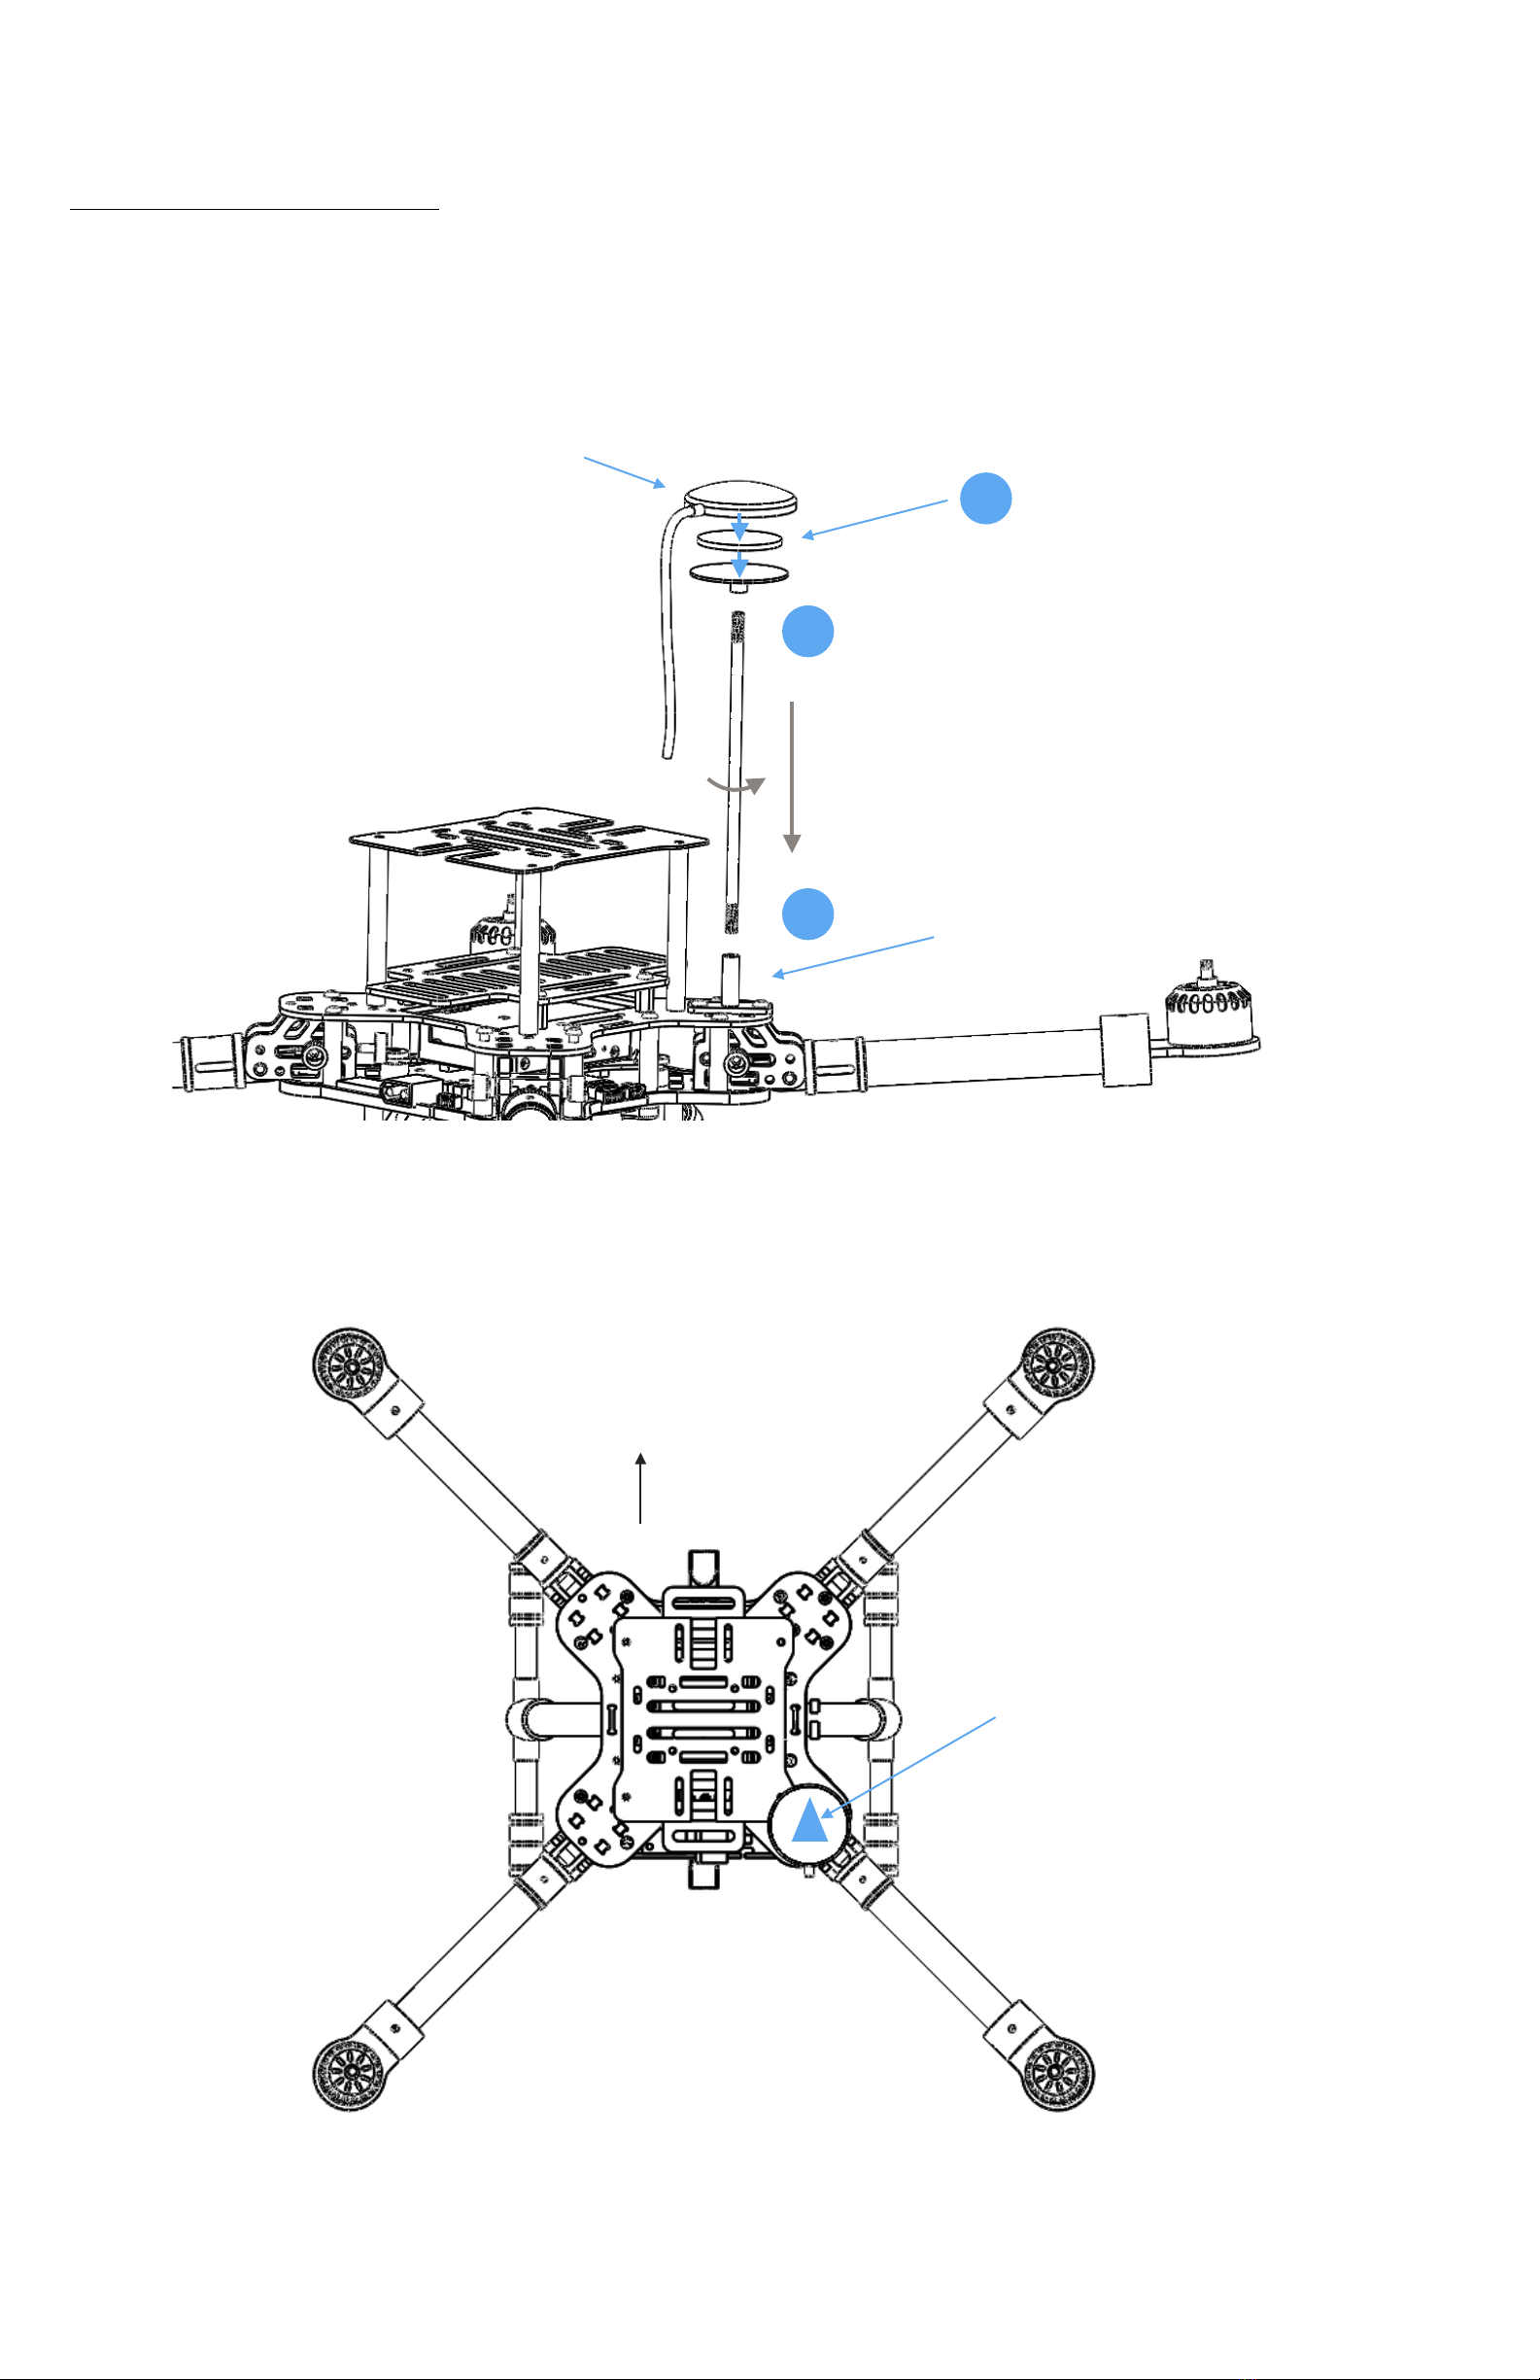
Antenna (optional)
Note This step is optional if you do not want to use the on-vehicle gust-air radio system.
MX400 is optimized for co-existing of multiple radio systems. Two antenna racks allow mounting of
external antennas with different shape and size.
To install, attach the antenna onto the surface of the rack, and tightening it using nylon fastener tape, as
shown in figure 5, 6, and 7.
Page 6

Fig. 5 Install antennas
Fig. 6 Fasten antenna
Fig. 7 Connect gust-air radio with antenna
Page 7
1
2
Connect Gust-air BLE
radio output to antenna
socket
GPS/Compass and battery
GPS/compass module needs to be mounted properly to avoid interference from other parts on frame.
Fig.8 and 9 shows how the external GPS/compass combo should be mounted. It is important that the
direction of external GPS/compass combo MUST align with the head of direction of the frame.
Fig. 8 Mount GPS/Compass
Fig. 9 The direction must be aligned
Page 8
3M tape
GPS module
GPS racket
1
2
3
Direction of head
Direction of compass
MUST align with
direction of head of the
frame
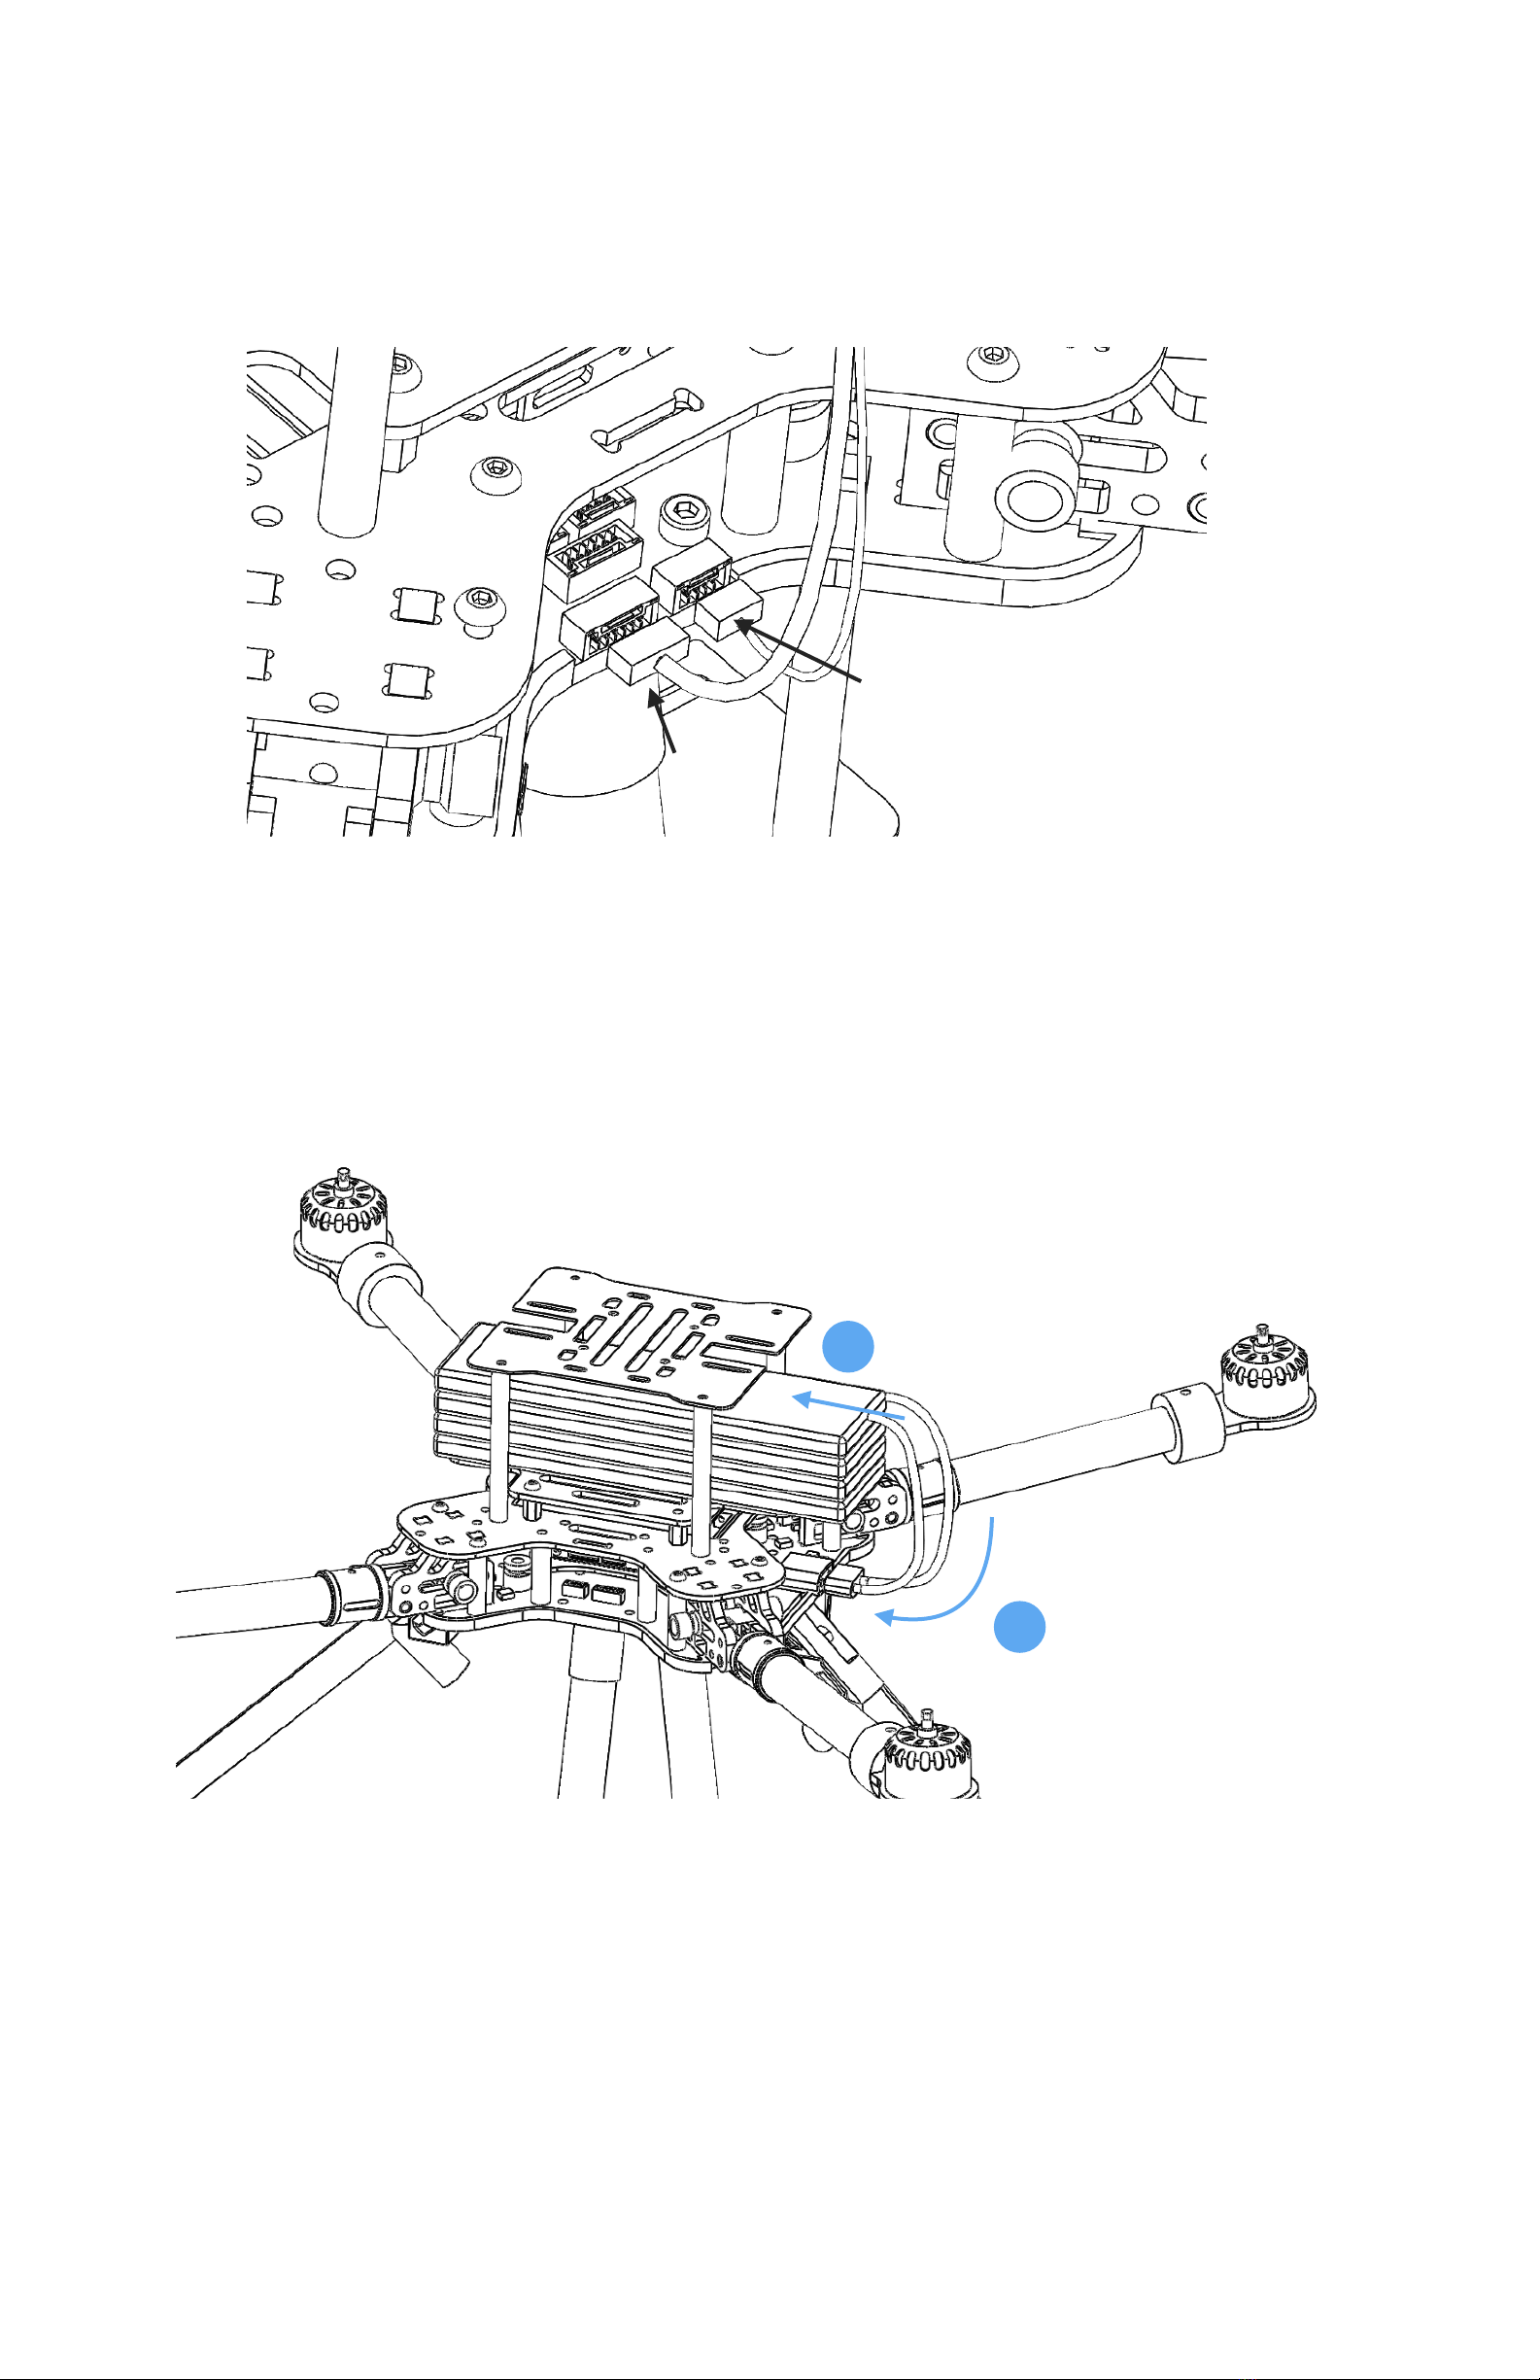
Finally, connect the external module’s cable plug to the sockets on the flight deck.
Fig. 10 Connect the sockets
Now it is time to connect the main battery. Insert the battery as shown in Fig. 11, and connect the battery
plug to the receptacle on flight deck. Fasten the nylon belt on battery to hold its position.
Fig. 11 Connect the main battery
Please note that, the drone’s power is controlled by power switch. After connect the battery the drone’s
power is in OFF status by default. Use power switch to turn it on (see next section).
Page 9
GPS plug
Compass plug
1
2

Power On/Off
MX400/450’s power switch is a LED button to the right side of battery receptacle. By default the button is
at OFF status. Short click on the button will turn the power ON, and all parts on MX400/450 will be
powered on. Long press on the button for at least 3 seconds will turn the power OFF again. This will shut
down power of all parts on the drone.
Fig. 12 The power switch
When power is switched on, the motors may beep several times during the process, then wait for the
main LED on flight controller to turn into breathing blue, and the drone is now ready for command.
If the drone is not intended to fly for a long period, please also disconnect the battery after power is shut
down.
Page 10
Power switch

Propellers
The propellers need to be installed in exact order as in Fig. 13. It is important to notice that installing into
wrong position will make the copter overturned and may cause serious harm. The 2 pull propellers
should be installed on motor 1 & 2 (clockwise - cw), while the 2 push propellers (marked with ‘R’) should
be installed on motor 3 & 4 (counter clockwise - ccw).
Fig. 13 Install propellers
Page 11
1
2
3
4
CW motor
CCW motor
Pull propeller
Push propeller(R)
Pull propeller
Push propeller(R)
CW motor
CCW motor
Direction of head

RC Pairing
The remote controller needs to be paired with the drone before it can control the drone to fly. Find the
tiny paring button on the left corner of the receiver module on drone’s flight deck (to the left side of
battery receptacle), as shown in Fig. 14.
Start from the drone’s power is off. Hold the paring button, and turn on the power switch, this will get the
receiver into pairing mode. Then turn on the power of the remote controller, enter menu interface and
navigate to page #2, scroll down through the menu items and find “bind” button, click on it and the
remote controller will start the pairing process with the receiver. When the green LED on receiver goes
solid the pairing is done.
The pairing process is a one-time job and the binding will be saved. Next time when you power on the
receiver will automatically connected with the remote controller.
Tips: One remote controller can be paired with multiple drones.
Fig. 14 RC paring
Before you use the remote controller to command the drone, it needs to be setup properly. Follow
instructions in this link to configure the remote controller correctly for MX400/450.
Taranis Q X7 remote controller setup instructions
Arm/Disarm
Warning: Before arming, please make sure no obstacle can be occluded with drone’s spinning propeller.
Page 12
Pairing button

After the remote controller is powered on and paired, lower the throttle stick to the low-right corner for a
few seconds. The propeller will start to spin at a minimum speed. The drone is then in armed state and
ready to take off.
Fig. 15 Arming
To disarm, lower the throttle stick to the low-left corner for a few seconds, the propellers will stop
spinning.
Fig. 16 Disarming
Select Flight Mode
Page 13

Fig. 17 select flight modes
Flight modes is pre-set on remote controller as in Fig.17. By default 4 flight modes are configurable
through remote controller: manual, assist/altitude control, assit/position control, and hold mode.
The modes can be chosen by switches in the remote controller.
For beginners, manual mode is a good start point, as the drone will auto stabilize its attitude during the
flight which makes it easier for pilots to control.
Flight log - Using a SD Card
All flight data can be recorded into the SD card. It is important for reproducing flight course either for
training or analysis purpose. So it is recommended that pilot inserts a SD card before taking off.
The SD card must be formatted with FAT32.
Connect to Ground Station
As a professional drone, MindPX has hundreds of parameters that user can tune. Using MindCentral
software from computer is the best way to carefully adjust these parameters.
MindCentral is a free software that supports all major PC OS platforms including Windows, MacOS, Linux,
etc. Select the right version for your OS.
There are two methods to connect a MindPX to MindCentral, through Gust radio system, or using an USB
cable. For how to connect through Gust radio system, please refer to Gust radio user manual. Here is the
introduction of connecting using an USB cable.
Launch MindCentral on your PC. Turn OFF the drone’s power. Use a micro-USB cable to connect the ‘USB-
GCS’ port on MX400/450’s flight deck (Fig.18) to an USB port on PC.
Page 14
assist/pos-ctl
assist/alt-ctl
manual
hold
mission
return-to-launch

Fig. 18 Connect to ground station
The flight controller should be powered on. Wait for a few seconds until the flight controllers main LED
turns in to any stable color.
The MindCentral should auto-connect to the flight controller by now, and update its UI with drone’s status
information.
Fig. 19 Launch MindCentral
Page 15
USB port

Calibrate the drone in GCS
MindPX drone has multiple sensors integrated and needs to be carefully calibrated to achieve a stable
flight quality. MindCentral provides intuitive GUI for this process and you can do all calibration processes
with the software.
Please refer to this tutorial on how to calibrate a MindPX drone.
Note Every time when pilot adds a new sensor or removes a sensor to the drone, it needs to be
calibrated again. For example, if pilot connects the external GPS/compass module to the drone, or
disconnects from it, the calibration process needs to be performed again.
Verify the calibration
Before close this procedure, verify if the calibration is done successfully.
Return to the ‘flight view’, check the attitude and compass gadget on the top right of the UI. The attitude
of the drone should now be leveled when drone is still on the ground, and the north of compass should
be aligned with the TRUE north of your geo-location.
Fig. 20 Verify calibration success
Preflight checks
To ensure flight safety, it is a highly recommended practice to perform preflight check every time before a
flight. Recommended items in preflight check list includes:
-Propeller installation
-battery status
-GPS lock
-Radio signal strength
-RC throttle position
-Failsafe setting
-Audio feedback
You can also add your own preferred items to the list.
Propeller installation
Check if propellers are installed in correct order. Try to arm the vehicle (but do not takeoff), check if the
spinning direction of propellers are correct.
Page 16
Attitude
Compass
Battery status
To start a new flight, lower than 70% remaining battery is not recommended unless you know exactly what
you are doing.
Recharge battery to ensure enough air time of your vehicle.
GPS lock
Drone flight requires high accuracy of GPS coordinates. Upon power on, on-board GPS needs up to few
minutes to lock into position with enough accuracy.
Watch the GPS indicator on MindCenral’s top menubar. Wait until HDOP value goes under 1.0.
Tips On first GPS synchronization, MindCentral will automatically download the map of your geo-location
(need an Internet connection). The map is cached locally, so next time you do not need a network
connection to fly.
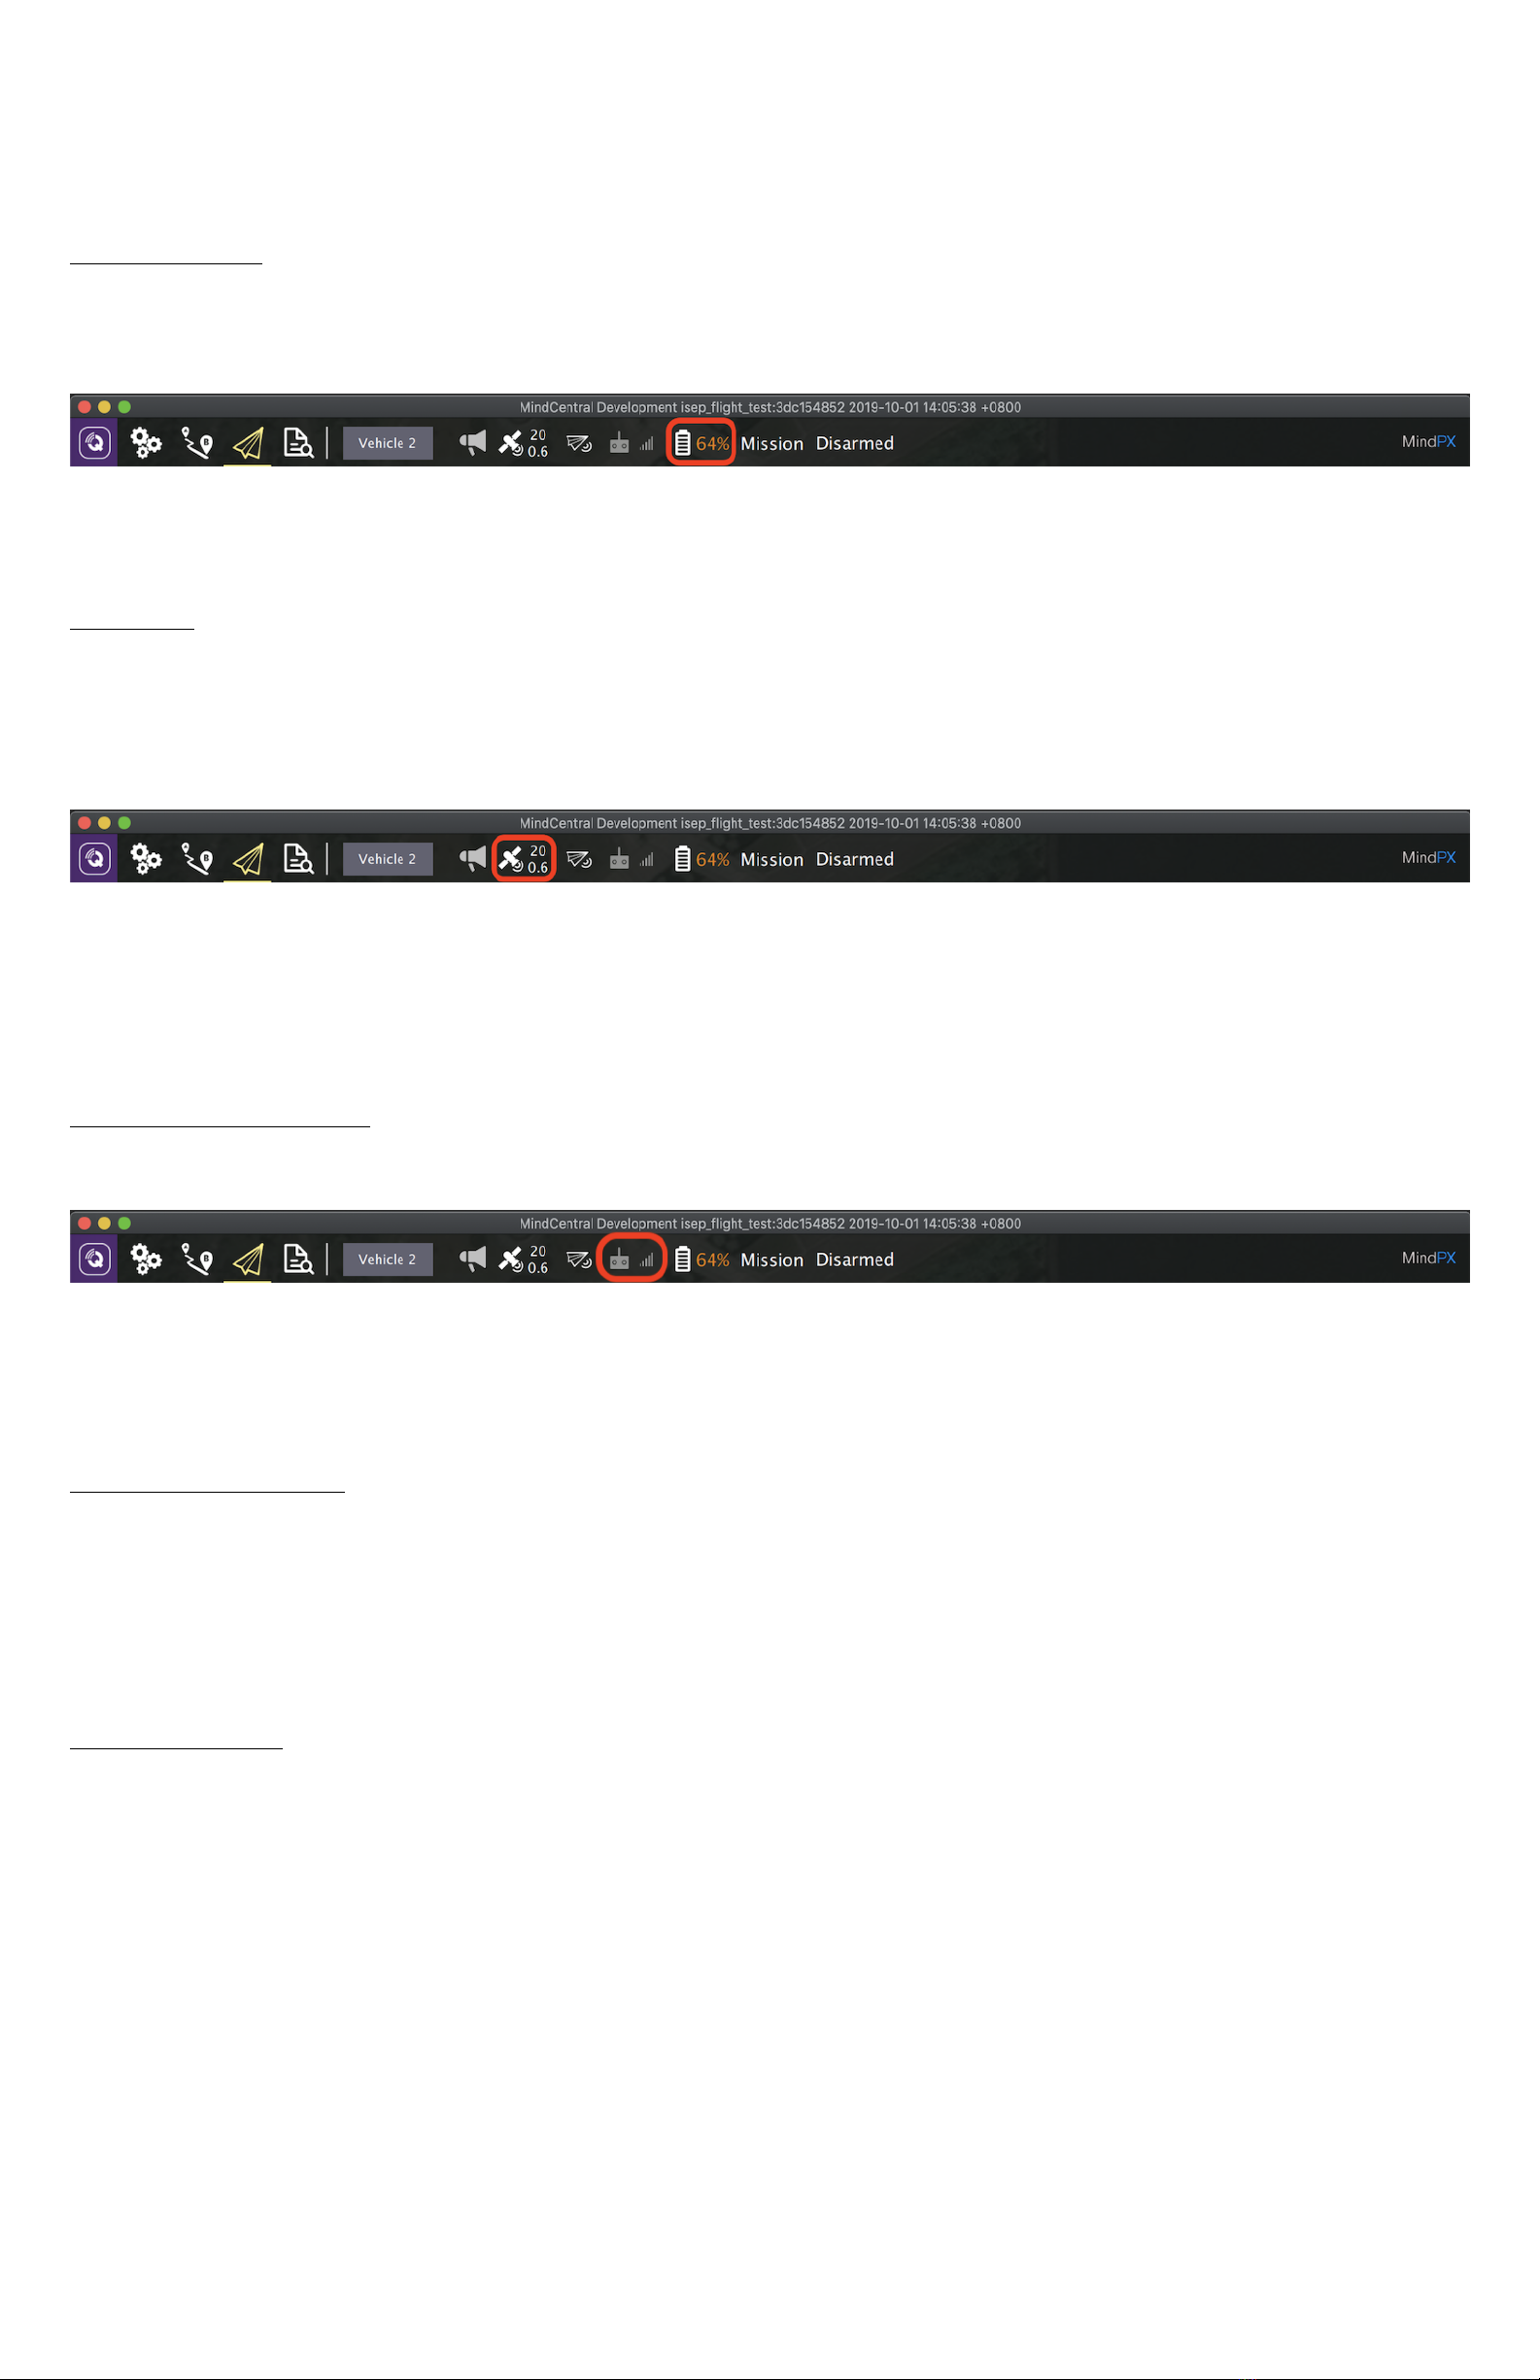
Radio signal strength
Check the remote controller’s signal strength on top menubar.
Check Gust Radio’s RSSI in the pop-up menu on the right side (if Gust radio connected). It is not
recommended to fly with a RSSI lower than -79dBm.
RC throttle position
When performing a manual flight, RC throttle should be at lowest position before arming.
When performing an autonomous flight, it is recommended to leave remote controller on, and put
throttle in central position.
Failsafe setting
Always think ahead. Have a plan for failure before it actually happens. This can save the vehicle in many
accidents.
Use failsafe settings to trigger failsafe action when foresee failures happen, as in Fig.21 & 22.
Page 17
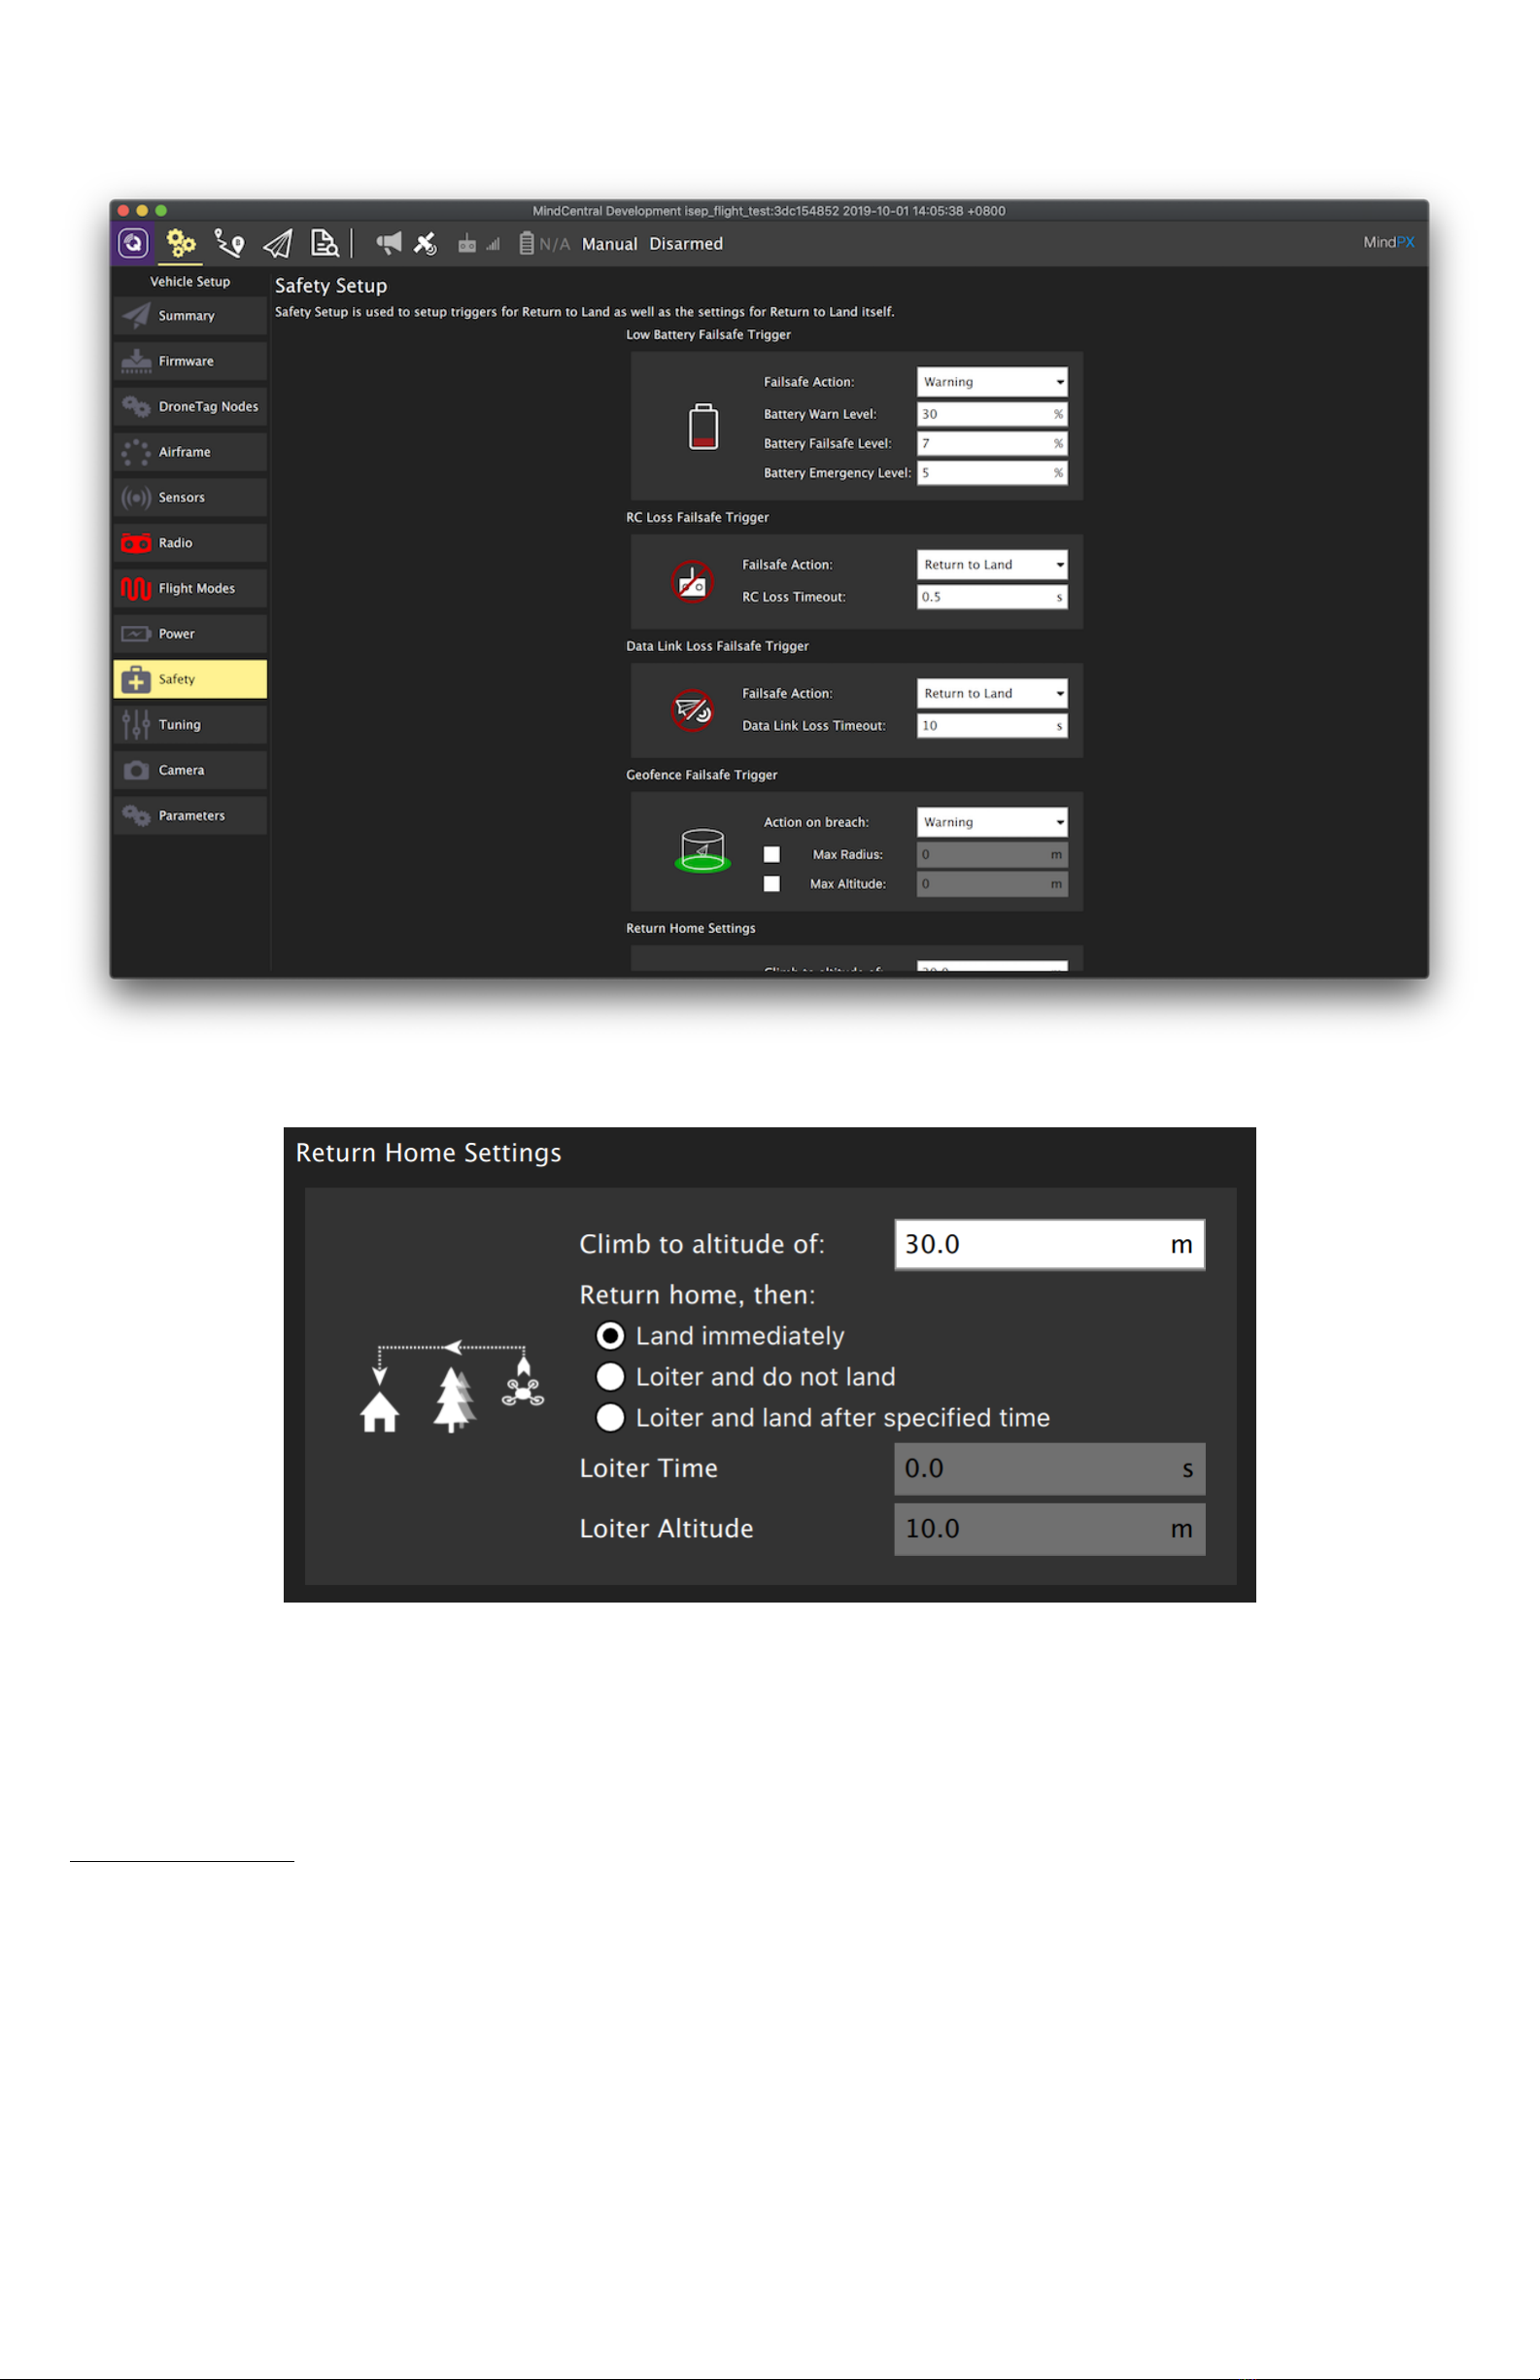
Fig. 21 Safety settings
Fig. 22 Return home settings
The exact settings under ‘Safety’ tab should depend on your specific flight plan and terrain. Fig.21 & 22 is
just an example setting. Adjust these settings to best fit into your own flight plan.
Audio feedback
Try to switch flight mode for few times and make sure you can hear voice feedback from MindCentral, as it
can alert you when something happens while you were looking into other things.
Page 18
Autonomous flight
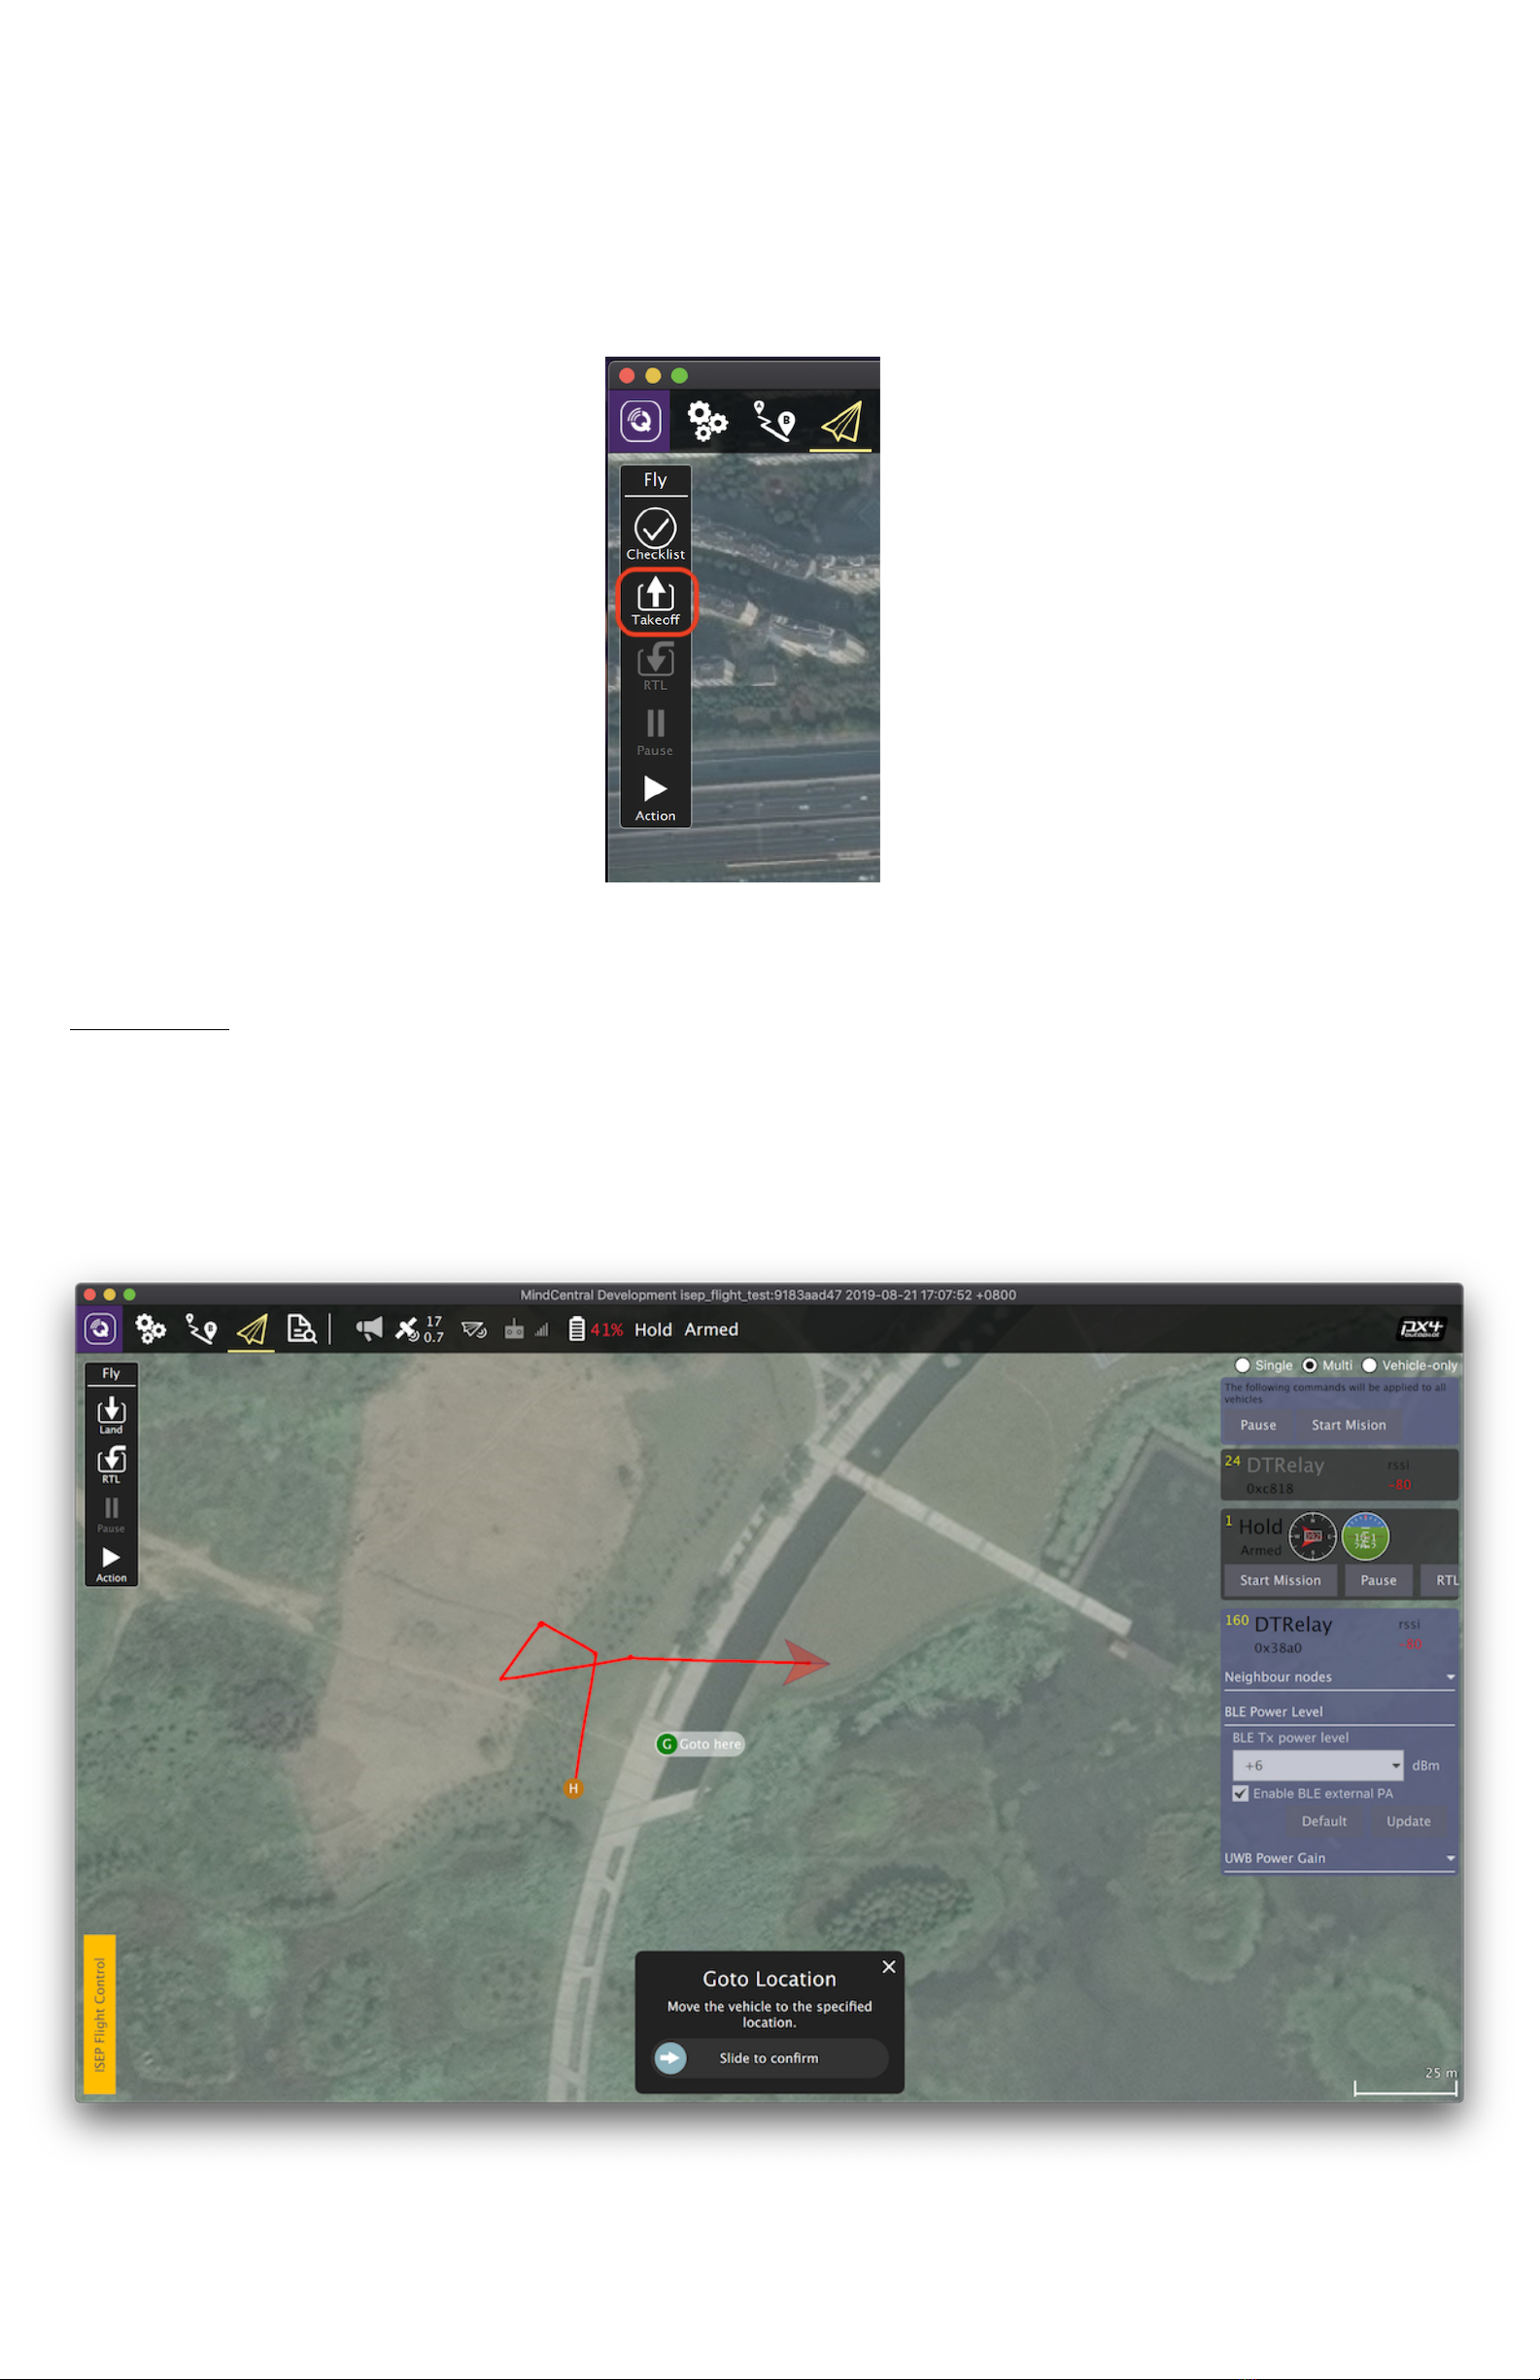
Autonomous flight requires to use Gust radio as telemetry. After preflight check OK, pilot can command
take off from MindCentral UI.
Fig. 23 Take off command from MindCentral
There are 2 major types of autonomous flight, goto mode and mission mode.
Goto mode
In this mode the drone will hold its position by default after take off, until pilot specifies a spot in map and
issue the ‘goto’ command. The drone will then fly to the exact point pilot designated and hold its position
again after arrived, waiting for the next instruction from pilot.
Note pilot needs to specify flight altitude upon take off. Altitude value below 5 meters is not
recommended.
Fig. 24 Fly in goto mode
Page 19

Warning The drone flies constant altitude by default. Check if any obstacles standing in the way of your
selected path, and adjust altitude value before issue the command, or the drone may crash into it.
Mission mode
In this mode the drone will flight a preset route after take off. The route is planned by pilot in advance in
MindCentral, and upload to MindPX.
Fig. 25 Mission editor
Warning The drone flies constant altitude by default. Check if any obstacles standing in the way of your
planned path and adjust waypoint altitude values accordingly, or the drone may crash into it.
Page 20
This manual suits for next models
1
Table of contents
Other MindPX Quadcopter manuals


