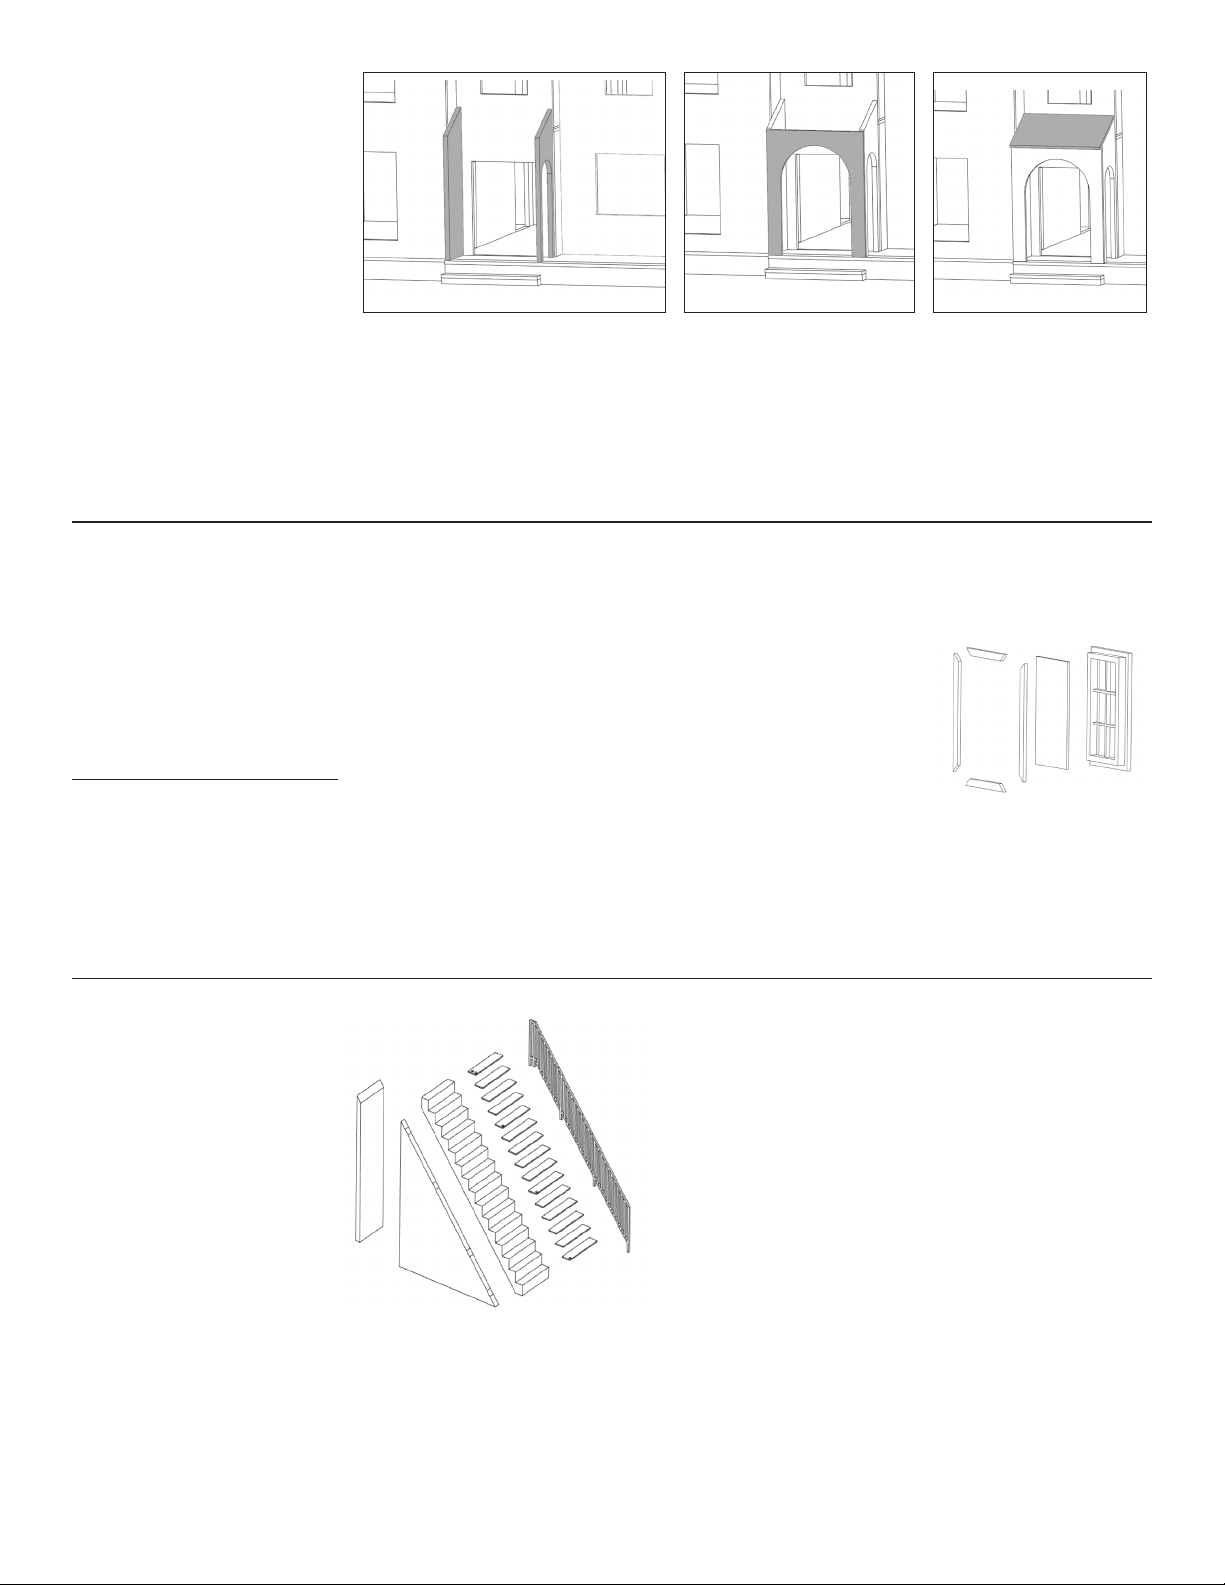
Miniatures The Brentwood 41045 User manual

#41045 The Brentwood
from Paper Doll Miniatures
Available exclusively at miniatures.com
Step-by-step assembly instructions
Copyright miniatures.com 2022
GENERAL INSTRUCTIONS
•Identify and inspect all parts using the Parts List and Parts Diagram.
•Read the directions completely before beginning the project.
•If possible, it is most ideal to have a dedicated work area so that you are
not unpacking, repacking, and moving the project from place to place.
•Choose a work surface that is level, flat, clean, dry, and protected
from spills.
•Do a dry fit, using masking tape to hold parts in place, to make sure
everything fits together correctly before permanent assembly.
Tip: Plan the finishes for the interior and exterior at the dry-fit stage,
before final/permanent assembly. It is easier to finish the panels as flat
surfaces. Disassemble and finish as desired, then reassemble using glue.
See miniatures.com for nishing ideas
and materials
SUPPLIES NEEDED:
Masking tape
Glue (such as #1249 Weldbond)
Door hardware
Finishes
Assembly Instructions
1. Glue and tape house foundation
perimeter. The ends of the Foundation
Middle Braces / A02 insert into the grooves
in the Foundation Long / A01 pieces.
2. Glue, tape, and weight the 1st Floor
/ A16 to the foundation. Allow to dry
before moving on to the next step.
Foundation
Parts you will need in this section:
Foundation Long (2)
1st Floor
Foundation Middle Brace (4)
1. Glue and insert the Exterior Right
Side Wall / A33 and the Right Front
Wall / A37 into the 1st Floor / A16
grooves. Tape together and allow to
dry. An extra pair of hands would be
helpful at this step.
2. Glue and tape the 1st Level
Entrance Wall / A32 to the
Right Front Wall / A37 and
into the shortest groove on
the 1st Floor / A16.
3. Glue and tape in the
Entrance Front Wall / A36
in groove on 1st Floor / A16.
Exterior Shell
Parts you will need in this section:
Exterior Right Side Wall
Right Front Wall
Filler Strip Access Panel
Exterior Left Side Wall A & B
Large Gable Front Wall
1st Level Entrance Wall
Filler Strip Arch (2)
1st Level Interior Wall Arches
Entrance Front Wall
2nd Floor

5. Glue and insert the Large
Gable Front Wall / A35 into
the 1st Floor / A16 grooves.
6. Glue and insert the Exterior
Left Side Wall A/ A34 into the
1st Floor / A16 grooves.
4. Glue and tape the 1st Level Interior
Wall with Arches / A31 into the long
groove in the center of the 1st Floor /
A16. Add both Arch Filler Strips / A75
in the grooves between the arches.
7. Add glue to the lower grooves in
the exterior walls on the inside as
well as the edges of the 2nd Floor
/ A38. Slide in the 2nd Floor / A38
and lightly tap it in place.
2nd Level
Parts you will need in this section:
2nd Level Interior Short Wall
2nd Level Interior Divider Wall
2nd Level Interior Long Wall
8. Glue and insert the Exterior
Left Side Wall B/ A48 into the
1st Floor / A16 grooves.
9. Add the Filler Strip Access
Panel / A77 in the groove within
the opening. Allow everything
to dry.
2|©2022 miniatures.com |1-800-926-6464 |[email protected]
2. Glue the 2nd Level Interior Short
Wall / A29 into the shorter groove in
the 2nd Floor / A38. Then glue the 2nd
Level Interior Long Wall / A28 into the
longer groove in the 2nd Floor / A38.
3. Glue in the 2nd Level Interior Divider Wall /
A30 between the two doorways in the largest
room on the 2nd level. The placement of the
wall is by individual preference.
Note: If you install this wall permanently then
be sure to make Access Panel Front / A40
openable so you can maintain access to the
room at the front left of the house.

Layout Options
4. Glue in the 3rd Level Closet Wall / A27. It
goes in front of the 3rd Level Interior Short
Wall / A26 and beside the 3rd Level Interior
Long Wall / A25.
The walls can be swapped for a different layout. The closet can be
either in the room with stairs, or in the room without stairs.
(see Layout Options)
1. Glue and tape the Dormer Roof /
A43 in place at the back of the house.
It will fit either way, but the roof
looks cleaner with the angle slanted
downwards.
2. Glue and tape the Back Roof / A18 in
place. Allow the indented sides to face
upwards.
3. Glue and slot Eaves A / A19 and B
/ A20 into the holes on each exterior
side wall. Overlap the indented ends
with the Back Roof / A18. Allow to dry.
Back Roof
Parts you will need in this section:
Back Roof
Dormer Roof
Eave A
Eave B
2. Glue 3rd Level Interior Short / A26 and Long /
A25 into the groves on 3rd floor / A39.
3. Use the Filler Strip 3rd Level / A76 to correctly
place the 3rd Level Interior Short Wall / A26. The
Filler Strip 3rd Level / A76 lines up with the back
of the 3rd Floor / A39.
3rd Level
Parts you will need in this section:
3rd Floor
3rd Level Closet Wall
3rd Level Interior Short Wall
Filler Strip 3rd Level
3rd Level Interior Long Wall
1. Add glue to the upper
grooves in the exterior walls
on the inside as well as the
edges of the 3rd Floor / A39.
Slide in the 3rd Floor / A39
and lightly tap it in place.

4|©2022 miniatures.com |1-800-926-6464 |[email protected]
Gable Roofs
Parts you will need in this section:
Large Right Gable
Small Right Gable
Large Left Gable
Small Left Gable
1. Glue and tape the Large
Right Gable / A08 in place.
The bottom will rest on the
3rd Floor / A39.
Front View
2. Glue and tape the Large
Left Gable / A07 on the left
side. It sits below the Large
Right Gable / A08 roof and
overhangs off the left side of
the dollhouse, (see Front View).
3. Glue and tape the Small
Left Gable / A09 in place. The
bottom will rest on the Large
Right Gable / A08 roof.
4. Glue and tape the Small
Right Gable / A10 in place. The
bottom will overhang off the
right side. Allow to dry.
2. Glue and tape in place the Main Roof / A17 to the front of the house. The Main
Roof / A17 rests on the 3rd floor behind the Largeaand SmallbGable roofs. It then
overhangs on the right side of the house past the Right Front Wallc/ A37. The Main
Roof / A17 sits in front of the Back Roofd/ A18. Allow to dry.
Front Roof
Parts you will need in this section:
Main Roof
Main Roof Spacer
d
abc
1. Glue and fit the Main Roof Spacer
/ A47 behind the Entrance Front
Wall / A36. It serves to support the
Main Roof / A17 during assembly.
Porch Extension and Step
Parts you will need in this section:
Foundation Spacer (2)
Foundation Floor Extension
Front Step Tread
Foundation Porch Extension
Front Step Base
1. Glue the long wide side of
the Foundation Spacers /
A05 to the front of the main
foundation. They should
line up with the right side of
the house foundation and
where the entrance meets
the Large Right Gable / A08.

1. Glue the long narrow side
of the two Foundation
Spacers / A05 to the
Foundation Access
Panel / A04 at the ends.
This orientation differs
from the porch extension.
3. The Access Panel Front / A40 can be glued in place, or made openable
using magnets, hinges (included), or velcro. Note that if you glued in place
the 2nd Level Divider Wall / A30 then the Access Panel Front A/40 must
remain removable or openable.
To install the hinges, place the Access Panel Side / A41 and the Access
Panel Front / A40 on your work surface. Align the pre-drilled holes for the
hinge screws that are on the Access Panel Side / A41 and the Access Panel
Front / A40. Glue the two hinges on one Access Panel
Side / A41. Then screw them in place.
To adjust the location of a hole(s) or hinge(s), lay the hinge where you
want it and place a piece of masking tape over the hinge to secure it in
place. Drill new holes with a small drill bit while using the hinge as a guide.
Hammering in a nail and pulling it out to create a starter hole works too.
5. Glue the Access Panel 1st Floor
/ A15 and Access Panel 2nd Floor /
A42 in place. Both line up with the
main house floors, extending out.
Access Panel
Parts you will need in this section:
Foundation Spacer (2)
Foundation Access Panel
Access Panel Side (2)
Access Panel 1st Floor
Access Panel Roof Lower
Access Panel Front
Access Panel 2nd Floor
Access Panel Roof Upper
Hinge pack / XXX
2. Glue and tape
the assembly
to the main
foundation. It sits
centered below the
opening on the left
exterior side wall.
4. Line up both Access Panel
Sides / A41 with the opening.
Glue and tape into place.
6. Top the extension with both
Access Panel Roofs / A13 &
A14. The smaller goes on first
and the larger goes on top.
7. Glue and mount the Access
Panel Front / A40 to the
Hinges that are on the Access
Panel Side / A41.
3. Glue and tape the
Foundation Floor
Extension / A11 on
top of the Foundation
Porch Extension / A03. It
overhangs by 1/8" towards
the front. Allow to dry.
4. Glue the Front Step
Base / A06 and line
it up to the far left of
the Foundation Porch
Extension / A03.
5. Glue on the Front Step
Tread / A12 on top of the
Front Step Base / A06.
2. Glue the Foundation
Porch Extension / A03 to
the Foundation Spacers
/ A05.
Table of contents
Other Miniatures Toy manuals
Popular Toy manuals by other brands

FUTABA
FUTABA GY470 instruction manual

LEGO
LEGO 41116 manual

Fisher-Price
Fisher-Price ColorMe Flowerz Bouquet Maker P9692 instruction sheet

Little Tikes
Little Tikes LITTLE HANDIWORKER 0920 Assembly instructions

Eduard
Eduard EF-2000 Two-seater exterior Assembly instructions

USA Trains
USA Trains EXTENDED VISION CABOOSE instructions