Step 1 – Unpacking Step 3 – Calibrating
Step 2 – Adding Oil Step 4 – Programming
1) With two people lift
machine straight out of
corrugated box and
place machine on a
secure table.
CAUTION:
When unpacking
DO NOT tilt
machine.
1) Open lid, confirm that main power switch is in the OFF position.
2) Simultaneously hold down , turn main power switch ON, release when CAL appears.
3) Close lid, machine will automatically start within 15 seconds.
4) As the display increments up, note the three digit number it levels o at.
5) Depress to set, open lid and turn power switch back to the OFF position.
6) Repeat procedure except this time depress when the display reaches 1 digit below the
noted number from step 4. Machine is now calibrated to its environment.
1) Open lid, turn main power switch to ON, wait for P1 to display. Press to open a program and move forward.
2)
VACUUM % – Use to select vacuum % (at 99.9% machine oers extra vacuum time). Press
to move forward.
3) EXTRA VACUUM TIME – Use to select value (up to 30 seconds). Press to move forward.
4) INERT GAS % [OPTIONAL] – Use to select % of gas injection. Press to move forward.
5) SEALING TIME – Use to select seconds of sealing time. Press to lock in the data.
LED
Display
LCD
Display
1) Open lid, turn power switch to ON position, after 30 seconds machine will display PROGRAM.
2) Hold down for 6 seconds, machine will display CALIBRATE.
3) Press 10 times until CALIBRATE is highlighted, close lid to start.
4) Display will increment down and eventually stop decreasing.
5) Depress and open lid, machine will return to operation after 6 seconds.
6) SAVING DATA appears on the display. Machine is now calibrated to its environment.
1) Open lid, turn power switch to ON, wait for program P01 to display. Press to open a program and move forward.
2) SEALING TIME – Use to select seconds of sealing time. Press to move forward.
3)
VACUUM % – Use
to select vacuum % (at 100% machine oers extra vacuum time). Press
to move forward.
4) VACUUM DISPLAY – Use to select display in % or millibar. Press to move forward.
5) EXTRA VACUUM TIME – Use to select value (up to 45 seconds). Press to move forward.
6) INERT GAS % [OPTIONAL] – Use to select % of gas injection. Press twice to return to the main menu.
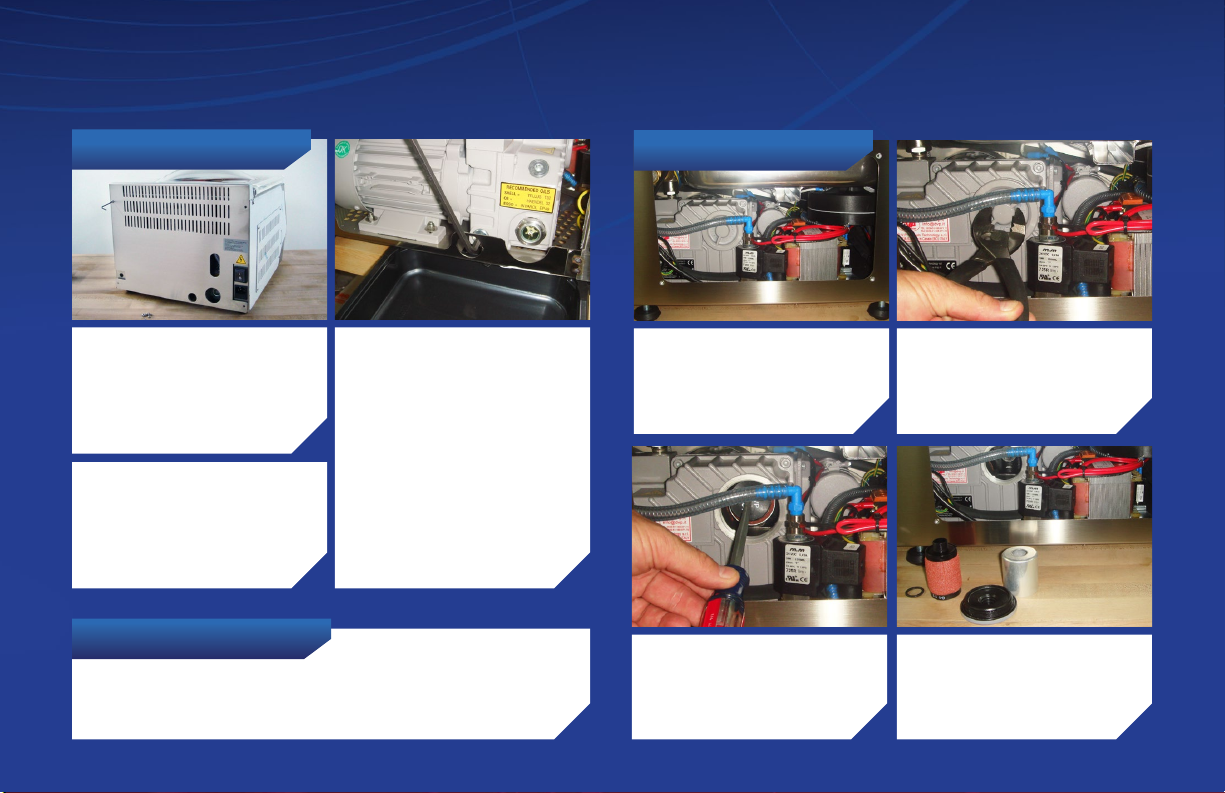
1) Remove the machine
back cover using the
supplied hex wrench.
4) Remove all packing
material.
CAUTION:
DO NOT remove brown
Teflon tape from sealing
bar(s).
2) Carefully remove the
upper oil fill plug using
the supplied hex wrench
or pliers.
Add supplied non-
detergent pump oil until
it reaches the middle
of the sight glass and
replace the upper oil
fill plug tightly.
Example pictures show the MVS 31XP. Your packaging may slightly dier.
Example pictures show the MVS 31XP. Your machine and tools may slightly dier.
Refer to operational manual for detailed programming instructions.
090815V5
3) Remove white
protective coating
adhered to the
stainless steel.
3) Plug female end of AC
power cord directly into
machine and the other
end into an AC outlet.
2) Using the four
adjustable rubber feet
level vacuum machine
on the secure table.
4) Turn power switch to
the ON position and cycle
machine a minimum of
three times.
IMPORTANT:
Be sure to calibrate
machine before
operating.
LED Display
LCD Display
S
S
S
S
S
S
S
S