manuals.online logo
Brands
  1. Home
  2. •
  3. Brands
  4. •
  5. minky
  6. •
  7. Household Appliance
  8. •
  9. minky SureDri User manual

minky SureDri User manual

Before using this appliance, please read the following instructions
carefully and keep for future reference.
SAFETY INSTRUCTIONS
1. This appliance is for indoor use only.
2. This appliance is for domestic use only and should not be used for
commercial purposes.
3. Check that the voltage on the rating plate corresponds with that of the local network before
connecting the appliance to the mains power supply.
4. This appliance can be used by children aged from 8 years and above and persons with reduced
physical, sensory or mental capabilities or lack of experience and knowledge providing they have
been given supervision or instruction concerning use of the appliance in a safe way and understand
the hazards involved. Cleaning and user maintenance shall not be undertaken by children unless they
are older than 8 years and supervised.
5. This is not a toy - children should be supervised to ensure they do not play with the appliance. Keep
the appliance and its cord out of reach of children less than 8 years.
6. If the appliance, power supply cord and plug are malfunctioning or they have been dropped or
damaged switch o the appliance and discontinue use immediately.
7. This appliance contains no user serviceable parts. Repairs should only be undertaken by the
manufacturer, its service agent or a similar qualified person.
8. If the power supply cord is damaged, it must be replaced by the manufacturer, its service agent or a
similar qualified person in order to avoid a hazard.
9. If replacement of the plug fuse is required, the replacement fuse should be of an identical rating to
the original.
10. Keep the power supply cord away from sharp edges and parts of the appliance that may become hot
during use. Do not allow the power supply cord to run under rugs or carpets or create a trip hazard.
11. Do not use this appliance with an extension lead or multiple socket adaptor.
12. Do not use this appliance near an open flame or in moist or damp conditions. Keep the appliance
away from other heat emitting appliances.
13. Allow sucient space around the Heat Pod Unit and airer for ventilation and heat dissipation. Place
on a flat, stable, heat resistant surface a minimum distance of 5 to 10 cm from walls and other items.
14. Do not leave the appliance unattended whilst connected to the mains power supply. Switch o the
mains power supply and remove the plug by hand.
15. Always disconnect the appliance from the power supply before assembling, disassembling or
performing cleaning or maintenance.
16. Do not immerse the Heat Pod Unit, power supply cord or plug in water or any other liquid. Care
should be taken to avoid spillage on the electrical components, power cord and plug. Do not operate
the appliance with wet hands.
17. Do not use any accessories or attachments with the appliance that have not been supplied or
recommended by the manufacturer.
WARNING
1. This appliance is intended only for drying textiles washed in water.
2. Applying dripping wet garments can cause a fire hazard. Ensure all garments have been spun well in a
washing machine before hanging.
3. Do not use with delicate textiles i.e. silks or non-colourfast garments.
CAUTION
Misuse of the appliance could cause injury – do not use the appliance for anything other than its intended use.
Caution:
Any heated surfaces and the heating element may contain residual heat and still be hot after use. Allow the
product to cool fully before moving or handling.
In order to avoid a hazard due to inadvertent resetting of the thermal cut-out, this appliance must not be supplied
through an external switching device, such as a timer, or connected to a circuit that is regularly switched on and
o by the utility.
Do not allow any garments, objects or the Airer Cover to be placed on top of or cover the Heat Pod and ensure
the outlet is not obstructed to avoid overheating.
Do not insert any objects into the air vents and ensure each vent is not obstructed.
Do not place the Heat Pod Unit next to the mains power supply
It is normal for the appliance to produce a little odour on the first use. This will cause no harm and will dissipate
after the first few uses.
GETTING STARTED
1. Remove the appliance from the packaging
2. Store or dispose of the packaging safely
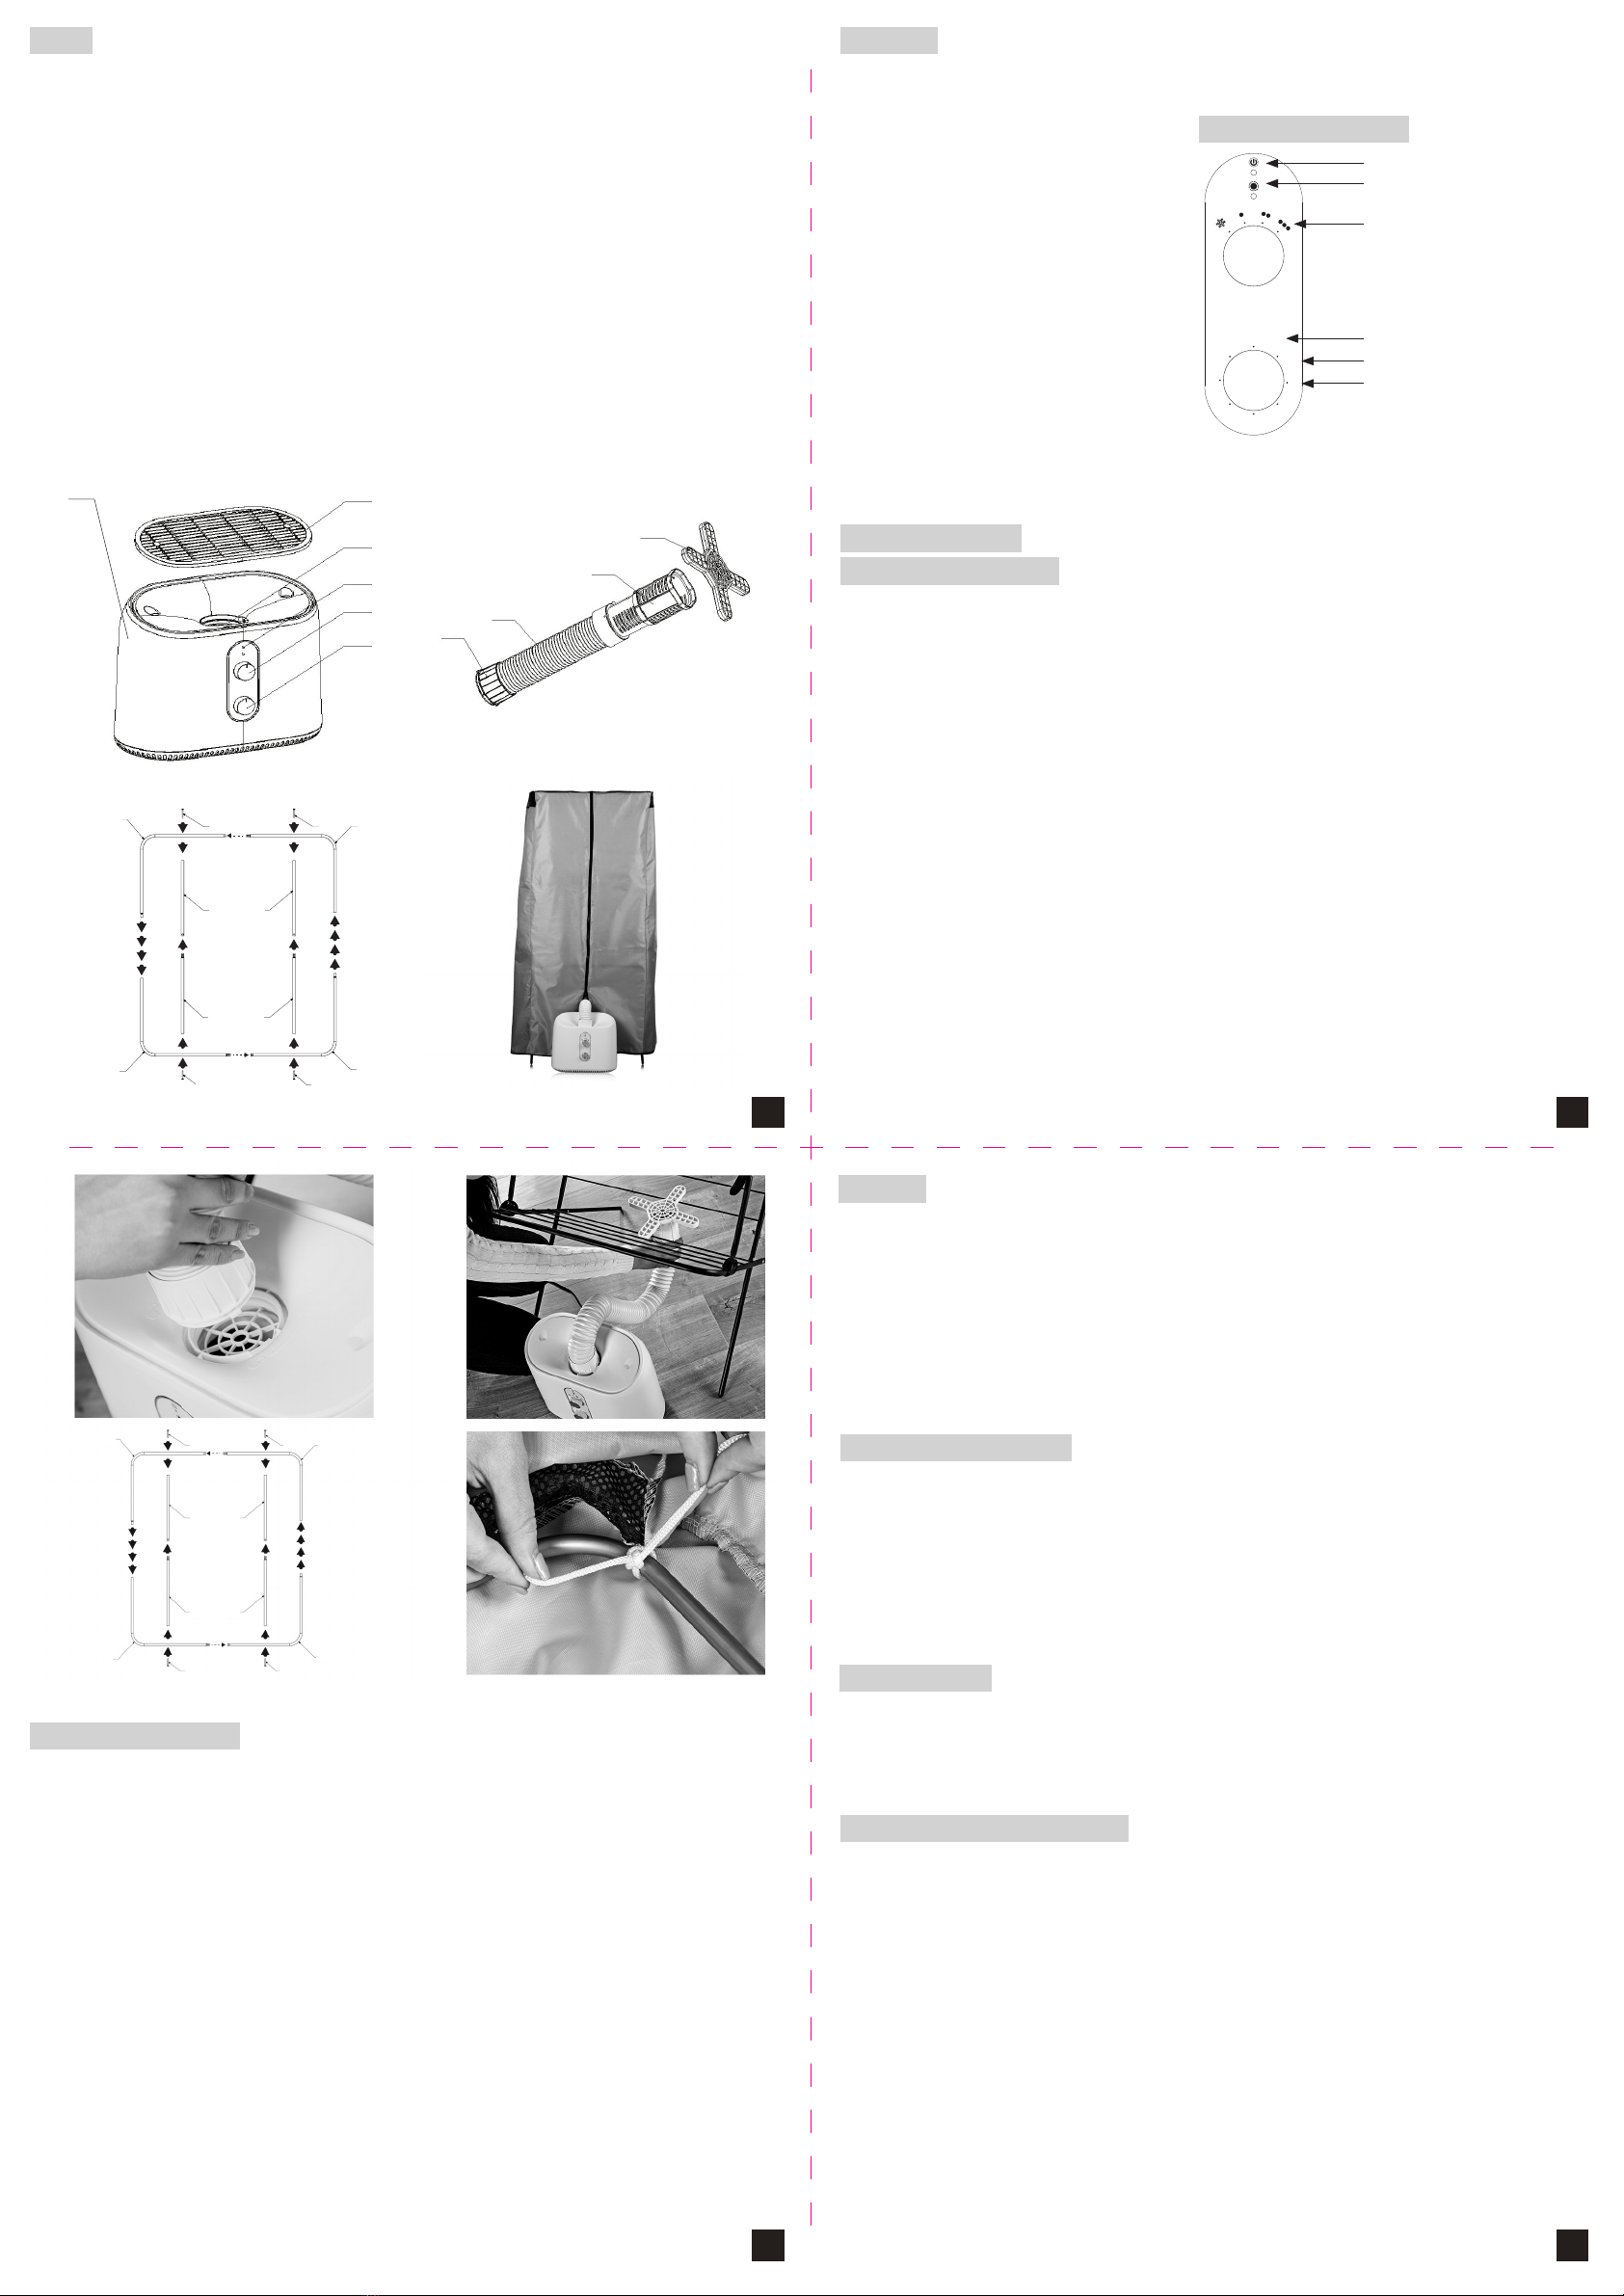
WHAT’S IN THE BOX
1. Minky Sure Dri Heat Pod Unit
2. Telescopic hose
3. Hose end cap
4. Frame
5. Cover
6. Instruction manual
Minky Homecare, Vale Mill (Rochdale) Ltd,
Robinson Street, Rochdale, OL16 1TA.
PL Innovation GMBH, HauptstraBe 103,
53619, Rheinbreitbach, Germany.
minky.com
Heat Pod Drying System
Instruction Manual
FOR HOUSEHOLD USE ONLY
READ THESE INSTRUCTIONS BEFORE USING THIS UNIT
PLEASE RETAIN THESE INSTRUCTIONS FOR FUTURE REFERENCE
Airer not included
1
32
PARTS
1. Minky Sure Dri Heat Pod Unit
2. Grille
3. Air outlet
4. Power indicator
5. Heat settings
6. Timer
7. Hose connector
8. Telescopic hose
9. Extension tube head
10. Hose end cap
11. Frame: 2 x A, 2 x B, 2 x C, 2 x D, 4 x E
12. Cover
FEATURES
1. Designed to be used with all 3 tier airers with maximum open dimensions of H139 x W59 x D49cm
2. Costs pennies to run *
3. Telescopic hose fits underneath any 3 tier airer
4. Low / medium / high temperature feature
5. Cool air feature
6. Safety cut out switch
7. 3 hour timer feature
8. 850W power
9. 1.4m power cord
*Exact cost per hour dependent on domestic
electricity prices at time of use.
INSTRUCTIONS FOR USE
ASSEMBLING THE APPLIANCE
1. The appliance needs to be assembled before plugging into the mains power supply.
2. Remove the grille from the top of the Heat Pod Unit.
3. Extend the extension tube head to maximum.
4. Apply hose end cap to the extension tube head, push on to fit.
5. Insert the hose connector into the air outlet and twist to lock (as per Figure 1 below).
6. Locate the appliance to the front of the base of the airer, extend the telescopic hose and extend the extension
tube head (as per figure 2 below).
7. Position the end cap between the middle of bottom rungs.
8. Assemble the frame (as per Figure 3 below).
9. Tie the cover onto the frame (as per Figure 4 below).
10. The appliance can now be plugged into the mains power supply.
OPERATING THE APPLIANCE
1. Ensure the ‘Assembling the appliance’ instructions have been followed.
2. Once the appliance is ready to be used, load the airer with damp garments.
3. Applying dripping wet garments can cause a fire hazard. Ensure all garments have been spun well in a washing
machine before hanging.
4. Load the airer and place the cover and frame over the airer. Ensure the frame is resting flush with the top
of the airer.
5. Plug in the Heat Pod Unit and switch on at the mains power supply. The Power light will illuminate to indicate
the appliance is plugged in.
6. Turn the temperature dial to your desired heat setting.
7. Turn the timer dial to ON for continuous running. The fan indicator light will illuminate to show that the fan
is running.
8. To use the timer function, turn the timer dial to the desired run time. The Heat Pod Unit will automatically
turn o once the time has elapsed.
9. Once the garments are dry, turn o the appliance by turning the Timer Dial to the ‘O’ position. The fan
indicator light will turn o to show that the fan has stopped. If a timer has been set, the Heat Pod Unit will
automatically turn o once the timer has elapsed.
10. Remove your garments with care as the appliance may still be hot.
STORAGE
1. Unplug the appliance.
2. Remove the cover and frame.
3. Untie the cover from the frame.
4. Fold the cover and place the cover and frame in a safe place.
5. Remove the telescopic tube from underneath the airer, compress the tube and untwist the hose connector
from the appliance.
6. Place the appliance and telescopic tube in a safe place.
CLEANING AND MAINTENANCE
1. Before cleaning, ensure the appliance is unplugged from the mains power supply and allow to cool fully.
2. Clean the appliance with a soft damp cloth and dry thoroughly.
3. Do not clean the appliance with scourers or harsh detergents as this could damage the appliance and impair its
functionality and appearance.
4. Do not immerse the appliance into water or any other liquid.
5. Clean the cover with a soft damp cloth and allow to dry naturally.
SPECIFICATIONS
Product Code: MS21N-001
Input: 220V-240V~; 50 Hz/60 Hz; IPX2
Output: 850W
GUARANTEE AND CUSTOMER SERVICES
This product is guaranteed for a period of 1 year from the date of purchase against all manufacturing defects,
subject to correct use in accordance with these instructions and normal domestic use. Please retain a valid proof
of purchase or receipt to activate this guarantee.
For full terms and conditions please refer to our website.
Minky products are manufactured to the highest standards to ensure the consistent quality expected from
Britain’s leading supplier of homecare products.
To contact us please call our customer helpline on 0330 00 22 555 or email support@minkyhomecare.co.uk
Minky Homecare, Vale Mill (Rochdale) Ltd. Robinson Street, Rochdale, OL16 1TA, United Kingdom
PL Innovation GMBH, HauptstraBe 103, 53619, Rheinbreitbach, Germany.
Please retain this information for future reference. These instructions can also be found on the Minky website.
ON
30
mins
2.5
hrs
1hr2hr
3hr
1.5hrs
OFF
1. Power indicator
2. Fan indicator
3.Heat and cool air settings
4. On – continuous
5. OFF
6. Timer functions
2
3
4
5
6
1
7
8
9
10
11 12
AEEB
C C
A
B
EE
D D
Figure 1 Figure 2
Figure 3
Figure 4
(Airer not included)
A
A
A
A
D
D
C
C
D
D
C
C
E
E
E
E
E
E
B
B
B
B
E
E
CONTROL PANEL FEATURES
1
2
3
4
5
6
7
5
6
4

Popular Household Appliance manuals by other brands

HSPT Golden Rainbow AUTOMATIC GOLDEN RAINBOW 10 PLUS instruction manual

HSPT Golden Rainbow

HSPT Golden Rainbow AUTOMATIC GOLDEN RAINBOW 10 PLUS instruction manual

Philips GC026 user manual

Philips

Philips GC026 user manual

Pella 801U0103 installation instructions

Pella

Pella 801U0103 installation instructions

Project Source 08-3843 manual

Project Source

Project Source 08-3843 manual

Kagan IsoBreathe quick start guide

Kagan

Kagan IsoBreathe quick start guide

puregiene 120263 instruction manual

puregiene

puregiene 120263 instruction manual

Pella 80AT0102 installation instructions

Pella

Pella 80AT0102 installation instructions

aidapt VM948 Usage and maintenance instructions

aidapt

aidapt VM948 Usage and maintenance instructions

Hills Supa Fold 230 instruction sheet

Hills

Hills Supa Fold 230 instruction sheet

Hills Traditional Rotary 42 Hoist owner's manual

Hills

Hills Traditional Rotary 42 Hoist owner's manual

Pella 80WW0101 Replacement instructions

Pella

Pella 80WW0101 Replacement instructions

ZANE ARTS BG-015 manual

ZANE ARTS

ZANE ARTS BG-015 manual

Abode AECHD2001 instruction manual

Abode

Abode AECHD2001 instruction manual

Pella HURRICANESHIELD 80GY0102 installation instructions

Pella

Pella HURRICANESHIELD 80GY0102 installation instructions

Songmics RCR19 manual

Songmics

Songmics RCR19 manual

rainforest EMU user manual

rainforest

rainforest EMU user manual

Kagan shUVee Instructions for use

Kagan

Kagan shUVee Instructions for use

Bg BATTISTELLA NETTUNO Instruction and maintenance

Bg

Bg BATTISTELLA NETTUNO Instruction and maintenance

manuals.online logo
manuals.online logoBrands
  • About & Mission
  • Contact us
  • Privacy Policy
  • Terms and Conditions

Copyright 2025 Manuals.Online. All Rights Reserved.