Mistral 352136_2007 Technical specifications

INFLATABLE STAND-UP PADDLE BOARD
AUFBLASBARES STAND-UP-
PADDLE-BOARD
Montage-, Bedienungs- und Sicherheitshinweise
INFLATABLE STAND-UP PADDLE BOARD
Assembly, operating and safety instructions
IAN 352136_2007
NAFUKOVACÍ PADDLERBOARD
Pokyny pre montáž, obsluhu a bezpečnostné pokyny
NAPIHLJIVA DESKA STAND-UP-PADDLE
Navodila za montažo, uporabo in varnostna navodila
MISTRAL DVOUKOMOROVÝ
PADDLE BOARD
Pokyny k montáži, obsluze a bezpečnostní pokyny
FELFÚJAHTÓ STAND-UP-PADDLE-BOARD
Szerelési, használati és biztonsági tudnivalók

GB Assembly, operating and safety instructions Page 5
HU Szerelési, használati és biztonsági tudnivalók Oldal 17
SI Navodila za montažo, uporabo in varnostna navodila Stran 30
CZ Pokyny k montáži, obsluze a bezpečnostní pokyny Strana 43
SK Pokyny pre montáž, obsluhu a bezpečnostné pokyny Strana 56
DE/AT/CH Montage-, Bedienungs- und Sicherheitshinweise Seite 69

A
B
C 1/2
11d 1c1c 1a/b1a/b/e
5
1x
6
1x
7
1x
8
1x
9
1x
11
1x
14
1x
12
1x
13
1x 2b
1x
2a
1x
10
1x
3
1x
4
1x
1414b14a
13
1e
1a
1b 1b
14
13a

D E
F
C 3/4
1a11 12
1e
12b
12a

5GB
Introduction...................................................................................................................................Page 6
Intended use........................................................................................................................................Page 6
Parts description..................................................................................................................................Page 6
Scope of delivery................................................................................................................................Page 6
Technical data.....................................................................................................................................Page 6
General safety notes.............................................................................................................Page 7
User-defined safety instructions..........................................................................................................Page 7
Product-specific safety notes...............................................................................................................Page 8
Pictograms ...........................................................................................................................................Page 8
Before first use............................................................................................................................Page 10
Unrolling the board.............................................................................................................................Page 10
Inflating the board ..............................................................................................................................Page 11
Installing the US fin .............................................................................................................................Page 12
Assembling the single blade paddle .................................................................................................Page 12
Assembling the double-bladed paddle .............................................................................................Page 12
Disassembling the product .................................................................................................................Page 12
Using the product.....................................................................................................................Page 13
Adjusting the paddle length ...............................................................................................................Page 13
Using on the water..............................................................................................................................Page 13
Transport.........................................................................................................................................Page 14
Storage .............................................................................................................................................Page 14
Cleaning and care....................................................................................................................Page 15
Repair and maintenance....................................................................................................Page 15
Repairing the valve .............................................................................................................................Page 15
Repairing the board............................................................................................................................Page 16
Maintaining the air pump .................................................................................................Page 16
Disposal............................................................................................................................................Page 16
Service...............................................................................................................................................Page 16

6 GB
Inflatable Stand-Up Paddle Board
Introduction
We congratulate you on the purchase of your new
product. You have chosen a high quality product.
Familiarise yourself with the product before using it
for the first time. In addition, please carefully refer
to the operating instructions and the safety advice
below. Only use the product as instructed and only
for the indicated field of application. Keep these
instructions in a safe place. If you pass the product
on to anyone else, please ensure that you also pass
on all the documentation with it.
Intended use
This product is intended as a stand-up paddle board
for use in protected shore areas up to 150m, never
in nature reserves with breeding places for animals.
This product is intended for paddling in protected
near-shore coastal water, small bays, small lakes,
small rivers and canals. Never use the product in
high wind and/or breaking waves. This product is
not a personal flotation device, it must not be used
as a water toy or for winter sports. It may only be
used by persons able to swim. Not suitable for chil-
dren under age 14 years. Before using this product,
you should attend a suitable course, a certified
school or receive instruction from an experienced
athlete. This product is only intended for private use,
not for commercial use.
Parts description
1Board
1a Valve
1b Valve needle
1c D-ring
1d Board transport
handle
1e Valve cap
2a Paddle blade
2b Second paddle
blade
3Paddle shaft
4Extension
4a Locking lever
5Box with repair kit
6Glue
7Repair patches
8Drybag
9Leash
9a Leash strap
9b Leash loop
10 Backpack
11 Valve wrench
12 US fin
12a Metal plate
12b Screw
13 Air pump (with
pressure gauge)
13a Male thread
14 Hose
14a Threaded coupler
14b Hose connection
15 Fin protector
16 Seat
17 Strap
18 Foot rest
19 Loop
Scope of delivery
1 Inflatable Stand-Up Paddle Board (HG06954)
1 Universal paddle (HG05822)
1 Air pump with pressure gauge (HG06968)
1 Foot rest (HG06962)
1 Seat (HG06961)
1 Backpack (HG06960)
1 Drybag (HG05824)
1 Leash (HG05756(B))
1 Repair kit (HG06963)
1 US fin (HG05756(D))
1 Set of installation instructions and instructions for
use
Technical data
Max. load: 150kg
Max. air pressure: 1 bar (15PSI)
Dimensions: (inflated):
approx. 320 x 84 x 15cm
(L x W x H)
Pack size: drybag:
approx. 49 x 31 x 20.5cm
(H x W x Ø bottom);
Volume: 10 L
Backpack: approx. 95 x 44 x 25cm
Weight: 10.8kg

7GB
General safety
notes
FAILURE TO OBSERVE THE SAFETY INFORMATION
IN THE INSTRUCTIONS FOR USE
MAY RESULT
IN RISKS SUCH AS INJURIES AND DEATH, E.G.
FROM DROWNING! KEEP ALL SAFETY INFOR-
MATION AND INSTRUCTIONS FOR FUTURE
REFERENCE!
ATTENTION! Prudence and self-assessment
on water are extremely important. Never over-
estimate your strength and steersmanship! Always
stay near shore! Be aware of the weather, storm
warnings or possible flares!
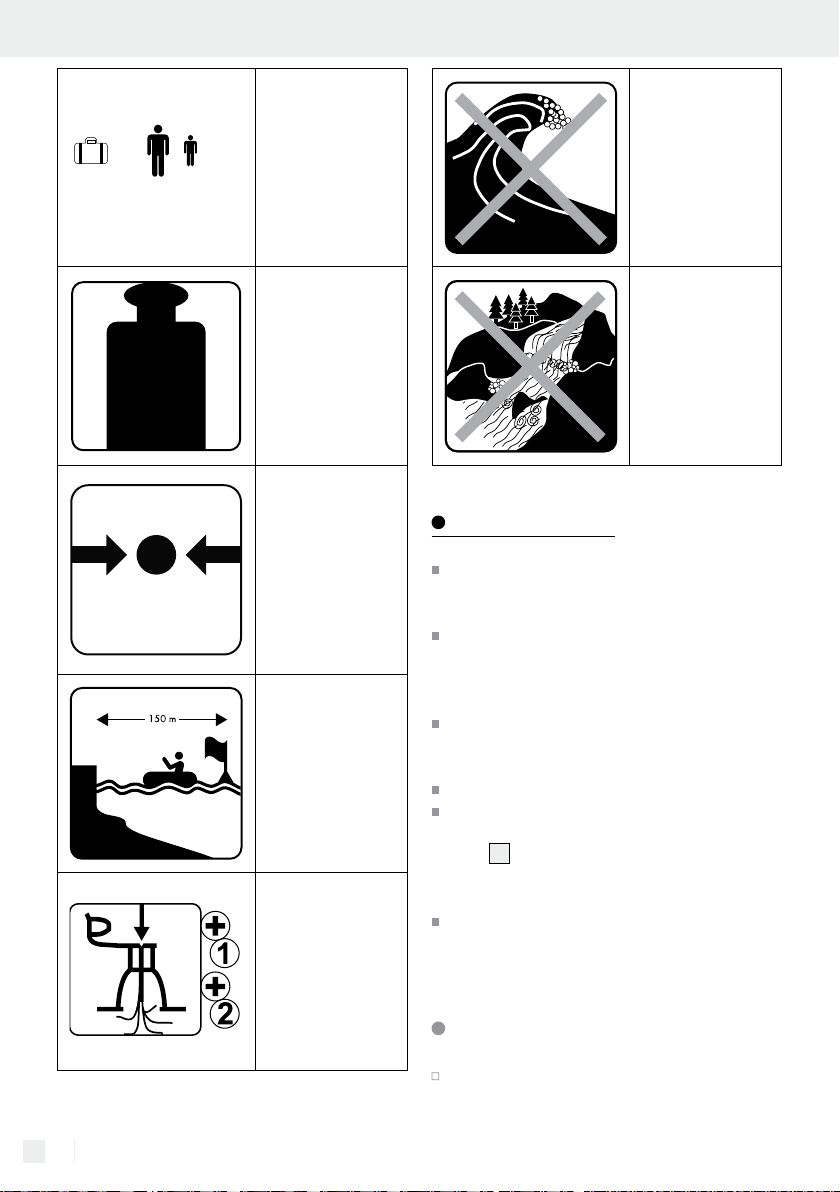
ATTENTION! Always observe the safety rules
and relevant ordinances for lakes and open
waters, and always wear an approved life
jacket for your own safety.
Always use the product as specified in these
instructions and the information on labels and
in the instructions for use. Never exceed the
maximum load, air pressure of 1bar (15PSI)
and the number of persons specified on the
product and in the instructions for use. Always
wear a life jacket.
Never modify the product. Any modifications
affect the functionality of the product and will
void the warranty.
Do not modify the basic design of the product,
as this can affect safety.
Observe the information on the manufacturer
label on the product.
By using this product you acknowledge your
obligation to acquire the necessary knowledge
and skills required for water sports and navigat-
ing waters. This also applies to observing the
relevant rules and laws. Safety on water is a
result of the synergy between user, weather
and water conditions. By using this product you
accept, understand and acknowledge the risks
associated with paddling.
The inflated board, the paddle and the blades
are rigid and may cause injuries.
Please watch for bystanders when transporting
the product.
DANGER TO
LIFE AND RISK OF ACCIDENT
FOR INFANTS AND CHILDREN!
Never leave children unattended with the pack-
aging material or the product. The packaging
material presents a suffocation hazard and
there is a risk of death from strangulation and/
or drowning. Children frequently underestimate
the dangers. Always keep children away from
the product.
This device is not intended to be used by persons
(including children) with restricted physical,
sensory or mental abilities or with insufficient
experience and / or knowledge, unless they
are supervised by a person who is responsible
for their safety or they have received instruction
on how to use the device from such a responsi-
ble person. Children must be supervised to
ensure they do not play with the product.
User-defined safety
instructions
Wear a life jacket when using the product on
water.
Be careful and prudent on waters.
Do not use this product under the influence of
drugs, medication or alcohol.
Never overestimate your strength, steersmanship
and skills. Be aware of your limits. Paddling can
be dangerous and physically strenuous. Always
stay as close as possible to the shore and coast.
Do not use the product in floods. Only paddle
in safe weather conditions.
Obtain information about current weather con-
ditions and check the weather forecast. Be aware
of severe weather warnings or possible flares.
Never use the product in offshore wind (wind
from the land blowing toward the water). You
could easily be swept away.
Check the water for rocks, docks, ripples and
other hazards before paddling. Be careful in
offshore wind and currents, tidal change, river
water levels and obstacles in and above water.
Stay in protected shore areas up to 150m.

8 GB
Keep a safe distance from rapids, whirlpools,
flotsam and other obstacles.
Always observe local navigation rules.
If necessary, wear a protective helmet.
Always use a leash to prevent the board from
floating away from you.
Wear clothing suitable for the weather and
water conditions. Wear a wetsuit when paddling
in cool weather. There is a risk of hypothermia!
Attach the leash to yourself and the board.
When using the leash, you could be tossed
against the board if you lose control. Be careful
the leash does not entangle around your body
or feet.
Always paddle together with others, never
alone.
Notify others before you go paddle boarding.
Keep identification on you.
When using the product outside of designated
swim areas, be sure another person is watching
you.
Watch for others in the water when paddle
boarding.
Do not use the product near boat traffic, other
watercrafts, dams, locks and other hazards.
Do not use the product in situations where you
may injury others, e.g. people in the water or
on the beach.
Uneven weight distribution of cargo or persons
on the board affects the stability, balance and
product characteristics. This can also cause the
product to tip. Always be sure to distribute your
weight as evenly on the board as possible.
Any change in the distribution of the cargo or
persons on the board (such as adding fishing
equipment, a radar, a folding mast, motor, etc.)
can significantly affect stability, balance and
the characteristics of the board.
Product-specific safety notes
Inflatable products are sensitive to low temper-
atures. Never fold and inflate the product in
temperatures under 15°C.
Inflate the product at a pressure of 0.8bar
(12PSI) up to a maximum pressure of 1bar
(15PSI).
If the air pressure inside the product rises in
direct sunlight, it must be balanced out accord-
ingly by releasing air.
If the pressure exceeds 1bar (15PSI), open
the valve and release air until the operating
pressure is in the safe operating range again.
Be sure the product – particularly when inflated
– does not come into contact with stones, gravel
or sharp objects and does not rub or scrape
against rough surfaces, as this can cause dam-
age.
Do not let the product sit in the sun for extended
periods; always set it down in the shade. If the
product will not be used for extended periods,
e.g. in winter, store it slightly inflated and away
from frost.
Only insert the included or suitable pump adapt-
ers in the safety valves. Other adapters can
damage the valves.
Do not overinflate the product or the welded
seams may rupture. Close the valve properly
after inflating.
Avoid contact with hot, sharp, pointy or dan-
gerous objects, chemicals or liquids. If this does
occur, thoroughly check the product for leaks or
other damages. Do not carry sharp or pointy
objects on the board.
Keep the product away from fire and hot ob-
jects (e.g. lit cigarettes).
Do not transport the inflated board on vehicles.
Q
Pictograms
Please note the pictograms on
the product before use. Injuries and/or property
damage may otherwise occur.

9GB
General
warning sign
General
mandatory
action symbol
General
prohibition sign
Does not prevent
drowning.
Read the instruc-
tions for use first.
Do not use in
offshore wind.
Do not use in
offshore currents.
0-14
Not suitable for
children under
14 years.
Number of users:
1 adult,
0 children
For swimmers
only!

10 GB
+
= 150 k
= 150
kg (330 lbs.
)
Maximum weight
capacity.
max.
150 kg
Maximum weight
capacity
1 bar
Operating
pressure: 1 bar,
15 PSI
Safe distance
from shore:
150m
100%
Fully inflate air
chambers.
Do not use in
breaking waves.
Do not use in
whitewater.
Before first use
Before using this product, you should attend a
suitable course, a certified school or receive in-
struction from an experienced athlete.
The load on the product must not exceed 150kg.
Ensure weight is distributed evenly. Failure to
observe this advice may result in injury and/or
product damage.
Check all parts of the product for damage such
as wear, leaks, tears or other damages before
every use.
Do not use the product if it is damaged.
Check the air pressure inside the board. Also
verify the valve is closed tight and the valve
cap
1e
is attached to prevent sand and dirt from
entering the valve. Watch for any pressure loss
in the board.
Never leave the product in the water unattended.
A current can quickly sweep the product away
so that a swimmer cannot retrieve it.
Unrolling the board
Select an even, clean surface with enough
room to unpack and unfold the product.

11GB
Remove all product packaging.
Verify that all parts are present and in good
condition.
When unrolling the board 1, ensure there are
no sharp objects such as shards of glass, loose
gravel or glowing charcoal or cigarette butts
are on the ground.
Note: Check the board for any damage such
as holes and tears the second time it is assem-
bled or sooner. Please refer to chapter ”Repair
and maintenance” how to repair these. Damage
cannot be repaired once you are on the water.
Unroll the board 1and remove the plastic
foam fin protector 15 from the two fins.
Note: Do not throw away the fin protector 15 .
These are required to protect the fixed fins when
rolling up the board 1after use.
Inflating the board
Avoid overinflating to prevent the welded
seams from over-expanding or even rupturing.
Only inflate up to a pressure of 1bar (15PSI).
The air pressure will increase when the product
heats up from the sun. In this case, reduce the air
pressure by releasing air from the board 1.
Inflate the board 1with the included air pump
13 . You can alternatively use a standard foot
pump or twin stroke piston pump with the cor-
responding attachments and a pressure gauge.
Only open the valves 1a to inflate or
release air. They can otherwise become
dirty.
The area around the valve 1a must always
be dry and clean. Check the valve 1a for dirt
particles.
Ensure sand or other dirt does not enter the
valve 1a .
You may also use electric pumps designed spe-
cifically for SUP boards. These pumps are pre-
set to 15 PSI; the pump automatically shuts off
when this air pressure is reached.
Screw the threaded coupler 14a of the hose 14
onto the male thread 13a of the connector on
the air pump 13 . Be sure to screw the hose 14
onto the thread marked ”INF” (Fig. B).
Set the air pump 13 to twin stroke by moving
the front lever to the right (Fig. F1). Now inflate
the board 1.
Once you notice a lot of force is required, set
the air pump 13 to single stroke by moving the
front lever to a vertical position. You can now
continue inflating with considerably less force.
Note: Do not pull the handle on the air pump
13
all the way up, only far enough so your arms
remain straight (Fig. F2). Now use the weight
of your body to inflate the product by simply
bending at the knees. Keep your arms straight.
This way you are not inflating with your arm
muscles but the weight of your body (Fig. F3).
Inflate the board 1with the air pump 13 to
the recommended pressure of 1 bar (15PSI).
Use the pressure gauge to check the pressure.
Stop inflating the product once the pressure
gauge reads 1 Bar (15PSI).
Inflate in the following order:
1. First inflate the air chamber with valve number
1. The valves are marked 1 and 2.
2. Turn the valve head clockwise so it comes out
upward (Fig. C1).
3. Then open valve 2 and turn the valve head an-
ti-clockwise whilst pushing down (Fig. C4).
Your board 1is now ready to inflate.
4. Start with valve 1 by inserting the hose 14 into
the valve 1a and securing it all the way clock-
wise (Fig. C2).
Note: The valve head must be in the closed
position.
5. Then inflate the second air chamber via valve
2. To do so, turn the valve head clockwise so
it comes out upward (Fig. C1), insert the pump
hose the same as with valve 1 and start inflat-
ing. Since the inner air chamber is small, leave
the front lever on the air pump 13 vertical to
inflate using little force.
6. Unscrew the hose end anti-clockwise from the
valve 1a and attach the valve cap 1e to the
valve 1a .
7. Tighten the valve cap 1e , turning clockwise.

12 GB
Installing the US fin (Fig. E)
Insert the metal plate 12a in the hole in the mid-
dle of the slot and slide forward.
Note: You can use the screw 12b to slide the
plate along the slot.
Insert the back of the US fin 12 in the fin box
and slide back. Insert the front of the US fin 12
in the fin box and slide the US fin 12 forward
until the hole in the fin is located over the hole
in the metal plate 12a .
Insert the screw 12b in the hole in the fin and
screw it in along with the metal plate 12a to
secure the US fin 12 .
Note: Always ensure the fins are facing toward
you when carrying the board
1
. Be particularly
careful not to injure others with the board 1in
windy conditions.
Assembling the single blade
paddle (Fig. K)
Loosen the locking lever
4a
on the extension
4
.
Insert the paddle shaft 3in the extension 4.
Extend the paddle shaft 3to the desired
length.
Note: For information about the recommended
paddle length, please see chapter
”
Adjusting
the paddle length
”
.
Press in the locking lever
4a
on the extension
4
to lock the paddle shaft 3.
Insert the paddle blade 2a in the opening on
the extension 4. Ensure the locking pin is in-
serted all the way in the pinhole on the paddle
blade 2a . You must hear the pin on the exten-
sion 4click into place when it locks into the
pinhole of the paddle blade 2a .
Assembling the double-bladed
paddle (Fig. K)
Loosen the locking lever
4a
on the extension
4
.
Insert the second paddle blade 2b in the end
of the extension 4with the locking lever 4a .
Turn the second paddle blade 2b to the de-
sired angle.
Push in the locking lever 4a on the extension 4
to lock the second paddle blade 2b in place.
Insert the paddle blade 2a in the opening on
the extension 4. Ensure the locking pin in in-
serted all the way in the pinhole. You must hear
the pin on the extension 4click into place
when it locks into the pinhole.
Disassembling the product
Select a clean, even surface with adequate
space to disassemble the product.
Disassembly requires the following steps:
·Removing the US fin 12 and other accesso-
ries (foot rest 18 , seat 16 )
·Releasing air from the board 1
·Rolling up the board 1
·Disassembling the paddle into the individual
parts
Note: Remove the US fin 12 before releasing
air from the board 1.
Removing the US fin:
Remove the US fin 12 per chapter
”
Installing
the US fin
”
in reverse order.
Disassembling the paddle:
Disassemble the paddle per chapter
”
Assem-
bling the single blade paddle
”
or
”
Assembling
the double-bladed paddle
”
in reverse order.
Releasing air:
Place the dry board 1flat on the ground and
open the two valves 1a by pushing in the valve
needle 1b whilst turning clockwise.
Only push the valve needle 1b in slightly so air
can escape slowly.
Release the air.
You can alternatively use the air pump 13 to
fold the board 1as flat as possible by attach-
ing the hose 14 backwards on the air pump 13
(Deflate). Connect the hose 14 to one of the
valves 1a . The valve head must be down. Turn
the valve head to the right (Fig. C4), pump and

13GB
extract the remaining air from the board 1
until it is completely flat.
Then turn the valve head anti-clockwise so it
comes out upward (Fig. C1).
Now place the board 1flat on the ground
(Fig. N1).
Then fold the board 1once and place the
nose over the tail (Fig. N2).
Then fold the tail and nose again, making sure
the external fins under the board 1do not
buckle (Fig. N3).
Do not fold the board 1along the
outside edges of the fin box. This will
cause excessive tension in the board
1
.
Now fold the opposite side to about the middle
(Fig. N4).
Then fold the board 1once more onto the
opposite side so the external fins are on top
(Fig. N5).
Use the strap to lash up the board 1.
Attach the fin protector 15 to the fins so they
remain straight whilst packed.
Using the product
Adjusting the paddle length
Stand straight and raise one arm up; bend
your palm to about a right angle (Fig. J).
Open the locking lever 4a on your paddle and
slide the extension up until the paddle handle
fits below your bent palm. Close the lock on
the locking lever 4a . Your paddle is now set to
the correct length.
Important: Do not extend the paddle
shaft 3past the ”STOP” mark. The
paddle will otherwise become unsta-
ble and could break.
Using on the water
Note: Be careful not to hurt others when carrying
the board 1in windy conditions. Always keep the
fins toward you.
Note: You can use the board 1standing up or
sitting.
Standing up:
In this position, use the leash 9as an addi-
tional safety measure.
Do not attach the leash 9to your ankle when
using the board
1
on flowing water, e.g. water
with rapids such as streams and rivers.
Always attach the leash 9to your ankle in
offshore winds.
If you find yourself in distress, always stay on
the board 1. Never abandon the board 1
in strong offshore winds, or you may drown. In
this case, use the international distress signal to
draw attention to yourself: stand or sit on the
board 1and slowly and clearly raise and
lower your straight arms at your side (Fig. P).
Attach the leash 9as shown in figure G:
1. Attach the leash 9to the rear D-ring 1c .
2. Pull the loop on the leash 9b through the
D-ring 1c .
3. Pull the leash strap 9a through the loop on
the leash 9b .
4. When standing to use the board 1in
deeper waters, attach the leash 9to the
leg/ankle (Fig. H/I).
Seated:
To use the board 1in a seated position, you will
need to install the foot rest 18 and the seat 16
(Fig. O). Proceed as follows:
Installing the foot rest 18 :
Insert the tube end of the foot rest 18 through
the first loop 19 from the side.
Insert the opposite end through the second
loop 19 until both are in the middle of the
board 1.
Installing the seat 16 :
Place the seat 16 on the board 1so your
legs are slightly bent when your heels are
touching the foot rest 18 .

14 GB
Note: The distance to the foot rest is very im-
portant. Ensure it is correct so you can use the
foot rest 18 well.
Sit down, lift yourself up with both hands and
slide your bottom into the seat 16 . Adjust the
backrest so you are sitting straight.
Secure the seat 16 by attaching the snap hooks
on the four adjustable straps
17
to the D-rings
1c
on the board 1.
Set the seat on the board 1, the inside of the
backrest must always face toward the foot rest
18 .
Secure the backrest by attaching the four straps
17 with snap hooks to the four D-rings 1c at
the back of the board 1.
Position the seat 16 so your legs are slightly
bent when touching the foot rest 18 .
Mounting the board (Fig. L):
Stand next to the board (Fig. L1).
Place the paddle on the board 1perpendicu-
lar to the centreline of the board, slightly in front
of the board transport handle 1d (Fig. L2).
Now kneel on the board, behind the paddle,
in shallow water (Fig. L3). Grab the paddle but
do not pick it up. Your hands are far apart.
Now move one foot forward and position it on
the board 1at about the level of the board
transport handle 1d (Fig. L4). Place the other
foot next to the board transport handle 1d .
Stand on the board 1with your legs apart,
preferably to the right and left of the board
transport handle 1d .
Now kneel all the way down, slightly back, whilst
picking the paddle up horizontally (Fig. L5).
Now slowly stand up; the paddle will help you
maintain your balance. You are standing on
the board with your legs apart (Fig. L6) and
can start to paddle.
Correct paddling technique (Fig. M):
Note: The top arm holding the paddle handle
should always remain straight whilst paddling.
Insert the paddle in the water directly next to the
board 1as far forward as possible (Fig. M1).
The lower arm holding the paddle at about
shoulder width is also straight (Fig. M2).
With the top arm straight, pull the paddle toward
you with the bottom arm (Fig. M3). Bend the
bottom arm in the process. Pull the paddle out
of the water at about your feet (M4). Repeat
the process.
Transport
Do not transport the inflated board 1on
vehicles.
Backpack 10 :
All accessories can be stored in the backpack
10
for transport or storage.
Disassemble the product per chapter
”
Disas-
sembling the product
”
.
Ensure it is completely clean, dry and rolled up.
Place the board 1and all individual parts
and accessories stored inside the drybag 8in
the backpack 10 (maximum weight capacity:
25kg).
Drybag 8:
Note: Please note, the drybag 8is not water-
proof. Do not store delicate objects, e.g. cameras,
in it.
Store the smaller accessories in the drybag
8
.
Close the hook-and-loop fastener.
Fold the hook-and-loop fastener twice.
Close the drybag 8tight with the strap and
buckle.
Storage
Store the product in a dry, dust-free location,
protected from direct sunlight, where it will not
be exposed to extreme temperature fluctuations.
If the product will not be used for extended
periods, we recommend possibly storing the
board 1flat and slightly inflated.
Store the product in a safe location, out of the
reach of children.
Do not place heavy or sharp objects on the
board 1.

15GB
Do not drag the product over hard and abra-
sive surfaces before storing it.
Ensure there is no sand or gravel in the folds
of the board 1. This could cause abrasion or
holes during storage.
Check the product for wear or ageing after it
has been stored for an extended period.
Storing the board 1rolled up in cold weather
for extended periods can cause tears in the
material.
Cleaning and care
Do not use aggressive cleaning agents, brushes
with metal or nylon bristles or sharp or metal
objects such as knives.
Only use mild cleaning agents.
Clean the board 1after every use, with the
valve 1a closed.
Remove the US fin 12 per chapter
”
Removing
the US fin
”
.
Place the board 1on a clean, dry and even
surface.
Rinse the board 1and US fin 12 with fresh
water and mild soap to remove salt crystals,
grains of sand and other particles.
Wipe the board 1down with a dry, soft cloth.
Then allow the board 1and US fin 12 to dry
thoroughly.
Repair and maintenance
Carry out any repairs in
a well ventilated location and avoid inhaling
toxic fumes. Avoid contact with the skin or the
eyes. Keep all repair supplies (glue, solvent,
etc.) out of the reach of children.
Never glue the seams. The
seams can only be repaired by the manufacturer
of the board 1.
Never repair large holes yourself. You can
repair small holes with the included repair kit.
Check the board 1for pressure loss, holes or
tears before every use. If air escapes from the
board 1, it may be due to a leaking valve 1a ,
defective valve 1a or a hole in the actual
board 1.
Repairing the valve
Proceed as follows to check valves 1a for leaks:
Turn the valve cap 1e anti-clockwise and re-
move it from the valve 1a .
Ensure there is no sand or other foreign objects
in the valve 1a .
Close the valve 1a .
Turn the valve cap 1e anti-clockwise and re-
move it from the valve 1a .
Place the valve wrench 11 over the valve 1a
until it covers the entire valve 1a .
Tighten the valve cap 1e , turning clockwise.
Close the valve 1a with the valve cap 1e .
Fully inflate the board 1.
Close the valve 1a .
Pour soapy water over the area around the
valve 1a . If bubbles do not form, the valve 1a
is tight. If bubbles form around the valve 1a ,
air is escaping. The valve 1a either needs to
be tightened or replaced.
Tightening the valve 1a (Fig. D):
Never use the valve wrench 11
to tighten the valve 1a if the board 1is pressur-
ised. Injuries may otherwise occur.
Place the valve wrench 11 over the valve 1a
until it covers the entire valve 1a . Tighten the
valve 1a , turning clockwise.
Repeat the bubble test.
If bubbles form around the valve 1a after tight-
ening, it needs to be replaced.
Replacing the 1a valve (Fig. D):
Place the valve wrench 11 over the valve 1a
until it covers the entire valve.
Unscrew the valve cap 1e anti-clockwise and
remove the defective valve 1a from the valve
seat.

16 GB
Insert a new valve 1a in the valve seat. For the
best seal, we recommend applying a small
amount of silicone grease or petroleum jelly
around the valve 1a .
Place the valve wrench 11 over the valve 1a
and tighten, turning clockwise.
Note: If the valve 1a leaks and tightening with
the valve wrench 11 does not help, completely
remove the top of the valve 1a with the valve
wrench 11 . Remove any dirt from the valve
membrane. Verify the valve 1a is tight after
screwing it in.
Repairing the board
Before using the product on water
after making repairs, verify the repair
patch 7is air tight and seals properly.
Never attempt to repair large damaged
areas yourself. Take the product to a
speciality shop.
Detecting holes:
Coat the area on the board 1you suspect
has a hole with soapy water. Bubbles will form
where air is escaping the board 1.
Mark the respective area.
Rinse the board 1with clear water and wipe
dry before starting the repair.
Patching holes:
Only repair holes with suitable glue. Glue 6is
included. Using the wrong adhesive for repairs
can cause further damage. You can also purchase
suitable adhesive from speciality retailers.
Once you have located the hole(s), release all
of the air from the board 1.
Thoroughly clean the area to be repaired.
Dry the cleaned area.
Measure and cut a repair patch
7
large enough
to cover 1.5cm around the damaged area.
Note: If you're able to, ensure the surface
around the damaged area and the repair
patch 7is absolutely free from grease.
Apply an even coat of glue 6to the surface
around the damaged area and the actual repair
patch 7.
Allow the glue to dry for approx. 3–4 minutes
(at temperatures of about 20–25°C).
Place the repair patch 7on the surface of the
board with the adhesive surfaces facing.
Press the repair patch 7onto the board 1
with a heavy object.
Note: Be sure to work on an even surface
without kinks or creases. Use a rounded object
to carefully smooth out any bubbles, working
from the middle outward.
Allow the glue to dry for at least 12 hours.
Once dry, apply more adhesive along the edge
of the repair patch 7. The glue only needs to
dry for approx. 4 hours along this seam.
Maintaining the air pump
Ensure the air pump 13 is greased well before
and after use.
To grease the air pump 13 , open the cap at
the top and apply a thin coat of oil or grease
to the sealed areas and lines. Be sure to use
acid-free silicone oil.
Disposal
The packaging is made entirely of recyclable mate-
rials, which you may dispose of at local recycling
facilities.
Contact your local refuse disposal authority for
more details of how to dispose of your worn-out
product.
Service
Service Great Britain
Tel.: 08000569216

17HU
Bevezető.........................................................................................................................................Oldal 18
Rendeltetésszerű használat...............................................................................................................Oldal 18
Alkatrészleírás....................................................................................................................................Oldal 18
A csomag tartalma.............................................................................................................................Oldal 18
Műszaki adatok .................................................................................................................................Oldal 18
Általános biztonsági tudnivalók................................................................................Oldal 18
Felhasználó specifikus biztonsági utasítások ...................................................................................Oldal 19
Termékspecifikus biztonsági tudnivalók............................................................................................Oldal 20
Piktogrammok.....................................................................................................................................Oldal 20
Első használat előtt................................................................................................................Oldal 22
Deszka kitekerése ..............................................................................................................................Oldal 23
Deszka felpumpálása ........................................................................................................................Oldal 23
US-szkeg összeszerelése...................................................................................................................Oldal 24
Egyes evező összeépítése.................................................................................................................Oldal 24
Duplaevező összeépítése..................................................................................................................Oldal 24
A termék szétszerelése ......................................................................................................................Oldal 24
A termék használata............................................................................................................Oldal 25
Evező hosszának beállítása..............................................................................................................Oldal 25
Használat a vizen..............................................................................................................................Oldal 25
Szállítás ...........................................................................................................................................Oldal 27
Tárolás..............................................................................................................................................Oldal 27
Tisztítás és ápolás...................................................................................................................Oldal 27
Javítás és karbantartás.....................................................................................................Oldal 27
Szelep javítása...................................................................................................................................Oldal 28
Javítások a deszkán...........................................................................................................................Oldal 28
Levegőpumpa karbantartása......................................................................................Oldal 29
Mentesítés .....................................................................................................................................Oldal 29
Szerviz..............................................................................................................................................Oldal 29

18 HU
Felfújahtó Stand-up-Paddle-Board
Bevezető
Gratulálunk új termékének vásárlása alkalmából.
Ezzel egy magas minőségű termék mellett döntött.
Az első üzembevétel előtt ismerkedjen meg a ké-
szülékkel. Ehhez figyelmesen olvassa el a következő
Használati utasítást és a biztonsági tudnivalókat. A
terméket csak a leírtak szerint és a megadott fel-
használási területeken alkalmazza. Őrizze meg ezt
az útmutatót egy biztos helyen. A termék harmadik
félnek történő továbbadása esetén mellékelje a ter-
mék a teljes dokumentációját is.
Rendeltetésszerű használat
Ez a termék Stand-up-Paddle deszkaként a védett
vízpartoktól 150 m-es távolságig szupozásra való, de
semmi esetre sem a természetvédelmi területen az
állatok ivadéknevelőhelyén. A termék védett partmenti
vizeken, kis öblökben, kisebb tavakon, keskeny fo-
lyókon és csatornákban használható. Ne használja
a terméket erős szélben és/vagy hullámoknál. A
termék nem úszássegítő, nem szolgál vízi játékként
és nem használható télisport árucikként. Kizárólag
úszni tudó személyek használhatják. Nem alkalmas
14 év alatti gyermekek számára. Mielőtt használja
ezt a terméket, vegyen részt egy megfelelő kurzuson,
menjen el egy akkreditált iskolába vagy tanuljon
egy tapasztalt sportolótól. A termék magánháztar-
tásokban történő alkalmazásra és nem közületi fel-
használásra készült.
Alkatrészleírás
1deszka
1a szelep
1b szeleptű
1c D-gyűrű
1d deszka szállítófo-
gantyú
1e szelepsapka
2a evezőlapát
2b második evezőlapát
3evezőrúd
4hosszabbítórúd
4a zárókar
5javítókészlet-doboz
6ragasztó
7javítófolt
8száraztáska
9kötél
9a kötél rögzítése
9b kötél hurok
10 hátizsák
11 szelepkulcs
12 US-szkeg
12a fémlemez
12b csavar
13 levegőpumpa (nyo-
másmérővel)
13a külső menet
14 tömlő
14a menetvédő
14b tömlőcsatlakozó
15 szkegvédő
16 ülőke
17 öv
18 lábtámasz
19 hurok
A csomag tartalma
1 felfújható SUP-deszka (HG06954)
1 univerzális evező (HG05822)
1 levegőpumpa nyomásmérővel (HG06968)
1 lábtámasz (HG06962)
1 ülőke (HG06961)
1 hátizsák (HG06960)
1 száraztáska (HG05824)
1 kötél (HG05756(B))
1 javítókészlet (HG06963)
1 US-szkeg (HG05756(D))
1 összeszerelési- és használati útmutató
Műszaki adatok
max. terhelés: 150kg
max. légnyomás: 1 bar (15psi)
mérete: (felfújva): kb. 320 x 84 x
15cm (H x Sz x Ma)
csomag mérete: száraztáska: kb. 49 x 31 x
20,5cm (M x Sz x Ø alap);
térfogat: 10L
hátizsák: kb. 95 x 44 x 25cm
súly: 10,8kg
Általános biztonsági
tudnivalók
A HASZNÁLATI ÚTMUTATÓBAN SZEREPLŐ
BIZTONSÁGI ELŐÍRÁSOK FIGYELMEN KÍVÜL
HAGYÁSA VESZÉLYT JELENTHET, ÍGY PL. SÉRÜ-
LÉSHEZ VAGY FULLADÁS ÁLTALI HALÁLHOZ

19HU
VEZETHET! GONDOSAN ŐRIZZEN MEG MIN-
DEN BIZTONSÁGI TUDNIVALÓT ÉS ÚTMUTA-
TÁST A JÖVŐBENI FELHASZNÁLÁS CÉLJÁBÓL!
FIGYELEM! Rendkívül fontos, hogy a vízen
körültekintő és megfontolt legyen. Ne becsülje
túl erejét és kormányzási képességeit! Marad-
jon mindig a part közelében! Vegye figyelembe
az időjárási viszonyokat, a viharra történő fi-
gyelmeztetéseket vagy az esetleges fényjelzé-
seket!
FIGYELEM! Mindig tartsa be a biztonsági
szabályokat és a tavakra és nyílt vizekre vonat-
kozó törvényi előírásokat, és saját biztonsága
érdekében mindig viseljen bevizsgált mentő-
mellényt.
A terméket mindig az utasításoknak és azono-
sító táblán, illetve a használati utasításban sze-
replőeknek megfelelően használja. Ügyeljen rá,
hogy ne lépje túl a maximális terhelést, az 1bar
(15 PSI) légnyomást és a személyek számát,
ahogyan az a termék használati utasításában
is szerepel. Mindig viseljen mentőmellényt.
Semmilyen műszaki változtatást ne végezzen
a terméken. Bármilyen jellegű változtatás befo-
lyásolja a termék működőképességét és a ga-
rancia elvesztéséhez vezet.
A termék alapfelépítését ne változtassa meg,
mert ez befolyásolja a biztonságát.
Ügyeljen a gyártó adattábláján lévő adatokra.
A termék használatával elismeri, hogy rendel-
kezik a vízi sportokhoz, valamint a vízen való
eligazodáshoz szükséges tudással és képessé-
gekkel. Ez az érvényes szabályok és törvények
betartására is vonatkozik. A víz biztonságos-
sága a felhasználó, az időjárás és a vízen tel-
jesülő feltételek összjátékának tudható be. A
termék használatával elfogadja, megérti és el-
ismeri az evezőssportokhoz szükséges veszé-
lyeket.
A felpumpált deszka, az evező és a lapok
kemények és bizonyos körülmények között sé-
rülést okozhatnak.
A termék szállításakor ügyeljen a körülötte lévő
emberekre.
KISGYE-
REKEK ÉS GYEREKEK SZÁMÁRA
ÉLET- ÉS BALESETVESZÉLYES!
Soha ne hagyja a gyerekeket a termékkel és a
csomagolóanyaggal felügyelet nélkül. A csoma-
golóanyagok fulladásveszéllyel és megfojtás
általi életveszéllyel fenyegetnek. A gyerekek
gyakran alábecsülik a veszélyeket. A gyereke-
ket tartsa a terméktől mindig távol.
Ez a termék nem alkalmas arra, hogy olyan sze-
mélyek használják (ideértve a gyermekeket is),
akik korlátozott testi, érzékszervi vagy szellemi
képességek miatt vagy megfelelő tapasztalat
és/vagy tudás hiányában nem tudnák biztonsá-
gosan használni a terméket, kivéve akkor, ha
rájuk egy a biztonságukért felelős személy fel-
ügyel, vagy tőle utasításokban részesülnek a
termék használatára vonatkozóan. A gyere-
kekre felügyelni kell annak biztosítása érdeké-
ben, hogy ne játszanak a termékkel.
Felhasználó specifikus
biztonsági utasítások
Viseljen mentőmellényt, amikor a termékkel a
vízen van.
A vízen legyen óvatos és körültekintően járjon el.
Ne használja a terméket ha kábítószer, gyógy-
szer, vagy alkohol hatása alatt áll.
Soha ne becsülje túl az erejét, a kormányzási
képességeit és az alkalmasságát. Legyen tisz-
tába a határaival. Az evezős sport veszélyes
és testileg megerőltető lehet. Mindig maradjon
olyan közel a parthoz és partvidékhez, ameny-
nyire lehet.
Ne használja a terméket árvíz idején vagy da-
gálykor. Kizárólag biztonságos időjárási körül-
mények között evezzen.
Tájékozódjon az aktuális időjárási feltételekről
és ellenőrizze az időjárás előrejelzést. Vegye
figyelembe az időjárási viszonyokat, a viharra
történő figyelmeztetéseket vagy az esetleges
fényjelzéseket!
Soha ne használja a terméket part felől fújó
szélben (olyan szél, amely a part felől a víz
felé fúj). Könnyen lesodródhat.

20 HU
Evezés előtt ellenőrizze a vizeket a sziklák, ki-
kötőhelyek, fodrozódó hullámok szempontjából.
Ügyeljen a part felől fújó szélre és áramlatokra,
az árapályra, a folyók vízszintjére, valamint a
vízben és a vízen lévő akadályokra. Tartózkod-
jon a védett partszakaszon 150m-ig.
Tartson biztonságos távolságot a gyors áram-
latoktól, az örvényektől, hordalékoktól és egyéb
akadályoktól.
Mindig tartsa be a helyi hajózási rendeleteket.
Adott esetben viseljen védősisakot.
Mindig használjon kötelet, hogy a deszka ne
sodródhasson el Öntől.
Viseljen az időjárásnak és a víz viselkedésének
megfelelő ruházatot. Hidegebb időben viseljen
evezéskor neoprén ruházatot. Lehűlés veszélye
áll fenn!
A kötelet önmagához és a deszkához erősítse.
Ha kötelet használ, egyensúlyvesztéskor a desz-
kának csapódhat. Ügyeljen arra, hogy a kötél
ne csavarodjon a teste vagy a lába köré.
Soha ne evezzen egyedül, mindig másokkal.
Tájékoztassa a többieket, ha elmegy egy evezős
kirándulásra. Mindig vigyen magával iratokat.
Amennyiben a terméket kijelölt fürdőhelyen kí-
vül használja, ügyeljen rá, hogy egy másik sze-
mély mindig szemmel tartsa Önt.
Evezés közben figyeljen a többi személyre, akik
a vízben tartózkodnak.
Ne használja a terméket hajóforgalom, más vízi
járművek, gátak, zsilipek és egyéb veszélyfor-
rás közelében.
Ne használja a terméket olyan helyzetekben,
ahol más személyeknek sérülést okozhat, pl.
fürdőző személyek vagy úszók a strandon.
A rakomány vagy a személyek egyenletlen el-
oszlása a deszkán befolyásolja a termék stabi-
litását, egyensúlyi helyzetét, valamint a termék
viselkedését. Így akár fel is borulhat. Evezés
közben folyamatosan ügyeljen rá, hogy az Ön
súlya lehetőleg egyenletesen el legyen oszlatva
a deszkán.
A deszkán a rakomány vagy az emberek elosz-
lásának bármilyen megváltoztatása (mint hor-
gászfelszerelés, radar, összecsukható rúd, motor
stb. elvitele) befolyásolhatja a deszka stabilitá-
sát, egyensúlyi helyzetét és a viselkedését.
Termékspecifikus biztonsági
tudnivalók
A felfújható termékek hidegre érzékenyek. Soha
ne hajtsa össze és fújja fel a terméket 15°C
alatt.
Fújja fel a terméket 0,8bar (12psi) és maximum
1bar (15 psi) nyomás közé.
Ha a levegő nyomása a tűző napon megemel-
kedik, ezt ki kell egyenlíteni a megfelelő meny-
nyiségű levegő kiengedésével.
Ha a nyomás túllépi az 1 bart (15psi), nyissa
ki a szelepet és engedjen ki annyi levegőt, míg
az üzemi nyomás ismét a biztonságos üzemi
tartományon belül lesz.
Ügyeljen rá, hogy a termék - főleg felfújt álla-
potban - ne érintkezzen kövekkel, kaviccsal
vagy hegyes tárgyakkal és ne dörzsölje vagy
hántsa le durva felület, egyébként megsérülhet.
Ne hagyja a terméket hosszabb időre a napon,
hanem tegye az árnyékba. Ha hosszabb ideig
nem használja a terméket, pl. télen, tárolja eny-
hén felfújt állapotban és fagymentese helyen.
Kizárólag a csomagban lévő vagy megfelelő
pumpaadaptert dugja be a biztonsági szelepbe.
Más adapter használata során megsérülhetnek
a szelepek.
Ne fújja fel túlzottan a terméket, különben fenn-
áll a hegesztési varratok felszakadásának ve-
szélye. A szelepeket a felpumpálás után jól
zárja el.
Kerülje az forró, éles, hegyes vagy veszélyes
tárgyakkal, vegyszerekkel vagy folyadékokkal
történő érintkezést. Ha ez mégis megtörténne,
ellenőrizze alaposan a terméken a lyukakat
vagy egyéb sérüléseket. Ne vigyen magával a
deszkára éles vagy hegyes tárgyakat.
Tartsa távol a terméket tűztől és forró tárgyak-
tól (mint pl. égő cigaretta).
Ne szállítsa a deszkát felfújt állapotban a gép-
járművön.
Q
Piktogrammok
Nézze meg a terméken
látható piktogrammokat a termék használata előtt.
Table of contents
Languages:
Other Mistral Boat manuals