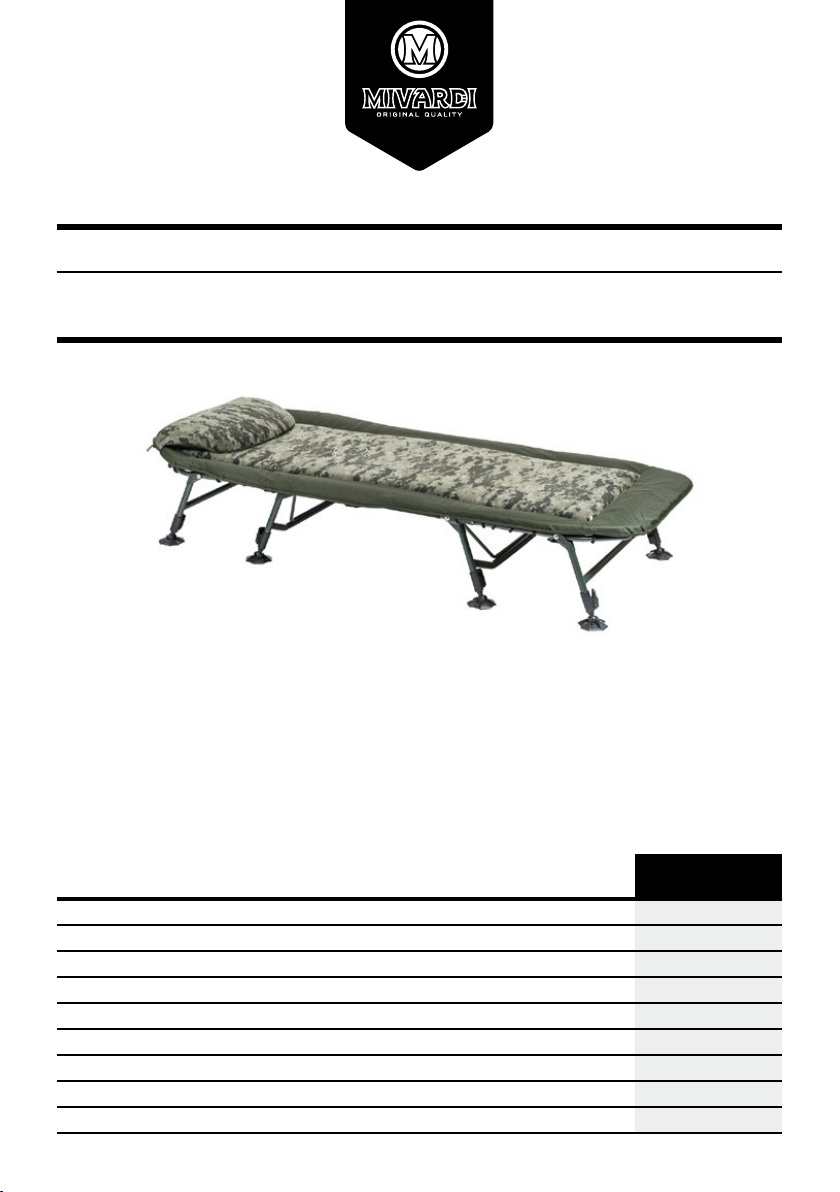
manuals.online logo
Brands
  1. Home
  2. •
  3. Brands
  4. •
  5. MIVARDI
  6. •
  7. Camping Equipment
  8. •
  9. MIVARDI CamoCODE Air 8 User manual

MIVARDI CamoCODE Air 8 User manual

MIVARDI |1
Návod kpoužití / User guide / Bedienungsanleitung & Sicherheitshinweise
RYBÁŘSKÉ LEHÁTKO / BEDCHAIR / BEDCHAIR
CamoCODE Air 8
Technické parametry / Technical parameters / Technische Angaben / Produkteigenschaften: CamoCODE Air 8
Výška rámu od země / Height of sitting part from the ground / Höhe der Liegefläche vom Boden ab (von‑bis) 38 - 50
Délka x šířka / Length x width / Abmessungen (Länge x Breite) 220 x 90
Transportní rozměr / Transport size / Transportgröße 80 x 96 x 36
Hmotnost / Weight / Gewicht 13,2 kg
Materiál potahu / Cover materiál / Material Fleece
Nosnost / Strength / Max. Belastbarkeit 160 kg
Počet noh / Number of legs / Anzahl der Standbeine 8
Samovýsuvné nohy / Self Extending legs / Automatische Höhenverstellung der Standbeine X
Samonafukovací matrace / Self‑infanting mattress / Selbstaufblasende Luftmatratze X
DE / Lesen Sie diese Bedienungsan‑
leitung sorgfältig durch, bevor Sie das
Bedchair benutzen. Befolgen Sie alle
Sicherheitshinweise im Handbuch.
Bewahren Sie Diese Anleitung an
einem trockenen und sicheren Ort
auf, geben Sie diese Personen weiter,
welche das Bedchair benutzen.
EN / Before putting this product
into operation, read the instructions,
even if you are already familiar with
the use of products of this type. Use
product only as described in these
operating instructions. Keep these
instructions safe for future refe‑
rence.
CZ / Před uvedením tohoto výrobku
do provozu se seznamte s návodem
kjeho použití, ato ivpřípadě, že jste
již obeznámeni spoužíváním výrobků
tohoto typu. Výrobek používejte pouze
tak, jak je popsáno v tomto návodu
kpoužití. Návod uschovejte pro případ
další potřeby.
2| MIVARDI
• CZ / Nejprve odklopte páry nohou pod středovou částí
lehátka alehátko postavte na zem. Následně odklopte
pár noh, který se nachází vhlavové části lehátka atuto
část následně vyklopte. Je‑li lehátko vybaveno osmi
nohami, odklopte zbývající pár noh aodklopte spodní
část lehátka.
• Pomocí teleskopických nohou ustavte lehátko do roviny
ado požadované výšky.
• Při používání dbejte na to, aby lehátko bylo kompletně
asprávně rozložené. Vopačném případě by mohlo dojít
kpoškození výrobku či zranění.
• Lehátko můžete polohovat výškovým nastavením teles‑
kopických noh.
• Složení lehátka provedete opačným způsobem.
• Při přepravě chraňte před prudkými nárazy a defor‑
mací.
• Po použití výrobek řádně očistěte avysušte.
• Pokud lehátko dlouhodobě nepoužíváte, uskladněte ho
vsuché, dobře větrané místnosti
• Pečlivým zacházením asprávnou údržbou prodlužujete
mnohonásobně životnost.
• Lehátko je určeno pro jednu o osobu. Nepřekračujte
maximální nosnost! Přetížení a následnou deformaci
konstrukce, poškození kloubů nebo matrace může
způsobit inepřiměřený prudký pohyb či pád na lehátko,
nedotažení kloubů, nezajištění výsuvu noh,apod.
• Na lehátku nestůjte ani neskákejte.
• Tuhost matrace lze upravit povolením či utažením lan
po obvodu lehátka nebo popruhů či pružných lan umís‑
těných ze spodní strany matrace.
• Samonafukovací matrace lehátka je vybavena ventilem,
přístupným ze zadní strany polštáře. Při rozkládání
lehátka tento ventil povolte. Lehátko rozložte a matrace
se sama během krátké doby nafoukne. Pro vyšší tuhost
matrace proveďte dofouknutí ústy. Ve chvíli, kdy je
matrace dostatečně nafouklá, ventil ihned uzavřete.
• Při skládání lehátka vždy nejprve povolte ventil matrace
a následně lehátko složte, čímž se vzduch vyfoukne.
• Dbejte zvýšené opatrnosti při manipulaci s ostrými
předměty, abyste předešli riziku poškození samonafu‑
kovací matrace
• TIP: V případě poškození lze nafukovací matraci
vytáhnout a díru rychle a snadno opravit pomocí
sady na opravu nafukovací matrace.
• EN / First unfold the pairs of legs under the centre of
the bedchair and place the bedchair on the floor. Then
unfold apair of legs, which is located in the head part
of the bedchair, and then fold this part. If the bedchair
is equipped with eight legs, unfold the remaining pair of
legs and unfold the lower part of the bedchair.
• Use the telescopic legs to level the bedchair and to the
required height.
• When using, make sure that the bedchair is completely
and correctly unfolded. Failure to do so could result in
damage to the product or injury.
• You can position the bedchair by adjusting the height of
the telescopic legs.
• Fold the bedchair in the opposite way.
• Protect against sharp shocks and deformation during
transport.
• Clean and dry the product thoroughly after use.
• If you do not use the bedchair for along time, store it in
adry, well‑ventilated room
• Careful handling and proper maintenance prolongs
service life many times over.
• The bedchair is designed for one person. Do not
exceed the maximum load capacity! Overloading and
subsequent deformation of the structure, damage to
the joints or the mattress can also cause dispropor‑
tionate sudden movement or falling on the bedchair,
failure to tighten the joints, failure to ensure the exten‑
sion of the legs, etc.
• It is not allowed to jump or stand on the bedchair.
• The stiffness of the mattress can be adjusted by loose‑
ning or tightening the ropes around the perimeter of the
bedchair or the straps or elastic ropes placed on the
underside of the mattress.
• The self‑inflating mattress of the bedchair is equipped
with a valve accessible from the back of the cushion.
Loosen this valve when unfolding the lounger. Unfold
the bedchair and the mattress will inflate on its own in
a short time. For higher stiffness of the mattress, inflate
it with your mouth. When the mattress is sufficiently
inflated, close the valve immediately.
• When folding the bedchair, always loosen the mattress
valve first and then fold the lounger to blow out the air.
• Take extra care when handling sharp objects to avoid
the risk of damaging the self‑inflating mattress
• TIP: In the case of damage, the air mattress can be
pulled out and the hole repaired quickly and easily
using the air mattress repair kit.
• DE / Klappen Sie die Beinpaare des mittleren Bere‑
iches des Bedchairs aus und platzieren Sie das
Bedchair, achten Sie auf einen guten Stand auf festem
Untergrund. Klappen Sie nun die weiteren Beinpaare
aus und klappen Sie das Bedchair vollständig auf. Je
nach Modell und Version sind Beinpaare am Kopf‑
und Fußteil. Richten Sie das Bedchair aus indem Sie
Návod kpoužití / Instruction to use / Bestimmungsgemäße Verwendung:
MIVARDI |3
gebrauch machen von den herausziehbaren Stan‑
dbeinen. Der Abbau erfolgt in umgekehrter Reihenfolge.
• Bevor Sie sich auf das Bedchair legen, überprüfen
Sie die Position der ausgeklappten Beinpaare bis zur
Endposition, achten Sie auch auf einen sicheren Stand.
Ansonsten kann es zu Beschädigungen am Bedchair
kommen oder Sie können sich verletzen.
• Das Bedchair darf nur
• Achten Sie beim Transport des Bedchairs darauf,
dass die angeklappten Beine keinem hohen Druck /
Belastungen ausgesetzt sind.
• Reinigen Sie, je nach Bedarf die ausziehbaren Stan‑
dbeine und achten Sie darauf dass keine Verschmut‑
zungen in den teleskopierbaren Bereich gelangen.
• Lagern Sie das Bedchair nur in einem trockenem, kühlen
Raum. Achten Sie auf eine gute Belüftung des Raumes.
• Das Bedchair darf immer nur von 1 Person welche das
Gewicht der max. Belastbarkeit des Bedchairs nicht
übersteigt benutzt werden. Lassen Sie sich nicht auf
das Bedchair fallen, stellen Sie sich nicht darauf und
springen Sie nicht darauf herum.
• Mit lösen oder spannen der umlaufenden Matratze‑
naufhängung können Sie die „Härte“ der Liegefläche
variieren.
• Sorgfältige Handhabung und ordnungsgemäße Wartung /
Reinigung verlängern die Lebensdauer um ein vielfaches.
• Die Liegefläches des Bedchairs verfügt über eine sich
selbst aufblasende Luftmatratze. Bei Transport und
Lagerung des Bedchairs MUSS das Ventil stets geöffnet
sein. Es befindet sich am Kopfteil, öffnen Sie den
Reißverschluß des Kissenabteils um an das Ventil zu
gelangen. Beim auseinander klappen des Bedchairs füllt
sich die Matratze selbstständig mit Luft. Beachten Sie,
dass es bei neuen Bedchairs ggf. nötig ist, selbst einiges
an Luft einzublasen, damit der Luftkörper der Matratze
sich vollständig entfaltet. Sie können die “Härte” der
Liegefläche so auch jederzeit nach persönlichem Bedarf
erhöhen, oder durch Luftablassen verringern.
• Es ist unbedingt erforderlich, dass Ventil zu öffnen bevor
das Bedchair zusammengeklappt wird.
• Achten Sie beim Umgang mit scharfen und oder spitzen
Gegenständen darauf, dass die Luftmatratze nicht
beschädigt wird.
• Tipp: Im Falle einer Beschädigung kann die Luft-
matratze am Fußteil des Bedchairs herausgezogen
werden. Oft lässt sich ein Loch oder Riss mit Flic-
kzeug für Fahrräder / Luftmatratzen einfach und
schnell reparieren.
Čištění aúdržba / Cleaning and maintenance / Reinigung und Pflege:
• CZ / Potah lehátka neperte ani chemicky nečistěte
• Lehátka smatrací zfleecového materiálu čistěte pouze vlhkým hadříkem nebo kartáčem na sucho.Tato lehátka nenechte
promoknout či nasáknout vodou (matrace sfleecovým potahem vysychá velmi pomalu).
• Abyste předešli problémům svysunutím či zasunutím teleskopických noh, odstraňte nečistoty, které by se mohly vysky‑
tovat na vnitřní trubce. Kzajištění bezproblémového chodu mechanismu používejte vhodná maziva, například WD40.
Nikdy nepoužívejte sílu, mohlo by dojít kpoškození.
• EN / Do not wash or chemically clean the chair
• Clean the fleece material with adamp cloth or dry brush.
• Do not let the bedchair fleece parts get wet or soaked in water (mattress with fleece cover will dry out very slowly).
• If the telescopic legs cannot be pulled in or out, remove any dirt that may be present in the inner pipe. Use suitable lubri‑
cants such as WD40 to make the mechanism run smoothly. Never use force, this will cause damage.
• DE / Verwenden Sie zum Reinigen niemals chemische Reiniger.
• Reinigen Sie das Vliesmaterial mit einem feuchten Tuch oder einer trockenen Bürste. Lassen Sie die Vliesteile nicht nass
oder in Wasser eingeweicht werden (sie trocknen sehr langsam aus.
• Sollten sich die Teleskopbeine nicht Ein‑ oder Ausziehen lassen, so entfernen Sie ggf. vorhandenen Schmutz im Inne‑
nrohe. Verwenden Sie geeignete Schmierstoffe wie z.B. WD40 um den Mechanismus leichtgängig zu machen. Wenden
Sie niemals Gewalt an, dies führt zu Beschädigungen.
4| MIVARDI
Výrobce / Producer / Hersteller:
Mivardi,s.r.o., Tlustého 2401/4,
193 00 Praha 9, Česká republika
Tel: +420281921962
Servisní oddělení / Service center / Servicecenter:
Mivardi,s.r.o., Třebovská 47, 789 85 Mohelnice
Česká republika, Tel. +420583 431886
e‑mail: info@fish‑pro.cz
www.mivardi.com
Záruka / Guarantee / Garantie
CZ / Záruka se nevztahuje na:
• Běžné opotřebení azměnu barvy textilního potahu, přiro‑
zené stárnutí materiálu
• Vady způsobené nesprávným použitím, neodpovídající
péčí či nedbalosti
• Vpřípadě zjištění závady vzáruční době se obraťte na
svého prodejce.
EN / The warranty does not apply to:
• Normal wear and discoloration of the textile cover,
natural ageing of the material
• Defects caused by improper use, inadequate care or
negligence
• If adefect is found during the warranty period, always
contact your dealer.
DE / Die Produktgarantie schließt folgendes aus:
• Normaler Verschleiß und Verfärbung des Textilmaterials,
natürliche Alterung des Materials
• Mängel, die durch unsachgemäße Verwendung, unzure‑
ichende Pflege oder Nachlässigkeit verursacht wurden.
• Wenn innerhalb der Garantiezeit ein Fehler festgestellt
wird, wenden Sie sich bitte an Ihren Händler.

Other MIVARDI Camping Equipment manuals

MIVARDI Executive User manual

MIVARDI

MIVARDI Executive User manual

MIVARDI Premium XL 6 User manual

MIVARDI

MIVARDI Premium XL 6 User manual

Popular Camping Equipment manuals by other brands

RidgeMonkey OUTDOOR POWER SHOWER manual

RidgeMonkey

RidgeMonkey OUTDOOR POWER SHOWER manual

Primal Vantage Comfort Zone HEH00588 Instruction and safety manual

Primal Vantage

Primal Vantage Comfort Zone HEH00588 Instruction and safety manual

Kogan KOMODO KDZRSLBSGLA user guide

Kogan

Kogan KOMODO KDZRSLBSGLA user guide

Snow Peak FES-432 product manual

Snow Peak

Snow Peak FES-432 product manual

Snow Peak FES-217 manual

Snow Peak

Snow Peak FES-217 manual

qeedo Quick Hub 20 instruction sheet

qeedo

qeedo Quick Hub 20 instruction sheet

Kampa Rally Pro Series Instructions & care manual

Kampa

Kampa Rally Pro Series Instructions & care manual

LACAL FC-04-100 manual

LACAL

LACAL FC-04-100 manual

Cascade Whisperlite International instruction manual

Cascade

Cascade Whisperlite International instruction manual

Crivit 296877 Instructions for use

Crivit

Crivit 296877 Instructions for use

Brunton Bantam 81-100726 instructions

Brunton

Brunton Bantam 81-100726 instructions

Snow Peak Zekka TM-710 instruction manual

Snow Peak

Snow Peak Zekka TM-710 instruction manual

DARCHE DUSK TO DAWN+ instruction manual

DARCHE

DARCHE DUSK TO DAWN+ instruction manual

Brunton ADC Summit user manual

Brunton

Brunton ADC Summit user manual

Ningbo SL273 instructions

Ningbo

Ningbo SL273 instructions

campgo Logi Compact user manual

campgo

campgo Logi Compact user manual

Osprey TALON TEMPEST PRO 30 owner's manual

Osprey

Osprey TALON TEMPEST PRO 30 owner's manual

Rothenberger Industrial RS 220 Instructions for use

Rothenberger Industrial

Rothenberger Industrial RS 220 Instructions for use

manuals.online logo
manuals.online logoBrands
  • About & Mission
  • Contact us
  • Privacy Policy
  • Terms and Conditions

Copyright 2025 Manuals.Online. All Rights Reserved.