MJX Bugs 16 User manual

Farther.Faster.Clearer3 Axis Gimbal
Bugs 16
Bugs 16 pro
User Guide

Product Description
Introduction
Prepare the Aircraft
Prepare the Transmitter
Parts Name
Flight Mode
The Status Indicator Light of Aircraft
Return Home Automatically
Optical Flow System
Gimbal Camera
Power Switch of the Aircraft
Aircraft Battery
Assemble & Disassemble the Propellers
Function&Situation of Transmitter
Transmitter Joystick Mode
Assemble Phone Holder
FPV Real Time Transmission Software
Surroundings Requirements of the Flight
Pre-Flight Inspection
The Operation of Aircraft
Basic Flight
Aircraft Specification
Packing List
Important Statement
Safety Precautions
Aircraft
Transmitter
M RC PRO APP
Flight
Appendix
Content
1
1
2
2
4
5
6
7
9
9
10
11
12
15
16
17
18
18
18
22
23
25
26
26

Product Description
!Reminder: If the battery is not installed properly, it may cause the aircraft to fall down due to
power failure.
Expand the arm
The aircraft is in folding state during shipping, please unfold it according to below instruction.
Install aircraft’s battery
Insert fully charged battery into the battery holder (as the below picture), make sure the battery install
correctly.
Disassemble the gimbal protection lock
Bugs 16/Bugs 16 pro are equipped with optical flow system and GPS, can hover and fly steadily indoor
and outdoor. They have automatic return home and easy-to-use intelligent flight, such as Orbit Flight,
Follow-Me and Waypoint Flight. It can shoot 4K HD video with highly precision 3 axis anti-shake
gimbal. The transmitter with functional buttons can complete various operation and setting of the
aircraft and camera. Through the APP, not only have real time HD image but also flight parameters
information. The folding design of transmitter improves the user operation experience. The pull-out
phone holder is easy to carry and store for the user. The gimbal can adjust the camera shooting angle
during flight. The maximum flying speed of Bugs 16/Bugs 16 pro is 40km/h.
Prepare the Aircraft
Introduction
Pull out the protective cover
of gimbal camera.
-1-

[6]
[7]
[8]
[5]
[1]
[2]
[3]
[4]
!● The transmitter use 2*AA Non-chargeable batteries or AA chargeable batteries.
(Please purchase)
● Please notice the polarity during install or change the batteries.
● Non-chargeable battery cannot be charged, only use the batteries the same with the
recommended ones.
● Please take out the chargeable batteries before charging.
● Forbid to connect the aircraft with higher than the recommended power batteries.
● Do not mix the old and new different type batteries.
● Please take out the exhausted batteries in time, discarded batteries cannot be littered.
● In order to avoid battery leakage causing damage to the aircraft, please take out the
battery if not in use for a long time.
Install the transmitter’s battery
Open the battery box, insert 2*AA batteries correctly according to the polarity in transmitter, then close
the battery box.
Prepare the Transmitter
Bugs 16/Bugs 16 pro User Guide
[5] Optical flow
system
[6] Front light
[7] Fill light
[8] Rear light
Parts Name
[1] Power switch
[2] Landing gear
[3] Propeller
[4] Gimbal camera
-2-

[12]
[1]
[2]
[3]
[5]
[4]
[7]
[8]
[6]
[1] Take picture/video
[2] Left joystick
[3] One key to unlock/
Lock
[4] Phone holder
[5] One key return home
[6] Right joystick
[7] Power switch
[8] Status display screen
[9] One key to take off/
landing
[10] Gimbal control
hand wheel
[11] Short press for
light control/
Long press for fast
slow speed switch
[12] GPS Switch
[9] [11]
[10]
Bugs 16/Bugs 16 pro User Guide
-3-

The following flight modes are available in Bugs 16/Bugs 16 pro.
In GPS mode, the aircraft achieves precise hovering by receiving GPS signals. If the GPS signal is
weak, the aircraft will enter Fix-Altitude Mode or Optical Flow Position mode.(Please refer to the status
bar for specific status in APP.)
When the GPS signal is week, please land to safe place immediately avoiding any accidents. In the
same time, please avoid flying in any weak GPS signal or narrow space, lest flight accidents.
GPS mode
If it cannot receive the GPS signal or the GPS turned off, the aircraft will enter the Optical Flow Position
mode automatically. In this mode, the aircraft can hover stably by optical flow system.
The applicable flight height of Optical Flow Position is 3 meters. The position effect will gradually weaken
if the height is higher than 3 meters. Recommend not to exceed a flight altitude of 3 meters.
Optical flow position mode
Aircraft
Flight Mode
-4-

1The front and rear indicator light flash
yellow quickly. The aircraft and transmitter have not connected.
2The front and rear indicator light flash
yellow green red in turns. The aircraft is in the initialization detection state.
6The front and rear light flash yellow
in turns.
The aircraft is in geomagnetic horizontal
calibration.
7 The front and rear light flash green in turns. The aircraft is in geomagnetic vertical calibration.
8The front light stays red, the rear light
flashes red slowly.
The aircraft is close to low battery,
only 16% power left.
9The front light stays red, the rear light
flashes red quickly.
The aircraft is in low battery,
only 12% power left.
10 The front and rear light flash red once,
stop about 1.5s. The gyroscope has a malfunction.
11 The front and rear light flash red twice,
stop about 1.5s. The barometer has a malfunction.
12 The front and rear light flash red three times,
stop about 1.5s. The compass has a malfunction.
13 The front and rear light flash red four times,
stop about 1.5s. The GPS has a malfunction.
No.
3The front indicator light stays in red,
the rear indicator light stays in yellow. No GPS signal.
4The front indicator light stays in red,
the rear indicator light stays in green.
Good GPS signal, available to enter into
GPS mode.
5 The front and rear light flash green quickly. The aircraft is in gyroscope calibration.
Indicator light status Meanings
The status indicator light reminder
The Status Indicator Light of Aircraft
The front indicator
light
The rear indicator light
The front indicator light
Bugs 16/Bugs 16 pro User Guide
-5-

!Notice for return home:
● In Return Home, the aircraft will fly straight to the home point, cannot avoid the obstacles.
Please pay attention to it.
● When the GPS signal is week or not working, it cannot return home.
● In return home, if the flight altitude is higher than 15 meters, the aircraft will perform the
return home immediately, otherwise, the aircraft will raise up to 15 meters, then perform
the return home (In APP, the return altitude can be setting)
● If the aircraft does not get the GPS signal, in the same time, the signal of transmitter has
been interrupted for more than 6 seconds, the aircraft will not be able to return home, it will
descend slowly until landing, then will be locked.
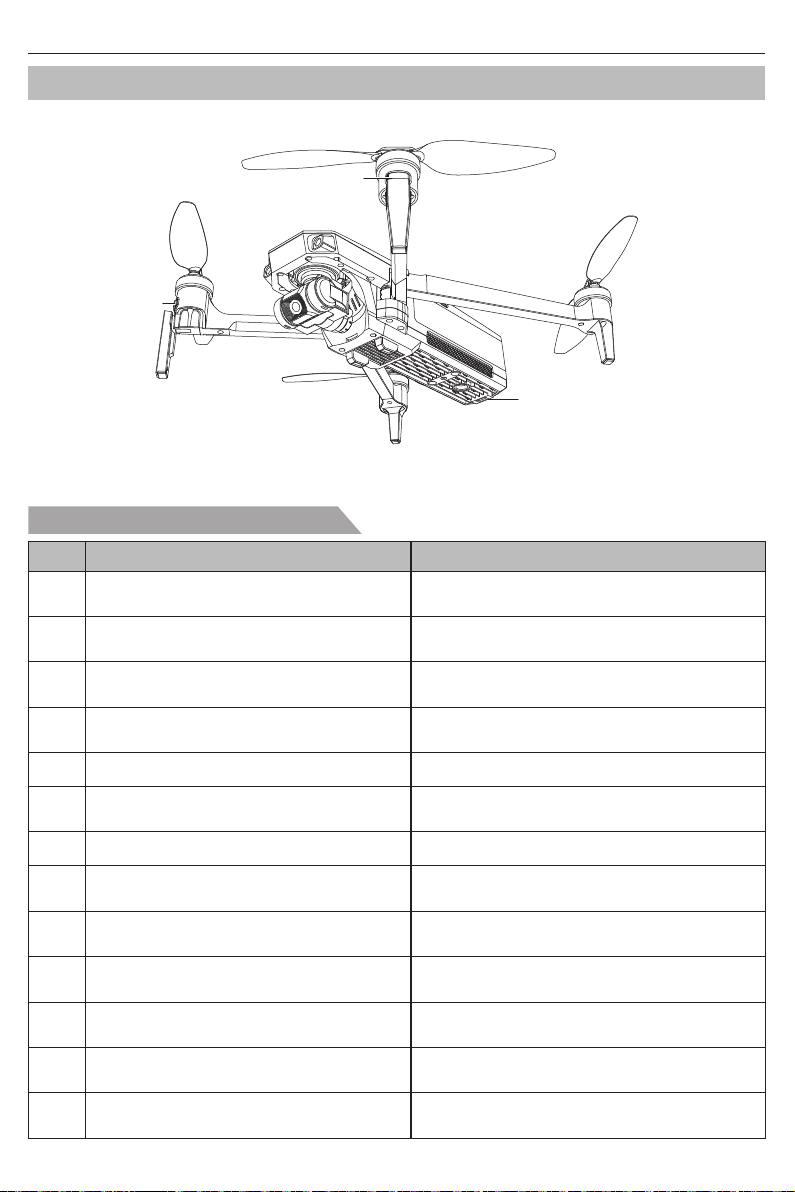
One key to return home
Home Point
GPS Description
In taking-off or flight, when the GPS signal reaches more than 7 for
the first time, the current position of the aircraft will be recorded as
the home point. In the same time, all indicator lights change yellow
to green.
Return Home Automatically
Bugs 16/Bugs 16 pro User Guide
When the GPS signal is good ( the No. of satellites is more than 7), you can press “ ” button to start the
return home. In return-home, press “ ” , the return home will be canceled, you will get the flight control
right again.
Return home in low power
Bugs 16/Bugs 16 pro are equipped with return home automatically. It include one key to return home,
return home in low power and out of control.
The aircraft has recorded the home point successfully. In good GPS signal, when the user turns on
the one key return, return home in low power, return home in out of control for disconnection between
transmitter and aircraft, the aircraft will fly back to home point and land automatically.
1. The red indicator lights flash slowly, the power icon in the LCD screen of transmitter is “ ” with
continuous Beep Beep sound. If the flight altitude is between 30 meters and 100 meters, the aircraft
will return home automatically, fly back to the home point.
2. The red indicator lights flash quickly, the power icon in the LCD screen of transmitter is “ ” with
continuous Beep Beep sound. If the flight altitude or distance is far than 15 meters, the aircraft will
return home automatically, fly back to the home point.
If the distance is less than 15 meters, the aircraft will land on the taking off spot.
Return home in out of control
When the GPS signal is good (the No. of satellites is more than 7), the compass situation is good, if the
signal of transmitter is interrupted for more than 6 seconds without APP control, the flight control will take
over the control of the aircraft and control the aircraft fly back to the home point. If the transmitter signal
is restored during flight, the return home will continue, while the user can cancel it by the return home
button on transmitter, get back the aircraft’s control right.
-6-

Usage requirements of optical flow positioning function
It is suitable for environments where the altitude is below 3 meters, there is no GPS signal or the GPS
signal is weak.
Optical Flow System
Bugs 16/Bugs 16 pro User Guide
Optical flow lens
The optical flow system is composed of optical flow lens modules. It is an image positioning system
that locating the aircraft by optical flow images. It ensures the accurate positioning and safe flight of
the aircraft.
!The measurement accuracy of the optical flow system is easily affected by the light intensity
and the surface texture of the object. Once the optical flow failure, the optical flow positioning
mode will automatically switch to fixed altitude mode. Please be cautious in as following
situations:
1. When flying fast at low altitude (below 0.5 meters), the optical flow system may not be
able to locate.
2. Monochrome surface (such as pure black, pure white, pure red, pure green).
3. Surfaces with strong reflections.
4. Water surface or transparent surface.
-7-

Bugs 16/Bugs 16 pro User Guide
!5. Surfaces of moving objects (such as, the upside of crowds, the swaying bushes or grasses).
6. Scenes with dramatic and rapid light changes.
7. Surface extremely dark (Lux<10) or extremely bright (Lux>10,000).
8. Very sparsely textured surface.
9. Surfaces with highly repeating textures (such as small grid brick in the same color).
10. Surfaces that are tilting over 30 degrees.
11. Flying speed should be controlled not too fast. When the aircraft altitude is 1 meters,
the flying speed should not be over 5m/s; When the aircraft altitude is 2 meters, the
flying speed should not be over 14m/s.
● Please ensure that the optical flow lens is clear.
● The optical flow system is only effective within the altitude less than 3 meters.
● Since the optical flow function system relies on ground surface to obtain location
information, please ensure that the surrounding environment has sufficient light
sources and rich texture ground.
● The optical flow system cannot be positioned on the water surface, in extremely dark
environment and no clear texture ground.
● If the light is dim, please turn on the optical flow fill light.
-8-

Gimbal description
The 3-axis gimbal provides a stable platform for the camera. Ensure that the camera can shoot
stable images even the aircraft is at high speed flying. The camera angle can be adjusted through
the transmitter handwheel, or through the buttons on the M RC PRO APP camera interface.
The default gimbal camera shooting angle is -90° to 0°.
Gimbal Camera
Power Switch of the Aircraft
Bugs 16/Bugs 16 pro User Guide
Long-press the power button for 3 seconds, the aircraft will turn on. In the same time, the aircraft will
have power-on sound and indicator light stays on. Long-press the power button for 3 seconds again,
the aircraft will turn off and indicator light will turn off.
!● Please place the aircraft on a flat and open ground before takeoff, do not touch the gimbal
after the power turned on.
● The gimbal contains precision parts. If it is hit or damaged, the precision parts will be
damaged, which may affect the performance of the gimbal. Please take good care of the
camera gimbal, keep it from physical damage.
● Please keep the gimbal clean, keep the gimbal from contacting objects such as sand and
rocks. Otherwise, the movement of the gimbal may be blocked and affect the performance.
● If the aircraft is placed on uneven ground or grass, when the object on ground hits the
gimbal, or the gimbal is subjected to excessive external force (such as being hit or being
blended) may cause the motor abnormal.
● Do not add any objects on the gimbal camera, otherwise it may affect the performance
even cause the motor burned.
● During using, please take off the gimbal protection lock first then turn on. During storage
or transportation, please re-assemble the protection lock to keep the gimbal safe.
● If flying in heavy fog or clouds, may cause condensation on the gimbal and then gimbal
not working. If this happens, please make the gimbal dry, then it will back to work.
0°
-90°
-9-

Charging
Aircraft Battery
Bugs 16/Bugs 16 pro User Guide
5V 2A Adapter
(Not included)
USB
Please charge the battery fully before using it. Be sure you use the officially supplied USB charging
cable to charge. The charging time is about 5.5 hours.
●Power off: The battery indicator light will flash.
●Charging: The battery indicator light will flash in turns.
●Fully charge: The battery indicator will stay on.
*The above charging data is based on 5V 2A adapter. Using the different adapter will affect the
charging data. Recommend using 5V 2A-2.1A adapter to charge.
PD Adapter
(Not included)
Please charge the battery fully before using it. Be sure you use the officially supplied USB charging
cable to charge. The charging time is about 70 minutes.
●Power off: The battery indicator light will flash.
●Charging: The battery indicator light will flash in turns.
●Fully charge: The battery indicator will stay on.
*The above charging time data is based on an adapter with 45W Up. Using the different adapter will
affect the charging data. Recommend to use a PD charger with 45W Up, for faster charging experience.
①USB to Type C charging cable
②PD Fast charging cable (PD fast charging only applies to Bugs 16 pro batteries)
!
Bugs 16 and Bugs 16 pro have different
battery types, please charge according
to corresponding adapter.
Warning:
Aircraft No.
Bugs 16
11.4VBugs 16 pro
7.6V
3200mAh
3400mAh
Rated voltage Battery capacity
-10-

Motor A
Align holes in the bottom
Assemble/disassemble the propellers
●Assemble
Select corresponding propellers, (A and A, B and B), use screwdriver to fix the 2 screws clockwise
(as pic 1-2).
●Disassemble
Turn screwdriver anti-clockwise, take out 2 screws then pull out the propellers (as pic.3-4).
Assemble & Disassemble the Propellers
Bugs 16/Bugs 16 pro User Guide
!● Please charge the battery under adult supervision. Do not let children to charge it alone.
Keep away from flammable materials when charging, pay attention on the aircraft, do not
leave it beyond your monitoring range.
● Please do not make the battery short-circuit or squeeze the battery to avoid explosion.
● Forbid to take the power cord out from the aircraft. Do not make the power cord short-circuit.
Forbid to make the battery short-circuit, disassemble or throw into fire. Do not put the battery
in high temperature or near heated places (such as fire or electric heating devices).
● Please check the charger’s power cord, plug, shell and other parts regularly, if any damage,
please fix first.
● Please use the charger indoor only.
● After the flight, please charge the battery to half full then store. If no use for long time,
recommend to use out and recharge the battery once per month, lest the battery damaged
for over discharge.
!● Please ensure that the clockwise and anti-clockwise propellers are installed correctly,
otherwise the aircraft cannot fly.
● As the propeller is thin, please be careful during installation, lest any accidental scratches.
● Please use the official propellers.
● Propellers are consumable, if necessary, please purchase accessories separately.
Pic. 4Pic. 3
A
Pic. 1 Pic. 2
-11-

Flight mode switch
Transmitter display screen
Transmitter
Function&Situation of Transmitter
Transmitter battery
GPS mode
Satellites
number
Flight height
Photo/Video
Return home icon
Aircraft battery
Joystick mode
Flying distance
Headless mode
Transmitter signal
Fast slow speed
A
B
GPS mode
Fix altitude mode
Gimbal control handwheel
By toggling gimbal hand wheel on transmitter, the camera shooting angle can be adjusted to get a
better aerial photography experience. When the wheel rolls to the A direction, the camera angle will
be adjusted to the A direction; when the wheel rolls to the B direction, the camera angle will be
adjusted to the B direction.
Toggle the switch button on the right side of the transmitter to control the aircraft flight mode. The flight
mode switch is below, please check it. The icon “ ” on transmitter LCD screen displays the current
flight mode.
A
B
90°
-12-

Photo/Video
Bugs 16/Bugs 16 pro User Guide
Short press the “ ” button on transmitter to take photo, the icon “ ” on LCD screen will flash once.
Long press the “ ” button on transmitter to take video, the icon “ ” on LCD screen will flash slowly
continuously. Long press the “ ” again, the shooting will exit.
One-key takeoff/landing
After the Bugs unlocked, short-press the “ ” button, the aircraft automatically take off and hover at
1.5m altitude.
When the aircraft is flying, short-press the “ ” button, the aircraft automatically land on the ground.
In landing automatically, press any joystick, the aircraft will exit the mode.
One-key return home
!Tips: The 4K HD Photos and videos cannot be saved without TF Card.
If TF Card is in errors, the drone cannot take picture/video.
Press the “ ” with the buzzer making “Beep” sound, the auto- return home is on. The aircraft will fly
back to the lasted home point.
Short press the button again, the return home will exit.
-13-

Aircraft low battery warning
Bugs 16/Bugs 16 pro User Guide
1. The indicator light of aircraft flash red slowly, in the same time, the battery icon in LCD screen
of transmitter is “ ” , with continuous Beep Beep Beep sound. If the altitude of aircraft is higher
than 30 meters or distance far than 100 meters, the aircraft will return home automatically, fly back
to the home point.
2. The indicator light of aircraft flash red fast, in the same time, the battery icon in LCD screen of
transmitter is “ ” , with continuous Beep Beep Beep sound. If the altitude of aircraft is higher than
15 meters or distance far than 15meters, the aircraft will return home automatically and fly back to
the home point. If the altitude of aircraft is lower than 15 meters or distance less than 15meters,
the aircraft will land directly at the flying point.
Transmitter low battery warning
When the “ ” icon displays on the LCD screen and the transmitter has continuous Beep Beep
Beep sound, it means the transmitter battery power is low. Please exchange new batteries.
Signal strength
● Icon “ ” displays the strength of the received signal. The more of the grid, the stronger of the
signal, otherwise, the signal is weaker.
● If the icon “ ” changes from the weak to strong circularly, means that the transmitter is under
signal matching status.
● If the “ ” is less than 2 grids or no any grid.
1) The distance between the aircraft and the transmitter is too far to get the signal.
2) The aircraft battery has been removed after signal matching.
Pic. 1 Pic. 2
-14-

Transmitter communication range
Joystick mode
Please keep the aircraft fly in front of the transmitter, there is not any obstacles between them.
Joystick mode switch
Bugs 16/Bugs 16 pro User Guide
Best communication range
!
①②
Reminder: Please make sure the transmitter is in signal matching status during switching
the mode, otherwise it cannot switch the mode.
1. As picture 1, press the unlock button “ ” of transmitter without releasing, then turn on the transmitter
make it on signal matching status.
2. As picture 2, long press the “ ” button for 3 seconds, the transmitter will switch other Mode.
The mode will be switched after each long press. The current mode will display on the LCD screen.
The default mode is Mode 2.
Mode 2
(Default)
Mode 1
Throttle
Left/Right side
flying
Forward/
Backward
Turn left/Right
Throttle
Left/Right side
flying
Forward/
Backward
Turn left/Right
Transmitter Joystick Mode
-15-

Assemble Phone Holder
Pic. 1 Pic. 2
1. Pull up the phone holder completely (Pic. 2);
2. Rotate the phone holder up 30° (Pic. 2);
3. Rotate and fix the support board in place (Pic. 3);
4. Adjust phone fixing components, stretch up and down to adjust the size (Pic. 4).
Pic. 3 Pic. 4
Bugs 16/Bugs 16 pro User Guide
-16-

Setting
Wi-Fi
Drone4G_*******
Connect WIFI
App Store MJXRC.NET
Scan code to download APP
● For Apple IOS system, please search for “M RC PRO” in APP STORE or directly scan the
QR code to install.
● For Android phones, please scan the below QR code to install. (MJXRC.NET is an alternative
download link)
Connection instructions
Enter the “Settings” option of the mobile phone, turn on the WIFI, find the name Drone4G_******* in
the mobile WIFI search list, connect until the word “Connected” appears, indicating that the connection
is successful and exit the setting options. Open the APP on the phone.
Photo/Video saving function
1. If the memory card is not installed, the video and photos will be saved in the phone APP album.
(This photo and video only have the quality of the image transmitted to the mobile phone)
2. If the memory card is installed, the video and photos will be saved to the memory card.
3. The videos and photos in the memory card can be downloaded to the mobile APP.
!
M RC PRO APP
Reminder: Only mobile phones that support 5G WIFI (802.11.ac) can connect to FPV.
FPV Real Time Transmission Software
-17-

Transmitter and aircraft signal matching
①Press the button “ ” without releasing and turn on the transmitter. The transmitter will have Beep
Beep Sound, then releasing the button. The signal strength icon changes from the weak to strong
circularly, It means the transmitter is under signal matching.
②Install aircraft battery, long press the power button of aircraft to turn on the aircraft. In this time,
the aircraft will have a power-on sound and the indication light stays on. After signal matching, the
transmitter will have a long Beep sound. The signal strength icon displays the current signal strength,
then the signal matches successfully.
The Operation of Aircraft
②①
Flight restrictions and special area restrictions
According to the regulations of the International Civil Aviation Organization and the air traffic control of
various countries on airspace control and the regulations of the management of drones, drones must fly
in the specified airspace. For flight safety, the flight restriction function is turned on by default, including
altitude and distance restrictions and special area flight restrictions, to help users use the aircraft more
safely and legally.
Flight
Surroundings Requirements of the Flight
1. Whether the transmitter, aircraft battery and phone are fully charged.
2. Whether the propelleres are installed correctly.
3. Whether the front and rear arms and propellers are fully unfolded.
4. After the power turned on, whether the camera and gimbal work.
5. Make sure the camera lens is clean.
6. Ensure to use official accessories or officially certified accessories. The non-official accessories may
cause damage of the aircraft.
Pre-Flight Inspection
1. Do not fly in bad weather, such as strong wind, snow, rain, fog, etc.
2. Choose an open place without tall buildings around to fly. Buildings that use a lot of steel bars will
affect the work of the compass and block the GPS signal, causing poor positioning of the aircraft or
even unable to locate.
3. When flying, keep the aircraft in sight, stay away from obstacles, crowds, water, etc.
4. Do not fly in areas with high-voltage lines, communication base stations or transmission towers,
avoiding interference with the transmitter.
5. When flying at the place whose altitude above 6000m, due to environmental factors, the performance
of the aircraft battery and power system will decrease, and the flight performance will be affected
correspondingly. Please fly with caution.
6. The aircraft cannot use GPS to fly in the north and south poles.
-18-
This manual suits for next models
1
Table of contents
Other MJX Drone manuals
Popular Drone manuals by other brands

JTT
JTT T60C product manual

PowerVision
PowerVision PowerEgg X user manual

LiteHawk
LiteHawk Click Auto instruction manual

Odyssey
Odyssey Stellar NX Instruction & reference manual

Overmax
Overmax X Bee Drone 1.5 user manual

Vertical Technologies
Vertical Technologies DeltaQuad VTOL UAV Series Operation manual