MM Kembla KemPress KPSA User manual

COPPER
PRESS-FIT
FITTINGS FOR
WATER TO
EUROPEAN
STANDARD
EN 1254
DESIGN &
INSTALLATION
GUIDE
®

8
INSTALLATION
2. Deburr carefully the end of the tube on the inside to
minimize turbulence and pressure loss according to the
relevant plumbing code and on the outside to avoid
damaging the O-ring.
The following is a step by step guide to installing the KemPress®System. For projects requiring maintenance and repair, visually
inspect the copper tube to ensure it is in reasonable condition with no signs of external corrosion.
3. For existing copper tube, clean the end with emery
paper or a soft scourer. 4. Mark the insertion depth by lining up the fitting side by
side with the tube and mark the tube. When the fitting is
inserted onto the tube the outer edge of the fitting must
line up with the marking. For correct insertion depths see
the table below.
1. Cut copper tube to length using a pipe cutter.
5. Select pressing jaw according to the fitting dimension and
insert into the pressing machine. Arrest the locking bolts of
the machine. Check the jaws are free from debris and in
good working order.
®
Tube Size Insertion Depth
mm mm
15 20
22 24
28 27
35 32
42 38
54 43

7. Check the fitting outer edge still lines up with the marking.
Open the pressing jaw and close it around the fitting so
the raised bump in the fitting rests inside the groove of the
pressing jaw.
8. Initiate the pressing job by pressing the start button. The
automatic pressing process guarantees a tight connection.
6. Check the fitting is clean and the O-ring is free from debris
and correctly sitting in place. Push fitting on tube all the
way to the engagement marking.
9. Visually inspect the fitting to ensure the press has been
completed. The KemPress®tool will flash if the fitting did
not press correctly. If this occurs a new fitting and tube
section is required. At the end of the project visually inspect
each fitting to ensure none have been missed.
9
CAUTION
Brazing or soldering near to KemPress
®
joints should be avoided
as this may cause the seal to degrade due to heat transfer.
The table below states the minimum distance away from the
press joint which is acceptable to braze. If this distance cannot
be maintained then adequate precautions must be taken such
as fabricating the brazed section prior to assembly with the press
fittings, wrapping the press joint in a wet rag and keeping cool
during brazing or applying tube freezing spray.
Tube Size 15mm 22mm 28mm 35mm 42mm 54mm
Minimum 350 550 730 875 1000 1400
Clearance
(mm)
®

PRESS TOOL
The KemPress®tool is the smartest, lightweight copper
pressing tool on the market and its slim line design makes it
easy to handle. It has been specifically designed and tested
to work with KemPress®fittings. There is a small tool and a
large tool which deliver different pressing forces.
The jaws have been designed specifically for each tool and
are not interchangeable.
• Lightest tools on the market
• One hand operation (Patent)
• Perfectly balanced with Jaws
• Longest Maintenance interval 40,000 pressing cycles
• Smart electronic controls:
Flashes if not pressed correctly
Battery status indicator
• Second battery included, rapid recharge (30 mins)
• Tool Service Program:
Service centre operated by Kembla Hong Kong
Loan tool provided during service/repair
Small tool (KPSA) designed for 15, 22, 28, 35mm
Large tool (KPL) designed for 15, 22, 28, 35, 42 and 54mm
TECHNICAL DATA Small Tool KPSA Large Tool KPL
Dimensions 15mm to 35mm 15mm to 54mm
Weight incl. battery 1.7 kg 3.3 kg
Length 319 mm 410 mm
Width 70 mm 80 mm
Height 96 mm 125 mm
Power consumption 240 W 450 W
Piston Force 19 kN 32 kN
Piston stroke 30 mm 40 mm
Battery 12V/1.5 Ah Li-Ion 18V/1.5 Ah Li-Ion
Charging time 30 min 30 min
Number of presses 40,000 40,000
before service
10
®

Key Features
• Safe handling with slip-proof rubberised housing
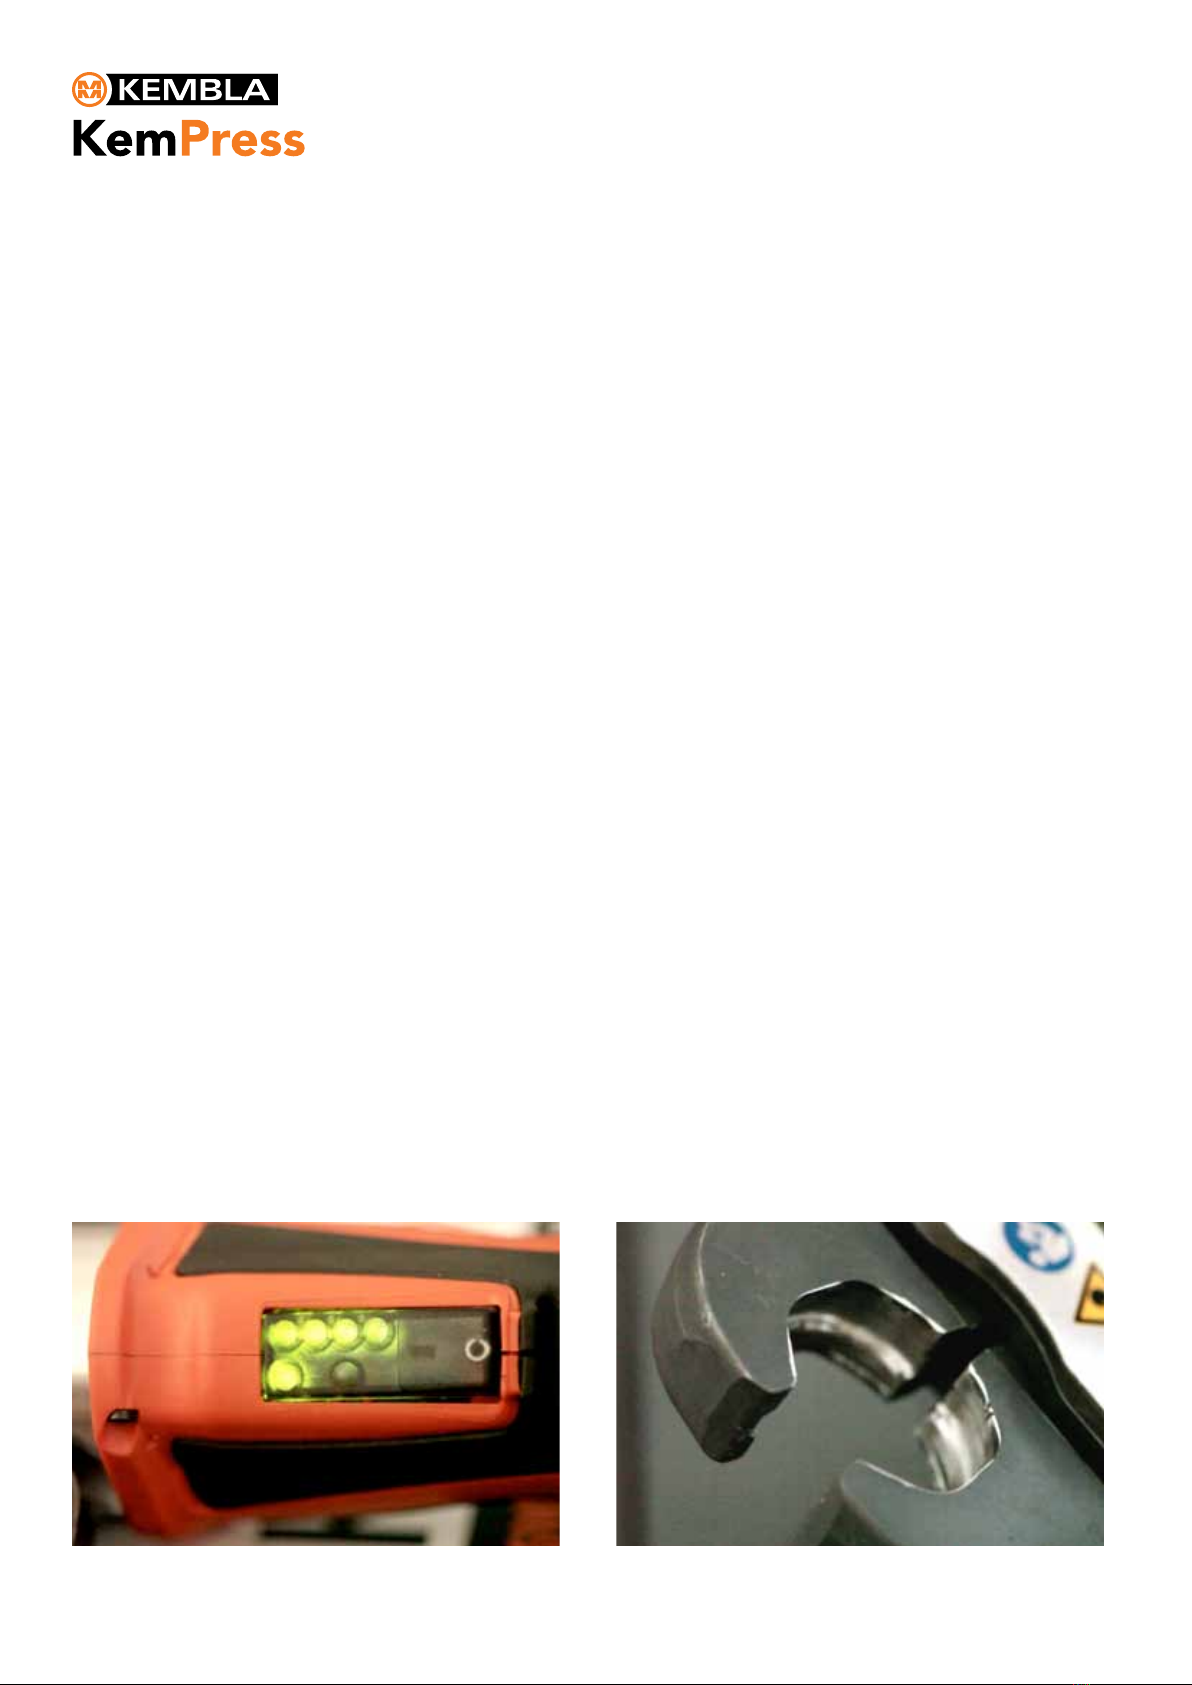
• Signals if press not completed correctly
-
Immediately
after the pressing cycle a green lights shows if the required
pressing force was achieved, a red light if not
• Automatic press cycle. Once it starts, it will automatically
complete. (manual override)
• Electronic log book allows for quick and precise
analysis of errors for servicing and repair
• Electronic monitoring of the jaw locking
bolt and visual error indicator (KPL)
• When you reach the maximum number of presses
before a service is required a warning light flashes.
The machine will not close down enabling you to
complete the job in hand.
• Redundant switch-off
• Rotatable head (KPSA)
Tool Operation
Holding the tool securely, press and hold the start button for
2 seconds to begin the automatic press cycle (the green LED
will go out). Release the start button and continue to hold the
tool securely. The green LED will light when the press cycle is
complete. To cancel the automatic press cycle press and hold
the release button on the side of the tool until the tool turns off.
If the red LED lights up, press the start button. If the tool does
not run, call Kembla Hong Kong for advice. If the red and
green LEDs flash alternately, the tool is ready for a service,
contact Kembla Hong Kong Customer Service Centre.
The tool will turn off automatically after 30 minutes of no use.
Turn the tool ON by quickly pressing and releasing the start
button and open the jaws around the fitting.
Tool Maintenance
Carry out basic inspection of the pressing device and jaws prior
to each use to ensure they are clean and free from debris and
dirt. The pressing jaws should be visually inspected to ensure
there are no cracks. If there are any cracks in the pressing jaws,
do not use them, as there is risk of the jaws shattering and
potential injury from flying fragments. It is recommended to
always wear appropriate eye protection whenever using the
pressing device. When inspecting the pressing jaws, also ensure
that there are no foreign material deposits and that the contours
of the jaw surfaces are in order. Failure to do this may result in
damage to the jaws and/or the pressing device. Always remove the
battery before performing regular cleaning and maintenance work.
The pressing device, jaws and batteries must be serviced at
least within 40,000 presses. Failure to have the required services
carried out may affect the warranty.
Tool Service Program
The Kembla Hong Kong tool service and repair program
is easy, ensures minimal down time and provides known
maximum costs for repairs. The key components of the
program include:
•
Replacement tools available while your tool is being
serviced/repaired
•
Maximum repair price guarantee: the cost won’t exceed
our maximum repair price and if the cost of repair is less,
you only get charged that amount
•
No fix, no charge
•
Up to 12 months warranty on repairs
Any service or repair of the KemPress
®
pressing tool or jaws,
requiring opening the device, or mechanical repairs, shall only
be carried out by MM Kembla or their authorised agent.
Failure to do so may void the warranty.
11
®
This manual suits for next models
1
Table of contents
Other MM Kembla Crimping Tools manuals
Popular Crimping Tools manuals by other brands

Textron
Textron Klauke K 15 instruction manual

TE Connectivity
TE Connectivity 607949-1 Original instructions

molex
molex 207129 Series Specification sheet

TE Connectivity
TE Connectivity 2063525-1 instruction sheet

TE Connectivity
TE Connectivity SDE-SA instruction sheet

Tyco Electronics
Tyco Electronics STRATO-THERM 1-46673-0 instruction sheet