Mobiky genius User manual

TECHNICAL SPECIFICATIONS
Weight 13 Kg
Folded dimensions 63,5 x 30,5 x 77 cm
Unfolded dimensions 127 x 45 x 102,5 cm
Saddle : Max level 102,5 cm
Handlebar : Max Level 98 cm
Frame Aluminium 6061
Rims Aluminium 6061 12’’
Chains Rust preventive steel
Front brake Disk 120 mm diam.
Rear brake Band brake 80 mm diam.
Colors 9Red
9Green
9Orange
9Cobalt
9Dark blue
Rider’s weight < 105 Kg
Adjusting torks
www.mobiky.com
OWNER’S MANUAL
by
www.mobiky.com
Model Head set Stem Seat
clip Seat
sheath Front
wheel Rear
wheel Pedals &
Cranks Arms &
Synchronism
GENIUS 10/15
N.m Clamp 12/16
N.m Clamp 37/42
N.m 37/42
N.m 37/42
N.m 30/35 N.m

Thank you for becoming a new owner of GENIUS folding bike.
We hope you will be fully satisfied and enjoy riding it.
Before using your bicycle for the first time, please take some time to read this
owner’s manual, and in particular to practice the folding and unfolding
procedures properly.
Proper operation of your bicycle is important for your safety and enjoyment.
With just a bit of experience, you should be able to fold and unfold your
bicycle in 3 seconds.
If you carry out any adjustments or maintenance work yourself, do read the
relevant section of this manual first.
Be sure to follow the sequence of steps carefully.
TABLE OF CONTENTS Pages
Safety 2
GENIUS bicycle terms 3
Riding position settings 4
How to use GENIUS 6
oUnfolding procedure 6
oFolding procedure 7
Running adjustments & checks 9
Maintenance 11
Routine replacements 12
Warranty 14
SAFETY
Before your first ride
Make sure it has been checked and adjusted by a bicycle technician. This will
validate your warranty and ensure that your bicycle is optimally adjusted for
performance and safety.
Riders should be between 1,20 m and 1,95 m in height and weight no more than
105 kg or 230 lbs.
¾When using be sure you know all local road regulations
¾A helmet is recommended for safe riding
¾Use appropriate lights, front and rear, when riding after dark
GENIUS is only for use on roads and well made paths. Other surfaces can
overstress the frame. The tyres and wheels are also quite unsuitable for riding on
uneven ground.
Be aware it has not been designed for cross country or freestyle riding.
All use out of the above instructions can cause injury and will cancel the
warranty immediately.
Before each ride
Saddle and handlebars should be ajdusted to suit your own riding position.
Please, follow the instructions below.
WARNING
In unfolded position (riding position), be sure that :
¾Stay tube (Refer to GENIUS Bicycle Terms: 3
3
) is properly secured to
the back of the rear fork slot
¾All latches and saddle, stay and stem clamps are properly secured
(Refer to GENIUS Bicycle Terms: 4
4
¾Check your brake system and tyre pressure
Do not ride your bicycle if it is damaged or if one of the above
instructions is not followed.
Have it serviced immediately by an authorised technician.
1

GENIUS BICYCLE TERMS
Riding position
Walking position Storage position
RIDING POSITION SETTINGS
The proper fit of the saddle and the handlebars is very important for safety and
good riding comfort.
Below you will find all the adjustements you need to make to the GENIUS before
riding.
GENERAL INSTRUCTIONS
For a comfortable riding position, the height of the saddle should be adjusted
according to your size.
When seated, straighten your leg until your heel lays on the pedal in its lowest
position.
Saddle adjustment
¾Unlock the stay clamp o
¾Draw the saddle up to the right position
¾If it’s not high enough and the seat pillar reaches the end, follow the
same procedure with the saddle clamp u.
¾Once the saddle is well adjusted, secure the quick releases properly.
¾Before riding check the saddle is correctly tightened. If it is loose, screw
the quick releases again and lock.
WARNING
Never draw out the seat post beyond
the stamped security line.
Saddle angle adjustment
The saddle angle is already adjusted in the normal way.
The best position is reached when the front pad is 0,5 cm to 1 cm higher than
the rear to prevent it from sliding.
¾Slacken the nut securing the mounting clip, choose a suitable angle
and re-tighten the nut: torque 13NM. Use an Alen key diam. 6 mm.
¾Check the saddle is correctly tightened. If necessary, screw again.
Stay Tubep
Stem clamp n
Saddle sheathq
Stay Clampo
Carry Handles
Saddle r
Kickstand t
Saddle clamp u
3 4
2

ADVICE
The GENIUS adjustable stem allows a few alterations for better fit.
For a comfortable riding position, the height of the handlebar is usually 1 or 2 cm
lower than the saddle but this is really subject to your morphology.
Each rider has to create his own fit depending on his cycling style.
Handlebar adjustment
¾Unlock the stem clamp n.
¾Draw the stem up to the right position.
¾Properly secure the quick release n.
¾Check that the stem is properly secured by pressing on the handlebar. If it is
loose, tighten again.
One final step is making sure that the saddle is lined up properly
with the frame. If not, you may loose control of your bike causing
injury or damage.
Tyre pressure
The most appropriate pressure depends on your weight and preference.
For minimum pedalling effort, use a higher pressure. A lower tyre pressure will
rapidly increase the pedalling effort and the risk of punctures is higher.
So, keep your tyres well inflated.
A car-type valve is used (US type) allowing various methods of inflation.
You can inflate the tyres with a standard foot or hand-pump.
If you use a standard bike pump with a flexible connector, you must unscrew the
connector very quickly to avoid air loss.
¾Recommended front and rear tyre pressure : 35 PSI - 2,5 Bar
Never use a compressed air line say at a garage or without
pressure control gear.
Never ride with poorly inflated tyres.
Safety gear
¾It is highly recommended that a helmet be worn.
¾Fasten loose clothing to ensure it does’nt get jammed in the
wheels.
¾Switch on appropriate rear and front lights when riding in the dark
¾GENIUS is designed and made under quality and safety control. It has been
tested by a french independant industrial laboratory and certified according to the
french bicycle standard NF R30-020.
HOW TO USE GENIUS
UNFOLDING PROCEDURE
1. By continously sliding, while pulling the
saddle seat-post up to the positive stop,
push handlebar ahead.
2. Open the bike by pulling the saddle while
pushing on the handlebar.
3. « Click » is audible when the stay tube is
reaching the rear fork slot
WARNING
When unfolded, ensure that the stay
tube is properly secured right to the
back of rear fork slot.
5
1 2 3
Pull up Open
« Click
Push
Self-locking of the stay tube

FOLDING TO THE WALKING POSITION
1. Take hold of the handlebar and press head part of the stay tube with
the other hand.
2. Create a sliding down motion to the saddle sheath and leave
3. Let it go down to a positive stop
4. Take hold of the carry handle
5. Pull up firmly
6. « Click » is audible when the rear fork is
locking
When folded make sure that the lock is
properly secure by pressing on the bottom
of the rear fork.
In this way, all riding fits (handlebar, seat-post) are saved and GENIUS can be rolled on
your side without carrying it.
If you want to ride again pull the saddle up in preparation for unfolding and off you
go!
FOLDING TO THE STORAGE POSITION
From the walking position (see before), GENIUS can be reduced easily to the final
step for efficient storage.
¾Pedals
Press the body of the pedal right to the crank and flip to its folded
position.
To unfold, flip the pedal into the horizontal position.
Be careful not to pinch your fingers.
¾Handlebar
Unlatch successively by pulling up button and rotating to the folded
position.
6 7
1 2 3
Press
Slide down
4 5 6
« Click »
Pull up firmly

1. Unlatch the stem clamp and slide down right to the lowest position.
Close the quick release to avoid untimely movement during transport.
2. Unlatch the stay and saddle clamps. Slide down and close the quick
release as above.
3. GENIUS is ready to be stored
For complete unfolding, follow all steps above in the opposite direction.
WARNING
During folding and unfolding operations take care of cable routing.
When the handlebar is down make sure that all cables are free and
the outers are not jammed.
This could damage the braking system and cause injury.
RUNNING ADJUSTMENTS & CHECKS
BRAKES
The cable tension is generated via the threaded cable stop on the brake levers.
Riding at a speed of 16 Km/h, the stop-point should be under 4,50 m when
using only one brake.
¾Screw or unscrew the threaded cable stop on the top of the brake lever to
tighten or slacken brake cables.
¾In braking is not efficient breaking adjust with the
threaded cable stop on the brake device : disk brake on
front wheel and band brake on rear wheel.
3 SPEED INTERNAL GEAR HUB
Genius is equiped with a STURMEY ARCHER SRB-3.
This 3 speed internal gear hub is fully encased within the alluminium hub
shell and maintenance is free.
To keep things simple, follow two rules for changing gear:
when moving, keep pedalling but take the pressure off the pedals while
shifting
when stationary, back pedal a little to allow the new ratio to engage. Even
when stationary this ensures a smooth and immediate gear change
without chain jumping.
In case of unusal resistance during shifting do not force the hub gear-control.
Instead, back pedal and try again.
Always make sure that the hub gear-control clicks positively into place and is not
left in an "in-between" position.
Do not be afraid to change gear; it’s so easy that you forget it. Remember if you
use only one sprocket all the time, the wear will be uneven. If transmission is not
smooth in any gear take action to remedy this, as this may result in damage to
the bike.
When riding never back pedal while changing gear.
CHAIN TENSION
For smooth riding and changing
gear, a well adjusted chain should
sag by 0,5 cm to 1 cm as shown
below.
After having slackened the rear
wheel nuts, screw the chain
adjuster on the right dropout for more tension. Unscrew to loosen.
For smooth pedalling the chain has to be well lubricated (see page 12)
o
CRANK AXLE BOLTS and PEDALS
The crank axle bolts should be torqued down (32NM, use a 8 mm Alen Key) after
the first few hours of use with occasional checks thereafter.
9 10
8
1 2 3

Check also that the pedals are secured (torque 30NM, use a 15 mm Plate key):
note that the left pedal has a left thread.
CLAMPS
The quick release clamps should be kept adjusted so that the levers close firmly
when doing the clamp up; if the movement is slack and easy, with little
resistance, the seat post or stem will not be properly secured.
As a guide, with the seat, stay or stem clamp levers forward, the adjustor nuts
should be tightened with a torque in the range 5-8NM and the maximum closing
force needed at the end of the lever while securing the clamps should lie in the
range 80-120N.
More specifically, the correct setting depends on the weight and strength of the
user. Do not over-tighten as this can cause damage.
For normal tightening during the Genius’ life, a sixth of a turn or less of the
adjustor nut will normally be quite sufficient.
If, after adjusting the clamps, the seat post or stem slip in use, then the cause
is almost certainly oil or grease; Remove them from the bike and clean up
using soapy water.
MAINTENANCE
Do not neglect your Genius. In order to ensure safe riding and enjoyment,
your folding bike requires attention and orderly servicing.
The frequency of this is subject to its mileage andconditions of use.
¾CLEANING
Genius can be swilled down using soapy water and a sponge. Dry before
storage.
Never use:
scotch-brite or similar abrasive gear.
High-pressure cleaning machines and still less steam-cleaners. These
could reduce grease to a liquid state in all articulated parts. Most of
bearings would be damaged and Genius could not be folded or
unfolded.
¾LUBRICATION
Avoid getting oil or grease on the seat post, stem and rims. Grease is the best
lubricant for all wearing parts (oil does not last as well). Apply grease
wherever it is practical to dismantle an assembly. Where it is inconvenient or
impossible, oil may be use. Applying oil to a greased assembly can cause the
remaining grease to be washed away fairly quickly and frequent re-lubrication
is needed thereafter (unless you re-grease).
Choice of lubricant: Any good quality general purpose grease is satisfactory
especially lithium based. For the chain, proprietary chain lubricants with good
penetrating properties give the best results. As for oil, some spray-on products
are convenient to use otherwise employ an ordinary light mineral oil
Notes:
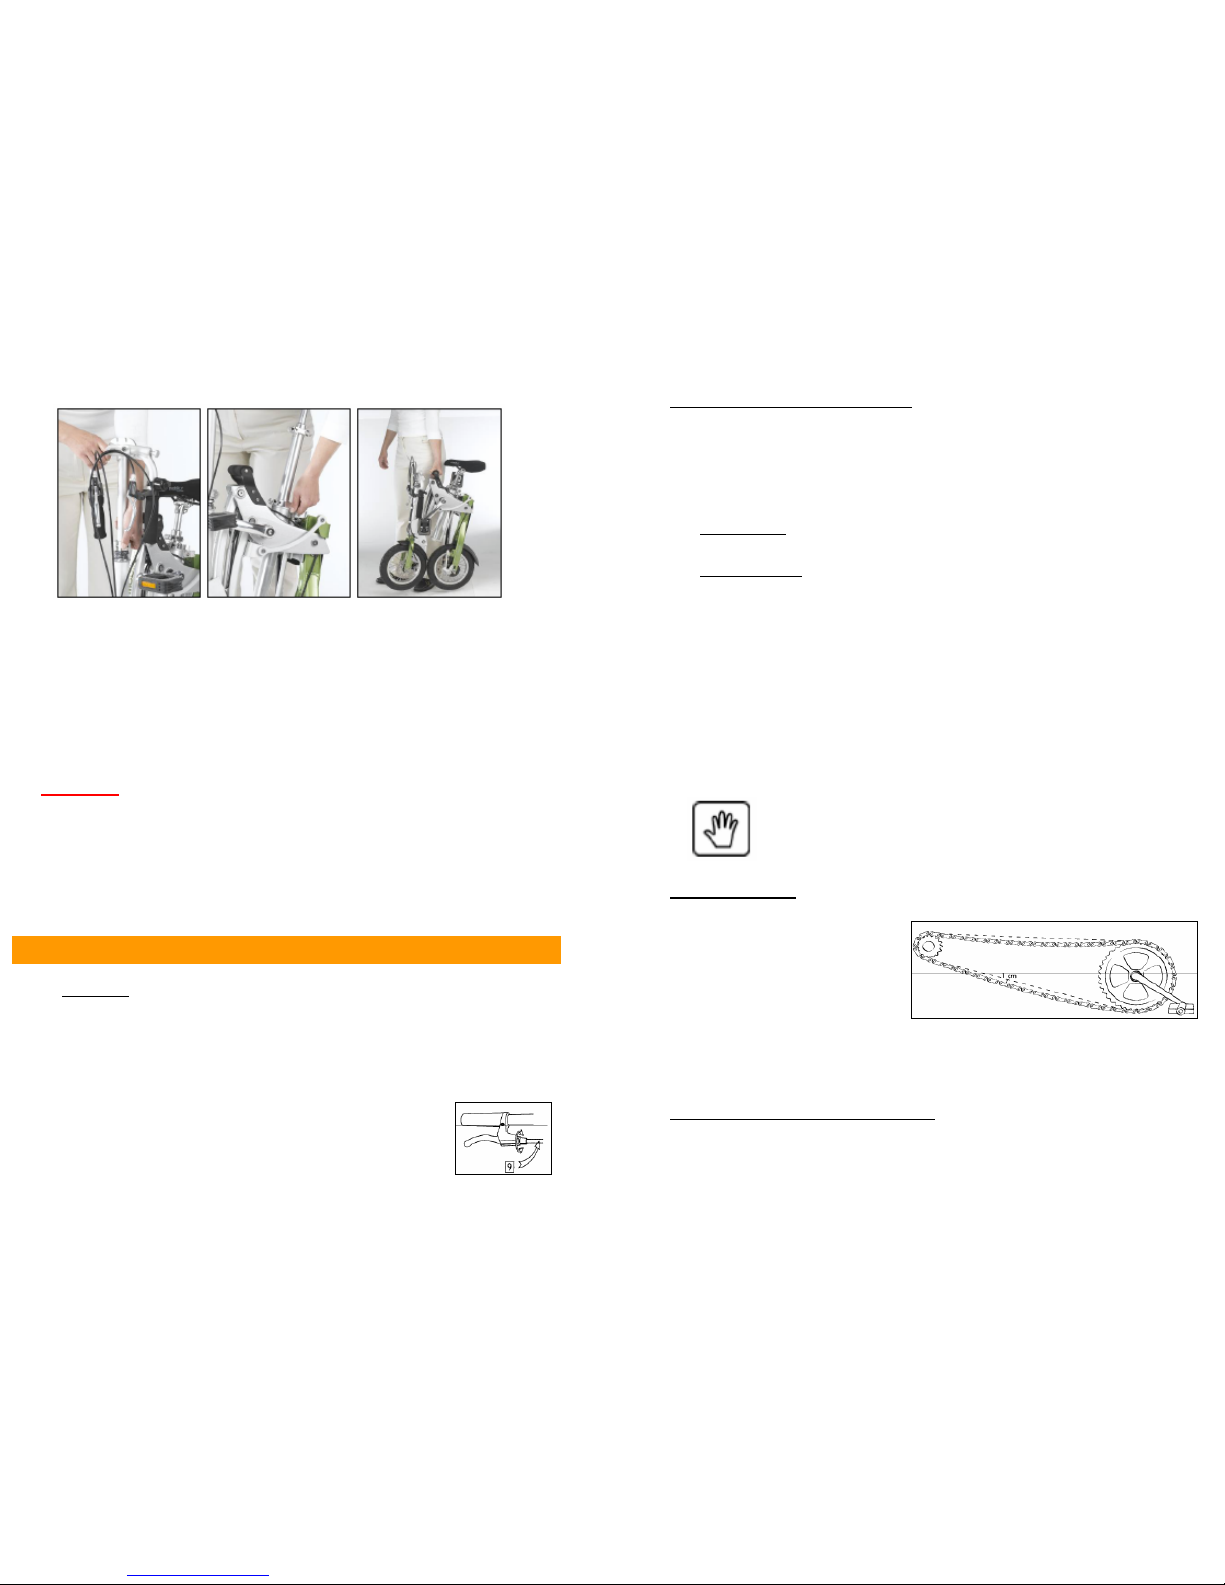
a) Chain: for smooth pedalling the chain has to be well lubricated: if the bike is
used in a wet or salted area this should be done frequently. The easiest way to
cover the whole chain is to turn the pedals backwards while applying oil: make
sure that the oil flows both onto the rollers and between the side plates: turn the
pedals a few more times to allow the oil to work in, and then wipe off excess oil.
b) Folding pedal: the pivot spindle on which it folds needs greasing from time to
time. The main bearing which is packed with grease, should not be oiled;
however, if the bearing is not running freely some oil fed in past the seal will
extend its useful life.
c) Cables: make sure that the cables are free running in their outers. If not, use
light mineral oil.
d) After water cleaning: Oil brake lever pivots and the two chains.
ROUTINE REPLACEMENTS
Planned replacement is advised to ensure both safety and good performance.
The suggested intervals between replacements are for Genius bikes subjected to
normal use: the most appropriate timing depends on the conditions of use and
your riding style.
REFLECTORS
The reflectors are factory fitted for your safety. Never remove them and make
sure they are well secured on wheels and pedals.
Keep them clean and replace if broken.
A light kit is supplied with Genius. Before your first ride, you must install both front
and rear lights successively on the handlebar and seat post. Make sure that both
reflecting surfaces are upright to the ground.
The rear reflector should be assembled at least 8 cm under the saddle.
12
11

BRAKE CABLES
These do not have an indefinite life. Therefore to avoid the risk of brake cable
failure, replace the inner cables at intervals of 4,000 miles or less.
If there is any doubt about the free running of the cables, the outer cables should
also be replaced. New outers should be exactly the same length as the original
cables with the correct terminating ferrules.
SRB-3 GEAR CABLE
Though less safety critical than brake cables, the SRB-3 hub-gear inner control
cable should be replaced at the same interval as the brake cables.
WHEELS – SPOKES - RIMS
In the first few hours of use the spokes tend to bed down and lose some of their
initial tension which can cause spoke failure particularly for heavier riders. See
that these are re-tensioned correctly after initial use and check thereafter.
This should be serviced by an authorised technician.
Riding with loosen spokes may brake the rims and cause injury.
If unusual noises are heard from the wheels while rotary motion, this may be due
to the application of the brakes or a defective hub. In both cases, have the bike
serviced.
TYRES
The risk of punctures increases with the mileage covered as the tyre accumulates
small sharp particles in its tread.
Replace the rear tyre every 4,000 miles and the front tyre every 6,000 miles.
After replacing make sure that the tyre is correctly fittted in the rim.
Never ride with a defective tyre Dimension : 12’’ ½ X 2 ¼
TRANSMISSION
If the chains are allowed to stretch unduly through lack of lubrication or long
term wear, power transmission will be inefficient and rough and the sprockets
will also wear quickly. It is recommended that the chains are replaced at least
every 3000 miles where the bike is used in harsh conditions. If you allow the
chain to stretch unduly, the middle double sprocket and rear sprocket will be
probably damaged, and possibly the chainwheel too. These should be checked
and if worn replaced at the same time as fitting the new chain set.
Standard replacing should be serviced by an authorised technician.
Front chain = 48 links Rear chain = 82 links
CRANK SET & PEDALS
The crank rotary motion should be smooth without looseness.
After having riden the bike a few times, make sure that both cranks
are well screwed and secured on the bottom bracket axle.
WARRANTY
Terms and Conditions :
The terms and conditions of the warranty issued by our responsible sales
company apply in every country. Any faults with the bike will be rectified free of
charge provided the problem was caused by a material defect or manufacturing
error (within the warranty period).
Warranty period :
¾2 years on frame defect
¾1 year on all other cycle components
Limits of application :
Are not covered :
¾Damages due to a crash or inappropriate use
¾Not keeping in good order as described above
¾Unapproved part served as substitute for original one.
¾Wear and tear on parts such as inner and outer cables, rims, chains,
or electric light...
¾Genius bike design modified without manufacturer’s authorisation
ZI La Croix Blanche
13 Avenue Philippe Lebon
91700 SAINTE GENEVIEVE DES BOIS
FRANCE
www.mobiky.com
The key to mobility
14
13
Table of contents
Other Mobiky Bicycle manuals