PROPAIN TYEE User manual

ASSEMBLY INSTRUCTIONS /USER MANUAL -
READ BEFORE YOUR FIRST RIDE!
INSTRUCTIONS DE MONTAGE /MANUEL D’UTILISATION -
A LIRE AVANT TOUTE SORTIE!
INSTRUCCIONES DE MONTAJE /MANUAL DE INSTRUCCIONES -
LEER ANTES DE LA PRIMERA SALIDA!
TYEE

CUSTOM HANDCRAFTED
MOUNTAIN BIKES
EN
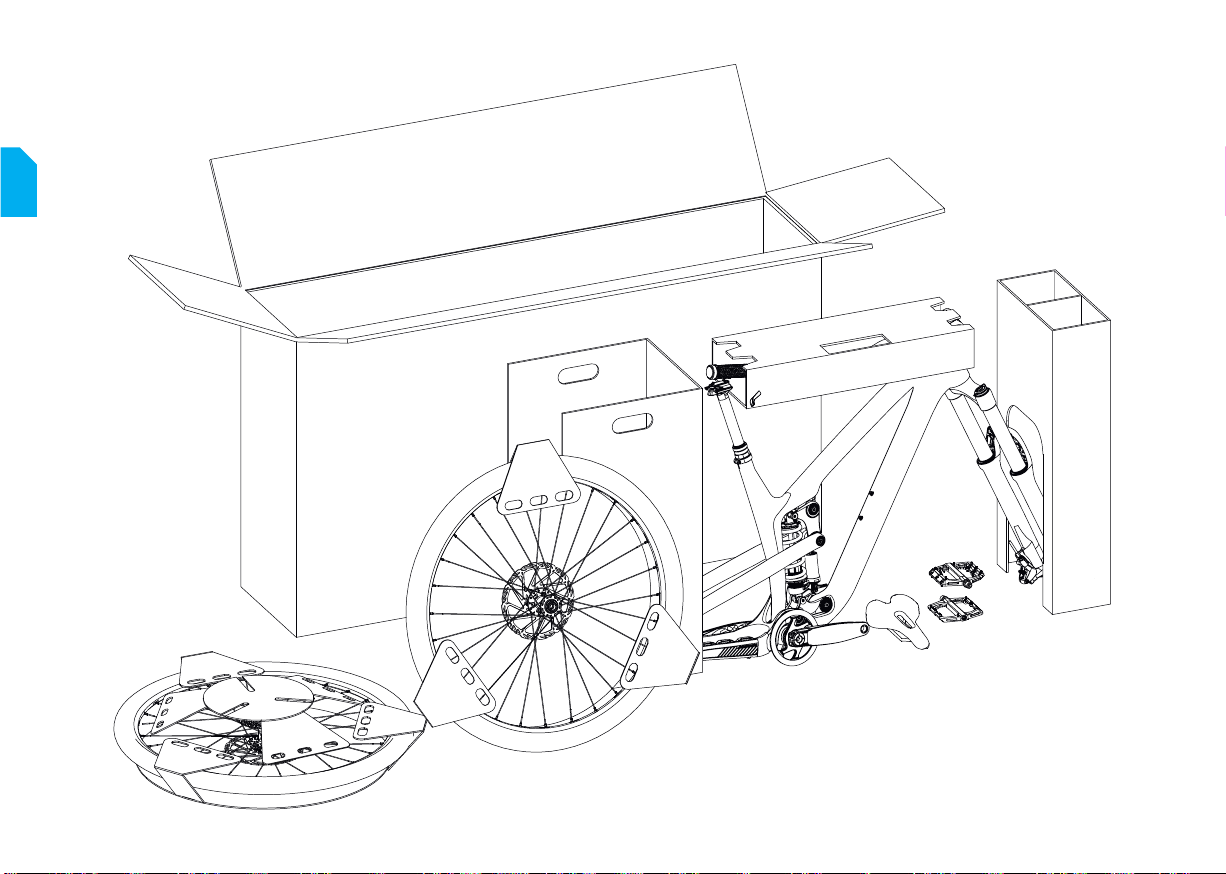
//SCOPE OF DELIVERY

1
4
32
5 6
//UNPACKING
Carefully open the top of the bike box ensuring no damage is
caused to internal parts whilst opening the box.
tÐĉďŒÐĴìÐťŘĴðďĊďåĴìÐìĊÌăÐÅīșĴìÐťŘĴðďĊďåĴìÐīÐī
ĴīðĊæăÐĊÌĴìÐťŘĴðďĊďåĴìÐåďīāȘ
ĺīÐåķăăřīÐĉďŒÐĴìÐìĊÌăÐÅīåīďĉðĴĮťŘĴðďĊșĴď
prevent possible damage to the paint.
Carefully remove both wheels.
ĺBe careful to avoid damages.
Carefully remove the bike.
ĺWatch the handlebars, suspension fork and rear derailleur.
Fix the bike to a work stand for further assembly or place
ðĴďĊĴìÐæīďķĊÌðĊĴìÐīÐīÐĊÌťŘĴðďĊȘ
Remove the box for the small parts and open it.
#ÐĴÆìĴìÐīÐīÌÐīðăăÐķīåīďĉĴìÐīÐīÐĊÌťŘĴðďĊȘ
1
43
2
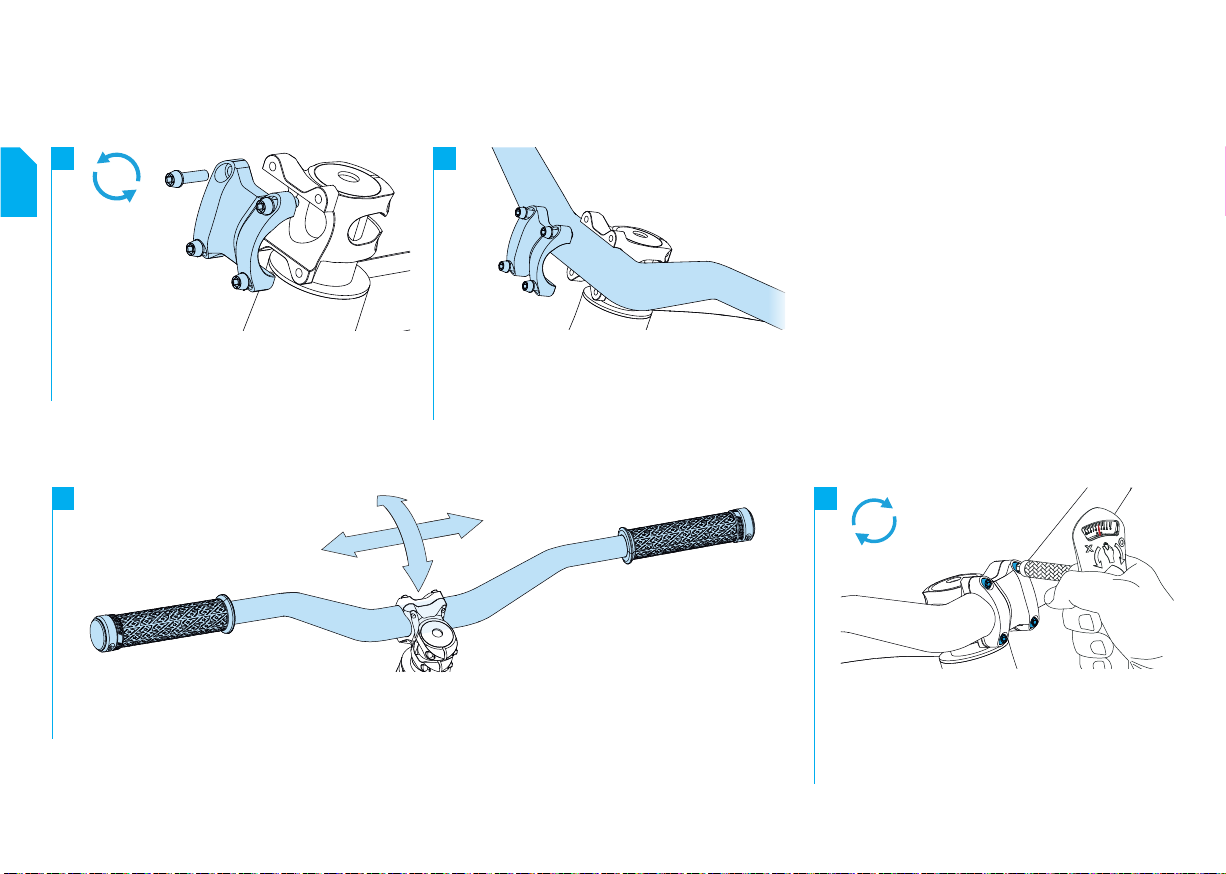
//MOUNTING THE HANDLEBAR
1. Unscrew the stem clamp bolts.
2. Remove the handlebar clamp and the bolts.
1. Attach the handlebar to the stem.
2. Attach the handlebar clamp and screw in the bolts a few
turns by hand.
1. Screw in the two upper clamping bolts and tighten both
bolts with the torque lasered on the clamp or stem.
2. Screw in the two lower clamping bolts and tighten both
bolts with the torque lasered on the clamp.
1. Center the handlebar and adjust the angle of the handlebar according to your personal preferences.
2. Adjust the brake levers and the shifters to the angle of the handlebar.

5
10 Nm
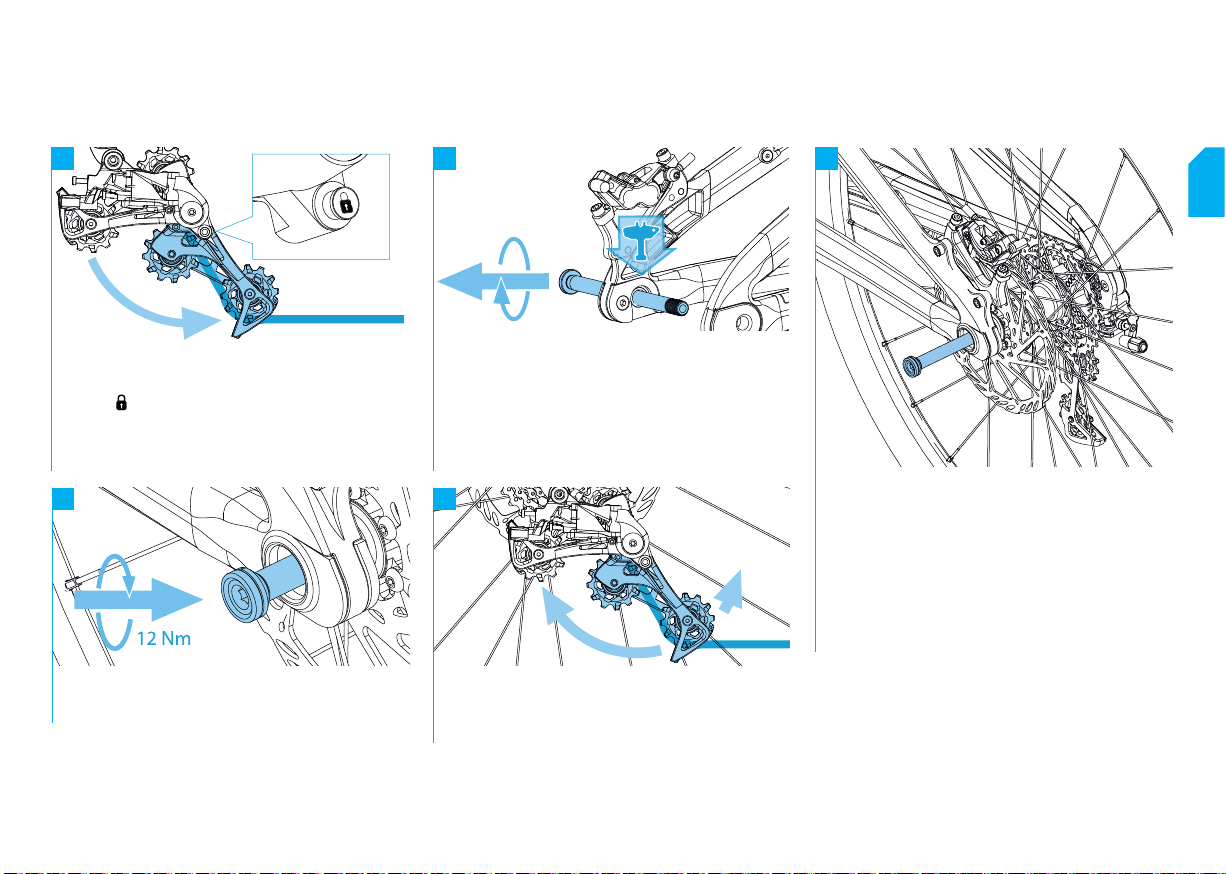
//MOUNTING THE REAR DERAILLEUR
Mount the derailleur to the derailleur hanger of the frame
using a 5 mm hex key.
ĺThe derailleur stop must be at the lug of the derailleur
hanger.
ĺTighten the derailleur with a torque of 10 Nm.
1 2 3
4 5
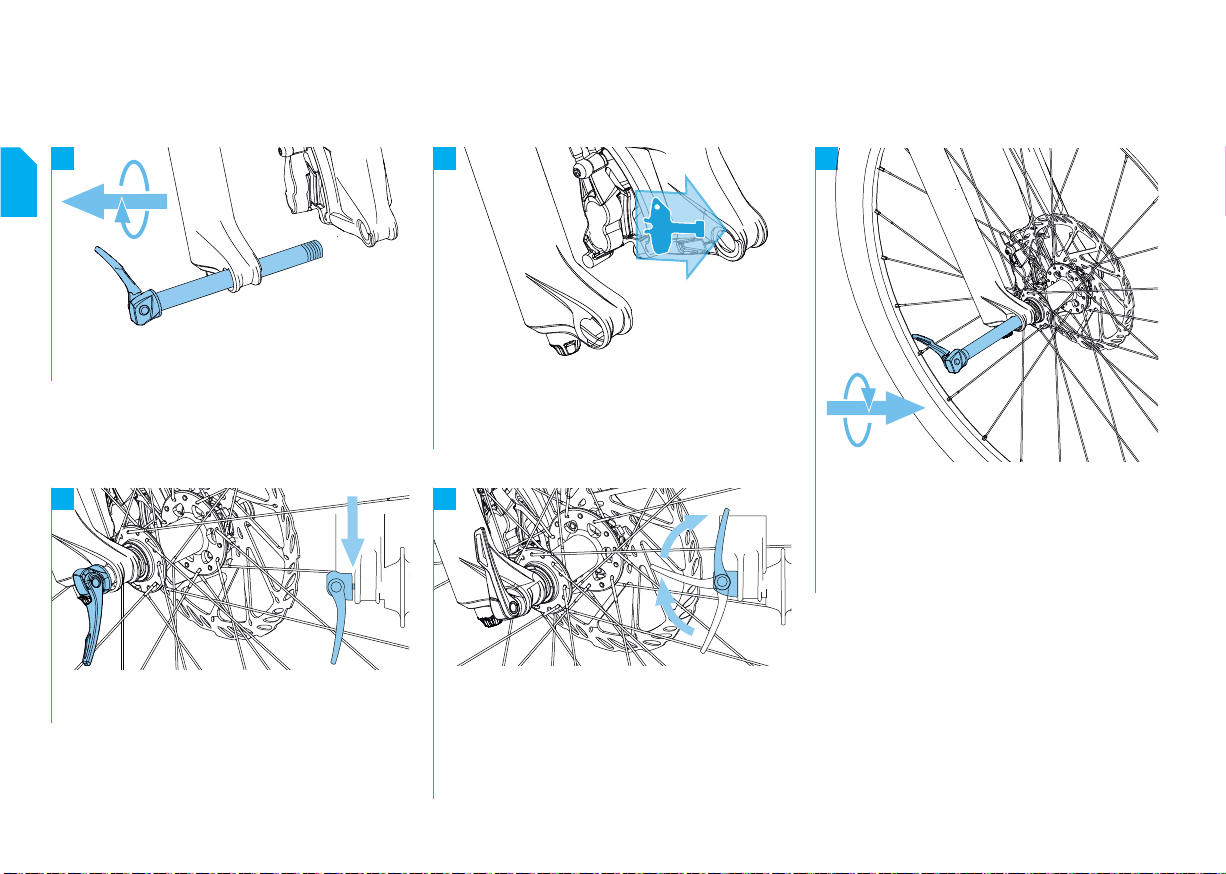
//MOUNTING THE FRONT WHEEL
Remove the thru axle from the fork. 1. tÐĉďŒÐĴìÐĴīĊĮĨďīĴĮÐÆķīðĊæÌÐŒðÆÐĴìĴðĮťĴĴÐÌ
between the brake pads.
2. Store the transport securing device for future transport
of your bike.
1. Put the front wheel into the dropouts of the fork. The
brake rotor must be placed between the brake pads.
2. Open the lever of the thru axle and slide the axle through
the non-drive side (left in the direction of travel) fork
dropouts and hub of the wheel.
Rotate the lever clockwise until there is only a small gap left
between lever head and dropout.
1. Close the lever of the thru axle.
2. There must be no gap between lever head and dropout.
ĺClosing the lever should require an increasing amount of hand force until the lever is fully closed.
To increase lever tension, open the lever and turn it clockwise. Close the lever to recheck lever tension.
tÐĨÐĴķĊĴðăĴìÐĴÐĊĮðďĊðĮĮķŨÆðÐĊĴșĴìÐĊÆăďĮÐĴìÐăÐŒÐīȘ
Depending on the fork manufacturer, the thru axle must be pushed from the right or left through the dropout of the fork.
2
4
1
21
5
3
//MOUNTING THE REAR WHEEL
1. Remove the thru axle from the frame.
2. tÐĉďŒÐĴìÐĴīĊĮĨďīĴĮÐÆķīðĊæÌÐŒðÆÐĴìĴðĮťĴĴÐÌ
between the brake pads.
3. Store the transport securing device for future transport
of your bike.
1. Insert the rear wheel into the dropout of the frame.
ĺThe brake rotor must be placed between the brake
pads.
ĺPut the chain on the smallest sprocket of the
cassette.
2. Slide the thru axle from the brake side (left in the
direction of travel) into the frame dropout and hub of
the wheel.
Screw the thru axle into the dropout using a 6 mm hex key
and tighten the thru axle to a torque of 12 Nm.
Activate the Cage Lock function. Pull the cage of the rear
derailleur forward and press the Cage Lock button with the
symbol .
ĺThe rear derailleur cage remains tilted forward when
the Cage Lock function is activated.
}ìðĮĮðĉĨăðťÐĮĴìÐ
installation of the rear wheel.
Deactivate the Cage Lock function. Pull the cage of the
derailleur slightly forward and carefully return the derailleur
to its original position.

1 1
2
3
R L
//MOUNTING THE PEDALS
One of the pedals has a right- and the other a left-hand thread.
Most pedals have the letter “L” and “R” stamped on the end of
ĴìÐĴìīÐÌȘwďĉÐĨÐÌăĮÆďĉÐœðĴìæīďďŒÐðĊĴìÐŦĊæÐďå
the left pedal.
1. Slightly grease pedal thread.
2. AåœĮìÐīĮœÐīÐĨīďŒðÌÐÌœðĴìĴìÐÆīĊāĮďåřďķīÅðāÐșťĴ
them on the pedal threads.
3. Turn the left pedal counter-clockwise to screw it into the
thread of the left crank arm and tighten the pedal to a
ĴďīĪķÐďåǢǤɁUĉȘ
4. Turn the right pedal clockwise to screw it into the thread
of the right crank arm and tighten the pedal to a torque
ďåǢǤɁUĉȘ
//MOUNTING THE SADDLE
1. Attach the upper clamp to the saddle frame.
2. Adjust the saddle to your personal preferences and
screw in the clamping bolts.
Adjust the seat height:
Caution: When adjusting the seat height, the cable of the seat
post must be pushed or pulled in or out the frame. Otherwise
the cable may get damaged!
1. Open the saddle clamp.
2. Push the seat post carefully and slowly into the frame
or pull the seat post out of the frame. At the same time
push or pull the cable in or out the frame.
3. Close the saddle clamp.
Unscrew the bolts of the saddle clamp and remove the upper
clamp.
1 2 3
//INFLATING THE TIRE
1. AĊŦĴÐĴìÐĴðīÐĴďÅďķĴǡÅīȘ
2. ìÐÆāĴìÐÆďīīÐÆĴťĴďåĴìÐĴðīÐȘ
ĺThe tire must contact the rim evenly around its
entire circumference. If not, release the air, press
the tire into the center of the rim bed and repeat
the procedure.
ĺHave the tire seat checked by a professional if in
any doubt.
3. Slowly rotate and shake the wheel to distribute the
ĮÐăðĊæŦķðÌďŒÐīĴìÐÐĊĴðīÐðĊĊÐīĮķīåÆÐďåĴìÐĴðīÐȘ
4. After the tire bead is fully seated, reduce the pressure to
your own requirements.
5. Screw on the valve cap.
6. Carry out a short test ride and check the tire pressure
regularly.
AåřďķìŒÐďīÌÐīÐÌřďķīÅðāÐœðĴìĴķÅÐăÐĮĮĮÐĴķĨșřďķĉķĮĴťăăÅďĴìĴðīÐĮœðĴìĴìÐÐĊÆăďĮÐÌĮÐăðĊæŦķðÌÅÐåďīÐĴìÐťīĮĴīðÌÐȘ
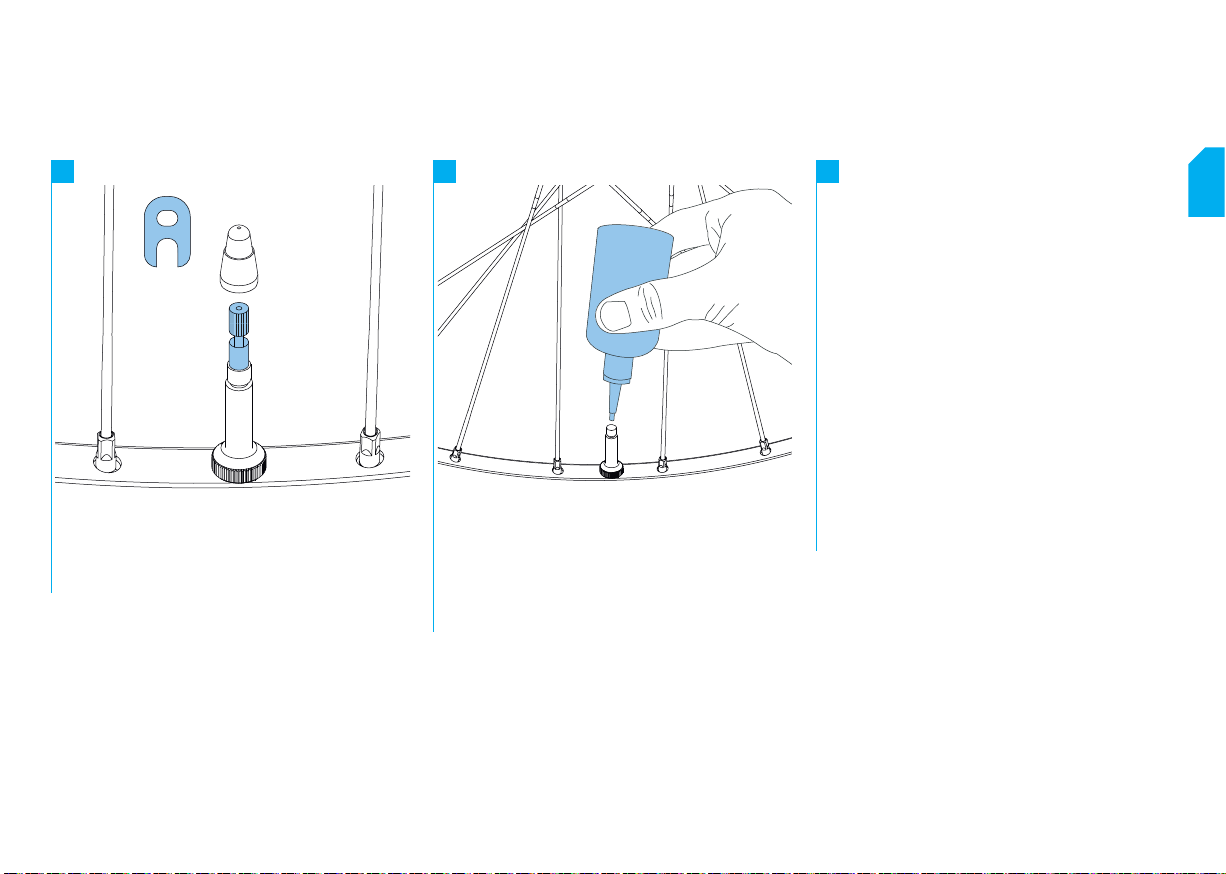
1. Release the air from the tire completely.
2. Unscrew the valve cap.
3. Unscrew the valve insert from the valve using the valve
key supplied.
1. wìāÐĴìÐĨīďŒðÌÐÌĮÐăðĊæŦķðÌåďīÅďķĴďĊÐĉðĊķĴÐȘ
2. 9ðăăĴìÐĮÐăðĊæŦķðÌĴìīďķæìĴìÐŒăŒÐðĊĴďĴìÐĴðīÐȘ
ĨĨīďŘðĉĴÐăřǥǟĉăďåĮÐăðĊæŦķðÌĮìďķăÌÅÐķĮÐÌ
per tire.
3. Screw the valve insert into the valve using the valve key
and tighten it by hand.
AåřďķìŒÐďīÌÐīÐÌřďķīÅðāÐœðĴìďķĴĴķÅÐăÐĮĮĮÐĴķĨșðĊŦĴÐĴìÐĴðīÐĮĴďĨīÐĮĮķīÐďåÅďķĴǡÅīȘ
A B
1
ďķīÅðāÐðĮÌÐăðŒÐīÐÌœðĴìÅĮðÆÌþķĮĴĉÐĊĴďåĴìÐĮķĮĨÐĊĮðďĊÐăÐĉÐĊĴĮȘÐåďīÐĴìÐťīĮĴīðÌÐșĴìÐðīĨīÐĮĮķīÐðĊĴìÐĮķĮĨÐĊĮðďĊÐăÐĉÐĊĴĮĉķĮĴÅÐÌþķĮĴÐÌĴďřďķīÅďÌřœÐðæìĴȘ
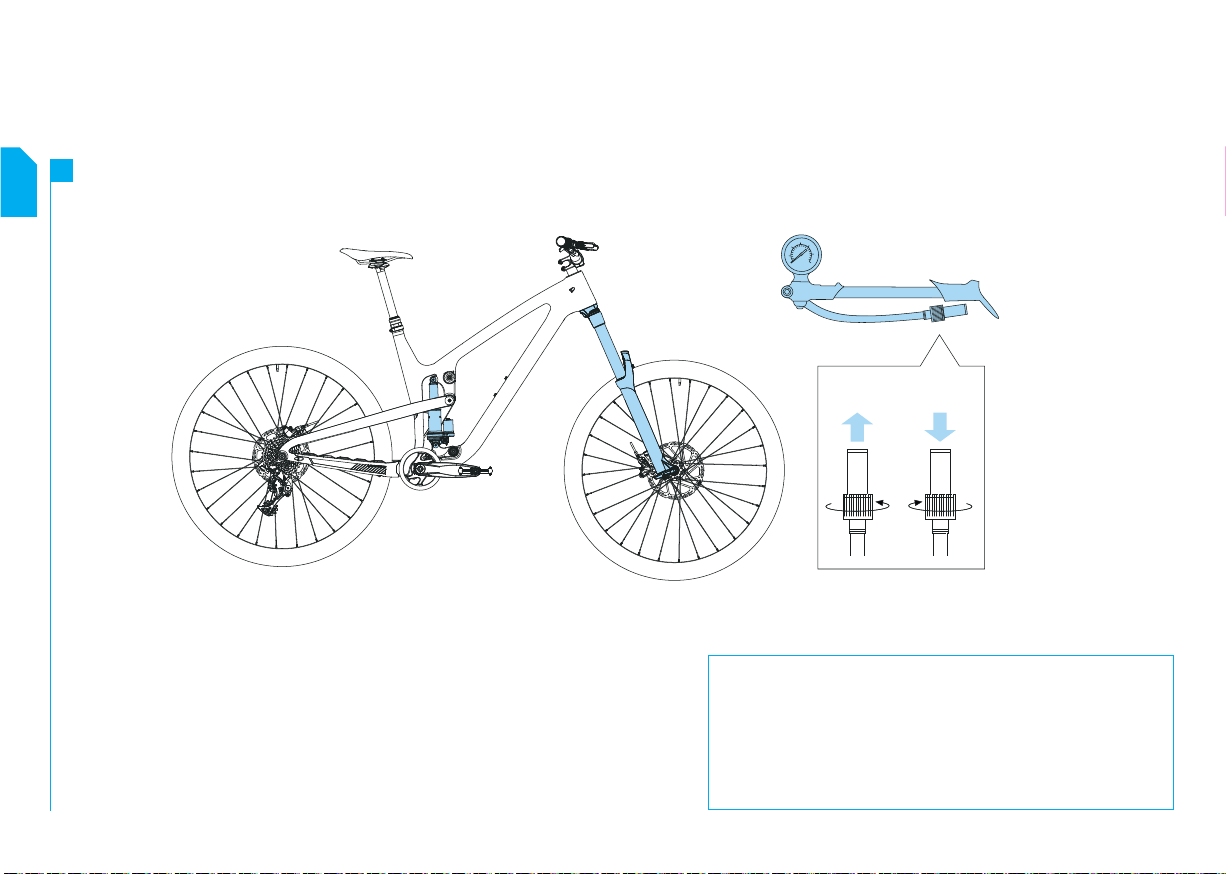
//ADJUSTING THE SUSPENSION ELEMENTS
1. Unscrew the valve cap of the shock / fork.
2. Screw on the shock pump and pump the shock / fork up to the required pressure.
ĺObserve the instructions for operating the shock pump.
ĺWe recommend a SAG* of 15% - 20% on the fork and 20% - 30% on the shock.
Please pay attention to the manufacturer's instructions of the suspension elements for the air
pressure. The corresponding manuals are included.
3. Unscrew the shock pump and screw the valve cap onto the valve.
* The air pressure of your suspension elements is adjusted via the so-called
SAG (negative travel). The SAG is the degree by which the shock and the fork
compresses under the weight of the rider. To adjust the SAG, sit on the bike with
all your cycling equipment (helmet, backpack, shoes, etc.) and take a normal
riding position. No air can escape when unscrewing the shock pump.

A
B
C
D
D
D
D
1 2
//BEFORE YOUR FIRST RIDE
PROVISIONS FOR USE
Observe the basic provisions for the TYEE:
INTENDED USE
}ìÐðĊĴÐĊÌÐÌķĮÐďåðāÐĮðĮÌðŒðÌÐÌðĊĴďťŒÐÌðååÐīÐĊĴ
categories – ranging from the use on paved roads through to
downhill or freeride use.
The TYEE must only be used in accordance with the
provisions of Category 5 or below.
Details can be found in the user manual of your bike.
PERMISSIBLE TOTAL MASS
The permissible total mass (rider + bicycle + equipment +
luggage) is 120 kg and may not be exceeded!
USER MANUAL
In addition to these instructions, please refer to the user
manual of your bike. All information contained therein must
have been read and understood!
REGULATIONS ACCORDING TO THE GERMAN TRAFFIC REGULATIONS
(STRASSENVERKEHRS-ZULASSUNGSORDNUNG STVZO)
AåřďķœĊĴĴďķĮÐĴìÐ}''ďĊĨķÅăðÆīďÌĮșåīďĊĴĊÌīÐīăðæìĴșœìðĴÐåīďĊĴīÐŦÐÆĴďīșīÐÌīÐīīÐŦÐÆĴďīĊÌĮĨďāÐīÐŦÐÆĴďīĮ
ĉķĮĴÅÐĴĴÆìÐÌĴďĴìÐ}''ȘAåĨÐÌăĮīÐťĴĴÐÌīÐĴīďĮĨÐÆĴðŒÐăřșĉāÐĮķīÐĴìĴĴìÐřìŒÐřÐăăďœīÐŦÐÆĴďīĮĴìĴÆĴåďīœīÌĮ
and backwards. These regulations are for the use on public roads in Germany. If the bicycle is used in another country, the
requirements applicable there must be observed.
Pos. Description Special notes
A front light and white
īÐŦÐÆĴďī
}ìÐåīďĊĴĊÌīÐīăðæìĴĮĊÌīÐŦÐÆĴďīĮĉķĮĴÅÐťĴĴÐÌĴÌķĮāșðĊĴìÐÌīāďīœìÐĊÐŒÐī
required by visibility conditions.
}ìÐăðæìĴĮĊÌīÐŦÐÆĴďīĮĉķĮĴÅÐťŘÐÌÌķīðĊæďĨÐīĴðďĊĊÌ
be protected against accidental movement under normal operating conditions and must
be permanently operational. The front light must be set so that other road users are not
ÅăðĊÌÐÌȘ}ìÐăðæìĴĮĊÌīÐŦÐÆĴďīĮĉķĮĴĊďĴÅÐÆďŒÐīÐÌȘ
B rear light and red
īÐŦÐÆĴďī
CĨÐÌăīÐŦÐÆĴďī ďĴìĨÐÌăĮĉķĮĴìŒÐřÐăăďœīÐŦÐÆĴďīĮœďīāðĊæåďīœīÌĊÌÅÆāœīÌȘ
DĮĨďāÐīÐŦÐÆĴďī }œďĮĨďāÐīÐŦÐÆĴďīĮĉķĮĴÅÐťĴĴÐÌĴďĴìÐåīďĊĴĊÌīÐīœìÐÐăȘ

// BEFORE YOUR FIRST RIDE
ÐåďīÐřďķīťīĮĴīðÌÐșÆìÐÆāăăÅĮðÆåķĊÆĴðďĊĮďåřďķīÅðāÐĴďÐĊĮķīÐĴìĴĴìÐīÐīÐĊďĮĮÐĉÅăřÐīīďīĮďīĴīĊĮĨďīĴÌĉæÐĮȘAåĴìÐīÐīÐĊřÌÐåÐÆĴĮďīŦœĮșřďķĮìďķăÌìŒÐřďķīÅðāÐðĊĮĨÐÆĴÐÌĊÌ
īÐĨðīÐÌÅřĪķăðťÐÌÅðÆřÆăÐĉÐÆìĊðÆȘUÐŒÐīīðÌÐœðĴìÌÐåÐÆĴðŒÐÅðāÐȝ
WHEELS / TIRES Lift the wheels one after the other and spin them.
ĺThe wheels must spin smoothly.
ĺThe wheels must run true, without moving up and down or from side to side.
ĺThe tires must not rub against the frame.
Check the tire pressure.
ĺThe tire pressure should be about 2 bar. The maximum tire pressure of the wheel and of the tire used must not be exceeded.
Check the tightening torque of the thru axles.
ĺ}ìÐăÐŒÐīďåĴìÐĴìīķŘăÐďåĴìÐåīďĊĴœìÐÐăĉķĮĴÅÐÆăďĮÐÌťīĉăřȝ
ĺThe thru axle of the rear wheel must be tightened to 12 Nm!
COMPONENTS ÐīðåřĴìÐĴðæìĴťĴďåĴìÐĮĴÐĉȚwĴĊÌðĊåīďĊĴďåĴìÐÅðāÐœðĴìĴìÐåīďĊĴœìÐÐăÅÐĴœÐÐĊřďķīāĊÐÐĮĊÌĴīřĴďĴķīĊĴìÐìĊÌăÐÅīăÐåĴĊÌīðæìĴȘ
ĺIt should not be possible to turn the handlebar with normal force.
Check the headset for play: Stand next to your bike, pull the front brake lever and gently push the bike backwards and forwards.
ĺNo bearing play must be detectable.
Make sure that all components are tight.
ĺTighten the parts to the proper torque, if need be. In case of doubt, contact the Propain Service.
FRAME Check the frame for damages and deformation.
ĺThere must be no damages.
FORK /
SHOCK
Sit on the bike with all your cycling equipment (helmet, backpack, shoes, etc.) and take a normal riding position.
ĺWe recommend a SAG of 15% - 20% on the fork and 20% - 30% on the shock.
ĺIf necessary, change the air pressure of your suspension elements. If you have ordered a shock with steel spring you have already chosen a spring rate corresponding to
your weight. Details can be found in the user manual of your bike.
BRAKES ìÐÆāÅīāÐÐŨÆðÐĊÆřȚqķăăďĊÐÅīāÐăÐŒÐīåĴÐīĴìÐďĴìÐīœìðăÐĮĴĊÌðĊæĊÌĨķĮìĴìÐÅðāÐÅÆāœīÌĮĊÌåďīœīÌĮȘ
ĺThe front and rear wheel must lock when the brake lever is pulled.
ìÐÆāœìÐĴìÐīĴìÐÅīāÐìďĮÐĮĊÌÆďĊĊÐÆĴðďĊĮīÐăďĮðĊæÅīāÐŦķðÌĊÌÆìÐÆāĴìÐĉåďīÌÐåÐÆĴĮȘ
ĺīāÐŦķðÌĉķĮĴĊďĴÐĮÆĨÐĴĴìÐÆďĊĊÐÆĴðďĊĮȘ
Break in the brake pads. Choose a road away from public roads and brake 20 to 30 times with the front or rear brake from a speed of 30 km/h down to 5 km/h. You should brake as
hard as possible without locking one of the wheels. Repeat the process for the other brake. Only then the brake can show its full braking power.

// NOTES
25
5
9
7
23
18
2
27
20
27
1
4
68
11
13
10
14
12
3
15
24
16
21
17
26
28
19
22
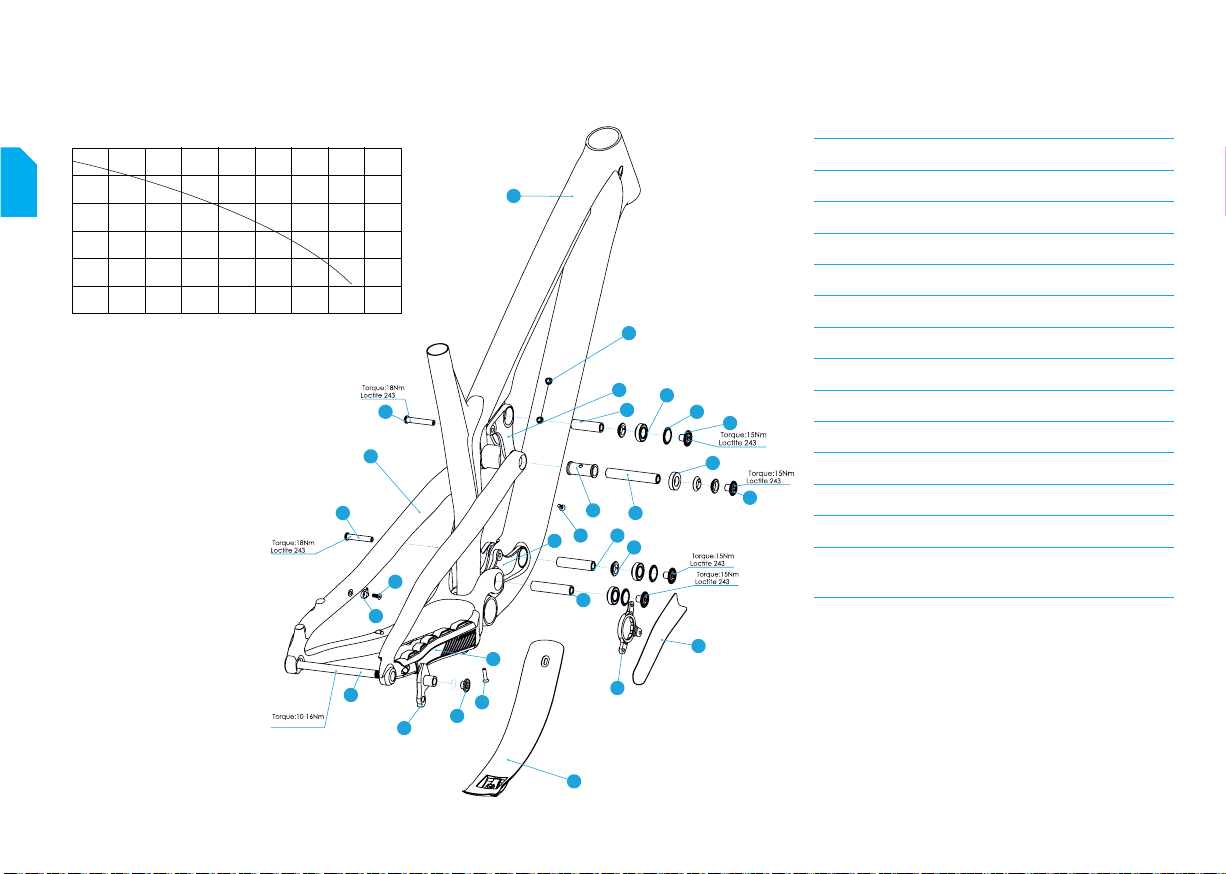
Suspension Leverage Ratio
3,3
2,9
2,5
3,1
2,7
2,4
2,3
TYEE - Standards
Shock length 210mm
Shock travel 55mm
Shock mount top 8mm x 35mm
Shock mount bottom 8mm x 30mm
Rear wheel travel 160mm
Bottom bracket BSA 73mm
Brake mount Post mount 180
Seat post diameter 31,6mm
Head set (S.H.I.S.) Top: ZS49 / Bottom: ZS56
Rear wheel axle Sixpack axle (148mm)
Rear hub width 148mm (Boost)
Front derailleur mount None
Chain line 52 mm (boost)
Chain guide mount ISCG 05
Tire size 29“(for 29“frame)
& 27.5“(for 27,5“ frame)
Maxium fork travel 170mm
//TECHNICAL SPECIFICATIONS

NO Propain Description QTY.
partnumber-version
1 001045-AC Front_triangle_Large 1
2 001112-AA Rear_triangle_TyeeCF29 (or 27.5“) 1
3 001044-AB Lever_low 1
4 001163-AA Upper_lever 1
5 001075-AA Alu_Bushing 1
6 000988-AA Axle_15dia_51mm_M10x1 1
7 000176-AA 6
8 000602-AB Dust_cap_seal 6
9 000600-AB 15mm_Axle_Cap 6
10 001066-AA Axle_15x91xM10_clamp_type 1
11 000006-AA Bearing_15x28x7 2
12 000604-AA Clamp_ring_15mm_axle 8
13 000605-AB 15mm_clamp_Axle_Cap 2
14 000616-AA Axle_15dia_62mm_M10x1 1
15 001065-AA Axle_15dia_71-5mm_M10x1 1
16 001076-AC ISCG_05_removable_boost148 1
17 001117-AA Hanger 1
18 001118-AA Hanger_screw 1
19 000991-AA Bolt_M8x44_custom 1
20 000992-AA Bolt_M8x48_custom 1
21 001168-AA Chain_stay_protector_TyeeCF 1
NO Propain Description QTY.
partnumber-version
22 001184-AA DT_protector_Tyee_CF_2020 1
23 001225-AA Bolt_M5x22_countersunk_DIN7991 1
24 001189-AB SS_protector_Tyee_CF 1
25 000733-AA Bolt_M5x13 2
26 000926-AC Propain_Sixpack_X12_148mm_axle 1
27 000056-AA Bolt_M5x12_countersunk 2

WE BUILD THE BEST BIKE FOR YOU
Congratulations on your new bike & thanks for your trust!
And now straight onto the bike! That's almost right, because it doesn't take long to assemble your bike. Nevertheless, please take the time to set up your bike correctly and read all safety-relevant
information in this user manual. So you are safe on the road and have much more fun with the right setup. With our manuals you will learn step by step how to set up your bike correctly and get all
the information you need. So you will be familiar with your bike in no time at all.
Now your bike has to come out of the box. It is best to have some space around you for the assembly. Our bikes come pre-assembled so that you don't have to have a specialist workshop at home
ďīÅÐĨīďåÐĮĮðďĊăĉÐÆìĊðÆȘďķĮĴðăăÆĊȾĴæÐĴìÐÌȟ}ìÐĊĮðĉĨăřÆďĊĴÆĴďķīÆķĮĴďĉÐīĮÐīŒðÆÐșœìÐĴìÐīŒððĊåďɩĨīďĨðĊȭÅðāÐĮȘÆďĉďīķĊÌÐīɎǣǨȧǟȨǦǤǠǡǟǠǧǟǡǡǡȘ}ďæÐĴìÐīœÐœðăăťĊÌ
solution. One more request: We want you to have fun with your bike and be safe on the road. If you are unsure about the assembly, contact a professional. We cannot accept any liability if crashes
and injuries occur due to incorrect installation or incorrect use.
tÐÌřȟ}ìÐĊœÐœðĮìřďķăďĴĮďååķĊœðĴìřďķīĊÐœÅðāÐȝ
PS: We are happy about your best pictures at #propainbicycles
//USER MANUAL

1. SPECIAL INFORMATION FOR PARENTS, GUARDIANS AND SUPERVISORS
This manual covers both adult, teenager and kid's bikes. Your child may already be riding a bike in a size that is intended for adults. All persons entrusted with the care or supervision of the child must know,
understand and observe the following points.
DANGER
RISK OF ACCIDENTS DUE TO CARELESSNESS AND LACK OF SENSE OF RESPONSIBILITY OF THE CHILD!
Children are often unable to assess dangers correctly and often do not have the necessary experience and sense of responsibility to use a bike safely!
• Parents, guardians or supervisors are responsible for the safe use and perfect condition of the child's bike.
• The points listed on this page must be observed during every ride.
• AĊÆĮÐďåÌďķÅĴșĴìÐqtZqAUwÐīŒðÆÐďīĪķăðťÐÌÅðÆřÆăÐĉÐÆìĊðÆĉķĮĴÅÐÆďĊĮķăĴÐÌȘ
As a parent, guardian or supervisor, you are responsible for the activities and safety of the child.
The following points are your responsibility:
• You must read this user manual and discuss the warnings, functions and use of the bike with your child before you let him or her ride the bike.
• ďķĉķĮĴťĴĴìÐÅðāÐĨīďĨÐīăřĴďĴìÐÆìðăÌďīìŒÐðĴťĴĴÐÌĨīďĨÐīăřȘ
• You must ensure that the bike is always in perfect condition.
• ďķĊÌĴìÐÆìðăÌĉķĮĴìŒÐăÐīĊÐÌĊÌķĊÌÐīĮĴďďÌĴìÐĮåÐďĨÐīĴðďĊďåĴìÐÅðāÐȘ}ìÐåďÆķĮďåĴìÐťīĮĴīðÌÐĮĮìďķăÌÅÐĴďĴÐÆìĴìÐÆìðăÌĴďÅīāÐĮåÐăřĊÌĴďķĮÐĴìÐÅðāÐĮåÐăřȘ
• ďķĊÌĴìÐÆìðăÌĉķĮĴìŒÐăÐīĊÐÌșķĊÌÐīĮĴďďÌĊÌåďăăďœÐÌĊďĴďĊăřĴìÐĨĨăðÆÅăÐăďÆăăœĮåďīĉďĴďīŒÐìðÆăÐĮșÅðÆřÆăÐĮĊÌĴīŨÆșÅķĴăĮďĴìÐÆďĉĉďĊĮÐĊĮÐīķăÐĮåďīĮåÐĊÌīÐĮĨďĊĮðÅăÐ
cycling.
• You must ensure that your child always wears an approved bike helmet when riding, but also that your child understands that a bike helmet is only suitable for cycling and must be removed when
not riding. A helmet may not be worn when playing, on playgrounds, on playground equipment, when climbing trees, or never when not riding a bike. Failure to observe this warning may result in
serious injury or death.
• Parental supervision is required when using a kid's bike.

• The supervising adult must observe at all times whether the child is assessing situations correctly and whether the bike is under control according to the requirements of the environment.
• You must make sure that the bike is the right size for the child. Both feet must touch the ground when the child is sitting on the saddle.
2. GENERAL
This user manual is the most important element to prevent any damages and risks during the use and servicing of your bike. It is provided to give you the most important information on your bike and to
æðŒÐřďķìÐăĨåķăĴðĨĮďŒÐīĴìÐÐĊĴðīÐăðåÐďåřďķīÅðāÐȘAåřďķìŒÐĊřÌďķÅĴĮďīķĊÆÐīĴðĊĴðÐĮīÐæīÌðĊæĴìÐœďīāďĊřďķīÅðāÐșřďķĮìďķăÌăœřĮÆďĊĮķăĴĪķăðťÐÌÅðÆřÆăÐĉÐÆìĊðÆďīĴìÐqtZqAUĮÐīŒðÆÐȘ
qăÐĮÐīÐÌĴìðĮĉĊķăÆīÐåķăăřÅÐåďīÐĴāðĊæĴìÐťīĮĴīðÌÐďĊřďķīĊÐœÅðāÐĊÌĉāÐĮķīÐřďķķĊÌÐīĮĴĊÌÐŒÐīřĴìðĊæȘ'ĊĮķīÐĴìĴĴìðīÌȭĨīĴřķĮÐīĮīÐăĮďðĊåďīĉÐÌÅďķĴĴìÐÆďĊĴÐĊĴĮďåĴìðĮĉĊķă
and that they understand and follow all instructions. Keep this user manual for future reference. If you sell or give away your bike, please include this user manual. This user manual is also available at www.
propain-bikes.com.
2.1 EXPLANATION OF SYMBOLS USED
DANGER
…indicates a hazard with a high level of risk which, if not avoided, will result in death or serious injury.
CAUTION
...indicates a hazard with a low level of risk which, if not avoided, may result in minor or moderate injury.
NOTE
… indicates a potentially hazardous situation that may result in damage to property.
//USER MANUAL

2.2 TARGET GROUP
This manual is intended for you, the owner of the PROPAIN bike. For kids bikes, the target groups of this user manual are parents, guardians or the person supervising them (see also „1. Special information
åďīĨīÐĊĴĮșæķīÌðĊĮĊÌĮķĨÐīŒðĮďīĮȵȨȘĮĮÐĉÅăřĊÌĉðĊĴÐĊĊÆÐœďīāĮīÐĪķðīÐÅĮðÆāĊďœăÐÌæÐðĊÅðāÐĴÐÆìĊďăďæřȘAåðĊÌďķÅĴșÆďĊĮķăĴĪķăðťÐÌÅðÆřÆăÐĉÐÆìĊðÆȘAĉĨīďĨÐīĮĮÐĉÅăřďīĉðĊĴÐĊĊÆÐ
of your bike may result in serious injury or death!
2.3 REQUIREMENTS TO OPERATE AN E-BIKE
The rider must be mentally and physically able to safely operate the bike over a longer period of time and longer distances. For beginners and those getting back into bike riding, special bike skills courses
are recommended.
2.4 OWNER’S MANUALS SUPPLIED BY COMPONENT MANUFACTURERS
This user manual contains all information you need for a safe use of your bike. In addition to this user manual, your bike may be accompanied by some product information or user manuals from various
component manufacturers. If need be, you can use those documents for further information on the respective product, its assembly and setup. The user manuals of some manufacturers might only be
available online (also see „8.2 Further Information“).
2.5 TOOLS
ďīāďĊĴìÐÅðāÐĉřďĊăřÅÐÆīīðÐÌďķĴœðĴìĮķðĴÅăÐĴďďăĮȘwÆīÐœÆďĊĊÐÆĴðďĊĮĉķĮĴÅÐĴðæìĴÐĊÐÌĴďÌÐťĊÐÌĴďīĪķÐķĮðĊæĴďīĪķÐœīÐĊÆìȘĨīďĨÐīðĊĮĴăăĴðďĊĊÌīÐĉďŒăďåÆďĉĨďĊÐĊĴĮÆĊďĊăřÅÐ
guaranteed when using perfectly functioning and undamaged tools.
2.6 THE SPECIAL PROPERTIES OF CARBON
Carbon frames must not be clamped (e.g. into a work stand) or subjected to pressure in any other way. Always tighten carbon parts to the prescribed torque. Damage to carbon components is not necessarily
ðĉĉÐÌðĴÐăřŒðĮðÅăÐȘAåðĊÌďķÅĴșÆďĊĮķăĴĪķăðťÐÌÅðÆřÆăÐĉÐÆìĊðÆȘīÅďĊĨīĴĮìŒÐăðĉðĴÐÌăðåÐĮĨĊȘ>ĊÌăÐÅīĮșĮÐĴĨďĮĴĮșĮĴÐĉĮșÆīĊāĮĊÌœìÐÐăĮĉÌÐåīďĉÆīÅďĊĮìďķăÌÅÐīÐĨăÆÐÌīÐæķăīăř
(e.g. every three years). Intense heat permanently damages the carbon structure. Carbon parts must not be stored close to heat sources or in a vehicle in direct sunlight.
Other manuals for TYEE
1
Table of contents
Languages:
Other PROPAIN Bicycle manuals

PROPAIN
PROPAIN tyee 2020 User manual

PROPAIN
PROPAIN Ekano 165 2020 User manual

PROPAIN
PROPAIN BAM BAM Owner's manual

PROPAIN
PROPAIN TYEE CARBON User manual

PROPAIN
PROPAIN EKANO 2 AL User manual

PROPAIN
PROPAIN 001464-AL Installation instructions

PROPAIN
PROPAIN YUMA Use and care manual

PROPAIN
PROPAIN Spindrift User manual

PROPAIN
PROPAIN RAGE User manual

PROPAIN
PROPAIN Frechdax User manual


