Mobot 1 sec eBike User manual

MOBOT®1 sec eBike
Electric Bicycle
USER MANUAL
PLEASE CAREFULLY READ THE USER MANUAL AND
WARRANTY BOOK BEFORE USING
MOBOT® 1 sec eBike, edited on 7/12/2015

WARNING
Whenever you ride the MOBOT®1 sec eBike electric bicycle you
might risk having serious injury from collisions, falls or loss of
control. To ride safely, YOU MUST READ AND FOLLOW ALL
INSTRUCTIONS AND WARNINGS STATED IN THIS MANUAL.
This manual includes basic operational instructions for the
MOBOT®Freedom electric scooter. It does not cover any
situations where injury or death may occur.
OPERATORS MUST USE GOOD JUDGMENT AND COMMON
SENSE TO DETECT AND AVOID HAZARDS AND DANGERS that
they may encounter when riding the MOBOT®1 sec eBike
electric bicycle. By using the MOBOT® 1 sec eBike electric
bicycle, it deems that you accept the inherent risks of operating
this product.
2

Table of Contents
Table of Contents 3
APPEARANCE 4
MAIN PART 5
SAFETY 6
CLOSING STEPS 7
Circuit diagram of the 1 sec Folding e-bike 8
ATTENTION TO DETAIL DURING RIDING & 8
ADJUSTMENT OF MAIN PARTS 8
BATTERY AND CHARGER 12
MAINTENANCE 13
GENERAL TROUBLESHOOTING 13
PRODUCT SPECIFICATION SHEET 14
PRODUCT WARRANTY 15
3

APPEARANCE
4

MAIN PART
1: Saddle
2: Seat Post
3: Big Seat Post
4: Folding Lift Handle
5: Lock System
6: Supporting Post
7: Li-ion Battery
8: Rear Wheel
9: Kickstand
10: Controller
11: Arc Link
12: Top Four -bar link
13: Telescopic Link
14: Down Four-bar Link
15: DC Motor
16: Front Wheel
17: Quick release ①
18: Stem
19: Foldable Handlebar
20: Brake handle
5

SAFETY
1. The product is recommended for adults (18 years old and above) and is not
suitable for minors age (below 12 years old). Please do not load two
passengers at the same time.
2. Please wear your safety helmet and other protective equipment when
riding.
3. Do ride traffic lane and not pavement as it is breaking the local traffic rules
and regulations.
4. Please exercise in wide areas, and ride after skilled manipulation.
5. Do not attempt any dangerous actions like riding single-handedly.
6. Do not attempt to ride the bicycle on stairs that are above 10 cm. It may
result in vehicle overturn, causing injuries and/or damages to the rider
and/or bicycle.
7. The maximum speed limit for MOBOT ® 1 sec eBike is 25 Km/h. For your
safety, please maintain the riding speed at 20 Km/h.
8. When travelling at night, please limit the speed within 15 Km/h or less and
turn on the headlights.
9. For safety reasons, do not ride the bicycle in bad weather conditions such
as heavy downpours and high winds.
10. Do not use the bicycle when outdoor temperature is lower than 0ºC.
11. Please slow down or avoid using the bicycle when riding in poor road
conditions such as oily or slippery road surfaces.
12. Please adjust the handlebar according to your height to ensure a safe and
comfortable riding.
13. To avoid damages to the electrical parts of the vehicle, do not immerse the
bicycle in water with depth of more than 10 cm. Do not wash it with
pressurized water.
6

CLOSING STEPS
1): Folding process: hold ③and ⑥together with one hand, after clamping these together
③will slide down to the bottom, then lift ④up till you hear the “click” sound which
means that ⑤is in its locked position. Folding process is finished.
Attention: If ③is too tight to slide down, please give a pressure on the ①which will
help ③slide down to the bottom easier.
2): Unfolding process: lift the ①& ②up and lock in place at height required, then kick ⑨
back gently, the ebike frame will pull itself open. Pull up ①& ②again, making sure ⑥
is touching the head of the rear fork and you can’t see the round mark on the frame which
is covered by the bottom of ⑥
Attention: Before riding, you must check that ⑥has opened to its correct position so that
①& ②are stable, as well as the saddle & handle bar are locked at desired heights.
The number are according to the main part digrame.
Repeat the step backward to open the bicycle.
7

Circuit diagram of the 1 sec Fo ldi n g e-bike
ATTENTION TO DETAIL DURING RIDING &
ADJUSTMENT OF MAIN PARTS
During the pedal assist riding, there is no need to turn off the power switch, you may keep the
switch on. This will feel just like riding a normal bicycle.
8

1): Before riding, you can loosen the quick release ②, adjust the saddle height up or down for your
required fit, and then lock the quick release fastener ②.
2): Handlebar Adjustment
See in reference illustration A:
Insertion depth of the stem cannot be less than the minimum depth, to make sure that the safety line
on the stem is adjusted to be hidden.
Attention: During the adjustment of the handlebar stem up or down, please do not disconnect any plug
or electrical parts.
3): The throttle adjustment (for outside Europe Market)
The throttle is installed on the right handlebar; there is an on/off switch to turn power on & off.
After turning on the power button, you can use the throttle to accelerate or decelerate by rotating it or
release it to the top.
During you release the throttle, it will return back to its starting position, and accordingly you can turn
off the power button.
4): Front brake Adjustment
See in reference illustration B:
●Gap adjustment: let the single side touch, loosen the terminal screw a little, there are three holes on
the board, when moving up the spring, the elasticity will be raised to make the gap between brake and
rim become bigger and vice versa.
9

●The best gap between the brake shoes and the rim is 1.5mm.
●The best position of brake wire stand is that it not to touch the front mudguard.
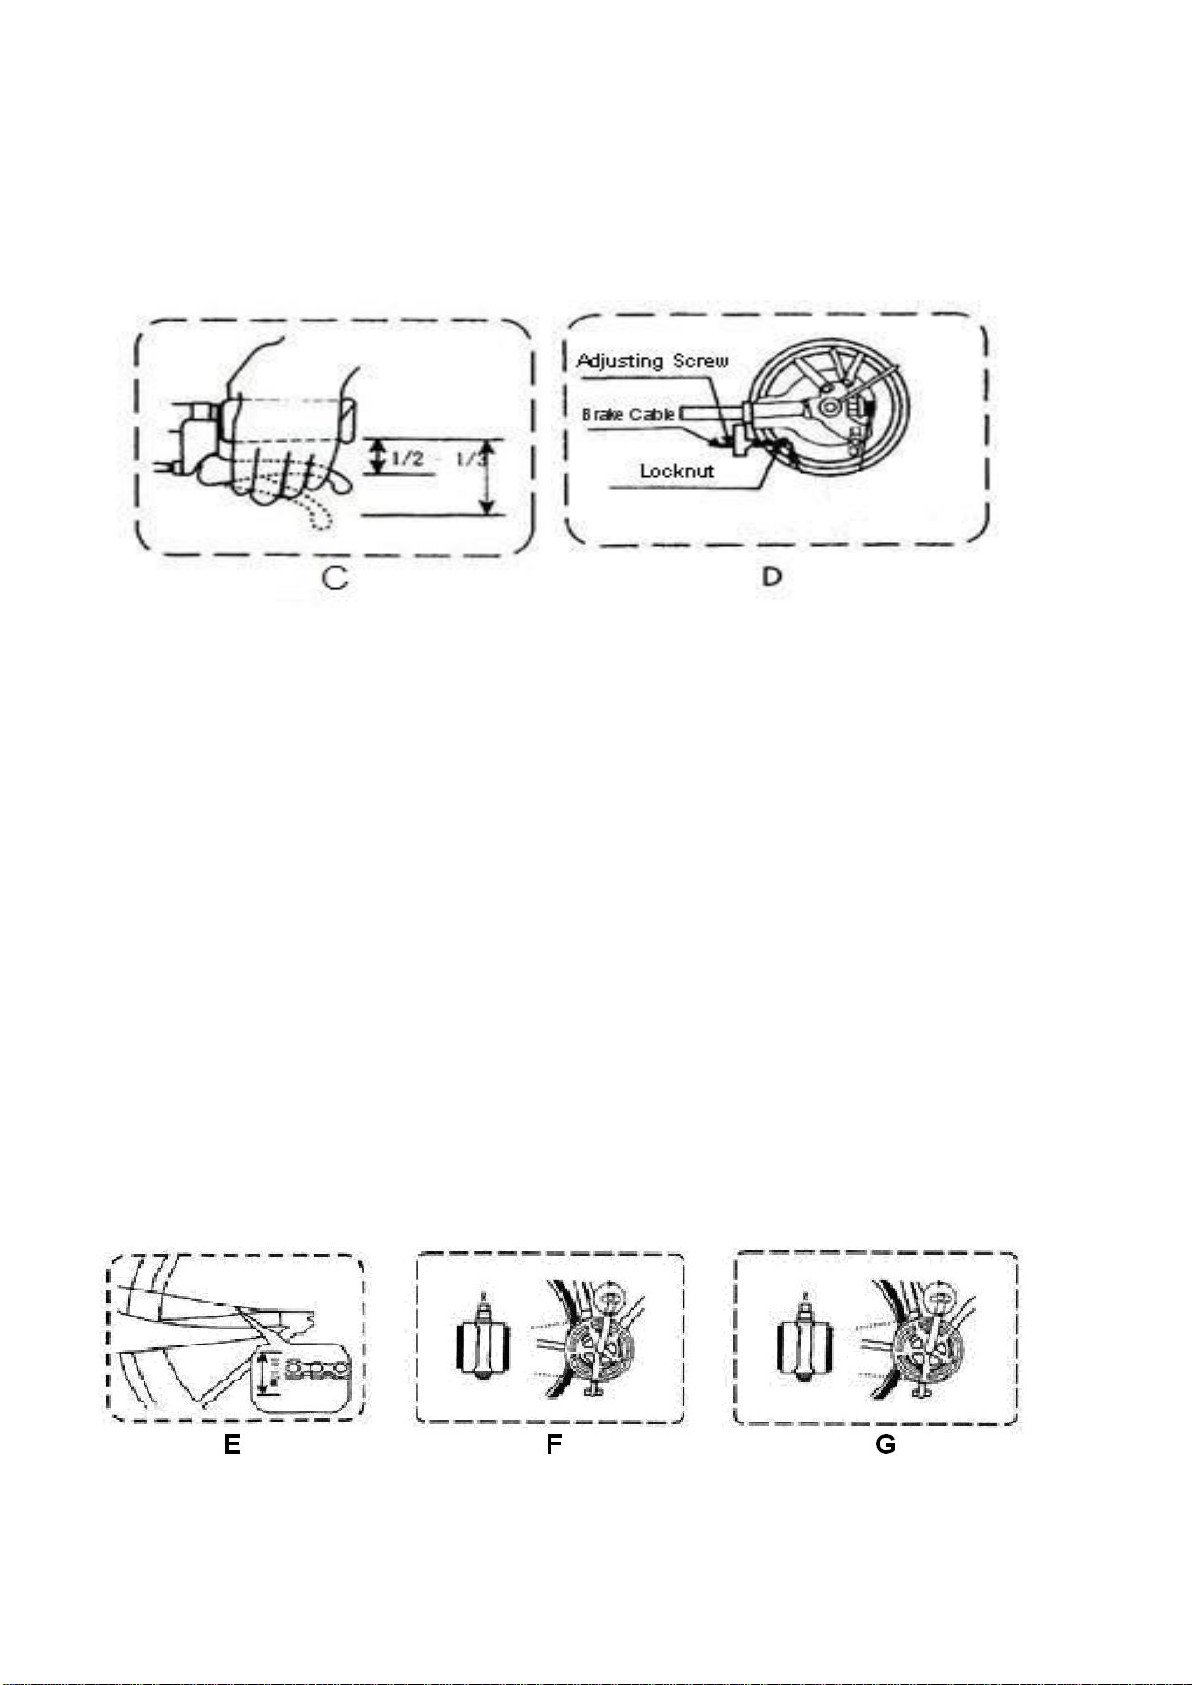
5): Rear brake adjustment
See in reference illustration C and D,adjust for rear brake:
●Loose nut and pull-rod nut of the adjusting screw, unscrew the adjusting screw, while meantime,
hold the brake to make sure its position is on the1/3—1/2 of total distance in order the rear brake
shoe cling to the centre of the brake to reach ideal braking effect, and then screw down nut and the
pull-rod nut.
6): Wheel hub tightening Adjustment
When you tighten the wheel hub, the fasten torque should be as below:
●For front wheel hub, the fasten torque can not be less than 40-45 N.M
●For rear wheel hub, the fasten torque can not be less than 18-20 N.M
★Attention: Front wheel hub axle collets nut can not be over-tightened, otherwise it can cause warping
at the front wheel (not be smooth & round)
7): Adjustment of Chain(See picture E)
The chain may become loose after long-time riding, when you find this problem, you can unscrew the
nut of rear hub axle; tighten the chain adjustor for tightening the chain. Pull the chain down 10-15mm
to its best tension. Hold the pedal and rotate on anti-clockwise, the chain should be in normal state:
(rotate well, without abnormality, without noise). Tighten the screw of the rear hub axle again.
10

8): Assembly of the Pedal
The screw thread direction of the Right Pedal is right-hand thread; its lock direction is shown as (F).
The screw thread direction of the left Pedal is left-hand thread; its lock direction is shown as (G).
▲Please carefully read the manual before riding your E-bike; avoid lending it to others who do
not know / unclear of the details.
1): Your Ebike has been equipped with brake switch-off device, left and right brake levers are installed
with brake power switch. No matter which brake you use on either left or right during riding, the power
will be cut off automatically for safety purposes.
2): When the battery output voltage has reached the bottom index, the electronic control system will
cut off the power automatically to protect the battery cycle lifetime. When the battery reaches its
bottom voltage, you can just ride your bike by the pedal. And the battery should be recharged full for
the next cycling time.
3): Please switch off the battery power (and the throttle if it’s installed) when ebike is not in use.
4): Please ensure your ebike is stable while parking and the kickstand is locked as well.
5): Please do not rotate the throttle grip to full throttle when the ebike start, it will cause a large start e-
current that may damage your battery and shorten the battery cycle lifetimes.
6): After fully charged, the riding range is subjected to the following facts like: road condition, loading
weight or wind direction etc. We suggest that riders should try to pedal more when travelling up the
slope or against wind direction to maintain a longer lifespan of the battery & motor.
7): Always try pedaling during riding on muddy or rough road to gain a better control of the bike.
8): For cleaning process, wipe the body frame of the ebike with wet cloth, never use water hose or
squirt gun for the cleaning work.
9): Prohibit putting oil on the front brake shoes.
10): The big seat post ③and the seat post ②should be cleaned, apply a few drops of machine oil
for lubrication if necessary.
11

BATTERY AND CHARGER
Each MOBOT® 1 sec eBike electric bicycle is equipped with a special lithium polymer battery and
special smart charger. These accessories that come with each scooter have a dedicated number, do
not use the chargers from other brands. Damages caused by using inappropriate battery chargers is
not under usual product warranty.
Battery
1) When charging the battery, the LED turns red which means that charging is in progress. When
it is in “green” it means battery is fully charged.
2) If the red light does not turn green after continuous charging, please visit our service center.
3) For the first 5 uses, please charge the battery for at least 10 hours before use.
4) Please do not charge the battery for more than 12 hours.
5) Charge the battery in area temperature of (0~45)°C, the ideal temperature for charging will be
25°C.
6) Please charge the battery once every month, if not in use for a long period of time.
7) Do not operate motor while charging.
(Important!)
8) Avoid direct contact of the battery from flames and direct sun exposure.
9) Avoid water or other liquid to be in contact with the battery.
10)We recommend you to go for maintenance once every 3 months to check on the body and
parts of the scooter.
Charging Description
1) Open the charging hole under the rubber protective cover and plug in the charger connector.
2) Connect the charger plug into the power socket.
3) The charger light turns red when charging is in progress. Charger light turns green when
battery is fully charged.
4) Please close the main power of the scooter, and charge the scooter around 48V.
5) Please always check whether there is still remaining power left in the battery the next trip.
6) The company provides dedicated charger which has a charging protection function, when the
battery is 100% charged, the charger will automatically stop charging. Charging time is no
more than 3 hours.
7) Water immersion, collisions, and other abnormal factors will lead to charger damage, which is
not covered under warranty.
12

MAINTENANCE
Due to the likelihood of breakdown of the electric scooter usually within 1 year, in order to allow
convenience and ease of maintenance. The company has implement 1 year of free warranty plan.
Proper use and maintenance of the scooter will prolong the lifespan of the scooter. We recommend
you to send the scooter for maintenance once every 3 months to check on the brakes and the battery
functionality.
1): Check the tires/tubes regularly to ensure that they are inflated to the correct air pressure.
Tyre pressure: 40 - 65 psi or 280 – 460 kps
2): Make sure all quick release fasteners, nuts and bolts have been tightened securely.
3): After a period of riding, check whether the spokes’ tension is normal. Make adjustments if
necessary.
4): The frame and other components are made of aluminum alloy. Avoid any friction or collision and
clean them regularly.
5): Maintenance of the motor, battery, controller, etc. Please do not disassemble by yourself, but take
the e-bike to the service centre for repair if necessary.
6): Never wash the e-bike with high-pressured water.
7): Apply lubrication periodically (once per three months) in the following sections: chain, freewheel,
rear wheel, head parts, kickstand etc, if necessary.
8): The product is equipped with lithium battery can repeat charging at least 2 year , 800 times. When
each time with electric range is too short, lithium batteries need to be replaced.
GENERAL TROUBLESHOOTING
Checking List
1) Please check the following actions do or not if the bicycle cannot work
2) Power switch is turned on
3) Display shows remaining power stand more the limited
4) Brake lever is not stand at the working position
5) All sockets and connectors are clean and well connected.
13

PRODUCT SPECIFICATION SHEET
①.12’’ E-bike
②.Li-ion Battery fig.
Size
:
L*W*H
126*55*109cm
Type:
Li-ion Battery
Folding Size
:
L*W*H
61 *27.5* 81cm
Battery
Capacity(AH):
9Ah
N.W
:(
KG
)
18.5KG (with 9Ah
battery)
Voltage(v):
36V
G .W
:(
KG
)
22 KG (with 9Ah battery)
Full Recharge Time
needed (h):
3-5h
Max
Speed:Km/h
23Km/h
④.Controller fig.
Battery-Full
Charge range:
30-40km
Bottom-voltage
limited protection(V):
28.5±1V
Max. Loading:
< 110kg
E-current limiting
protection index(A)
11±1.5A
③. DC Motor fig.
Type:
DC Brushless with gear
Riding Type:
Battery directly,
or PAS
Output Rating(W):
250W
Climbing Capacity:
≤7°
Rating Voltage (V)
36V
14

PRODUCT WARRANTY
In normal use, if a part or parts of the electric bicycle have any problems listed in the following form
during the warranty period, please contact your local vendor or authorised reseller, we will provide a
complete service as specified in the warranty book.
Item Quality problems
Warranty
period Service item
Motor
Under normal circumstances the motor cannot be
used One year
Free
maintenance
Controller Failures under normal use One year
Free
maintenance
Lithium Battery
Under normal circumstances cannot be charged
and discharged One year
Free
maintenance
Body structure
Failures under normal use, such as deformations
and fractures One year
Free
maintenance
Charger Failures under normal use Six month
Free
maintenance
UBHI
(uniblock human
interface-display)
Cannot be used under natural conditions
(Excluding the impact forces and external
damages) Six month Free
maintenance
Note: Please follow the correct way to use this product, the company will not be responsible for parts
damaged and other damages caused by misusing.
PRODUCT WARRANTY
In warranty period, if the malfunction and damage caused by the following reasons, it will not be within
the scope of product warranty:
1. Inappropriate maintenance and repair that are not in accordance with the instruction manual.
2. Use of the electric bicycle for other purposes such as performing dangerous acts which result
in damages or functional failures.
3. Using any of the external factory components.
4. Disassembling the bicycle without contacting the local reseller.
5. Wrongly usage causing traffic accidents or accidental collision damage to the product body and
the parts.
6. Product wear and tear.
MOBOT PTE LTD
62 Ubi Road 1, #03-19 Oxley Bizhub 2, Singapore 408734
Tel: 65382816 | Fax: 65382817 www.MOBOT.sg
15
Table of contents
Other Mobot Bicycle manuals