TRIKE BIKE Sobowo 2050 Series User manual

Unit 2. No 481 Scottsdale Dr, Varsity Lakes, QLD 4227
www.trike-bike.com.au
Warns about a situation that can cause
death, serious physical injury
and/or tricycle damage if you don’t
obey the safety instructions.
Certification Notice: Your Trike Bike meets/exceeds
all Australian rules and regulations including the fol-
lowing where they apply.
AS/NZ S1927:2010, Pedal Cycle (AA), Power Assisted
Pedal Cycle (AB), EN 15194:2009, EN 15194:2009
The product(s) satisfies the requirements for the at-
tachment of these certification marks.
Where you see this symbol you are
being highlighted to a task which is im-
portant, needs extra attention, or re-
lates to safety.
Important
Informa�on
This manual is Intended to provide guidance
and reference for the assembly, mainte-
nance and repairs of your Trike Bike.
A tricycle is a complex personal mobility
device and there will be times you need to
seek additional assistance from a profes-
sional bicycle mechanic.
Our website lists our preferred maintainers
who are experienced on Trike Bikes.
Please watch the extensive video assembly
guides on our website for more information.
Service &
Technical Support
This manual provides instructions for the
assembly of the Sobowo 2050 & 2450 series
Trike Bike. This manual should also be used
in conjunction with the video instructions
available from our YouTube channel.
www.youtube.com/TrikeBikeAustralia
Thank you for your purchase of a Sobowo
2050 or 2450 series Trike Bike. We are sure
that when assembled correctly this tricycle will
provide you with many years of service and
enjoyment. It is important to know that not
everybody has the skills to assemble and tune
a tricycle and we recommend assembly is
completed
completed by a professional or somebody
with the necessary mechanical skills. We do
however remain available at any time to
answer your questions so please reach out as
necessary during the assembly process if you
need assistance.
Sobowo 2050 & 2450 Series
Trike Bike Assembly Manual

Page 3
www.trike-bike.com.au © Trike-Bike™ Manual 2023
Page 2 www.trike-bike.com.au
© Trike-Bike™ Manual 2023
Sobowo 2050 & 2450 Trike Bike Assembly Manual
Index
THE MAXIMUM TRICYCLE SPEED IS HARD LIMITED TO 25 KPH MAXIMUM CONTINUOUS RATED POWER
There are references in this manual to the torque sengs of dierent nuts and bolts, a torque wrench is
recommended but not necessary to complete the assembly of the Sobowo 2050 or 2450 series Trike Bike.
Index ............................................................................................................................................... 2
Parts descripon ............................................................................................................................. 3
Introducon .................................................................................................................................... 4
Tools required ................................................................................................................................. 4
Unpacking ....................................................................................................................................... 4
Hardware Idencaon ................................................................................................................. 4
Hardware nuts and bolts ................................................................................................................ 5
Assembly preparaon ..................................................................................................................... 6
Rear assembly bolts ........................................................................................................................ 6
Connect the main frame to the rear axle assembly ....................................................................... 6
Remove the baery ........................................................................................................................ 7
Fit the handlebars ........................................................................................................................... 7
Connect the chain .......................................................................................................................... 7
Fing the front wheel .................................................................................................................... 8
Fing the pedals ............................................................................................................................ 9
Fing the seat ................................................................................................................................ 9
Fing the front basket ................................................................................................................. 10
Fing the front light .................................................................................................................... 10
Fing the front mudguard ........................................................................................................... 10
Aaching the rear brakes ............................................................................................................. 11
Connecng the rear tail light ........................................................................................................ 11
Fing the rear mudguards ........................................................................................................... 12
Fing the rear basket .................................................................................................................. 12
Tire pressure ................................................................................................................................. 13
Securing the handlebars ............................................................................................................... 13
Serial number ............................................................................................................................... 13
Operators Guide - Important informaon .................................................................................... 14
Pre-ride checks ............................................................................................................................. 14
How to ride safely ......................................................................................................................... 15
Mounng and riding instrucons ................................................................................................. 15
Important ps ............................................................................................................................... 16
Safety informaon ........................................................................................................................ 16
Note on wearing protecve gear .................................................................................................. 17
An important message to parents ................................................................................................ 17
Addional warnings ...................................................................................................................... 17

Page 3
www.trike-bike.com.au © Trike-Bike™ Manual 2023
Page 2 www.trike-bike.com.au
© Trike-Bike™ Manual 2023
Sobowo 2050 & 2450 Trike Bike Assembly Manual
Parts descripon
LCD Display
Brake lever
Hand grip
Handlebar stem
Seat
Suspension forks
Tyre
Rim
Spokes
Valve
Key
Charging port
Baery
Controller
Foot pedals
Thumb throle
Display buons
Disk brake
Front hub motor
Parking brake
Front basket
Rear basket
Headlight
Tail-light
Page 5
www.trike-bike.com.au © Trike-Bike™ Manual 2023
Page 4 www.trike-bike.com.au
© Trike-Bike™ Manual 2023
Sobowo 2050 & 2450 Trike Bike Assembly Manual
Congratulaons on your recent purchase of the Sobowo 2050 or 2450 series Trike Bike tricycle! We, at Trike Bike
Australia, have been proudly imporng top-quality tricycles since 2007, and we are absolutely delighted to assist you
in the assembly process of your new tricycle. This manual has all the assembly instrucons you need to ensure your
tricycle is safe and ready for years of enjoyable rides.
For more detailed guidance, along with helpful photographs and videos, please visit our website. Our video gallery
is an invaluable resource, and we highly recommend exploring the various assembly videos as they provide valuable
assistance.
If you have any quesons or concerns during the assembly, don’t hesitate to reach out to Trike Bike. You can contact
us via phone at (07) 5522 0583 and ask for workshop assistance, or simply drop us an email at bigm@trike-bike.com.
au. We’re here to help and ensure you have a fantasc experience with your new Sobowo Trike Bike.
Introducon
Tools required
A tool kit is included with every Sobowo 2050 or 2450 series Trike Bike tricycle. The tool kit contains the basic tools
needed for assembly.
Unpacking
Your Sobowo 2050 or 2450 series Trike Bike will arrive in two separate boxes. The rst box, (Box 1 of 2), will contain
the main frame and other essenal components. The second box, (Box 2 of 2), will house the complete rear axle
assembly with pre-installed wheels, along with the front and rear baskets, and any addional accessories you pur-
chased, such as a comfort seat, helmet, or chain lock.
When opening the boxes, it’s crucial to handle them with care and use a sharp knife to do so. However, be cauous
to avoid cung or scratching any of the bike parts, and keep in mind that the cardboard might have sharp staples
that could cause injury. Aer opening the boxes, gently take out the parts and place them on the ground. To create a
safe workspace and prevent any harm during assembly, you can use your knife to carefully cut open the sides of the
box, making it at. To begin the assembly process, take some me to idenfy and familiarise yourself with the indi-
vidual parts. Having a good understanding of the components will make the assembly smoother and more ecient.
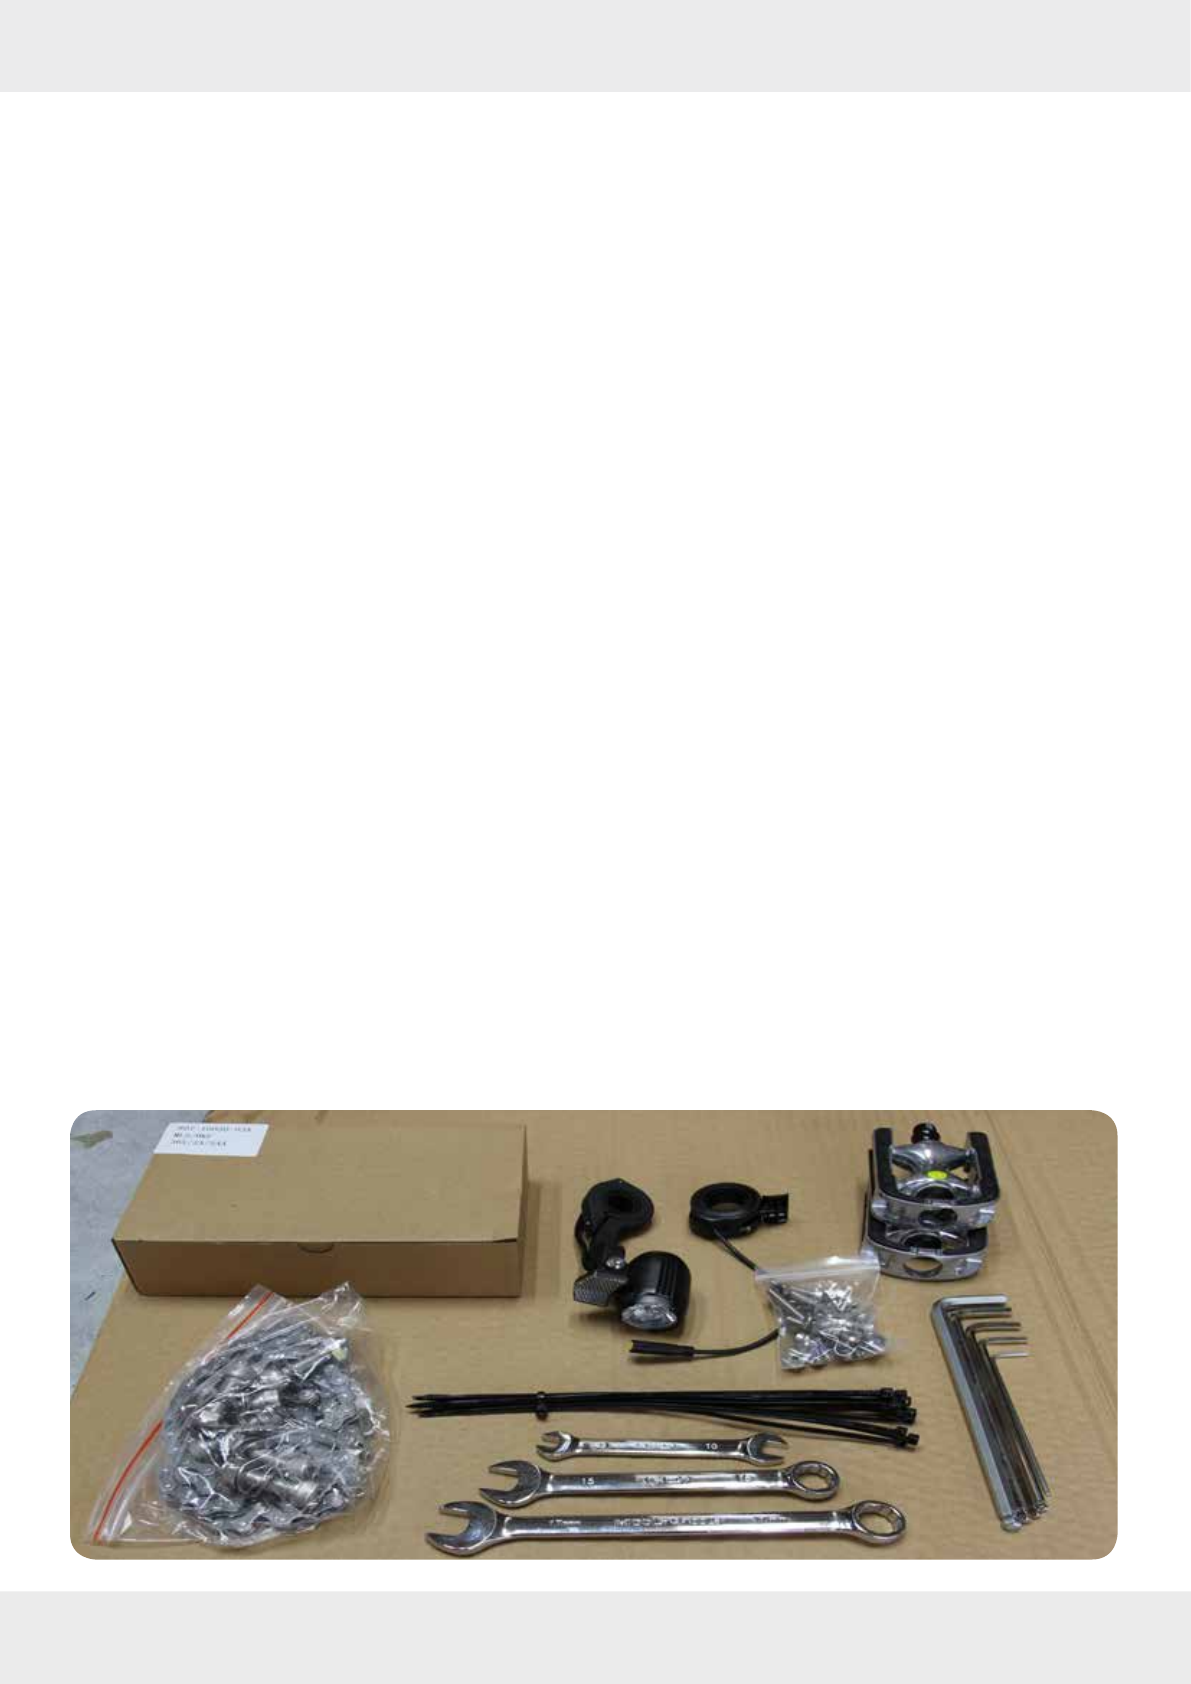
Hardware Idencaon
You will nd all the hardware required for the assembly of the tricycle in a small cardboard box labeled as “Tool Kit”
or individually wrapped. The tool kit box comprises a baery charger, assembly tools, this assembly manual, pedals,
an assortment of nuts and bolts required for assembly, mudguard brackets, headlight and cable es.
In addion, the front and rear baskets, front and rear mudguards, and front wheel are included separately and
wrapped for protecon.

Page 5
www.trike-bike.com.au © Trike-Bike™ Manual 2023
Page 4 www.trike-bike.com.au
© Trike-Bike™ Manual 2023
Sobowo 2050 & 2450 Trike Bike Assembly Manual
Hardware nuts and bolts
Qty 4 x M5 bolts, used to hold the mudguard frames to the rear axle assembly
Qty 4 x M6 bolts, Qty 4 x M6 washers, and Qty 4 x M6 nyloc nuts for holding the rear basket to the rear axle
assembly
Qty 4 x Saddles for aaching the rear mudguards to the rear mudguard frames
Qty 2 x Cable end nipples, used to cover the end of the brake cables aer assembly and cung
Qty 8 x M5 bolts, Qty 8 x M5 washers and Qty 8 x M5 nyloc nuts, used to mount the rear mudguard to the
rear mudguard frames (used with the saddles, Item C)
Qty 1 x M6 bolt, Qty 2 x M6 washers and Qty 1 x M6 nyloc nut, used to secure the top of the front mud-
guard bracket to the forks
Qty 2 x M5 bolt and Qty 2 x M5 large washer used to t the front mudguard supports to the boom of the
forks
Page 7
www.trike-bike.com.au © Trike-Bike™ Manual 2023
Page 6 www.trike-bike.com.au
© Trike-Bike™ Manual 2023
Sobowo 2050 & 2450 Trike Bike Assembly Manual
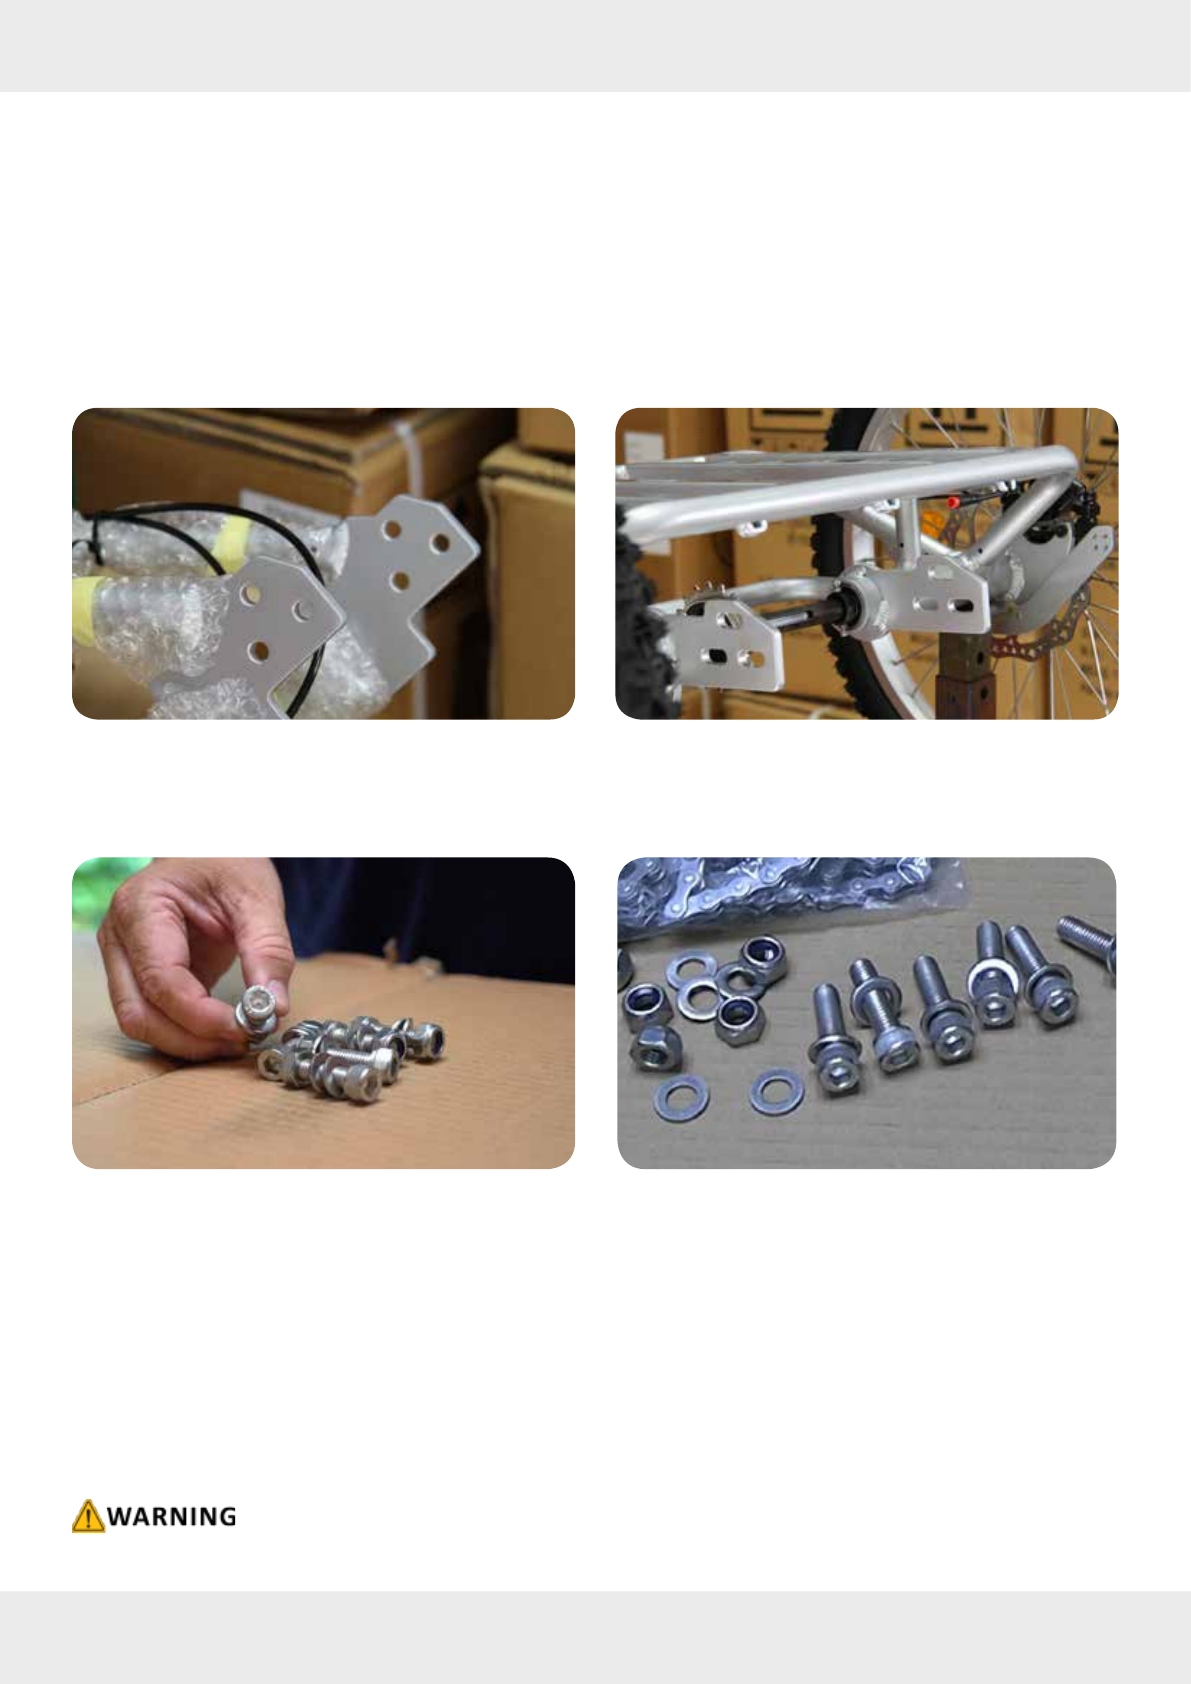
Rear assembly bolts
Find the plasc bag with the chain, inside this plasc bag are 6 sets of M10 bolts with 2 washers and nyloc nut.
Prepare these for assembly by removing the nyloc nut and one washer.
Connect the main frame to the rear axle assembly
To assemble the main frame and rear axle assembly, place the rear axle assembly on a stable surface, such as a work-
bench or other stand as menoned above, to hold it rmly in place and prevent it from rolling away. It’s recommend-
ed to have a second person assist with this step to make it easier. Align the main frame with the rear axle assembly,
taking care not to scratch the paint. The main frame will t inside the rear axle assembly brackets.
Once aligned, insert the 3 bolts on one side and then insert 3 bolts in the other side, inserng 6 bolts in total. Add a
washer and a nyloc nut to each bolt, and then ghten by hand only.
Leave these 6 bolts loose unl aer the chain is ed because we need to move the frame forwards or backwards
from the rear axle assembly as part of the chain adjustment.
The recommended torque seng for these 6 bolts/nuts is 25-35 Nm.
Assembly preparaon
To begin, open Box 2 of 2 and remove the baskets, remove the rear frame assembly with the wheels aached and,
remove front wheel and mudguards for later ng. Remove the wrapping material covering the rear axle assembly
and posion the rear assembly on a workbench or other stand where it can be secured to stop the rear axle assembly
from rolling away.
Open Box 1 of 2 and remove the main frame, then remove the wrapping material from the rear of the mainframe.
The remaining bubble wrap on the frame can remain in place to safeguard against any damage while assembling.
Ensure the complete exposure of the rear of the tricycle frame and the main bolt holes, 3 on each side which connect
into the rear frame assembly.
Page 7
www.trike-bike.com.au © Trike-Bike™ Manual 2023
Page 6 www.trike-bike.com.au
© Trike-Bike™ Manual 2023
Sobowo 2050 & 2450 Trike Bike Assembly Manual
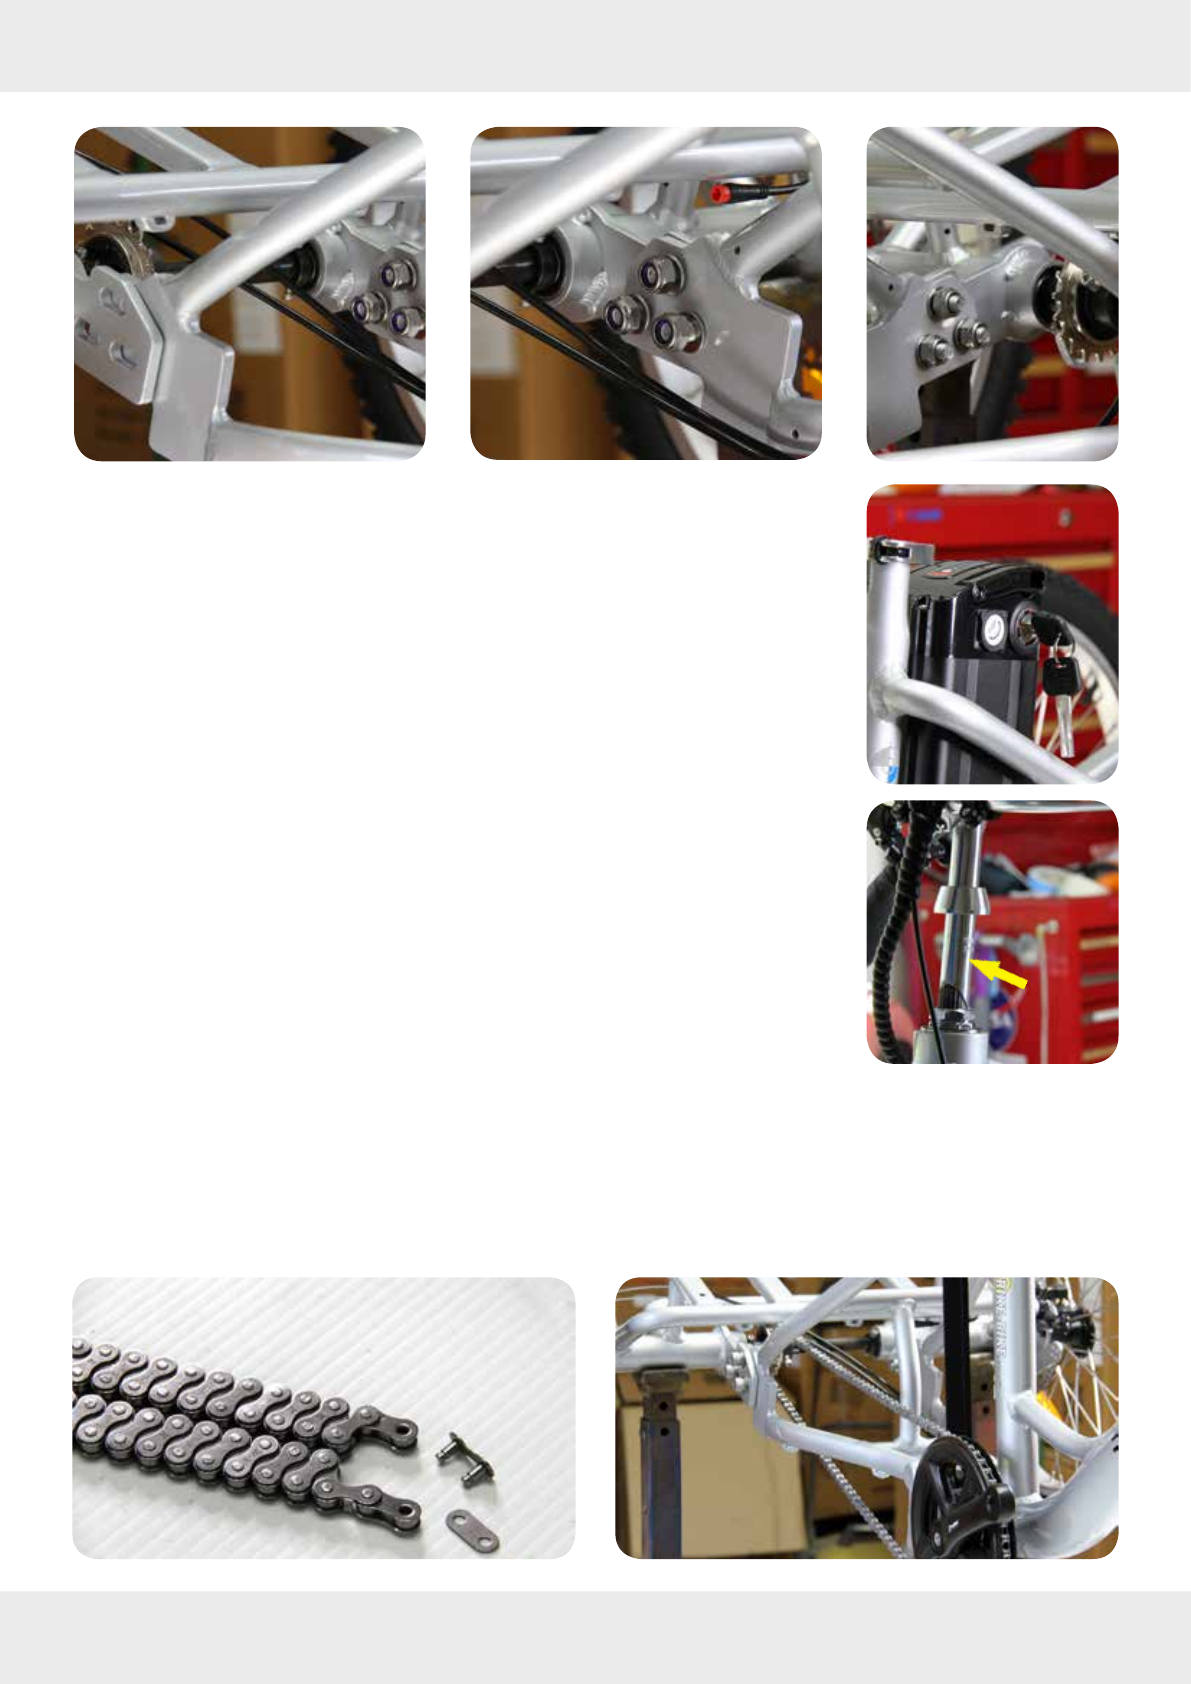
Connect the chain
Lay the chain on a clean surface and locate the two components that make up the chain link, these are used to con-
nect the ends of the chain.
Pass the chain through the frame, looping it around the rear axle. Avoid pung it on the rear sprocket for now.
Instead, loop it around the rear axle, bring it forward around the front sprocket, and aach the chain ends with the
link. The assembly video contains detailed instrucons on how to accomplish this task.
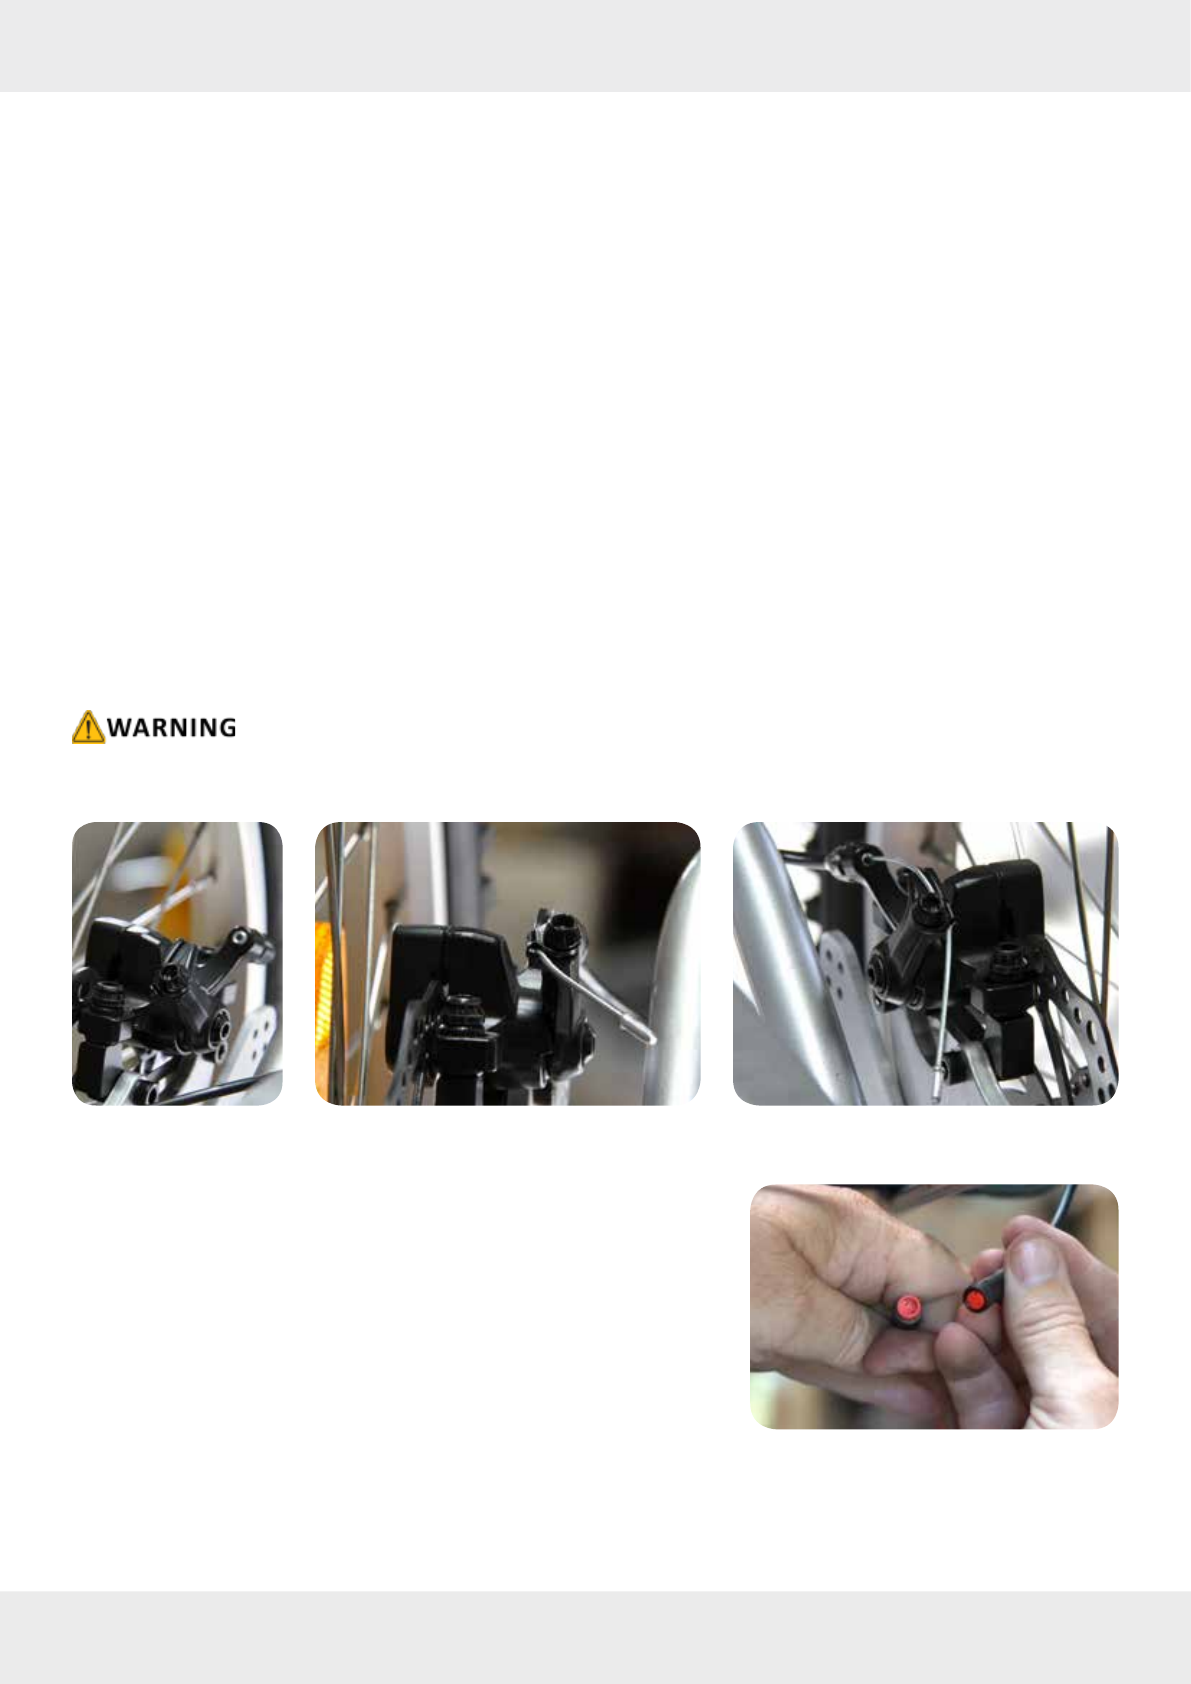
Remove the baery
Locate the baery key, which is typically secured to the front handlebars by a cable e.
Release the key by cung the cable e and insert it into the baery lock, ensuring that
it is posioned correctly. Push the key inward and turn it to the le (an-clockwise) at
the same me to unlock the baery. Once unlocked, take the baery out of the frame.
To remove the baery, raise the handle located on the top of the baery and pull it up-
wards in the same direcon as the baery rail to release it. This will enable the baery
to slide up the rear frame and detach from the tricycle.
This is a convenient me to charge the baery for rst use while connuing with the
rest of the assembly, the rst charge should take between 2 to 4 hours.
Fit the handlebars
To prepare for assembly, remove the cable es that hold the handlebars to the frame
and forks during shipping. Unwrap any plasc wrapping and raise the handlebars to a
posion above the front forks. Check that the cables are properly routed and not tan-
gled or twisted under any stress. Aer conrming the alignment, posion the handle-
bar stem on top of the front fork opening and insert to the mark on the stem. Use an
M6 Allen key to secure by ghtening the bolt inside the top of the stem. However, at
this point, only parally ghten the bolt since it will be fully secured and adjusted later
in the assembly process.
Page 9
www.trike-bike.com.au © Trike-Bike™ Manual 2023
Page 8 www.trike-bike.com.au
© Trike-Bike™ Manual 2023
Sobowo 2050 & 2450 Trike Bike Assembly Manual
❷
❶
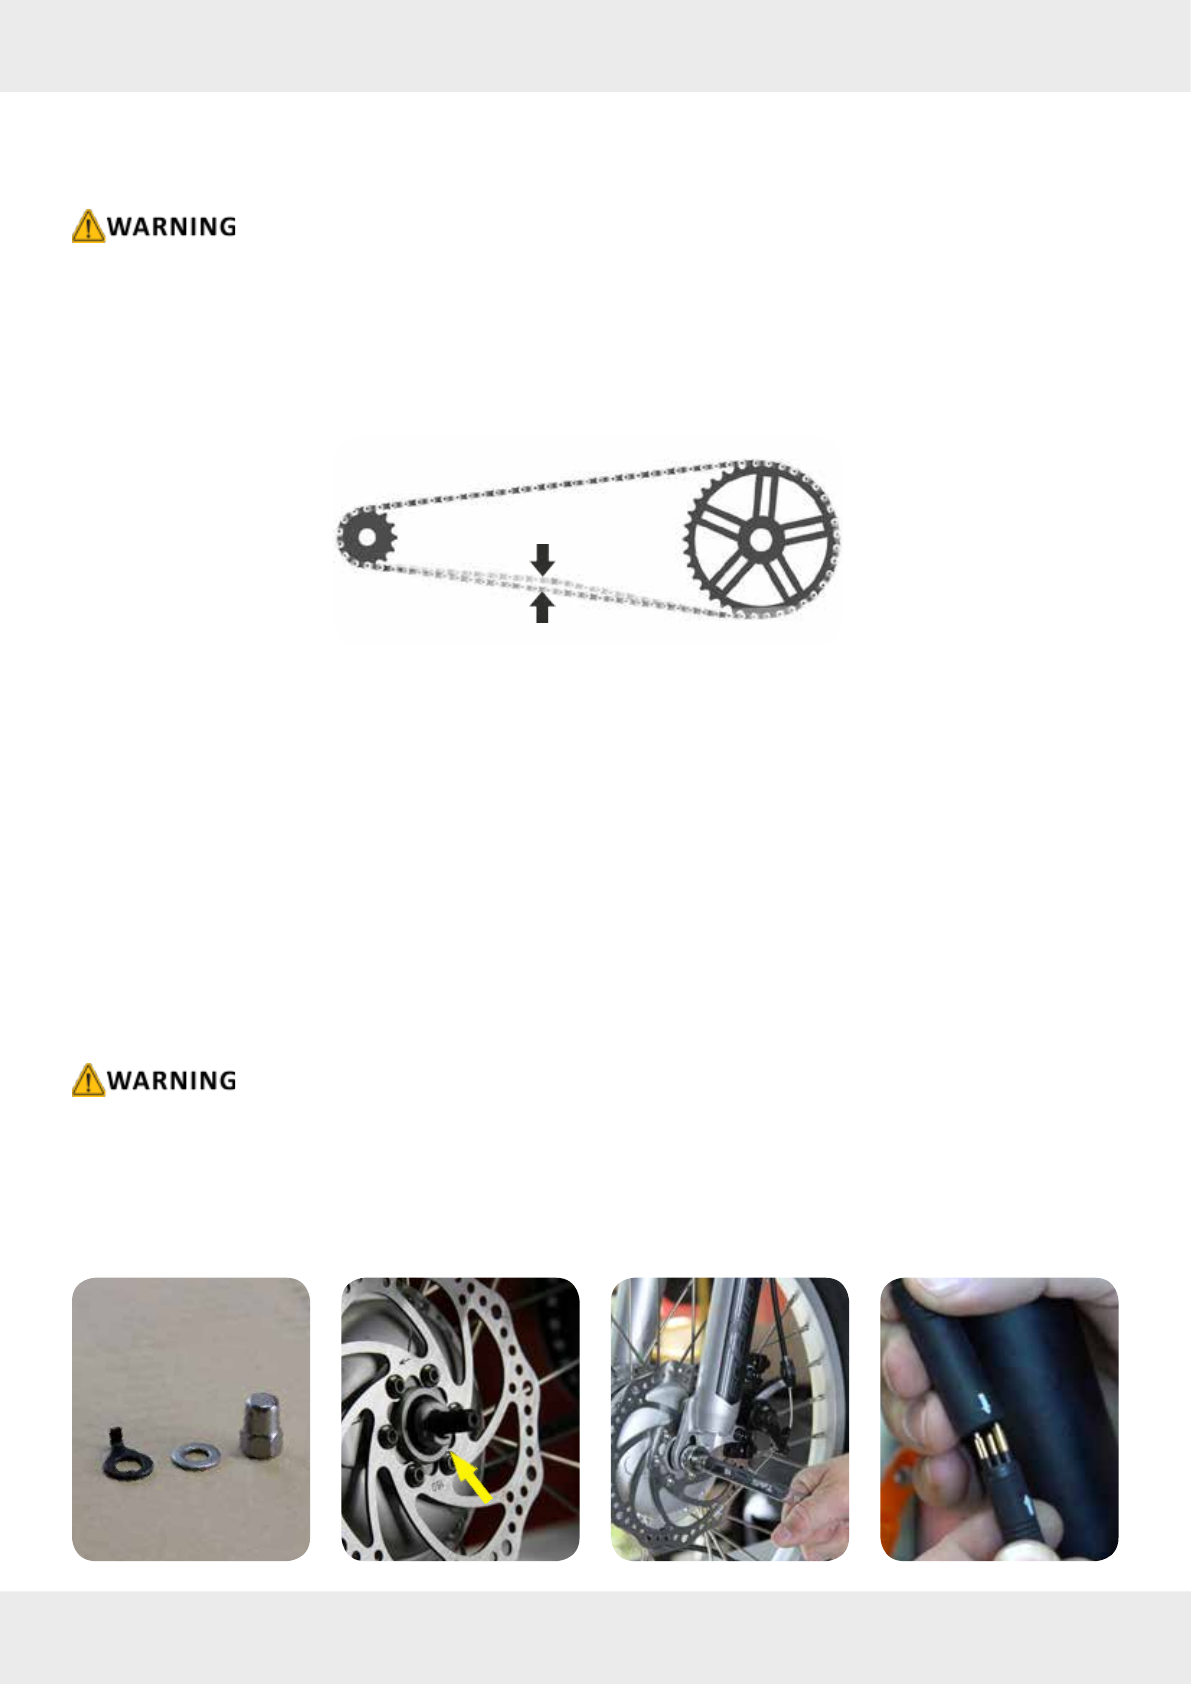
Fing the front wheel
When aaching the front wheel to a tricycle, it is recommended to have two people. One person should li the front
forks, while the other person inserts the wheel into the fork assembly. The front wheel can only be inserted correctly
in one posion, with the disk brake on the le-hand side of the tricycle (when seated). Furthermore, the right-hand
side of the wheel should have a cable extending from the boom of the hub assembly.
Begin by removing the nut and washers from each side of the front axle, leaving a thick washer with a tab on the
boom in place. This washer is designed to t into the fork cutout to ensure proper seang and assist in prevenng
the front axle from rotang under heavy loads.
With the assistance of someone liing the forks, posion the front wheel between the forks and gradually lower the
forks unl they make contact with the front wheel axle. Ensure that the washer with the tab remains poinng down-
wards and that the cable is emerging from the boom of the right side wheel hub. You may need to move the wheel
slightly back and forth to align the disk with the brake caliper. Once posioned properly, push the forks down unl
the axle is in the top of the fork cutout.
On each side of the axle, insert the special washer ❶ that was previously removed, making sure the tab is mounted
into the hole in the front fork, then add the washer ❷ and nally the wheel nut ❸
The recommended torque seng for the wheel nuts is 20-25 Nm, ghten each side a lile bit at a me to avoid the
wheel leaning sideways. Finally, connect the cable from the front wheel into the main harness. Please watch the
assembly video for more informaon.
~ 1cm slack
Aer joining the chain, mount it on the rear sprocket by carefully threading the chain onto the sprocket by turning
the pedal crank arms. When the chain is secure on both sprockets, you will noce that there is excessive slack in the
chain system. If ridden like this, the chain will keep falling o.
The following step is best performed with two people; push the front frame away from the rear axle assembly to
eliminate excessive slack in the chain. Once the chain is in the proper posion, we recommend ghtening one bolt
on each side of the frame rst to keep the frame and rear axle assembly square. Then ghten all six bolts on the rear
axle assembly to their nal torque value of 25-35 Nm. Aer compleng the nal alignment, the chain should have
approximately 1 cm of vercal movement, if the chain is too ght it will damage the chain and sprockets, if the chain
is too loose it will fall o when riding.
❸
Page 9
www.trike-bike.com.au © Trike-Bike™ Manual 2023
Page 8 www.trike-bike.com.au
© Trike-Bike™ Manual 2023
Sobowo 2050 & 2450 Trike Bike Assembly Manual
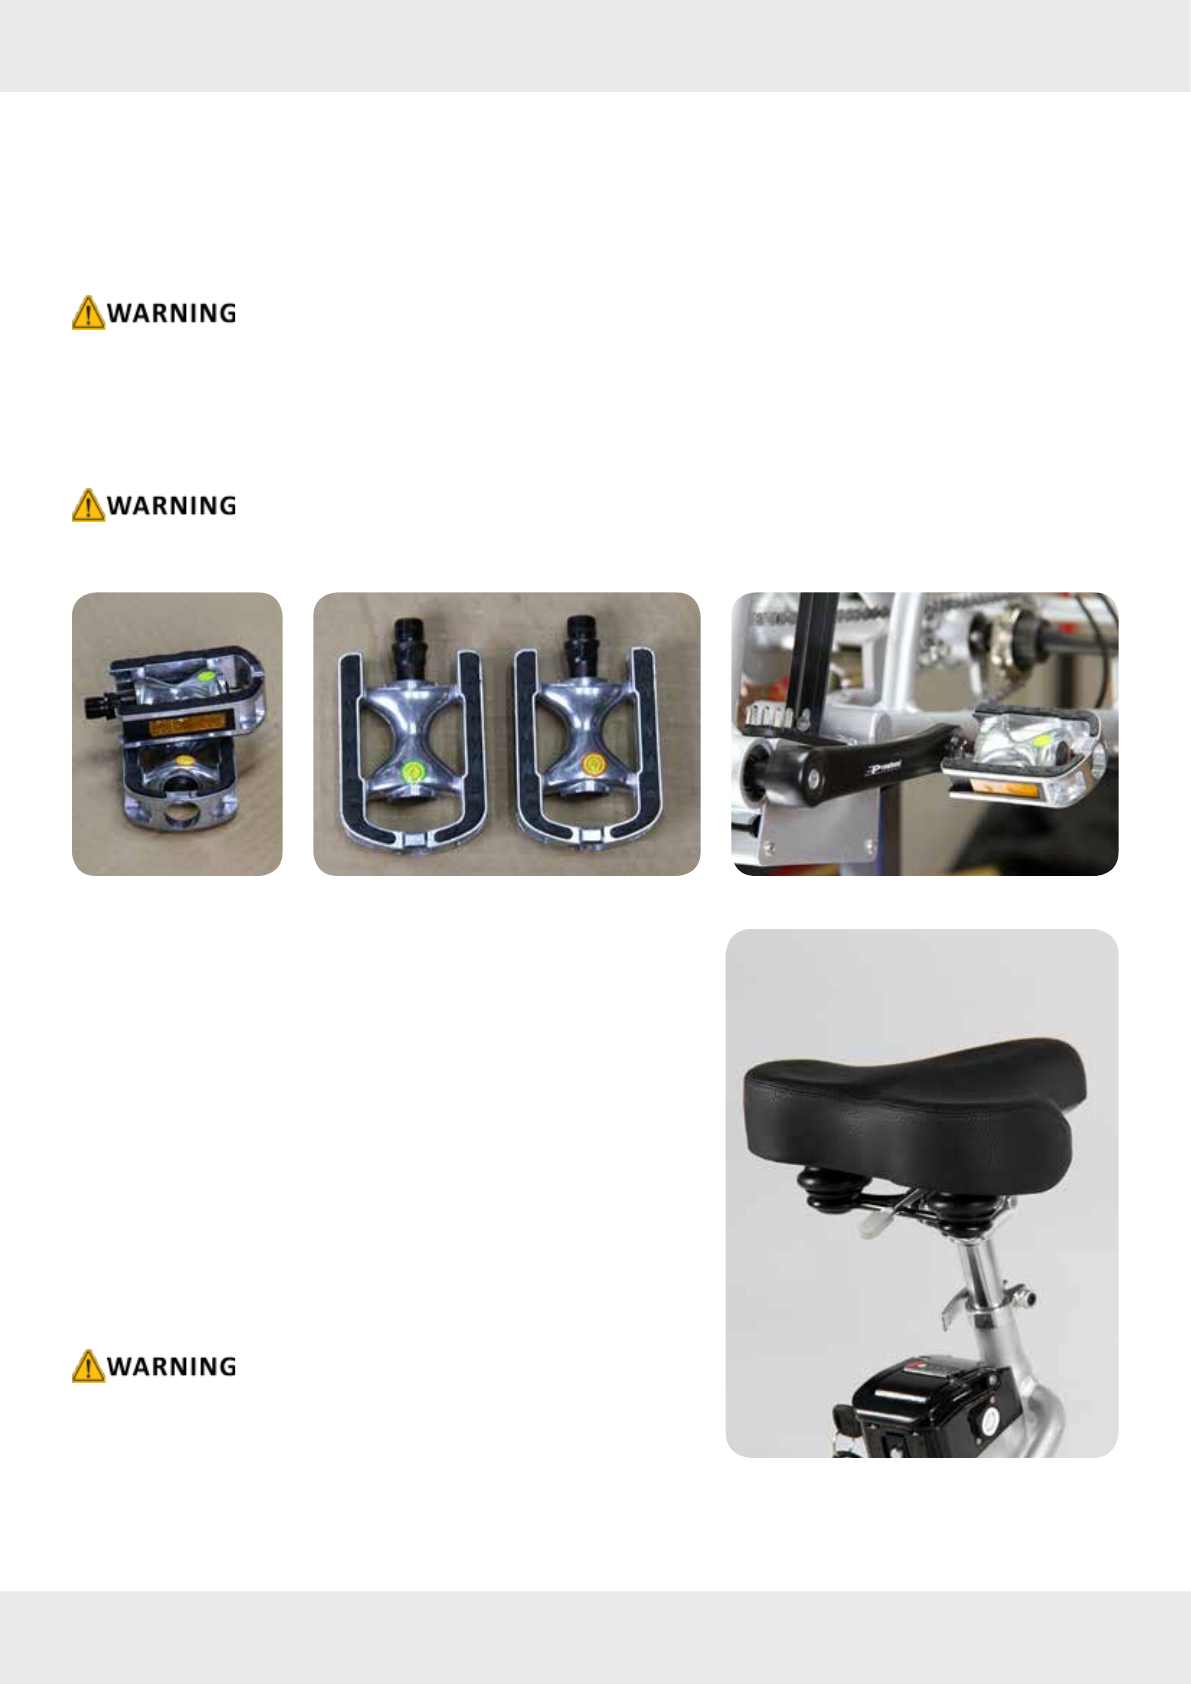
Fing the pedals
First, remove the pedals from the plasc wrapping and look for the “L” and “R” sckers.
One of the pedals will have the leer “L” scker indicang that it should be ed on the le-hand side of the tricycle
(when seated on the tricycle). The other pedal will have the leer “R” scker indicang that it should be ed on the
right-hand side of the tricycle.
When installing the pedals onto the pedal crank arms, it’s crucial to know that the le pedal has a le-hand thread.
Therefore, you should insert the le pedal into the le crank arm and rotate the pedal counterclockwise to secure it
into the correct posion.
On the other hand, the pedal on the right-hand side has a regular right-hand thread, so you should insert the pedal
into the crank arm and rotate the pedal clockwise to secure it into the correct posion.
The recommended torque value for ghtening both pedals is between 20-25 Nm.
Fing the seat
The seat is already securely aached to the seatpost, the seatpost
needs to be inserted into the main tricycle frame and the clamp ad-
justed for the appropriate level of fricon. You may also need to adjust
the seat angle to suit your desired seang angle, always start with he
seat level, then ghten the M14 nuts holding the seat to the seat post.
We recommend using a clean paper towel and some methylated
spirits to wipe the seatpost and remove any contaminaon or oil. This
will ensure that the seatpost has a good grip when it is inserted and
prevent it from slipping.
Insert the seatpost to the desired height and ghten the clamp. Then,
use the lever to push the seat into the closed posion to secure the
seat in place. Finally, The seat post height can be adjusted vercally as
needed for dierent riders.
The recommended torque seng for the seat post clamp is 18-20 Nm.
Page 11
www.trike-bike.com.au © Trike-Bike™ Manual 2023
Page 10 www.trike-bike.com.au
© Trike-Bike™ Manual 2023
Sobowo 2050 & 2450 Trike Bike Assembly Manual
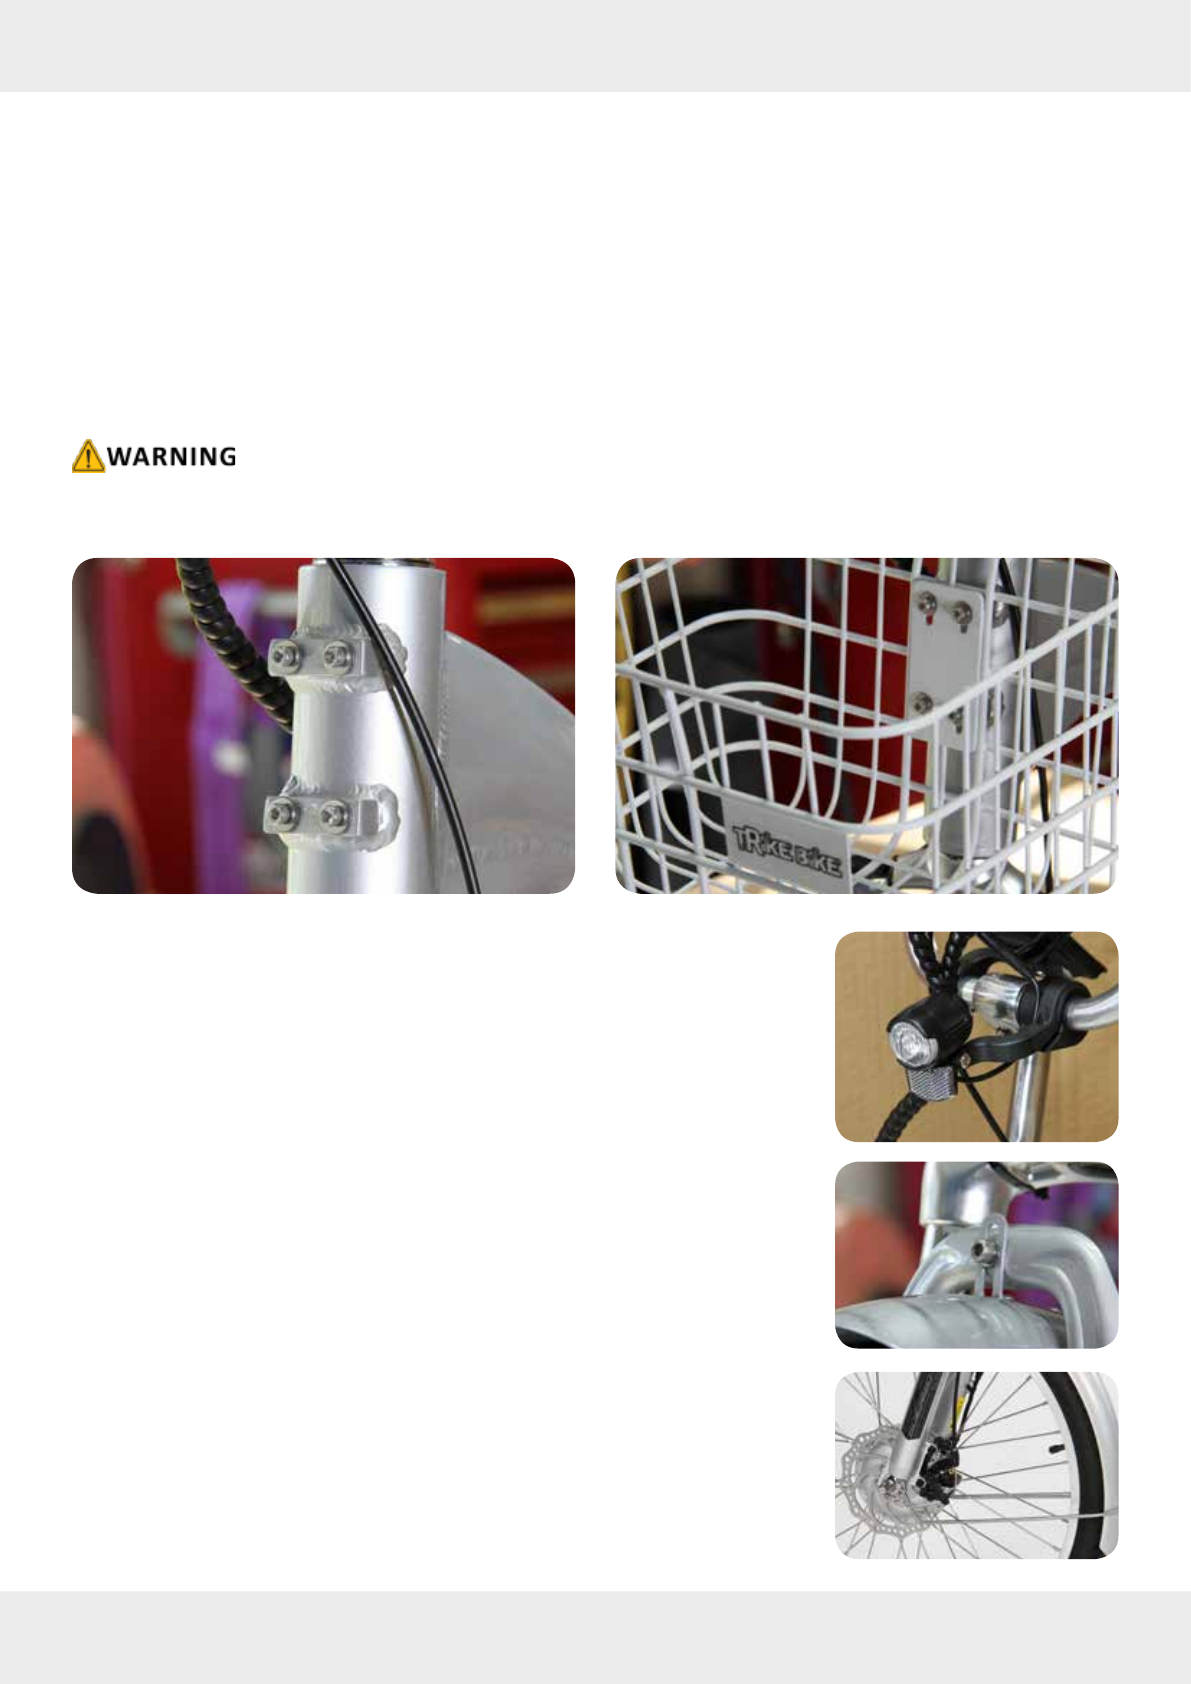
Fing the front basket
To aach the front basket to the tricycle, you must rst remove the four M5 bolts that secure the basket to the
frame. Once removed, posion the front basket to the frame and re-install the bolts. However, it is suggested to leave
them only nger-ght for now.
To ensure that the front basket is mounted evenly, it must be level with the ground. An unevenly mounted basket can
signicantly aect the appearance of the tricycle. Leaving the bolts nger-ght will allow you to use a spirit level to
ensure that the basket is horizontal before ghtening the bolts into place.
If a spirit level is not available, you can stand back 4 to 5 meters from the front of the tricycle and align the basket
‘by eye’ before ghtening it. If the basket is mounted on an angle, it will look unsightly and detract from the overall
aesthec of the tricycle.
The recommended torque seng for these bolts is between 4-5 Nm.
Fing the front mudguard
The front mudguard is aached to the tricycle in 3 locaons. The rst bolt locaon
is on the crossover between the forks, the other 2 locaons are on the boom of
the front forks.
Start by unwrapping the front mudguard and idenfying the mounng locaons.
Using an M6 bolt, 2 washers and nyloc nut secure the front mudguard to the front
fork crossover and ghten. There is vercal movement in the mudguard bracket
and we normally posion the mudguard centrally within the bracket. If there is not
enough clearance to get the mudguard underneath the fork crossover and into the
correct posion it is easiest to let any remaining air in the front tyre down momen-
tarily for ng. Now, proceed to aach the 2 mudguard brackets to the boom of
the front forks as shown in the photograph.
Detailed informaon is available in our assembly video.
Fing the front light
To aach the front light, remove the bolt in the base and t the bracket onto the
handlebars, ghten and align. Connect the cable to the corresponding plug in the
main harness assembly, matching the colours of the plugs.
Page 11
www.trike-bike.com.au © Trike-Bike™ Manual 2023
Page 10 www.trike-bike.com.au
© Trike-Bike™ Manual 2023
Sobowo 2050 & 2450 Trike Bike Assembly Manual
Aaching the rear brakes
The rear brake calipers are already aached to the rear axle assembly but they need to be posioned correctly and
then have the brake cables aached.
Start by nding both the rear brake cables. The short cable is used on the le-hand side brake and the long cable is
used on the right-hand side brake.
Aligning and adjusng the rear brakes is a technical operaon and the instrucons in this manual may not be su-
cient. We cover all of the ng and alignment in detail in our assembly video.
To begin wind the cable adjustment ngs on the brake caliper 3 turns anclockwise, with the cables in the best
posion avoiding sharp turns feed the cable through the brake caliper adjusng screw and then posion the cable
through the cable clamp, leaving the ng loose for now. Make sure the brake cable is ed correctly into the le-
hand handlebar lever and also check that the brake cable is ed correctly in the caliper ng.
Align the caliper centrally to the disk and very carefully holding it in posion ghten the 2 screws which allow the
caliper to move sideways. Tighten each screw a lile bit at a me to keep the caliper posion correct. If you ghten
one end completely and then the other end the caliper will twist sideways.
With the caliper secure and the brake cable sing in the correct posion, pull the brake cable end rmly with a pair
of pliers to eliminate any free play whilst at the same me posioning the caliper lever into the closed posion and
ghten the bracket on the cable. Repeat for the other side. The brakes will probably be scraping when the wheels are
turned, you then adjust the caliper adjusng screw clockwise to eliminate the rubbing and then do any ne tuning
adjustments so that the brakes work equally on each wheel when the brake lever is applied.
The recommended torque seng for these bolts is between 15-18 Nm.
Connecng the rear tail light
The taillight is already installed onto the rear axle assembly underneath
the basket and the power cable has been secured to the rear axle as-
sembly by the factory.
The only task is to connect this power cable to the matching electrical
cable, which is located on the boom frame tube on the le-hand side.
To accomplish this connecon, carefully rotate and align the keyway
posion before pushing the plugs together and fasten the cables in
place with cable es to the tricycle frame.
Page 13
www.trike-bike.com.au © Trike-Bike™ Manual 2023
Page 12 www.trike-bike.com.au
© Trike-Bike™ Manual 2023
Sobowo 2050 & 2450 Trike Bike Assembly Manual
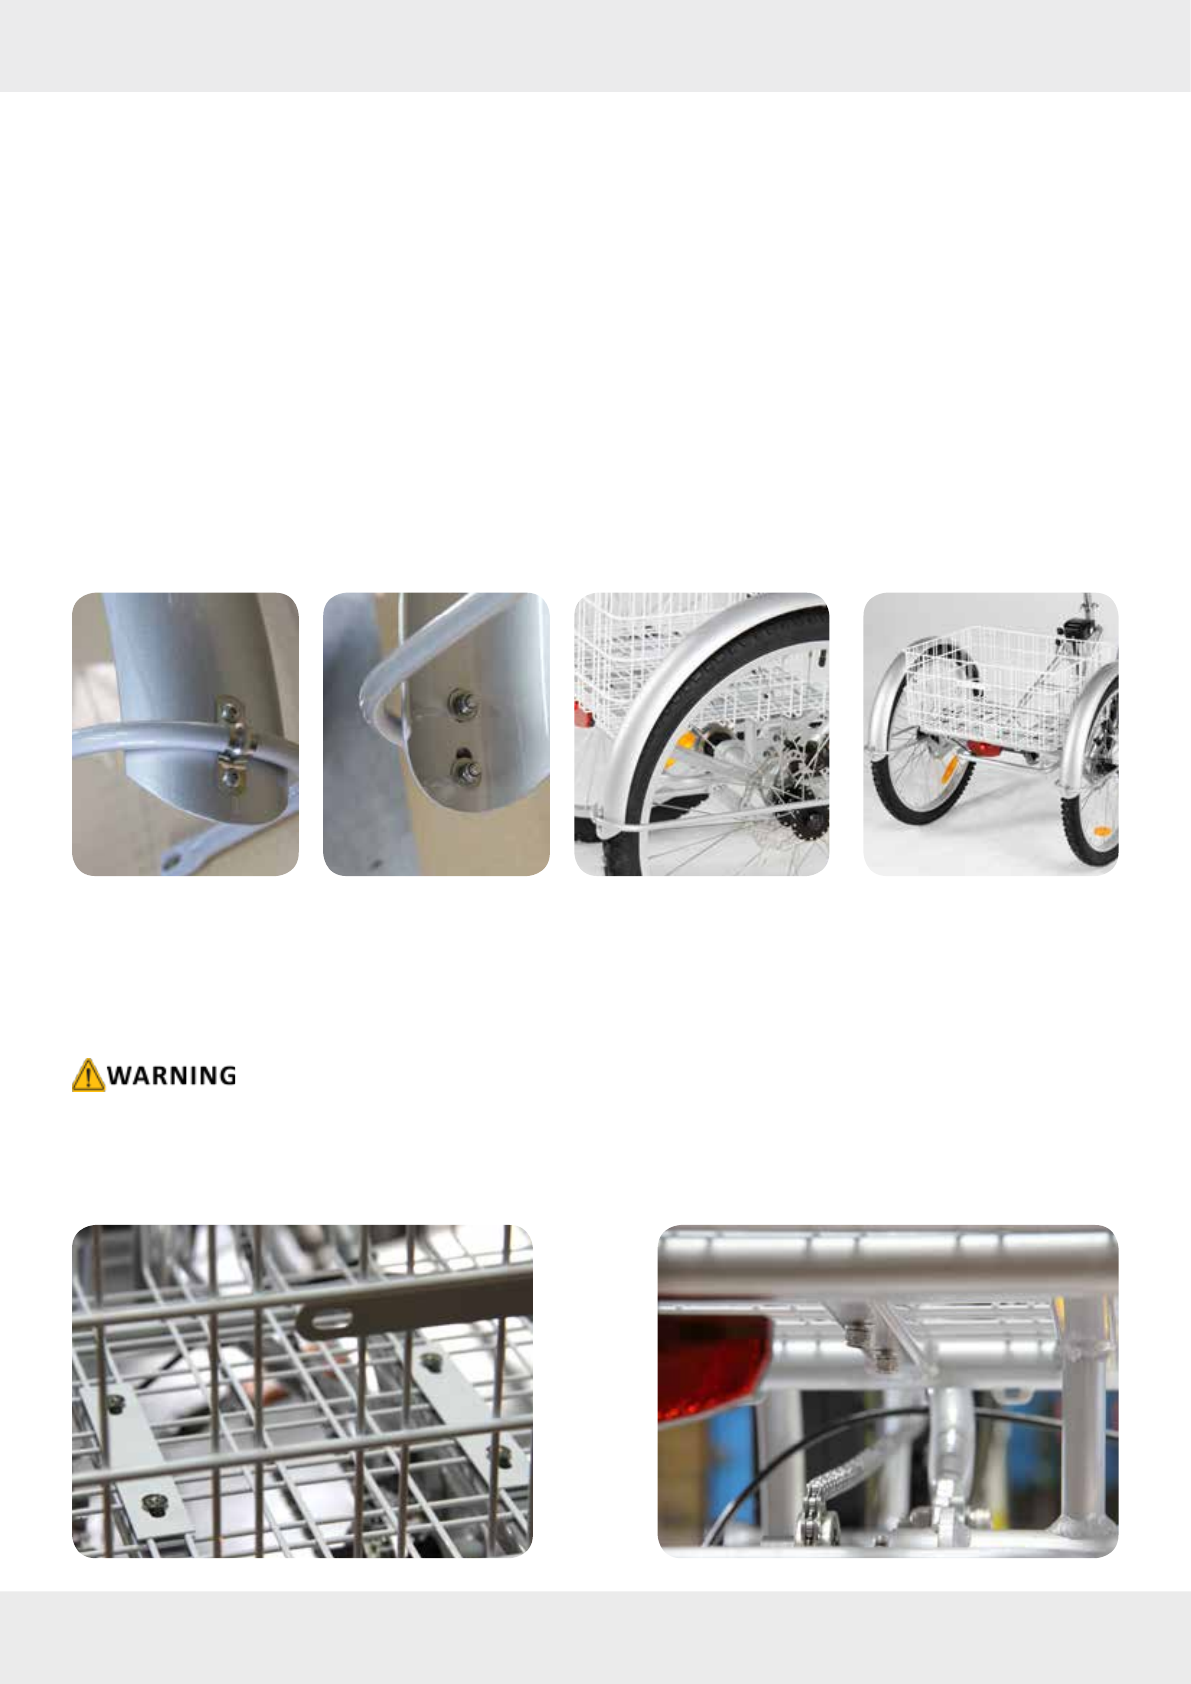
Fing the rear mudguards
The rear mud guards are ed to a mudguard bracket which is then mounted on each side of the rear frame. The
best assembly process is to t the rear mudguard to the mudguard frame and then aach the mudguard frame to the
rear of the tricycle. There are several steps involved to aach the mudguards correctly and also ensure the correct t.
Firstly, locate and idenfy the mounng brackets as shown in the photograph. The brackets go around the mudguard
frame and M4 bolts go through one side and are connected with a washer and then M4 nut on the rear. Make sure
the mudguard is posioned centrally in the mudguard frame as you ghten.
The mudguard frame is then aached to the brackets on each side of the tricycle rear frame assembly. You can move
the mounng posion forwards and backwards to achieve the best t. Very occasionally when the tyres are inated
they can actually rub against the bolts protruding into the inside mudguard area and in some rare occasions the end
of these bolts needs to be ground down so they are shortened. Later models will not be aected by these bolts being
too long.
NOTE: please watch the video for detailed mounng instrucons.
The recommended torque seng for these bolts is between 4-5 Nm.
Fing the rear basket
To aach the rear basket to the tricycle, use the four M6 x 60 bolts to secure the basket to the rear frame. Carefully
align the basket over the rear frame by visually looking through the holes in both the basket and the frame. Once
properly posioned, t all four bolts and ghten them securely.
The recommended torque seng for these bolts is between 8-10 Nm.
Page 13
www.trike-bike.com.au © Trike-Bike™ Manual 2023
Page 12 www.trike-bike.com.au
© Trike-Bike™ Manual 2023
Sobowo 2050 & 2450 Trike Bike Assembly Manual
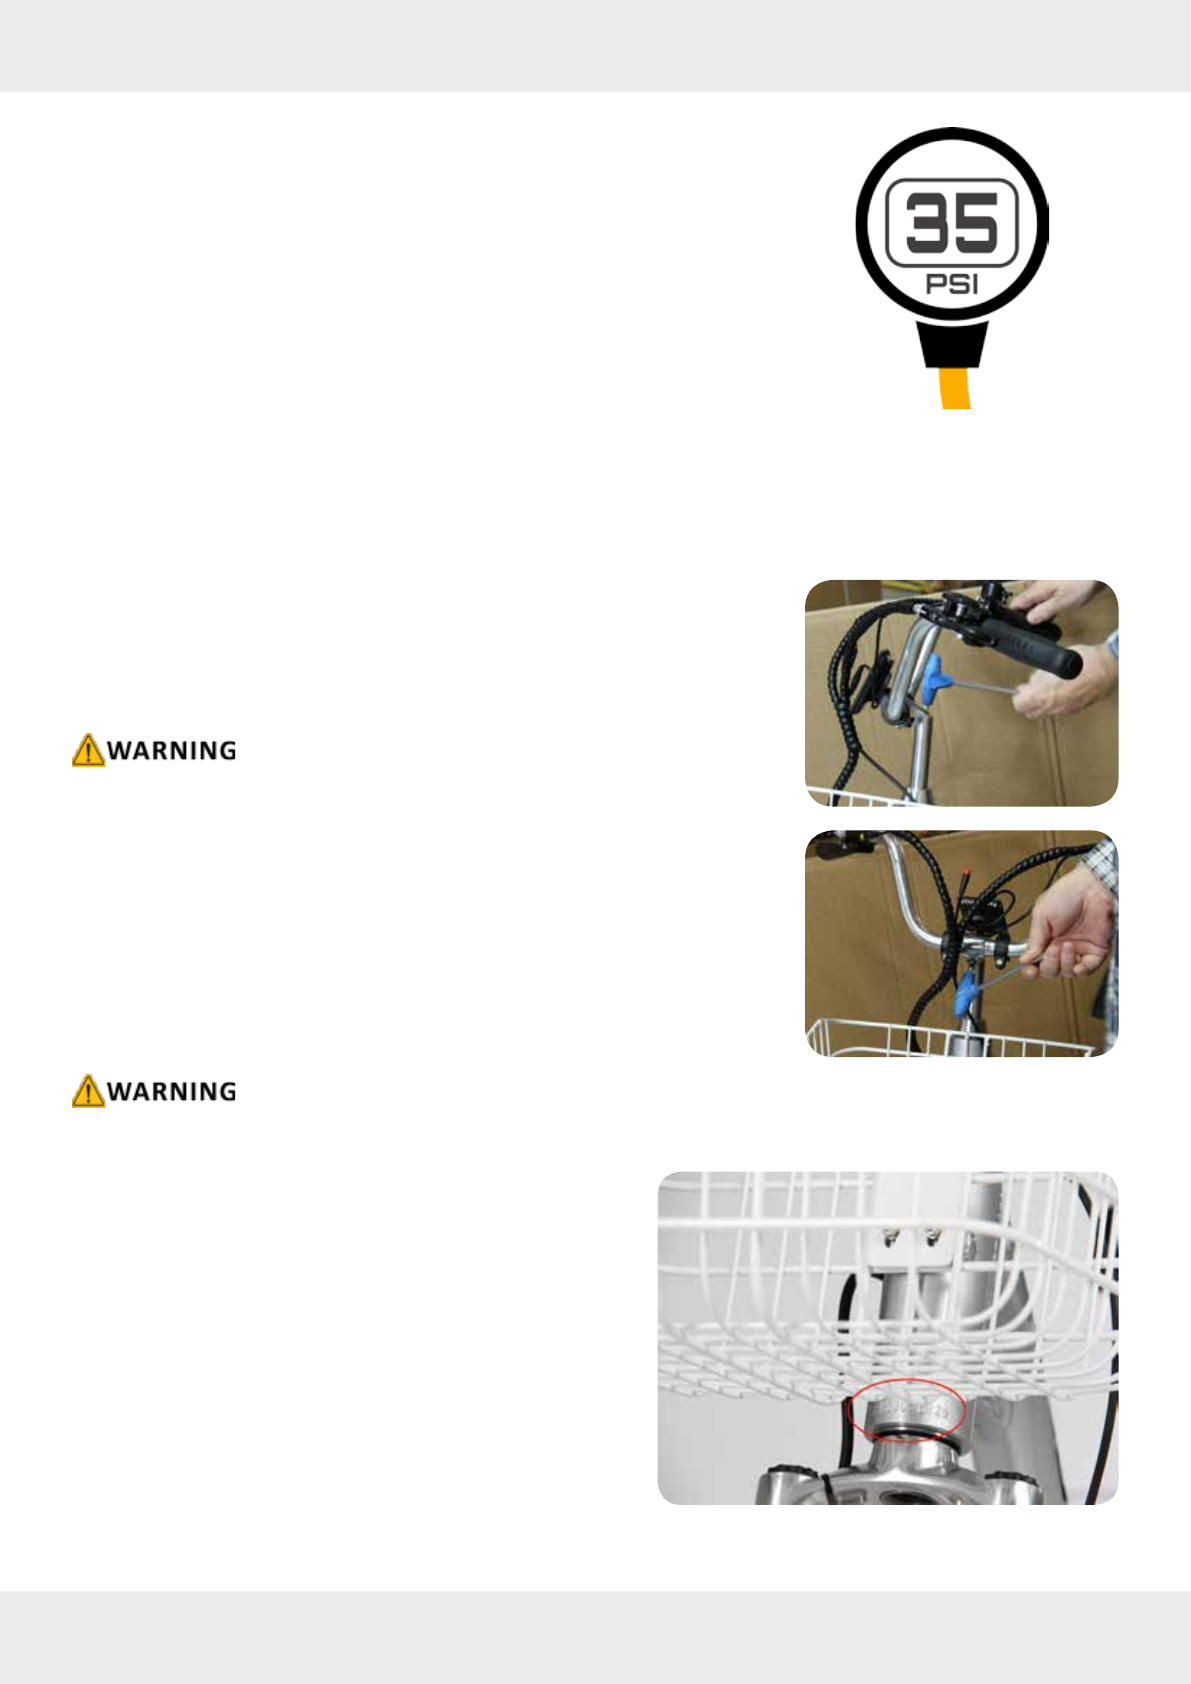
Tire pressure
Verify that the re pressure on all wheels is approximately 35 psi (2.4 bar).
Through our riding experience, we have found that 35 psi is the opmal re
pressure for general riding in various condions. However, if you plan on rid-
ing on rough terrain or the beach, it is recommended to lower the re pres-
sure to around 20 psi (1.4 bar).
It’s important to note that reducing re pressure will aect the tricycle’s
handling and speed, and will result in a decrease in range when using electric
assistance.
Securing the handlebars
To nish aligning the handlebars, there are 2 tasks that must be completed. These tasks involve securing the handle-
bars correctly, we intenonally leave unl the end. This approach enables you to sit on the tricycle and customize the
handlebar adjustments to your riding preferences.
Task 1
Tighten the primary bolt in the head-stem aer aligning the handle bars at
90° to the front wheel. This bolt must be ghtened correctly because it is the
primary bolt which aaches the handlebars to the front fork assembly and
allows you to steer the tricycle. Use a M6 Allen key.
The recommended torque seng for these bolts is between 18-20 Nm.
Task 2
Tighten the secondary bolt in the head-stem. Sit on the tricycle and move the
handlebars forwards and backwards to the desired riding posion, don’t over
force the handlebars, if they won’t move easily then loosen the secondary
bolt in the head stem. When the handlebars are in the nal posion ghten
the bolt fully, this is the main bolt that secures the handlebar posion to stop
the handlebars moving backwards and forwards unintenonally when riding.
Use a M6 Allen key.
The recommended torque seng for these bolts is between 18-20 Nm.
Serial number
Each Sobowo 2050 and 2450 tricycle possesses a unique serial
number, which is permanently engraved into the frame, as
evident in the accompanying photograph.
It’s of utmost importance to store this number securely, as it
serves as your permanent record of the frame serial number,
we don’t record serial numbers ourselves.
In the unfortunate event of the tricycle being stolen, this serial
number will prove indispensable in tracking and conrming
your ownership of the tricycle.

Trike-Bike Operators Guide
Page 14 www.trike-bike.com.au
© Trike-Bike™ Manual 2023
Operators Guide - Important informaon
Please carefully read and become familiar with the operator’s guide before using the tricycle to ensure safe operaon
and prevent potenal accidents. It is important to keep this manual as an ongoing reference for product knowledge
and safe riding of the tricycle, and to pass it on to any new owners or riders for reference.
The manual includes warnings and dangers related to the safe operaon and potenal consequences of riding a
tricycle. All informaon in the operator’s guide should be studied thoroughly, and if you have any quesons, please
contact Trike Bike or your distributor/dealer immediately.
It is essenal to fully understand the warnings and cauons provided in the manual as they directly relate to hazard-
ous or dangerous situaons. Although every eort has been made to ancipate potenal situaons or condions
that may occur while riding, this manual makes no representaon about the safe use of the Sobowo 2050 or 2450
series Trike Bike under all condions. The use of this tricycle carries inherent risks that may be unpredictable or un-
avoidable, and it is the sole responsibility of the owner or rider to assume those risks.
Please note that all content in this manual is subject to change or withdrawal without noce. While Trike Bike makes
every eort to ensure the accuracy of its documentaon, it assumes no responsibility or liability for any errors or
inaccuracies that may appear in this manual.
To ensure your safety and avoid accidents, do not ride on the roadway where there is vehicular trac where possible.
Always ride within your abilies and the condions, especially when you are learning.
Never carry more than one person on the tricycle, as this is dangerous and illegal, unless you are using an approved
child seat.
Also, never ride aer consuming alcohol or taking medicines that cause impairment.
Please note that the maximum rider weight recommended for this tricycle is 150 kgs. To avoid overloading, do not
carry too much weight and do not ride too fast.
The baskets are really strong but not indestrucble, avoid overloading them with unusual shaped, heavy items that
are not supported correctly in the basket base. The front basket has a capacity of 5 kgs, while the rear basket can
hold up to 50 kgs.
For increased safety, reduced wear and tear, and reduced power consumpon, it is recommended to avoid sudden
starts and stops.
Pre-ride checks
Before each day’s ride, perform the following checks to ensure maximum safety:
• Normal operaon of the front and rear lights, brake system, and brake lever power cut-o system.
• Check parking brakes are in the OFF posion and released.
• Check re pressure is 35 psi (2.4 bar), low pressure will inuence handling, speed and decrease your range.
• Check front and rear wheels, if there is any movement anywhere then ghten before riding.
• Check the baery charge level is sucient for the upcoming ride.
• Check the front and rear brake system for stopping and free operaon.
• Adjust the handlebars to your preferred posion.
• Adjust and secure the seat into the correct posion for your height.
• Make sure any loads you are carrying are secure and not overweight or overhanging.
• If you are transporng dogs or other pets make sure they have a secure oor to avoid slipping and they are prop-
erly secured.
• Wear appropriate high visibility clothing and closed shoes that provide protecon.
• Always wear a helmet.

Page 15
www.trike-bike.com.au © Trike-Bike™ Manual 2023
Trike-Bike Operators Guide
How to ride safely
Posion the tricycle on a level surface, ensuring there are no obstrucons nearby, parcularly while you become
accustomed to riding a tricycle.
If you intend to ride without electric pedal assistance, please proceed with the mounng guidelines provided below.
If you plan to use the tricycle with electric assistance, switch the baery key to the ‘ON’ posion, and then proceed
with the instrucons.
Mounng and riding instrucons
Posion the tricycle on level ground clear of any obstacles, especially unl you get used to riding your Sobowo 2050
or 2450 series tricycle.
While standing alongside the tricycle, hold the brakes and engage the parking brake especially while learning to ride.
Next, posion yourself holding onto the handlebar and seat, placing a leg through the tricycle frame unl standing
evenly over the frame with one foot on each side.
Avoid swinging your leg over the back basket area for safety reasons.
While standing with one leg either side of the tricycle, hold onto the handlebars and use your strongest leg to place
your foot onto the pedal when it’s at the lowest posion. Stand on the pedal to li yourself up and posion your
body onto the seat correctly. If you can get onto the seat without standing on the pedal, the seat is too low for you.
From this point, keep both feet on the pedals at all mes. Once comfortably seated, release the parking brake by
squeezing the brake lever which will release the parking brake.
Next, decide if you are going to ride the tricycle with, or without electric assistance.
If you are going to be riding without electrical assistance then you can check the path is clear and pedal away.
If you are going to ride the tricycle with electric assistance, then the key on the baery was already turned to the
‘ON’ posion previously, and then turn the Sobowo 2050 or 2450 series tricycle on, by pressing the ON buon on the
handlebar controller for about 0.5 seconds.
The colour LCD display will light up aer 0.5 seconds of self-checks.
Select the desired starng speed. The speed sengs are 1 to 5. 1, is the slowest seng with 5 being the fastest.
For reference, these sengs are approximately equal to...
PAS Seng 1 = 6 km/h
PAS Seng 2 = 12 km/h
PAS Seng 3 = 16 km/h
PAS Seng 4 = 20 km/h
PAS Seng 5 = 25 km/h
Decide if you want to operate as pedal assist or with twist throle (if ed).
Pedal assist mode, start to pedal and electric assistance will engage aer half-to-one turn of the pedals.
Throle mode, make sure the brakes are released and press the thumb throle for the desired speed level, the throt-
tle speed level will match your selected pedal assist sengs, example... PAS Seng 1 then the maximum speed with
throle is approximately 6 km/h* subject to programming.
With both feet on the pedals at even level, push o with your strongest leg, looking ahead for pavement condions/
obstacles and for other road users or trac.
If riding in pedal assist mode, power will engage aer half-to-one turn of the pedals.
In throle mode, press the throle slightly using your right thumb to introduce electric assistance.

Trike-Bike Operators Guide
Page 16 www.trike-bike.com.au
© Trike-Bike™ Manual 2023
You will not lose your balance on the electric tricycle so always keep both feet on the pedals at all mes.
Ride and control the tricycle up to your desired speed. Don’t ride too fast unl you are fully familiarised with the
Sobowo 2050 - 2450 electric tricycle, its performance, stopping distance and handling characteriscs.
Slowly squeeze the brakes to get the feel of how they work and their strength. The brakes on your Sobowo electric
tricycle are high-performance disk brakes, and they will reduce your speed very quickly. About 70% of the braking
power will come from the front wheel, but use front and rear brakes together for the best stopping performance.
The brake lever on the le-hand handlebar operates the brakes on both rear wheels, and they will brake/stop togeth-
er. The brake lever on the right-hand handlebar operates the front wheel. Using either brake lever will acvate the
stop light on the rear of the tricycle as long as the electrics ore turned on.
Try not to brake hard and start hard under electric power, look ahead when riding, judge the road condions in ad-
vance. Starng and accelerang slowly will give the maximum baery range.
Important ps
When pushing/walking the tricycle manually, please turn o the power at the key to avoid accidental acceleraon
and accidents. Many owners nd it easier to hold the basket when they are walking their tricycle, this gets you a long
way from the rear wheels so you won’t run over your feet, and you can steer the tricycle easily by simply moving the
basket le or right when you are walking. Many people describe it as similar to, walking the dog.
It is recommended when out riding to park your tricycle undercover, indoors if possible, or outdoors under cover in
the shade. There is nothing worse than returning to your tricycle and trying to ride with a really hot seat!
In a public place, the tricycle must be parked in accordance with local trac/legal regulaons.
Don’t forget to switch o and remove the key (to stop the baery from being stolen) and also engage the parking
brake/s to stop the tricycle moving if blown by the wind.
It’s important to keep in mind that tricycles have a natural tendency to steer downhill. This means that when riding
on a road with a camber or slope, the tricycle will tend to move towards the lowest point such as the guer. While
experienced riders can insncvely counter steer, beginners may nd this unseling. To overcome this nervousness,
we suggest that riders focus on looking ahead rather than directly in front of the tricycle. This will help riders quickly
adjust to the handling of the tricycle, and become more comfortable with its tendencies.
Safety informaon
This operators manual is only used for reference purposes only and cannot be used as an inspecon reference.
The images shown in this manual may dier from the actual model.
Due to technical improvements, we reserve the right to change the specicaons without noce.
The electric tricycle has a maximum speed limit. For safety reasons, it is strictly forbidden, and illegal, to adjust, or try
to reprogram the electric tricycle.
Make sure to perform a safety check before each ride, throle, brakes etc.
Only people who have read and understood these operang instrucons for this tricycle are allowed to ride.
Like riding a bicycle, riding this electric tricycle also has the risk of injury and damage. If you choose to use this elec-
tric tricycle, you will have to bear such risks, so you need to understand the rules of safe riding and maintenance.
Proper use and regular maintenance of your electric tricycle can reduce the risk of injury.
This electric tricycle is designed for people 16 years of age or older. Riders should have good physical coordinaon,
reacon, and mental abilies, and be able to cope with road condions and emergencies if they arise. You must also
comply with age restricons on cycling laws in your state or territory.
If you have visual impairment, hearing impairment, physical impairment, cognive/ language impairment, epilepc
seizures, or other impairments or disabilies that could aect your ability to ride safely then please consult your doc-
tor and/or health specialist(s) before riding.

Page 17
www.trike-bike.com.au © Trike-Bike™ Manual 2023
Trike-Bike Operators Guide
Note on wearing protecve gear
Always ensure the rider is wearing proper protecve equipment, such as an Australian Standards approved safety
helmet. A helmet is required by local laws and regulaons naon-wide in Australia.
Always make sure your helmet is posioned correctly.
Always wear closed shoes, and keep shoelaces ed and away from the sprockets and chain. Never ride barefooted or
in sandals/thongs.
If you are headed o-road then knee pads and elbow pads are highly recommended.
An important message to parents
This manual contains important informaon. For your child’s safety, it is your responsibility to review this informaon
with your child and make sure that your child understands all warnings, cauons, instrucons, and safety topics.
All children should always ride with adult guidance. Trike Bike recommends that you periodically review and reinforce
the informaon in this manual with younger riders.
You are required to inspect and maintain your child’s electric tricycle to ensure their ongoing safety.
Electric tricycles, because of their higher speeds, are intended for riders 16 years and older.
Addional warnings
Do not ride any tricycle if you suer from reduced physical, sensorial, or mental issues.
Riders with a lack of experience or knowledge should ride carefully.
Children should not play with the electric tricycle, nor should cleaning or maintenance be aempted by children.
The use of this tricycle can result in stress and fague by passing riding vibraons throughout the rider’s body, if this
causes you distress or discomfort then immediately stop riding.
This tricycle is a leisure device. However, when entering some public areas, it may be considered a vehicle and sub-
ject to possible trac laws and regulaons. For your own safety, please follow the instrucons in the manual as well
as local trac laws and regulaons.
At the same me, you should understand that operang risks cannot be enrely avoided as others may violate trac
regulaons and drive erracally. You may be exposed to road accidents just as when you’re walking or biking. The
higher your speed, the longer the stopping distance. On some surfaces, the electric tricycle may slip, lose balance,
and even result in a fall. Be cauous when riding, don’t speed, and keep a safe distance from other road users, espe-
cially when riding in unfamiliar areas.
Ensure handlebar grips are not damaged and installed properly. Loose or damaged grips can cause you to lose control
and fall.

Trike-Bike Operators Guide
Page 18 www.trike-bike.com.au
© Trike-Bike™ Manual 2023
Do not use this electric tricycle with standard bicycle trailers, stands, or vehicle bicycle racks. Please contact Trike Bike
to check if your equipment will work with the electric tricycle before use.
O-road riding requires special aenon and specic skills. Variable condions and hazards accompany o-road rid-
ing and extra care must be taken. Wear appropriate safety gear and do not ride alone in remote areas.
Take extra care while riding in wet condions. Feet or hands can slip in wet condions and lead to death or serious
injury from a fall. Riding in wet condions is not recommended at speeds above 15 km/h.
Don’t remove front or rear lights/reectors, or the orange reectors on the wheels and pedals, they are required by
law.
Engaging in extreme riding is dangerous and should be avoided. Although many arcles/ adversements and cata-
logues depict riders in extreme terrain, this is not recommended or permied, and you can be seriously injured or
killed if you perform extreme riding.
All tricycles do have strength and integrity limitaons. Extreme riding should not be performed, otherwise you can be
seriously injured. Failure to comply with these instrucons or engage in improper operaon, or not providing correct
maintenance of your electric tricycle or accessories can result in serious injury or death.
Aer any incident you must consider your tricycle unsafe to ride unl you consult with a tricycle service provider for
a complete safety inspecon.
You should check the operaon of the brake cut-out switches before each ride.
The brake system is equipped with brake cut-out switches in the brake levers that disconnect power to the electric
motor whenever the brakes are engaged. Check proper operaon slowly while in a controlled environment by riding
slowly with the electric motor running and applying the brake levers, the electric motor should immediately stop.
Riders must understand the operaon of the electric assistance before use and take care with their riding, respecng
speeds appropriate for the area they are riding in, and importantly, their user experience level. Most accidents could
be prevented by riding slower.
Any changes to the electric tricycle not expressly approved by Trike Bike will void warranty and could adversely aect
your safety while riding.
Because electric tricycles are heavier and faster than normal tricycles, they require extra cauon and care while rid-
ing.
To avoid damage never, submerge the electrical components in water or subject your electric tricycle to saltwater
environments.
Copyright noce for this Trike Bike Manual
This Trike Bike Manual is the exclusive property of Trike Bike Australia and is protected by the Copyright Act 1968
(Commonwealth of Australia) and internaonal copyright laws.
This manual is intended only for the use of Trike Bike customers and may not be reproduced, distributed, or trans-
mied in any form, or by any means, including photocopying, recording, or other electronic or mechanical methods,
without the prior wrien consent of Trike Bike Australia.
All images, diagrams, and illustraons contained in the Trike Bike Assembly Manual are also the property of Trike Bike
Australia and cannot be used or reproduced without prior wrien permission from Trike Bike Australia.
Any unauthorised use of the Trike Bike Assembly Manual or its contents may result in legal acon, in accordance with
Australian or Internaonal copyright laws.
If you have any quesons or concerns regarding the copyright of the Trike Bike Assembly Manual, please contact us at
bigm@trike-bike.com.au

Page 19
www.trike-bike.com.au © Trike-Bike™ Manual 2023
Trike-Bike Operators Guide
Notes

Page PB
www.trike-bike.com.au © Trike-Bike™ Manual 2023
Page 20 www.trike-bike.com.au
© Trike-Bike™ Manual 2023
Sobowo 2050 & 2450 Trike Bike Assembly Manual
Trike Bike YouTube Channel
For addional informaon on the assembly and setup of your Trike Bike, we encourage you to visit our
YouTube channel. Our channel features a range of helpful videos that can guide you through the assembly
process and provide you with useful ps for maintaining, and riding your Trike Bike.
To access our YouTube channel, simply search for “Trike Bike Australia” on YouTube or visit our website and
click on the “YouTube” icon located on the boom-right corner of any page.
We recommend watching the assembly videos in conjuncon with reading this product manual to ensure
you have a thorough understanding of the assembly and setup process.
If you have any quesons or concerns, please do not hesitate to contact us at bigm@trike-bike.com.au
Thank you for choosing Trike Bike Australia. We hope you enjoy your Trike Bike!
hps://www.youtube.com/TrikeBikeAustralia
Find us on Facebook, talk to other owners and stay updated on everything Trike Bike
hps://www.facebook.com/TrikeBike
Trike Bike Australia
Australian Distributor for Trike Bike and Sobowo
Unit 2, No. 481 Scosdale Drive Varsity Lakes, QLD 4227.
Phone: 07 5522 0583
Email: bigm@trike-bike.com.au
Web: www.trike-bike.com.au
This document text, images and layout are copyright to Trike Bike Australia
© Copyright 2023 - Refer to statement on page 18.
This manual suits for next models
1
Table of contents
Other TRIKE BIKE Bicycle manuals


