Mod Duo User manual

MOD Duo User Guide
From MOD Wiki
This first chapter describes the MOD Duo in high detail. You will find information about the physical
device, the device menu and how to control it, and how to hook up the device in your setup.
The MOD Duo when powered up
Side-shot of the MOD Duo

Contents
1 Warnings
■
2 Overview
■
3 Device features
■
3.1 Inputs and outputs
■
3.1.1 Inputs jacks
■
3.1.2 Output jacks
■
3.1.3 Headphone jack
■
3.1.4 Power jack
■
3.1.5 Control Chain port
■
3.1.6 USB Host port
■
3.1.7 USB computer port
■
3.1.8 DIN-MIDI I/O
■
3.2 Actuators
■
3.2.1 General knob actions
■
3.2.2 Left knob actions
■
3.2.3 Right knob actions
■
3.2.4 General footswitch actions
■
3.2.5 Switching pedalboards with the footswitches
■
3.3 Displays
■
3.4 Dimensions
■
3.5 LED Audio meters
■
4 Adjusting Volumes
■
4.1 Inputs
■
4.2 Outputs
■
4.3 Headphone
■
5 Tuning
■
6 Playing
■
6.1 Loading a pedalboard
■
6.2 Adjusting pedalboard parameters
■
7 Editing
■
7.1 Accessing the graphical interface
■
7.2 Accessing via USB cable
■
7.3 Accessing via Bluetooth
■
8 Getting Device Information
■
9 True Bypass
■
10 Hooking up the MOD Duo
■
10.1 Wiring examples
■
10.1.1 Guitar
■
10.1.2 Vocals
■
10.1.3 Keys
■
10.1.4 MIDI
■
10.1.5 Exotic
■

Warnings
Don't expose the MOD Duo to liquids, although it has been manufactured to prevent death-by-beer,
■
it's generally a good idea not to submerge electronics in liquids.
When inserting the USB-B cable into the MOD Duo, make sure that you are not accidentally
■
plugging it into the Control Chain socket, this can cause a short-circuit.
Don't connect the MOD Duo's Control Chain port to a regular Ethernet port, it uses a very different
■
protocol, and may damage your MOD Duo.
To power up the MOD Duo, only use a 12V-DC, center-positive adapter. Using a reverse polarity
■
adapter (like the average guitar pedal adapter) may destroy the circuitry of the MOD Duo. When in
doubt, only use the provided power supply.
When connecting output 1/2 to unbalanced equipment, only do this using mono cables. When you
■
use stereo cables, the MOD Duo works in balanced mode, which may or may not be harmful for
your equipment.
Overview
The wireframe images below expose the controls and inputs/outputs that the MOD Duo has.

Device features
The following sub-sections give information about the different physical device features: the inputs,
outputs, actuators, displays and finally the dimensions of the device.
Inputs and outputs
To ensure a safe connection, follow the steps below.
Turn down the volume of your amp and connect it to the OUTPUT jack(s)1.
Connect your instrument(s) to the INPUT jack(s)2.
Turn on the MOD Duo by plugging in its power adapter3.
Wait until the MOD Duo boots up4.
Inputs jacks
The MOD Duo has two independant audio inputs, with configurable input gain for each input. You
can set up the input gain through the device menu.

Output jacks
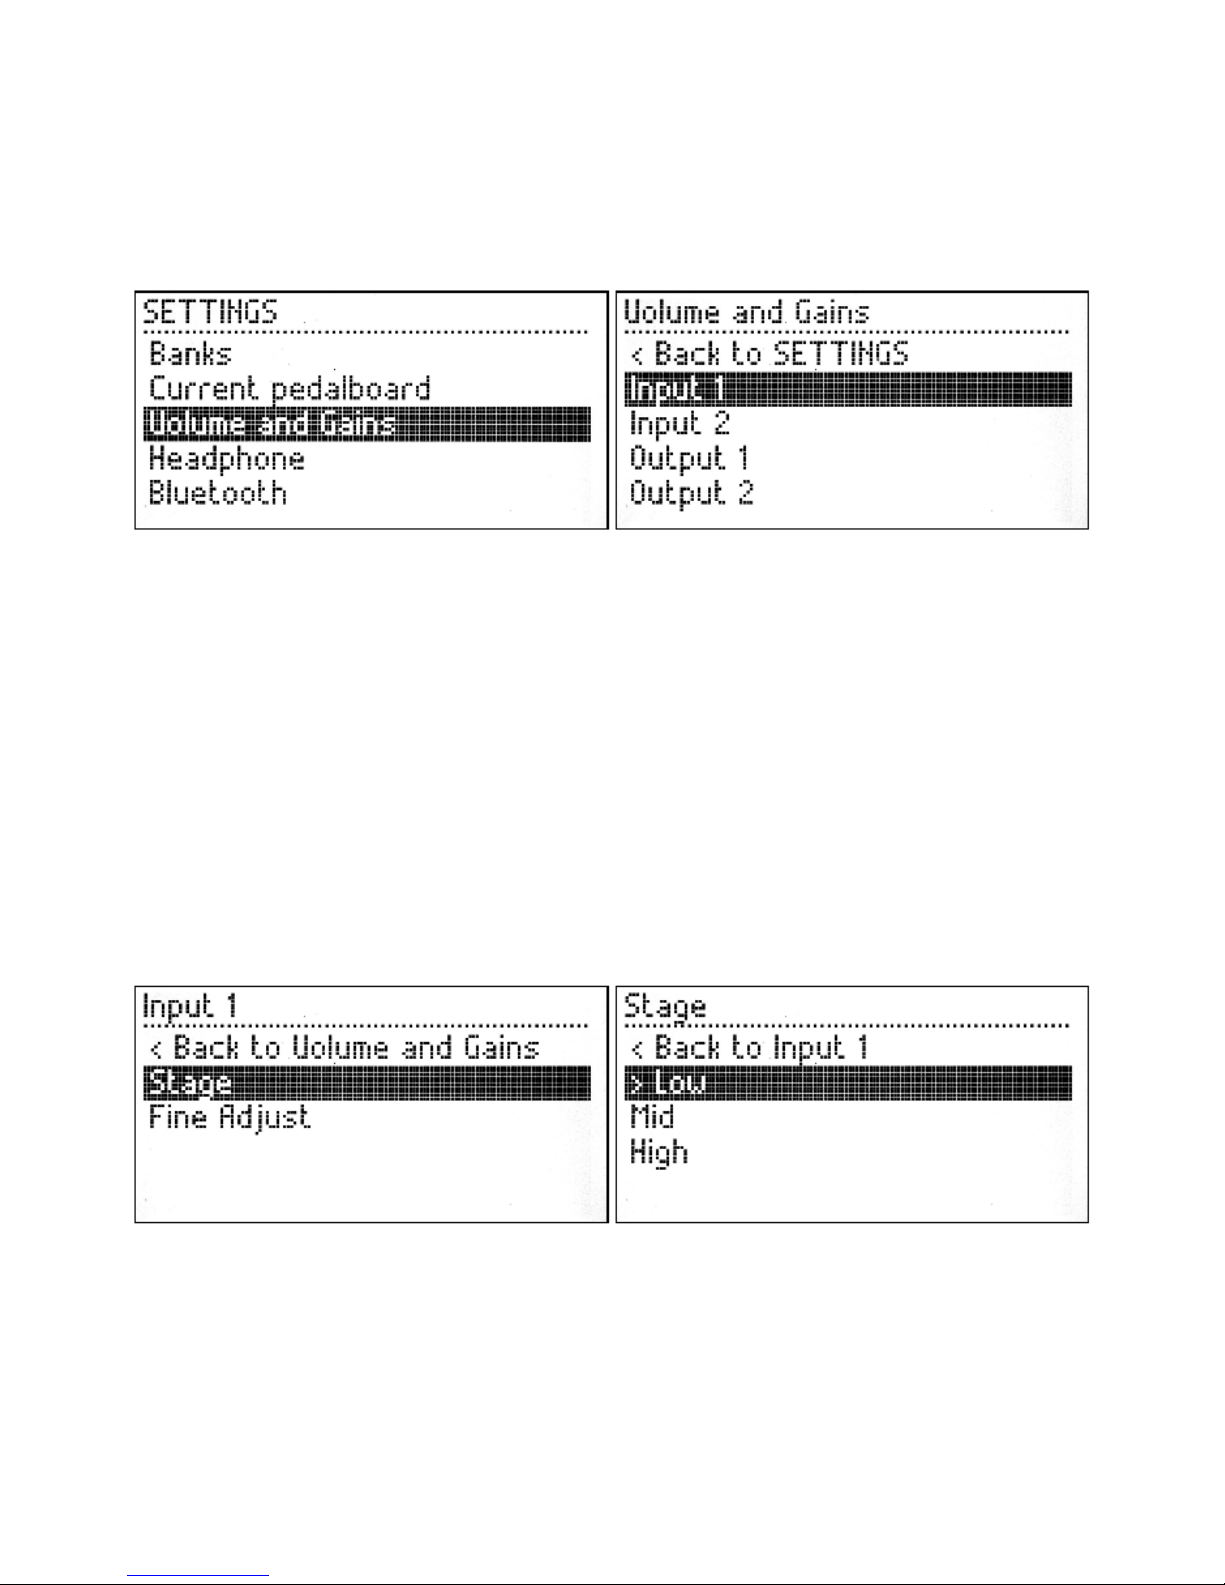
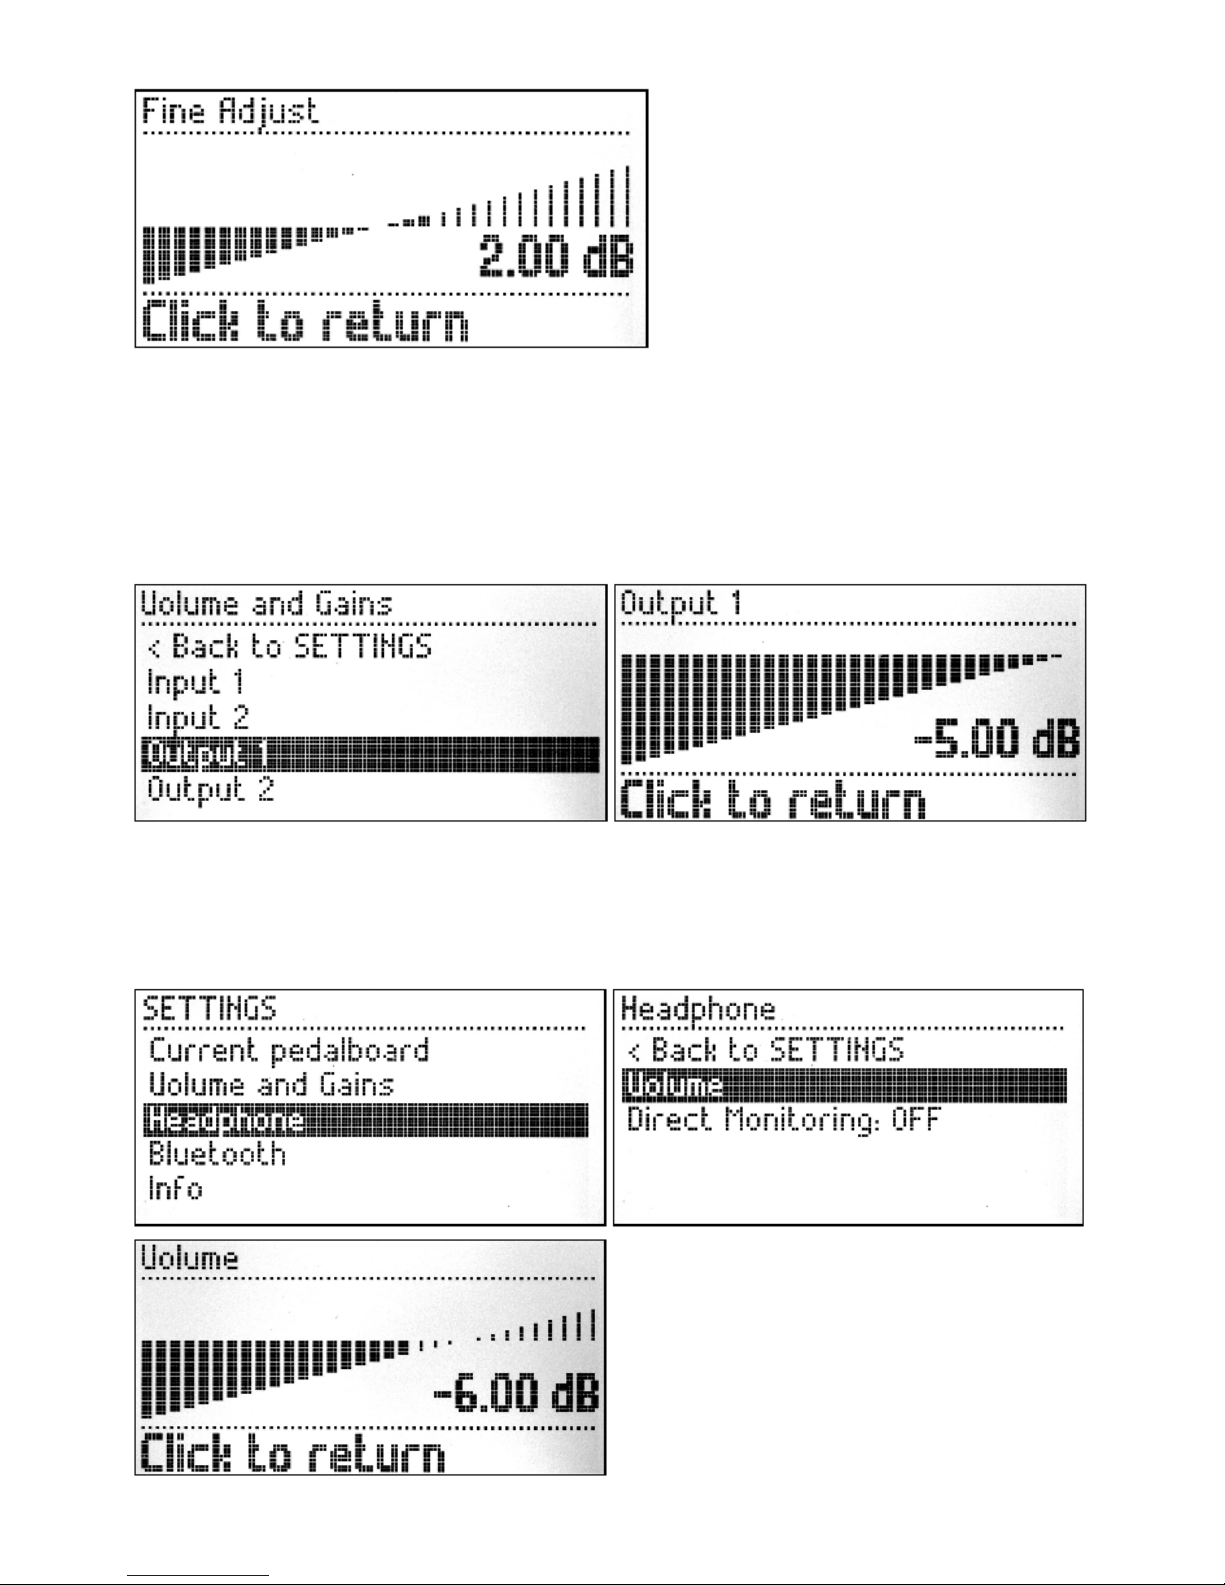
The MOD Duo has two independant audio outputs, with configurable output gain for each outut. You
can set up the output gain through the device menu.
Headphone jack
The headphone output on the MOD Duo usually monitors output 1 and 2, although it can also be set
up to monitor the inputs directly through the device menu. It is also possible to set the volume level
of the headphone output through the device menu.
Power jack
The MOD Duo comes with its own approved power supply which outputs 12V, 2A over a center-
positive barrel-type plug.
TODO: Add plug dimensions, minimum power requirements
The power consumption of the MOD Duo varies depending on the peripherals connected to the
device. For example: Hooking up a USB-hub to the USB-A port, and then hooking up multiple MIDI
controllers to the hub will change the power requirements. By using the provided power supply you
are sure that you will never run out of juice.
Control Chain port
TODO: explain use for CC, advantage over MIDI
NOTE: Please do NOT connect this port to a regular Ethernet port, it can damage your MOD Duo.
USB Host port
In the most common scenario, this port is used to hook up a single USB-MIDI device, such as a MIDI-
keyboard to control generator plugins.
Another common scenario is using this port to hook up a Bluetooth dongle for wireless connection to
your PC.
NOTE: The port can also be split up into multiple ports using a USB-hub for connecting multiple
USB devices to the MOD Duo.
USB computer port
This port is mostly used to connect the MOD Duo to your PC for setting it up. When executing a
manual system update, its use changes to a mass-storage device, so that you can copy the update-file
to the MOD Duo.
DIN-MIDI I/O
Finally, the MOD Duo also supports old-school DIN-MIDI devices, simply hook up your DIN-MIDI
device to the appropriate port on the back and enjoy!
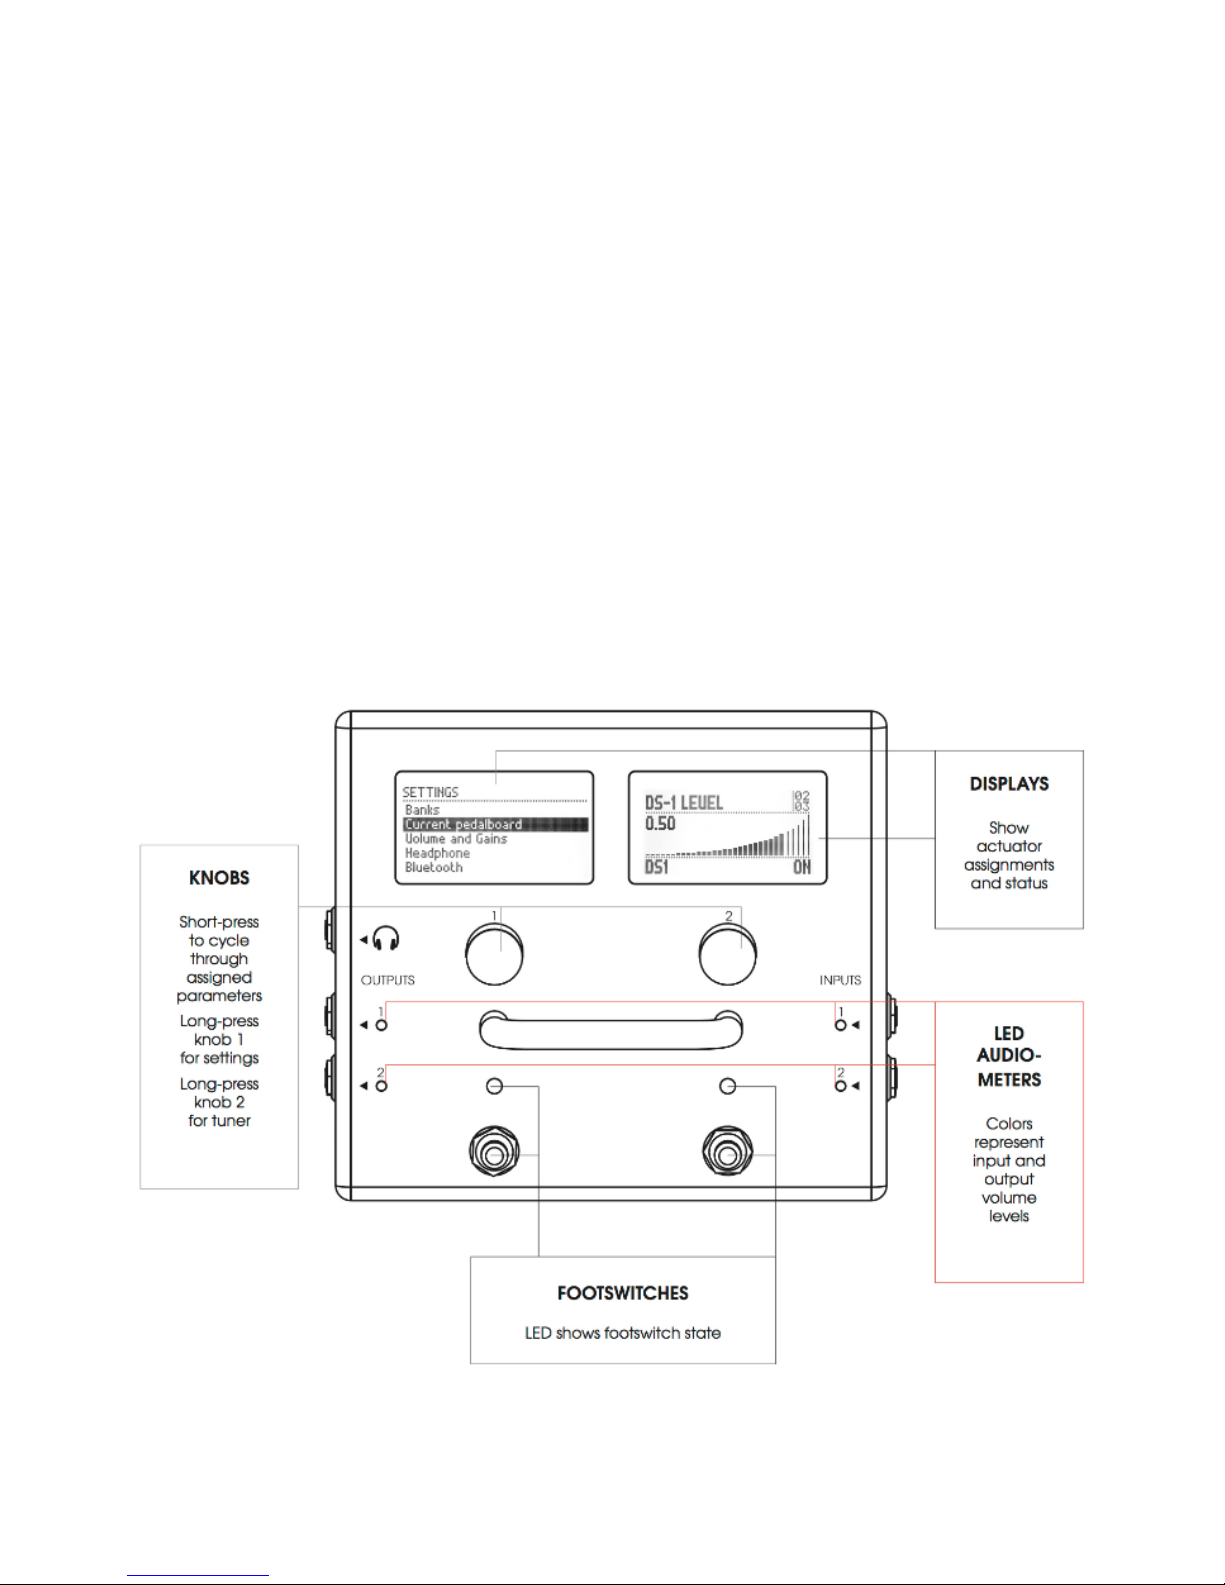
Actuators
The two knobs and two footswitches make up the actuators that are present on every MOD Duo.
The two knobs are used to access and navigate the device menu and tuner. They can also be freely
mapped to the parameters of the plugins running inside the MOD Duo, through the web interface.

General knob actions
Turn a knob to change the value of the parameter assigned to it
■
Press a knob to cycle through the list of parameters assigned to it
■
Left knob actions
Hold the left knob to access and exit the device menu
■
Turn the left knob to scroll through the device menu
■
Press the left knob to enter the selected sub-menu or toggle the selected option
■
Right knob actions
Hold the right knob to access and exit the tuner
■
Press the right knob to change the input that the tuner is used for
■
The two footswitches can be used to navigate through the pedalboards that are inside a bank (when
set up that way). They can also be freely mapped to the parameters of the plugins running inside the
MOD Duo, through the web interface.
General footswitch actions
Press the footswitch to change the value of the parameter mapped to it
■
Switching pedalboards with the footswitches
When switching pedalboards with the footswitches is enabled through the web interface:
Press the left footswitch to load the previous pedalboard in the active bank
■
Press the right footswitch to load the next pedalboard in the active bank
■
Displays
The MOD Duo sports two large (2.8") LCD displays. The displays normally give dynamic information
about the actions mapped to the device actuators, but they are also used for displaying the device
menu and tuner.
Dimensions
width: 180 mm
■
length: 160 mm
■
height: 74.7 mm
■
LED Audio meters
The LED colors represent the following input levels:
Off: below -30dB
■
Green: between -30dB and -12dB
■
Yellow: between -12dB and -3dB
■
Red: above -3dB
■
Blinking strong red: 0dB (CLIPPING!)
■

Adjusting Volumes
The MOD Duo allows each input and output volume to be individually adjusted. To access the
Volume and Gains menu, first press and hold the left knob for one second. The SETTINGS menu
will show up, now turn the left knob to select the Volume and Gains option and finally short press
the knob to access it.
In the Volume and Gains menu, turn the knob to select the input or output you want to adjust and
short press the knob to access it.
Inputs
The options for adjusting the inputs are Stage and Fine Adjust.
The Stage menu allows you to adjust the gain stage of the selected input. Inside of the Stage menu
there are 3 options: Low, Mid and High, representing the following input gain levels:
Low = -22dB
■
Mid = -9.5dB
■
High = +3dB
■
You should select the gain stage that best applies to the instrument you have connected. Short press
the knob to activate the selected gain stage.
Once you have chosen the desired Stage value you can return to the previous menu by selecting the
Back to ... option.
The Fine Adjust menu allows you to adjust the gain of the selected input. You should turn the knob
until you get the desired value.

Simply short press the knob to return to the previous menu.
Outputs
The Output menu has only one option, which allows you to adjust the attenuation of the respective
output. Turn the knob to adjust the value. To return to the previous menu simply short press the
knob.
Headphone
In the SETTINGS menu you can access the Headphone option and adjust the volume of the
headphone output. The volume can be adjusted from -33dB to +12dB.

Simply short press the knob to return to the previous menu.
There is also the option to enable the Direct Monitoring. By enabling the direct monitoring the
headphone will work as a monitor for the dry sound coming into the MOD Duo. To toggle the
monitor between ON and OFF press the knob while the Direct Monitoring option is selected.
Tuning
The MOD Duo has a built-in chromatic tuner which can be accessed by pressing and holding the
right knob for one second. Both inputs can be used as the tuner input, to select between them short
press the right knob. To exit the tuner press and hold the right knob for one second.
If you see a question mark on the tuner screen, it means the MOD Duo is not receiving any input.
To tune a guitar, play an unfretted note on a string and tune it until you see the correct note on the
display. When the background of the rectangle becomes black the string is in tune. Each vertical bar
represents 10 cents. The first bar, to the right or left of the central rectangle, is filled when the
signal is between 1-10 cents out of tune, the second bar when it is 11-20 cents out of tune, and so
on, and so forth.

Playing
After you have powered on and adjusted the volumes of your MOD Duo, it is ready for playtime. The
MOD Duo comes with many pedalboards ready to be used. They are organised in banks and can be
accessed via SETTINGS menu.
Loading a pedalboard
In order to load a pedalboard, first access the SETTINGS menu by pressing and holding the left
knob for one second, then select the option Banks with a short press. See how to organize your
banks using the MOD GUI.
Once you have the Banks menu open, you can select any bank according to your preference. The
name of each bank should give you an idea of the style of the pedalboards it stores. A short press on
the knob will open the selected bank showing the pedalboards inside of this bank.
To load a pedalboard, make your selection by turning the knob, followed by a short press on the
knob. Each time you load a pedalboard you can try how it sounds and once you find a pedalboard
that you like, you can exit the Banks or Pedalboard menu by pressing and holding the left knob for
one second.
Adjusting pedalboard parameters
As you might have noticed already, the default view of the displays shows the assigned parameters
of the plugins for the current pedalboard. You will learn more about assigning parameters in the
next chapter.
These parameters you see on the displays were considered important to be accessible to the user
when the pedalboard is loaded. To adjust the value of each parameter you just need to turn the knob
until the desired value is reached. More than one parameter can be assigned to the same knob, to
cycle between them, short press the knob. On the top-right corner of each display you can see the
index of the parameter being adjusted and the amount of assigned parameters on this display.

After you have changed the values you might want to save or reset them. The reset will restore the
last saved values for all assigned parameters, while the save option will save the current parameters
values to the current pedalboard. To access these options, press and hold the left knob for one
second to open the SETTINGS menu, then turn the knob moving the selection until Current
pedalboard option and short press the knob to select it.
Inside the Current pedalboard option there are two options: Save State and Reset State. Turn
the knob to select the desired option, and short press the knob. Finally, confirm the action by
selecting YES in the pop up dialog, and short pressing the knob. To exit this menu press and hold
the left knob for one second.
Editing
Accessing the graphical interface
The MOD Duo has a built-in graphical user interface (GUI), which means you don’t need to download
any extra software in order to configure the device. To access the interface, you only need a web
browser, such as Chrome, Safari or Firefox.
Once you are connected to your device you will be able to build and share your pedalboards,
download new plugins, organize your banks for offline access and much more.
Please refer to the Web GUI User Guide to learn all about it.

Overview shot of the pedalboard builder in the web interface
Accessing via USB cable
The easiest way to access the GUI is through the USB cable. Simply connect the USB cable, which
you received along with your MOD Duo, to your PC or Mac. The operating system should recognize
the MOD Duo as a network device and configure it automatically. However, this process may fail in
certain Windows versions, if that is your case please check the troubleshooting page
After successfully connecting the MOD Duo to your PC or Mac, open your favorite browser and
navigate to http://modduo.local (or http://192.168.51.1).
Accessing via Bluetooth
It is also possible to connect to your computer using a wireless Bluetooth connection. Check this
page to see how to do this!
Getting Device Information
This section serves to give you information about the services running, the versions of the different
pieces of software running on your MOD Duo, as well as the serial number attached to your MOD
Duo.
Press and hold the left knob for one second to open the SETTINGS menu, turn the knob to select
the Info option and short press the knob to access the Info menu.
Enter the "Services" sub-menu to see the activated services:
jack
■
mod-host
■
mod-ui
■

ttymidi
■
Enter the Versions sub-menu to see the versions of:
release
■
restore (hexadecimal)
■
system (hexadecimal)
■
controller (hexadecimal)
■
Enter the Device sub-menu to see the serial number of your MOD Duo.
True Bypass
The MOD Duo has a true bypass circuit for each pair of input/output. This allows you to physically
connect input 1 to output 1, and input 2 to output 2. The true bypass is enabled when the MOD Duo
is off and it is automatically disabled after the current pedalboard is loaded.
You can also enable or disable the true bypass via the GUI using the two bypass buttons
in the status bar. As a second option you can control the true
bypass using a special plugin called Hardware Bypass.
Install the Hardware Bypass plugin via the plugins store (see Installing new plugins section) and
add it to your pedalboard. Now you can assign the ON/OFF parameter to any physical actuator (see
Assigning plugins parameters to actuators) and control the true bypass with it.
Hooking up the MOD Duo
The MOD Duo has two completely independant inputs and outputs, as well as support for regular
DIN-MIDI as well as USB-MIDI devices. It quickly becomes clear that many different possibilities
exist for hooking up the MOD Duo in your setup.
In general, there are two scenarios for hooking up the MOD:
At setup time, with a computer connected to create new pedalboards1.
For live use, possibly without a computer connected2.

For the first scenario, the only connection that you need to make is from the USB B port on the MOD
Duo to your computer. (Bluetooth is possible in case that is preferred)
For the second scenario, it is possible to remove the connection to the computer completely, the
MOD Duo works perfectly fine as a standalone device!
Wiring examples
In the sections below you can find examples of setups that use the MOD Duo, split up into different
categories.
Guitar
TODO: Add typical use cases with guitar
in front of single amp, as stompbox1.
in front of, and in fx loop of single amp2.
into PA, with amp+cabsim on mod3.
semi-accoustic setup4.
Vocals
TODO: Add typical use cases with vocals
MIC -> MOD -> DI -> PA1.
?2.
Keys
TODO: Add typical use cases with keys
HW Synth -> MOD1.
ePiano -> MOD2.
keyboard -> MOD3.
MIDI
TODO: Add typical use cases with MIDI devices
MIDI Keyboard/controller -> MOD -> OUT1.
MIDI Keyboard/controller -> MOD -> HW Synth -> OUT2.
MIDI Grid-controller -> MOD3.
Exotic
TODO: Add exotic use cases
Chapman stick1.
Wind instruments2.
Accoustic instruments3.
Retrieved from "https://wiki.moddevices.com/index.php?title=MOD_Duo_User_Guide&oldid=11492"

This page was last edited on 22 August 2018, at 11:52.
■
Content is available under GNU Free Documentation License 1.3 or later unless otherwise noted.
■
■
■
Other manuals for Duo
1
Table of contents
Other Mod Recording Equipment manuals
Popular Recording Equipment manuals by other brands

Kramer
Kramer WAS-3 manual

Bosch
Bosch CLIMATE 5000 VRF RDCI Series Installation & user manual

Ziatech Corporation
Ziatech Corporation ZT 8952 Hardware user manual

Focusrite Audio Engineering
Focusrite Audio Engineering Novation Launchpad Pro user guide

ESI
ESI U46 XL user guide

Anthem
Anthem AVM 2 operating manual