SMA BLUETOOTH PIGGY-BACK PLUS User manual

BTPB-Ant-IEN111510 | 98-0032110 | Version 1.0
EN
Communication Interface for SMA Inverters
SMA BLUETOOTH® PIGGY-BACK PLUS
Installation Guide


SMA Solar Technology AG Table of Contents
Installation Guide BTPB-Ant-IEN111510 3
Table of Contents
1 Information on this Manual. . . . . . . . . . . . . . . . . . . . . . . . . 5
2 Safety . . . . . . . . . . . . . . . . . . . . . . . . . . . . . . . . . . . . . . . . . . 6
2.1 Appropriate Usage. . . . . . . . . . . . . . . . . . . . . . . . . . . . . . . . . . . 6
2.2 Standards . . . . . . . . . . . . . . . . . . . . . . . . . . . . . . . . . . . . . . . . . . 7
2.3 Target Group Qualification . . . . . . . . . . . . . . . . . . . . . . . . . . . . 7
2.4 Safety Instructions . . . . . . . . . . . . . . . . . . . . . . . . . . . . . . . . . . . . 8
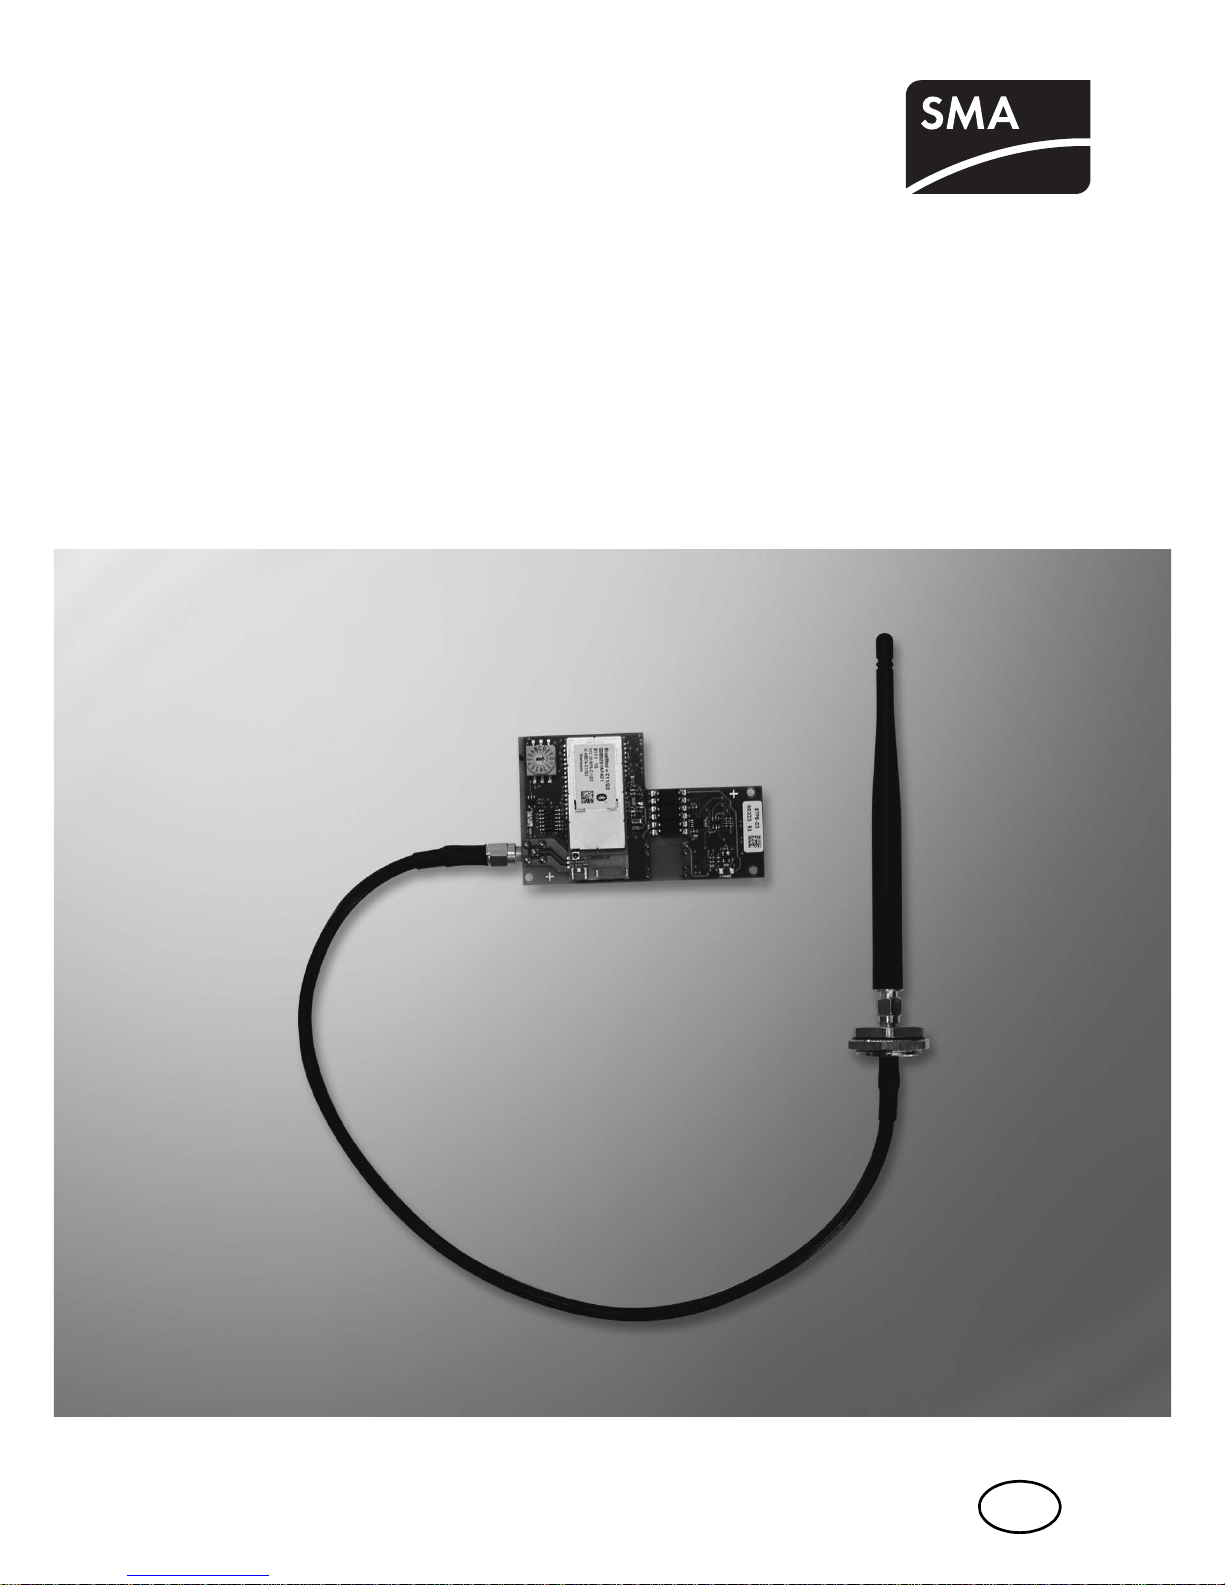
3 Description of the Bluetooth Piggy-Back. . . . . . . . . . . . . . . 8
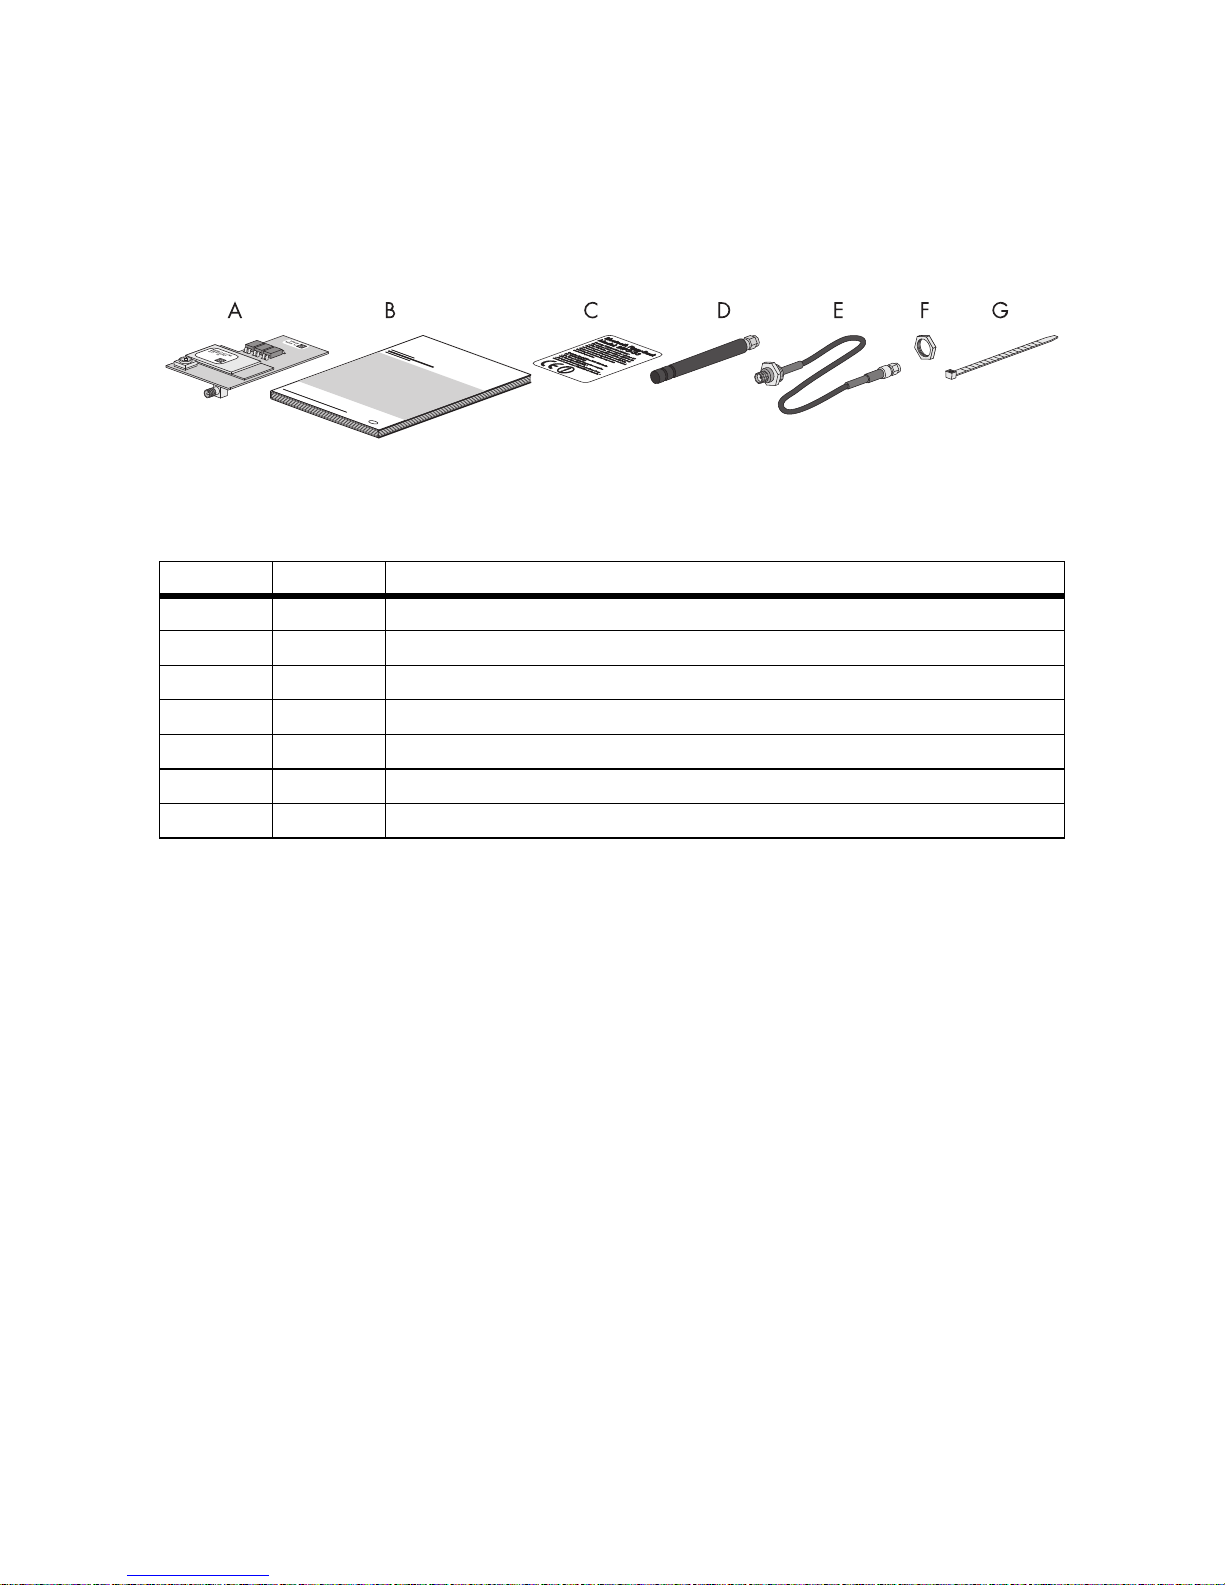
4 Scope of Supply . . . . . . . . . . . . . . . . . . . . . . . . . . . . . . . . . . 9
5 Identifying the Bluetooth Piggy-Back . . . . . . . . . . . . . . . . 10
6 Preparing Bluetooth Communication . . . . . . . . . . . . . . . . 11
6.1 Detecting a Free NetID. . . . . . . . . . . . . . . . . . . . . . . . . . . . . . . 11
6.2 Setting the NetID . . . . . . . . . . . . . . . . . . . . . . . . . . . . . . . . . . . 11
7 Mounting. . . . . . . . . . . . . . . . . . . . . . . . . . . . . . . . . . . . . . . 13
7.1 Installation Site Requirements . . . . . . . . . . . . . . . . . . . . . . . . . . 13
7.2 Installing the Bluetooth Piggy-Back . . . . . . . . . . . . . . . . . . . . . . 13
7.3 Connecting the Antenna to the Bluetooth Piggy-Back. . . . . . . . 16
8 Establishing Bluetooth Communication. . . . . . . . . . . . . . . 20
9 Updating the Firmware . . . . . . . . . . . . . . . . . . . . . . . . . . . 21
10 Decommissioning . . . . . . . . . . . . . . . . . . . . . . . . . . . . . . . . 22
10.1 Removing the Bluetooth Piggy-Back . . . . . . . . . . . . . . . . . . . . . 22
10.2 Disposing of the Bluetooth Piggy-Back . . . . . . . . . . . . . . . . . . . 24
11 Troubleshooting . . . . . . . . . . . . . . . . . . . . . . . . . . . . . . . . . 25

Table of Contents SMA Solar Technology AG
4 BTPB-Ant-IEN111510 Installation Guide
12 Technical Data . . . . . . . . . . . . . . . . . . . . . . . . . . . . . . . . . . 27
12.1 Bluetooth Piggy-Back . . . . . . . . . . . . . . . . . . . . . . . . . . . . . . . . 27
12.2 Antenna . . . . . . . . . . . . . . . . . . . . . . . . . . . . . . . . . . . . . . . . . . 28
12.3 Antenna Cable . . . . . . . . . . . . . . . . . . . . . . . . . . . . . . . . . . . . . 28
13 Contact . . . . . . . . . . . . . . . . . . . . . . . . . . . . . . . . . . . . . . . . 29

SMA Solar Technology AG 1 Information on this Manual
Installation Guide BTPB-Ant-IEN111510 5
1 Information on this Manual
Validity
This manual is valid for the SMA Bluetooth Piggy‑Back Plus, firmware version 02.00.03.R and higher.
Target Group
This manual is intended for skilled workers. Only qualified personnel are allowed to perform the tasks
set forth in this manual (see section 2.3”Target Group Qualification”,page7).
Additional Information
Additional information is available at www.SMA.de/en:
Symbols
Nomenclature
• This manual refers to PV plants and small wind turbine systems collectively as "plants."
• In this manual the SMA Bluetooth Piggy-Back Plus is referred to as Bluetooth Piggy-Back.
Document title Document type
SMA Bluetooth - SMA Bluetooth® Wireless
Technology in Practice.
Technical information
SMA Bluetooth® Wireless Technology Technical description
Symbol Explanation
Indicates a hazardous situation which, if not avoided, will result in death
or serious injury.
Indicates a hazardous situation which, if not avoided, could result in death
or serious injury.
Indicates a hazardous situation which, if not avoided, could result in minor
or moderate injury.
Indicates a situation that can result in property damage if not avoided.
Indicates information that is important for a specific topic or objective, but
is not safety-relevant.
☐ Indicates a requirement for meeting a specific goal.
☑ Desired result.
✖ Undesired result. Followed by a solution on how to achieve the desired
result.

2 Safety SMA Solar Technology AG
6 BTPB-Ant-IEN111510 Installation Guide
2Safety
2.1 Appropriate Usage
The Bluetooth Piggy-Back is a communication interface and is used to connect the inverter with other
SMA Bluetooth-enabled devices. Only skilled workers may install and uninstall the Bluetooth
Piggy-Back.
The Bluetooth Piggy-Back may only be used with the following inverters:
Photovoltaic inverters Wind power inverters
Sunny Boy (SB) Sunny Mini Central (SMC) Windy Boy (WB)
SB 700
SB 1100
SB 1100E
SB 1100LV
SB 1100‑IT
SB 1200
SB 1200-IT
SB 1600TL‑10
SB 1700
SB 1700E
SB 1700‑IT
SB 2100TL
SB 2500
SB 2500‑IT
SB 2500‑KR
SMC 4600A
SMC 5000
SMC 5000A
SMC 5000A‑IT
SMC 6000
SMC 6000A
SMC 6000A‑IT
SMC 6000A‑KR
SMC 7000HV
SMC 7000HV‑IT
SMC 7000HV‑11
SMC 7000HV‑11/IT
WB 1100
WB 1100‑IT
WB 1100E
WB 1100LV
WB 1100LV‑IT
WB 1200
WB 1200‑IT
WB 1700
WB 1700E
WB 1700‑IT
WB 2500
WB 2500‑IT
WB 2800i

SMA Solar Technology AG 2 Safety
Installation Guide BTPB-Ant-IEN111510 7
2.2 Standards
The Bluetooth Piggy-Back complies with the following standards:
• R&TTE 1999 / 5 / EC:
– EN 300 328-2
– EN 301 489-17
– EN 50371
– EN 60950
– EN 301489-1
2.3 Target Group Qualification
An electrically skilled person has received training and has demonstrated skills and knowledge
regarding the functions and operation of the device. An electrically skilled person is trained to deal
with the dangers and hazards involved in installing electrical systems.
Photovoltaic inverters Wind power inverters
Sunny Boy (SB) Sunny Mini Central (SMC) Windy Boy (WB)
SB 2800i
SB 3000
SB 3000‑IT
SB 3000‑KR
SB 3300
SB 3300‑IT
SB 3300TL HC
SB 3300TL HC‑IT
SB 3800
SB 3800‑IT
SB 4200TL HC
SB 4200TL HC‑IT
SB 5000TL HC
SB 5000TL HC‑IT
SMC 6000TL
SMC 6000TL‑IT
SMC 7000TL
SMC 7000TL‑IT
SMC 8000TL
SMC 8000TL‑IT
SMC 8000TL‑KR
SMC 9000TL‑10
SMC 9000TL‑10/IT
SMC 10000TL‑10
SMC 10000TL-10/IT
SMC 11000TL‑10
SMC 11000TL-10/IT
SMC 9000TLRP‑10
SMC 10000TLRP‑10
SMC 11000TLRP‑10
WB 3000
WB 3000‑IT
WB 3300
WB 3300‑IT
WB 3800
WB 3800‑IT
WB 5000A
WB 5000A‑IT
WB 6000A
WB 6000A‑IT

3 Description of the Bluetooth Piggy-Back SMA Solar Technology AG
8 BTPB-Ant-IEN111510 Installation Guide
2.4 Safety Instructions
Electric Shock
There is a risk of lethal electric shock when touching conductive parts of the inverter.
• Prior to performing any work on the inverter, disconnect the inverter on the AC and DC sides
(see inverter installation guide).
• Only skilled persons may work on the inverter.
Electrostatic Discharge (ESD)
By touching electronic components you can cause damage to or destroy the inverter through
electrostatic discharge (ESD).
• Ground yourself before touching a component by touching the protective conductor (PE) or a
non-coated part of the inverter enclosure.
• Avoid coming into contact with components and plug contacts.
3 Description of the Bluetooth Piggy-Back
The Bluetooth Piggy‑Back allows you to establish a connection via SMA Bluetooth Wireless
Technology to other SMA inverters and communication products with SMA Bluetooth
(e.g., Sunny Explorer, Sunny Beam with Bluetooth).
The Bluetooth Piggy‑Back reads inverter data and sends the data to a communication product with
SMA Bluetooth Wireless Technology. You can read or configure the inverter data using the
communication product.

SMA Solar Technology AG 4 Scope of Supply
Installation Guide BTPB-Ant-IEN111510 9
4Scope of Supply
Check the scope of supply for completeness and any visible external damage. Please contact your
dealer if the scope of supply is not complete or you find any damage.
Figure1:Scope of delivery
Item Quantity Description
A1SMA Bluetooth Piggy-Back Plus: BTPB-G3
B 1 Installation guide
C 1 Label with FCC certification, IC certification and CE mark
D1Antenna
E 1 Antenna cable
F 1 Counter nut for antenna cable
G1 Cable tie

5 Identifying the Bluetooth Piggy-Back SMA Solar Technology AG
10 BTPB-Ant-IEN111510 Installation Guide
5 Identifying the Bluetooth Piggy-Back
Serial Number, Assembly Name, Production Version
You can find the serial number, assembly name and
production version of the Bluetooth Piggy-Back on the
type label. The type label is located on the front of the
Bluetooth Piggy-Back.
Firmware Version
The firmware version of the Bluetooth Piggy-Back is displayed by means of the communication
product, e.g., Sunny Explorer or Sunny Beam with Bluetooth (see manual of the communication
product).

SMA Solar Technology AG 6 Preparing Bluetooth Communication
Installation Guide BTPB-Ant-IEN111510 11
6 Preparing Bluetooth Communication
6.1 Detecting a Free NetID
The NetID serves to distinguish PV plants with SMA Bluetooth in close proximity of each another.
If another plant with SMA Bluetooth is located within 500 m of your plant, you will have to detect a
free NetID. This way you will prevent setting a NetID for your plant that is already set for by another
plant. If no other plant is located within 500 m, you may choose any NetID for your plant.
• Detecting a free NetID using the Sunny Explorer software (see Sunny Explorer help).
6.2 Setting the NetID
Requirement:
☐ A free Net ID has been detected (see section 6.1).
• Use a screwdriver to turn the arrow of the rotary
switch to the plant's NetID. Use a screwdriver with
a width of 2.5 mm.

6 Preparing Bluetooth Communication SMA Solar Technology AG
12 BTPB-Ant-IEN111510 Installation Guide
Functions of the NetIDs
NetID Function
0Bluetooth is switched off.
1
(status upon delivery)
Bluetooth is switched on.
The device can connect with up to 2 of the following
communication products:
•computer with Bluetooth and Sunny Explorer software
The device cannot establish a connection with the following
devices:
• inverters with integrated SMA Bluetooth
•inverters with SMA Bluetooth Piggy-Back
•Sunny Beam with Bluetooth
•SMA Bluetooth Repeater
•SMA Bluetooth Repeater Outdoor
• SMA Power Injector with Bluetooth
2 to 9 and A to F Bluetooth is switched on.
The device can connect with all SMA Bluetooth products with the
same NetID.

SMA Solar Technology AG 7 Mounting
Installation Guide BTPB-Ant-IEN111510 13
7Mounting
7.1 Installation Site Requirements
• Keep a distance of at least 1 m from devices using the 2.4 GHz frequency band (e.g., WLAN
devices, microwave ovens, devices with Bluetooth Wireless Technology). This will prevent
reduced connection quality and data transmission speed.
7.2 Installing the Bluetooth Piggy-Back
Requirement:
☐ The NetID of the plant has been set on the Bluetooth Piggy-Back (see section 6.2).
Figure2:Position of the interface socket

7 Mounting SMA Solar Technology AG
14 BTPB-Ant-IEN111510 Installation Guide
1. Disconnect and open the inverter (see inverter installation guide).
2. If another communication interface is installed on the interface socket, remove the installed
communication interface (see communication interface manual).
3. Pass the cable tie through the mounting holes of the
display assembly. Make sure to pass the cable tie
below the display assembly.
Item Inverter*
*"From [...] to [...]" refers to the list of supported inverters, see section 2.1.
A From SB 1100 to SB 3000-KR as well as WB 1100 to WB 3000-IT, referred to as
"Enclosure type A" in the following.
B From SB 3300 to SB 5000TL HC-IT as well as from WB 3300 to WB 3800-IT,
referred to as "Enclosure type B" in the following.
C SB 700 as well as SB 1100, SB 1100E, SB1100LV, SB1100‑IT, WB 1100,
WB 1100E, WB 1100LV with the enclosure type of a SB 700, referred to as
"Enclosure type C" in the following.
D From SMC 4600A to SMC 11000TLRP-10 as well as WB 5000A and
WB 6000A, referred to as "Enclosure type D" in the following.
Risk of lethal electric shock when opening the inverter.
Death or serious injuries.
• Disconnect the inverter on the AC and DC side (see inverter installation guide).
Electrostatic discharge can damage the inverter.
• Ground yourself before touching components by touching the protective conductor (PE) or a
non-coated part of the inverter enclosure.

SMA Solar Technology AG 7 Mounting
Installation Guide BTPB-Ant-IEN111510 15
4. Plug the Bluetooth Piggy-Back onto the interface
socket, aligned to the left. Make sure to leave the
two pins on the right side of the lower row of pins
free.
5. Fasten the cable tie.
6. Cut off the surplus end of the cable tie and remove
it from the inverter.
7. Connect the antenna to the Bluetooth Piggy-Back (see section 7.3).

7 Mounting SMA Solar Technology AG
16 BTPB-Ant-IEN111510 Installation Guide
7.3 Connecting the Antenna to the Bluetooth Piggy-Back
Requirement:
☐ You have installed the Bluetooth Piggy-Back in the inverter (see section 7.2).
1. For inverters with enclosure type A and enclosure
type C: press the filler-plug in the middle out of the
enclosure opening.
2. For inverters with enclosure type B and with
enclosure type D: press the left filler-plug out of the
inverter's enclosure opening.
3. Insert the antenna cable with the cable end and the
plug through the enclosure opening into the
inverter.

SMA Solar Technology AG 7 Mounting
Installation Guide BTPB-Ant-IEN111510 17
4. Attach the counter nut onto the antenna cable with
the serrated edges facing towards the inverter
enclosure.
5. First tighten the counter nut by hand, then screw it onto the antenna cable's thread with a torque
of 9 Nm. Spanner size of the torque wrench: 26 mm.
6. Install the antenna cable in the inverter:
• For inverters with enclosure type C: pass the
antenna cable below the display assembly.
Pass the antenna cable along the left edge of
the inverter enclosure towards the antenna
connection of the Bluetooth Piggy-Back.
• For inverters with enclosure type A: pass the
antenna cable to the right over the display
assembly. Pass the antenna cable towards the
antenna connection of the Bluetooth Piggy-Back
in a loop.
The antenna cable can be damaged.
• Do not bend the antenna cable.
• Keep the antenna cable away from heat-conducting component parts.

7 Mounting SMA Solar Technology AG
18 BTPB-Ant-IEN111510 Installation Guide
• For inverters with enclosure type B: pass the
antenna cable along the lower edge of the
inverter enclosure. Pass the antenna cable
towards the antenna connection of the
Bluetooth Piggy-Back in a loop.
• For inverters with enclosure type D: pass the
antenna cable towards the antenna connection
of the Bluetooth Piggy-Back.
7. Screw the antenna cable plug to the antenna
connection by hand without tools.
8. Close the inverter (see inverter installation guide).
9. Screw the antenna onto the antenna cable by hand
without tools.

SMA Solar Technology AG 7 Mounting
Installation Guide BTPB-Ant-IEN111510 19
10. Attach the label with the FCC and IC certifications
and CE mark to the right side of the inverter
enclosure, close to the type label.

8 Establishing Bluetooth Communication SMA Solar Technology AG
20 BTPB-Ant-IEN111510 Installation Guide
8 Establishing Bluetooth Communication
Requirement:
☐ Free NetID has been detected (see section 6.1).
☐ The NetID of the plant has been set on the Bluetooth Piggy-Back (see section 6.2).
☐ You have installed the Bluetooth Piggy-Back in the inverter (see section 7.2).
or
☐The Bluetooth Piggy-Back is pre-installed in the inverter.
☐ The antenna has been connected to the Bluetooth Piggy-Back (see section 7.3).
1. Commission the communication product (e.g., Sunny Explorer, Sunny Beam with Bluetooth; see
manual of the communication product).
2. Commission the inverter with Bluetooth Piggy-Back (see inverter installation manual).
3. If the inverter with Bluetooth Piggy-Back has a different password than the plant, change the
password of the inverter with Bluetooth Piggy-Back to the plant password using the Sunny
Explorer software (see Sunny Explorer help).
☑The Bluetooth Piggy-Back is establishing a connection to other devices with SMA Bluetooth. You
can read or configure the inverter data using the communication product.
Using the Bluetooth Piggy-Back in France
In France there a restriction for maximum Bluetooth transmission power.
If you use the inverter with Bluetooth Piggy-Back in France, the French standard must have been
set on the inverter, so the Bluetooth Piggy-Back will reduce its transmission power. You can see
the default standard to which the inverter was set on the inverter's type label and on the
included supplementary document with the factory settings.
• If the inverter has not been configured for the French standard, set the French standard
using the Sunny Explorer software, for example (see Sunny Explorer software,
"Settings > Grid monitoring > Country standard").
Table of contents
Other SMA Recording Equipment manuals