Mode Machines SEQ12 User manual

USER MANUAL


3

4
CONTENT
5 1. INTRODUCTION
5 1.1. Quick overview
5 1.2. About this manual
5 1.3. Unpacking
6 2. CONNECTIONS
6 2.1. MIDI-connections
6 2.2. Power supply
6 2.3. Prog-Ports
7 3. CONTROL ELEMENTS
8 4. CONCEPT
10 5. DEFAULT-VALUES
11 6. QUICKSTART
14 7. JAM-MODE
14 7.1 Function of the Matrix
14 7.2 Function-button-assignments
15 7.3 Menu-functions in JAM-mode
17 8. SEQ-MODE
17 8.1 Function of the Matrix
18 8.2 Menu-functions and Display
20 8.3 Track-Types
20 8.4 Function-buttons
20 8.4.1 Function-buttons with track-type MONOPHON
23 8.4.2 Function-buttons with track-type POLY
24 8.4.3 Function-buttons with track-type DRUM
26 8.5 Spezialfunctions in SEQ-mode for DRUMPATTERN
27 8.6 Odd numbered sequence lenght (STEP and TRIM)
28 8.7 RATCHET function
29 8.8 COPY / PASTE / CLEAR
30 8.9 Random generator RND
30 8.10 MIDI-THRU
31 8.11 Recording notes and controllers with external MIDI-Keyboard
32 9. SONG-MODUS
33 9.1 Sequence chains
34 9.2 Parts
37 10. PLAYBACK FUNCTIONS AND MIDI
38 11. RECAP: SUMMARY OF FUNCTIONS/BUTTON ASSIGNMENTS
39 12. APPENDIX

5
1
INTRODUCTION
1
1. INTRODUCTION
1.1. Quick overview
SEQ12 is a MIDI-step-sequencer. It uses a pattern based structure. Patterns, called
sequences in this case, contain steps with MIDI-notes and MIDI-controller-data. Sequences
form melodies, chord progressions or drum-patterns. These may be arranged in parallel tracks
with individual MIDI-channels, resulting in complex sequences which can be manipulated in
real time.
Therefore, SEQ12 is a live-capable tool to create and arrange pattern-based music. It lends
itself to be used as a standalone sequencer, but may as well be perfectly combined with a
DAW, to hugely expand whose possibilities.
1.2. About this manual
Despite its clearly laid out user-interface, not all functions of your SEQ12 are self-explanatory,
naturally. Therefore we urgently recommend that you read and internalize this manual! Only
like that, you will unlock the full potential of your new sequencer.
To organize this manual in a clear way, certain terms and sections are highlighted:
• This is how a control element during operation is indicated: „Select MOD“
• The matrix-buttons are described like this: (X/Y). X represents the horizontal position,
Y the vertical position. Therefore, matrix-button (4/2) is the fourth button in track 2.
• This is how a display-text is indicated: „The display indicates
PATTERN
“
• This is how an important hint is indicated:
IMPORTANT! Always and exclusively use the provided power supply!
• This is how a tip for practical use is indicated:
TIP: The TRIM-function can be used to perform.
1.3. Unpacking
Carefully remove SEQ12 from its packaging. The box contains:
• your SEQ12 step-sequencer
• an external power supply (12 volts DC, 1000mA, pin = plus)
• this manual
IMPORTANT! Keep the original box and the packaging material. In case, your SEQ12
has to be sent somewhere, the original box and packaging is the safest way to trans-
port the unit.
We‘re ready to go now - Mode Machines wishes you a good time!

6
2
CONNECTIONS
2. CONNECTIONS
2.1. MIDI-connections
On its rear panel, SEQ12 offers connectors for MIDI-units. There are three outputs and one
input. To ensure optimal timing, SEQ12 offers three MIDI-outputs. If possible use these outputs
in parallel and avoid serial chaining of MIDI-units. Connect a suitable MIDI-unit to the MIDI-
input, such as a master-keyboard.
2.2. Power supply
Inaddition,youwillalsondtheconnectorforthesuppliedpower adapter (12 volts DC,
1000mA). It is labeled DC IN 12V.
IMPORTANT! Always and exclusively use the provided power supply! Using a power
supply with wrong performance data may result in damage of the SEQ12. Mode
Machines is not liable for damages resulting from wrong power supplies.
2.3. Prog-Ports
The connectors PROG 1 and PROG 2 will allow the connection of programming units to carry
outrmwareupdates.
MIDI Synth 1
MIDI Synth 2
MIDI Synth 3 MIDI-Keyboard
Power
Supply

7
3
CONTROL ELEMENTS
3. CONTROL ELEMENTS
The buttons of the user-interface are sorted by function into three sections. The Matrix claims
the largest space. It consists of 12 lines and 16 columns. The matrix serves to program
sequences and to display and edit different types of MIDI-data. Depending on the mode being
selected, it may also display the progression of different sequences.
To the left of the matrix, 12 function-buttons are placed in vertical order. These serve
different purposes, depending on the mode being selected: For example, you select, which
MIDI-data are going to be displayed or edited. This may be notes, velocity- or controller-data
for example. The four lowermost buttons may be assigned to carry out copy-functions. In
certain modes, the function-buttons serve to select tracks or as mute-buttons for those.
On the right hand side, there are buttons to carry out control-functions. The topmost three
buttons select the main view resp. the MODE. There is a MENU for each MODE. This contains
additional parameters that can be edited using the navigation-cursor and that will be shown
in the display.
The lowermost three buttons are used for transport control.
Function Buttons
Mode Buttons
Display
Cursor
Control Functions
Playback Functions
Matrix

8
4
CONCEPT
4. CONCEPT
As described earlier, SEQ12 is a pattern-based step-sequencer which creates MIDI-data. To
illustrate the concept, we will explain a couple of important terms here:
SEQUENCE
A sequence is the smallest unit within the SEQ12. It contains up to 16 steps, representing
MIDI-datasuchasnotes,controllers,shufeetc.
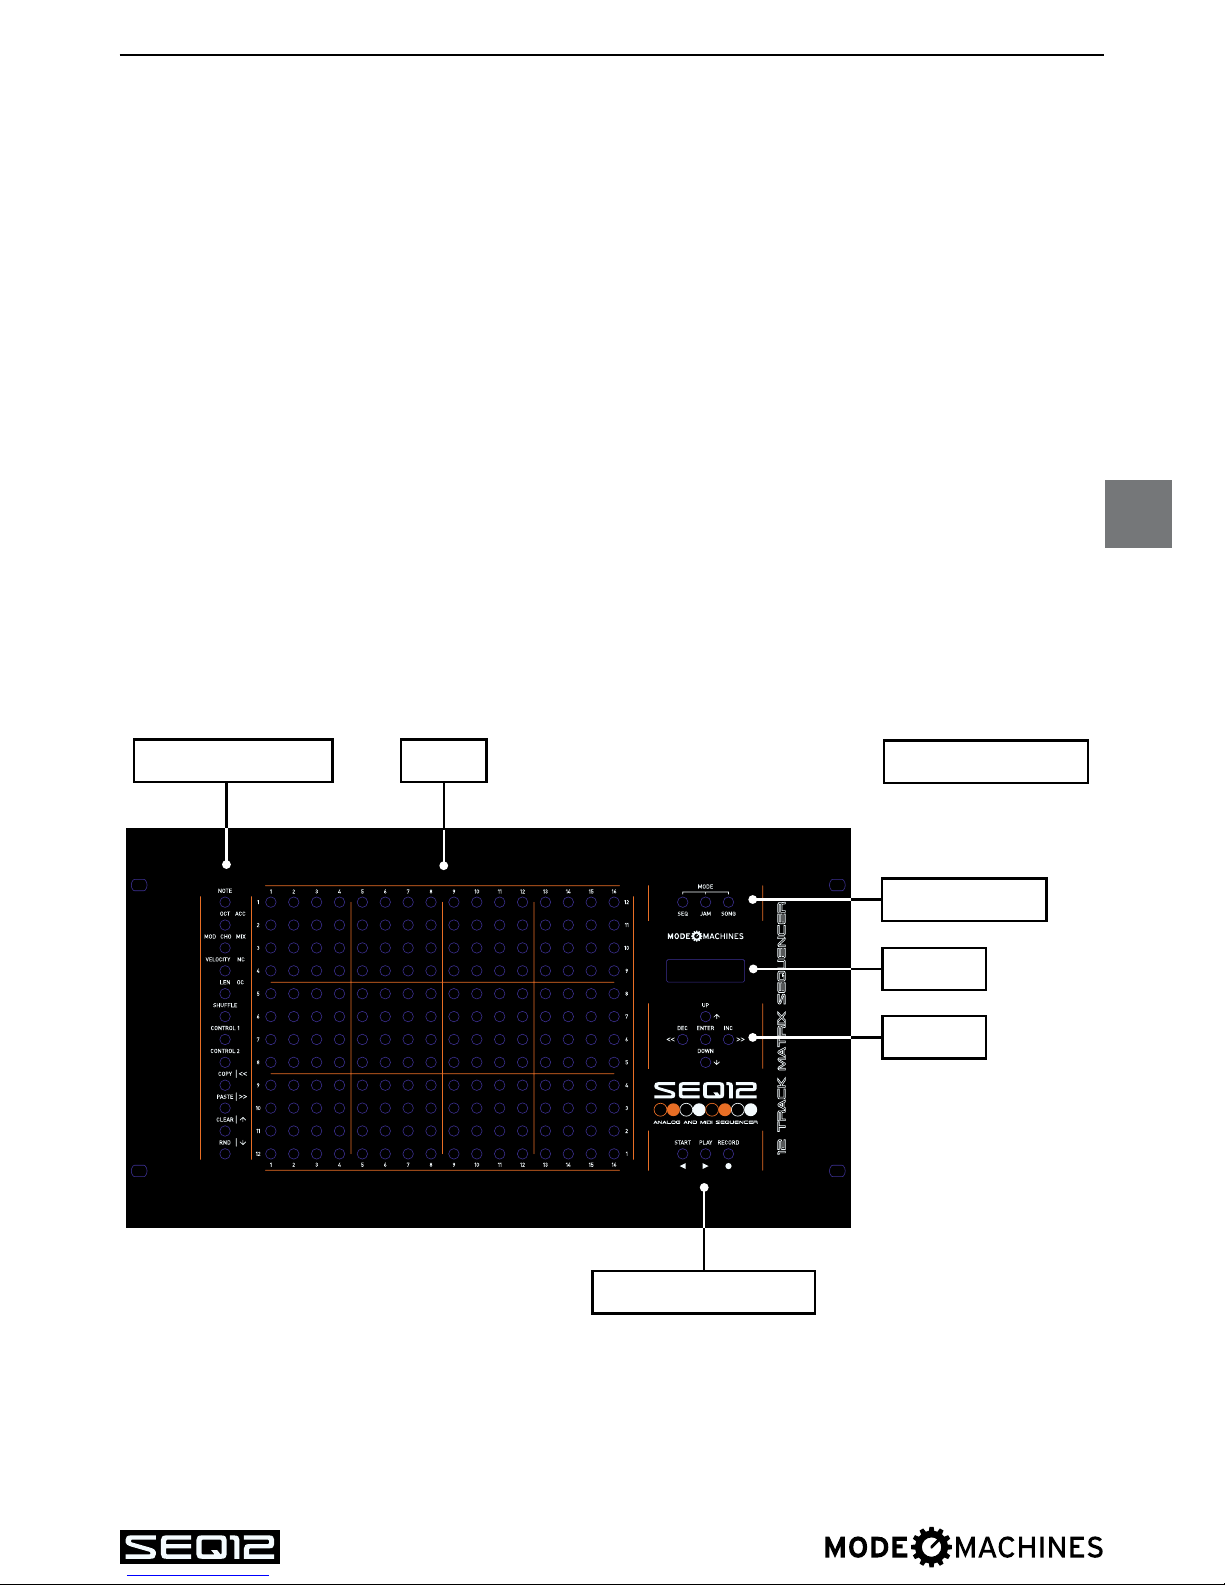
SEQ-mode
The SEQ-mode is used to program a sequence using the matrix or an external MIDI-input
device (e.g. a master-keyboard).
In SEQ-mode, the matrix visualizes steps with certain MIDI-data of the corresponding sequen-
ce which can be selected using the function-buttons 1 to 8(notes, octave range, step-length,
velocity,controller-values,shufeetc.).
A progressing locator-bar moving from left to right indicates the current step-position.
Parameter values such as velocity, controllers or step-length are visualized as LED-bars in the
matrix.
SEQ12 allows to store 16 sequences per track.
TRACK
SEQ12 offers 12 tracks, arranged one below the other in the matrix. Each track addresses one
of the three MIDI-outputs. Each track can additionally be assigned to one of three „track-
types“.Alloftheseareoptimizedregardingtotheirspecicmatrixvisualization.Inaddition,
they offer different functions. These are the track-types available:
• MONO: A monophonic track can only play one note per step and offers three
controller-tracks.
• POLY: Polyphonic tracks allow to play multiple notes per step. This makes them suited for
chords. Polyphonic tracks offer two controller-tracks.
• DRUM: Drum-tracks are optimized to address drum computers or similar units. The
matrixformsapatternwhereeachlinecanbesettotransmitadenablenote.For
example, you may set the bass drum to the lowest line, followed by the snare drum
above and so on. This way, you can address up to twelve different drum sounds
from a single track. Drum-tracks also offer two controller-tracks.
JAM-mode
The JAM-mode is the performance mode of the SEQ12. In JAM-mode, the matrix displays
12 tracks with 16 sequences each. This way it is possible to directly select any of the 16
available sequences for each of the 12 tracks for immediate playback.
The function-buttons to the left activate respectively mute the 12 tracks.

9
4
CONCEPT
Assumingthedifferenttrackscarryspecicmusicalpurposes(e.g.track1=melody,track2=
bassline,track3=chords,track4=drums),itispossibletoeasilycreateasong„onthey“in
JAM-mode.
It just requires two „clicks“ to switch from JAM-mode to SEQ-mode where, likewise, you can
edittheselectedsequences„onthey“.
SONG-mode
SONG-mode allows the creation and playback of longer and more complex arrangements or
even full songs. Even here, it is possible to change the sequence-progress in real time.
In SONG-mode, every track is given an individual series of up to 64 sequences which is called
a sequence-chain.
Part
The 12 sequence-chains of all tracks build a part. The SEQ12 can store up to eight parts. Parts
may be changed while the sequencer is running. Given that parts could equal song-parts, you
will have a choice of intro, verse, break, outro etc., which can all be called up to taste.
In this mode, the matrix serves to select parts as well as to display the sequence-chains of a
selected track. In song-mode, the locator-bar moves from top to bottom!
SETUP
The topmost hierarchic-level is the „setup“. A setup contains the settings of all data that can be
changed by the user. This includes all parts, contained sequences and sequence-chains as
well as the global settings. You may compare a „setup“ to a „song“. SEQ12 allows to store up to
32 setups.

10
5
DEFAULT VALUES
5. DEFAULT-VALUES
After switching on the SEQ12, it will automatically enable JAM-mode with the following de-
fault-setup:
Tempo : 126 BPM
Track 1 : monophonic, OUTPUT 1, MIDI-channel 1
...
Track 2 : monophonic, OUTPUT 1, MIDI-channel 6
Track 7 : monophonic, OUTPUT 2, MIDI-channel 1
...
Track 10 : monophonic, OUTPUT 2, MIDI-channel 4
Track11 :Drum,OUTPUT3,MIDI-channel10 (preconguredforJoMoXXBase999)
Track12 :Drum,OUTPUT3,MIDI-channel14 (preconguredforElektronAnalogRytm)
TIP: Here‘s an example for a useful track assignment:
You may connect a drum-synthesizer to the third MIDI-output (tracks 11 and 12).
Sequence 1 of track 11 is preset with note-assignments for the JoMox model
XBase 999. The bass drum is set in the lowermost line, followed by the snare and
so on ...
Equally, sequence 1 of track 12 is preset with note-assignments for the Elektron
model Analog Rytm.
Tracks 1 to 6 are routed to a polyphonic synthesizer connected to MIDI-output.
Tracks 7 to 10 are routed to a unit connected to MIDI-output 2.

11
6
QUICKSTART
6. QUICKSTART
TocheckoutyourSEQ12,pleasereadandfollowthisquickstartrst.Eventhoughnotallfunc-
tionsareexplainedhere,youwillgetarstimpressionofyourSEQ12‘sworkow.
1. Connect a synthesizer to MIDI-output 1. The unit should be set to receive on
MIDI-channel 1.
2. Switch on the SEQ12.
3. The unit now is in JAM-mode, With the default-setup being loaded. Only track 1 is active
becauseonlythetopmostfunction-buttontotheleftislit.Therstsequenceoftrack1
isactive(seematrix:button1/1islit).Therstsequenceisalsoselectedinallother
tracks (see matrix: buttons 1/2, 1/3, 1/4 etc. are lit).
4. Press SEQ. You are now in a mode to select sequences. The JAM- and SEQ-buttons are
lit. The display shows
SELECT SEQUENCE IN MATRIX
.
5. Press the topmost left button (1/1)ofthematrixtoselecttherstsequenceoftherst
track to be edited.
6. You are now in SEQ-mode. Here, the selected sequence can be programmed or edited. It
is empty currently.
7. Start the sequencer by pressing PLAY. You should see the locator-bar advancing from
left to right.
The display shows the selection-windows for sequence (
S01
) and track (
T01
) as well as
the currently select sequence-parameter (
NOTE
) and the track-type (
MONO
)
8. Use the function-buttons (left) to select the sequence-parameter to be edited. Select
NOTE (topmost function-button).
9. Deneafewnotes in the matrix using the MATRIX-BUTTONS. You should now hear a
note-sequence.
10. Now, select OCTAVE. Change the octave for the notes by pressing MATRIX-BUTTONS
on top or below a note being set.
11. Select MOD. Set a few MIDI-controller-values by pressing MATRIX-BUTTONS above
the corresponding step. Per default, MOD sends out MIDI-controller-number 1, i.e. the
modulation-wheel.
12. ChangevaluesforVelocity,LengthorShuferesp.Control1and2.
MONO PATTERN
T01 S01 NOTE
Spurtyp
Spur
(UP / DOWN)
Sequenz
(DEC / INC)
MIDI-Datentyp
(Funktionstaster)
Auswahl-Modus

12
6
QUICKSTART
13. Press ENTER in the navigation-cursor. You are now in edit-mode for the parameters of
the sequence. The display shows „
EDIT
“ and the active parameters below.
Repeatedly press UP resp. DOWN to toggle through the parameters. If desired, change
values using INC and DEC.Incase,ENTERashes,theinputhastobeconrmedby
pressing ENTER.
14. Press ENTER again. You are now back in the mode to select sequences. The display will
show
PATTERN
(see 7.)
15. Press INC. You are now editing the second sequence of track 1. It is still empty, too.
16. Presstherstfunction-button(NOTE) once more. Set a few notes or press RND (lower
most function-button).
Please note:Sofar,youstillheartherstsequence!
17. Press JAM. JAM-mode is now re-enabled.
18. Pressthesecondbuttonintherstline(2/1) of the matrix to playback this (second)
sequence.
Please note:Afterplayingsequence2once,SEQ12willjumpbacktotherst
sequence which will be played back in a loop because the corresponding
default-settings of the sequence-chain are active for track 1. (Find more detail on
page 33.)
19. PressSONG. You can now select the desired part (matrix-button 1-8/1). Currently, only
part 1 is occupied (1/1). Press SONG again.
20. The matrix shows the sequence-chain of track 1. It contains four steps (being displayed
one below the other (!) - matrix-buttons 1/1, 1/2, 1/3, 1/4).
Sequence 1 is selected for each step. Hence, you will hear sequence 1 four times.
The locator-bar moves from top to bottom and indicates the current position within the
sequence-chain.
21. Now change the sequence-progression. To do so, press the second button in the
second line (2/2). The moving locator-bar still indicates the currently played step of the
sequence-chain.
Press INC or DEC to change the length of the sequence-chain.
Please note: You still solely work in track 1.
MONO EDIT
T01 S01 STEPS 16
Spurtyp
Spur
Sequenz
Parameter
(UP / DOWN) Wert
(DEC / INC)
Edit-Modus

13
6
QUICKSTART
22. Change into JAM-mode. The matrix again displays all tracks (1-12), one below the other
now. It displays the currently played sequences per track. Watch how the current
sequenceinthersttrack(line)changescorrespondingtotheeditedsequence-chain
(see 21.).
23. Press FUNCTION-BUTTON 11 to activate track 11. Connect a drum computer to
MIDI-output 3. Make sure it receives on MIDI-channel 10.
24. Press SEQ and matrix-button 1/11 to switch to SEQ-mode and select sequence 1 of
track 11.
25. Now edittherstsequenceoftrack11.Thetriggersofthepattern‘slowermostline
transmit MIDI-note 36 which is often the bass drum of a drum-computer. The line above
sends note 40, which often is the snare drum. This way, you can easily create a
drum-pattern. Enjoy ...
26. Carefully read the following chapters.

14
7
JAM-MODE
7. JAM-MODE
The JAM-mode is the performance-mode of your SEQ12. Here, you can select sequences on
theyinalltracksaswellasmutetracks.Alsoyoucanarrangeyourtrackorlive-setinrealtime
while the sequencer is running.
JAM-mode is automatically active when switching the unit on. Additionally, it can also be imme-
diately activated by pressing the JAM-button.
The JAM-mode serves to
• select the sequence to be played back in a track:
By pressing a button in the matrix, the active sequence (1-16) of a track (1-12) is being
switched. The change is carried out immediately. There is not wait for the end of the bar.
This allows sequence-recombinations by spontaneous switching.
• mute tracks:
Pressing the function-buttons 1-12 (left side) will mute the corresponding tracks
(LED off) or activate (LED on).
• select the tempo of a clock-source:
The menu offers the corresponding parameters for tempo- and clock-source-adjustments.
Here,youcanalsocongureoutputs2and3fortheCV/Gate-modulebyModeMachinesto
use a data-transmission-speed that is eight times faster.
• to store or load setups:
Find the corresponding functions to load and save setups in the menu.
7.1 Function of the matrix
In JAM-mode, each button of the matrix represents a sequence. The 16 buttons in a line corre-
spond to the sequences of a track. This is why just one button per line is lit in JAM-mode - the
active sequence. The 16 sequences of track 1 are displayed in the topmost line of the matrix,
the sequences of track 2 below that etc. Each sequence can be activated/selected by pressing its
button.
7.2 Function-button assignments
The function-buttons to the left are lit with the corresponding track being enabled, i.e. not
muted. By pressing the corresponding button, the track is enabled/disabled.
The graphic to the right shows SEQ12 in JAM-mode. Tracks 1, 3, 11 and 12 are active. The
function-buttons of these tracks are lit. In track 1 sequence 1 is active, in track 3 sequence 2, in
track 11 sequence 8 and in track 12 sequence 7. They are all played simultaneously.
TIP: You may assign different musical functions to the tracks such as a melody for
track 1, a bass line for track 2, chords for track 3 and drums and percussions for
tracks 11 and 12.
By changing between sequences and using the track-mute-function, you can create
arrangements in real time.

15
7
JAM-MODE
7.3 Menu-functions in JAM-mode
With JAM-mode being selected (press JAM), the display looks like this:
Use the navigation-cursor to navigate the menu in JAM-mode. Use UP / DOWN and ENTER
to select the functions.
Use INC and DEC to increase and decrease values. Press and hold INC resp. DEC to carry out
larger value edits.
The menu in JAM-mode offers functions to adjust the tempo as well as to load and save setups.
A setup contains the settings of all data that can be edited by the user. This includes all sequen-
ces, parts as well as all global settings. You may compare a „setup“ to a „song“. SEQ12 can store
up to 32 setups.
Tracks 1, 3, 10, 11 active JAM-Mode active
In Track X active Sequence Y
1 1
2 1
3 2
4 1
: 1
10 1
11 8
12 7
SETUP TEMPO
default 126 bpm

16
7
JAM-MODE
The following menu-function are available in JAM-mode:
TEMPO
Set the tempo using the INC and DEC buttons.
By pressing ENTER When set to
EXTERN
, SEQ12 will sync to a received MIDI-clock. SEQ12
always transmits MIDI-clock and MIDI-start- and -stop-commands.
(SETUP) LOAD
Here, you can load SETUP-data. SEQ12 offers 32 memory locations for setups. Use INC and
DEC to select and ENTER to load.
Please note: Loading setups will overwrite all current settings of the SEQ12. This is
irrevocable!
(SETUP) SAVE
You can save your setups here. Select the memory location using INC and DEC. Press ENTER to
activate the save routine.
A safety mechanism hinders you from accidentally overwriting data: After selecting a memory
location and pressing ENTER, you need to subsequently press YES/ADD(ashing)tocarryout
the save process.
To cancel the save procedure, simply press the JAM-mode button.
Please note: Setups that have been accidentally overwritten end up in data-nirvana
beyond recall!
CVGATE FASTMODE
This mode allows adjustment of settings to connect to the CV/Gate-Interface by Mode Machi-
nes. To enable changed settings, you will need to switch the SEQ12 off and back on. In this state,
other MIDI-units cannot be operated at the corresponding port unless they support a
MIDI-transfer-rate of 250 kBaud.
LOAD
0
SAVE
0
SETUP TEMPO
default 126 bpm
CLOCK
intern

17
SEQ-MODE
8
8. SEQ-MODE
The SEQ-mode is dedicated to program and edit sequences. Depending on the track-type being
selected, the function-buttons call up different views of the matrix to enter the corresponding
MIDI-data.
8.1 Matrix-function
In SEQ-mode, the matrix visualizes a single sequence. The 16 columns of the matrix contain
and represent the steps of a sequence.
In SEQ-mode, the whole matrix is used to visualize the different MIDI-data which can be en-
tered per step. This way, the vertical position of a step informs about the pitch of MIDI-notes.
Other MIDI-data such as velocity, step-length or controllers are visualized by vertical or hori-
zontal LED-bars.
Fnct-Buttons 1 – 8
show
MIDI Data Display
(here NOTE View)
active NotesLocator
SEQ Mode active
Sequence Steps 1 - 16

18
8
SEQ-MODE
8.2 Menu-functions and display
Some functions in SEQ-mode need to be adjusted using the display and the navigation-cursor.
With SEQ-mode being selected by pressing SEQ, the display shows the sequence-selection-
menu. Select the sequence to be edited here.
•
S01
shows the current sequence (S01 to S16). Carry out the selection using DEC and INC.
•
T01
displays the track where the current sequence is located (T01 to T12). The selection is
carried out using UP and DOWN.
In correspondence to the selection, the display will inform you about:
• the track-type (
MONO, POLY, DRUM
)
• the type of MIDI-data being generated (
NOTE, TRIG
)
Attention: When changing from JAM-mode to SEQ-mode, both buttons are lit and the
display will show:
Now, select the desired sequence from the matrix and press SEQ again to open the menu for the
sequence-selection(seepage19)
Pressing ENTER will open the sequence-edit-menu:
SELECT SEQUENCE
IN MATRIX
MONO EDIT
T01 S01 STEPS 16
Track
Sequence
Parameter
(UP / DOWN) Value
(DEC / INC)
Edit Mode
Track Type
MONO PATTERN
T01 S01 NOTE
Track Type
Track
(UP / DOWN)
Sequence
(DEC / INC)
MIDI Data Type
(Function Buttons)
Select Mode

19
8
SEQ-MODE
The left side of the display will still show the selected sequence, track and track-type.
Onthelowerrightsideofthedisplay,youwillndaparameterselection.Theindividualparame-
ters are listed below and will be described in detail later in this manual:
• Use UP and DOWN to select the parameter.
• Use DEC and INC to change or adjust the parameter value.
STEPS : [1...16] number of steps of a sequence
TRIM : [0...64] sequence-length in 1/16th notes
CLKDIV : [1...32] the clock divider of a sequence (multiplies the
tempo of the sequence)
C1 : [0...127] MIDI-controller-number of controller-track 1
C1 smo : [0...1] nables/disables smoothing of
MIDI-controller-values
C2 : [0...127] MIDI-controller-number of controller-track 2
C2 smo : [0..1] enables/disables a smoothing of
MIDI-controller-values
C3 : [0...127] MIDI-controller-number of controller-track 3
(only for track-type MONO)
C3 smo : [0...1] enables/disables smoothing of
MIDI-controller-values
MIDI : [1...3] MIDI-output of track (valid for all sequences of
the track)
CHAN : [1...16] MIDI-channel of track (valid for all sequences of
the track)
TYP : [mono, poly, drum] track-type (valid for all sequences of the track)
THRU : [on, off] passes on received MIDI-notes and
controller-data to the selected MIDI-output
LINEAR : [LINEAR, RATCHET] enables linear- or ratchet-mode
IMPORTANT! Please note:
•ThevaluesforSTEPS,TRIMandCLKDIVhavetobeconfirmedbypressingENTER
and will only be active from the next cycle of the sequence. This way, the sequence
always stays in sync.
•Changingthetrack-typealsohastobeconfirmedbypressingENTER.

20
8
SEQ-MODE
•Whenchangingfromtrack-typeMONOtoPOLY,controller3isomitted.Thenotes
remain as is.
•Whenchangingfromtrack-typePOLYtoMONO,chordsareomitted.Thelowest
notes remain as is.
•Whenchangingfromortotrack-typeDRUM,alldataareomitted.
•Forallotherparameters,thenewvalueswillimmediatelybeexecuted.
•ThesettingsC1,C2,C3,MIDI,CHAN,TYPandTHRUarevalidforallsequencesof
a track.
8.3 Track-types
Each track can be assigned to one of three track-types. All of these are optimized in regard
totheirspecicmatrixvisualization.Inaddition,theyofferdifferentfunctions.Thefollowing
track-types are available:
•
MONO
: A monophonic track can play one note per step, and offers three controller-
tracks.
•
POLY
: Polyphonic tracks allow to playback multiple notes per step. This makes them
suited for chords. Polyphonic tracks offer two controller-tracks.
•
DRUM
: Drum-tracks are optimized to address drum computers or similar units. The
matrix forms a patternwhereeachlinecanbesettotransmitadenablenote.
For example, you could use a bass drum in the lowermost line, a snare in the line
above etc. This way, you can address twelve drum sounds from a single track.
Drum-tracks also contain two controller-tracks.
8.4 Function-buttons
The function-buttons 1 to 8 (left LED-column) are used to select the views for the different
MIDI-data of a sequence. Depending on the track-type, different MIDI-data can be programmed
for the sequence. The function-buttons 1 to 8 have the following assignments:
8.4.1 Function-buttons with track-type MONO
NOTE
With NOTE being selected, 16 steps can be set. In addition, the matrix displays pitches on the
vertical axis: The lowermost line represents the “C“. The higher lines move up to “B“ in twelve
semitones (track 1). In short: One octave is being displayed.
Pressing NOTE twice enables follow-mode. Here, the sequence-display will automatically
switch to the next sequence of the chain, once completed. The display will read „
F
“.
OCTAVE
By selecting OCTAVE, the octave of the steps can be changed. To do so, press MATRIX-
BUTTONS above and below any step.
Pressing OCTAVE twice will solo the currently selected track. This display will read „
S
“.
Table of contents
Other Mode Machines Recording Equipment manuals
Popular Recording Equipment manuals by other brands

Link electronics
Link electronics AES ANALOG TONE GENERATOR 812-OP/E Specification sheet

AuviTran
AuviTran AV-WALL-BT-EXT Assembly guide

KonzeSys
KonzeSys KZ-VC6000 user manual

Hitachi
Hitachi EH-TP504 operating instructions

Aiphone
Aiphone GT-TLI-IP Installation & operation instructions

Nice
Nice BiDi-Shutter Instructions and warnings for installation and use