Modena Immacolato Series Owner's manual

User
Manual Book
Dishwasher
Immacolato Series
WP 9140

2

3
TABLE OF CONTENT
Part 1: Safety Information 5
Safety Precaution 5
Grounding Instruction 6
Environmental Notice 7
Part 2: Name of Parts 8
Part 3: Installation Instructions 10
Installation Location 10
Installation 10
Part 4: How to Use 19
Control Panel 19
Before Using Your Dishwasher 20
Filling The Salt Container 20
Adjusting Salt Consumption 22
Loading The Basket 23
Loading The Basket According To EN50242 26
Basket Usage Tips 28
Function Of Rinse Aid 31
When To Refill Rinse Aid 31
Function of Detergent 31
Filling the Rinse Aid Dispenser 32
Adjusting The Rinse Aid 32
Filling The Detergent Dispenser 33
Wash Programs 34
Turning On The Appliance 35
Changing The Program 36
Adding Dish 36
Part 5: Maintenance 37
External Maintenance 37
Internal Maintenance 37
Spray Arms 39
Moving The Appliance 40
If Not In Use For A Long Time 40

4
Part 6: Troubleshooting 41
Error Code 43
Part 7: Specification 45
This guide book explains everything you need to know about your new
product. Please contact our Customer Care should you need further
assistance trhough www.modena.com

5
Safety Precaution
•This appliance is intended to be used in household and similar
applications such as:
ostaff kitchen areas in shops, offices and other working
environments;
ofarm houses;
oby clients in hotels, motels and other residential type
environments;
obed and breakfast type environments.
•This appliance is not intended for use by persons (including
children) with reduced physical, sensory or mental capabilities, or
lack of experience and knowledge, unless they have been given
supervision or instruction concerning use of the appliance by a
person responsible for their safety.
•This appliance is for indoor use only, for household use only.
•To prevent the risk of electrical shock, do not immerse the unit,
cord or plug in water or other liquid.
•Please unplug the power plug before cleaning and maintaining the
appliance.
•Use a soft cloth moisten with mild soap, and then use a dry cloth to
wipe it again.
•Do not harm, sit on, or stand on the door or the dish rack of the
dishwasher.
•Do not operate your dishwasher unless all panels are properly in
place.
•Open the door very carefully if the dishwasher is operating, there is
a risk of water sprays out.
•Do not place any heavy objects on or stand on the door when it is
open. The appliance could fall forward.
•When loading items to be washed: 1) Check and place sharp items
to ensure they won't damage the door seal; 2) Warning: Knives and
other utensils with sharp points must be loaded in the basket with
their points down or placed in a horizontal position.
•Check if the detergent powder is empty after completion of the
wash cycle.
PART 1: SAFETY INFORMATION

6
•Do not wash plastic items unless they are marked as dishwasher
safe or the equivalent. For plastic items without mark, check the
manufacturer's recommendations.
•Use only detergent that exclusively designed for an automatic
dishwasher.
•Never use soap, laundry detergent, or hand washing detergent for
this appliance.
•Supervise the children to ensure that they do not play with the
appliance.
•The door should not be left open, since this could increase the risk
of appliance to fall forward.
•If the supply cord is damaged, it must be replaced by the
manufacturer or its service agent or a similarly qualified person in
order to avoid hazard.
•During the installation, the power supply and the cord must not be
bent or crushed.
•Do not tamper the controls.
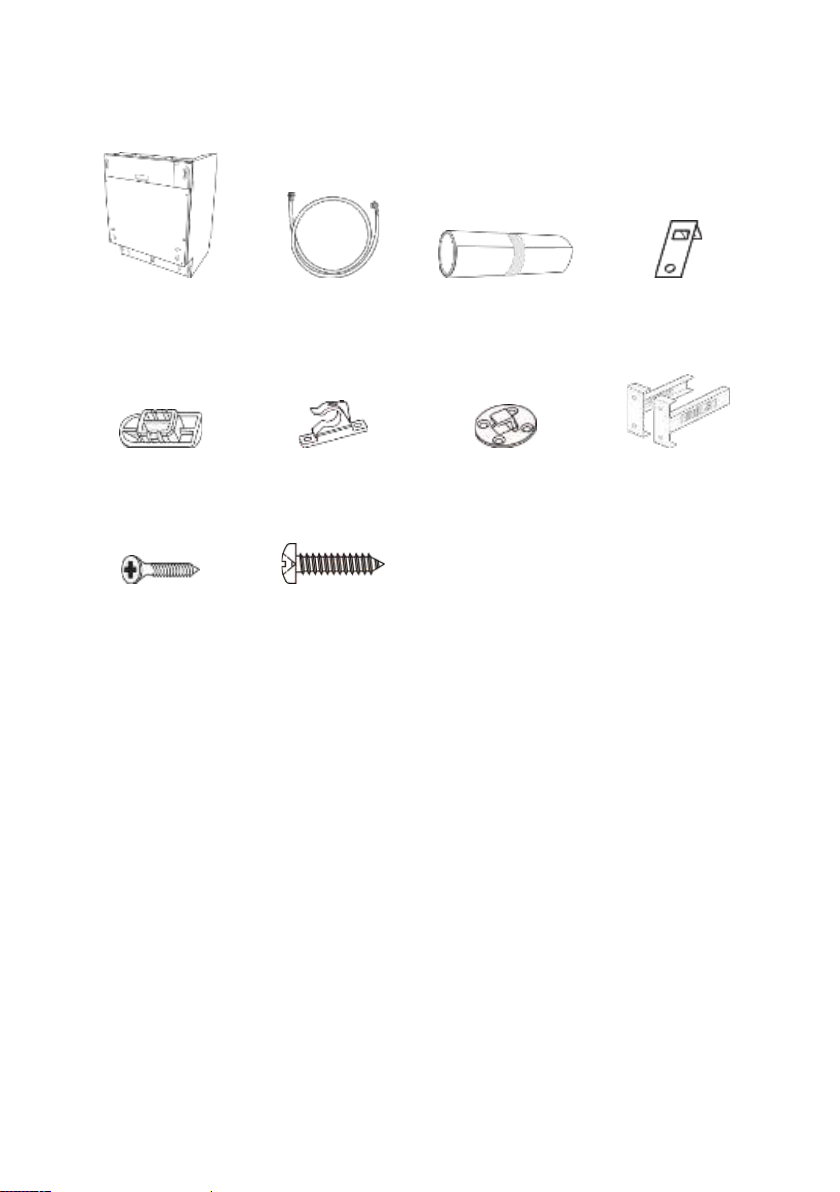
•The appliance has to be connected to the water sources using new
hose sets and the old hose-sets should not be reused.
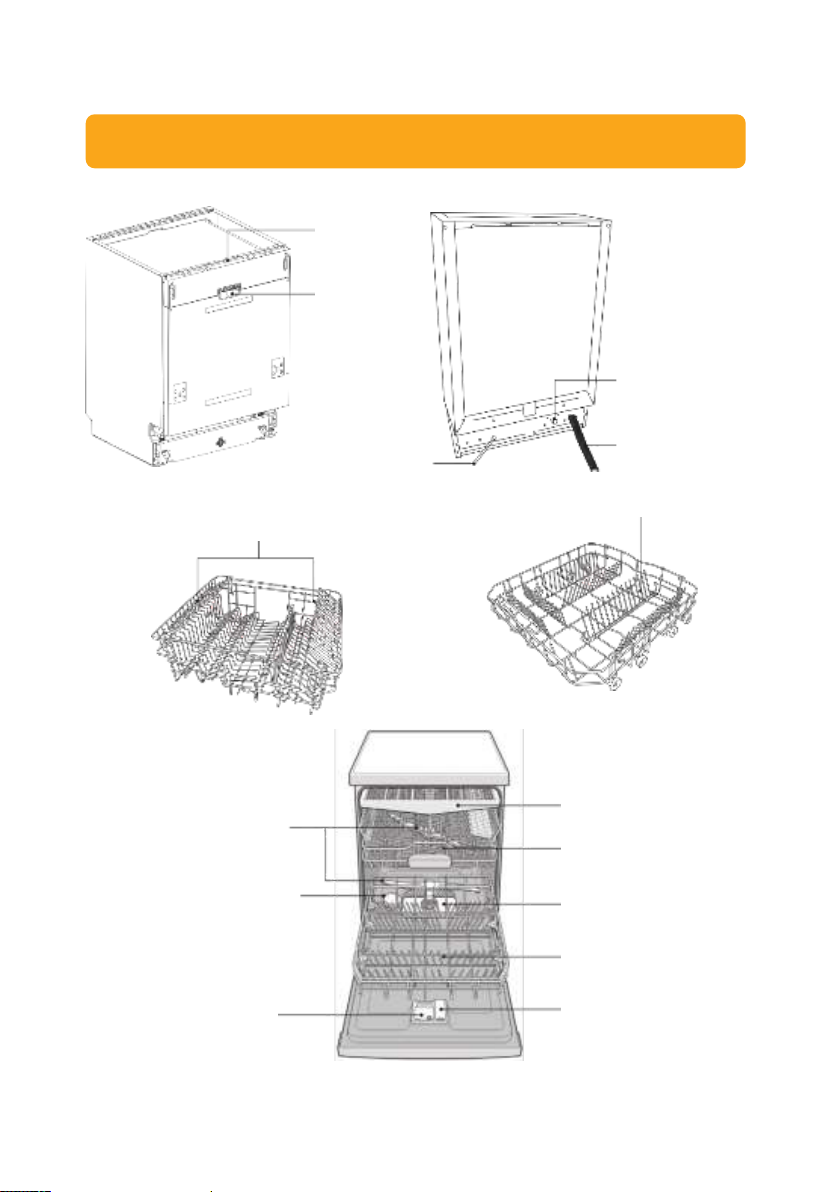
•The maximum number of place settings to be washed is 14.
•The maximum permissible inlet water pressure is 1 MPa.
•The minimum permissible inlet water pressure is 0.04 MPa.
Grounding Instruction
•This appliance must be grounded. When malfunction or breakdown
occurs, grounding will reduce the risk of an electric shock by
conducting the electric current to the ground. This appliance is
equipped with a grounding-equipped conductor cord and a
grounding plug.
•The plug must be plugged into an appropriate outlet that is
installed and grounded in accordance with all local regulations and
safety standards.
•Do not modify the plug provided with the appliance if it does not fit
with the outlet. Have a proper outlet installed by a qualified
electrician.
•Improper connection of the grounding-equipment conductor can
result in the risk of electric shock. Check with a qualified electrician
or service representative if you are in doubt whether the appliance
is properly grounded.

7
Environmental Notice
The packaging material used is recyclable. We recommend
that you separate plastic, paper and cardboard and give
them to recycling agents. According to WEEE (Waste of
Electrical and Electronic Equipment) guidelines, waste from
electrical and electronic devices should be collected
separately. If you need to remove of this appliance in the
future, do not throw it away with the rest of your domestic garbage.
Instead, please take the appliance to the nearest WEEE collecting
agents, where available.

8
PART 2: NAME OF PARTS
Control panel
Door handle
Main cable
Water inlet
Drain hose
Cup rack
Dish rack
Spray arms
Salt reservoir
Detergent dispenser
Rinse aid dispenser
Lower basket
Filter system
Upper basket
Cutlery basket

9
1 x main unit
1 x inlet hose
1 x condensation
strip
2 x upper bracket
2 x hole cover
2 x lower hook
2 x upper hook
2 x toe panel
mounting bracket
18 x ST4x14 screw
2 x ST3.5x16 screw

10
Installation Location
When selecting a position for your dishwasher you should make sure
the installation surface is flat and firm, and the room is well ventilated.
Avoid locating your dishwasher near a heat source, e.g. cooker, boiler
or radiator. Extreme cold ambient temperatures may also cause the
appliance not to perform properly. This dishwasher is not designed for
use in a garage or outdoor installation. Do not drape the dishwasher
with any covering. When installing, ensure that free space is left at the
sides.
Installation
1. Please ensure the
dishwasher is installed by a
qualified technician. Refer
to the tools required.
ATTENTION!
All parts removed must be saved to do the reinstallation in the
future. Ensure the dishwasher is unplugged and empty. We
recommend that 2 people handle the dishwasher during installation.
PART 3: INSTALLATION GUIDE

11
2. Ensure there is clearance
each side of the unit to
allow slight sideways
movement for servicing
when required. The height
of the unit is 815 mm. The
figure outlines the minimum
dimensions required to
accommodate the
dishwasher within fitted
kitchen furniture units.
3. Do not connect the unit to
the mains socket before
installation. Ensure you are
not installing the unit right
in front of the mains socket.
This is to avoid potential
damage to the back of the
unit.
4. The condensation strip
must be fitted to the
underside of the worktop
above your dishwasher to
protect it against any
moisture. Its purpose is to
protect your worktop’s
underside from steam rising
from the dishwasher.

12
5. Stick the condensation strip
to the underside of the
worktop. Ensure the
surface is clean prior to
sticking the condensation
strip to the underside of the
worktop. Failure to attach
the condensation strip
could result in damage to
the underside of your
worktop!
6. For Wooden Worktop Only:
Place the Installation Hook
to secure the unit as shown
7. Position the dishwasher
next to a water tap and a
drain. Ensure the water
inlet and drain hoses are
not kinked or squashed.
Leave some space
Stick the
Condensation Strip
under the worktop

13
The unit must not stand on
the mains cable.
8. Adjust the leveling feet and
ensure that the appliance is
level and stable. Level and
stable appliance ensures
the door to be fully closed.
Do not move the appliance
while the leveling feet is
adjusted!
9. Ensure the Aesthetic Door
weight is a minimum of 4 kg
and a maximum of 10 kg.
Drill the required holes
following the depth and
diameter of the dishwasher
door

14
10. Install the Upper bracket
(5) and Lower (6) bracket
onto the Aesthetic Door
using the provided ST4x14
screws (1)
11. Install the Aesthetic Door
onto the dishwasher door.
After the aesthetic door is
installed, the tension of the
dishwasher door spring can
be adjusted by rotating the
adjusting bolt. If the tension
is right, the door will remain
horizontal in the fully open
position.
12. Adjust the bolt to loosen or
tighten the tension of the
dishwasher door.

15
13. To secure the dishwasher under the table top, tighten the screws
as shown. Note their positioning for the different types of
worktops.
Wooden Worktop
Ceramic/Synthetic Worktop
14. Cut out a 589 mm wide
plinth for toe panel. Tape
the supplied toe panel
mounting brackets to the
toe panel as shown. Drill
the required holes.
Upper bracket
ST4x14
ST3.5x16
Hole cover
Adjust height

16
15. Determine the correct
position for the toe panel
mounting bracket, remove
the bracket and bend the
metal tab. This ensures that
the toe panel won’t slide in
further than you need.
16. Attach the toe panel
mounting brackets to the
toe panel. Align the screw
holes, then use the 4
screws ST4x14 to secure
the toe panel.
17. Insert the toe panel to the
dishwasher.

17
18. Make sure your plumbing is
suitable for use with the
dishwasher. If in doubt
contact a qualified plumber.
The appliance must be
connected using a new
hose. Do not reuse the old
hose! Inlet water pressure
must be at a minimum of
0.04 MPa and a maximum
of 1.0 MPa.
•Connect one end of the safety water supply hose to your
dishwasher, and then connect the other end of the hose to
your water mains. Please ensure the black rubber seal is in
place.
•After connecting the hose, turn on your water mains and check
for leaks.
•Connect the dishwasher to the mains socket.
NOTE!
The safety supply hose consists of the double walls. The hose’s
system guarantees its intervention by blocking the flow of water in
case of the supply hose breaking and when the air space between
the supply hose itself and the outer corrugated hose is full of water.
NOTE!
You may use a Y-Adaptor (not included) for an additional water feed
for another appliance, for example a washing machine. This is only
applicable for cold water mains.
Water
tap
Y Adaptor
(not
included)
Water inlet hose

18
•Do not bend your drain
hose.
•Secure the water drain hose
to the waste pipe to avoid it
coming off during the
washing process.
NOTE!
•The waste pipe must only be connected to the foul drains and
not the surface water drainage system.
•The water drain hose should be placed between 40-100 cm
from the floor level and must not be extended, otherwise the
unit may not be able to expel the waste water properly.
•Please close the water tap after using.
WARNING!
Before connecting to the waste pipe, make sure to check the waste
pipe and remove any stopper or blockage inside, otherwise the unit
may not be able to expel the waste water properly.

19
Control Panel
1
Power
Press this button to turn on the dishwasher. When turned
on the screen will light up.
2
Program
To select the appropriate washing program, the selected
program indicator will lights up.
3
Delay
Press this button to set the delay time for washing. You can
delay the washing up to 24 hours. One press of this button
delays the start of washing by one hour.
4
Program
Indicator
Auto
Washing program by automatically detect the level of soiled
tableware, with or without dried food particles.
Intensive
Heavily soiled items including pots and pans, and dishes
with sticky dried food particles.
Normal
For normally soiled loads, such as pots, plates, glasses and
lightly soiled pans.
ECO
This is the standard program suitable for normally soiled
loads, such as pots, plates, glasses and lightly soiled pans.
Glass
For lightly soiled crockery and glass.
90 Min
For normally soiled loads that need a quick wash.
Rapid
A shorter wash for lightly soiled loads that do not need
drying.
Soak
To rinse the dishes that you plan to wash later that day.
5
Display
To show the program, delay time, error code etc.
6
Status
Indicator
Rinse Aid
If the indicator is lit, it means the rinse aid is low and
requires a refill.
PART 4: HOW TO USE

20
Salt
If the indicator is lit, it means the dishwasher salt is low and
needs to be refilled.
Water Tap
If the indicator is lit, it means the dishwasher did not get
sufficient water supply
7
Function
Indicator
Power wash
To improve cleaning efficiency
Extra Drying
To improve drying efficiency
Express
To reduce wash program time
Energy Save
To reduce energy consumption
8
Dual Zone
Indicator
Upper: Upper basket wash indicator
Lower: Lower basket wash indicator
9
Function
Press this button to select additional function
10
Dual Zone
Press this button to select Dual Zone function
Before Using Your Dishwasher
•Set the salt setting
•Load the salt into the salt container
•Load the basket
•Fill the rinse aid and detergent dispenser
Filling The Salt Container
If your model does not have salt container, you may skip this section.
The salt container is located beneath the basket and should be filled as
follows:
Other manuals for Immacolato Series
1
This manual suits for next models
1
Table of contents
Other Modena Dishwasher manuals

Modena
Modena Adattare Series User manual

Modena
Modena WP 7121 S Owner's manual

Modena
Modena WP 7090 WBR Owner's manual

Modena
Modena WP 2081 W Owner's manual

Modena
Modena WP 600 User manual

Modena
Modena WP 7134 WVM Owner's manual

Modena
Modena Immacolato Series Owner's manual

Modena
Modena WP 1200 FDWH Owner's manual