Modena Vicino Series Owner's manual

User
Manual Book
Built-in Microwave Oven
Vicino Series
BV 6435
BV 3435

2
TABLE OF CONTENTS
Part 1: Safety Warnings 3
Part 2: Name of Parts 4
Control Panel 4
Display 5
Part 3: Installation 5
Installing the Oven into Kitchen Set 5
Electrical Connections 7
Part 4: How to Use 8
Operation 8
Programme/Function 8
Microwave Oven Functions 11
Auto Cooking 14
Defrost Time Table 16
Part 5: Maintenance 16
Cleaning the Oven 16
Changing the Oven Light 17
Removing the Oven Door 17
Inspecting the Seal 17
Part 6: Troubleshooting 18
Part 7: Precaution 19
Advice and Precautions 19
General Safety Instructions 19
Part 8: Specification 21
This guide book explains everything you need to know about your new
product. Please contact our Customer Care should you need further
assistance through www.modena.com

3
•Please independently use sockets with rated current above 25A. Reliable
grounding must be guaranteed. Please do not use loose or poor contact power
sockets, or it easily leads to electric shock, short circuit and fire; if the
equipment share one socket with other electric appliances, fire may be caused
for abnormal heating.
•When unplugging socket, hold the plug end with a hand to pull it out; do not
unplug with the hand holding power cord, otherwise electric shock, short
circuit, fire and other dangers will be caused.
•Only professional repair technicians can disassemble, repair and transform the
equipment.
•If the equipment is idle for a long time, please unplug the power plug or turn
off the power supply of the product.
•Accessible parts may become hot during use. Keep children away from the
appliance.
•This appliance is not intended for use by persons (including children) with
reduced physical, sensory or mental capabilities, or lack of experience and
knowledge, unless they have been given supervision or instruction concerning
use of the appliance by a person responsible for their safety.Children should
be supervised to ensure that they do not play with the appliance.
•If the supply cord is damaged, it must be replaced by the manufacturer, its
service agent or similarly qualified persons in order to avoid a hazard
PART 1: SAFETY WARNINGS

4
Information:
1
Display screen
2
Control Panel
3
Rack stand
Control Panel
Information:
1
Power Button
6
Up
2
Program Button
7
Down
3
Timer
8
Select
4
Temperature (°C)/Power (Watts)/
Weight (grams)
9
Light / Child Lock
5
Auto Cooking
10
Start / Pause
PART 2: NAME OF PARTS

5
Display
Information:
1
Program / Function
8
Child Lock
2
Microwave
9
Light
3
Defrost
10
Alarm
4
Auto Cooking
11
End time
5
Temperature / Power / Weight
12
Duration Time
6
Timer
13
Temperature
7
Time
Pull the plug out of the power socket before installation or maintenance process.
Installation can only be done according to the guide by a certified professional
technician.
MODENA disclaims any responsibility on any human, animal, or property damage
due to improper installation.
Installing the Oven into Kitchen Set
•The kitchen set where the oven will be placed should be heat resistant.
•Use the appropriate kitchen set to ensure that the unit can work well. Frame
or panels in contact to the oven must be made of heat-resistant material.
•Cabinet with lacquer-coated exterior must be assembled with adhesives that
can with stand temperatures up to 100°C.
PART 3: INSTALLATION

6
•Put / insert oven into the kitchen set hole by installing a screw type A into the
four holes in the oven. Screws can be found on the side of the oven frame.
•For the most efficient air circulation, the oven must be installed in accordance
with the dimensions shown in Figure 1-2.
•The back panel of the cabinet should be removed to allow free circulation of
air. Panel where the oven is placed should have a free space at least 7cm at
the back of the oven.

7
•The oven will become hot when in use. Be careful and avoid touching the
heating elements inside the oven.
•The reachable components can be hot when in use. Keep children away from
the oven.
•Do not use abrasive or sharp cleaner to clean the oven door’s glass as it may
scratch and break the glass.
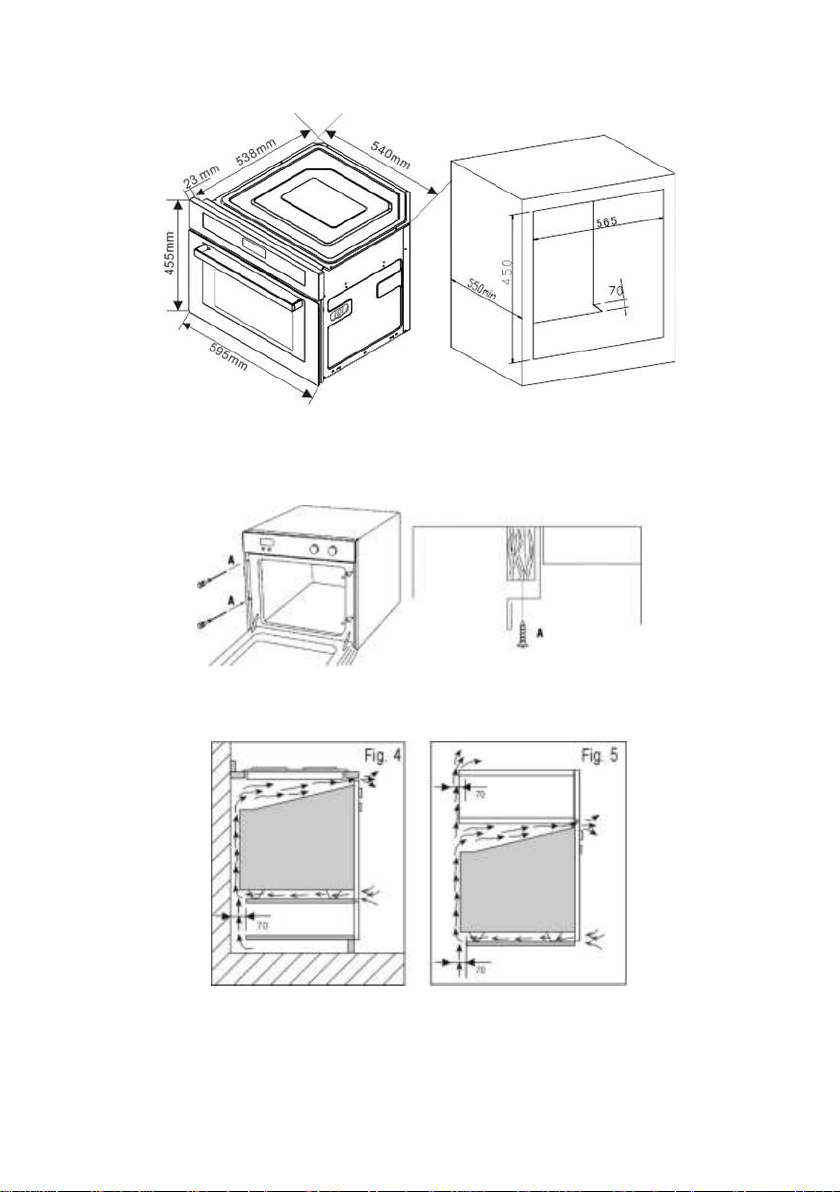
For a built-in oven, the cabinet should be compatible with the oven.
Furniture panels around the oven must be heat-resistant, especially if the
furniture are made of plywood. The plywood adhesive should be resistant to heat
of 120°C. Plastic or adhesive that is not heat resistant to the temperature may
change the shape or fall off.
To meet the safety measures, after the oven is installed, avoid any contact with
components that are connected to electricity.
Electrical Connections
This oven should be installed properly to secure the electrical appliance’s safety.
During the installation and
maintenance process, the plug must be detached from the electrical socket;
circuit breaker must be turned off or disconnected. Electrical connections should
be established and completed before oven is installed on the cabinet.
Make sure that:
a. The electricity has enough voltage.
b. The cables are in good condition.
c. Cables’ diameter should meet the requirements of installation.
Electrical cable for the oven should be standardized with 3 pole power cords with
the cross-sectional area of 1,5 mm2 (1 current + 1 neutral + arde) that should be
connected to a single-phase electric power 220-240V through a CEI 60083
standardized electrical socket with (1 current + 1 neutral + arde) nodes or a device
that disconnects all the poles according to general electrical installation
requirements.
NOTE:
If the oven will be installed together with another oven, follow the
instructions on the other oven’s guide book.

8
MODENA is not taking any responsibilities after any accidents caused by the
grounding that is not installed or not functioned properly.
Call a professional electrician if you need some changes on your house’s
electricity installation.
If problem occurs, remove the plug from the socket or disconnect the circuit
breaker in the part of the electrical network where the oven is installed.
Operation
Press the button to turn the oven on. When turned on, the display will light up
and the time of day will be shown.
Programme/Function
To select a function, press the button to toggle through the functions and
press once you have reached the required function. Press the button to
enter the temperature(℃), power(W), or weight(g) mode depending on what
function has been selected.
To adjust temperature, power or weight, use the / keys followed by
to confirm.
Once confirmed, press the button to start cooking. The main timer will show
the actual temperature, with the set temperature shown above this.
NOTE:
•
Grounding cable (green-yellow) is connected to the oven
terminal and must be connected to electric power’s grounding
terminal.
•
After the installation process is completed, the electricity from
the oven to the power source should be able to be
disconnected with an easily accessible plug or using a switch
on electric wires where the oven is placed according to
installation regulation. Circuit breaker where the oven is
installed should have the capacity of 16 ampere.
•
If the cable is broken, cable should only be replaced by
MODENA or their service agent, or a similar qualified
technician to avoid electrical hazard.
PART 4: HOW TO USE

9
Light Function
Press the button once to turn the internal microwave oven light on & off. The
lights will automatically turn off after 3 minutes of idle. When the light is activated
the symbol will be shown on display.
Child Lock
Hold the button for 2-3 seconds to activate the child lock. To deactivate, press
and hold the button again for 2-3 seconds.
When Child Lock is activated, the symbol will be shown on the display.
Alarm setting
To set the Alarm/minute minder, press the button until the symbol starts
to flash. Use / keys to adjust the time, and then press to confirm. If
you want to cancel the alarm, se the alarm time back to ‘0.00’ and press to
confirm. When the time is up, the alarm will sound for 90 seconds, and the
symbol will begin to flash. To stop the alarm, press any button.

10
Setting the time
To set the time, turn the oven on, and then press and hold the button for 3
seconds until the time begins to flash. Adjust the time using the / keys
and then press to confirm.
When the oven is first turned on or restarts, the time must be set before using the
oven.
Duration Cooking(0-10hrs)
Once a function and temperature have been selected, press the button for 3
seconds until the time begins to flash. Adjust the time using the / keys
and then press to confirm.
Once the time is up, the alarm will sound and the oven will switch off. Press any of
the buttons to turn off the alarm / , and .
To cancel Duration cooking set the cooking time to ‘0,00’ and confirm.
End Cooking Time
Once the Duration cooking time has been set, press twice and the End
cooking time should start to flash. Adjust the time to the time you wish
cooking to stop and press to confirm.
Your oven will then work out when to turn on, so that it cooks for the required
duration time, and finishes at the required end time. E.g. Duration time set at
30minutes, and the end time set to 18.15, the oven will automatically turn on at
17.45 and cook for 30 minutes on the set function and temperature (start
time=End time-Duration time.

11
Microwave Oven Functions
Function
Description
Display
Microwave –Default power P100 ( power
range P10 –P100 )
To adjust the power, press / until
the correct power is reached followed by .
Default time is 30 seconds. To adjust the time
press the button followed by the /
and to confirm.
The time will increase in 30 seconds increments
( Max 60 mins ).
Note The Duration time when using the
microwave function will display
‘minutes:seconds’, in all other function it will
show ‘ hours : minutes’.
Finally press to start the program.
Defrost –Default weight 1000g (weight range
100 –2000 g )
To adjust the weight press the button
followed by the / and to
confirm.
Finally press to start the program. The
default time will be adjusted according to the
set weight (See the ‘Defrost time table‘ for
more info)
Fan Heat –Default temperature 200 °C
To adjust the temperature press
followed by . Press to confirm.
The default time is 1.00 hr. To adjust the time,
press the button followed by the ,
and to confirm.
Finally press to start the program.

12
Function
Description
Display
Turbo Grill –Default temperature 200 °C
(Temperature range 50 - 220 °C)
To adjust the temperature press the
button followed by the / and
to confirm.
The default time is 1.00 hr. To adjust the time,
press the button followed by the ,
and to confirm.
Finally press to start the program
Turbo Conventional –Default temperature
200°C (Temperature range 50 - 220°C)
To adjust the temperature press the
button followed by the / and
to confirm.
The default time is 1.00 hr. To adjust the time,
press the button followed by the ,
and to confirm.
Finally press to start the program
Microwave & Fan heat –Microwave Default
power P50 (power range P10 –P50)
Fan heat default temperature 200 °C
(Temperature range 50 –220 °C)
Press once to enter the microwave
power mode, and then again to enter the fan
heat temperature mode. These can
both then be adjusted using the /
and to confirm.
The default time is 1.00 hr. To adjust the time,
press the button followed by the ,
and to confirm.
Finally press to start the program.

13
Function
Description
Display
Microwave & Turbo Grill –Microwave Default
power P50 (Power range P10 –P50)
Fan heat default temperature 200 °C
(Temperature range 50 - 220°C)
Press once to enter the microwave
power mode, and then again to enter the fan
heat temperature mode. These can
both then be adjusted using the /
and to confirm.
The default time is 1.00 hr. To adjust the time,
press the button followed by the ,
and to confirm.
Finally press to start the program.
Microwave & Turbo convectional heat –
Microwave Default power P50 (Power range
P10 –P50)
Fan heat default temperature 200°C
(Temperature range 50 - 220°C)
Press once to enter the microwave
power mode, and then again to enter the fan
heat temperature mode. These can
both then be adjusted using the /
and to confirm.
The default time is 1.00 hr. To adjust the time,
press the button followed by the ,
and to confirm.
Finally press to start the program.

14
Auto Cooking
Example
Milk (Auto Program)
Press the auto program button until the
milk symbol is displayed.
Press to enter the Weight selection.
use / to adjust the weight and
to confirm.
The default time will be adjusted according
to the weight selected.
Finally press to start the program.
Symbol
Default Weight
Weight Alternatives
(g)
Function
Duration (Minutes)
250 g
250
Microwave
2
500
Microwave
4
500g
500
Microwave
19
800
Microwave
22
300g
300
Microwave
5
600
Microwave
8
200g
100
Microwave
2
200
Microwave
4
300
Microwave
5
400
Microwave
6
500
Microwave
7
600
Microwave
8
200g
100
Microwave
1
200
Microwave
2
300
Microwave
3

15
Symbol
Default Weight
Weight Alternatives
(g)
Function
Duration (Minutes)
500g
100
Microwave
3
200
Microwave
5
300
Microwave
6
400
Microwave
7
500
Microwave
8
600
Microwave
9
700
Microwave
10
800
Microwave
11
900
Microwave
12
1000
Microwave
13
500g
200
Microwave
7
300
Microwave
8
400
Microwave
10
500
Microwave
12
600
Microwave
14
800
Microwave
16
1000
Microwave
19
1000g
200
Microwave +
Grill
15
400
Microwave +
Grill
20
600
Microwave +
Grill
25
800
Microwave +
Grill
30
1000
Microwave +
Grill
32
1200
Microwave +
Grill
35
1400
Microwave +
Grill
40
1600
Microwave +
Grill
46
1800
Microwave +
Grill
52
2000
Microwave +
Grill
56

16
Defrost Time Table
The maximum weight for defrost is 2000g. The default defrost time will be
adjusted according to different weight selected.
Weight (Grams
Time (Minutes)
Weight (Grams)
Time (Minutes)
100
3
1100
22
200
5
1200
24
300
6
1300
26
400
8
1400
28
500
10
1500
30
600
12
1600
32
700
14
1700
34
800
16
1800
36
900
18
1900
38
1000
20
2000
40
•Wait until the appliance has cooled down before attempting to clean it.
•Disconnect it from the power supply, either by pulling the plug out or
switching off the power supply at the mains.
•Do not leave corrosive or acidic substances (lemon juice, vinegar, etc.) on
enameled, painted or stainless steel parts.
Cleaning the Oven
•After finish used the oven, let the oven door is open for a few minutes so that
the oven is no hot.
•The inside of the oven should ideally be cleaned after each use.
•Clean the oven if whilst the oven is still warm (no hot), so that the food
spillages on the oven surface can be removed easily.
•Clean the rubber, stainless or parts are coated with enamel or chrome using a
soft sponge and warm soapy water or liquid detergent that is not abrasive.
Use special products to remove stubborn stains. After cleaning, dry the unit
until it is completely dry.
PART 5: MAINTENANCE

17
•All accessories - with the exception of sliding shelves - can be washed like
every day cooking equipment and also safe if washed using a dishwasher.
•Do not use any type of steam cleaners or high-pressure cleaning unit.
Changing the Oven Light
•Disconnect the oven from the power supply,
either by pulling the plug out or by switching off
the power supply at the mains;
•Remove the protection glass (A) and replace the
burnt out bulb with one of the same type
•Install the cover protection “A”.
Removing the Oven Door
To water down in cleaning oven, door oven earn
released by:
•Insert hook A (pic. beside) in hinge slot B.
•Half open the door and, using both hands, pull
the door towards you until it becomes
unhooked.
•To refit the door, carry out the same operation
in reverse, taking care to introduce the two
sectors C correctly.
Clean the glass with a sponge and cleaning products are
non-abrasive, then dry with a soft cloth. Do not use
materials that are abrasive or have sharp surfaces as it
can scratch the surface and cause the glass to crack.
Inspecting the Seal
Check the seals around the doors on a regular basis. If the seal is damaged,
contact the service center MODENA for repair or replacement. It is advisable not
to use the oven for separately seals have not been replaced or repaired.
PART 6: TROUBLESHOOTING

18
Make a check against the things below before contacting our Service Center, if
there is interference on your gas oven:
Problem
Possible Cause
Recommended Action
The upper crust is
dark and the lower
part too pale
Not enough heat
from the bottom
•
Use the natural convectionposition
•
Use deeper cake tins
•
Lower the temperature
•
Put the cake on a lowershelf
The lower part is
dark and the upper
crust too pale
Excessive heat from
the bottom
•
Use the natural convectionposition
•
Use lower side tins
•
Lower the temperature
•
Put the cake on a higher shelf
The outside is too
cooked and the
inside not cooked
enough
Too high
temperature
Lower the temperature and increase
the cooking time
The outside is too dry
even though of the
right color
Too low
temperature
Increase the temperature and reduce
the cooking time.

19
Advice and precautions
This unit is designed and manufactured in compliance with international safety
standards. Warnings and instructions below is for safety reasons and must be
read and followed carefully.
General Safety Instructions
•The unit is designed for household use and for use indoors and is not intended
for commercial use or industry.
•Unit should not be installed in an open area. Very dangerous to let the unit
exposed to rain and typhoon.
•When move and install the unit always use the handrail available in the oven.
•Do not touching the side of the unit with bare feet or wet conditions or wet
hands and feet.
•Unit should be used only by adults to prepare the dish accordance with the
instructions in the guide book.
•Do not touch the heating element or a particular part of the oven door when
the unit is used, since some parts become very hot. Keep children away from
the oven and do not touch the hot parts of the electrical wiring directly.
•Make sure other electronic equipment not in contact with the hot parts oven.
•The open for ventilation and heat dissipation should not obstruct.
•Always grasp handle of the oven in the middle, the end part of the handle
could be hot.
•Always wear gloves when placing or removing the cutlery into or out of the
oven.
•Do not use aluminum foil to line the bottom oven.
•Do not put combustible materials in the oven, if the unit is accidentally turned
on, these material can burn.
•Always make sure the knob on the position when the unit is not in use.
•When you disconnect the power cord, always pull from the cable
head, do not pull the cord.
•Always unplug the power cord from its source when doing maintenance or
repairs to the unit. If there is damage on the unit, however, do not try to fix it
by yourself. Repairs that carried out by inexperienced person could potentially
PART 7: PRECAUTION

20
cause injury or further damage to the unit. Contact MODENA authorized
service center for repair.
•Do not laying or leaning heavy objects on the oven door.
•Do not let the children play with the unit.
•Units are not to be used by people (including children) with a lack of physical
abilities, sensory, or mental, or lack of experience and knowledge about these
products, unless they have been given supervision or instruction concerning
the use of tools by a person responsible for their safety.
•Always turn off the oven before removing the oven rack and plates.
•During the cooking process, fats or oils should be treated with caution because
this material is likely to cause a fire if it reaches a certain temperature..
•When you smell gas, immediately release the regulator from the gas tank, do
not light a fire and immediately contact MODENA Service Center.
•Frequently check the gas hose, to make sure that gas hose is far from hot
surface, and not in bent position. Make sure the outer surface of hose isn’t
cracked so that can be a leakage.
•Always remember that territory around the gas stove can be hot for the long
time (around 30 minutes) after you turn off the gas stove.
•Do the routine service on your built-in oven every 3 (three) month, because if
the is something wrong on your Built-in oven, you can immediately detect and
repair.
Other manuals for Vicino Series
5
This manual suits for next models
2
Table of contents
Other Modena Microwave Oven manuals

Modena
Modena MG 2517 WAM Owner's manual

Modena
Modena MV Series User manual

Modena
Modena MG Series User manual

Modena
Modena Agiato Series Owner's manual

Modena
Modena MK Series User manual

Modena
Modena MG Series Guide

Modena
Modena MG Series User manual

Modena
Modena Agiato Series Owner's manual

Modena
Modena MG 3116 Owner's manual

Modena
Modena MO Series User manual