MOISWELL Explorer V164 User manual

Commercial Grade Dehumidifier
User Manual
Model No.: Explorer V164
Please read this User Manual before operating and save for future reference.

Welcome
Thanks for choosing MOISWELL dehumidifier!
Moiswell is offering high-quality commercial and industrial dehumidifier for sales
including in both vertical and horizontal orientations. These commercial dehumidifiers
reduce humidity levels quickly, being particularly ideal for excess water removal,
high-speed construction drying, water damage restoration tasks. With an onboard
humidistat, these commercial dehumidifiers will maintain the room humidity level at
the setting level, providing effortless humidity control in warehouses, storage areas,
manufacturing plants, office buildings, restaurants, bars, sports facilities, locker rooms,
indoor pool and spa environments, marine environments, and other areas that are
vulnerable to excessive humidity.
We do hope you'll enjoy the dehumidifier you purchased from us.
Before plugging in your new dehumidifier, we suggest that you read this user manual
as it contains important safety information, operation instructions, troubleshooting,
maintenance tips, and warranty information to ensure the reliability and longevity of
your dehumidifier.
We also kindly ask you to take a few minutes to register your product at
www.moiswell.com for more efficient support.
It is our goal that you are always happy with what you bought from us, so
please let us know if your buying experience was anything short of excellent.
We're always just an email away
To access customer support, please email to service@moiswell.com with your
purchase order ID to help us address the problem faster and serve you better.
Thank you again!

BEFORE FIRST USE:
Please leave the dehumidifier standing upright and outside the box for
24 HOURS before plugging it in.
The dehumidifiers may have been tilted or placed upside down during shipping. Leave the
dehumidifier to stand upright for 24 hours so the oil in the compressor can settle from the
move, not doing so can affect the performance or lifespan of the dehumidifier.

CONTENTS
SAFETY INFORMATION.........................................................................................................................................1
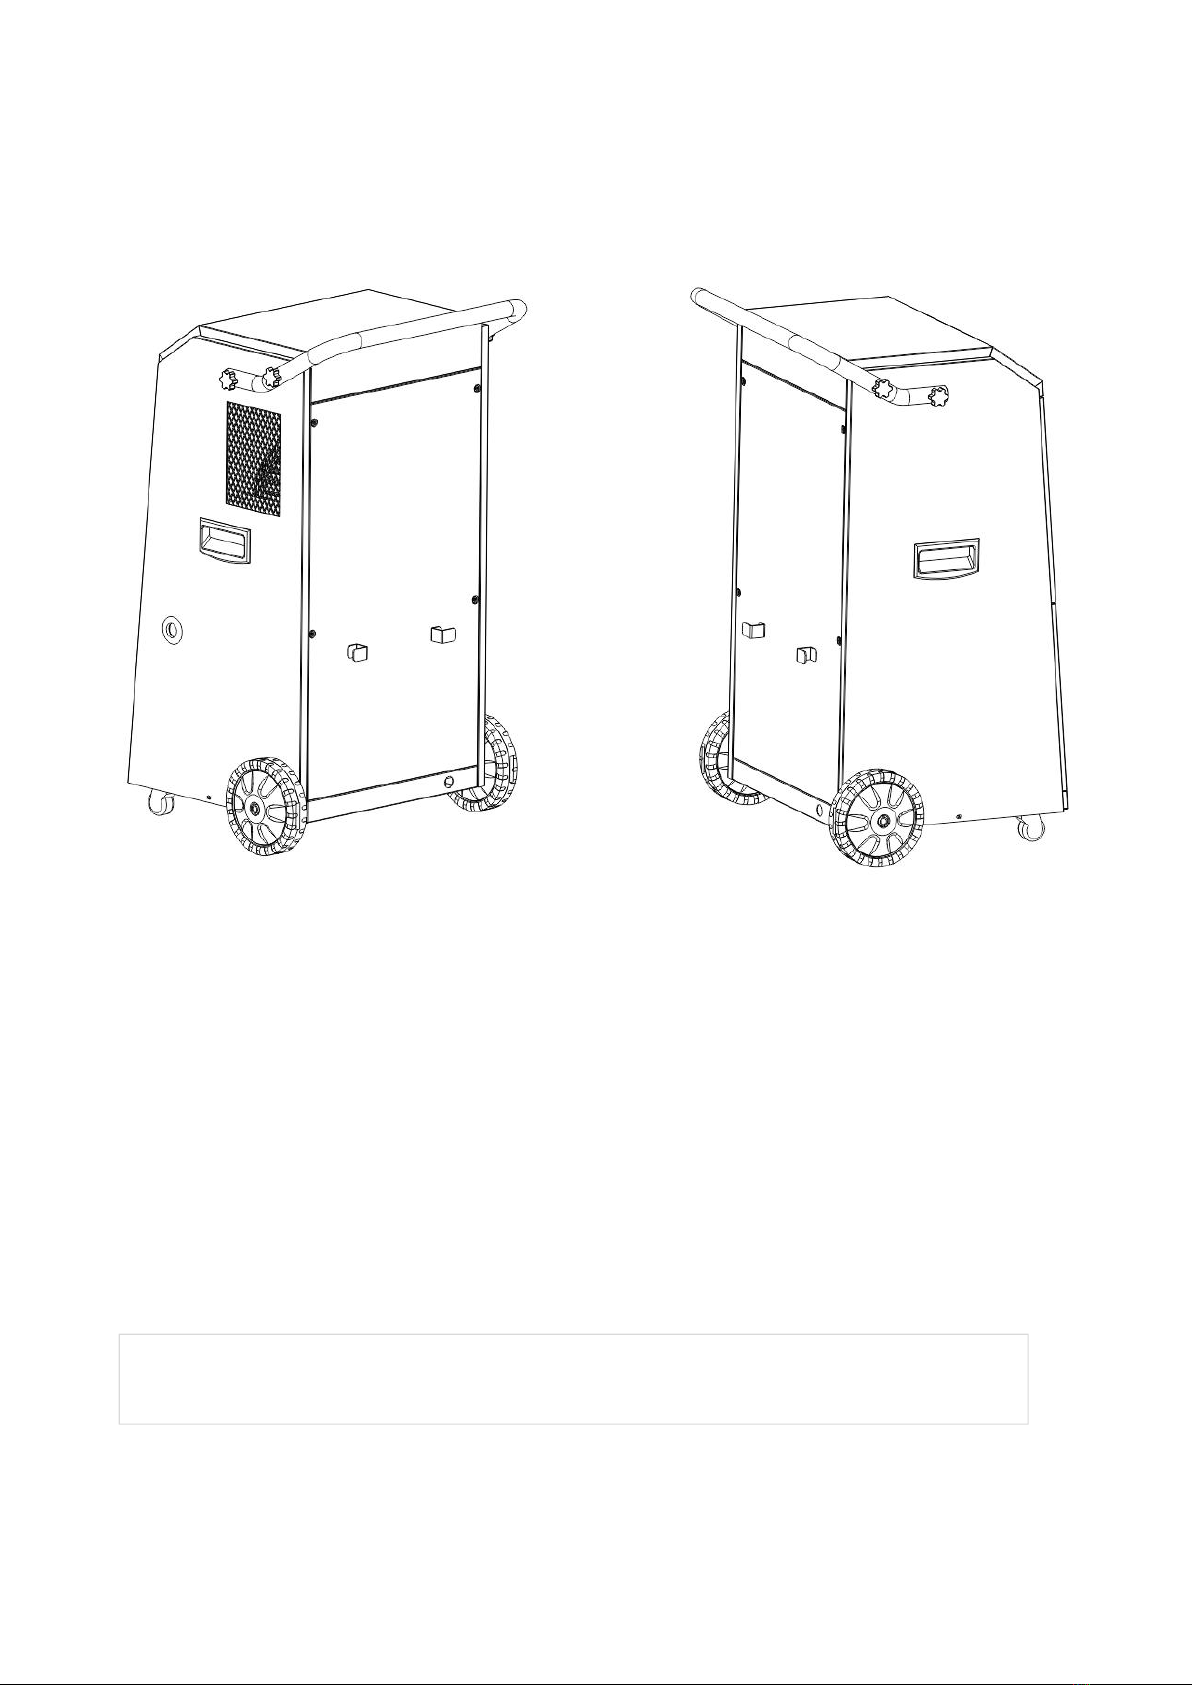
PARTS IDENTIFICATION........................................................................................................................................2
OPERATION INSTRUCTIONS...............................................................................................................................3
1. Install the Handle........................................................................................................................................3
2. Position Your Dehumidifier.....................................................................................................................4
3. Plug in Electrical Cord............................................................................................................................... 4
4. Understand the Control Panel............................................................................................................... 5
(1) What is on the LCD Screen? ..........................................................................................................5
(2) Understand the Control Buttons................................................................................................. 6
5. General Operation Instructions ............................................................................................................. 6
(1) Turn the dehumidifier on ............................................................................................................... 6
(2) Set a desired humidity percentage value................................................................................ 6
(3) Turn the dehumidifier off...............................................................................................................7
6. Timer Setting................................................................................................................................................ 7
7. Drain Collected Water ...............................................................................................................................8
(1) Emptying the Water Bucket.......................................................................................................... 8
(2) Continuous Drain by Gravity.........................................................................................................9
8. Smart Functions........................................................................................................................................ 10
(1) 3 Minutes Compressor Delay Mechanism............................................................................ 10
(2) Auto Defrost..................................................................................................................................... 10
(3) Auto-Restart......................................................................................................................................10
(4) Temperature Protection Function............................................................................................ 10
TECHNICAL SPECIFICATIONS...........................................................................................................................11
MAINTENANCE................................................................................................................................................... 12
(1) Cleaning the Dehumidifier ..................................................................................................................12
(2) Cleaning the Air Filter........................................................................................................................... 12
(3) When Not Using dehumidifier for Long Periods of Time.......................................................13
TROUBLE SHOOTING GUIDE............................................................................................................................14
WARRANTY............................................................................................................................................................. 16

1
SAFETY INFORMATION
To prevent injury and property damage, the following instructions must
be followed when using the dehumidifier.
• Install the dehumidifier on flat surface to minimize vibration and or noise.
• Inspect the power cord before use. Never operate the dehumidifier when the power cord
or plug is damaged.
• Insert the three-prong plug on the power cord into a matching electrically grounded outlet
(120V/ 60 Hz, 16A at least).
• Never cut off the third prong. Do not modify power cord length.
• Do not operate the dehumidifier in standing water. Keep motor and wiring dry.
• Never immerse the dehumidifier into water or other liquids.
• Do not put the dehumidifier close to heat-generating devices, including flammable or
dangerous materials.
• Unplug the power supply before cleaning or storing the dehumidifier. Always grasp the
plug (not the cord) to unplug.
• Do not put fingers or other items into air inlet or air outlet.
• Never insert any other objects into the dehumidifier body.
• Do not sit, stand or put heavy objects on the dehumidifier.
• Make sure to turn off and unplug the dehumidifier before cleaning.
• Disconnect the power if strange sounds, odors, or smoke come from the dehumidifier.
• Do not operate or turn off the dehumidifier by plugging in or unplugging the dehumidifier.
Use the control panel instead.
• This dehumidifier should only be used by adults who have read the manual and understand
the operating procedure of the dehumidifier.
• The dehumidifier is not to be used by persons (including children) with reduced physical,
sensory or mental capabilities, or lack of experience and knowledge, unless they have been
given supervision or instruction by an adult.
• This appliance is not intended for use by persons (including children) with reduced
physical,sensory or mental capabilities, or lack of experience and knowledge, unless they
have been given supervision or instruction concerning use of the appliance by a person
responsible for their safety.
• Children should be supervised to ensure that they do not play with the appliance.

2
PARTS IDENTIFICATION
NOTE: DO NOT OBSTRUCT THE AIR INLET OR OUTLET.
Note: the technical parameters of this product are subject to the nameplate of the product.
1. Handle
2. Air Inlet
3. Power Cord
4. Drain Outlet
5. Control Panel
6. Air Outlet
7. Wheel
8. Spring Lock

3
OPERATION INSTRUCTIONS
1.Install the Handle
1) Unscrew the pre-installed hand screws on both sides of the handle to take the handle off.
2) Install the handle as illustrated below, please note to align the holes on the handle with
the holes on the dehumidifier.

4
3) Tighten the 4 hand screws securely until the handles secure tightly against the
dehumidifier.
2. Position Your Dehumidifier
For best results, operate your dehumidifiers in an enclosed area. Close all doors and
windows. Place your dehumidifier away from obstructions, and keep it away from anything
that could block airflow into and out of the dehumidifier.
3. Plug in Electrical Cord
The dehumidifier needs to be plugged into a properly grounded 120 volt outlet rated for at
least 16 amps. Uncoil the power cord and plug it firmly into a suitable outlet.
IMPORTANT
Please let the dehumidifier stand upright for 24 hours before initial plugging in.

5
Note: When the dehumidifier is first plugged into AC power, the control panel display will light up for
a second, which is part of the dehumidifier’s self-diagnosis procedure and no user intervention is
required.
4. Understand the Control Panel
The control panel on the dehumidifier has an LCD screen and 4 buttons. Press the POWER
Button to turn the dehumidifier on. The LCD screen will light up and display the readouts as
below.
(1) What is on the LCD Screen?
Big Font Digital Number (43 RH% on the above illustration) is humidity percentage reading of
the inlet air that the dehumidifier detects which is similar to the room humidity level. When
you are pressing the ↑or ↓button to set a desired humidity percentage value, the big font
digital number will turn to display the setting value and flash.
Small Font Digital Number (34 °F on the above illustration) is temperature reading of the inlet
air which is similar to the room temperature. However, if the timer function is being set or
has been activated, the small font digital number will turn to display the timer setting value
or time remaining.
Running Icon:Running icon flickers typically because the compressor has not kicked
in. It usually happens 1) when the dehumidifier is under the 3-minute compressor delay
status; 2) when the dehumidifier is programmed to delay-start (AUTO ON TIMER).
Wet Controller Icon: Wet Controller Icon flickers when the room humidity level (inlet
humidity reading) is 3% lower than the set humidity.
1) When you see the “wet controller” icon illuminating while setting up, it typically means the
set humidity level is not 3% lower than the inlet humidity reading. Please make sure the set

6
humidity value is at least 3% (10% recommended) lower than the inlet humidity reading.
2) In Humidistat Mode, if you see “wet controller” icon illuminating after running the
dehumidifier for a while, it means the dehumidifier has got the room humidity down to the
set point and the dehumidifier enters into standby mode.
Defrosting Icon: The dehumidifier begins to defrost when the frost has accumulated
on the interior of the dehumidifier. When the dehumidifier is defrosting, the fan is running,
but the compressor is not, the defrost icon is flashing. The dehumidifying function will cease
until the frost has melted. When defrosting is complete, the defrosting Icon will disappear
and the dehumidifier begins to dehumidify again automatically.
Note: The frequent defrost process indicates that the room temperature is too cold.
Therefore, if the room temperature is lower than 60°F, please consider adding heat to
promote proper drying.
Fan Icon: The fan icon illuminates when the fan is running.
Water Droplets Icon: The water droplets icon illuminates when the compressor kicks in,
which means the dehumidifier is dehumidifying. When the compressor delays to start due to
the 3-minutes delay system, this icon flickers.
Caution: Water tank must place in right position,other wise will cause the waterfull alarm.
Timer Icon: Timer icon illuminates when the timer function is enabled.
(2) Understand the Control Buttons
Power Button: Press to turn the dehumidifier ON or OFF.
Up Button: Press ⬆to increase the set-point of humidity level or timer.
Down Button: Press ⬇to decrease the set-point of humidity level or timer.
Timing/Function Button: Press once to check the settings. Press and hold for 3 seconds to
enter Timer setting system.
5. General Operation Instructions
(1) Turn the dehumidifier on
Press the Power Switch to turn the dehumidifier on.
(2) Set a desired humidity percentage value
Press ⬆or ⬇button to set your desired humidity percentage value between 10%-98% in
increment of 1%. 40%-60% is a general humidity setting guide. After selected the target
value, press Timing/Function Button to confirm your setting, or let the setting be registered
automatically after 5 seconds of no operations on the control panel.

7
Note:
·The dehumidifier with a humidistat will stop and start automatically to maintain room humidity level
within a range of ±3% of the set point.
For example, if the set humidity is 50%,
- when the inlet humidity level the dehumidifier detects is 47%, 3% lower than the set humidity, the
dehumidifier will automatically stop and enter into “wet controller” mode.
- when the inlet humidity level the dehumidifier detects raises to 53%, 3% higher than the set
humidity, it will automatically restart.
·However, if the set humidity level is equal to or lower than 30, the dehumidifier will enter
CONTINUOUS MODE where the dehumidifier will run continuously.
(3) Turn the dehumidifier off
Press the Power Switch to turn the dehumidifier off.
Note: To protect the compressor, the fan will continue to operate for 5 seconds after the dehumidifier
has shut off. So please do not disconnect the power cord to force the dehumidifier to stop. Always
use the power button.
6. Timer Setting
The TIMER function enables you to either delay AUTO-ON or delay AUTO-OFF the
dehumidifier in the choice from 1 hour to 24 hours.
· Setting an AUTO-ON timer: When the dehumidifier is off, selecting Timer will turn the
dehumidifier on in the hours that will be set.
· Setting an AUTO-OFF timer: When the dehumidifier is on, selecting Timer will turn the
dehumidifier off in the hours that will be set.
Follow the below steps to set the TIMER:
1) Press and hold the Timing/Function Button for about 3 seconds, until you see the TIMER
icon lights up and the small font digital number changes into 00 Hand flashes;
2) Adjust the timer setting by pressing ↑or ↓button repeatedly to change the delay timer
at 1-hour increments, up to 24 hours.
3) After selected the target timer value, press Timing/Function Button to confirm your
setting, or let the setting be registered automatically after 5 seconds of no operations on the
control panel.
4) The small font readout will count down the time remaining (8,7,6, etc.) until the
dehumidifier either starts or stops.

8
5) To disable the timer function, manually turn ON/OFF the dehumidifier, or set the timer to
00 H.
Note:
·Before entering the AUTO ON TIMER setting, make sure power is being supplied to the dehumidifier.
·For the AUTO ON setting, please turn on the dehumidifier to select a desired humidity level.
Otherwise, the humidity maintained will be the same as the previous setting.
·You can only set AUTO ON timer when the dehumidifier is off or set AUTO OFF timer when the
dehumidifier is on, but not be able to set both AUTO ON and AUTO OFF timer at the same time.
·The TIMER will ONLY function one time instead of cycling the dehumidifier on or off indefinitely.
·The TIMER function will be disabled when the dehumidifier has been powered on/off manually.
·Set the timer as 00, the timer function will not be activated.
7. Drain Collected Water
(1) Emptying the Water Bucket
When the bucket is full, the dehumidifier will automatically stop working and make a beep
sound for 5 seconds. Meanwhile, the LCD FULL BUCKET icon will illuminate. Do not move the
dehumidifier at this time in case the water spills on the floor.
To remove the bucket to empty the collected water:
·Pull up the spring lock to open the door of the water bucket.
·Hold the handle and take the water bucket out.
·Empty the water bucket.
·Replace the water bucket in the dehumidifier. The dehumidifier will auto operation in 1-3
minutes after the water bucket been replaced properly.

9
(2) Continuous Drain by Gravity
Water can be automatically be emptied into a floor drain by attaching the included drain
hose.
To Achieve Continuous Drain by Gravity:
·Remove the plastic cover from the continuous drain outlet;
·Attach one end of the drain hose to the drain outlet;
·Direct the other end of the drain hose down to a suitable drainage facility, like a floor drain.
The drainage facility should be lower than the drain outlet of the dehumidifier.
Note:
- Make sure the connection is tight and there is no leaking.
- Be sure to run the water hose sloping downward to let the water flow out smoothly. No kinks or bent.
- If the condensation water would be drained out to an external container via the hose, be sure NOT to
submerge the other end of the hose into the drained out water.
- It is recommended to use a short hose. If the drain hose is too long, water may not drain completely,
which can lead to stagnant water and mildew build up inside the hose.
- When the continuous drain feature is not being used, remove the drain hose from the outlet and place
the drain outlet cover back.

10
8. Smart Functions
(1) 3 Minutes Compressor Delay Mechanism
To avoid any damage to the dehumidifier, the dehumidifier will not start operation following
a complete cycle until after 3 minutes. Operation will automatically start after 3 minutes. In
other word, if you turn the dehumidifier off and then restart it immediately, the compressor
will not kick in until 3 minutes later. During this period, you can see the RUNNING icon
flashing on the LCD screen until the compressor kicks in.
(2) Auto Defrost
When the frost builds up on the evaporator coils, the compressor will cycle off and the fan
will continue to run until the frost disappears. When the dehumidifier is defrosting, you can
see the DEFROSTING icon light up on the LCD screen.
(3) Auto-Restart
If the dehumidifier shuts off unexpectedly due to power outage, the dehumidifier will restart
with the previous function settings automatically when the power resumes.
(4) Temperature Protection Function
When the room temperature is higher than 113°F,the dehumidifier will automatically enter
into HIGH-TEMPERATURE PROTECTION SYSTEM where the LCD screen displays an "HH"
message and the compressor stops.
When the room temperature is lower than 40°F,the dehumidifier will automatically enter
into LOW-TEMPERATURE PROTECTION SYSTEM where the LCD screen displays an "LL"
message and the dehumidifier stops working.
Note: When you see HH or LL message under normal circumstances, please contact the customer
service at service@moiswell.com to get technical support.

11
TECHNICAL SPECIFICATIONS
This dehumidifier is designed to operate with a working environment between 41°F (5°C) and 95°
F (35°C). This dehumidifier may not work properly when the room temperature is less than 41°F
(5°C) or higher than 95°F (35°C).

12
MAINTENANCE
Ensure the dehumidifier is turned OFF and the plug is removed from the power socket
before cleaning or maintenance is carried out.
(1) Cleaning the Dehumidifier
Clean the dehumidifier housing with a soft damp cloth. Do not submerge or place water on
the dehumidifier or control panel. Water may damage the electronic components of the
dehumidifier. Do not use chemical solvents such as benzene, alcohol, gasoline or other
heavy-duty cleaners. The surface may become damaged or deformed.
(2) Cleaning the Air Filter
The working performance of the dehumidifier will be greatly reduced if the filter becomes
blocked. The air filter should be cleaned approximately every 2 weeks and may require more
frequent cleaning if there is significant dander or fur in the air. The air filter is located behind
the inlet grill.
Follow the steps below to take the filter out:
• To remove the grill: Hold the top part of both sides of the inlet grill and then pull upward to
take the grill out, as illustrated below.
• To remove the air filter: Grasp the filter tab on the bottom of the filter, pull up for about 1
inch and then pull the filter obliquely down to take the whole filter out, as illustrated below.

13
Follow the steps below to clean the filter:
• Use a vacuum cleaner with a soft brush attachment to remove any large debris or dust
build-up from the air filter.
• Wash the filter in lukewarm, soapy water, below 104°F, or use a neutral cleaning agent.
• Rinse the filter with clean water and dry thoroughly.
• Re-install the filter.
NOTE: DO NOT operate the dehumidifier without a filter because dirt and lint will clog it,
reducing performance.
(3) When Not Using dehumidifier for Long Periods of Time
• Wait for 1 day after turning off the dehumidifier to complete drain.
• Clean the dehumidifier, water bucket, and air filter. Ensure the whole dehumidifier is clean
and dry.
• Wrap the cord and the hose and bundle them to keep safe.
• Cover the dehumidifier with a plastic bag.
• Store the dehumidifier upright in a dry, well-ventilated place.

14
TROUBLE SHOOTING GUIDE
The below chart will help you solve common problems that may occur. If the problem you
come across can not be fixed after troubleshooting or the problem is not listed in the below
troubleshooting chart, please contact MOISWELL customer service to obtain professional
support at service@moiswell.com.
Problem
Possible Cause
Solution
Dehumidifier does not
operate
No power to dehumidifier
Plug it into a working outlet
Not turned on
Turn the dehumidifier on
Has not set it properly, Wet
Controller icon flashes.
Make sure the set humidity level
is at 3% lower than the inlet
humidity reading
Error code displays
Contact customer service
Dehumidifier collects
little water
Insufficient working time
Allow more working time
Filter is blocked
Clean filter
Air Inlet or Outlet is blocked
Clear the obstructions
Room temperature is low
Heat up the room
Condensate hose is blocked
Check hose for restrictions
dehumidifier
operating, but room
not dry
Doors and windows are
open
Seal room from external areas
Insufficient working time
Allow more working time
Abnormal Noise
The dehumidifier has not
been placed properly.
Place the dehumidifier in a
horizontal position
Filter is blocked
Clean filter
Humidity always shows
"10%RH" (there is a big
difference from the
actual humidity)
Humidity sensor failure?
Set the humidity to 10%RH,the
dehumidifier can still continue
to work, and can be used
normally.
Repair and replace the humidity
sensor.
Humidity always shows
The dehumidifier is not affected

15
Note: It is normal that the dehumidifier pulls warm air out.
"99%RH" (there is a big
difference from the
actual humidity)
1.Water on the surface of
humidity sensor?
2.Humidity sensor failure?
and can continue to work, and
can be used normally.
Please let the dehumidifier
keeps working for a period of
time, after the water on the
surface of the humidity sensor
is removed, it will return to
normal.
Repair and replace the humidity
sensor.

16
WARRANTY
MOISWELL warrants to the original purchaser that this MOISWELL product is free from
manufacturing defects in material or workmanship for the limited warranty period of:
2 Years Full Warranty (1 year standard + 1 year with registration)
This warranty starts from the date of purchase and covers all parts and labor to repair or
replace any part of the product that proves to be defective in materials or workmanship.
5 Years Limited Warranty on Refrigeration System
MOISWELL warrants the refrigeration system, including compressor, condenser and
evaporator, that prove to be defective in materials or workmanship, for 5 years from the date
of purchase, the labor and shipping fee will be not included after the above full warranty.
The warranty does not apply where damage is caused by other factors, including without
limitation:
·normal wear and tear;
·abuse, mishandling, accident, or failure to follow operating instructions;
·exposure to liquid or infiltration of foreign particles;
·servicing or modifications of the product other than by MOISWELL.
This limited warranty is valid only on products purchased from the manufacturer or
MOISWELL authorized dealer and operated, installed, and maintained according to the
instructions included in this user guide or furnished with the product.
These are our general terms for warranty service, but we always urge our customers to reach
out to us with any issue, regardless of warranty terms. If you have an issue with a MOISWELL
product, please contact us at service@moiswell.com, and we will do our best to resolve it for
you.
Website
www.moiswell.com
Email
Table of contents
Other MOISWELL Dehumidifier manuals