Molpir RV1000P User manual

RV1000P
Kamera záznamu kolíznych situácií
Drive Recorder
INŠ ALAČNÁ PRÍRUČKA
INS ALLA ION MANUAL
Objednacie číslo
Order number
RV1000P
N_RV1000P_001_18052010_SK_EN

2 19

3 19
PROCES INŠ ALÁCIE SK
1. Otvorte “My Computer”
2. Klik pravým na “SD card” a zvoľte [Open]
3. Dvojklik [SETU.EXE]
4. Zvoľte jazyk a nasledujte dialógové okno
5. Na ploche sa zobrazí ikona “PC Viewer”
VLOŽENIE SD PAMÄŤOVEJ KAR Y
1. Vložte SD pamäťovú kartu do slotu na SD kartu.
Odstránenie "PC Viewer"
Otvorte „Control Panel“
Zvoľte [remove program] and odstráňte [PC Viewer (Built-In Type)]
N_RV1000P_001_18052010_SK_EN

4 19
2. Spustite “PC Wiever”
3. Zvoľte [File] a potom kliknite „Select Data Folder“ prípadne [OPEN]
4. Zvoľte SD pamäťovú kartu v okne výberu zložky.
NAHRA IE SÚBORU
5. Vyberte so zoznamu myšou alebo zvoľte všetky pomocou [Check All]. Potom kliknite
na [Load].
[OPEN] button
Tlačidlo nahrania
N_RV1000P_001_18052010_SK_EN

5 19
Dozadu
Rýchlo späť
Play
Rýchlo vpred
Predchádzajúci
Nasledujúci
Pauza
1 obraz
4x4 multi obraz (16 obrazov)
Priblíženie grafu G-senzora
Oddialenie grafu G-senzora
Prehrávanie
GPS Speed
G senzor údaje
Dátum
a
čas
GPS údaje pred (15 sekúnd) po (5 sek.)
udalosť
Chytťe a posúvajte bielu zvislú čiaru pre
zmenu pozície prehrávania.
6. Zoznam udalostí sa zmení [PLAY LIST] viď nižšie
PLAYBACK (PREHRÁVANIE)
7. Stlačte pre prehrávanie
N_RV1000P_001_18052010_SK_EN

6 19
GOOGLE MAPA
Trasa je zobrazená na Google mape v pravom dolnom rohu.
Pre zobrazenie
position Google mapy je
potrebné nahrať GPS údaje
videom.
Trasa pri prehrávaní je
označená na modro a pozícia
pri prehrávaní je označená
šípkou.
Dvojklik na modrú pozíciu
spustite prehrávanie videa.
Pre zobrazenie mapy na PC, je potrebné pripojenie na internet.
N_RV1000P_001_18052010_SK_EN

7 19
8. Stlač pre zobrazenie multi obrazu 4x4 obrázky (miniatúry)
Kliknutím na miniatúru zmeníte pozíciu prehrávania.
9. Klik na tlačidlo [Close] ukončí prehrávanie udalosti.
Uloženie JPG a AVI súborov
10. Prerušte prehrávanie a kliknite na tlačidlo vytvoriť JPG súbor
Klik [Close] na ukončenie
prehrávania udalosti. Okno
[PLAY LIST] sa zmení na
základný stav.
Tlačidlo vytvoriť JPG súbor
N_RV1000P_001_18052010_SK_EN

8 19
11. Prerušte prehrávanie a klinite na tlačidlo vytvoriť AVI súbor
Záloha udalosti / Log files
12. Kliknite [Backup Event Log files] tlačidlo na zálohovanie súborov do PC.
Zvoľte [Event data] a [Log data] predtým ako kliknete [Backup Event Log files]
zoznam Event a Log budú v zálohovom okne.
Tlačidlo vytvoriť AVI súbor
[Backup Event Log files] tlačidlo
N_RV1000P_001_18052010_SK_EN

9 19
Nastavenie Drive rekordéra
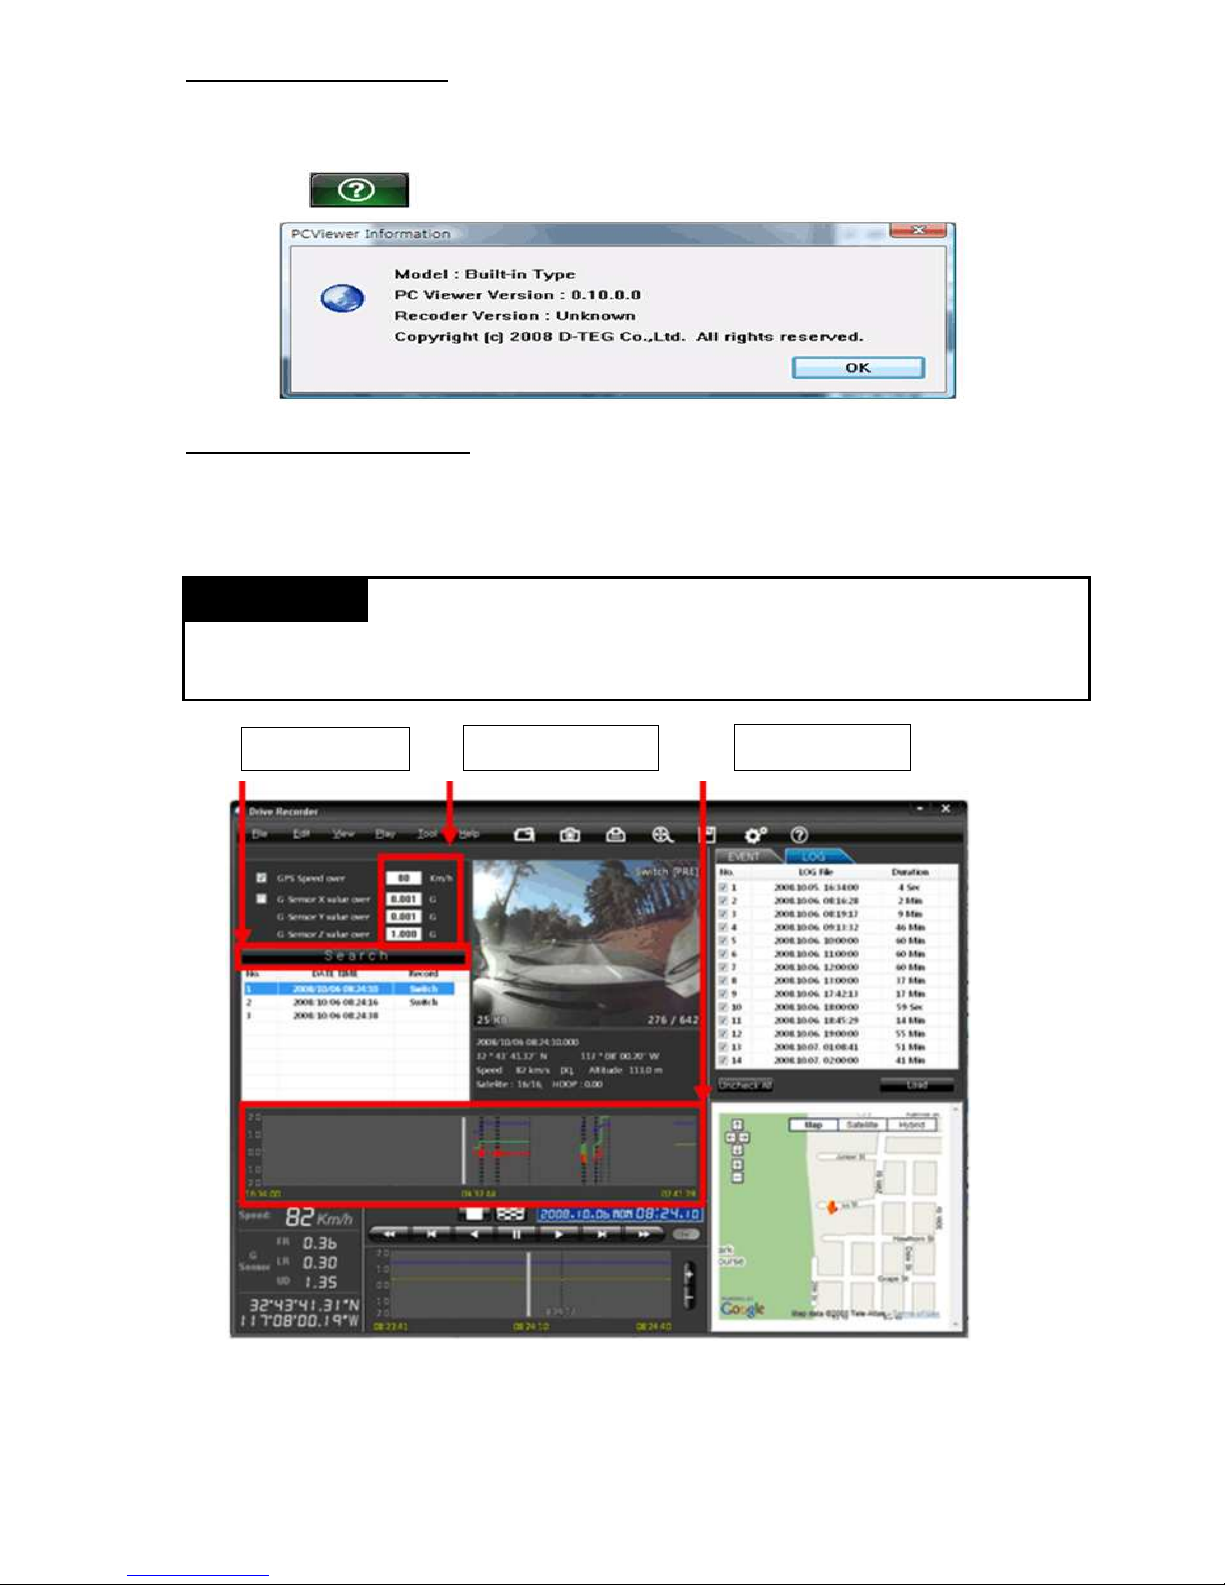
13. Kliknite [Setting Drive Recorder] tlačidlo pre nastavenie.
Rozlíšenie 640 x 480(vysoké), 640 x 240, 320 x 240(nízke)
Obrazová frekvencia max. počet obrázkov za sek: 30-NTSC 25-PAL
Kvalita obrazu Vysoká (veľká veľkosť, dobrá kvalita obrazu)
Nízka (malá veľkosť, horšia kvalita obrazu)
Nahrávací režim
Prepisovanie (ak je pamäťová SD karta plná,
údaje sa začnú prepisovať od najstarších)
Jednorázový (nahrávanie automaticky zastaví,
keď je SD karta plná)
Spúšť pri udalosti
G-senzor alebo manuálny spínač
Dávajte pozor pri zmene nastavenia. Je to
dôležité pre nahrávanie
Nastavenie G-senzora
Skontrolujte nastavený režim a zmeňte citlivosť
(vysoká citlivosť znamená, že nahrávanie začne
pri slabom podnete)
Dátum čas Automaticky sa synchronizuje s GPS časom. Je
možné aj manuálne nastavenie
Inicializácia SD karty Všetký dáta budú vymazané a nastavenie Drive
rekordéra sa vráti späť na výrobné nastavenia
Pred inicializáciou zálohujte
údaje z SD karty. Potom už
nie je možné obnoviť staré
údaje.
[Setting Drive Recorder] tlačidlo
UPOZORNENIE
N_RV1000P_001_18052010_SK_EN

10 19
Informácie o produkte
14. Stlačte tlačidlo [About] na zobrazenie informácii o produkte.
PREHRÁVANIE LOG FILE
15. Zvoľte [LOG] okno a potom vyberte log zo zoznamu myšou alebo tlačidlom [Check All]
vyberte všetky. Nakoniec stlačte tlačidlo [Load].
GPS rýchlosť, G senzor X hodnota, G senzor Y hodnota, G senzor Z hodnota, sa môže určiť
ako prvá. V pravom rohu každej hodnoty je box na kliknutie. Potom zadajte dáta na
triedenie. Ak sú nahrané dáta, [Switch] alebo [G Senzor] budú zobrazené.
Tlačidlo info
Vyhľadávanie
Input sorting G-senzor
Log dáta sa nahrávajú počas celej doby, aj keď nenastane žiadna
udalosť. Zoradenie dát je možné tlačidlom Search. Maximálna veľkosť log dát je
30MB. Po naplnení pamäte sa dáta začnú prespisovať od najstarších.
Vyhľadávanie
N_RV1000P_001_18052010_SK_EN

11 19

12 19
INS ALLING PROCEDURES EN
6. Open the “My Computer”
7. Right-click the “SD card” drive and select [Open]
8. Double click [SETU.EXE]
9. Select the language and then follow the dialog box
10.The “PC Viewer” icon will be displayed on your desktop
CONNEC SD MEMORY CARD
16. Connect SD memory card in to the SD card reader
Open the „Control Panel“
Select [remove program] and remove [PC Viewer (Built-In Type)]
N_RV1000P_001_18052010_SK_EN

13 19
17. Run “PC Wiever”
18. Select [File] and then click „Select Data Folder“ or Click [OPEN] button
19. Select SD memory card folder at the folder select window
FILE LOADING
20. Check the event from the event list using mouse or click [Check All] button. Then click
[Load] button
[OPEN] button
Load Button
N_RV1000P_001_18052010_SK_EN

14 19
Reverse
Fast Reverse
Play
Fast Forward
Previous Image
Next Image
Pause
Single View
4x4 Multi View ( humb-nail function
Zoom In G-sensor graph
Zoom Out G-sensor graph
Playback buttons
GPS Speed
G sensor data
Date
&
ime
GPS location data Before 15 seconds After 5sec
Event
Drag & Move the white line to move the
playback position
21. The event list will be changed [PLAY LIST] as below,
PLAYBACK
22. Click button for playback
N_RV1000P_001_18052010_SK_EN

15 19
GOOGLE MAP
The route are on the Google map at lower right corner of software.
To see the route &
position on the Google map,
the GPS data should be
recorded with video
Playback position is the
arrow mark on the map. And
blue mark is the route
Double click the blue mark
then video playback position
will be Changed.
To see the map on the PC, the internet line should be connected.
N_RV1000P_001_18052010_SK_EN

16 19
23. Click button for 4x4 multi view (Thumb-nail function)
Click the thumb-nail image to change the playback position
24. Click [Close] button to quit the event playback
Save JPG file & AVI file
25. Pause the playback and click save image button to make JPG file
Click [Close] to finish the
event playback. Then the
[PLAY LIST] window will be
changed to the initial status
Save image button
N_RV1000P_001_18052010_SK_EN

17 19
26. Pause the playback and click save image button to make JPG file
Backup Event / Log files
27. Click [Backup Event Log files] button to backup the files to the PC
Load [Event data] and load [Log data] first, before click the [Backup Event Log files]
button. Then Event and Log list are on Backup windows
Save AVI file button
[Backup Event Log files] button
N_RV1000P_001_18052010_SK_EN

18 19
Setting Drive Recorder
28. Click [Setting Drive Recorder] button for setup
Image Resolution 640 x 480(Hight), 640 x 240, 320 x 240(Low)
Frame Rate 30 means real-time recording
Image Quality Hight (Large file size, but good picture quality)
Low (Small file size, but low picture quality)
Recording Mode
Overwrite (The image data is overwritten from
the oldest when the SD memory is full.)
One time (The recording stop automatically
when the SD memory is full.)
Event Trigger
G-Sensor or Manual record switch
Be cateful to change this setting. This is related
with recording
G-sensor setting
Check simple setting mode and then change the
sensitivity High sensitivity means recording will
be started at low impact
Date Time Automatically synchronize with GPS time.
However Manual time setting is also available
Initialize SD card All date will be deleted and set the configuration
of Drive Recorder to the factory default
Backup the SD data first,
before click initialize SD
memory card button. One it
done, cannot recover the old
data
[Setting Drive Recorder] button
CAU ION
N_RV1000P_001_18052010_SK_EN

19 19
Product Information
29. Click [About] button to check the product information
LOG FILE PLAYBACK
30. Select [LOG] windows and then check the log from the log list using mouse or click
[Check All] button. Then click [Load] button
GPS speed, G sensor X value, G sensor Y value, G sensor Z value, can be checked first.
There is small check box on right side of each value. And then input data for data sorting.
If there is recorded data, [Switch] or [G Sensor] mark will be displayed.
About Button
Search
Input sorting G-sensor
Log data will be recorded during driving even though there are no
event. So the data sorting is possible using Search button. The total log data size is no
more than 30MB. The log data is overwritten from the oldest when 30MB is full.
Search button
N_RV1000P_001_18052010_SK_EN
Table of contents
Languages: