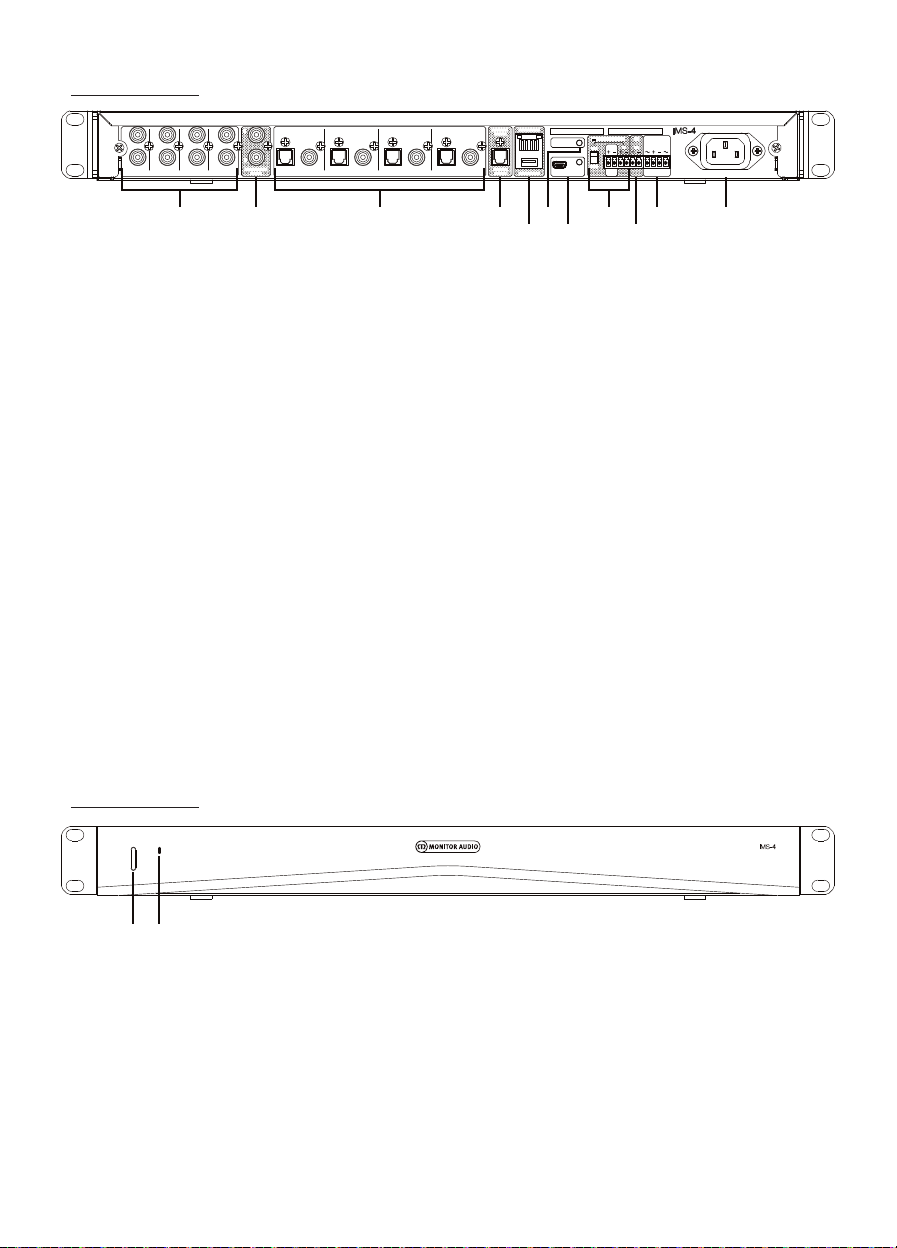
Monitor Audio IMS-4 User manual

owner’s manual


Contents
Introduction 1
Back Panel 2
Front Panel 2
LED Colour Matrix 3
Connecting Sources to the IMS-4 3
Connecting to the IMS-4 4
Navigating the BluOS Application 4
iOS & Android Application 4
Windows & Mac Application 5
Basic Use 6
Android & iOS applications 6
Windows & Mac Application 6
Advanced Use 7
Settings 7
Alarms 7
Sleep Timer 8
Doorbell 8
Player 8
Music Library 9
Playback 10
Reload Artwork 10
Custom Installation 10
Help 10
Online Support 10
Send Support Request 10
Upgrade Check - Player 11
Upgrade Check - Controller 11
Shortcuts 11
Add a Player 11
Diagnostics 11
About 11
Factory Reset 11
Specifications 12
Introduction
The IMS-4 music streamer’s discreet design allows it to be easily incorporated into any custom installation
project. And, its slim line form ensures that it occupies just 1U of rack space.
BluOS allows the IMS-4 to stream lossless music at a quality of up to 24-bit/ 192 khz to 4 zones in a home
network. Accessed through the app, or one of the many supported integrated control systems, multiple
IMS-4 streamers can be combined to provide up to 64 zones, with each zone able to play together in
perfect sync. It can also simultaneously play different streams to separate zones.
The IMS-4 can access millions of Master Quality Authenticated (MQA) recordings using BluOS technology
to allow music to be heard exactly as the artist intended, anywhere in the home.
To power the music, the IMS-4 should be partnered with an installation amplifier such as our IA150-8C.
The IMS-4 can be integrated with Crestron, Control4 and RTI and is compatible with other BluOS enabled
devices.
Analogue and digital inputs allow the addition of a cable box or other non-network sources and to make
them available in every zone. The IMS-4 even includes a system interrupt to let doorbells and fire alarms be
heard.
monitoraudio.com 1
ENGLISH

Back Panel
AC 100-240V – 50/60Hz
MONITOR AUDIO
OPTICAL
OUT 1
COAXIAL
OUT 1
DIGITAL PRE-AMPLIFIER OUTPUTANALOGUE PRE-AMPLIFIER OUTPUT
LAN INPUT
1
1L
1R
2L
2R
OPTICAL
OUT 2
COAXIAL
OUT 2
2
OPTICAL
OUT 3
COAXIAL
OUT 3
3
OPTICAL
OUT 4
OPTICAL
INPUT
DIGITAL
INPUT USB INPUT SERVICE ONLY
SYSTEM
INTERRUPT
5V–30V AC/DC
OFF
OUT IN
ON
RESET
ANALOGUE
INPUT
COAXIAL
OUT 4
41234
3L
3R
4L
4R
L
R
+12V TRIGGER
MAC ID 00:00:00:00:00:00 S/N X00XX000X000000
IN
IR
1 2 3 4
5
6
7
8
9
10 11
Front Panel
AC 100-240V – 50/60Hz
MONITOR AUDIO
OPTICAL
OUT 1
COAXIAL
OUT 1
DIGITAL PRE-AMPLIFIER OUTPUTANALOGUE PRE-AMPLIFIER OUTPUT
LAN INPUT
1
1L
1R
2L
2R
OPTICAL
OUT 2
COAXIAL
OUT 2
2
OPTICAL
OUT 3
COAXIAL
OUT 3
3
OPTICAL
OUT 4
OPTICAL
INPUT
DIGITAL
INPUT USB INPUT SERVICE ONLY
SYSTEM
INTERRUPT
5V–30V AC/DC
OFF
OUT IN
ON
RESET
ANALOGUE
INPUT
COAXIAL
OUT 4
41234
3L
3R
4L
4R
L
R
+12V TRIGGER
MAC ID 00:00:00:00:00:00 S/N X00XX000X000000
IN
IR
1 2
1. Power Button
Used to toggle the power of the IMS-4. A
single press will wake the unit and holding in
for 5 seconds will put in to standby - the LED
will go off shortly after 5 seconds.
2. Status LED
Shows the status of the IMS-4. Refer to the
table below for further information.
IMS-42
1. 4 x L & R Analogue Outputs
Connect to analogue inputs on amplifiers
2. L & R Analogue Input
This is the input from the analogue source
3. 4 x Optical and Coaxial Digital Outputs
Connect to the optical or coaxial inputs on
amplifiers
4. Digital Input
Connects to the optical digital output of
source
5. LAN & USB Input
Connect the Ethernet cable from the router
or switch to connect the IMS-4 to the local
network.
The USB input can be used to connect a
USB drive with locally stored music files for
playback to the selected Room.
6. Reset
This is the factory reset button. For details on
performing the factory reset, please refer to
page 12.
7. Service Only
This Mini USB socket and button are for
service use only and should only be used by
qualified personnel
8. 12v Trigger
Connect the output from another 12v trigger
to remotely turn on and off the IMS-4. The
toggle switch needs to be enabled for the
trigger to work. The output will only work
when there is a 12v trigger input.
9. IR Input
Connect an appropriate IR receiver to the
IMS-4 to be able to teach it basic commands.
Refer to page 9 for further information.
10. System Interrupt
Connect to either an AC or DC system to
trigger a door bell chime, or mute the system
if connected to a fire alarm. Refer to page 8
for further information.
11. Mains Input Socket
Connection made to the mains using the
provided, standard 3 pin (earthed) IEC mains
lead.

LED Colour Matrix
LED BLINK CODE DESCRIPTION
Solid red Booting up
Solid pale blue Indexing
Solid blue Connected to network – ready to use with Bluesound App
Flashing green No internet gateway
Alternate flashing red and green Upgrade mode
Flashing red Factory reset in progress
Installing in a Rack
To install the IMS-4 into a standard 19” equipment rack, the rack mount brackets need to be fitted first.
This is done by removing the 4 screws on each side and then place the brackets over the holes that have
been revealed and use the same screws to attach the brackets.
Connecting Sources to the IMS-4
Prior to connecting the IMS-4 to the mains and network, you can connect you sources. You can connect
a single Digital Optical, Single Stereo RCA Analogue and a USB source. These can all be configured within
one of the applications.
Powering on the IMS-4
The IMS-4 is supplied with an IEC mains cable. Connect the mains cable to the wall outlet and the other
end to the IMS-4. When connected to the mains, you can turn the IMS-4 on by pressing the button on the
front.
NOTE: Do not switch on the power at the wall outlet until all system connections have
been made.
To turn off the IMS-4 hold the power button down for 5 seconds or until the LED goes off.
monitoraudio.com 3
ENGLISH

4
Connecting to the network
If the IMS-4 is powered on and not connected to a network via an Ethernet cable, the LED on the front will
pulse green. To connect it to the network follow the simple steps below:
1. Plug an ethernet cable from router/ switch into the IMS-4
2. Turn on the IMS-4 (if not already on). The LED will go from being bright red > faint red > solid blue.
If it doesn’t go blue and is pulsing green, then it is not connected to the network. Check connections
at both ends and check the router/ switch is powered on. Alternatively see the troubleshooting guide.
Connecting to the IMS-4
Before trying to connect to the IMS-4 you must first download the BluOS companion app for your platform
(Windows, Mac, Android, iOS).
1. When installed, turn on the IMS-4 (if not already on) and run the app for the first time. It shall start by
searching for the IMS-4 within the network.
2. It is recommended to use the mobile app for first use as it will ask you to set up each room. Each
room is treated as a separate player. On the first room, it will check for updates (and install them if
available) and configure it on the network. The other 3 rooms will connect a lot quicker.
You can also rename the rooms in this step if you wish. By default they will be named the model of
the unit then the last 4 digits of the MAC address and then a number depending on the room
eg IMS-4-xxxx-2.
Navigating the BluOS Application
iOS & Android Application
13
2
1. Menu
Brings up the source and settings menu.
Refer to items 1 - 11 on page 5.
2. Volume
Adjusts the volume of the selected Room.
3. Room Selection
Brings up the list of available rooms on the
current network.
IMS-4

Windows & Mac Application
1
2
3
4
5
6
7
8
9
10
11
12 13 14 15 16
1. My Playlists
Select your custom made playlists.
2. My Presets
Select your personal presets which can
include inputs or stored internet radio stations.
3. My Favourites
Select from your “starred” favourites.
4. USB Input
Selects the USB input for the selected Room.
5. Analogue Input
Selects the analogue input for the selected
Room - Will not be displayed in other Rooms
when selected.
6. Optical Input
Selects the digital optical input for the
selected Room - Will not be displayed in other
Rooms when selected.
7. TuneIn
Selects TuneIn Radio for the selected Room.
8. Radio Paradise
Selects Radio Paradise for the selected Room.
9. Music Services
Show a list of all of the other available music
services.
10. Settings
Brings up all of the settings options available
for the IMS-4.
11. Help
Provides access to Online Support, firmware
upgrades and other help articles.
12. Now Playing
By clicking on this brings up the currently
selected Room and what is playing on it.
There will also be a thumbnail for the currently
playing artwork.
13. Room Controls
A shortcut to control the currently playing
track in the selected Room.
14. Room Selection
Select the Room to control within the list of
available Rooms.
15. Volume Control
Control the volume level of the selected
Room. When volume is fixed, this is not
adjustable.
16. Play Queue
Shows tracks in the current play queue. This
can be pinned to the side for permanent view.
monitoraudio.com 5
ENGLISH

6
Basic Use
Android & iOS applications
Once the Players/ Rooms have been set up (refer to “Connecting to the IMS-4), follow the steps below for
basic use of the IMS-4 and to get music playing in your rooms.
1. Select a room to control by clicking on the Room Selection Button (Item 3 on Page 4).
2. Swipe the screen from left to right to show what input is currently selected.
3. Press the Menu Button (Item 1 on Page 4) to select the desired source for that room.
To select the same input in more than one room they have to be grouped by clicking on the + icon
next to the appropriate room.
4. Music services can be added by clicking on the “Music Services” icon to reveal a list of available
services. TuneIn Radio and Radio Paradise are listed by default.
Windows & Mac Application
1. Select a room to control by clicking on the Room Selection button.
2. Select an input by clicking on the desired source in the left hand navigation pain.
To select the same input in more than one room they have to be grouped by clicking on the + icon
next to the appropriate room.
3. Music services can be added by clicking on the “Music Services” icon to reveal a list of available
services. TuneIn Radio and Radio Paradise are listed by default.
IMS-4

Advanced Use
This section will guide you through the advanced use of the applications. The screenshots are taken from
the desktop app, but the same options are available within the menu of the mobile apps.
Settings
Check that you will be making changes to the correct room. In all examples here we will be looking at
Room 1.
Alarms
Select the Alarms option to set up and configure your alarm. Click on “Add Alarm”, here you can set the
alarm up accordingly.
monitoraudio.com 7
ENGLISH

Sleep Timer
By clicking on the Sleep Timer option, it is possible to
select a period of time that the room will continue to play
for in 15 minute increments.
Doorbell
The IMS-4 has a doorbell interrupt system. This is ideal
for installing commercial applications where a fire alarm
needs to mute the system. Additionally it can be used
with smart doorbells with a doorbell output facility. Please
refer to the doorbell manufacturer’s wiring configuration
for this feature.
Here, different chimes can be set, along with volume
control for each room.
Player
Here you can customise some universal settings of the
product and rename the Room currently selected.
Customising Sources
This enables you to rename the source, change the icon,
enable AV Mode, adjust Lip-sync and also hide the source.
Audio
This enables the customisation of the sound for each
selected room:
• The Tone Controls give +/-6 dB of gain/ attenuation of
the bass and treble.
• Replay Gain, fixes the issue when different recordings
are at different levels. You may equalise the volume
settings using the Replay Gain settings embedded in
the digital file. Replay-Gain modes work with volume
adjustment metadata tags from your audio files to
select the appropriate volume levels.
If present, these are either Track Gain or Album Gain,
which are different volume adjustments dependent
on the songs album or settings for individual listening.
Track gain is the individual song while Album gain is
for the entire recording. Smart Gain automatically
selects the best volume level for each file, resulting in
IMS-48

all files, regardless of recordings, to be played back at approximately the same volume level. It will use
a combination of the track gain or album gain to retain the original quality of all your audio files.
• Output Mode, sets the output to be either mono, stereo, just left or just right channels.
• Output Level Fixed, fixes the level of the output which is ideal for when using the IMS-4 with a source
that already has volume control.
• Volume Limits, allows you to limit the maximum output of the selected room. This is disabled when
the Output Level is fixed.
IR Remote
Here you can enable/ disable the BluOS remote and chose what channel it transmits on.
Additionally, the IMS-4 has the facility to add an IR Receiver so that it can learn commands from IR remote
controls (TV, amplifier, Blu Ray player, etc).
This input is connected to the output of an IR (infrared) repeater (Xantech or similar) or the IR output
of another component to allow control of the IMS-4 from a remote location. To program IR Remote
commands into your IMS-4 via IR IN, go to the Settings menu of the BluOS App, select Player and then IR
remote. Simply select the function desired from the IR Remote menu, point an IR remote control at the IR
repeater and press the button to perform that function. Once successful, a check-mark will appear beside
the programmed function.
Room Name
Here, you can edit the name of the room.
Indicator Brightness
This adjusts the intensity level of the front LED.
Backup Playlists
Here, you can make a backup of your favourite playlists. Playlists can become
corrupt over time in rare occasions. Your playlists can be backed-up to a USB
Drive or memory stick to prevent permanent loss of those great playlists and mixes
created over time. Backing up the playlists also means, that should a factory reset be
performed, they can be reinstated in no time. For information this search the BluOS
support pages for “Backup Playlists” https://support.bluos.net/hc/en-us
Music Library
Here you can configure and search the library on the local network and stored on
locally attached USB devices.
For additional help and information on this, please visit the BluOS Library help page:
https://support.bluos.net/hc/en-us/sections/360000011607-My-Library
You may need to reindex the music collection stored on the USB for trouble shooting
or if it hasn’t picked up on changes made to the USB content. This can be solved by reindexing the
device.
monitoraudio.com 9
ENGLISH

Playback
Auto fill
Enabling Auto fill will automatically add songs to the current playing list.
Simply browse through your Local Library or favourite Music Service and tap a song you want to hear. It
will start playing instantly. Auto fill will then auto-populate the Play Queue by adding all of the tracks that
follow the selected song. Songs that are Auto filled will also be highlighted in the App to be easily identified
as suggested tracks.
To listen to another song, simply tap your song of choice and it will play instantly. It is placed next in the
Play Queue and Auto fill will add all of the tracks that follow the newly selected song. Only previously
played songs will remain and stay at the top of the Play Queue.
Want to add to the Play Queue without interrupting what is currently playing or by adding songs one at a
time? The BluOS App can do that too. Press the More indicator to the right of the Song and a Context
Menu will appear. Select Play Now to immediately start the current spot in the Play Queue, Add Next to be
queued up after the current song or Add Last to have the song added at the bottom of the Play Queue. All
Auto fill songs will now be removed from the Play Queue.
Auto filled songs can also be easily removed from the Play queue by selecting the trash can icon in the
Auto fill page.
Like what you heard? You can Save the current Play Queue as a Playlist making it easy to listen to again
and again. To Save select the Save Icon and enter a name for the Playlist. Auto filled songs yet to play in
the Play Queue will not be saved.
Suggested tracks in the Auto fill section will be added to the Play Queue as Play Next when the currently
playing track has less than 40 seconds left to play
In the Settings Menu, Playback you can set the Enable Auto fill to off. This is a User App Preference setting
unique to the currently used smartphone or tablet.
DSD Playback
When enabling this feature and pointing the IMS-4 to a local computer or USB connected hard drive, the
IMS-4 will convert any DSD files to FLAC to allow them to be played.
Reload Artwork
Selecting this will reload all album artwork on the attached USB and network devices.
Custom Installation
Room Names
This is another area to rename the Rooms. Except here, they are all listed rather than just the one,
selected Room.
Help
Online Support
By selecting this takes you straight to the BluOS online FAQ’s.
Send Support Request
If you have a question or need some help diagnosing a fault you cannot fix. here you can fill out the
Support Request form for some assistance direct from BluOS.
IMS-410

Upgrade Check - Player
This checks the BluOS servers for any updates to your IMS-4.
Upgrade Check - Controller
Desktop app only. This checks the BluOS servers for any updates to your IMS-4 controller app.
Shortcuts
Desktop app only. Lists the available keyboard shortcut
functions.
Add a Player
Mobile app only. Looks for additional IMS-4’s on the network. Use this function for expanding the
current number of IMS-4’s on the network to control more rooms.
Diagnostics
Initially, this will show some basic details including IP
address, reindexing options, other connected players,
and the option for statistics collection (click on the “i” for
information on what is collected and privacy statements).
There is also a “More” button for more advanced
information which should only be accessed by a qualified
BluOS technician.
About
This shows the app version, IMS-4 BluOS version and the licenses.
Factory Reset
To carry out a factory reset to the unit, you need to follow the following steps:
1. Remove power from the IMS-4
2. Hold reset button in on the back of the unit (item 6, page 2).
3. Reconnect power keeping the button held in until LED on front starts to flash red when you can
release the button.
4. The IMS-4 will then go through the reset and rebooting process.
monitoraudio.com 11
ENGLISH

IMS-412
Specifications
IP Control BluOSTM
Channel Number / Rooms 4 Rooms
Maximum Input Voltage (RMS) 2.2 V
Signal to Noise Ratio 110 dBA
Sample Rate Up to 24-bit/ 192 kHz
Supported File Formats MP3, AAC, WMA, WMA-L, OGG Vorbis, FLAC, ALAC,
WAV, AIFF, MQA, HRA
Supported Cloud Services Custom Channels, Sound Machine, QSIC,
Spotify Connect, Tidal, Amazon, Qobuz, Napster,
Deezer,LiveXLive, Idagio, nugs.net, KKBox, Bugs!, DMH
Supported Operating Systems Microsoft Windows 7 SP1 or higher, Apple Macintosh
OSX 10.7.5 or higher
Free Internet Radio TuneIn Radio, iHeartRadio, Calm Radio, Radio Paradise,
Radio.com
Integration Partners Control4, RTI, Crestron, URC, roon
Input Connections Analogue - RCA Stereo
Digital SPDIF - Optical (TOSLINK)
USB - Type A (FAT32 Formatted)
Output Connections Analogue - 4 x RCA Stereo
Digital SPDIF - 4 x Optical (TOSLINK)
4 x Coaxial
IP Communication RJ45, TCP/IP (1000 Base T)
User Interface Free Android, iOS, Windows applications available from
the appropriate app store
Rack Height 1U
Dimensions (Without Feet) (H x W x D) 43.1 x 438 x 236.1 mm (111/16 x 171/4 x 95/16”)
Height (With Feet) 45.1 mm (113/16”)
Width Including Rack Mounting Brackets 482 mm (19”)
Mains Operating Voltage 100 – 240 V 50/ 60 Hz
Standby Power Consumption <1 W
Network Standby Power Consumption <6 W
Weight 2.8 kg (6 lb 3 oz)
This IMS-4 supports AirPlay 2 and requires iOS 11.4 or later.
All specifications are subject to change by Monitor Audio and its partners without notice.


Monitor Audio Ltd.
24 Brook Road
Rayleigh, Essex
SS6 7XJ
England
Tel: +44 (0)1268 740580
Fax: +44 (0)1268 740589
Email: [email protected]
Web: www.monitoraudio.com
Designed & Engineered in the United Kingdom
Made In China
Version 1. 2020
Other manuals for IMS-4
1
Table of contents