Monoprice 16385 User manual

MONOPRICE
MP Intelligent Robot Vacuum with Drop Sensing
P/N 16385
User's Manual

2
CONTENTS
SAFETY WARNINGS AND GUIDELINES.............................................................................................................................. 4
INTRODUCTION....................................................................................................................................................................................... 5
FEATURES..................................................................................................................................................................................................... 5
PACKAGE CONTENTS........................................................................................................................................................................ 5
PRODUCT OVERVIEW........................................................................................................................................................................ 6
Vacuum.................................................................................................................................................................................................... 6
Charging Station...............................................................................................................................................................................7
Remote Control.................................................................................................................................................................................7
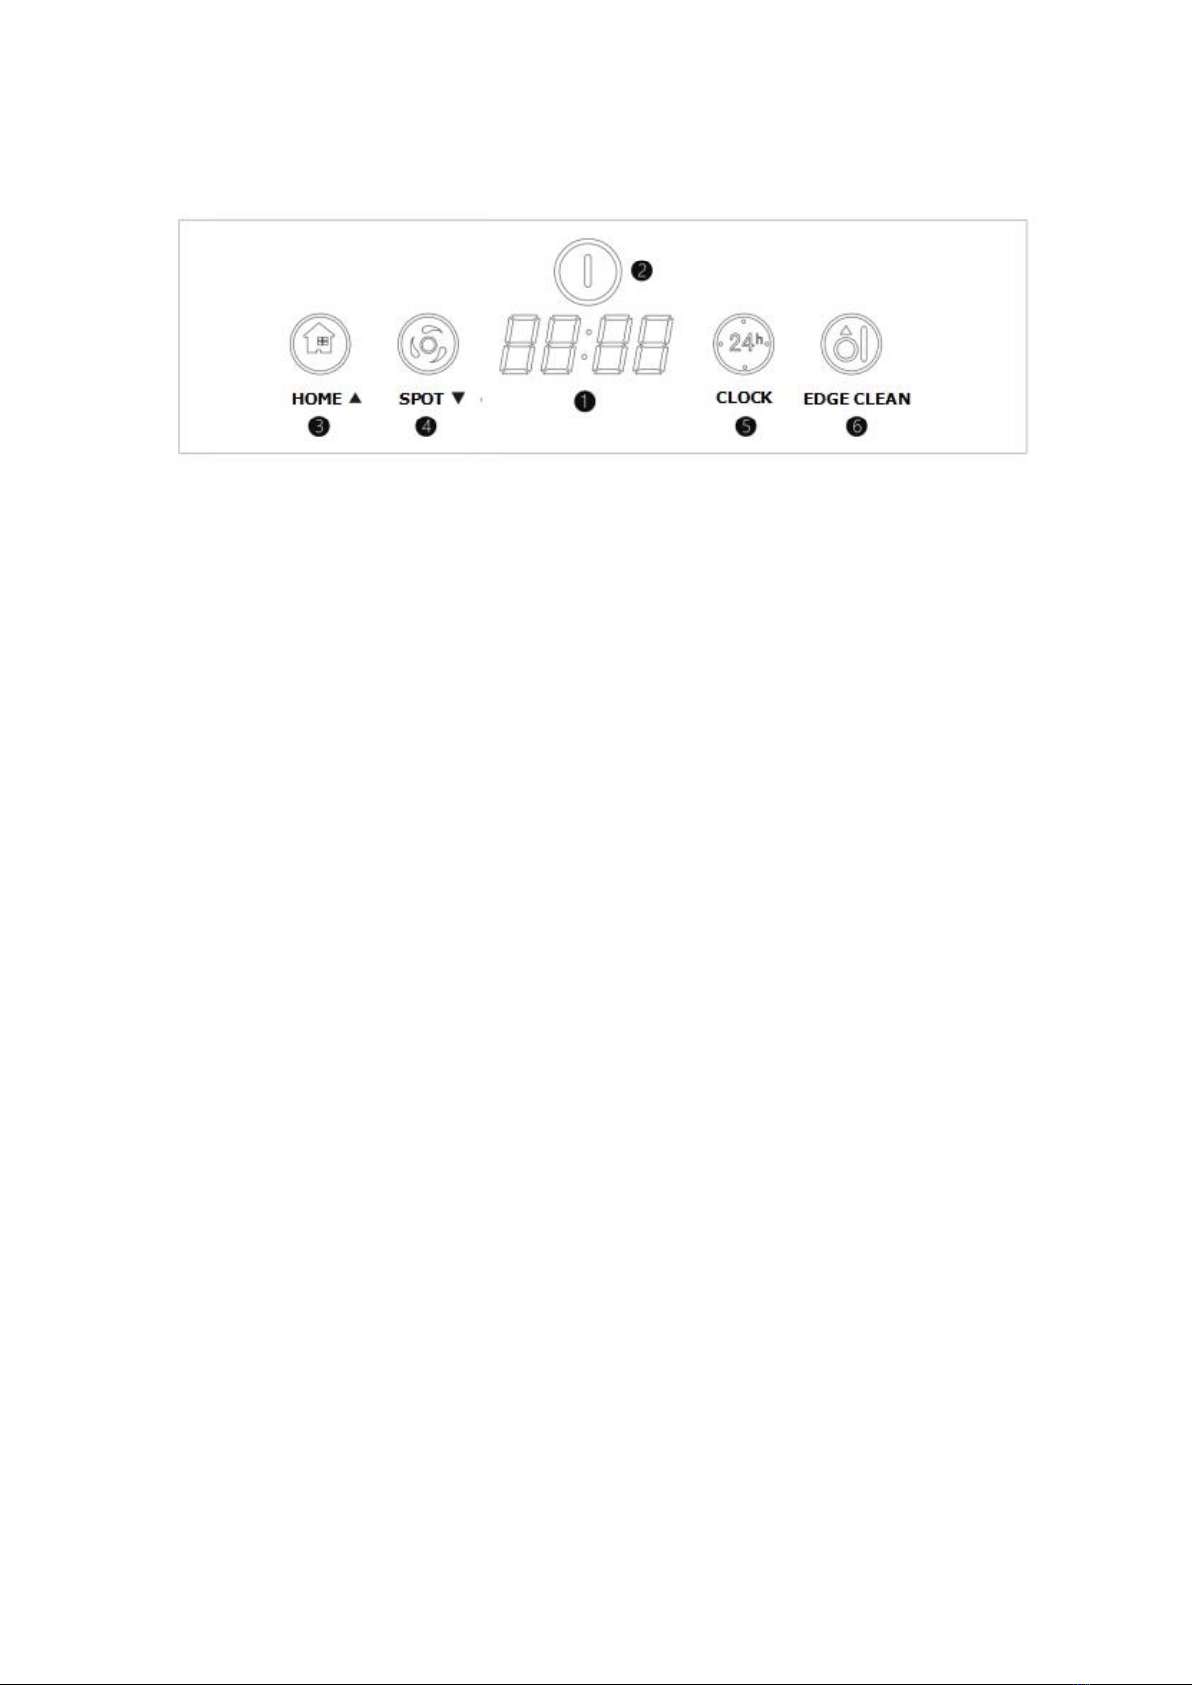
Main Panel............................................................................................................................................................................................. 8
OPERATING MODES.............................................................................................................................................................................9
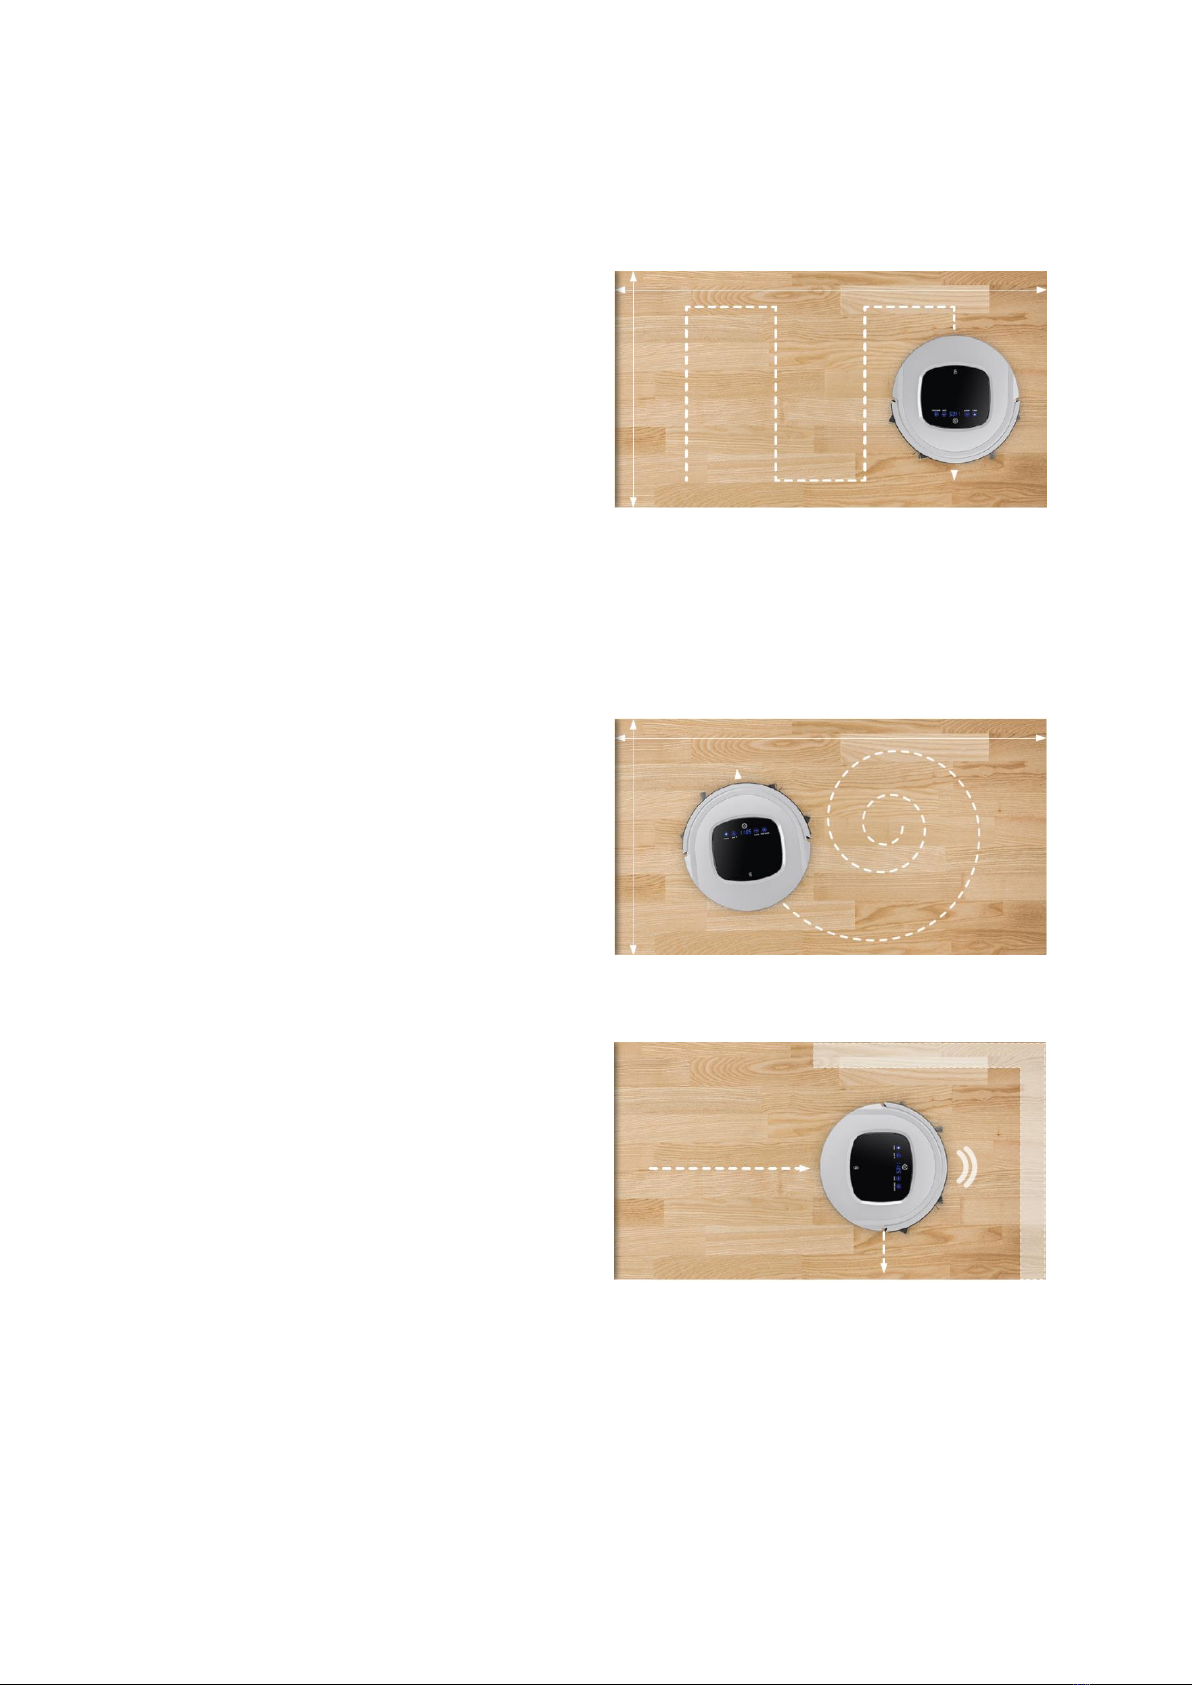
Normal Cleaning Mode...............................................................................................................................................................9
Spot Cleaning Mode.....................................................................................................................................................................9
Edge Cleaning Mode ....................................................................................................................................................................9
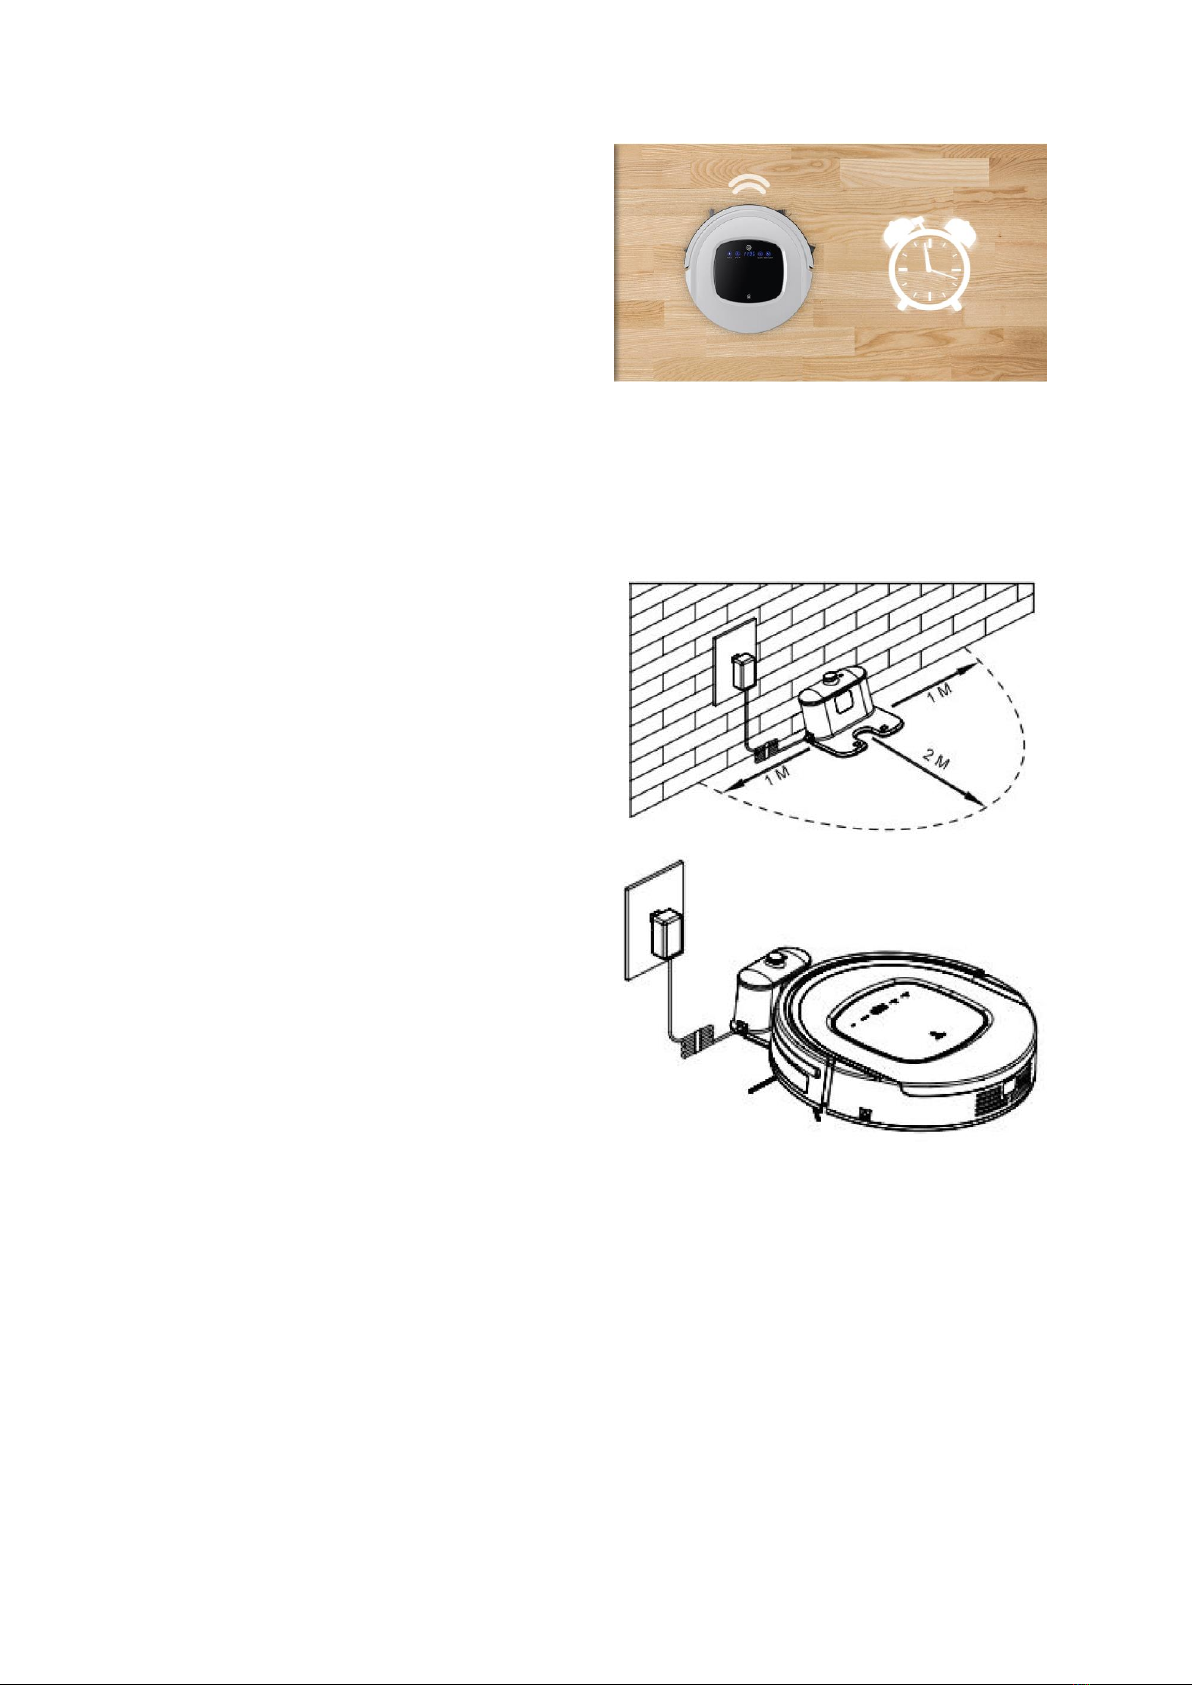
Schedule Mode............................................................................................................................................................................... 10
SETUP AND CHARGING ................................................................................................................................................................. 10
OPERATION.................................................................................................................................................................................................11
Power On/Off.....................................................................................................................................................................................11
Standby and Sleep Modes .....................................................................................................................................................11
Cleaning..................................................................................................................................................................................................12
SCHEDULING............................................................................................................................................................................................13
Setting the Clock ...........................................................................................................................................................................13
Setting the Scheduled Time.................................................................................................................................................13
Clearing the Schedule Time................................................................................................................................................. 14
MAINTENANCE.......................................................................................................................................................................................15
Side Brushes .......................................................................................................................................................................................15
Dust Bin and Filters......................................................................................................................................................................15

3
Sensors and Wheels ....................................................................................................................................................................17
Charging Contacts ....................................................................................................................................................................... 18
Suction Passage and Dust Sensor.................................................................................................................................. 18
BATTERY REMOVAL.......................................................................................................................................................................... 18
AUDIO PROMPTS..................................................................................................................................................................................19
TROUBLESHOOTING ........................................................................................................................................................................ 20
TECHNICAL SUPPORT..................................................................................................................................................................... 25
SPECIFICATIONS.................................................................................................................................................................................. 25
REGULATORY COMPLIANCE.................................................................................................................................................... 26
Notice for FCC ................................................................................................................................................................................ 26
Radio Notice for FCC .................................................................................................................................................................27
Notice for Industry Canada..................................................................................................................................................27
Radio Notice for Industry Canada..................................................................................................................................27

4
SAFETY WARNINGS AND GUIDELINES
Please read this entire manual before using this device, paying extra attention to these
safety warnings and guidelines. Please keep this manual in a safe place for future
reference.
This device is intended for indoor use only.
Do not expose this device to water or moisture of any kind. Do not use it in wet
or moist environments, such as the bathroom or laundry room. Do not use it to
clean wet spots on the floor.
Do not touch the device, the power cord, or any other connected cables with
wet hands.
Do not expose this device to excessively high temperatures. Do not place it in,
on, or near heat sources, such as a fireplace, stove, radiator, etc. Do not leave it
in direct sunlight.
Do not use this vacuum in proximity to curtains, cords, loose cables, fragile
objects, papers, loose debris, or anything that could get easily knocked over.
Do not use this vacuum around cigarette ends, lighters, matches, volatile liquids
such as gasoline, or any other flammable materials.
If the vacuum needs to be cleaned, it should be fully charged beforehand.
Do not sit on the vacuum or allow pets or children to sit on it. Take care when
using this around children or pets.
Do not use this product where it can easily fall, such as on tables, chairs, or next
to stairs.
Turn off the vacuum when transporting it or when it will not be used for a long
time.
Empty and clean the dust bin and filters after each use.
Remove the batteries from the remote if it will be unused for a long time.
Fully charge the battery before first use and at least once every three months.
This device contains a rechargeable battery. Dispose of the device or battery
only in accordance with local, state, or federal regulations for electronic waste.
Do not allow small children to use or play with this vacuum.

5
INTRODUCTION
Thank you for purchasing this Intelligent Robot Vacuum! This vacuum can automatically
clean the floor of almost any room. It features several cleaning modes, including
Normal, Spot, and Edge cleaning. It uses side brushes and powerful suction to clean the
floor without agitator brushes. It can clean for up to 100 minutes at full power on a
single charge and can automatically return to its Charging Station when the battery
charge is low. It has a large dust bin and HEPA filter, and includes a remote control.
FEATURES
Normal, Spot, and Edge cleaning modes
Cleaning can be scheduled
Powerful suction to clean even the smallest dirt or dust
Can clean carpeted and non-carpeted floors
Automatically adjusts suction power based on floor type
Washable dust bin and main filter
Includes infrared remote control
PACKAGE CONTENTS
Please take an inventory of the package contents to ensure you have all the items listed
below. If anything is missing or damaged, please contact Monoprice Customer Service
for a replacement.
1x Vacuum
1x Charging Station
1x Power Adapter
1x Remote Control
2x HEPA Filters
1x Cleaning Brush
4x Side Brushes
1x User's Manual

6
PRODUCT OVERVIEW
Vacuum

7
Charging Station
Remote Control
1. Clean Button (on/off): With the vacuum in
Standby mode, press the Clean button to start
or stop cleaning.
2. Directional Buttons: While cleaning is in
progress, press the directional buttons to alter
the vacuum's path. The left and right buttons
will cause the vacuum to turn in those
directions, the forward button will cause the
vacuum to move forward and the back button
causes it to back up. The center button has no effect.
3. Spot Cleaning Mode Button: Press the Spot button to cause the vacuum to
enter Spot cleaning mode in its current location. The vacuum will automatically
re-enter Normal cleaning mode when the Spot cleaning is finished. Alternatively,
use the directional buttons to re-enter Normal mode or stop cleaning by
pressing the Clean button.
4. Home Button: Press the Home button to cause the vacuum to return to the
Charging Station to begin charging.
5. Mode Button: Press the Mode button to cycle through the three cleaning
modes.
Note: Insert two AAA batteries (not included) into the remote control's battery
compartment prior to use. Remove the batteries if the remote will go unused for a long
period of time.

8
Main Panel
1. LED Display: The LED display shows the time setting, charging status, and error
codes.
2. Clean Button: When the vacuum is in Sleep mode, press the Clean button to put
it into Standby mode. When it is in Standby mode, press the button once to start
automatic cleaning. When in Standby mode, press and hold the button for about
3 seconds to put it in Sleep mode. When scheduling, press the button to confirm
the setting. When the vacuum is in charging mode, press the button to start
cleaning.
3. Home Button: When in Scheduling mode, press the Home button to increase the
value. When in any other mode, except while cleaning is in progress, press it to
cause the vacuum to return to the Charging Station and begin charging.
4. Spot Button: When in Scheduling mode, press the Spot button to decrease the
value. When in any other mode, except when cleaning is in progress, press it to
begin Spot cleaning.
5. Clock Button: When in Standby mode, press the Clock button to enter
Scheduling mode. When in Scheduling mode, press it to exit Scheduling mode
and return to Standby mode.
6. Edge Clean Button: When in any mode other than Scheduling mode or when
cleaning is in progress, press the Edge button to begin Edge cleaning mode.

9
OPERATING MODES
Normal Cleaning Mode
The Normal cleaning mode is an automatic
mode in which the vacuum automatically
switches between the three types of
cleaning paths. Normally, when in a room
with few obstacles, it will clean the floor
using an S-shaped path, as shown in the
diagram. When it detects a particularly dirty
spot, it will switch to Spot cleaning mode and when it detects obstacles, it will switch
to Edge cleaning mode. When cleaning is in progress, the LED display shows the current
time.
Spot Cleaning Mode
The vacuum will clean intensively in a spiral-
shaped cleaning pattern when it detects a
very dirty area or when the Spot cleaning
mode is manually activated.
Edge Cleaning Mode
The vacuum cleans along walls and
obstacles when it detects walls and
obstacles or when the Edge cleaning mode
is manually activated.

10
Schedule Mode
Once a cleaning schedule time has been
set, the vacuum will automatically start
cleaning in Normal cleaning mode at the
scheduled time.
SETUP AND CHARGING
1. Position the Charging Station
against a wall near an AC outlet and
with at least 1 meter (3 feet) of space
on each side and 2 meters (6 feet) of
space to the front.
2. Ensure that the Power Switch on the
side of the vacuum is in the OFF
position.
3. Insert the DC barrel connector on
the included AC Power Adapter into
the Charging Socket on the Charging
Station, then plug the adapter into a
nearby AC power outlet.
4. Flip the Power Switch on the side of
the vacuum to the ON position, then
place the vacuum on the floor.
5. Press the Home button on the vacuum or on the included remote control. The
vacuum will automatically position itself against the power station and charging
will begin. While charging is in progress, the LED display on the Main Panel will
show a series of 1s, from left to right. When charging is complete, the LED display
will show FULL.

11
Notes:
Fully charge the battery for 12 hours prior to first use.
Charge the battery for 12 hours at least once every three months.
If the vacuum will go unused for more than three months or for any long period
of time, charge the battery for 12 hours, then flip the Power Switch to the OFF
position and store it in a cool, dry place.
You can charge the vacuum directly,
without using the Charging Station, by
plugging the included AC Power Adapter
into the Charging Socket on the vacuum.
When the vacuum is in Standby mode
and the battery level is low, it will
broadcast the voice message Please
Charge.
When the vacuum is in operation, it will automatically return to the Charging
Station and begin recharging when the battery level is low.
The vacuum will automatically return to the Charging Station and begin charging
when it is finished cleaning.
OPERATION
Power On/Off
Flip the Power Switch on the right side of the vacuum to power it on or off.
While powered on and not in actual operation, the vacuum can be placed in
Sleep or Standby mode.
Standby and Sleep Modes
The vacuum must be powered on to enter Standby or Sleep mode.
The LED display is illuminated when the vacuum is in Standby mode and is off
when it is in Sleep mode.

12
When the vacuum is in Sleep mode, press the Clean button once to enter
Standby mode.
When the vacuum is in Standby mode, press and hold the Clean button for
about three seconds to enter Sleep mode.
When the vacuum is in Standby mode, it will automatically enter Sleep mode if
no buttons are pressed for 60 seconds.
Cleaning
Perform the following steps to manually begin cleaning.
1. Ensure that the Power Switch on the side of the vacuum is in the on position.
2. Press the Clean button on the vacuum to enter Standby mode. If the vacuum is
on the charger it will begin cleaning right away in Normal mode. Otherwise,
press the Clean button again to begin cleaning.
3. While cleaning is in progress, use the remote control to control the vacuum's
cleaning behavior.
Press the Clean button on the remote to stop cleaning and re-enter
Standby mode. Press it again to start Normal cleaning again.
Press the Mode button on the remote to cycle through Normal, Spot, and
Edge cleaning modes.
Press the Spot button on the remote to immediately enter Spot cleaning
mode. After it is finished cleaning the spot, the vacuum will automatically
re-enter Normal cleaning mode.
Press the Home button on the remote to cause the vacuum to return to
the Charging Station to begin charging.
While in any cleaning mode, use the Directional buttons on the remote to
alter the vacuum's cleaning path. Use the left and right buttons to change
the path to the left or right. Use the back button to cause the vacuum to
back up. Use the forward button to straighten out the vacuum's cleaning
path. The center button has no function.
When cleaning is complete or when the battery level is low, the vacuum
will automatically return to the Charging Station to begin charging.

13
SCHEDULING
Setting the Clock
Prior to scheduling, the vacuum's clock should be set to the current time. Perform the
following steps to set the clock.
1. Ensure that the vacuum is in Standby mode or is charging. If it is in Sleep mode,
press the Clean button on the vacuum to enter Standby mode. If the vacuum is
actively cleaning, press the Clean button on the remote control to stop cleaning
and enter Standby mode.
2. Press the Clock button on the vacuum to enter Clock Setting mode. The clock's
hour display will start to flash.
3. Press the Home button on the vacuum to increase the hour value or press the
Spot button on the vacuum to decrease it.
4. Press the Clean button on the vacuum to confirm the hour setting. The clock's
minute display will start flashing.
5. Press the Home button on the vacuum to increase the minute value or press the
Spot button on the vacuum to decrease it.
6. Press the Clean button on the vacuum to confirm the minute setting.
7. Press the Clock button on the vacuum to exit Clock Setting mode.
Setting the Scheduled Time
Perform the following steps to set the time at which the vacuum will begin automatic
cleaning.
1. Ensure that the vacuum is in Standby mode or is charging. If it is in Sleep mode,
press the Clean button on the vacuum to enter Standby mode. If the vacuum is
actively cleaning, press the Clean button on the remote control to stop cleaning
and enter Standby mode.
2. If the clock has not yet been set, set it by following the instructions in the
Setting the Clock
section.
3. Press and hold the Clock button on the vacuum for two seconds, then release
the button to enter Scheduling Mode. The LED display will show either the

14
currently set scheduled time or 00:00 if no scheduled time is set. The hour value
will be flashing.
4. Press the Home button on the vacuum to increase the hour value or press the
Spot button on the vacuum to decrease it.
5. Press the Clean button on the vacuum to confirm. The minute value will begin
flashing.
6. Press the Home button on the vacuum to increase the minute value or press the
Spot button on the vacuum to decrease it.
7. Press the Clean button on the vacuum to confirm the minute setting.
8. Press the Clock button on the vacuum to exit Clock Setting mode.
Clearing the Schedule Time
Perform the following steps to clear the scheduled time.
1. Press and hold the Clock button on the vacuum to enter Scheduling mode. The
hour value will begin flashing.
2. Use the Home or Spot button on the vacuum to set the hour value to 00.
3. Press the Clean button on the vacuum to confirm the hour setting. The minute
value will begin flashing.
4. Use the Home or Spot button on the vacuum to set the minute value to 00.
5. Press the Clean button on the vacuum to confirm the minute setting.
6. Use the Power Switch on the side of the vacuum to turn the vacuum off. Wait
for 3 seconds, then turn the vacuum back on to finish clearing the scheduled
time.

15
MAINTENANCE
Side Brushes
Periodically remove the side brushes to clean them and to remove any hair or
other debris from around the brush post.
Replace the side brushes if they become damaged.
Replace the side brushes at least once every 12 months.
When replacing or reinstalling the side brushes, ensure that the L and R marks on
the brushes match the L and R marks on the bottom of the vacuum.
Dust Bin and Filters
Perform the following steps to empty and clean the Dust Bin and Filters after each use.
1. Use the Power Switch to turn the vacuum OFF.
2. Press Push on the top cover to unlatch the cover.
3. Use the handle on the dust bin to lift it out of the
vacuum.

16
4. Remove the HEPA filter from the side of the dust
bin.
5. Open the dust bin lid and remove the primary
filter.
6. Empty the dust bin.
7. Wash the dust bin and primary filter. Allow the dust
bin and filter to fully dry before reassembly.
8. Clean the HEPA filter with the included brush.

17
9. Reinstall the primary filter, then close the
dust bin lid.
10. Reinstall the HEPA filter in the side of the dust bin,
then reinstall the dust bin into the vacuum and
close the lid.
Notes:
Wash the HEPA filter after 15-30 days of use.
Wait until the HEPA and primary filters are fully dried before reassembly.
Replace the HEPA and primary filters after 24 months of use.
Do not dry the filters in sunlight.
Sensors and Wheels
Periodically wipe the sensors and wheels with a
clean, dry cloth.

18
Charging Contacts
Periodically wipe the charging contacts on the vacuum and Charging Station
with a clean, dry cloth.
Suction Passage and Dust Sensor
Remove the dust bin from the vacuum. Using a
clean, dry cloth, clean the suction passage and
dust sensor.
BATTERY REMOVAL
Perform the following steps to remove the battery from the vacuum. Remove the
battery if storing the vacuum for a long period of time. Replace the battery with
another original battery. Do not use other batteries with this SmartVac.
1. Use the Power Switch on the left side to turn the vacuum OFF.
2. Using a #2 Phillips screwdriver, remove the two screws securing the battery
cover.
3. Lift the battery cover off the battery compartment.
4. Lift the battery out of the battery compartment.
5. Press the lever on the connector, then unplug the battery from the battery lead.
6. Replace the battery cover and secure it in place using the screws removed in
step 2 above.

19
AUDIO PROMPTS
The following table lists all the audio prompts, the condition they represent, and the
corrective action to take, if applicable.
Condition/Action
Audio Prompt
The Home button has been pressed
"Please wait"
The battery level is low
"Please charge"
When charging is started
"Start charging"
When charging is complete
"Charging finish"
The power switch is in the off position
during charging
"Please turn on the power switch"
The vacuum is lifted or is on a dark
surface
"Please put the machine in a safe place"
The wheels are stuck or there is an
internal error
"Wheel overload"
The dust bin is not properly installed
"Please install the dust bin"
An internal error has occurred
"Side brush fault"
A button on the vacuum or remote
control is pressed
Short ring
An operating error has occurred
Short ring
The vacuum is powered on or off
Long ring
The suction inlet is clogged
"Please clean the suction inlet"
When scheduling is confirmed
"Scheduling confirmed"
Scheduling mode enabled with no
existing schedule set
"No scheduling"
An operating error has occurred
"Front bumper fault"

20
TROUBLESHOOTING
If a fault occurs, the vacuum will display an error code on the LED display.
Error Code
Cause
Solution
AUBF
Suction passage blocked
Clean suction passage
AUBN
Dust bin missing or improperly
installed
Properly install the dust bin
E1XX
Left collision switch fault
Check the sensitivity of the front
bumper
E2XX
Right collision switch fault
E3XX
Left and right collision switch
faults
E4XX
Left wheel is off the ground
Put the vacuum on solid ground
E5XX
Left wheel is off the ground and
left collision switch fault
Put the vacuum on solid ground
and check the sensitivity of the
front bumper
E6XX
Left wheel is off the ground and
right collision switch fault
E7XX
Left wheel is off the ground and
left and right collision switch faults
E8XX
Right wheel is off the ground
Put the vacuum on solid ground
E9XX
Right wheel is off the ground and
left collision switch fault
Put the vacuum on solid ground
and check the sensitivity of the
front bumper
EAXX
Right wheel is off the ground and
right collision switch fault
EBXX
Right wheel is off the ground and
left and right collision switch faults
ECXX
Left and right wheels are off the
ground
Put the vacuum on solid ground
EDXX
Left and right wheels are off the
ground and left collision switch
fault
Put the vacuum on solid ground
and check the sensitivity of the
front bumper
Table of contents
Other Monoprice Vacuum Cleaner manuals