Moog ETHERWAVE THEREMIN User manual

ETHERWAVE THEREMIN

3
- Dr. Robert Moog -
“As electronics go, the theremin is very
simple. But there are so many subtleties
hidden in the details of the design. It’s like a
great sonnet, or a painting, or a speech, that
is perfectly done on more than one level.”

IMPORTANT SAFETY INSTRUCTIONS
WARNING! WHEN USING ELECTRIC PRODUCTS, THESE BASIC PRECAUTIONS SHOULD ALWAYS BE
FOLLOWED:
1. Read all the instructions before using the instrument.
2. Do not use this product near water—for example, near a bathtub, washbowl, or kitchen sink; in a wet
basement; or near a swimming pool.
3. This product, in combination with an amplifier and headphones or speakers, may be capable of
producing sound levels that could cause permanent hearing loss. Do not operate for a long period
of time at a high volume level or at a level that is uncomfortable.
4. The product should be located so that its location does not interfere with its proper ventilation.
5. The product should be located away from heat sources such as radiators, heat registers, or other
products that produce heat. No naked flame sources (such as candles, lighters, etc.) should be
placed near this product.
6. Do not operate in direct sunlight.
7. The product should be connected to a power supply only of the type described in the operating
instructions or as marked on the product.
8. The power supply cord of the product should be unplugged from the outlet when left unused for
a long period of time or during lightning storms.
9. Care should be taken so that objects do not fall, and liquids are not spilled, into the enclosure
through openings.
There are no user serviceable parts inside. Refer all servicing to qualified personnel only.
NOTE: This equipment has been tested and found to comply with the limits for a Class B digital
device, pursuant to Part 15 of the FCC rules. These limits are designed to provide reasonable protection
against harmful interference in a residential installation. This equipment generates, uses, and can
radiate radio frequency energy and, if not installed and used in accordance with the instructions, may
cause harmful interference to radio communications. However, there is no guarantee that interference
will not occur in a particular installation. If this equipment does cause harmful interference to radio
or television reception, which can be determined by turning the equipment o and on, the user is
encouraged to try to correct the interference by one or more of the following measures:
— Reorient or relocate the receiving antenna.
— Increase the separation between the equipment and receiver.
— Connect the equipment to an outlet on a circuit dierent from
that to which the receiver is connected.
— Consult the dealer or an experienced radio/TV technician for help.
CAUTION: Please note that any changes or modifications made to this product not expressly approved
by Moog Music, Inc. could void the user’s authority granted by the FCC to operate the equipment.
OPERATING CONDITIONS AND STORAGE: For optimal performance you should use your Etherwave
Theremin between 50–95 degrees Fahrenheit or 10–35 degrees Celsius. Safe operating conditions are
within the range of 50–110 degrees Fahrenheit or 10–43 degrees Celsius. Your Etherwave Theremin
should be stored in temperatures above 32° F (0°C) but never greater than 135° F (57°C).
Do not leave your Etherwave Theremin in a vehicle on a hot day with the windows closed.
Temperatures in a vehicle can exceed 175° F (80°C).

TABLE OF CONTENTS
OVERVIEW
Unpacking and Inspection
Setup and Connections
Using the Mic Stand Adapter
Attaching the Antennas
Tuning Up
About Etherwave Theremin
Music from the Ether
Meet the Etherwave Theremin
LEARNING HOW TO PLAY
Volume Antenna
Pitch Antenna
Getting Started
Playing Exercises and Techniques
Pitch Hand Exercises
Volume Hand Exercises
Pitch and Volume Hand Exercises
Expressive Volume
Vibrato
CONTROLS AND FUNCTIONS
Mute and Monitor
Mute
Phones/Phones Volume
Antenna Functions
Volume Range
Pitch Range
Timbre Parameters
Waveform
Brightness
REAR PANEL CONNECTIONS
Audio Out
Mute Switch
Control Jacks
Pitch CV Out
Volume CV Out
Gate Out
Power
CONTROLLING MOOG SYNTHESIZERS
How It Works
Etherwave Theremin Control Signals
Playing Subsequent 25
Modifying DFAM Performance
CALIBRATION POINTS
Top Panel
Front Panel
Rear Panel
SPECIFICATIONS
SERVICE AND SUPPORT INFORMATION
Warranty
6
8
9
9
10
11
12
13
13
14
14
14
15
16
16
17
17
18
18
19
19
19
19
20
20
20
21
21
21
22
22
22
22
22
23
23
23
24
24
24
26
26
27
27
28
29
30
31
31
6 7
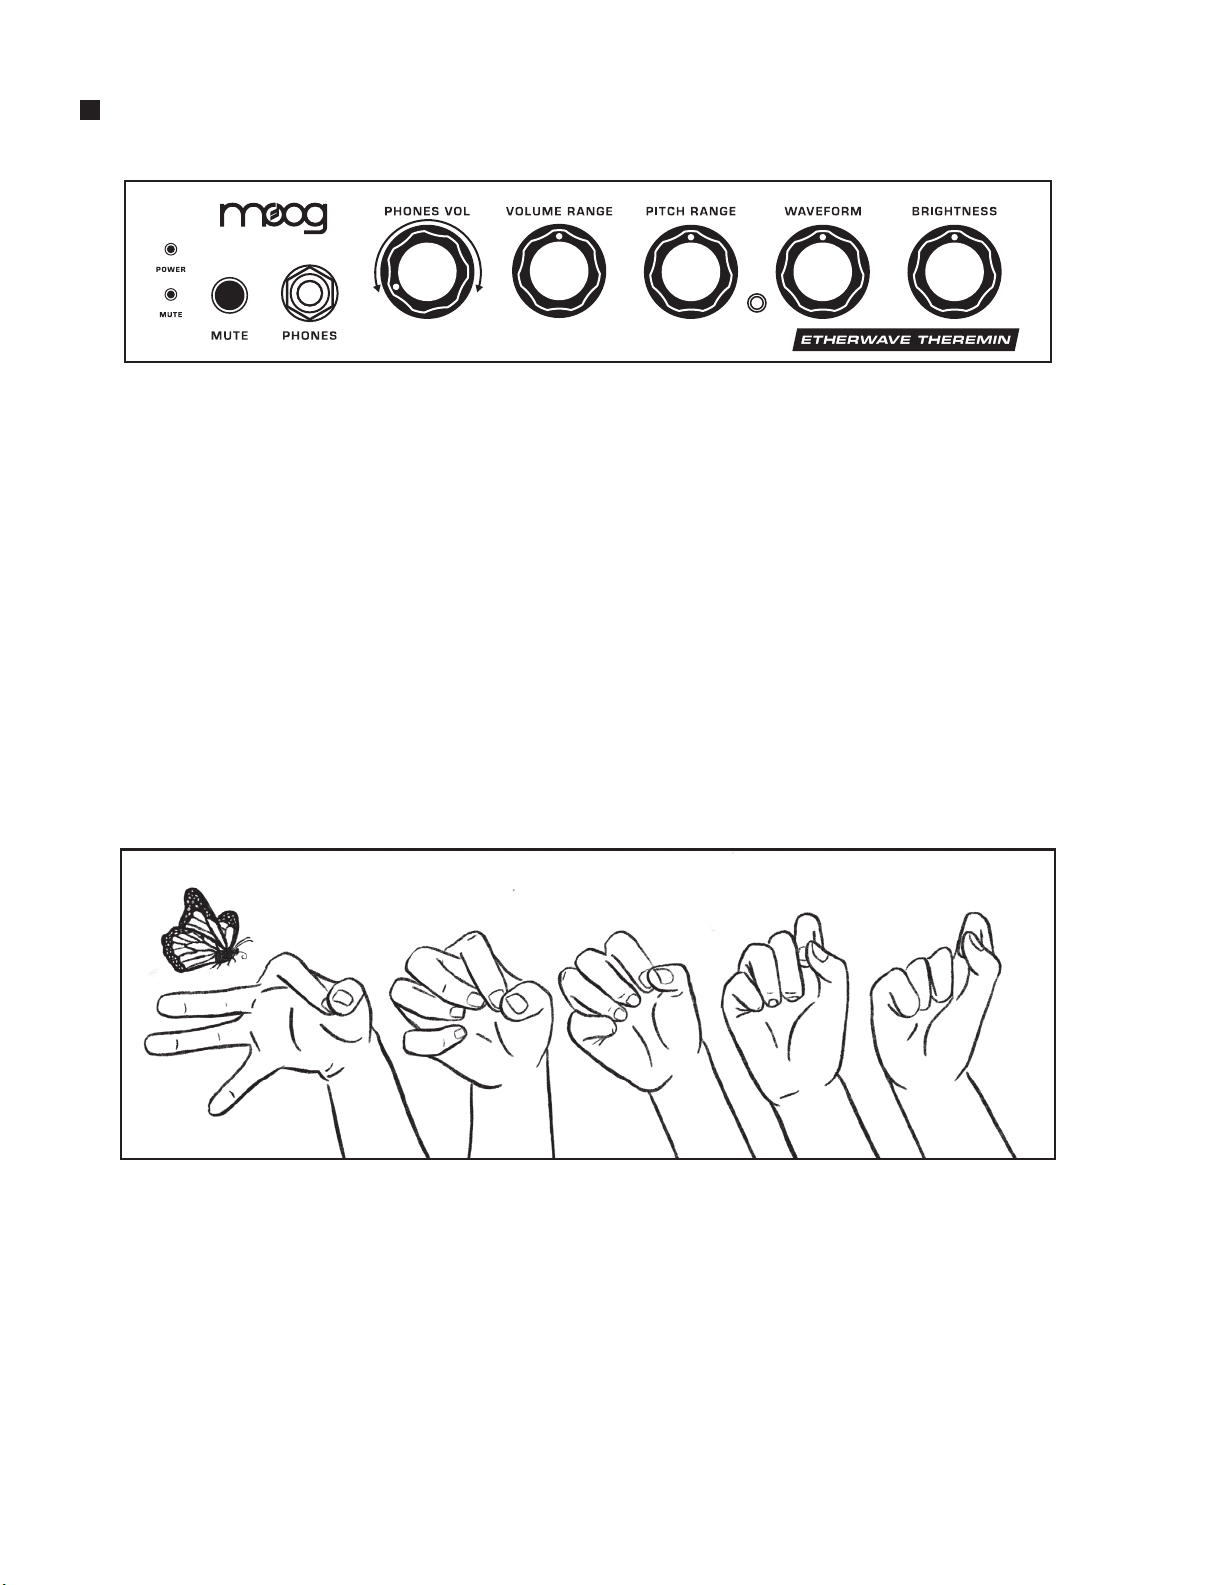
HEADPHONES
Enjoy your Etherwave Theremin via
headphones. The dedicated volume
knob sets the level. This output is
unaffected by the MUTE button.
TIMBRE CONTROLS
This pair of knobs affects the timbre,
or tonal quality, of your Etherwave
Theremin.
VOLUME ANTENNA
AUDIO OUT / MUTE
Activate the MUTE feature via the front
panel button or an optional footswitch
connected here. The headphone output
is unaffected.
The Volume Antenna controls the volume
level of your Etherwave Theremin.
The Pitch Antenna controls the pitch
of your Etherwave Theremin.
PITCH ANTENNA
POWER
Using the included adapter, connect
the instrument to a properly grounded
wall outlet. Grounding is required for
stable operation.
PAGE 19
PAGE 22
PAGE 14
PAGE 14
CV / GATE JACKS
Use your Etherwave Theremin to
control other modular and Eurorack
devices using these output jacks.
PAGE 22-23
PAGE 23
RANGE KNOBS
These knobs adjust the playing range of
the corresponding antennas. Readjust
when setting up your theremin in a
new space to compensate for changes
in the environment.
PAGE 20
PAGE 21
REAR PANEL
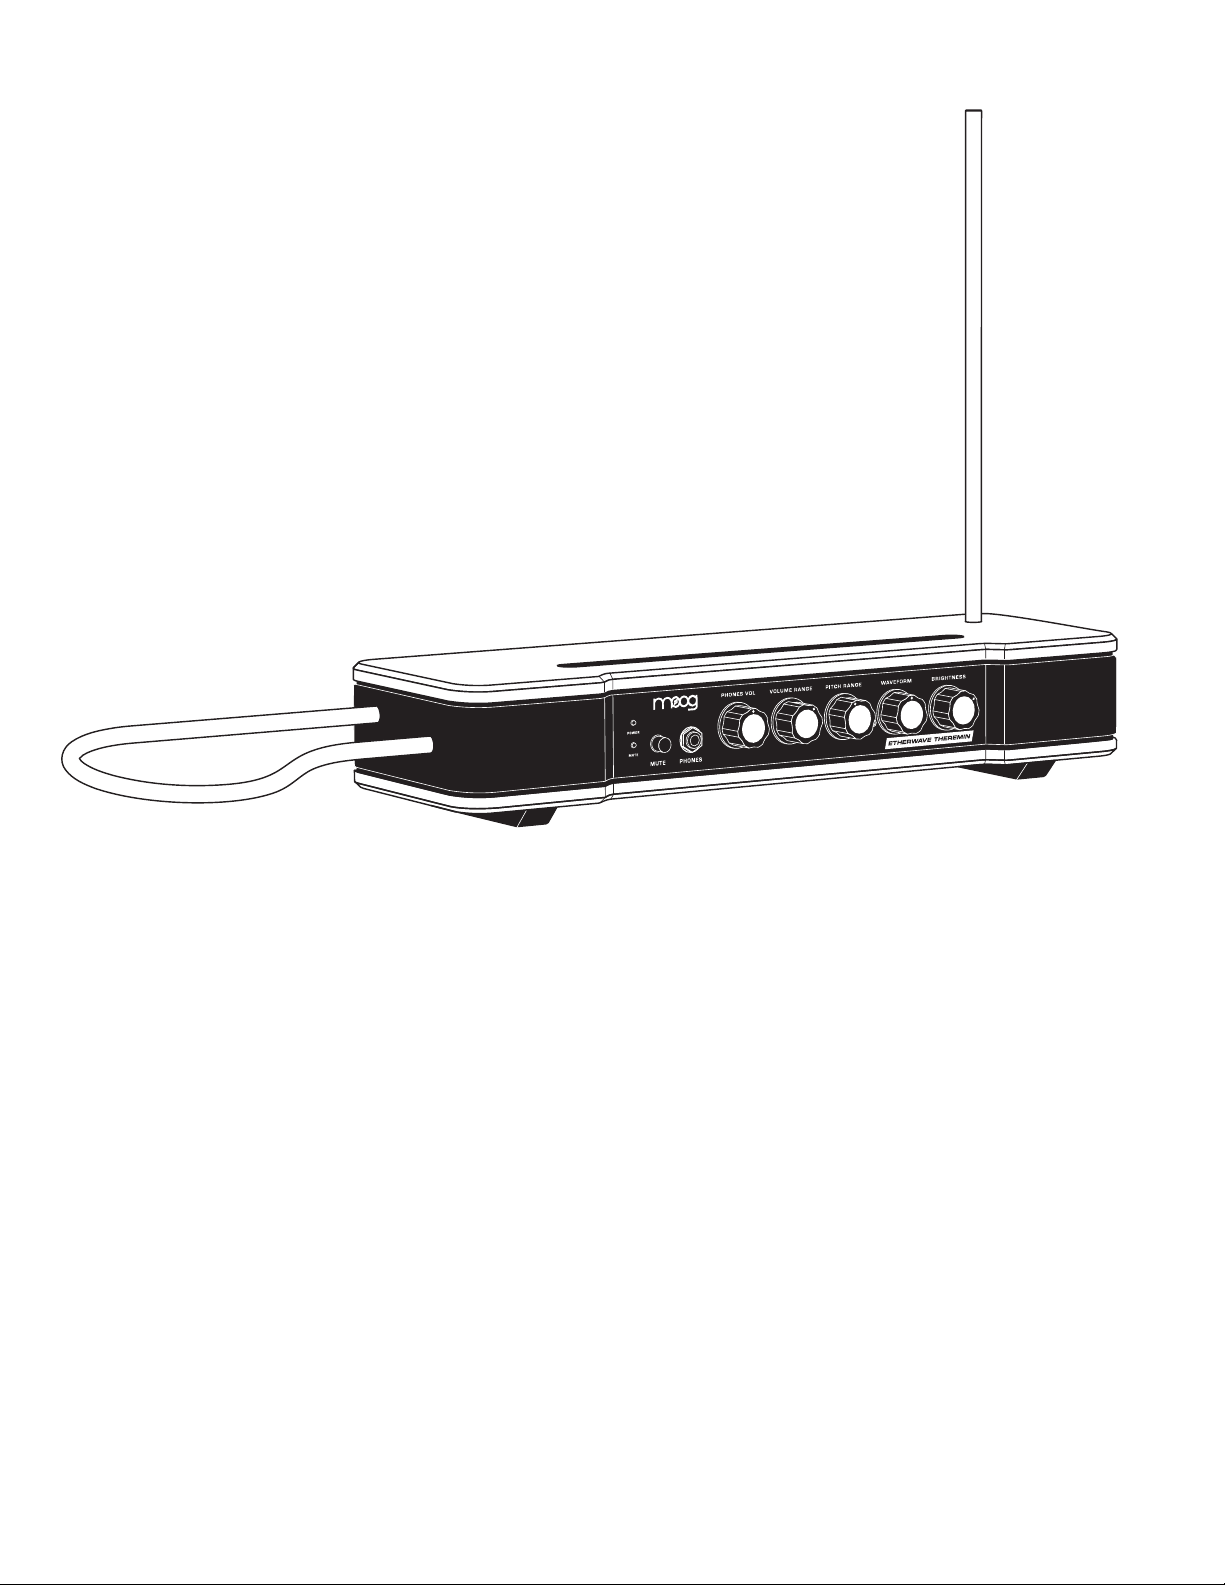
ETHERWAVE THEREMIN

8
UNPACKING AND INSPECTION
Be careful when unpacking your new Moog Etherwave Theremin so that nothing is lost or damaged.
We recommend saving the carton and all packing materials in case you ever need to ship the
instrument for any reason.
Etherwave Theremin ships with the following items:
Etherwave Theremin
Pitch Antenna (Straight Tube)
Volume Antenna (Loop Tube)
Microphone Stand Adapter (attached)
Calibration Tool
Power Supply
User’s Manual
Registration Card
What you will need:
A standard microphone stand, Moog theremin stand, or a non-metallic surface (free of metal
supports or accents) capable of supporting your Etherwave Theremin.
A 1/4” instrument cable and amplified speaker, or headphones with a 1/4” plug.
A properly wired and grounded AC outlet.
NOTE: The player’s entire body acts as the ground in the LC (Inductance/Capacitance) circuitry at the heart of
Etherwave Theremin; therefore, a properly grounded connection is required for stable operation.
1.
2.
3.
4.
5.
6.
7.
8.
1.
2.
3.
9
SETUP AND CONNECTIONS
Let’s begin by getting your Etherwave Theremin properly positioned, attaching the antennas,
making the right connections, and then adjusting the antenna response so that you can begin to
enjoy playing your instrument.
PLACEMENT
Your Etherwave Theremin requires either a standard microphone stand (preferred), or a small non-
metallic table standing 36” to 42” (91cm to 106cm) high. The included microphone stand adapter is
secured using the two thumbscrews as shown below. If a table is used, no objects on the table should
be within a foot or two of the instrument, and Etherwave Theremin itself should be positioned so
that the Volume Antenna will overhang the edge of the table. Your Etherwave Theremin should be
positioned away from walls and other large stationary objects because nearby large objects will aect
the performance of the Etherwave’s antennas.
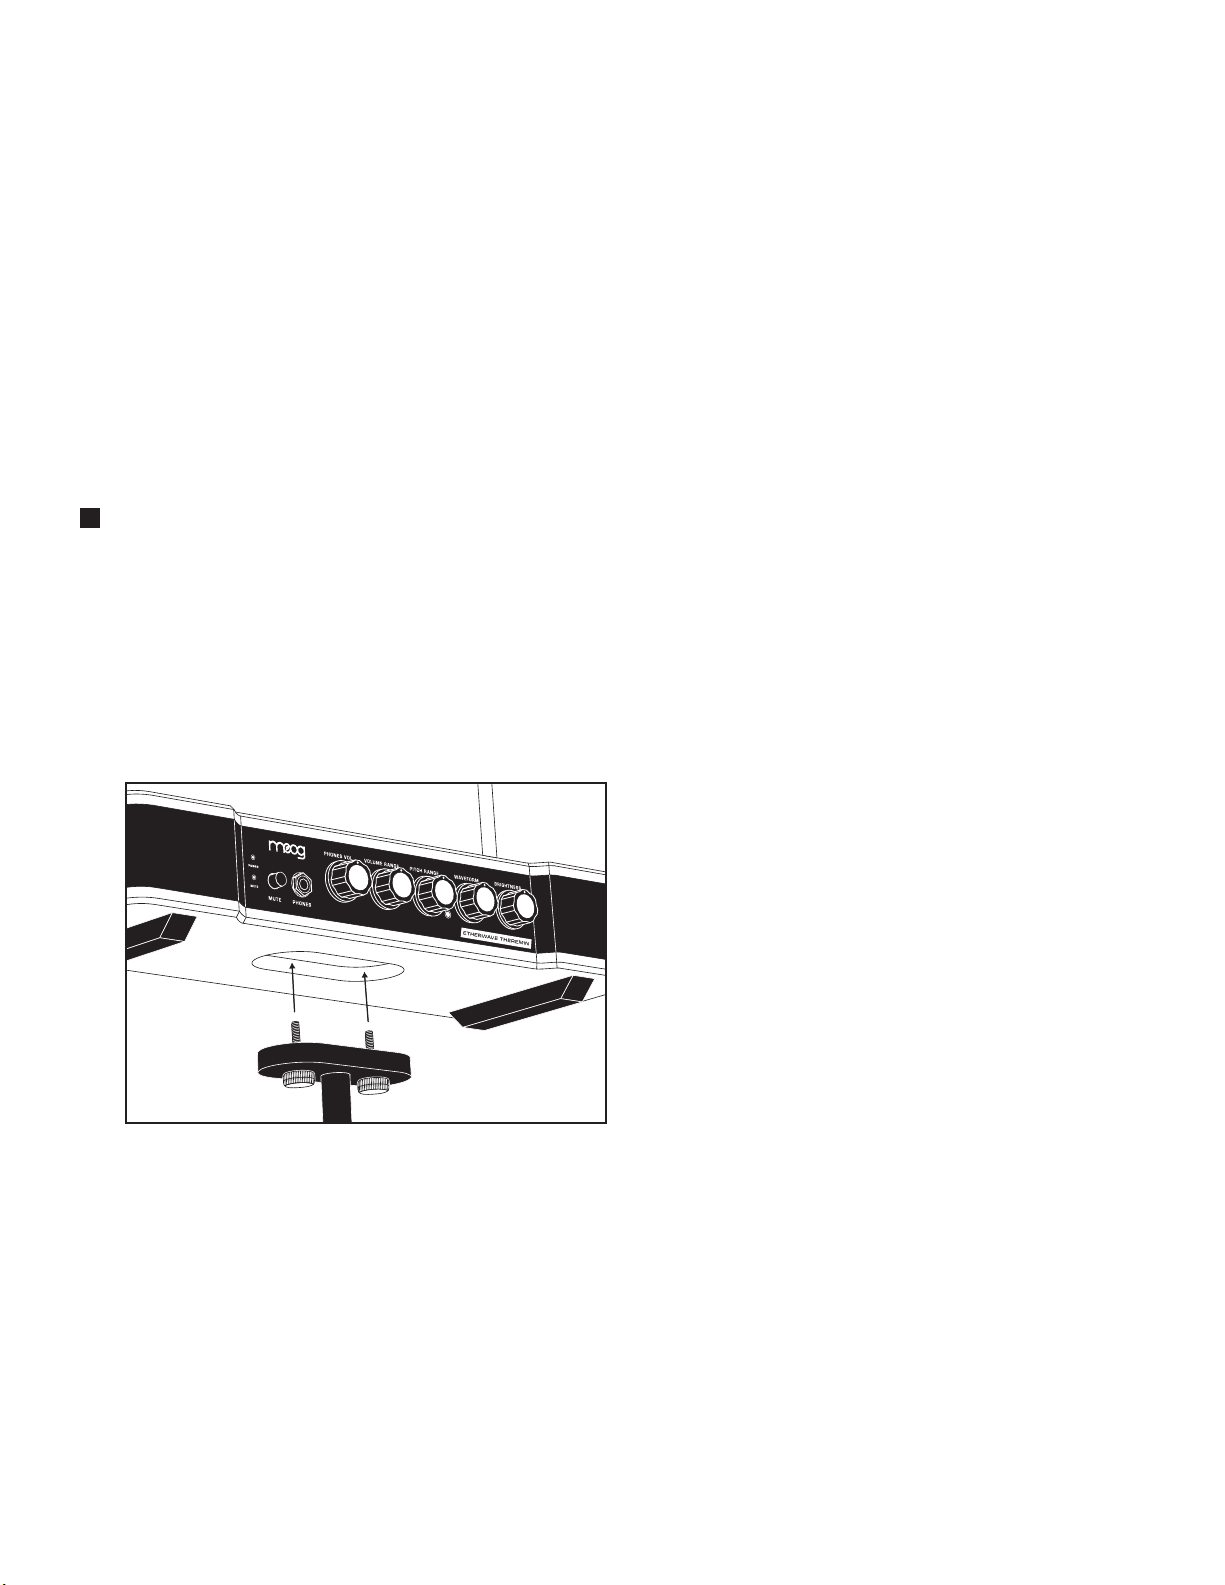
USING THE MIC STAND ADAPTER
The microphone stand adapter/mounting plate was created to make setup of your Etherwave Theremin
quicker and more ecient. No tools are required. The mounting plate consists of a small metal oval
that fits into a recess in the bottom of the instrument. In the center of the mounting plate there is a
threaded hole. On either side are two smaller holes. Each of these smaller holes contains a captive
thumbscrew. The thumbscrews are used to attach the mounting plate to the Etherwave Theremin body.
By design, the mounting plate can remain attached to the microphone stand itself; the thumbscrews
connect and detach the instrument from the mounting plate. This prevents the cumbersome task of
spinning Etherwave Theremin—antennas and all—onto the threads of the microphone stand. Instead,
the stand and mounting plate remain stationary, and the thumbscrews are used to hold it all in place.
STEP 1 - With the heads of the captive
thumbscrews facing down, attach the
mounting plate to a common 5/8” 27
TPI US-threaded microphone stand by
matching up the threads and spinning
the mounting plate in a clockwise
direction, until tight.
STEP 2 - Place Etherwave Theremin on top
of the mic stand and adapter assembly, so
that the mounting plate fits into the recess
in the bottom of the instrument.
STEP 3 - Tighten both of the captive
thumbscrews until secure. Each will
connect to a threaded insert in the
body of the instrument.
NOTE: Double check to make sure both thumbscrews are tightened snugly. There is no need to tighten them
more than finger-tight—remember, you will most likely be taking them out again.
REMOVING ETHERWAVE THEREMIN
To remove the instrument from the microphone stand and adapter, simply loosen and remove the
two captive thumbscrews, then carefully lift Etherwave Theremin from the mounting plate and stand.
10
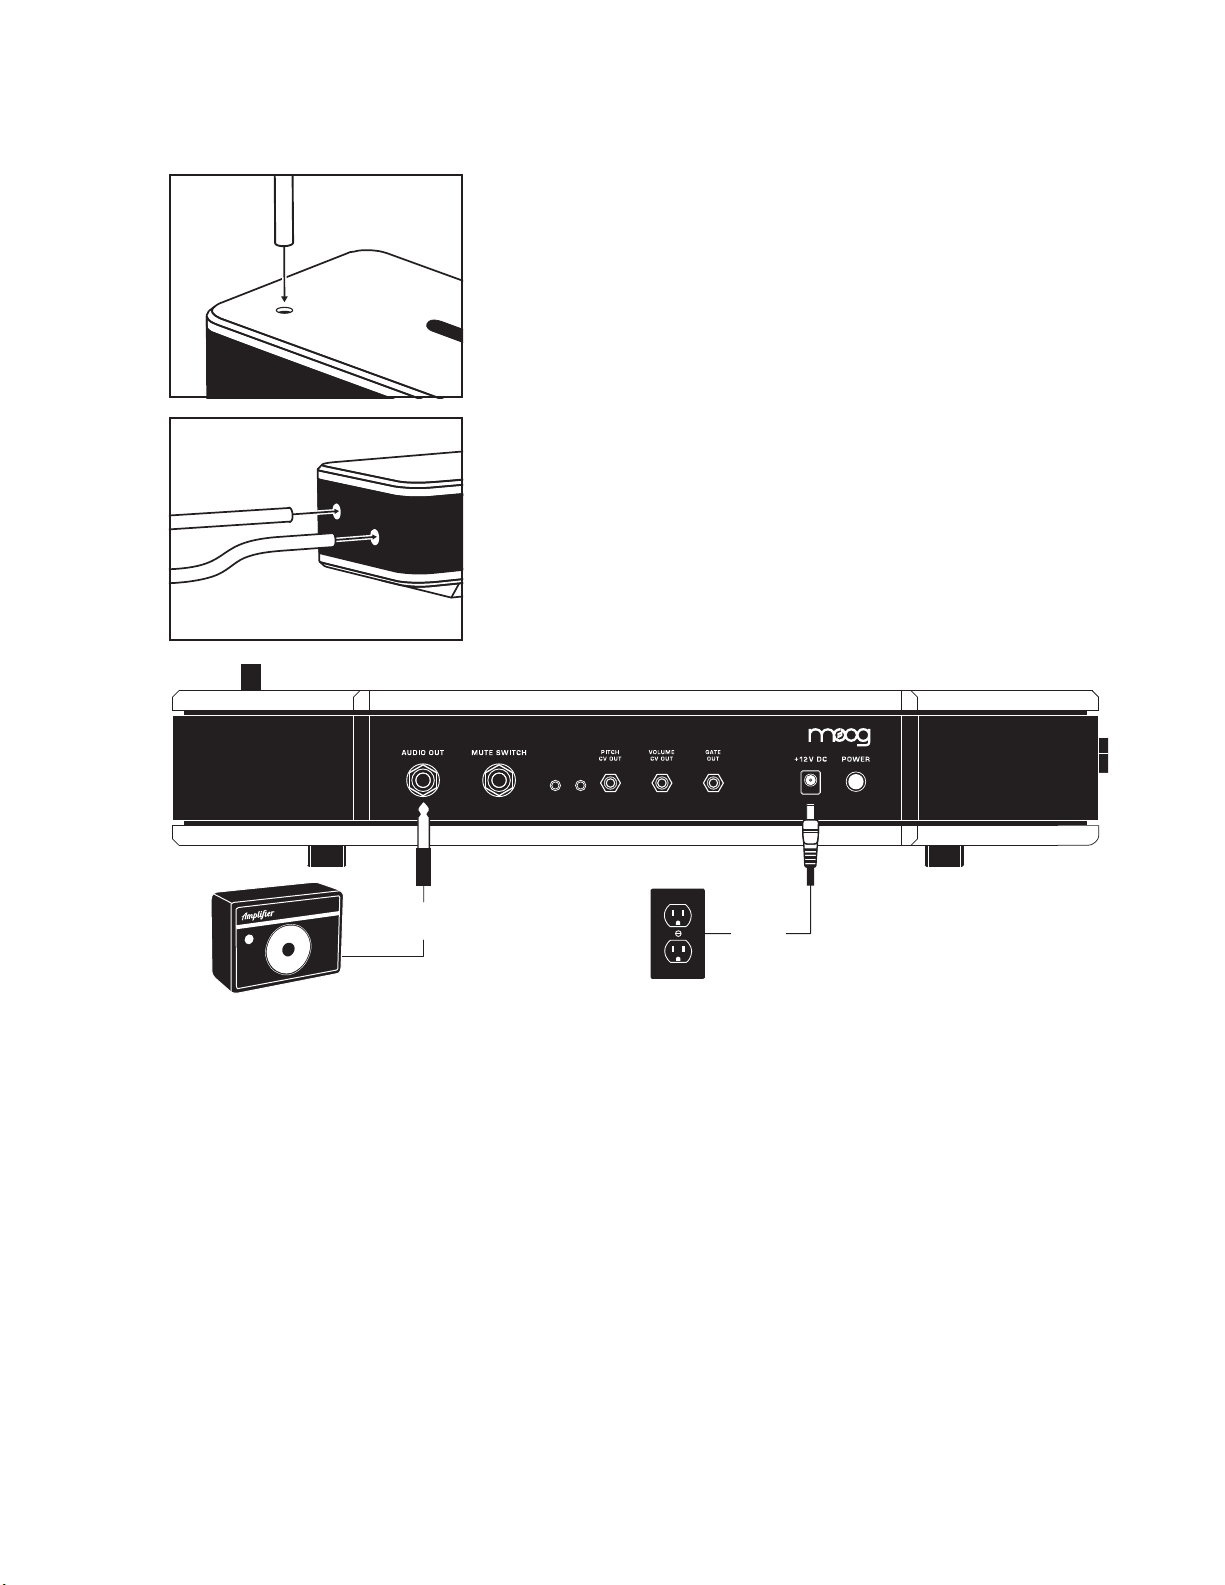
ATTACHING THE PITCH ANTENNA
The Pitch Antenna, which is the long straight tube, is inserted into
the Pitch Antenna opening on the Etherwave Theremin top panel.
Gently insert the Pitch Antenna into the opening (located in the
far right-hand corner of the top panel) so that it sticks straight up
like the mast on a boat. Ensure that the antenna is seated snugly
and securely.
ATTACHING THE VOLUME ANTENNA
The Volume Antenna, which is the looped tube, is inserted into
the two Volume Antenna openings located on the left-hand end
panel of your Etherwave Theremin. Gently insert the Volume
Antenna into the two Volume Antenna receptacles, so that the
bend in the loop is facing toward the performer. Ensure that
the antenna is seated snugly and securely.
SETUP AND CONNECTIONS (Continued)
POWER
Plug the included power adapter into the +12V DC power jack on the rear panel of your Etherwave
Theremin. Pressing the POWER button turns your instrument On. The front panel POWER LED
indicator will remain lit (red) to indicate that the instrument is powered On.
AUDIO OUT
First, plug one end of a 1/4” instrument cable (TS) into the AUDIO OUT jack on the rear panel.
Then plug the other end into an amplified speaker or mixing console input.
PHONES OUT
Your Etherwave Theremin includes a convenient 1/4” headphone jack on the front panel, complete with
a dedicated headphone volume control (PHONES VOL knob). Be sure to keep the headphone cable
secured so that it does not interfere with the Pitch Antenna.
NOTE: This headphone jack is unaffected by the status of the MUTE button (page 19).
Amplifier or
Headphones Power
Supply

11
SETUP AND CONNECTIONS (Continued)
TUNING UP
Tuning each antenna is an important part of being able to perform on your Etherwave Theremin with
precision, and being able to achieve the highest order of control. Please note that all theremins are
sensitive to their immediate surroundings, and these tuning steps should be performed every time you
turn the unit on and get ready to play. As you and your Etherwave Theremin become more acquainted,
performing these tuning steps will become second nature to your theremin experience.
NOTE: A more complete explanation of the VOLUME RANGE knob and PITCH RANGE knob can be found later in
this manual in the section titled ANTENNA FUNCTIONS (page 20).
TIP: Begin with the WAVEFORM and BRIGHTNESS knobs set to their midpoint (12 o’clock) position.
TUNING THE VOLUME ANTENNA
Begin with the VOLUME RANGE knob in the midpoint (12 o’clock) position
and your volume hand floating just above the Volume Antenna so that no
sound is heard. Move your volume hand up and down at varied speeds and
notice the way your Etherwave Theremin responds with changes in volume.
Using your pitch hand, turn the VOLUME RANGE knob counterclockwise to
introduce slower, smoother dynamics and clockwise to experience faster
dynamics approaching a staccato style.
Once you have found the setting that best suits your personal playing style and
the music being performed, move your hand away from the Volume Antenna
and adjust your sound system so that this note is playing at the loudest level
you want to reach.
TUNING THE PITCH ANTENNA
As with the Volume Antenna, begin with the PITCH RANGE knob in the
midpoint (12 o’clock) position. Without touching the Pitch Antenna, rotate
the PITCH RANGE knob fully counterclockwise. A high-pitched note
will begin to emerge. Rotate the PITCH RANGE knob very slowly in the
clockwise direction. As you do, you will hear the note drop in pitch.
When the pitch reaches about an octave below Middle C, step back from
your Etherwave Theremin. The pitch will continue to decrease until the tone
stops completely (null point). This null point is called “zero-beat” because it
corresponds to zero vibrations per second or 0 Hz. With your right shoulder
about 24” (60cm) from the Pitch Antenna and your arm and hand flat at your
side, carefully adjust the PITCH RANGE knob so that the pitch of the note
is more than two octaves below Middle C. Now your antenna settings are
optimized for performance.
TIP: An electronic tuner can be useful for this operation. Two octaves below Middle C
is the lowest note on a cello, and about a Major Third below the lowest note on a six-
string guitar.
Firmer
Attack
Softer
Attack
Slowly rotate clockwise
to find the “null point”

12
ABOUT ETHERWAVE THEREMIN
Your Etherwave Theremin represents the natural evolution of the esteemed Etherwave line of Moog
theremins, combining analog playability with unprecedented performance potential. Easily accessible
controls allow for spontaneous changes in timbre, and the antennas’ response can be adjusted to suit
any player and their environment. In addition, your Etherwave Theremin can connect directly to—and
control—other modular, semi-modular, and Eurorack synthesizer systems. The ecient design keeps
all connections accessible, while keeping any cabling from interfering with the performer. Inside
the finished cabinet, analog components and an updated design allow your Etherwave Theremin
to achieve peak musical performance. In short, this Etherwave Theremin is all things Etherwave—
enhanced for the modern theremin performer.
DIAL IN YOUR SOUND
Waveform and Brightness
controls let you vary the tone
and timbre of your Etherwave
Theremin to meet your
performance needs.
CUSTOMIZE THE
ANTENNA RESPONSE
Independent controls for the
Pitch Range and Volume Range
allow you to tailor the response
to match your playing style.
CONVENIENT
HEADPHONE OUTPUT
The front-mounted headphone
output oers a dedicated
volume control for easy
monitoring.
PERFORMANCE CUE
SYSTEM
Activated via the MUTE button
or an optional footswitch, this
function silences only the main
Audio Output, leaving the
headphone output available for
discreetly tweaking your settings.
HIGHLY ACCESSIBLE
CABLE JACKS
The CV, Gate, Audio, and Power
connections are located on the
rear panel for easy access, and
to prevent cable clutter near
the performer.
PERFORMANCE DESIGN
Etherwave Theremin includes
an adapter for mounting the
instrument onto a standard
microphone stand. Adjusting
the height of the mic stand
provides a comfortable playing
position for performers of
nearly any size.

13
MUSIC FROM THE ETHER
The instrument we now know and love as the theremin was originally christened the Etherphone
(Ætherphone). It was a fitting name for an instrument with no reeds to blow, no keys to press, and no
strings to bow or pluck. Instead, this was an instrument played by a performer who seemingly conjured
music from the ether by the motion of their hands, limbs, and body. Nonetheless, virtuosic performers
—including Clara Rockmore—have achieved unprecedented expression by mastering this unique
connection between the hands, the body, the environment, and the instrument.
Introduced in 1920 by Soviet scientist Leon Theremin (Lev Sergeyevich Termen), the theremin was
embraced by composers and performers of the day—including Edgard Varèse, Joseph Schillinger,
and Dmitri Shostakovich. Over the years, the theremin became the backbone for science-fiction movie
soundtracks and eerie phenomena. Today, the theremin remains an instrument that inspires awe—and
intrigue. The dexterous movements of the artist summon an ethereal sound without touching the
instrument in a way that seems slightly magical—as all good technology should.
But the adoption of the theremin owes less to its other-worldly qualities than its strong foundation in
the burgeoning world of electronics in the 1920s, then seen as a pathway to aid the human artist in
reaching their full potential—much as the computer would do generations later. The theremin remains
firmly embedded in the world of electronic music, and has only grown in popularity, due to strong
interest in the hardware of electronic music creation, a resurgence of analog synthesizer control,
and the instrument’s continued appearances in film and pop culture.
MEET THE ETHERWAVE THEREMIN
The Etherwave Theremin is heir to the name Etherwave—the most popular line of theremin instruments
ever available. Proud to be part of the Etherwave family, Etherwave Theremin represents a full step
forward. Updated electronics have been used to create Bob Moog’s classic theremin circuit designs.
The rear panel strip provides easy access to important ports and jacks while also moving cabling as
far from the performer as possible. On the front panel, controls are accessible and clearly labeled. A
headphone output—with a dedicated volume control—has been added to the front panel, along with
a MUTE button that silences the audio output, while leaving the headphone output live for privately
adjusting the timbre and tuning.
Moog shares a long history with both the theremin and with the Etherwave lineup. Bob Moog loved
the theremin, and built his first theremin as a teenager. Before he turned twenty, R.A. Moog was selling
mail-order theremins and theremin kits—eventually funding his graduate degree at Cornell through
the proceeds of his theremin business. Throughout his career and all of his commercial ventures, the
theremin remained near and dear to Bob. His attention to the theremin and the creation of the first
Etherwave model at Moog Music (previously Big Briar) remains key in the theremin’s steady growth
in popularity.
For the novice enthusiast or the seasoned professional player, the Etherwave Theremin oers
exceptional sound. The thoughtful design was created for performance. The inclusion of CV and
Gate jacks allows your Etherwave Theremin to connect to both new and vintage synthesizers,
from the legendary Moog Modular era to today’s semi-modular Moog instruments and beyond.
14
LEARNING HOW TO PLAY
The Etherwave Theremin is traditionally played by interacting with two electronic antennas using
subtle hand gestures. The horizontal loop antenna is used to control the volume, and the vertical rod
antenna is used to control the pitch. Bringing your hand near the Volume Antenna will decrease the
volume, while bringing your hand near the Pitch Antenna will raise the pitch.
The following sections contain helpful information and practice exercises for developing your theremin
skills. These suggested techniques are intended to guide your experimentation as you discover and
establish your own unique playing style. There is no right or wrong approach; as you get to know the
instrument, trust your instincts to lead the way.
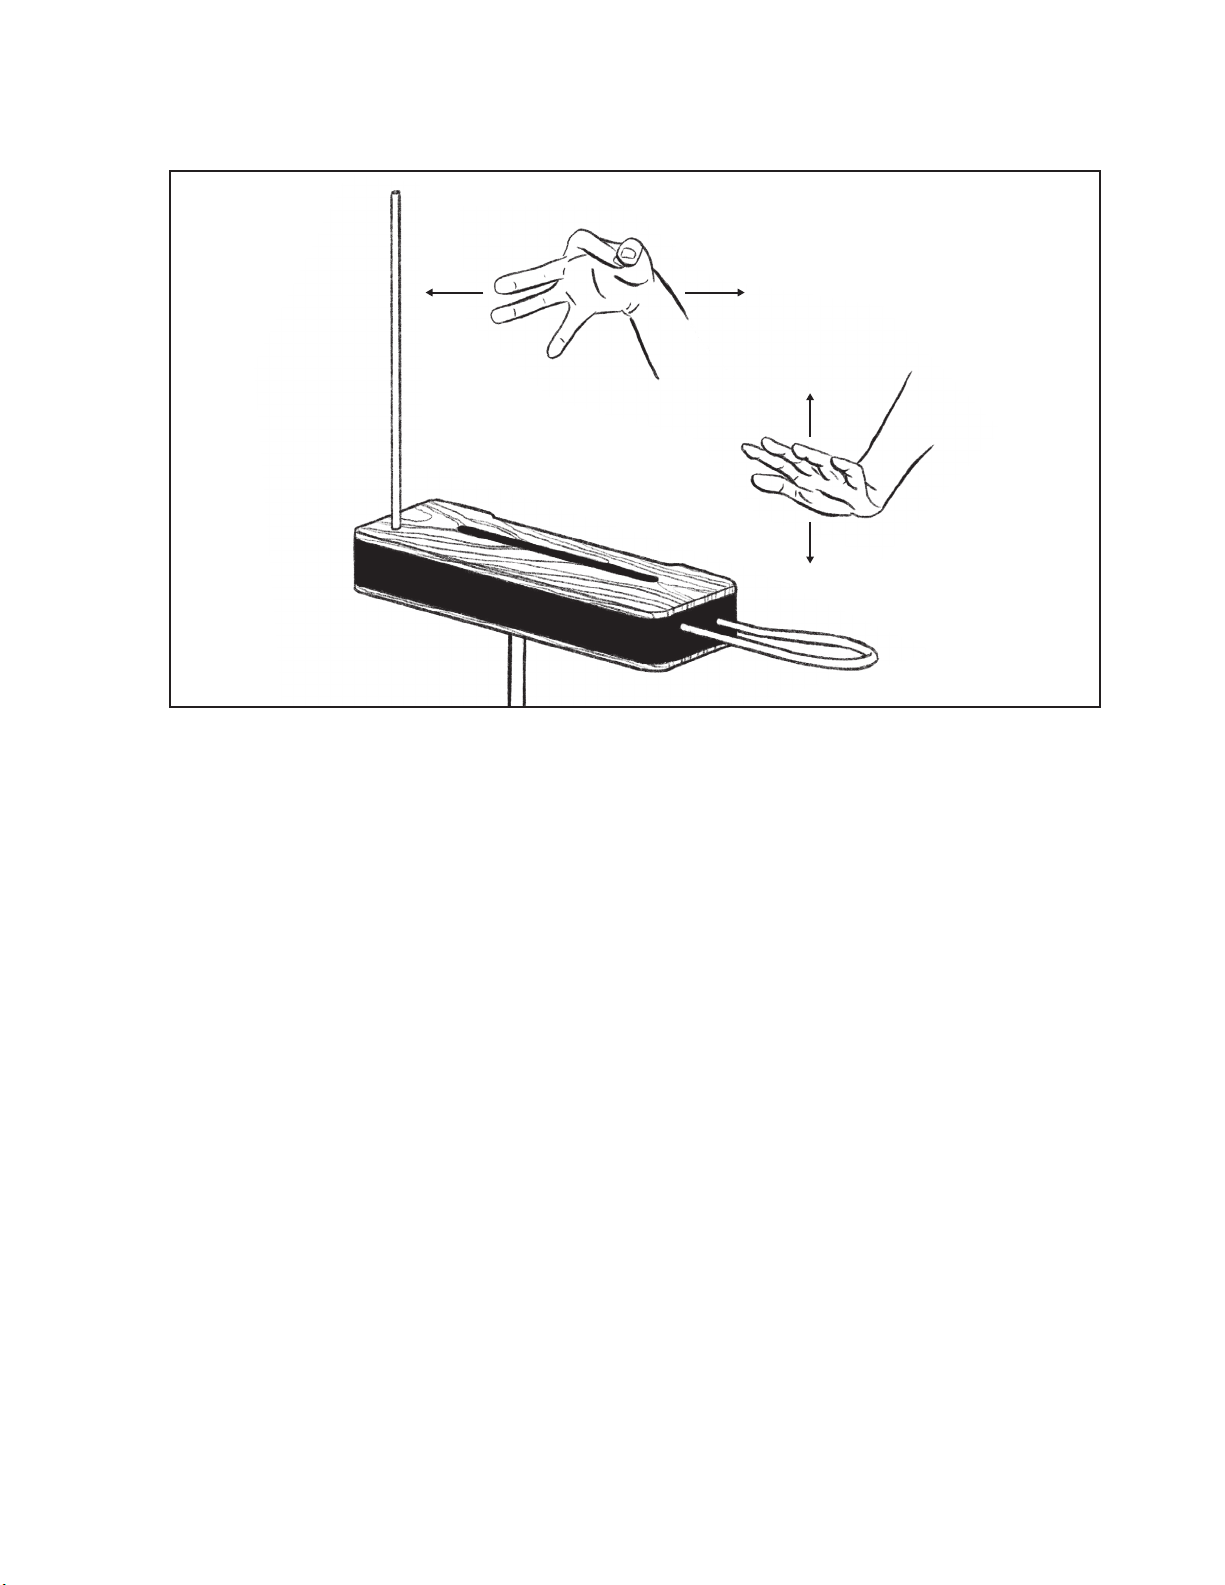
VOLUME ANTENNA
The Volume Antenna controls the volume level of the Etherwave Theremin. Lift your left hand up
away from the Volume Antenna to raise the volume of the Etherwave Theremin. Lowering your hand,
or increasing its proximity to the looped Volume Antenna, makes the Etherwave Theremin quieter.
When your hand is very close, the volume will be muted. You can use changes in the volume to
accentuate, play, or not play notes.
PITCH ANTENNA
The Pitch Antenna controls the pitch or frequency that the Etherwave Theremin is playing—relative to
the horizontal proximity of the player’s hand. Extending your arm outward, bringing your hand closer
to the Pitch Antenna, raises the pitch of the Etherwave Theremin. Pulling your hand back, or reducing
its proximity to the Pitch Antenna, lowers the pitch—or frequency—of the instrument. You can use
changes in proximity to play dierent notes.
LOUD
LOWHIGH
VOLUME
ANTENNA
PITCH
ANTENNA
QUIET
15
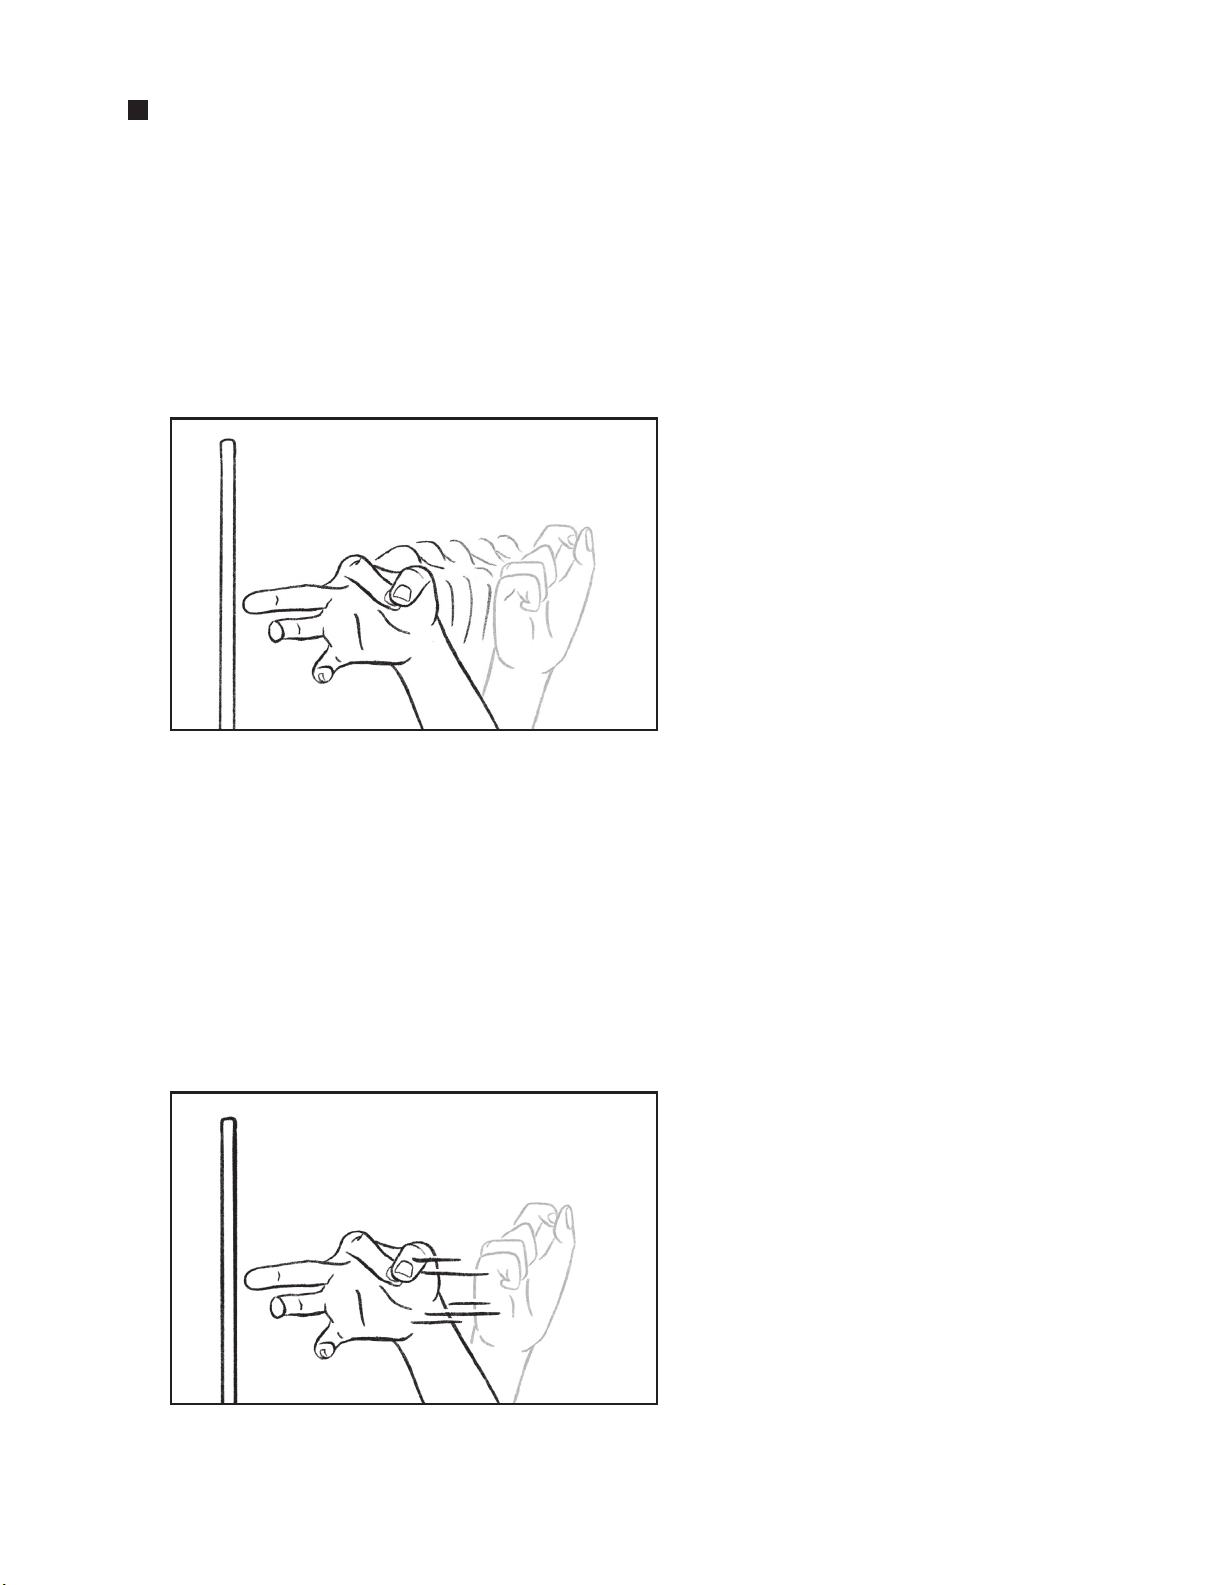
GETTING STARTED - CLASSIC THEREMIN
1. Set your Etherwave Theremin controls to the above knob positions.
2. Stand facing the front panel of your Etherwave Theremin with your body about 12” back and
slightly left of center.
3. Your belly button should be in line with the left edge of the front panel.
4. Adjust your position so that you are about an arm’s length away from the Pitch Antenna.
5. Place your legs slightly apart to keep your body as still as possible.
6. Relax your shoulders and drop your elbows to your waist.
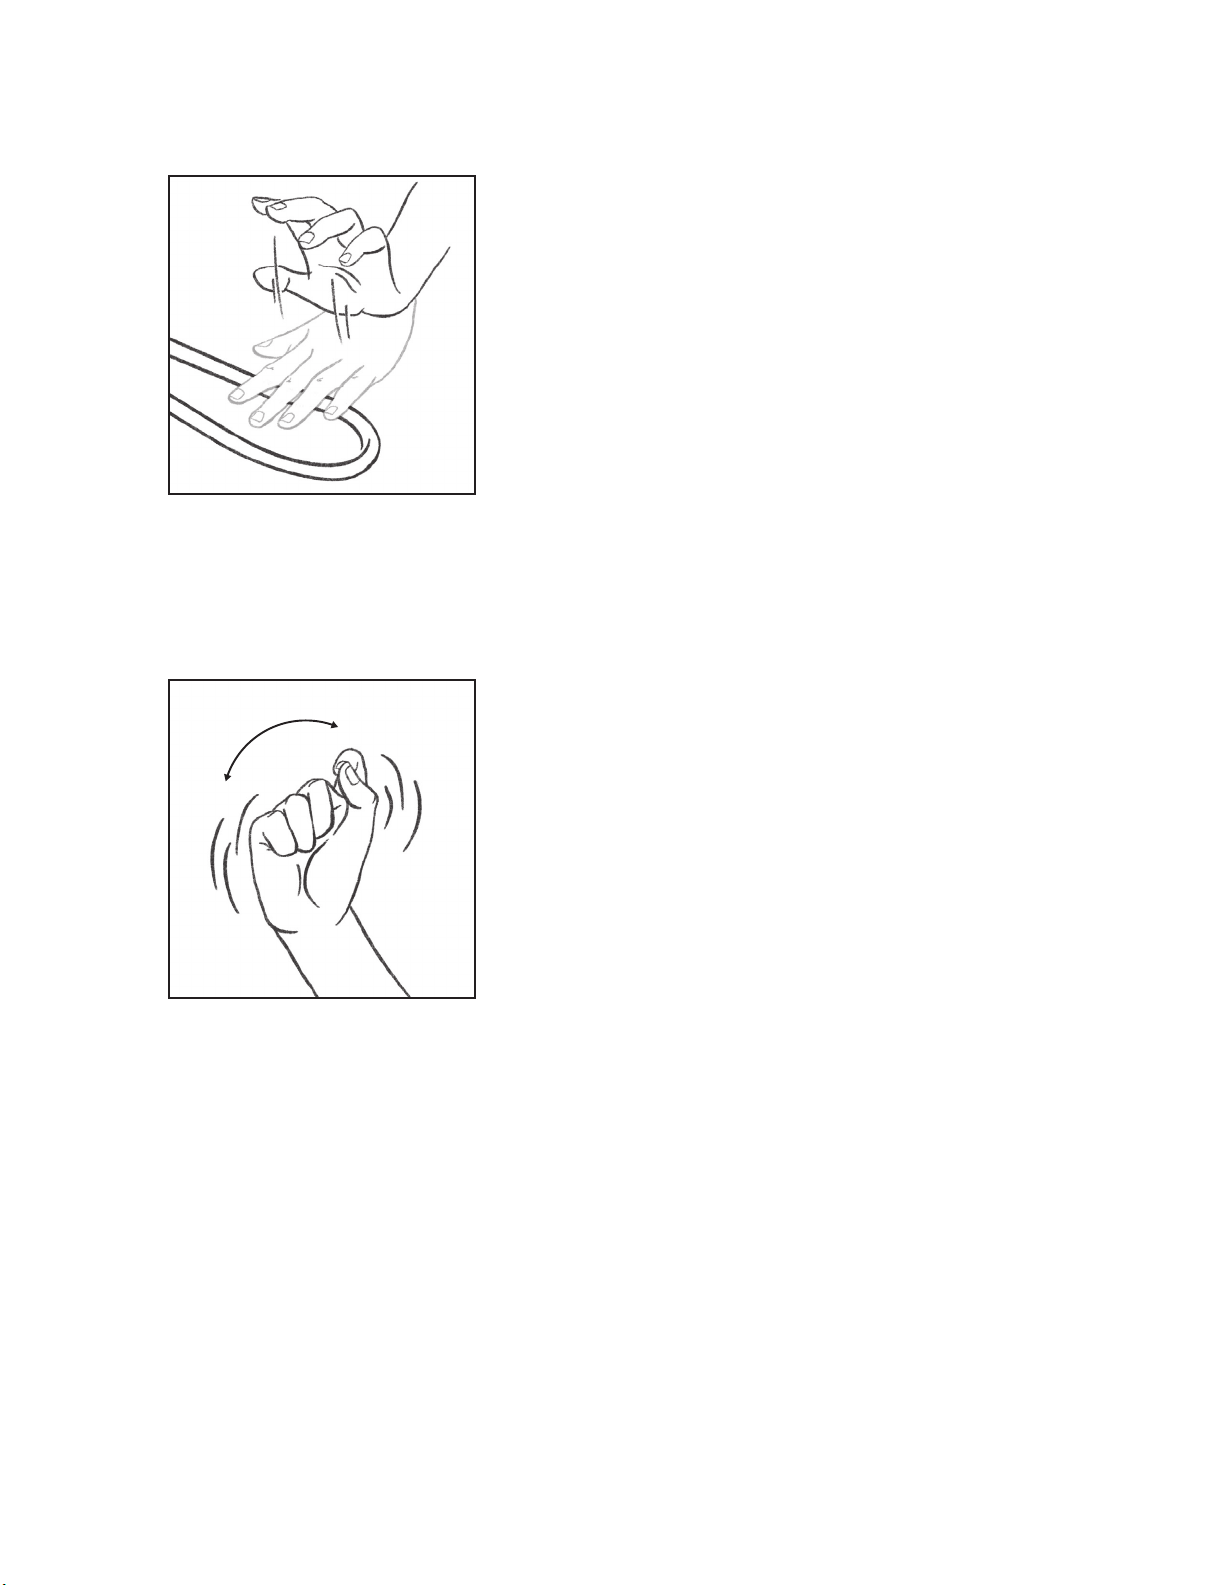
7. Hold your left hand just above the loop of the Volume Antenna, while positioning your right hand
in a rest position with your pointer finger resting on your thumb (as shown on the far right in the
illustration below).
8. Slowly raise your left hand up to hear your Etherwave Theremin.
Notice that it only takes incredibly small movements with your pitch hand to articulate a wide range
of notes. Subtly moving a knuckle or slightly extending your pinky is all that is required to move to the
next note, while opening your fist and spreading out your fingers can raise the pitch of your Etherwave
Theremin a full octave. If you find that your pitch sensitivity range is too small or too big for you to
easily control, you can adjust the PITCH RANGE knob (page 20) to specify the playing range.
Clara Rockmore, widely regarded as the most skillful thereminist in history, utilized a technique with
tiny knuckle extensions. She would start with a loosely closed fist, uncurling her pinky, ring, and middle
fingers outward in small steps while keeping her index finger resting on the thumb. As a beginning
player, this is a good place to start.
NOTE: Avoid large, forceful hand gestures, and focus on light, delicate movements. Imagine tickling butterflies
rather than clutching guitar strings.
16
PLAYING EXERCISES AND TECHNIQUES
The theremin has been described as one of the most dicult instruments to play due to the lack of a
physical interface. Unlike an instrument that provides physical feedback as to where each note lies, the
thereminist must rely strictly on their ears to find each note. The most dicult obstacle to overcome
is learning to control both the pitch and volume simultaneously. While each gesture by itself is quite
simple, performing these two motions at the same time can feel a bit awkward. Fortunately, all it takes
is a little practice. If you use your hands to hold utensils while you eat, you’ll be fine.
PITCH HAND EXERCISES
1. Hum a note. Moving only your pitch hand,
try to find that same note. When you find it,
hold it steady and hum another note just a
few tones higher.
2. Now gradually extend your fingers to
raise the pitch and “glide” to the new note.
This glide is called a glissando.
3. Now slide back down to the first note.
NOTE: You can use an instrument tuner
(connected to the PHONES or AUDIO OUT jack
of your Etherwave Theremin) as a visual aid to
help guide you, but more importantly, listen
to the change and distinct sound of each note.
4. Now hum a third note that is slightly higher than the second. Play the first note, slide to the second,
pause, and then glide to the third.
5. Start at the third note and then play down to the first.
Practice this a few times, going up and down, making sure to hit the same three notes. Gradually speed
up, while keeping your movements smooth and graceful. Pay attention to how much movement is
needed to reach each note. Try to repeat the same movements and finger positions.
When you can consistently glide back and forth across three notes, try this:
Start at the first note again, but rather than
gliding up, make a quick jump to the second
note. This will require snapping your hand
into the second note position with an abrupt
change. This creates the stepped sound of
two distinct notes.
Playing notes together like this, with no
space in between, is referred to as legato.
Practice snapping the three notes in order,
up and down; then, try larger jumps—
snapping from note one to note three.
Experiment by mixing combinations of
legato and glissando.
LEGATO
Quick snap to the next note
GLISSANDO
Glide to the next note
17
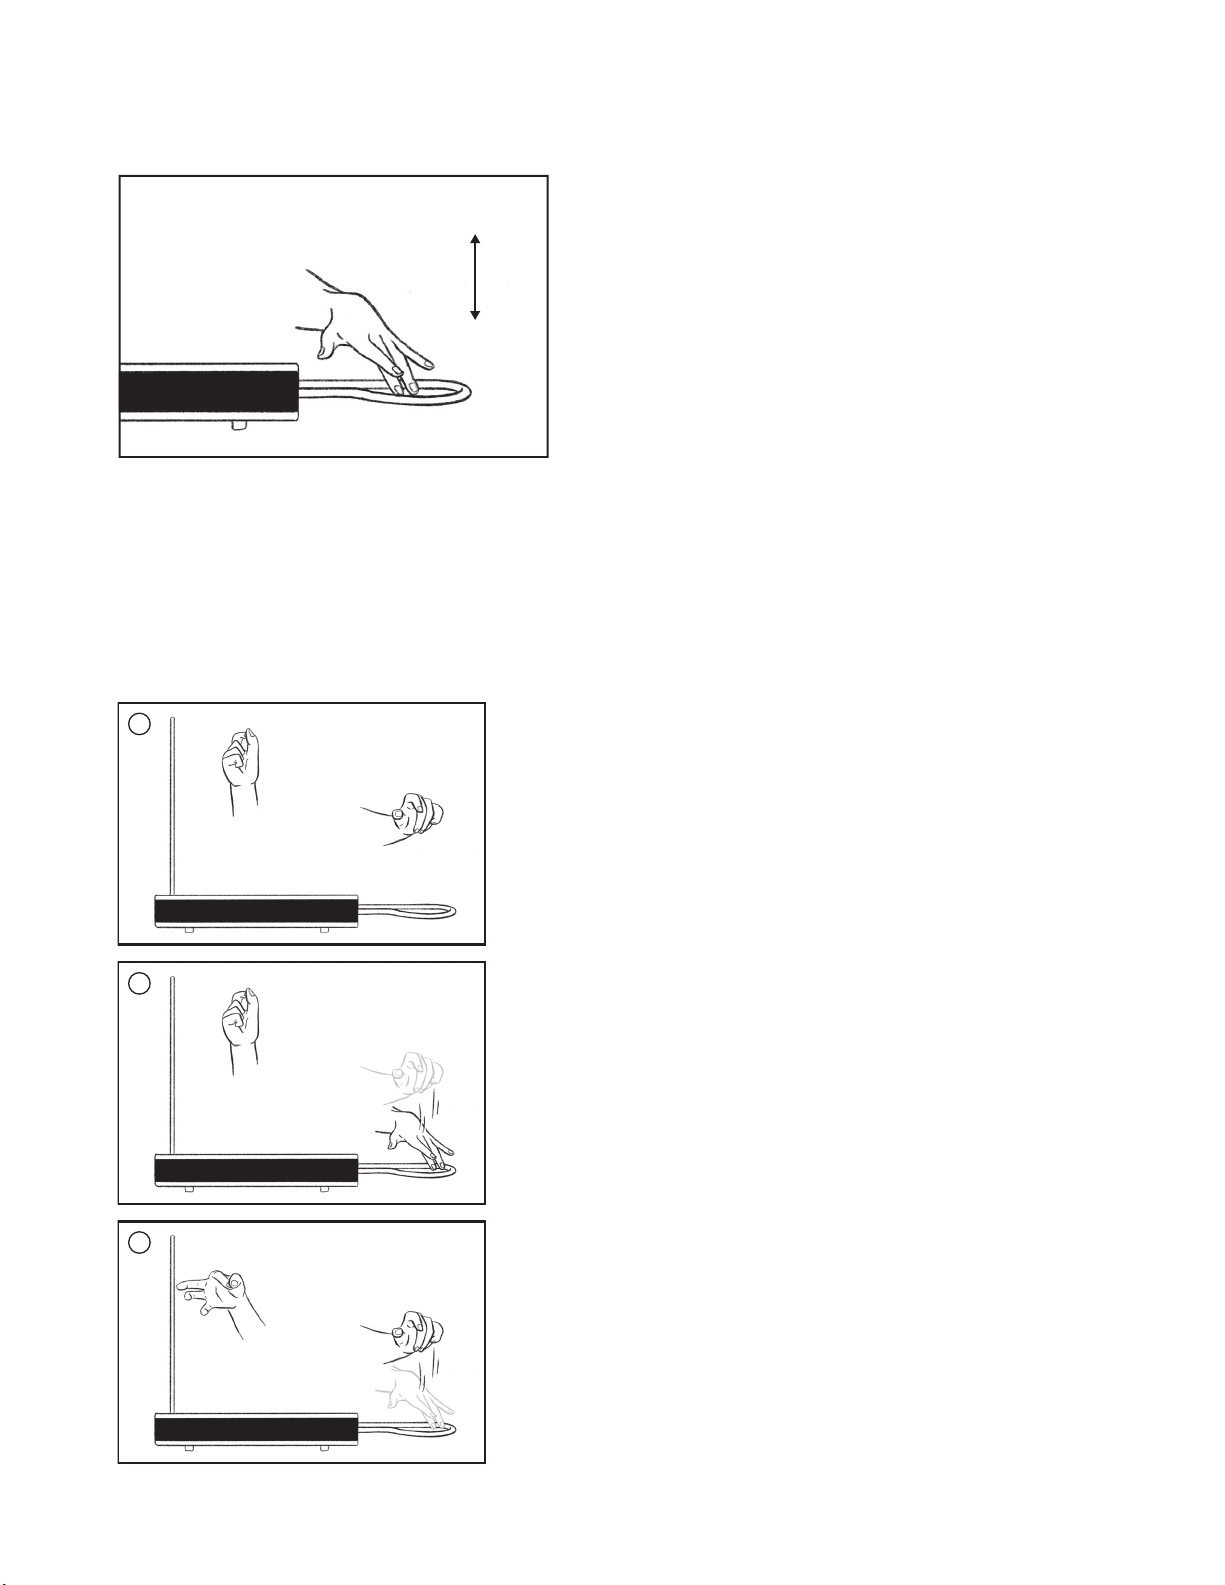
PLAYING EXERCISES AND TECHNIQUES (Continued)
VOLUME HAND EXERCISES
Now that you’ve gotten your pitch hand in shape,
let’s work on your volume hand. Keep your pitch
hand still and use only the Volume Antenna to
articulate notes.
Play any note and slowly raise your left hand
to raise the volume. Gradually lower your hand
toward the Volume Antenna to reduce the volume.
NOTE: Keep the motion mainly in your wrist as opposed
to raising your whole forearm.
Practice making your movements as smooth as possible. The start of the note is called the “attack” and
the end is the “decay.” This exercise is an example of a slow attack and slow decay. Try it again, but this
time, make your movement as quick as possible, so that there is a dramatic jump in volume.
A fast attack gives you the ability to pluck out sharper sounding staccato notes and rhythms. Practice
playing notes with a fast attack and fast decay in groups of three or more; then, try mixing it up by
playing notes with a slow attack and fast decay, or with a fast attack and slow decay.
PITCH AND VOLUME EXERCISES
Now it’s time to get both hands working in concert.
1. Hum a note and play it aloud.
2. This time, before sliding to the second note, slowly
lower the volume all the way using your left hand.
3. Raise your left hand just after your right hand has
glided to the second note.
Do this again, syncing a dip of your volume hand as
you glide between the second to the third note. Don’t
get frustrated if you find it dicult to keep both hands
moving accurately at the same time; just keep practicing!
LOUD
QUIET
1
2
3
18
PLAYING EXERCISES AND TECHNIQUES (Continued)
EXPRESSIVE VOLUME
There is a wide range of loudness that the thereminist can
employ to liven up their playing. Try playing with your volume
hand about three-quarters of the way up. From here, just a
casual raising of your hand or fingers makes the volume swell;
dipping your fingers or wrist slightly makes the volume drop.
This variation in volume adds articulation and depth to your
playing, while also highlighting specific notes or passages
of music.
Try attenuating the volume to emphasize the mood in your
playing, making some sections soft and others loud. If you find
that your volume sensitivity range is too small or too big for
you to easily control, you can adjust the VOLUME RANGE knob
(page 20) to specify the distance between the near volume
and the far volume to suit your needs.
Ideally, you should be able to go from full mute to maximum
loudness with just a flip of the wrist.
VIBRATO
Vibrato is an eect created by shaking your hand and
rhythmically “bending” notes back and forth, causing a
vibration of the pitch frequency.
This can make certain passages seem more mysterious or
interesting. A strong, fast vibrato will add tension or drama
to a passage, while a slow and delicate vibrato creates a subtle
movement that can soften or sweeten a passage. To perform
vibrato, simply give your pitch hand a slight wiggle. The trick
is learning to sync the back-and-forth motions in a way that is
musically appropriate to what you are playing.
Keep your movements small and gentle. You are bending
the note up and down just slightly. Vibrato that is too wide,
covering several steps, is a trill and generally doesn’t sound
as pleasant. There is no “correct” way to perform vibrato, but
generally you want to find a technique that is both precise
and physically comfortable to sustain.
Using only your wrist to provide the necessary back-and-forth
motion can become painful even after just a few minutes.
Instead, try leaving your wrist relaxed and flexible, using mainly
forearm movements to shake your hand.

19
MUTE AND MONITOR
Muting and monitoring controls are conveniently
located on the front panel, where they are easily
accessible during performance. This arrangement
also minimizes interference by keeping the headphone
cable away from other cabling, or from intruding on
the performance space.
MUTE
Pressing the MUTE button stops any audio signals from being sent from the
AUDIO OUT jack on the rear panel. The MUTE LED indicator will remain lit
(red) as long as the Mute Function is On. The PHONES output is unaected
by this MUTE button, allowing the settings and tuning to be adjusted and
checked discreetly, before or during your performance.
PHONES/PHONES VOL
Connecting a set of headphones to the 1/4” PHONES jack allows you
to monitor your performance. The dedicated PHONES VOL knob sets the
listening level for the PHONES output only. Even when the MUTE LED
indicator is lit and the Mute Function is On, the PHONES output will
remain active, so that any parameters can be adjusted and cued up
without broadcasting an audio signal to the audience.
CONTROLS AND FUNCTIONS
The controls on the front panel of your Etherwave Theremin are grouped together by function,
providing intuitive operation of your theremin. This manual will deal with each group of controls,
first collectively, and then individually.

20
CONTROLS AND FUNCTIONS (Continued)
ANTENNA FUNCTIONS
In the TUNING UP section of this manual (page 11), you already learned how to tune each of the
antennas for optimal performance. This section deals a bit more with what is actually changing
and being controlled as you adjust the antenna range knobs.
VOLUME RANGE
In the theremin world, generally the left hand is used to control the volume
and articulation of each note. Bringing the hand closer to the Volume
Antenna (the Loop Antenna) will decrease the volume, until eventually,
with the hand close to or inside the loop, there is no sound. Moving the
hand further away will increase the volume.
When adjusting the Volume Antenna Range, you are actually setting
the rate of volume change caused by your hand motion. That is, if you
want a finer control of soft attacks and dynamics, you might try a lower
(counterclockwise) value for the VOLUME RANGE knob. If you want to
play individual notes cleanly and with a firmer attack, rotate the VOLUME
RANGE knob in the clockwise direction.
PITCH RANGE
Conversely, the right hand is generally used to control the pitch of each
note. Bringing the hand closer to the Pitch Antenna will raise the pitch;
moving the hand (and/or fingers) further away will lower the pitch, until
eventually there is no sound. The PITCH RANGE knob allows the performer
to define a useful playing range by setting the pitch of the null point—that
is, the pitch that will sound when the performer’s hand, arm, or body is no
longer aecting the pitch.
Getting familiar with the Pitch Antenna response is probably the single
most important factor is developing a strong theremin technique. Use
the procedure described in the TUNING UP section of this manual, and
check this parameter each time you prepare to play. In time, you will be
comfortable tweaking the response during breaks in a performance or
session to achieve the best control.
Firmer
Attack
Softer
Attack
Slowly rotate clockwise
to find the “null point”
21
CONTROLS AND FUNCTIONS (Continued)
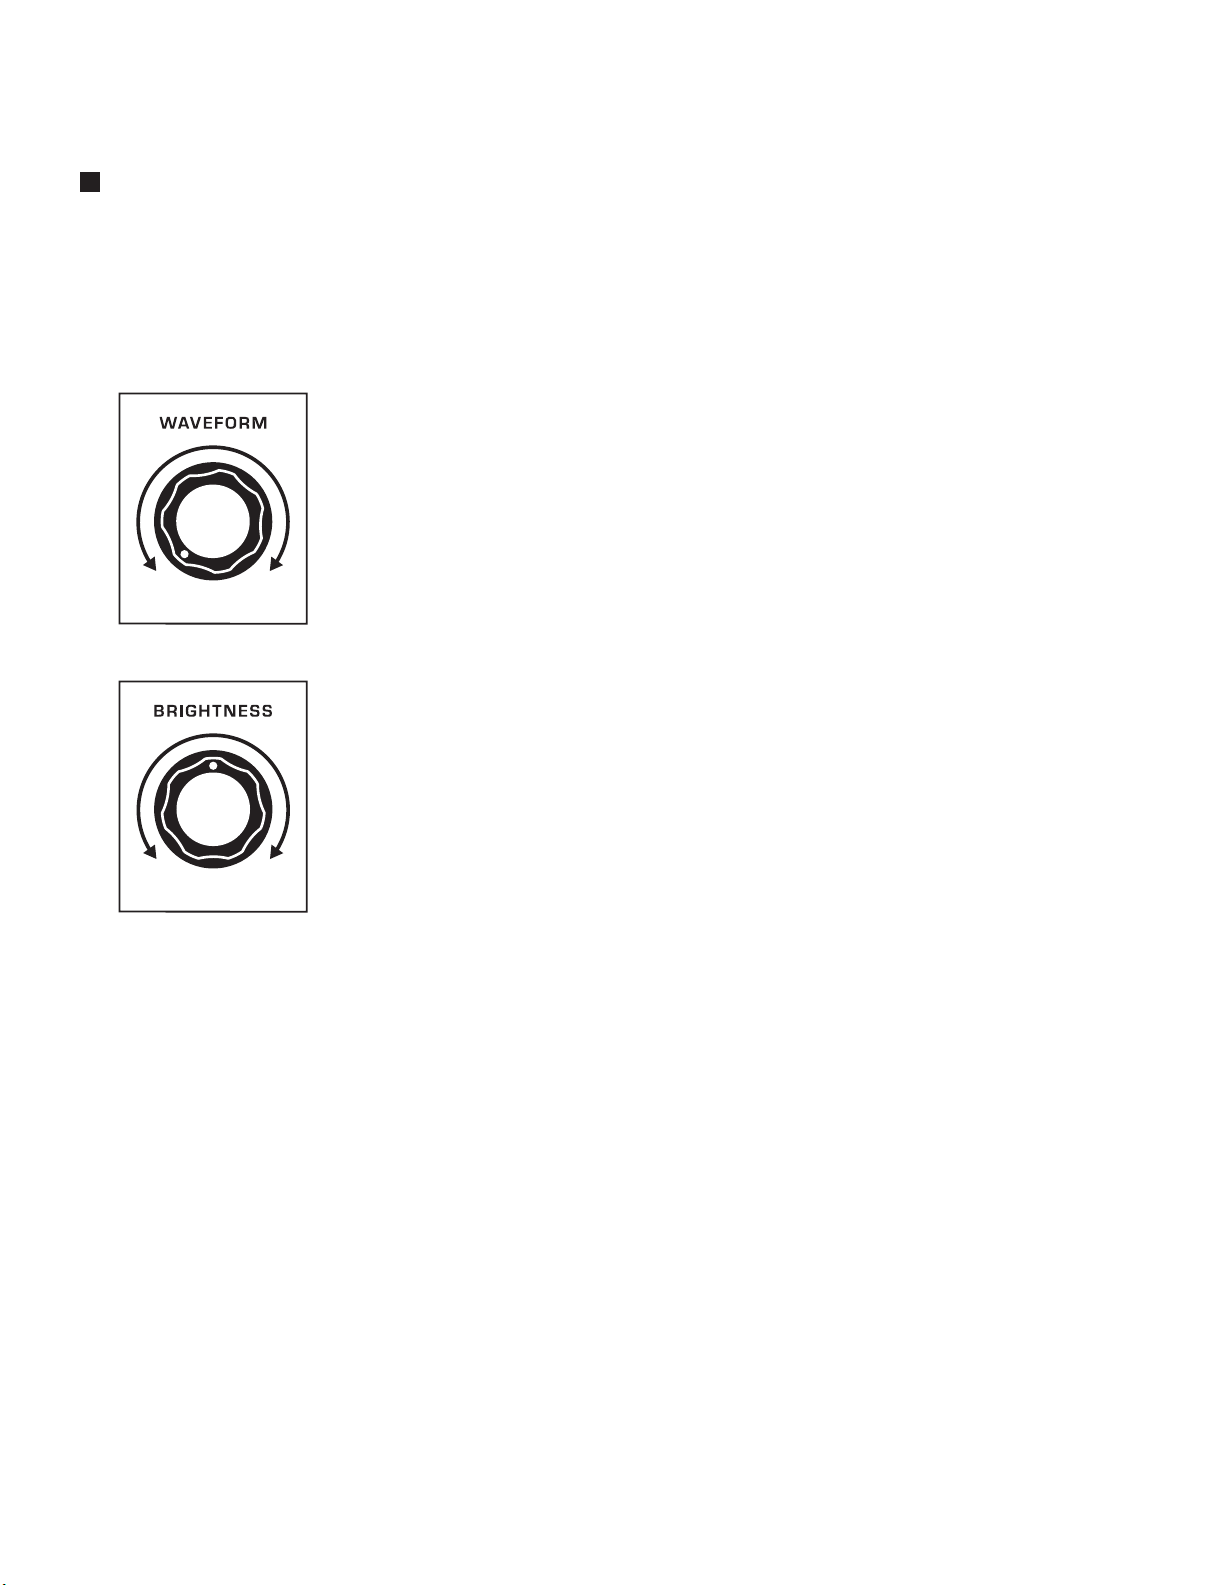
TIMBRE PARAMETERS
This pair of parameters can be used to modify and transform the sound of your Etherwave Theremin
by changing the tonality and harmonic content to suit your preference or your performance.
Each parameter has its own function, but both are part of the analog wave shaping circuitry.
TIP: Begin with both the WAVEFORM and BRIGHTNESS knobs in the midpoint (12 o’clock) position.
WAVEFORM
This parameter controls the analog wave shape, thereby changing the
harmonic content. With this knob in the fully counterclockwise position,
the initial wave will resemble a pulse wave, creating a “reed” or “nasal” tone.
As the WAVEFORM knob is rotated clockwise, the initial wave will morph
into a slightly skewed triangle wave, creating a more “vocal” tone.
BRIGHTNESS
This parameter modifies the transient time (or slew) of the edges of
the wave itself to alter the harmonic content. Rotating the BRIGHTNESS
knob clockwise will increase the “sharpness” of the edges of the wave,
adding more overtones and increasing the harmonic content. Rotating the
BRIGHTNESS knob counterclockwise will produce a “rounder” edge to
the wave, resulting in fewer overtones, thus decreasing the harmonic content.
The midpoint (12 o’clock) position is a good starting place for a traditional
theremin timbre.
Triangle
Wave
Pulse
Wave
Sharper
Edges
Rounder
Edges
Other Moog Musical Instrument manuals


