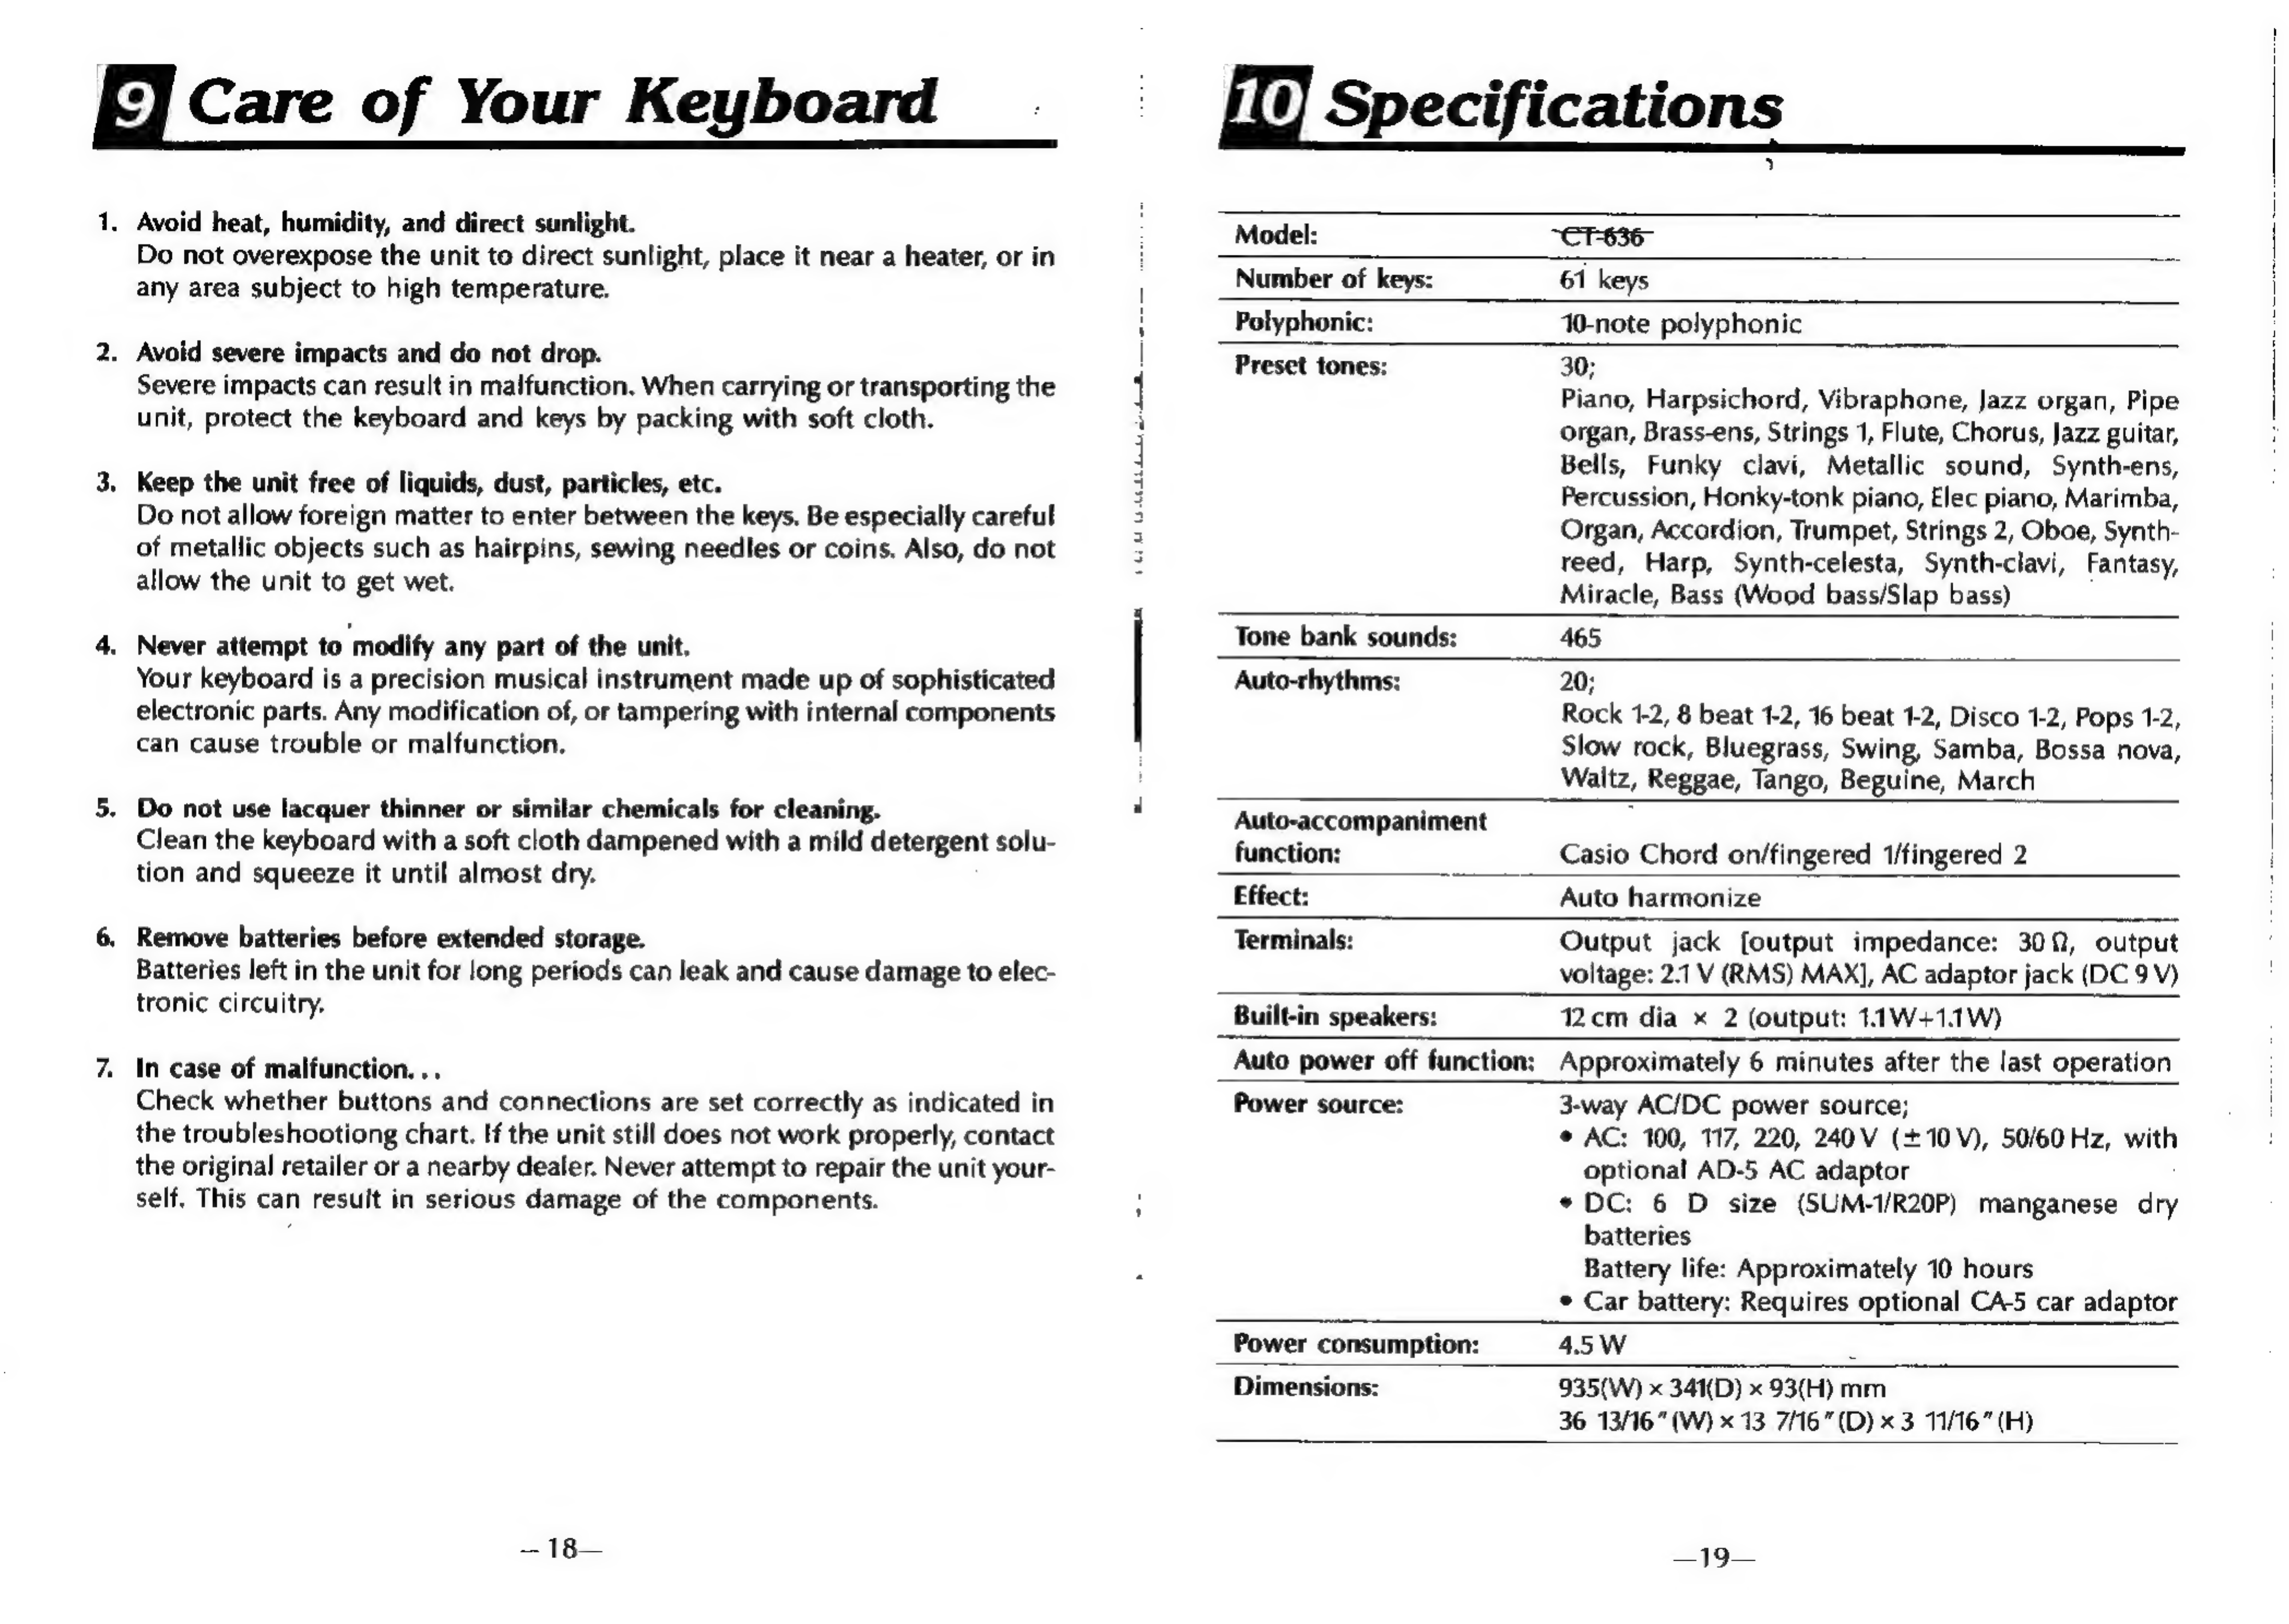
Casio TONEBANK CT-636 User manual

CASIO.
OPERATION
MANUAL
MANUAL
DE
OPERACION
21

ToreBan
‘CT-636
ELECTRONIC
MUSICAL
INSTRUMENT
Introduction
Your
new
€¥:636
keyboard
is
a
state-of-the-art
musical
in-
strument
which
incorporates
the
latest
electronics
tech-
nology
to
make
its
operation
as
easy
as
possible.
Exceptional
sound
quality
backed
up
by
a
host
of
sophisti-
cated
features
and
functions
makes
this
keyboard
a
joy
to
play
for
everyone.
,
In
order
to
enjoy
the
features
and
functions
of
this
unit
to
their
fullest,
be
sure
to
carefully
read
this
manual
and
follow
the
instructions
contained
herein.
Contents
-
General
Guide
......
0...
cc
cece
eens
4
-
Power
Supply
.
.
General
Operation.
.
Preset
Tones
-
Tone
Bank
Sound
Combinations
.................
10
.
Auto-rhythms
.
Auto-accompaniment............
000.006
cece
Troubleshooting
................0
00.0
eee
ee
eee
Care
of
Your
Keyboard
SPECIFIC
ALIONS:
«
«i.a%
25 BS
PASE
nee
teens
iecaie’d
seo
as
essinne
SLOnAYAWNHe
=
Ais

Ef
General
Guide
4:
General
Ciutae
<Rear
panel>
PHONES’
ouTeuT
@
Output
jack
@AC
adaptor
jack
@
Built-in
stereo
speakers
@
TONE
BANK
button
2
@
POWER/CHORD
switch
@SYNCHRO/FILL-IN
button
;
Demonstration
Tune
@
MAIN
VOLUME
slider
@START/STOP
button
This
unit
features
a
preset
demonstration
tune
which
has
been
@
ACCOMP
VOLUME
slider
@INTRO/ENDING
button
carefully
programmed
to
showcase
all
the
features
and
benefits
@
TEMPO
contro!
buttons
@
RHYTHM
selectors
of
this
unit.
Simply
press
the
DEMO
button
@,
and
listento
©
@
210
SOUND
TONE
BANK
list
@
Rhythm
SELECT
button
the
GT-636
play!
@
TONE
selectors
@
AUTO
HARMONIZE
button
@
Tone
SELECT
button
@
DEMO
button
*
The
demonstration
tune
is
played
in
an
endless
loop.
Press
the
DEMO
button
again
to
stop
the
tune,
¢
The
keyboard
is
inoperable
while
playing
the
demonstration
tune.
A
—5—

B
Power
Supply
DC
‘Power:
*
Dry
batteries
This
unit
can
be
powered
by
six
D
size
(SUM-1/R20P)
manganese
dry
cell
batteries.
Weakened
batteries
will
result
in
lower
volume
or
poor
tonal
quality.
The
power
indicator
lamp
will
gradually
lose
its
brightness
when
battery
power
weakens.
At
this
time,
change
batteries
or
shift
to
one
of
the
alter-
nate
power
sources
mentioned
below.
©
Battery
replacement
@
Open
the
battery
compartment
cover
on
the
bottom
of
the
unit
and
take
out
used
batteries.
@)
Load
new
batteries
taking
care
that
polarity
is
correct.
*
it
is
advisable
to
replace
all
six
batteries
at
the
same
time
for
longer
battery
life.
*
Standard
battery
life
is
approximately
10
hours.
*
Car
battery
With
the
car
battery
adaptor
(CA-5,
optional),
DC
power
is
supplied
from
a
car
battery
through
the
cigarette
lighter
socket.
An
AC
adaptor
(AD-5,
optional)
is
required
when
using
household
current.
Use
only
a
genuine
CASIO
adaptor
with
the
same
voltage
rating
(100,
117,
220,
or
240)
as
the
power
supply
in
your
area
to
prevent
component
damage.
Plug
the
AC
adaptor
into
the
AC
outlet
and
the
cord
into
the
unit.
This
will
automatically
cut
off
the
battery
power
supply.
AC
outlet
AC
adaptor
AD-5
Ss
Sv
Cigarette
lighter
socket
AC
adaptor
jack
Car
battery
adaptor
CA-5
—~6—
2.
Power
Supply
a
rr
*
Use
only
genuine
CASIO
adaptors
to
avoid
risk
of
damage.
*
The
adaptor
may
become
warm
when
left
connected
to
an
outlet.
This
is
normal,
but the
adaptor
should
be
disconnected
when
not
in
use.
*
Auto
power
off
function
Power
is
automatically
cut
off
approximately
6
minutes
after
the
last
opera-
tion
of
the
unit.
Power
supply
can
be
restored
by
switching
power
OFF
and
then
ON
again.
PRECAUTIONS
Incorrectly
using
batteries
can
cause
leakage
or
bursts,
and
may
damage
your
product.
Note
the
following
precautions:
*
Be
sure
that
+
polarity
is
correct.
*
Do
not
mix
battery
types.
*
Do
not
mix
new
batteries
with
old
ones.
*
Never
leave
dead
batteries
in
battery
compartment
as
they
may
cause
mal-
functions.
*
Remove
batteries
when
not
using
the
product
for
extended
period.
*
Never
try
to
recharge
the
batteries
that
are
specified
for
the
power
supply
of
this
unit.
*
Do
not
expose
the
battery
to
direct
heat,
let
it
become
shorted
or
try
to
take
it
apart.
(if
a
battery
leaks,
clean
out
the
battery
compartment
of
the
product
im-
mediately,
taking
care
to
avoid
letting
the
battery
fluid
come
into
direct
contact
with
your
skin.)
General
Operation
*
Refer
to
the
general
guide
found
on
page
4-5
for
exact
locations
of
this
keyboard
controls
and
connections.
@
Set
the
POWER/CHORD
switch
to
ON.
@
Adjust
the
volume
level.
@
Select
one
of
30
preset
tones
(see
“Preset
Tones”,
page
8)
or
one
of
465
Tone
Bank
sounds
(see
“Tone
Bank
Sound
Combinations”,
page
10).
@®
Now,
start
playing.

Preset
Tones
*
Refer
to
the
general
guide
found
on
page
4-5
for
exact
locations
of
this
keyboard
controls
and
connections.
4.
Preset
Tones
*
Dual
bass
sounds
When
BASS
sound
is
selected
by
pressing
the
BASS
button
(one
of
the
tone
selectors),
two
different
bass
tones
can
be
played
on
the
keyboard
at
the
same
time.
The
WOOD
BASS
tone
sounds
on
the
lower
half
of
the
keyboard
(C2—B3),
while
the
SLAP
BASS
tone
sounds
on
the
upper
half
(C4—C7).
®
To
select
a
preset
tone
@
Press
the
tone
SELECT
button
to
switch
between
the
two
tones
assigned
to
each
TONE
selector.
When
the
SELECT
indicator
is
lit,
you
can
select
one
:
of
the
lower
tones
(16—30).
When
it
is
not
lit,
you
can
select
one
of
the
upper
tones
(1—15).
@
Press
a
TONE
selector
to
choose
a
preset
tone.
*
PIANO
tone
is
automatically
selected
whenever
you
switch
the
power
of
the
keyboard
ON.
©
To
select
percussion
sounds
When
PERCUSSION
sound
is
selected
by
the
tone
selector,
the
keyboard
keys
can
be
used
to
play
a
total
of
61
different
built-in
percussion
sounds.
|
i
These
sounds
aye
assigned
to
respective
keys
as
shown
below;
|
|
|
|
@
bass
drum
1/2/3
@
gated
snare
drum
@
snare
drum
1/2/3
@
synth.
snare
drum
@
rim
shot
1/2
@
closed
hihat
1/2
@
sample
percussion
1/2
©
open
hihat
1/2
@
synth.
cymbal
1/2/3
@
crash
cymbal
1/2/3/mixed
@
ride
cymbal
1/2
@
gong
1/2
®
@
tom
1/2/3/4/mixed
@
synth.
tom
1/2/3
@
cow
bell
1/2
@
triangle
open/mute
@
timbales;
high
mute/high/low/mixed
@
computer
game
sound
1/2/3
@
agogo;
high/low
@
scratch;
fast/slow
@
conga;
high
mute/high/middle/low/
mixed
@
brass
hit
1/2/3
@
clave
high/low
8

Eq
Tone
Bank
Sound
Combinations
*
Refer
to
the
general
guide
found
on
page
4-5
for
exact
locations
of
this
keyboard
controls
and
connections.
4
This
keyboard
features
Casio’s
innovative
“Tone
Bank”
feature,
which
lets
you
choose
from
an
amazing
total
of
465
different
sound
combinations.
To
create
these
layered
sounds,
the
Tone
Bank
function
actually
integrates
the
characteristics
of
the
30
preset
tones.
You
can
select
these
sound
combinations
through
the
following
procedure.
*
To
select
Tone
Bank
Sound
Combinations
@®
Select
any
of
the
30
preset
tones.
When
selecting
Tone
Bank
sounds,
the
tone
initially
selected
is
used
as
a
base,
or
“Primary”
sound.
*
When
the
Primary
sound
is
selected,
the
keyboard
features
10-note
polyphony.
@
Press
the
TONE
BANK
bution.
\
This
activates
the
Tone
Bank
function,
allowing
you
to
choose
a
Secondary
sound
to
integrate
with
the
Primary
sound
you
just
selected.
*
After
the
TONE
BANK
button
is
pressed,
the
keyboard
changes
to
5-note
polyphony.
1
i
i
@
Select
any
other
of
the
30
preset
tones.
The
characteristics
of
this
|
“Secondary”
sound
is
automatically
integrated
with
those
of
the
“Primary”
sound
already
selected.
H
®
To
select
a
different
secondary
sound
The
secondary
sound
can
be
changed
at
any
time,
as
long
as
the
Tone Bank
function
is
selected.
Simply
select
a
different
preset
tone—the
primary
sound
remains
the
same.
*
To
select
a
different
primary
sound
The
primary
sound
can
be
changed
by
first
turning
the
Tone
Bank
function
OFF
(press
TONE
BANK
button
so
that
indicator
goes
out),
selecting
any
other
preset
tone,
and
finally
turning
the
Tone
Bank
function
back
ON.
The
secon-
dary
tone
remains
the
same
in
this
case.
-O—
5.
Tone
Bank
Sound
Combinations
GY
<Example
of
Tone
Bank
Operation>
Look
at
the
465-SOUND
TONE
BANK
list
on
the
keyboard.
Here,
let
us
produce
the
TONE
BANK
sound
“4
6
BRASSH
ORGAN”.
The
two
numbers
to
the
left
of
the
TONE
BANK
sound
name
are
preset
tone
numbers.
The
number
4
represents
the
“Primary”
sound,
while
6
is
the
“Secondary”
sound.
Basically,
the
465-SOUND
TONE BANK
list
indicates
that
if
you
mix
preset
tone
“6
BRASS
ENS”
with
preset
tone
“4
JAZZ
ORGAN”,
you
will
get
BRASSH
ORGAN.
preset
tone
numbers
a
ARE
ORGAN
19
ORGAN
tone
selector
°
To
select
“4
6
BRASSH
ORGAN”
©
First,
select
preset
tone
4,
JAZZ
ORGAN.
This
first
selection
becomes
the
“Primary”
sound.
@
Press
the
TONE
BANK
button.
At
this
time,
the
TONE BANK
indicator
above
the
button
should
light.
@
Select
preset
tone
6,
BRASS
ENS.
This
selection
becomes
the
“Secondary”
sound.
BRASSH
ORGAN
is
now
selected,
The
following
is
a
summary
of
the
above
operation.
TONE
BANK
ve
oat
A
anew
Os
4
6
BRASSH
ORGAN
-
O:+°O
+
©

Auto-rhythms
*
Refer
to
the
general
guide
found
on
page
4-5
for
exact
locations
of
this
keyboard
controls
and
connections.
*
To
play
an
auto-rhythm
@)
Press
the
rhythm
SELECT
button
to
switch
between
the
two
rhythms
assigned
to
each
RHYTHM
selector.
When
the
SELECT
indicator
is
lit,
you
can
select
one
of
the
lower
rhythms
(ROCK
2,
8
BEAT
2,
etc.).
When
it
is
not
lit,
you
can
select
one
of
the
upper
rhythms
(ROCK
1,
8
BEAT
1,
etc.).
@
Press
a
RHYTHM
selector
to
choose
an
auto-rhythm.
*
ROCK
1
rhythm
is
automatically
selected
whenever
you
switch
the
power
of
the
keyboard
ON.
@
Press
START/STOP
button
to
start
the
rhythm.
@
Adjust
the
tempo
of
the
rhythm
by
using
the
TEMPO
control
buttons.
Press-
ing
the
<A>
button
will
increase
tempo,
while
pressing
the
<¥>
button
will
decrease
tempo.
*
Tempo
of
the
auto-rhythm
can
be
adjusted
between
40
and
256
beats
per
minute.
Pressing
both
tempo
keys
at
the
same
time
resets
the
tempo
to
132
beats
per
minute.
*
After
playing
the
demonstration
tune,
the
tempo
of
the
auto-rhythm
is
changed.
Adjust
the
tempo
of
the
auto-rhythm
if
you
need.
®
You
can
adjust
the
relative
volume
of
the
rhythm
by
using
the
ACCOMP
VOLUME
slider.
Press
START/STOP
button
once
again
to
stop
auto-rhythm
play.
¢
Using
SYNCHRO/FILL-IN
button
Press
to
enter
synchro
start
standby.
Rhythm
starts
when
an
accompaniment
keyboard
key
(lower
1.5
octave,
C
through
F)
is
pressed.
(See
page
14
to
use
synchro
start
in
the
auto-accompaniment
performance.)
When
pressed
during
auto-rhythm
and
accompaniment
performance,
an
appropriate
fill-
in
is
inserted
in
the
rhythm
pattern.
If
the
button
is
held
down,
the
fill-in
pattern
is
repeated
until
the
end
of
the
measure
during
which
the
button
is
released.
«
Using
INTRO/ENDING
button
If
you
press
the
INTRO/ENDING
button
instead
of
pressing
the
START/STOP
button
to
start
an
auto-rhythm,
the
selected
auto-rhythm
begins
after
a
one-
measure
intro
pattern.
This
can
be
an
effective
way
to
lead
into
auto-rhythm
performance.
If
pressed
during
auto-rhythm
and
accompaniment
perfor-
mance,
the
rhythm
stops
after
an
appropriate
ending
pattern.
%
Using
synchro
start
with
an
intro
pattern
Press
the
SYNCHRO/FILL-IN
button
to
enter
synchro
start
standby,
and
sub-
sequently
press
the
INTRO/ENDING
button.
Rhythm
starts
when
an
accom-
paniment
keyboard
key
is
pressed,
after
a
one-measure
intro
pattern.
a
be
kf
Auto-accompaniment
*
Refer
to
the
general
guide
found
on
page
4-5
for
exact
locations
of
this
keyboard
controls
and
connections.
*
POWER/CHORD
switch
Slide
to
switch
the
power
ON
and
to
select
one
of
the
Casio
Chord
functions.
For
normal
play
without
auto-accompaniment.
...For
auto-accompaniment
pressing
chords
as
usual.
For
auto-accompaniment
using
the
Casio
Chord
system.
¢
ACCOMP
VOLUME
slider
Adjust
the
volume
of
the
auto-accompaniment.
NOTES:
*
If
the
POWER/CHORD
switch
is
set
to
®
“FINGERED
(1
or
2)”
or
©
“ON”,
the
lower
15
octave
of
the
keyboard
become
accompaniment
keyboard
keys,
and
the
upper
part
of
the
keyboard
becomes
4-note
polyphonic.
Accompaniment
Melody
keyboard
(4-note
polyphonic)
———»|
keyboard
¢
During
auto-accompaniment
performance,
chord
played
on
the
accompani-
ment
keyboard
will
continue
to
sound
after
releasing
the
keys.
*
Auto-accompaniment
starts
with
rhythm,
the
moment
the
accompaniment
keyboard
key
is
pressed
if
synchro
start
is
in
standby
status.

7.
Auto-accompaniment
‘
The
Casio
Chord
system
has
been
developed
so
you
can
play
the
four
main
types
of
chords
more
easily.
Playing
of
the
chords
is
simplified
as
shown
below:
(mec
Chord
system
*
Pressing
one
of
the
accompaniment
keyboard
keys
produces
a
major
chord
corresponding
to
that
note.
¢
Simultaneously
pressing
any
key
to
the
right
(two
keys
at
the
same
time)
results
in
a
minor
chord.
*
Similarly,
pressing
one
more
key
to
the
right
(three
keys
in
all)
produces
a
seventh
chord,
and
pressing
the
fourth
key
to
the
right
(four
keys
in
all)
creates
a
minor
seventh
chord.
IC
IDE
|F
IG JA
|BIC
ID
<
Examples
>
C
(C
major
chord)—Press
@.
Cm
(C
minor
chord)—Press
@,
@
together.
©
C7(C
seventh
chord)—Press
@, @,
©
together.
Oe
ee
cccséidbent
Cw7
(C
minor
seventh
chord)—Press
@,
@,
@,
@
ao
together.
“Not
only
@
@,
and
@,
but
any
black
or
white
keys
can
be
used
as
long
as
they
are
to
the
right
of
@.
[1]
Auto-accompaniment
using
the
Casio
Chord
system
(One-finger
method)
@
Set
the
POWER/CHORD
switch
to
“ON”
(©
position).
@®
Select
one
of
the
auto-rhythms
and
press
the
SYNCHRO/FILL-IN
button.
*
Tempo
indicator
lights,
meaning
that
the
accompaniment
keyboard
keys
are
ready
for
play.
@
Play
on
the
accompaniment
keyboard
keys
according
to
the
Casio
Chord
system.
*
Adjust
the
tempo
and
accompaniment
volume
using
the
respective
controls.
[2}
Auto-accompaniment
play
using
standard
chord
fingering
@)
Set
the
POWER/CHORD
switch
to
“FINGERED
1”
or
“FINGERED
2”.
@
Select
one
of
the
auto-rhythms
and
press
the
SYNCHRO/FILLIN
button.
*
Tempo
indicator
lights,
meaning
that
the
accompaniment
keyboard
keys
are
ready
for
play.
@
Play
a
chord
on
the
accompaniment
keyboard
keys.
*
Adjust
the
tempo
and
accompaniment
volume
using
the
respective
controls.
*
This
unit
is
capable
of
recognizing
the
following
chords;
<M,
m,
—5,
+5,
dim,
sus4,
7,
M7,
m7,
mMZ
m7-5,
7sus4,
9,
m9>
—14—
7.
Auto-accompaniment
eS
<About
“FINGERED
1”
and
“FINGERED
2”>
This
keyboard
features
two
different
types
of
fingered
accompaniment
patterns.
You
can
select
which
type
you
want
by
selecting
either
the
FINGERED
1
mode,
or
the
FINGERED
2
mode.
Respective
accompaniment
patterns
and
characteris-
tics
are
as
listed
below.
FINGERED
1
Accompaniment
Accompaniment
consists
of
a
single
bass
line
and
two
different
backing
chord
patterns,
The
pattern
does
not
change
until
you
play
a
chord
consisting
of
at
least
3
notes.
FINGERED
2
Accompaniment
Accompaniment
consists
of
a
single
bass
line
and
a
single
backing
chord
pattern.
In
addition,
you
can
add
notes
manually
in
two-note
polyphony
on
the
“accompaniment
keyboard”
without
affecting
the
accompaniment
pattern.
The
pattern
does
not
change
until
you
play
a
chord
consisting
of
at
least
3
notes.
Fingered
2
accompaniment
also
allows
you
to
choose
the
way
the
chord
will
play
rhythmically.
!f
you
keep
repeating
your
chord
shape
in
any
rhythmic
pattern
you
choose
(quarter-notes,
eight-note
triplets
or
any
syncopation)
this
keyboard
will
play
that
chord
pattern
rhythm,
allowing
for
more
flexibility
in
your
accom-
paniment
patterns.
*
Auto-accompaniment
tones
are
preset
in
correspondence
to
each
auto-rhythm
type.
A
list
of
auto-thythms
and
corresponding
accompaniment
tones
is
provided
on
page
16
a
se

7.
Auto-accompaniment
E
;
5
Tro
ub
les.
ho
ot
ing
<About
the
tones
used
in
the
auto-accompaniment
>
always
check
battery
condition
first.
(see
page
6)
Each
auto-accompaniment
pattern
consists
of
one
bass
line
and
two
types
of
Sd
Rone
nr
uechen
ras
chord
lines
(chord
1
and
chord
2),
The
tones
of
these
elements
are
preset
s
x
é
corresponding
to
each
auto-rhythms
as
shown
below;
1.
Main
volume
turned
|
1.
Turn
up
main
down.
volume.
RHYTHMS.
CHORD
1
TONES
CHORD
2
TONES
BASS
TONES
H
2.
Headphones
con-
2.
Disconnect
head-
ROCK
1
FUNKY
CLAVI
HARPSICHORD
SLAP
BASS
j
nected.
phones.
8
BEAT
1
ELEC,
PIANO
VIBRAPHONE
WOOD
BASS
:
3.
Auto
power
off
has
|
3.
Turn
the
power
16
BEAT
1
JAZZ
ORGAN
SYNTH
CLAVI
SLAP
BASS
|
activated.
switch
off
and:then
DISCO
1
JAZZ
ORGAN
ORGAN
SLAP
BASS
\
éntaeatn
POPS
1
PIANO
VIBRAPHONE
WOOD
BASS
Bein.
SLOW ROCK
PIANO
HARPSICHORD
WOOD
BASS
i
A
Main
a .
:
SWING
PIANO
JAZZ
GUITAR
WOOD
BASS
oe
in
erage
at
Tura)
ee
and
SAMBA
‘JAZZ
GUITAR
HONKY
TONK
PIANO
WOOD
BASS
ment
volume
turne
accompaniment
volume.
BOSSA
NOVA
JAZZ
GUITAR
ELEC,
PIANO
WOOD
BASS
|
down.
WALTZ
JAZZ
ORGAN
ORGAN
WOOD
BASS
|
2 ‘
ROCK
2
HARPSICHORD
HARPSICHORD
SLAP BASS
i
Refrigerators,
washing
Use
outlet
as
far
away
8
BEAT
2
PIANO
HARPSICHORD
SLAP
BASS
#
machines
and
similar
|
as
possible
from
appli-
16
BEAT
2
BRASS
ENS.
HARPSICHORD
SLAP
BASS
electric
appliances.
ance
thought
to
be
the
DISCO
2
HARPSICHORD
HARPSICHORD
SLAP
BASS
cause
POPS
2
PIANO
ELEC,
PLANO
WOOD
BASS
:
BLUEGRASS
HARPSICHORD
HARPSICHORD
WOOD
BASS
1
i
3
REGGAE
HARPSICHORD
JAZZ
ORGAN
SLAP BASS
.
pha
Hh
yolumestumned)
|“:
So
upcmaln
TANGO
ACCORDION
HARPSICHORD
WOOD
BASS
Own:
:
volume:
BEGUINE
JAZZ
GUITAR
CHORUS
WOOD
BASS
2.
Defective
connection
|
2.
Replace
connection
MARCH
BRASS
ENS.
FLUTE
WOOD
BASS
cord,
cord.
©
Using
the
auto
harmonize
function
When
you’re
using
the
Casio
Chord
or
fingered
chord
function,
you
can
add
automatic
harmony
to
your
melodies
by
pressing
the
AUTO
HARMONIZE
button.
If
you
use
this
function
when
Tone
Bank
button
is
ON,
automatic
harmony
is
added
using
the
Secondary”
sound
(see
“Tone
Bank
Sound
Combinations”,
page
10),
and
“Primary”
sound
performance
becomes
F
monophonic.
*
When
you
select
this
function,
melody
keyboard
performance
becomes
monophonic
even
if
=z
no
accompaniment
keyboard
keys
are
pressed.
=16—
—17—

9
Care
of
Your
Keyboard
__.
1,
Avoid
heat,
humidity,
and
direct
sunlight.
10
Specifications
.
.
:
: ,
‘
Model:
"ET636-
Do
not
overexpose
the
unit
to
direct
sunlight,
place
it
near
a
heater,
or
in
i
:
-
~
any
area
subject
to
high
temperature.
Number
of
keys:
61
keys
Polyphonic:
10-note
polyphonic
.
Avoid
severe
impacts
and
do
not
drop.
Severe
impacts
can
result
in
malfunction.
When
carrying
or
transporting
the
unit,
protect
the
keyboard
and
keys
by
packing
with
soft
cloth.
.
Keep
the
unit
free
of
liquids,
dust,
particles,
etc.
Do
not
allow
foreign
matter
to
enter
between
the
keys.
Be
especially
careful
of
metallic
objects
such
as
hairpins,
sewing
needles
or
coins.
Also,
do
not
allow
the
unit
to
get
wet.
.
Never
attempt
to
modify
any
part
of
the
unit.
Your
keyboard
is
a
precision
musical
instrument
made
up
of
sophisticated
electronic
parts.
Any
modification
of,
or
tampering
with
internal
components
can
cause
trouble
or
malfunction.
-
Do
not
use
lacquer
thinner
or
similar
chemicals
for
cleaning.
Clean
the
keyboard
with
a
soft
cloth
dampened
with
a
mild
detergent
solu-
tion
and
squeeze
it
until
almost
dry.
Remove
batteries
before
extended
storage.
Batteries
left
in
the
unit
for
long
periods
can
leak
and
cause
damage
to
elec-
tronic
circuitry.
In
case
of
malfunction.
..
Check
whether
buttons
and
connections
are
set
correctly
as
indicated
in
the
troubleshootiong
chart.
If
the
unit
still
does
not
work
properly,
contact
the
original
retailer
or
a
nearby
dealer.
Never
attempt
to
repair
the
unit
your-
self,
This
can
result
in
serious
damage
of
the
components.
ast
Be
(Wo
GU
Preset
tones:
30;
Piano,
Harpsichord,
Vibraphone,
Jazz
organ,
Pipe
organ,
Brass-ens,
Strings
1,
Flute,
Chorus,
Jazz
guitar,
Bells,
Funky
clavi,
Metallic
sound,
Synth-ens,
Percussion,
Honky-tonk
piano,
Elec
piano,
Marimba,
Organ,
Accordion,
Trumpet,
Strings
2,
Oboe,
Synth-
reed,
Harp,
Synth-celesta,
Synth-clavi,
Fantasy,
Miracle,
Bass
(Wood
bass/Slap
bass)
Tone
bank
sounds:
465
Auto-rhythms:
Auto-accompaniment
function:
20;
Rock
1-2,
8
beat
1-2,
16
beat
1-2,
Disco
1-2,
Pops
1-2,
Slow
rock,
Bluegrass,
Swing,
Samba,
Bossa
nova,
Waltz,
Reggae,
Tango,
Beguine,
March
Casio
Chord
on/fingered
1/fingered
2
Effect:
Auto
harmonize
Terminals:
Output
jack
{output
impedance:
30,
output
voltage:
2.1
V
(RMS)
MAX],
AC
adaptor
jack
(DC
9
V)
Built-in
speakers:
cm
dia
x
2
(output:
11W+1.1W)
Auto
power
off
function:
Approximately
6
minutes
after
the
last
operation
Power
source:
3-way
AC/DC
power
source;
©
AC:
100,
117,
220,
240V
(+10
V),
50/60Hz,
with
optional
AD-5
AC
adaptor
¢
DC:
6
D
size
(SUM-1/R20P)
manganese
dry
batteries
Battery
life:
Approximately
10
hours
¢
Car
battery:
Requires
optional
CA-5
car
adaptor
Power
consumption:
4.5W
Dimensions:
935(W)
x
341(D)
x
93(H)
mm
36
13/16”
(W)
x
13
7/16”
(D)
x
3
11/16"
(H)
=~49.-
Table of contents
Other Casio Musical Instrument manuals

Casio
Casio Celviano AP-80R User manual

Casio
Casio Celviano GP-300BK User manual

Casio
Casio CDPS-100 User manual

Casio
Casio Aculaser M2 User manual

Casio
Casio CDP-235R User manual

Casio
Casio Magical Light ML-2 User manual

Casio
Casio WK-1200 User manual

Casio
Casio Celviano AP-28 User manual

Casio
Casio WK-1300 User manual

Casio
Casio Privia PX-S7000 User manual

Casio
Casio CELVIANO PX-770 User manual

Casio
Casio VA-10 User manual

Casio
Casio MG-500 Troubleshooting guide

Casio
Casio AP-20 User manual

Casio
Casio CTK6000 User manual

Casio
Casio CDP-S360 User manual

Casio
Casio CDP-S360 User manual

Casio
Casio Privia PX-720 User manual

Casio
Casio CDP-S130 User manual

Casio
Casio Privia PX-150 Manual