Moosoo R3 User manual

Instructions Manual
Robotic Vacuum Cleaner
Model: R3
For any questions and malfunctions of the appliance during use, please contact our customer service email: [email protected]


Safety Instructions
Product and its Accessories
Product Composition
Attention
Preparations
Use Instructions
Parts Maintenance
Troubleshooting
Installation
Contents
01
03
04
07
08
10
14
19
22

01
Before using this product, read the following safety instructions and follow all conventional safety precautions.
Read this manual carefully, and keep it properly.
Any operation not conforming to this manual may cause damage to this product.
CAUTIONS
1. Only authorized technicians can disassemble this product. Users are not recommended to disassemble this product by themselves.
2. Use only the power adapter provided by the manufacturer for this product. Use of other adapters may cause damage to this product.
3. Do not touch wires, sockets, or power adapter when your hands are wet.
4. Do not roll the curtain or body parts into the product drive wheel.
5. Keep this product away from cigarettes, lighters and other open flames.
6. Clean the product after charging.
7. Do not bend the wire excessively, or place heavy objects and sharp objects over the machine.
8. This product is intended for indoor use. Do not use it outdoors.
9. Do not sit on the product.
10. Do not use this product in a humid environment, such as the bathroom.
11. Before using this product, remove all vulnerable items (such as glasses and lamps) on the ground, as well as articles that may entangle the edge
brush and suction channel (such as wires, paper, and curtains).
12. Do not place the product in a place where it is easy to fall off (such as tables and chairs).
13. Check carefully that the power adapter is connected with the socket before use; otherwise the battery may be damaged.
14. To prevent tripping over the product, inform other members of the house when the product is working.
15. When the dust box is full, empty the dust box before using this product.
16. The operating temperature of this product is 0°C to 40°C.
Safety Instructions

1. Use only the original rechargeable battery and docking station provided by the manufacturer. Do not use non-rechargeable batteries. For
battery specifications, see "Product Specifications".
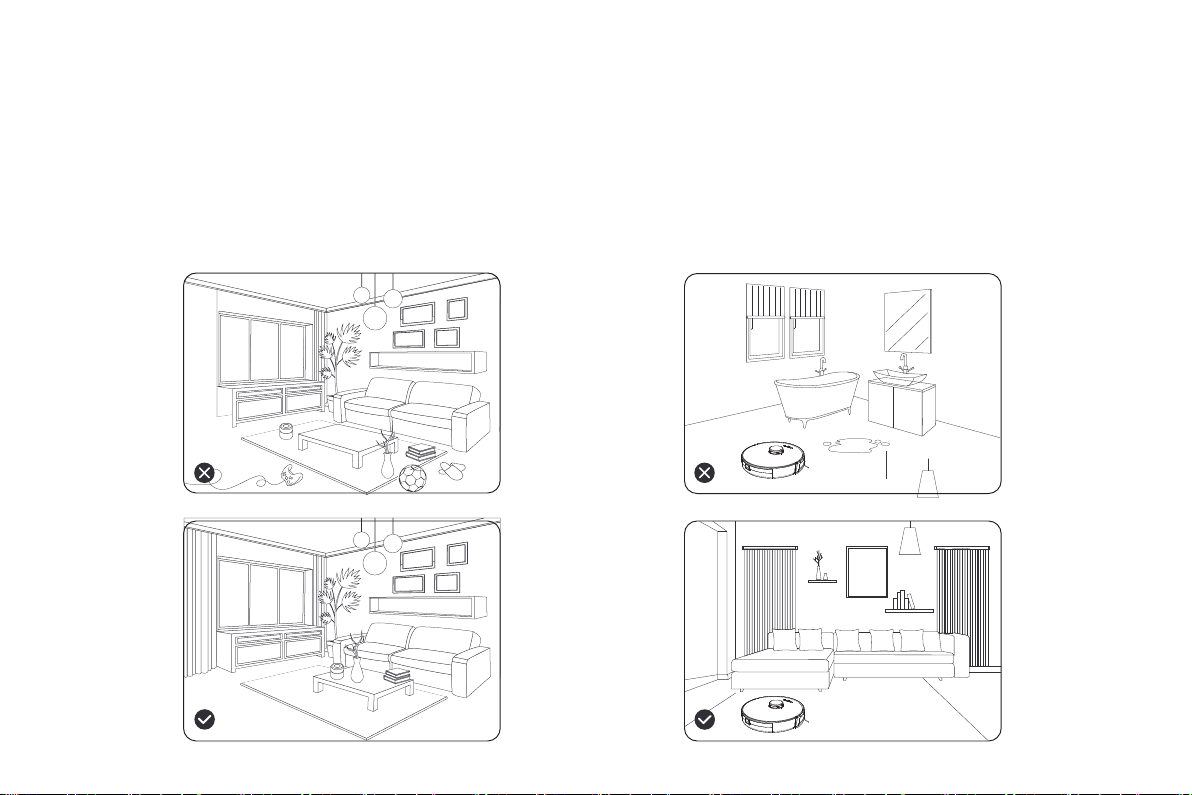
2. Do not use the product in an environment with open flames or fragile products.
3. Do not use the product in an extremely hot (above 40°C) or extremely cold (below 0°C) environment.
4. Keep the hair, clothes, fingers and other parts of the human body away from the opening or operating parts of the product.
5. Do not use the product on wet or water-filled ground.
6. Do not use the product to vacuum any items that may block the product, such as stones and waste paper.
7. Do not use the product to vacuum any flammable materials, such as gasoline and toner used in printers or copying machines. Do not use the
product in clean areas with flammable materials.
8. Do not use the product to vacuum any burning items, such as cigarettes, matches, ashes and other items that may cause fire.
9. Do not place any articles at the suction port. Do not use the product when the suction port is blocked. Remove the dust, cotton wool and hair
from the suction port to ensure smooth air circulation at the suction port.
10. Handle the power cord with care to avoid damage. Do not use the power cord to drag or pull the product and its docking station, use the
power cord as a handle, clamp the power cord in the door gap, or pull the power cord at sharp corners. Do not run the product over the
power cord. Keep the power cord away from heat sources.
11. Do not use a damaged docking station.
12. Even if the product is severely damaged, do not burn the product, as the product battery may explode.
02
WARNINGS
17. Do not use this product in a high temperature environment.
18. Remove the battery from the product before scrapping it.
19. When removing the battery, make sure that the product is disconnected from the power supply.
20. Properly recycle the waste batteries.

Product and its Accessories
03
Main unit Docking station Power adapter
Instructions Manual Side brush (2 sets) HEPA filter
Cleaning brush
Dust box

Front view
Rear view
Wi-Fi button
Cover
Laser head
Dust box button
On/Pause button
Return to docking station button
Omnidirectional lens
Cliff sensor Charging electrode
Omnidirectional wheel
Battery
Roller brush assembly
Side brush
Drive wheel
Dust box
Product Composition
04

Dust Box
Charging Dock
Remote Control
HEPA filter
Prefilter
Sheet metal of the dust box
HEPA filter cover
Conductive shrapnel of the dust box
Side cover of the dust box
Signal indicator
DC connector
Charging electrode
05

Parameter
R3
100~240V,50/60Hz
30W
Li-ion 3000mAh
0.6L
Max, 120 min
Around 300 min
100~240V,50/60Hz
19V/0.6A
06
Product Model
Input
Power
Battery Capacity
Dust Box Capacity
Cleaning Time
Charging Time
Input
Output

Attention
Considerations
1. Before starting the vacuum cleaner, clean up wires and sundries
scattered on the ground, and remove easy-to-fall, fragile, valuable
and potentially dangerous items. Avoid being entangled, jammed,
dragged, or knocked down by the main unit; otherwise, personal or
property damage may be resulted.
2. Avoid using this product in the wading area; otherwise, the fan
may be damaged, affecting the performance of the vacuum
cleaner.
07

Preparations
Remove the protective strip
Before using the main unit, remove the protective strip from the main unit.
08

Charging the Main Unit
1. Place the docking station on the flat ground against the wall. Do
not place any articles 0.5m to the left and right of the docking
station and 1.5m in front of the docking station.
2. Connect the docking station to the power supply.
3. Install the left and right side brushes.
4. Place the main unit on the docking station to charge the main
unit. During charging, the indicator blinks. When charging is
completed, the indicator is steady on. It takes about 6.5 hours to
fully charge the main unit.
During the cleaning process, the main unit automatically
checks its power level. If the power is insufficient, the main
unit activates the "Return to docking station" mode, and
automatically returns to the docking station for charging.
Alternatively, you can tap the "Return to docking station"
button in the app to activate the "Return to docking station"
mode of the main unit.
LR
Note:
Do not use the docking station in a highly reflective environment such as the environment exposed to direct sunlight or with mirrors nearby.
To ensure the normal working time of the main unit, fully charge the main unit before use. The charging time is about 6.5 hours.
To ensure the safety of charging and prevent the damp cloth from damaging the floor, remove the water tank before charging the main unit.
09

Power on and off the machine
Start cleaning
Use Instructions
Zone 1: Cleaned Zone 2: Cleaned
Zone 3: CleaningZone 4: To be cleaned
Tap and hold the button to power on the machine. Then, the
power indicator is on, and the vacuum cleaner enters the standby
state. When the vacuum cleaner is in a static state, press and hold
the button to power off the machine and stop the current cleaning
task.
Tip:
The vacuum cleaner in charging state cannot be powered off.
Pause cleaning
Press the button to start cleaning. Then, the vacuum
cleaner dynamically plans the cleaning route according to the
map generated after scanning, and completes cleaning of
different zones one by one. In each zone, the vacuum cleaner
first sweeps the floor along the wall, and then moves in zigzag
mode to clean the remaining part of the zone in an orderly and
efficient manner.
Tips:
• If the power is too low, the vacuum cleaner cannot start
cleaning. Therefore, charge the vacuum cleaner before
starting it.
• Before cleaning, tidy up all kinds of wires on the ground
(including the power cord of the docking station). Otherwise,
the vacuum cleaner may drag the wires while cleaning,
which may cause power failures of other electric appliance or
damage to items or wires.
• If the cleaning area is less than 2 square meters, the vacuum
cleaner will clean the area twice by default.
• If the power is insufficient in the cleaning process, the main unit
will automatically return to the docking station for charging.
After the power is sufficient, the main unit will automatically
return to the interrupted point to continue cleaning (ensure
that you have enabled the resumable cleaning function).
If you need to pause the robot vacuum, please press the
button. You can press the button to continue cleaning, or
pressthe button to return to the docking station and stop
the current cleaning task.
Tip:
In pause state, if the vacuum cleaner returns to the docking station
for charging, the current cleaning task is stopped.
10

Enter the sleep mode
If no operation is performed in 10 minutes, the vacuum cleaner
automatically enters the sleep mode, and the power indicator
blinks every several seconds. In sleep mode, you can press any
button to wake up the vacuum cleaner.
Tips:
• When the vacuum cleaner is being charged at the docking
station, it cannot enter the sleep mode.
• If the sleep time exceeds 12 hours, the vacuum cleaner
automatically powers off.
Charge the vacuum cleaner
Auto mode: After completing cleaning, the vacuum cleaner
automatically returns to the docking station for charging.
Manual mode: In pause state, you can press the button
to activate the "Return to docking station" mode.
When the vacuum cleaner is being charged, the power indicator
blinks in breathing manner.
Tips:
If the vacuum cleaner fails to find the docking station, it
automatically returns to the starting point. In this case, you
need to manually put the vacuum cleaner back to the docking
station.
Reset the Wi-Fi settings
If your mobile phone fails to connect to the vacuum cleaner due
to reasons such as change of router settings and password
forgotten, re-pair the vacuum cleaner with the mobile phone
according to the Wi-Fi connection instructions.
Tips:
If the vacuum cleaner is in wait-to-connect state for more
than 2 minutes, its Wi-Fi function is automatically disabled.
To reconnect the vacuum cleaner to your mobile phone,
reset the Wi-Fi settings.
Faulty state
If the vacuum cleaner encounters a fault while working, the
power indicator blinks quickly in red, and a voice prompt is
generated. For details about troubleshooting method, see
"Troubleshooting".
Tip:
• In faulty state, if no operation is performed in 10
minutes, the vacuum cleaner automatically enters the
sleep mode.
• In faulty state, if the vacuum cleaner returns to the
docking station for charging, the current cleaning task is
stopped.
11

Pin and Go
Tip:
If you activate partial cleaning when the vacuum cleaner is in
pause state, the current cleaning task will be stopped.
You can use the mobile app to specify a target point on the map.
The vacuum cleaner will automatically plan the route and move to
the specified point. If you specify a target point in the app when
the vacuum cleaner is in standby or pause state, the vacuum
cleaner will clean the 1.6mx1.6m square zone centered on this
point. After cleaning, the vacuum cleaner will automatically
return to the starting point and stop working.
You can use the mobile app to set a restricted zone or virtual wall.
After the setting is completed, the vacuum cleaner will not enter
the restricted zone or cross the virtual wall for cleaning.
Tips:
• Before using this function, you need to enable the map save mode
for the vacuum cleaner in the mobile app.
• This function is only used to divide cleaning zones, but cannot be
used to block dangerous zones.
• If the vacuum cleaner is moved or there are significant changes in
the home environment, the map may become invalid and the settings
of the virtual wall or restricted zone may be lost.
1.6 m
1.6 m
Set a restricted zone or virtual wall
Virtual wall
12
Restricted
zone for
mopping
Restricted
zone for
cleaning

You can use the mobile app to select one or more zones for
cleaning. The vacuum cleaner will clean one or more rooms
based on the zone that you select on the app map.
Tips:
• Before using this function, you need to enable the map save mode
for the vacuum cleaner in the mobile app, and the vacuum cleaner
has already generated a map for cleaning.
• After cleaning starts, the main unit may move to a place beyond the
selected zone. Make sure that you have cleared the obstacles on
the ground around the selected zone, which cannot be used for
safety isolation.
You can use the mobile app to configure a zone for cleaning. The
vacuum cleaner will start cleaning based on the zone that you plan
in the mobile app.
Tips:
After cleaning starts, the main unit may move to a place beyond
the configured zone. Make sure that you have cleared the
obstacles on the ground around the configured zone, which
cannot be used for safety isolation.
You can use the mobile app to select the Energy saving,
Standard, and Strong mode. The Standard mode is selected by
default.
Selected zone cleaning
Configured zone cleaning
Cleaning mode
During the Do-Not-Disturb (DND) period, the vacuum cleaner will
not automatically continue cleaning or play the voice prompt. The
power indicator dims. You can use the mobile app to disable the
DND mode, or change the DND time range.
DND mode
More app functions
Real-time map update
Cleaning record viewing
Robot voice changing
Robot positioning
Volume adjustment
Map management
Firmware update
Robot status viewing
Tip:
The functions and details of the app may change slightly due to
continuous development and upgrade of the app. The specific
functions and details of the app are subject to the actual version.
13

Parts Maintenance
Regular maintenance
To achieve the best cleaning effect, clean and maintain the main unit regularly according to the table below. Determine the frequency of cleaning
and maintenance according to your use habits.
Component of the Main Unit
Filter
Roller brush
Side brush
Roller brush cover
Sensor
Charging electrode
Omnidirectional wheel
Cleaning
Frequency
Every week
Every week
Every month
Every month
Every month
Every month
Every month
Replacement Frequency
Every 2 months
Every 6 to 12 months
Every 3 to 6 months, or when it is obviously damaged
Every 3 to 6 months, or when the rubber silicon strip
on the roller brush cover is obviously damaged
/
/
/
Recommended cleaning and maintenance frequency:
14

1. Press down the button on the dust box to remove the dust
box.
2. Open the side cover of the
dust box.
4. Open the HEPA filter cover.
5. Take out the HEPA filter and prefilter. Tap the HEPA filter to
remove dust. Water washing is not recommended for the
HEPA filter.
3. Dump the trash.
15
Dust Box

6. Wash the prefilter.
7. Wipe the dust box clean with a cloth. Do not wash the dust
box with water.
8. Dry the dust box and filter components, and keep them dry
to ensure their service life.
Note: It is recommended that you wash the prefilter every 15 to
30 days. The maximum service life of the HEPA filter is 3
months.
A. Install the prefilter and HEPA filter back to the dust box.
Note:
1. Before installing filters, ensure that the prefilter and HEPA
filter are dry.
2. Do not expose the prefilter and HEPA filter to the sunlight.
B. Close the cover of the dust box, and install the dust box on
the main unit.
Note: Do not wash the dust box with water.
16

Roller Brush and Side Brush
1. Clean the roller brush.
2. Open the roller brush cover assembly.
3. Take out the roller brush shaft.
4. Use a tool to clean the tangled hair.
5. Clean the side brushes.
17
Table of contents
Other Moosoo Vacuum Cleaner manuals